BSP Compano
User Manual


Take a photo of the number of the key for your new e-bike or make a note of it in this manual. If we have that number, we can provide you with a new key should you lose this one.
VIN number
Key number
Date of purchase
1.1 Pedal assistance
1.2 Assistance profiles and power levels
2. Before we go
2.1 Register your e-bike
2.2 Setting the height of the saddle
2.3 Charging the battery
3. Operating and display
3.1 Important notice
3.2 Introduction of display
3.3 Product discription
3.4 Display installation
3.5 Display information
3.6 Key definition
3.7 Normal operation
/ Backlighting
4. Let's charge
4.1 Battery | Use and storage
4.2 Range Assistance setting and own strength
and setting off
long trip or a number of short ones
5. Parts 5.1 Lights
Brakes
5.4 Tyres and desirable tyre pressure
& unfolding
6.1 How to unfold your folding bike
6.2 How to fold your folding bike
7. Maintenance
7.1 Servicing
Cleaning
Aftercare
7.2 General maintenance
Weekly
Monthly
7.3. Major overhaul Every 3 months
Annually
8. Helpdesk
8.1 Error code definition
8.2 Error codes
8.5 Warranty
8.6 Conditions
Get to know me
Everything
you need to know about your e-bike.
Your e-bike has electrically powered pedal assistance. Thanks to the motor, it takes less effort to pedal. The motor provides appropriate assistance, depending on your speed and strength. So it's easy to start up and you also get a little extra nudge during the ride too.
The power assistance gives you more speed, so practise first out of traffic.
The effect of the motor kicks in as soon as you set off. It's best to engage the lowest level of assistance when setting off.
You can also use the bike without the pedal assistance. Bear in mind that the bike's lights don't work if the e-bike's power isn't switched on.
Switch off the pedal assistance when you get off. If you're walking and pushing your bike, use the 'Walk assist' option.
It's easy to adjust the pedal assistance to your preference and your route. Select the profile you want in the app and use the console on the e-bike to switch between various levels of assistance.
The degree of pedal assistance depends on your speed, the assistance profile you selected and how full the battery is.
The assistance of an e-bike motor is legally limited to a speed of 25 km/h (15½ mph). As you approach the maximum speed, the assistance from the motor will gradually decrease.
Important: the more powerful the assistance profile you select, the shorter the range of the battery.
Prepare for your trip.
You can use the VIN number (Vehicle Identification Number) of the e-bike to register and identify the e-bike and to activate the warranty. You will find the VIN number on the steering head. If you have a middrive bike, the frame number will be above the crank axle.
Important: We recommend you make a note of both the VIN number, the number of the key and the date of purchase and keep it in a safe place. In the event of theft or loss, this will help us help you faster and better.
In order to determine the correct height for the saddle, sit on the bike and put your feet on the pedals in the lowest setting. If you knee is slightly bent, the pedals are correctly adjusted. If your leg is straight or you can barely reach the pedals, the saddle is too high. If you are able to put your foot flat on the ground, the saddle is too low.
Use an Allen key to adjust the height of the saddle.
Don't forget to tighten all bolts properly after you've adjusted the saddle.
Watch out for the exposed helical springs under the saddle. Cover these to prevent a child's fingers from getting caught in them.
To ensure that the vehicle is ready for use, it is important to tighten the bolts and screws to the specified torque. Overtightening can lead to cracks and fractures. The table opposite lists all the prescribed tightening torques.
Recommended tightening torques
Handlebar plug bolt
Handlebar stem bolt
Nut for seat post bolt
– 15 Nm
– 12 Nm
– 15 Nm
Cranks with square section 25 – 35 Nm
Head tube nut 18 – 23 Nm
Front wheel hub axle nuts 20 – 27 Nm
Rear wheel hub axle nuts 20 – 27 Nm
Seat post 5 Nm
You can charge the battery both in the e-bike and separate from it.
First connect the charger to the e-bike. Then connect the charger to the mains.
You can find more information about the battery and charger on Page 59.
Release the battery and remove it from the rear rack of the bike.

All about your LCD screen.
• If the error information from the display cannot be corrected according to the instructions, please contact your retailer.
• The product is designed to be waterproof. It is highly recommended to avoid submerging the display under water.
• Do not clean the display with a steam jet, high-pressure cleaner or water hose.
• Please use this product with care.
• Do not use thinners or other solvents to clean the display. Such substances can damage the surfaces.
• Warranty is not included due to wear and normal use and aging.
Model: DP E171.CAN

The label marking is as follow:

Note: Please keep the QR code label attached to the display cable. The information from the Label is used for a later possible software update.
Specifications
• Operating temperature: -20℃ ~ 45℃
• Storage temperature: -20℃ ~ 60℃
• Waterproof: IPX5
• Bearing humidity: 30%-70% RH
1. After the bracket is welded to the bicycle frame, the key unit can be fixed on the key base by M4*12 cross recessed countersunk screws. Then attach the aluminum label.
Functional Overview
• Battery capacity indicator
• Switch on and off
• Indication and selection of support level
• Control of lighting system
• Indication for error messages

Please keep the surface of key unit clean and dry. After attaching the label, please apply a certain of pressure to make it fit.
2. Assemble the main body of display with cabling through customer's bicycle tube.

3. Dock the DP’s male connector “h” with EB-BUS’s female connector “H” as indicated.


The display area is indicated by RGB lights, including the support level, battery capacity and error indication.

• Display of Support Level
It shows the current support level of 1-3.
• Display of Battery Capacity
The RGB light indicates the current battery capacity. Under the state of support level, if there is no operation within 5s, the screen will switch to display the battery capacity.
• Display of Error Code
The RGB light flashes at a frequency of 1Hz.
DP E171.CAN has a single button, which achieves to power on and off the machine, select the support levels, and switch on and off the headlight.


Press and holdPress and hold (>2S) to power on the HMI, and the HMI isplays the boot up (>2S) on the display to turn on the system. Press and holdPress and hold (>2S) to power on the HMI, and the HMI isplays the boot up LOGO. (>2S) again to turn off the system. In the off state, the leakage current is less than 1uA.
When the display is turned on, pressPress and hold (>2S) to power on the HMI, and the HMI d isplays the boot (<0.5S) to switch the support levels and change the output power of the motor. The default level is level 1-3. The lowest level is 1, the highest level is 3.

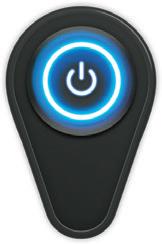

ON: Double clickPress and hold (>2S) to power on the HMI, and the HMI d isplays the boot up LOGO. when the light is off, and the controller will turn on the lights. OFF: Double clickPress and hold (>2S) to power on the HMI, and the HMI d isplays the boot up LOGO. when the light is on, and the controller will turn off the light.
(After turning on the headlight, the brightness of DP will decrease, and vice versa.)
Green Yellow Red Flashing Red
The current battery capacity is displayed by default upon powering on. PressPress and hold (>2S) to power on the HMI, and the HMI d isplays the boot up LOGO. (<0.5S) to display the current level, and short press again to switch the level.
Under the state of support level, if there is no operation within 5s, the screen will switch to display the battery capacity.
DP E171.CAN can work with App (BAFANG GO) via Bluetooth, and all information can be displayed on the smart phone, such as bicycles, battery, sensor, controller and display. The default name of Bluetooth is DP E171. CAN.


All about charging, range and maintenance of your battery.
In order to keep enjoying your e-bike for a long time, it's important that you use the battery correctly. The following tips will help you to get the most out of your battery:
Please note
→ Charge the battery as soon as it's empty. An empty battery, left to stand, can become irreparably damaged after just a few weeks.
→ Charge the battery regularly, in winter too or when you're not using it for a long period. A battery must be charged at least every three months, but every month is even better.
→ When transporting the bike by car, remove the battery or cover it.
Make sure you never let your battery run out completely before you recharge. So don’t cycle until it’s totally empty; that’s bad for the battery. If it does run out completely, attach it to the charger as soon as possible.
To extend the lifespan of the battery, it's important to regularly ride the bike until the battery is empty and then charge the battery fully. That's better than always topping it up after every trip.
→ If you won't be using the battery for some time, try to store it charged to roughly 70% (3-4 bars); and preferably at a temperature of 10-15° C.
If you fail to follow the most important points for attention, the battery may become damaged in the short term. BSP will examine a battery that is still under warranty and if there are signs of serious abuse, the warranty may expire. If you have any questions, please get in touch with your dealer.
Even when the battery is switched off, the bike's electrical system will use a tiny bit of power from the battery. If you're not going to be using the bike for a long time, it's best to store the battery separate from the bike.
The battery is waterproof and therefore resistant to rain. However, it's better not to expose the battery to large amounts of water.
The range of the e-bike is the total distance you can travel on a fully charged battery. This range depends on the capacity of the battery and the energy consumption of the motor. It is difficult to calculate the exact range of your bike because there are so many factors that play a role. You will find the average estimated range to be expected in the table below:
Stopping (often) for red traffic lights has a negative effect on the range. Setting off from a stationary position uses a relatively large amount of power and makes the battery run out more quickly.
In general, one long trip uses less battery power than multiple short ones.
The total weight on the bike reduces the range exponentially. For example, if you are carrying 10 kg of luggage, the range may be reduced by 10%.
The figures above are based on tests on flat ground , in temperatures of roughly 20°C, at an average speed of 20 km/h and a total weight on the bike of approximately 75 kg.
If you should experience less range compared to this table, bear the following in mind:
The higher the assistance level set, the harder the motor has to work and the more power it uses. In addition, your own pedalling power has a lot of influence. The harder you pedal, the more battery you save. Generally speaking; the lighter cycling feels, the more energy is being used by the battery.
Your pedalling frequency (RPM) also influences the range of the e-bike. In general, a higher RPM results in a greater range, so don't forget to use lower gears when setting off or climbing. That will help you get up to speed faster from stationary. You can compare the e-bike in this respect to a car, which also has more difficulty if you don't change down for a traffic light.
Tyre pressure also plays an important part in the range. On an e-bike, you scarcely notice if your tyres are slowly losing pressure. Soft tyres will significantly reduce the range. You will find the minimum and maximum tyre pressures indicated on the side of the tyre. Pump the tyres up to the desired pressure and check them every two weeks.
Bear in mind that low temperatures will reduce your bike's range. The battery's capacity is measured at 25°C and will decrease (temporarily) when it gets colder.
At a temperature of 0°C, a fully charged battery has roughly 70% of its maximum capacity and at -10°C, this can decrease even more to 50%. Take into account the fact that in the winter, your e-bike battery may well run out more quickly than you are accustomed.
Not only the temperature, but such factors as wind, rain and the type of road surface will all influence the remaining range of the battery.
The display on your e-bike shows consumption. It will tell you how much energy the motor is using at that moment. This allows you to closely monitor what effect things like changing to a lower gear, headwind or a climb have on the consumption. The lower the meter indicates, the further you can ride on your battery.
Here at BSP, we do our very best to communicate the range as honestly and clearly as possible. So we choose to give you a detailed description of our testing circumstances so that you can make a good comparison with your own situation. Naturally, there's always the possibility of the range being greater or shorter due to the number of factors that can affect the operating radius. So we recommend you ride your bike's battery till almost empty a few times, certainly in the beginning. That will help you get to know your bike and find out what your personal range is.
The lifespan of the battery depends on how and how frequently it's used. With the tips in this manual, you can easily make your battery last for years. However, bear in mind that usage will always decrease a battery's lifespan. A reduction in capacity of between 5 and 15% a year is perfectly normal.
In ideal circumstances, the battery can be charged and emptied between 1,000 to 1,500 times with the capacity gradually diminishing. If the end of the battery's lifespan is reached, it must be replaced.
Do not dispose of batteries, chargers or accessories with household waste. All these components can be recycled in an environmentally friendly way. Take them to one of the special collection points. You can also take the battery to the dealer in your neighbourhood.
Your whole bike taken care of completely.
You can switch the lights on and off by briefly pushing the button below. The TFT colour display is also equipped with a light sensor that automatically switches on the lights. If you subsequently turn the lights on or off manually, this function will expire until you start up the display again.

In order to avoid any unpleasant surprises while cycling, it's important to check beforehand which brake handle operates the front brake and which the rear brake. The left brake handle operates the front brake and the right one the rear brake.
Never use lubricant or regular cleaning agents on your brake blocks or rotors, since that can cause noise when braking and reduce the reliability of the brakes.
Disc brakes ensure a powerful braking sensations and give a strong sense of control. With disc brakes, you can adjust the brake blocks. To do so, use an Allen key to slightly loosen the bolts the caliper is attached to then tighten them again while keeping the brake handle firmly depressed.
Disc brakes need a 'breaking in' procedure. If you don't break them in, you won't reach the maximum braking capacity, with the risk that the brake blocks will squeak. If they do start to squeak, replace the brake blocks, clean the discs with brake cleaner and repeat the breaking in procedure.
You need a clean, dry environment for breaking in. Accelerate to 20 km/h, and brake moderately on one brake until the bike stops. Do this 20 times for each brake.
Some dealers have what is known as a breaking in machine at their disposal and can carry out the breaking in procedure for you before delivery.
Get to know the stopping capacity of your brakes well, so that you will be able to rely on your bike in the event of an emergency stop. An emergency stop using only one brake can lead to you briefly lose control of your bike. So always use two brakes at the same time. Keep your arms stretched and your weight to the back. That way, you'll stop fastest and steadiest.
The BSP Compano is equipped with dual speed hub gear, which is a low maintenance gear that allows you to easily ride on hilly terrain.
Not all bicycles and, in turn, all tyres are suitable for any terrain. The BSP Compano should only be used on paved/asphalt roads.
Tyre pressure greatly affects the range and comfort of your bike. So we recommend you always pump your tyres up properly. Optimal tyre pressure is between 3.5 and 6 bar. The sidewalls of all tyres display the correct inflation pressure recommended by the manufacturer. A handy aid: if you push your thumb against the top of the tread and it's possible to depress the tyre slightly, you have the correct pressure.
Check your tyre pressure every 2 to 4 weeks.
How To Fold And Unfold your BSP Compano
To separate front and rear wheel
There is a buckle to lock them up. We need to unlock it to separate the frame. A folding buckle in middle of the frame will make a "tic" sound when you successfully unfold it.
lock
Then you need to turn the buckle to point it towards the front wheel and press downward.
Next, unfold and lock the head tube in clockwise direction.
To adjust the saddle height
A little tip here - Don't blend the brake cable by the frame
It needs to be running nice and smooth. We can go for a ride now!
When we fold the bike, the left pedal should point towards the front wheel.
Then, release the headtube buckle in anti-clockwise direction and fold the headtube.
To pull up the buckle and fold the bike
Next, release the buckle in the middle of the frame, turn the buckle from pointing toward front wheel to outside of the frame. Pull up the buckle and fold the bike.
Remember to lock the front and rear wheel by the frame buckle!
To lower the saddle and press the pedal
Lastly, we lower the saddle. For the foldable pedal: - To press the pedal towards the bike frame then fold it upwards - The other side is the same.
Loving attention for your new e-bike.
It's time to have your bike serviced for the first time after either 250 km or 3 months. After that, maintenance is mainly dependent on how intensive your use of the bike is. So discuss with your dealer what would be an appropriate maintenance plan for your situation. BSP advises having the bike checked at least every 6 months after the first service.
Naturally, there's a lot you can do yourself to keep your bike in peak condition. Our tips:
Always go for the first service. Parts such as spokes and cables can stretch after the first use of the bike. If they're not adjusted, there is a greater risk of spokes snapping or gears not engaging.
You can clean your e-bike by removing dirt with a soft brush and hot water. That'll get it gleaming like a showroom model again. Not only that, but regular cleaning makes sure your bike will be with you for longer. Do be careful not to use too much water around electronics and the battery. It's best to remove the battery before washing.
Don't use a high-pressure cleaner to spray the e-bike clean. The jet can damage the bike's electronics.
It makes sense to take care of certain parts of the bike immediately after cleaning it. Chrome components, unlacquered aluminium and stainless steel parts can be greased with acid-free Vaseline or Vaseline spray to prevent rust. Moving parts need grease/oil. We recommend you regularly lubricate the chain, cogs and axles. Naturally, your BSP dealer can do this for you too.
How do you keep your e-bike safe and looking good for longer?
→ Check the tyre pressure and tread regularly.
→ Check that the brakes are working properly and if the brake blocks are worn. Replace or repair them where necessary.
→ Check that there is enough tension in the spokes, that none of them are broken or that there is no twist in the wheel. If there is, visit your dealer.
→ Treat all moving parts and electrical contact points regularly with acid-free Vaseline spray.
*We recommend you maintain your bike regularly in addition to the periodic servicing by the dealer.
For urgent repairs or a major overhaul, you can always go to your BSP dealer. But you can also regularly run a check on your bike yourself. This checklist will help you keep your bike in peak condition:
→ Is the pedal assistance working as it should?
→ Are all the gears working and does the e-bike change gear smoothly?
→ Is there enough tension on the chain?
→ Are both brakes working properly?
→ Is the saddle at the correct height? Is it still comfortable?
→ Are the handlebars adjusted correctly and are they at right angles to the front wheel?
→ Are all the spokes still whole?
→ Are the tyres pumped up to the right pressure? Is there still enough tread on the tyres?
→ Are all the lights working? Is the headlight properly adjusted?
→ Are all reflectors still clearly visible?
→ Is your e-bike in need of cleaning?
→ Is there any damage visible?
→ Is the stand attached firmly and is it greased well?
→ Are the nuts and bolts of the brake calipers still tightened properly? Are the brake blocks and discs in good condition?
→ Do you hear any strange sounds while you're cycling?
→ Are the seat post and handlebar stem positioned correctly and are they tightened properly?
→ Have the seat post and handlebar stem been greased?
→ Is there slack in the front fork, around the steering head bearings?
→ Are all nuts and bolts properly greased?
→ Is the lock still working smoothly and has it been greased?
→ Does the bell still work and is it in the right position?
→ Are the pedals attached properly and have they been greased at the screw thread?
BSP recommends you schedule a service check-up every 3 months and a major overhaul once a year. During a service check-up, your dealer will carry out the following:
Every 3 months
→ Check wheels and tyres (twists in the wheels, tension of spokes, tyre pressure and tread)
→ Check all mounting components/nuts and bolts, and tighten where necessary
→ Check brake blocks for wear, adjust cable tension, check efficiency of brakes
→ Check steering head for slack, check attachment of handlebar stem and adjust if necessary
→ Clean chain, tighten and grease with Teflon spray
→ Electrical system: Fully charge the battery, clean pedal sensor with lukewarm water and sponge, treat contacts with contact spray
→ Check drive system of the e-bike and where necessary, replace defective parts
→ Take apart, degrease, grease and put together the following parts:
- chain and cogset
- hub
- gear and brake cables
- steering head
- handlebar stem
- seat post
→ Check and grease the following parts:
- gears and shifters
- brakes and brake handles
- lock
- stand
→ Check spoke tension (tighten and/or true if necessary)
→ Check tyre pressure (replace tyres if necessary)
→ Check crankset and pedals and adjust
→ Check that lights are working properly and adjust
→ Check saddle for damage and suspension
→ Apply a protective layer of wax to the bike
→ Take the bike for a test drive to check that all parts are working as they should
- When replacing parts, always make sure that the original parts are put back in place
Is something not working properly? Follow this handy step-by-step guide.
The display can show the errors of a pedelec. When the fault is detected, the RGB lights will flash at a frequency of 1 Hz. The flashing blue light indicates the tens digit of the error code, while the flashing cyan light indicates the unit digit. For example:
Error code 25 :
The blue light flickers for 2 times, and the cyan light flickers for 5 times.
Note: Please read carefully the description of the error code. When the error code appears, please first restart the system. If the problem is not eliminated, please contact your dealer or technical personnel.
Fault description
The throttle has fault.
The throttle is not back in its correct position.
Overvoltage protection
Error with the hall sensor signal inside the motor
Error with the Engine phase’s
The temperature inside the engine has reached its maximum protection value
The temperature sensor inside the motor has an error
Error with the current sensor in the controller
Error with the temperature sensor inside of the battery
1. Check the connector and cable of the throttle are not damaged and correctly connected.
2. Disconnect and reconnect the throttle, if still no function please change the throttle.
Check the connector from the throttle is correctly connected. If this does not solve the problem, please change the throttle.
1. Remove and re-Insert the battery to see if it resolves the problem.
2. Using the BESST tool update the controller.
3. Change the battery to resolve the problem.
1. Check all connectors from the motor are correctly connected.
2. If the problem still occurs, please change the motor.
Please change the motor.
1. Turn off the system and allow the Pedelec to cool down.
2. If the problem still occurs, please change the motor.
Please change the motor.
Please change the controller or contact your supplier.
1. Check all connectors from the battery are correctly connected to the motor.
2. If the problem still occurs, please change the Battery.
The protection temperature inside the controller has reached its maximum protection value
Error with the temperature sensor inside the controller
Speed sensor Error
Torque signal Error
1. Allow the pedelec to cool down and restart the system.
2. If the problem still occurs, please change the controller or contact your supplier.
1. Allow the pedelec to cool down and restart the system.
2. If the problem still occurs, Please change the controller or contact your supplier.
1. Restart the system
2. Check that the magnet attached to the spoke is aligned with the speed sensor and that the distance is between 10 mm and 20 mm.
3. Check that the speed sensor connector is connected correctly.
4. Connect the pedelec to BESST, to see if there is a signal from the speed sensor.
5. Using the BESST Tool- update the controller to see if it resolves the problem.
6. Change the speed sensor to see if this eliminates the problem. If the problem still occurs, please change the controller or contact your supplier.
1. Check that all connections are connected correctly.
2. Please connect the pedelec to the BESST system to see if torque can be read by the BESST tool.
3. Using the BESST Tool update the controller to see if it resolves the problem, if not please change the torque sensor or contact your supplier.
Fault description
Speed signal of the torque sensor has an error
Overcurrent from controller
Communication problem
Brake signal has an error (If brake sensors are fitted)
Solution
1. Check that all connections are connected correctly.
2. Please connect the pedelec to the BESST system to see if speed signal can be read by the BESST tool.
3. Change the Display to see if the problem is solved.
4. Using the BESST Tool update the controller to see if it resolves the problem, if not please change the torque sensor or contact your supplier.
Using the BESST tool update the controller. If the problem still occurs, please change the controller or contact your supplier.
1. Check all connections on the pedelec are correctly connected.
2. Using the BESST Tool run a diagnostics test, to see if it can pinpoint the problem.
3. Change the display to see if the problem is solved.
4. Change the EB-BUS cable to see if it resolves the problem.
5. Using the BESST tool, re-update the controller software. If the problem still occurs please change the controller or contact your supplier.
1. Check all connectors are correctly connected on the brakes.
2. Change the brakes to see if the problem is solved. If problem continues Please change the controller or contact your supplier.
Detection circuit for 15V has an error
Using the BESST tool update the controller to see if this resolves the problem. If not, please change the controller or contact your supplier.
Fault description
Detection circuit on the keypad has an error
Controller WDT circuit is faulty
Sensor WDT circuit is faulty
Total voltage from the battery is too high
Total voltage from the battery is too low
Total power from the battery cells is too high
Voltage of the single cell is too high
Temperature from the battery is too high
The temperature of the battery is too low
SOC of the battery is too high
SOC of the battery is too low
Solution
Using the BESST tool update the controller to see if this resolves the problem. If not, please change the controller or contact your supplier.
Using the BESST tool update the controller to see if this resolves the problem. If not, please change the controller or contact your supplier.
Using the BESST tool update the sensor to see if this resolves the problem. If not, please change the sensor or contact your supplier.
Please change the battery.
Please Charge the battery. If the problem still occurs, please change the battery.
Please change the battery.
Please change the battery.
Please let the pedelec cool down. If problem still occurs, please change the battery.
Please bring the battery to room temperature. If the problem still occurs, please change the battery.
Please change the battery.
Please change the battery.
Fault description
Switching detection defect
Electronic derailleur cannot release.
Electronic lock is jammed
Bluetooth module has an error
Solution
1. Check the gear shifter is not jammed.
2. Please change the gear shifter.
Please change the derailleur.
1. Using the BESST tool update the Display to see if it resolves the problem.
2. Change the display if the problem still occurs, please change the electronic lock.
Using the BESST tool, re-update the software onto the display to see if it resolves the problem.
If not, Please change the display.
The frame is guaranteed for 5 years, and all types of battery for 2 years. All the other electrical components are guaranteed for 1 year.
Using your bike unchecked can put yourself and others in danger. Moreover, the warranty expires in the case of unchecked use.
There is no guarantee: if changes have been made to the product, including repairs which have not been authorised by PMG Retail B.V. or the purchaser.
Use only the battery supplied by BSP on your bike.
You can always visit your BSP dealer for maintenance on your e-bike.
For more information, please refer to PMG Retail B.V. general terms and conditions
BSP reserves the right to make changes to the models of e-bikes. Prices may also be subject to change.
BSP cannot be held liable for any inaccuracies in this manual. The copyright on this manual rests with PMG.