Popal GTX
User Manual


Take a photo of the number of the key for your new e-bike or make a note of it in this manual. If we have that number, we can provide you with a new key should you lose this one.
VIN number
Key number
Date of purchase
1.1 Pedal assistance
1.2 Assistance profiles and power levels
2. Before we go
2.1 Register your e-bike
2.2 Setting the height of the saddle
2.3 Installing the Seatpost And Saddle
2.4 Installing the Handlebar And Stem
2.5 Hand brakes
2.6 Charging the battery
3. Operating and display
3.1 Introduction of the display
3.2 Production description
3.3 Display Installation
3.4 Display
3.5 Key defenition
3.6 Normal operation
3.7 Settings
4. Let's charge
4.1 Use and storage
4.2 Battery lifespan
5. Parts
5.1 Lights
5.2 Brakes Breaking in
5.3 Tyres and desirable tyre pressure
6. Maintenance
6.1 Servicing Cleaning
Aftercare
6.2 General maintenance Weekly Monthly
6.3. Major overhaul Every 3 months
Annually
7. Helpdesk
7.1 Warranty
7.2 Conditions
7.3 Error code defenition
7.4 Error codes
Everything you need to know about your e-bike.
Your e-bike has electrically powered pedal assistance. Thanks to the motor, it takes less effort to pedal. The motor provides appropriate assistance, depending on your speed and strength. So it's easy to start up and you also get a little extra nudge during the ride too.
The power assistance gives you more speed, so practise first out of traffic.
The effect of the motor kicks in as soon as you set off. It's best to engage the lowest level of assistance when setting off.
You can also use the bike without the pedal assistance. Bear in mind that the bike's lights don't work if the e-bike's power isn't switched on.
Switch off the pedal assistance when you get off. If you're walking and pushing your bike, use the 'Walk assist' option.
It's easy to adjust the pedal assistance to your preference and your route. Select the profile you want in the app and use the console on the e-bike to switch between various levels of assistance.
The degree of pedal assistance depends on your speed, the assistance profile you selected and how full the battery is.
The assistance of an e-bike motor is legally limited to a speed of 25 km/h (15½ mph). As you approach the maximum speed, the assistance from the motor will gradually decrease.
Important: the more powerful the assistance profile you select, the shorter the range of the battery.
The A-weighted emission sound pressure level at the driver ears is less than 70 dB(A)
Prepare for your trip.
You can use the VIN number (Vehicle Identification Number) of the e-bike to register and identify the e-bike and to activate the warranty. You will find the VIN number on the steering head. If you have a middrive bike, the frame number will be above the crank axle.
Important: We recommend you make a note of both the VIN number, the number of the key and the date of purchase and keep it in a safe place. In the event of theft or loss, this will help us help you faster and better.
In order to determine the correct height for the saddle, sit on the bike and put your feet on the pedals in the lowest setting. If you knee is slightly bent, the pedals are correctly adjusted. If your leg is straight or you can barely reach the pedals, the saddle is too high. If you are able to put your foot flat on the ground, the saddle is too low.
Use an Allen key to adjust the height of the saddle.
Don't forget to tighten all bolts properly after you've adjusted the saddle.
Watch out for the exposed helical springs under the saddle. Cover these to prevent a child's fingers from getting caught in them.
To ensure that the vehicle is ready for use, it is important to tighten the bolts and screws to the specified torque. Overtightening can lead to cracks and fractures. The table opposite lists all the prescribed tightening torques.
Recommended tightening torques
Handlebar plug bolt
Handlebar stem bolt
Cranks with square section
If the seatpost/saddle assembly has been removed for shipping, install it in the seat tube. You may need to slightly loosen the clamp bolt this type requires an allen wrench to tighten or loosen a bolt that clamps the seat post in the seat tube. . Aluminum frames: Grease inside the seat tube and on the seat post. Grease prevents corrosion which can cause a seatpost to seize in a frame.
All seat posts have a minimum insertion line. The seat post must be inserted far enough into the bike seat tube to cover this line. Do not ride without properly adjusting the seat post height and securely tightening the seat post clamp or quick-release clamping mechanism. Failure to observe the minimum insertion line or properly tightening the clamping mechanism could result in seat post system failure, which could lead to an accident, with risk of serious injury, paralysis or death.
Your bike will normally be shipped to you with the handlebar assembly (handlebars, brake and shift levers with all cables attached) inside the bike, but turned 90 degrees. Place the stem + handlebar in the correct angle and fix them. Find the stem clamping bolts on the back of the stem. These are the bolts that hold the stem/ handlebar assembly in place on the steering tube of the fork. Tighten these bolts using a torque wrench to the torque value marked on the stem. If no torque marking is present, tighten to 7Nm.
Before riding, make sure you know which brake lever controls which brake (front or rear) as these may be set up specific to market regulations. If you have two hand brakes, apply both brakes at the same time. The front brake provides more stopping power than the rear, so do not use it too forcefully or too abruptly. Gradually add pressure to both brakes until you slow to the desired speed or stop. If you must stop quickly, shift your weight back as you apply the brakes to keep the rear wheel on the ground.
You can charge the battery both in the e-bike and separate from it.
First connect the charger to the e-bike. Then connect the charger to the mains.
Release the battery and remove it from the rear rack of the bike.
All about your LCD screen.
Model: DP C010.CB
The housing is made of PC+ABS; the LCD display windows is made of tempered glass; the button is made of ABS:


The label marking is as follows:
DPC010CBF80101.0
PD051505
Note: Please keep the QR code label attached to the display cable. The information from the Label is used for a later possible software update.
• 4.0“, 480*800 (RGB) TFT screen
• Power supply: 36/43/48/50.4/60/72Vdc
• Operating temperature: -20℃~45℃
• Storage temperature: -20℃~60℃
• Waterproof: IP66
• Storage Humidity: 30%-70% RH
Functional Overview
• Battery capacity indicaton
• Power-assisted mode selection
• Speed indication (including the max. speed and average speed)
• Unit switching between km and mile
• Motor power indication
• Mileage indication (including single-trip distance TRIP, total distance ODO, and remaining distance Range)
• Walk assistance
• Automatic sensors explanation of the lighting system
• Brightness setting for backlight
• Intelligent indication (including energy consumption CAL and Cadence, only when the matching controller supports this function)
• Information of controller, HMI and battery
• Error code and warn code indiaction
• Bluetooth Function
• USB charge (max. charge current: 1A)
• Service indication
• Clock indication
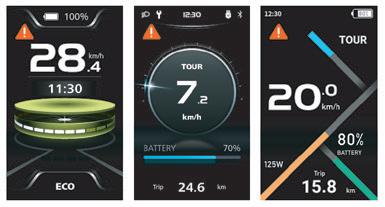
• 3 Themes (Sporty, Fashion, Technology)
• 6 Languages (English, German, Dutch, French, Italian, Czech)
1. Match the rubber sleeve: Select the required rubber sleeve according to the diameter of the handlebar (for specifications: Ø22.2, Ø25.4, Ø31.8, Ø35). Open the two clamps of the HMI, then place the suitable rubber sleeves into the clamps.
4. Temporarily install the control unit: Open the clamp of the control unit, then place the clamp with rubber sleeve on the suitable position. Adjust the angle of the control unit to make it easier to operate.
Note: The diameter of the control unit is Ø22.2mm.

+ Ø25.4
+ Ø22.2
2. Temporarily install the HMI: Place the two clamps with rubber sleeves on the handlebar, then use an M3 hex wrench to tighten the fixing screws M3*12 temporarily.

Note: The light sensing device is on the back of the HMI. Do not cover this area in case of blocking out the light.

Position of the light sensing device
3. Install the HMI: Adjust the angle of the HMI to make it easier to see the screen when cycling, then tighten the screws with tightening torque of 1N.m.
5. Install the control unit: Use an M3 hex wrench to tighten the fixing screw M3*12 with tightening torque of 1 N.m.

6. Link the connectors: Link the male connector of HMI (F) to the female connector


1 Battery capacity indication
2 Warn code indication
3 Speed in real-time
4 Speed bar
5 Power-assisted mode indication (4 Modes/6 Modes)
6 Unit switching of speed (km/h, mph)
7 Multifunction indication (Clock. TRIP, ODO, MAX, AVG, Range, CAL, Cadence, Time)
8 Symbol indication (Headlight, USB, Service, Bluetooth)

3.6.1 Power ON/OFF
PressPress and hold (>2S) to power on the HMI, and the HMI d isplays the boot up and hold (>2S) to power on the HMI, and the HMI displays the boot up LOGO. PressPress and hold (>2S) to power on the HMI, and the HMI and hold (>2S) again to power off the HMI.

(>2S) to turn on the headlight and reduce the brightness of backlight. Press and hold When HMI powers on, briefly press or change the output power of motor. 4 Modes or 6 Modes can be selected, but the default selection is
3.6.2
The headlight can be switched on manually or automatically. When the HMI powers on, the auto light function works. Press and hold When HMI powers on, briefly press or change the output power of motor. 4 Modes or 6 Modes can be selected, but the default selection is
(>2S) again to turn off the headlight and increase the brightness of backlight.

(Note: The headlight can be automatically switched according to the ambient light, but the auto light function fails once user manually switches the headlight on/off. After restarting the HMI, the function works again.)
3.6.4 Headlight / Backlight
Note: The walk assistance can only be activated with a standing e-bike.
When HMI powers on, briefly press When HMI powers on, briefly press or change the output power of motor. 4 Modes or 6 Modes can be selected, but the default selection is oror (<0.5S) to select the power-assisted mode and change the output power of motor. 4 Modes or 6 Modes can be selected, but the default selection is (<0.5S) to select the power-assisted mode and change the output power of motor. 4 Modes or 6 Modes can be selected, but the default selection is 6 Modes of which the lowest mode is ECO and the highest mode is BOOST. The default mode is ECO after HMI powering on, mode OFF means no power assistance. 6 Modes:
Briefly press buttonor (<0.5S) to select the power-assisted mode and change the output power of motor. 4 Modes or 6 Modes can be selected, but the default selection is

4 Modes:


(<0.5S) until this symbol appears. Next keep pressing theor (<0.5S) to select the powe change the output power of motor. 4 Modes or 6 Modes can be selected, but the default selection is button until the walk assistance is activated and the symbol is flashing. (When the real-time speed is less than 2.5km/h, the speed indication is shown as 2.5km/h.) Once releasing theor (<0.5S) to select the power-assisted mode and change the output power of motor. 4 Modes or 6 Modes can be selected, but the default selection is button, it will exit the walk assistance and the symbol stops flashing. If no operation within 5s, the HMI will automatically return to mode OFF.
Briefly pressPress and hold (>2S) to power on the HMI, and the HMI button (<0.5S) to switch the different function and information.
The position of multifunction indication displays the real-time clock (Clock) → single trip distance (TRIP, km) → total distance (ODO, km) → maximum speed (MAX, km/h) → average speed (AVG, km/h) → remaining distance (Range, km) → energy consumption (CAL, kcal) → riding cadence (Cadence, rpm) → riding time (Time, min) → cycle.


HMI displays the real-time battery capacity from 100% to 0%. When the battery capacity is less than 5%, the indicatior will blinks at frequency of 1 Hz to alert to recharge.
This HMI is equipped with OTA function, which can update the firmware of HMI, controller, sensor and battery through the Bluetooth. This HMI can be connected to the Bafang Go+ APP through Bluetooth.


(BAFANG GO+ for AndroidTM and iOSTM)
The data that can be sent to the APP are as follows:

3.6.7
When the HMI is off, insert the USB cable to the charge port on the HMI, and then turn on the HMI to start charging. The maximum charge voltage is 5V and the maximum charge current is 1A.

When the total mileage exceeds 5000 km, the symbol will be displayed on the HMI, reminding users to go to the after-sales outlet for maintenance. The function is off by default.
3.6.10

Double press the Press and hold (>2S) to power on the HMI, and the HMI button (<0.5S) to enter the interface of riding data. Press the Press and hold (>2S) to power on the HMI, and the HMI isplays the

button (<0.5S) to switch the pages. Dubble press the Press and hold (>2S) to power on the HMI, and the HMI d isplays the boot up button (<0.5S) again to return the main interface. When the real-time speed is less than 5 km/h and the power assisted mode is not walk assistance, press and hold theor (<0.5S) to select the power-assisted mode and change the output power of motor. 4 Modes or 6 Modes can be selected, but the default selection is button (>2S) to clear the riding data of Trip, MAX, AVG, Time.
Briefly press the When HMI powers on, briefly press or change the output power of motor. 4 Modes or 6 Modes can be selected, but the default selection is
oror (<0.5S) to select the power-assisted mode and change the output power of motor. 4 Modes or 6 Modes can be selected, but the default selection is
button (<0.5S) to select the desired “Theme”, and briefly press thePress and hold (>2S) to power on the HMI, and the HMI d isplays the boot up button to save the selection.
When you in the main interface, press and hold the When HMI powers on, briefly press or change the output power of motor. 4 Modes or 6 Modes can be selected, but the default selection is andor (<0.5S) to select the power-assisted mode and change the output power of motor. 4 Modes or 6 Modes can be selected, but the default selection is button (at the same time) to enter the "Quick settings" interface.
When you in the "Quick settings" interface, press and hold the When HMI powers on, briefly press or change the output power of motor. 4 Modes or 6 Modes can be selected, but the default selection is and or (<0.5S) to select the power-assisted mode and motor. 4 Modes or 6 Modes can be selected, but the default selection is
button (at the same time) to exit back to the main interface.
3.7.1.5
Briefly press the When HMI powers on, briefly press or change the output power of motor. 4 Modes or 6 Modes can be selected, but the default selection is oror (<0.5S) to select the power-assisted mode and change the output power of motor. 4 Modes or 6 Modes can be selected, but the default selection is
button (<0.5S) to enter the "Modes" setting, and briefly press thePress and hold (>2S) to power on the HMI, and the HMI d isplays the boot up
Briefly press the When HMI powers on, briefly press or change the output power of motor. 4 Modes or 6 Modes can be selected, but the default selection is oror (<0.5S) to select the power-assisted mode and change the output power of motor. 4 Modes or 6 Modes can be selected, but the default selection is
button (<0.5S) to select “Brightness”, and briefly press the to enter the item.
Then select the desired percentage from 10% to 100% by pressing the When HMI powers on, briefly press or change the output power of motor. 4 Modes or 6 Modes can be selected, but the default selection is oror (<0.5S) to select the power-assisted mode and change the output power of motor. 4 Modes or 6 Modes can be selected, but the default selection is button, and briefly press the button (<0.5S) to save and exit back to the "Quick settings" interface.
Briefly press the

button to select "4 Modes" or "6 Modes".
3.7.1.6 “Trip reset” Reset the single-trip
Briefly press the When HMI powers on, briefly press or change the output power of motor. 4 Modes or 6 Modes can be selected, but the default selection is oror (<0.5S) to select the power-assisted mode and change the output power of motor. 4 Modes or 6 Modes can be selected, but the default selection is
button (<0.5S) to enter the "Trip reset" setting, and briefly press thePress and hold (>2S) to power on the HMI, and the HMI d isplays the boot up button to select "YES" or "NO".
3.7.2 “Display settings” Interface
When HMI powers on, briefly press or change the output power of motor. 4 Modes or 6 Modes can be selected, but the default selection is
oror (<0.5S) to select the power-assisted mode and change the output power of motor. 4 Modes or 6 Modes can be selected, but the default selection is
button (<0.5S) to select “Auto off”, and briefly press the to enter the item. Then select the automatic off time as “OFF”/“1

When you in the "Quick settings" interface, briefly press the When HMI powers on, briefly press or change the output power of motor. 4 Modes or 6 Modes can be selected, oror (<0.5S) to select the powe change the output power of motor. 4 Modes or 6 Modes can be selected, button (<0.5S) to select the "OTHERS" and enter the "Display settings" interface.
”/“2”/“3”/“4”/“5”/“6”/“7”/“8”/“9” with the When HMI powers on, briefly press or change the output power of motor. 4 Modes or 6 Modes can be selected, but the default selection is or or (<0.5S) to select the power-assisted mode and motor. 4 Modes or 6 Modes can be selected, but the default selection is button. Once you have chosen your desired selection, press thePress and hold (>2S) to power on the HMI, and the HMI d isplays the boot up LOGO. button (<0.5S) to save and exit back to the "Quick settings" interface.
Note: “OFF” means the "Auto off" function is off.
3.7.2.1 “Trip reset” Reset the single-trip
Briefly press the When HMI powers on, briefly press or change the output power of motor. 4 Modes or 6 Modes can be selected, but the default selection is oror (<0.5S) to select the power-assisted mode and change the output power of motor. 4 Modes or 6 Modes can be selected, but the default selection is
button (<0.5S) to select the “Trip reset” item, and briefly press thePress and hold (>2S) to power on the HMI, and the HMI d isplays button to enter the item. Then select “YES”/“NO” (“YES”- to clear, “NO”-no operation) with the
When HMI powers on, briefly press or change the output power of motor. 4 Modes or 6 Modes can be selected, but the default selection is oror (<0.5S) to select the power-assisted mode and change the output power of motor. 4 Modes or 6 Modes can be selected, but the default selection is

Briefly press the When HMI powers on, briefly press or change the output power of motor. 4 Modes or 6 Modes can be selected, but the default selection is or or (<0.5S) to select the power-assisted mode and change the output power of motor. 4 Modes or 6 Modes can be selected, but the default selection is button (<0.5S) to enter the "Time format" setting, and briefly press thePress and hold (>2S) to power on the HMI, and the HMI d isplays the boot up LOGO. button to select "12h" or "24h". Briefly press the When HMI powers on, briefly press or change the output power of motor. 4 Modes or 6 Modes can be selected, but the default selection is or or (<0.5S) to select the power-assisted mode and motor. 4 Modes or 6 Modes can be selected, but the default selection is button (<0.5S) to select the “Clock setting“ item, briefly press the button to enter the item. Then set the accurate time by pressing the When HMI powers on, briefly press or change the output power of motor. 4 Modes or 6 Modes can be selected, but the default selection is or or (<0.5S) to select the power-assisted mode and change the output power of motor. 4 Modes or 6 Modes can be selected, but the default selection is button, and briefly press the Press and hold (>2S) to power on the HMI, and the HMI d isplays the boot up LOGO. button (<0.5S) to save and exit back to the "Quick settings" interface.

button and briefly press thePress and hold (>2S) to power on the HMI, and the HMI d isplays the boot button (<0.5S) to save and exit back to the "Display settings" interface.
Note: The riding time (Time), average speed (AVG) and maximum speed (MAX) will be reset simultaneously when you reset TRIP.
Briefly press the When HMI powers on, briefly press or change the output power of motor. 4 Modes or 6 Modes can be selected, but the default selection is oror (<0.5S) to select the power-assisted mode and change the output power of motor. 4 Modes or 6 Modes can be selected, but the default selection is
button (<0.5S) to select the “Unit” item, and briefly press thePress and hold (>2S) to power on the HMI, and the HMI d isplays the boot up LOGO. button to enter the item. Then select “km”/“mile” with the briefly press or power of motor. 4 Modes or 6 Modes can be selected, but the default selection is oror (<0.5S) to select the power-assisted mode and power of motor. 4 Modes or 6 Modes can be selected, but the default selection is
button and briefly press thePress and hold (>2S) to power on the HMI, and the HMI d isplays the boot up LOGO. button (<0.5S) to save and exit back to the "Display settings" interface.

Briefly press the When HMI powers on, briefly press or change the output power of motor. 4 Modes or 6 Modes can be selected, but the default selection is oror (<0.5S) to select the power-assisted mode and change the output power of motor. 4 Modes or 6 Modes can be selected, but the default selection is button (<0.5S) to select the “Boot Password” item, and briefly press thePress and hold (>2S) to power on the HMI, and the HMI d isplays the boot up LOGO. button to enter the item. Then select the 4-digit number as “0”/“1”/“2”/“3”/“4”/“5”/“6”/“7”/“8”/“9”with the When HMI powers on, briefly press or change the output power of motor. 4 Modes or 6 Modes can be oror (<0.5S) to select the power-assisted mode and change the output power of motor. 4 Modes or 6 Modes can be selected, but the default selection is button. After setting, select the "YES" by briefly pressing thePress and hold (>2S) to power button (<0.5S) to save and exit back to the "Display settings" interface.
After back to the "Display settings" interface, briefly select “ON”/“OFF” with the When HMI powers on, briefly press or change the output power of motor. 4 Modes or 6 Modes can be selected, but the default selection is oror (<0.5S) to select the power-assisted mode and change the output power of motor. 4 Modes or 6 Modes can be selected, but the default selection is button and briefly press the Press and hold (>2S) to power on the HMI, and the HMI d isplays the boot up button (<0.5S) to save and exit back to the "Display settings" interface.
Briefly press the When HMI powers on, briefly press or change the output power of motor. 4 Modes or 6 Modes can be selected, but the default selection is oror (<0.5S) to select the power-assisted mode and change the output power of motor. 4 Modes or 6 Modes can be selected, but the default selection is button (<0.5S) to select the “Service tip” item, and briefly press thePress and hold (>2S) to power on the HMI, and the HMI d isplays the boot up LOGO. button to enter the item. Then select “ON”/“OFF” with the HMI powers on, briefly press or the output power of motor. 4 Modes or 6 Modes can be selected, but the default selection is oror (<0.5S) to select the power-assisted mode and the output power of motor. 4 Modes or 6 Modes can be selected, but the default selection is button and briefly press thePress and hold (>2S) to power on the HMI, and the HMI d isplays the boot up LOGO.
button (<0.5S) to save and exit back to the "Display settings" interface.

Note: The default setting is OFF. If the ODO is more than 5000 km, the "Service tip" indication will flash.

Note: The default password is 0000, and the default setting is OFF.
Briefly press the When HMI powers on, briefly press or change the output power of motor. 4 Modes or 6 Modes can be selected, but the default selection is oror (<0.5S) to select the power-assisted mode and change the output power of motor. 4 Modes or 6 Modes can be selected, but the default selection is button (<0.5S) to select the “Reset Password” item, and briefly press the Press and hold (>2S) to power on the HMI, and the HMI
button to enter the item. Enter the 4-digit old password with the When HMI powers on, briefly press or change the output power of motor. 4 Modes or 6 Modes can be selected, but the default selection is oror (<0.5S) to select the power-assisted mode and change the output power of motor. 4 Modes or 6 Modes can be selected, but the default selection is button, then enter the new password and confirm the new password. After setting, select the "YES" by briefly pressing thePress and hold (>2S) to power on the HMI, and the HMI isplays the boot

Briefly press the When HMI powers on, briefly press or change the output power of motor. 4 Modes or 6 Modes can be selected, but the default selection is oror (<0.5S) to select the power-assisted mode and change the output power of motor. 4 Modes or 6 Modes can be selected, but the default selection is button (<0.5S) to select the “AL sensitivity” item, and briefly press thePress and hold (>2S) to power on the HMI, and the HMI d isplays the boot up LOGO. button to enter the item. Then select the level of the light sensitivity as “OFF”/“1”/ “2”/“3”/“4”/“5” with the HMI powers on, briefly press or the output power of motor. 4 Modes or 6 Modes can be selected, but the default selection is oror (<0.5S) to select the power-assisted mode and the output power of motor. 4 Modes or 6 Modes can be selected, but the default selection is button and briefly press the Press and hold (>2S) to power on the HMI, and the HMI d isplays the boot up LOGO. button (<0.5S) to save and exit back to the "Display settings" interface.
Note: “OFF” means the light sensor is off. Level 1 is the weakest sensitivity and level 5 is the strongest sensitivity.
button (<0.5S) to save and exit back to the "Display settings" interface.
3.7.3


Note: All information here cannot be changed, it is to be viewed only.
3.8.3.1 “Wheel size”
After entering the "Information" page, you can see "Wheel size -inch" directly.
3.7.3.2 “Speed limit”
After entering the "Information" page, you can see "Speed limit --km/h" directly.
3.7.3.3 “Battery info”

3.7.3.7
Briefly press the When HMI powers on, briefly press or change the output power of motor. 4 Modes or 6 Modes can be selected, but the default selection is
or or (<0.5S) to select the power-assisted mode and change the output power of motor. 4 Modes or 6 Modes can be selected, but the default selection is
button (<0.5S) to select “Battery info”, and briefly press thePress and hold (>2S) to power on the HMI, and the HMI button to enter, then briefly press the When HMI powers on, briefly press or change the output power of motor. 4 Modes or 6 Modes can be selected, but the default selection is oror (<0.5S) to select the powe change the output power of motor. 4 Modes or 6 Modes can be selected, but the default selection is button to view the battery information.
Briefly press the When HMI powers on, briefly press or change the output power of motor. 4 Modes or 6 Modes can be selected, but the default selection is or or (<0.5S) to select the power-assisted mode and change the output power of motor. 4 Modes or 6 Modes can be selected, but the default selection is

Note: If the battery doesn't have communication function, you won’t see any data from battery.
3.7.3.4 “Controller info”
Briefly press the
When HMI powers on, briefly press or change the output power of motor. 4 Modes or 6 Modes can be selected, but the default selection is or or (<0.5S) to select the power-assisted mode and change the output power of motor. 4 Modes or 6 Modes can be selected, but the default selection is
3.7.3.5 “HMI info”
button (<0.5S) to select ”Warn code”, and briefly press the Press and hold (>2S) to power on the HMI, and the HMI d isplays the boot up button to view the message of warn code. Press the Press and hold (>2S) to power on the HMI, and the HMI isplays the boot up button (<0.5S) again to exit back to the "Information" interface.


Briefly press the When HMI powers on, briefly press or change the output power of motor. 4 Modes or 6 Modes can be selected, but the default selection is or or (<0.5S) to select the power-assisted mode and change the output power of motor 4 Modes or 6 Modes can be selected, but the default selection is
button (<0.5S) to select ”Error code”, and briefly press the Press and hold (>2S) to power on the HMI, and the HMI d isplays the boot up button to view the message of error code. Press the Press and hold (>2S) to power on the HMI, and the HMI button (<0.5S) again to exit back to the "Information" interface.

3.7.4 “Language” Interface
button (<0.5S) to select ”Controller info”, and briefly press thePress and hold (>2S) to power on the HMI, and the HMI d isplays the boot up LOGO. button to view the hardware version and software version. Press thePress and hold (>2S) to power on the HMI, and the HMI d isplays the boot up button (<0.5S) again to exit back to the "Information" interface.

When you in the "Language" interface, briefly press the When HMI powers on, briefly press or change the output power of motor. 4 Modes or 6 Modes can be selected, but the or or (<0.5S) to select the power-assisted mode and change the output power of moto . 4 Modes or 6 Modes can be selected, but the default selection is
Briefly press the When HMI powers on, briefly press or change the output power of motor. 4 Modes or 6 Modes can be selected, but the default selection is or or (<0.5S) to select the power-assisted mode and change the output power of motor. 4 Modes or 6 Modes can be selected, but the default selection is

3.7.3.6
Briefly press the When HMI powers on, briefly press or change the output power of motor. 4 Modes or 6 Modes can be selected, but the default selection is or or (<0.5S) to select the power-assisted mode and change the output power of motor. 4 Modes or 6 Modes can be selected, but the default selection is
button (<0.5S) to select the desired language as "English" /"Deutsch"/"Nederlands"/"Français"/"Italiano"/"Čeština" and briefly press thePress and hold (>2S) to power on the HMI, and the HMI d isplays the boot up OGO. button to save the selection.
button (<0.5S) to select ”HMI info”, and briefly press thePress and hold (>2S) to power on the HMI, and the HMI isplays the boot up LOGO. button to view the hardware version and software version. Press the Press and hold (>2S) to power on the HMI, and the HMI d isplays the boot up button (<0.5S) again to exit back to the "Information" interface.
3.7.5 “Theme” Interface
When you in the "Theme" interface, briefly press the When HMI powers on, briefly press or change the output power of motor. 4 Modes or 6 Modes can be selected, but the default selection is or or (<0.5S) to select the power-assisted mode and change the output power of motor. 4 Modes or 6 Modes can be selected, but the default selection is

button (<0.5S) to select the desired theme as "Sporty"/"Technology" /"Fashion" and briefly press thePress and hold (>2S) to power on the HMI, and the HMI isplays the
button to save the selection.


button (<0.5S) to select ”Sensor info”, and briefly press thePress and hold (>2S) to power on the HMI, and the HMI isplays the boot up LOGO. button to view the hardware version and software version. Press thePress and hold (>2S) to power on the HMI, and the HMI d isplays the boot up button (<0.5S) again to exit back to the "Information" interface.
Note: If your e-bike doesn't have torque sensor, "--" will be displayed.
All about charging, range and maintenance of your battery.
4. Let's charge
In order to keep enjoying your e-bike for a long time, it's important that you use the battery correctly. The following tips will help you to get the most out of your battery:
Please note
→ Charge the battery as soon as it's empty. An empty battery, left to stand, can become irreparably damaged after just a few weeks.
→ Charge the battery regularly, in winter too or when you're not using it for a long period. A battery must be charged at least every three months, but every month is even better.
→ When transporting the bike by car, remove the battery or cover it.
Make sure you never let your battery run out completely before you recharge. So don’t cycle until it’s totally empty; that’s bad for the battery. If it does run out completely, attach it to the charger as soon as possible.
Points for attention
To extend the lifespan of the battery, it's important to regularly ride the bike until the battery is empty and then charge the battery fully. That's better than always topping it up after every trip.
→ If you won't be using the battery for some time, try to store it charged to roughly 70% (3-4 bars); and preferably at a temperature of 10-15° C.
If you fail to follow the most important points for attention, the battery may become damaged in the short term. Popal will examine a battery that is still under warranty and if there are signs of serious abuse, the warranty may expire. If you have any questions, please get in touch with your dealer.
Even when the battery is switched off, the bike's electrical system will use a tiny bit of power from the battery. If you're not going to be using the bike for a long time, it's best to store the battery separate from the bike.
The battery is waterproof and therefore resistant to rain. However, it's better not to expose the battery to large amounts of water.
The lifespan of the battery depends on how and how frequently it's used. With the tips in this manual, you can easily make your battery last for years. However, bear in mind that usage will always decrease a battery's lifespan.
A reduction in capacity of between 5 and 15% a year is perfectly normal.
In ideal circumstances, the battery can be charged and emptied between 1,000 to 1,500 times with the capacity gradually diminishing. If the end of the battery's lifespan is reached, it must be replaced.
Do not dispose of batteries, chargers or accessories with household waste. All these components can be recycled in an environmentally friendly way. Take them to one of the special collection points. You can also take the battery to the dealer in your neighbourhood.
Your whole bike taken care of completely.
You can switch the lights on and off by briefly pushing the button below. The TFT colour display is also equipped with a light sensor that automatically switches on the lights. If you subsequently turn the lights on or off manually, this function will expire until you start up the display again.
In order to avoid any unpleasant surprises while cycling, it's important to check beforehand which brake handle operates the front brake and which the rear brake. The left brake handle operates the front brake and the right one the rear brake.
Never use lubricant or regular cleaning agents on your brake blocks or rotors, since that can cause noise when braking and reduce the reliability of the brakes.
Disc brakes ensure a powerful braking sensations and give a strong sense of control. With disc brakes, you can adjust the brake blocks. To do so, use an Allen key to slightly loosen the bolts the caliper is attached to then tighten them again while keeping the brake handle firmly depressed.
Disc brakes need a 'breaking in' procedure. If you don't break them in, you won't reach the maximum braking capacity, with the risk that the brake blocks will squeak. If they do start to squeak, replace the brake blocks, clean the discs with brake cleaner and repeat the breaking in procedure.
You need a clean, dry environment for breaking in. Accelerate to 20 km/h, and brake moderately on one brake until the bike stops. Do this 20 times for each brake.
Some dealers have what is known as a breaking in machine at their disposal and can carry out the breaking in procedure for you before delivery.
Get to know the stopping capacity of your brakes well, so that you will be able to rely on your bike in the event of an emergency stop. An emergency stop using only one brake can lead to you briefly lose control of your bike. So always use two brakes at the same time. Keep your arms stretched and your weight to the back. That way, you'll stop fastest and steadiest.
Not all bicycles and, in turn, all tyres are suitable for any terrain. The Popal GTX should only be used on paved/asphalt roads.
Tyre pressure greatly affects the range and comfort of your bike. So we recommend you always pump your tyres up properly. Optimal tyre pressure is between 3.5 and 6 bar. The sidewalls of all tyres display the correct inflation pressure recommended by the manufacturer. A handy aid: if you push your thumb against the top of the tread and it's possible to depress the tyre slightly, you have the correct pressure.
Check your tyre pressure every 2 to 4 weeks.
Loving attention for your new e-bike.
It's time to have your bike serviced for the first time after either 250 km or 3 months. After that, maintenance is mainly dependent on how intensive your use of the bike is. So discuss with your dealer what would be an appropriate maintenance plan for your situation. Popal advises having the bike checked at least every 6 months after the first service.
Naturally, there's a lot you can do yourself to keep your bike in peak condition. Our tips:
Always go for the first service. Parts such as spokes and cables can stretch after the first use of the bike. If they're not adjusted, there is a greater risk of spokes snapping or gears not engaging.
You can clean your e-bike by removing dirt with a soft brush and hot water. That'll get it gleaming like a showroom model again. Not only that, but regular cleaning makes sure your bike will be with you for longer. Do be careful not to use too much water around electronics and the battery. It's best to remove the battery before washing.
Don't use a high-pressure cleaner to spray the e-bike clean. The jet can damage the bike's electronics.
It makes sense to take care of certain parts of the bike immediately after cleaning it. Chrome components, unlacquered aluminium and stainless steel parts can be greased with acid-free Vaseline or Vaseline spray to prevent rust. Moving parts need grease/oil. We recommend you regularly lubricate the chain, cogs and axles. Naturally, your Popal dealer can do this for you too.
How do you keep your e-bike safe and looking good for longer?
→ Check the tyre pressure and tread regularly.
→ Check that the brakes are working properly and if the brake blocks are worn. Replace or repair them where necessary.
→ Check that there is enough tension in the spokes, that none of them are broken or that there is no twist in the wheel. If there is, visit your dealer.
→ Treat all moving parts and electrical contact points regularly with acid-free Vaseline spray.
*We recommend you maintain your bike regularly in addition to the periodic servicing by the dealer.
For urgent repairs or a major overhaul, you can always go to your Popal dealer. But you can also regularly run a check on your bike yourself. This checklist will help you keep your bike in peak condition:
→ Is the pedal assistance working as it should?
→ Are all the gears working and does the e-bike change gear smoothly?
→ Is there enough tension on the chain?
→ Are both brakes working properly?
→ Is the saddle at the correct height? Is it still comfortable?
→ Are the handlebars adjusted correctly and are they at right angles to the front wheel?
→ Are all the spokes still whole?
→ Are the tyres pumped up to the right pressure? Is there still enough tread on the tyres?
→ Are all the lights working? Is the headlight properly adjusted?
→ Are all reflectors still clearly visible?
→ Is your e-bike in need of cleaning?
→ Is there any damage visible?
→ Is the stand attached firmly and is it greased well?
→ Are the nuts and bolts of the brake calipers still tightened properly? Are the brake blocks and discs in good condition?
→ Do you hear any strange sounds while you're cycling?
→ Are the seat post and handlebar stem positioned correctly and are they tightened properly?
→ Have the seat post and handlebar stem been greased?
→ Is there slack in the front fork, around the steering head bearings?
→ Are all nuts and bolts properly greased?
→ Is the lock still working smoothly and has it been greased?
→ Does the bell still work and is it in the right position?
→ Are the pedals attached properly and have they been greased at the screw thread?
Popal recommends you schedule a service check-up every 3 months and a major overhaul once a year. During a service check-up, your dealer will carry out the following:
Every 3 months
→ Check wheels and tyres (twists in the wheels, tension of spokes, tyre pressure and tread)
→ Check all mounting components/nuts and bolts, and tighten where necessary
→ Check brake blocks for wear, adjust cable tension, check efficiency of brakes
→ Check steering head for slack, check attachment of handlebar stem and adjust if necessary
→ Clean chain, tighten and grease with Teflon spray
→ Electrical system: Fully charge the battery, clean pedal sensor with lukewarm water and sponge, treat contacts with contact spray
→ Check drive system of the e-bike and where necessary, replace defective parts
→ Take apart, degrease, grease and put together the following parts:
- chain and cogset
- hub
- gear and brake cables
- steering head
- handlebar stem
- seat post
→ Check and grease the following parts:
- gears and shifters
- brakes and brake handles
- lock
- stand
→ Check spoke tension (tighten and/or true if necessary)
→ Check tyre pressure (replace tyres if necessary)
→ Check crankset and pedals and adjust
→ Check that lights are working properly and adjust
→ Check saddle for damage and suspension
→ Apply a protective layer of wax to the bike
→ Take the bike for a test drive to check that all parts are working as they should
- When replacing parts, always make sure that the original parts are put back in place
Is something not working properly? Follow this handy step-by-step guide.
The frame is guaranteed for 5 years, and all types of battery for 2 years. All the other electrical components are guaranteed for 1 year.
Using your bike unchecked can put yourself and others in danger. Moreover, the warranty expires in the case of unchecked use.
There is no guarantee: if changes have been made to the product, including repairs which have not been authorised by Popal Fietsen Nederland bv or the purchaser.
Use only the battery supplied by Popal on your bike.
You can always visit your Popal dealer for maintenance on your e-bike.
For more information, please refer to Popal Fietsen Nederland bv general terms and conditions
Popal reserves the right to make changes to the models of e-bikes. Prices may also be subject to change.
Popal cannot be held liable for any inaccuracies in this manual. The copyright on this manual rests with PMG.
The ebike system's parts are automatically monitored in real time. If a part is abnormal, the corresponding error code is displayed on the HMI. The DP C010.CB displays the error code on the HMI directly.
The troubleshooting methods in the list are listed in order according to the fault probability and the operability of the related parts. In practice, dealers can adjust the order based on the existing tools and spare parts. (For detailed disassembly steps, please refer to the dealer manual of the corresponding parts on the official website.
<www.bafang-e.com>)
In order to protect the electric parts, before disassembling the parts, please switch off the system power first by pressing the control unit of HMI and then disconnect the power cable of the disassembled part. When installing the parts, please fix the parts first, then connect the power cable of the parts, and finnally switch on the system power by pressing the control unit of HMI.
Please contact Bafang after-sale service personnel <service@ bafang-e.com> if the above troubleshooting fails to solve the problem or the error code is not in the above list.
System overvoltage protection
Hall signal in motor is abnormal
Phase wire in motor abnormal
Hub Motor System
1. Check whether the throttle is in place.
2. Check whether the throttle cable is connected correctly or the cable (from throttle to controller) is damaged.
3. Troubleshoot the faulty part:
1) Replace the throttle
2) Replace the controller
1. Check whether the nominal voltage of the battery is the same as the controller.
2. Troubleshoot the faulty part:
1) Replace the battery
2) Replace the controller
1. Check whether the motor cable is connected correctly or the cable (from motor to controller) is damaged.
2. Troubleshoot the faulty part:
1) Replace the motor
2) Replace the controller
1. Check whether the motor cable is connected correctly or the cable (from motor to controller) is damaged.
2. Troubleshoot the faulty part:
1) Replace the motor
2) Replace the controller
Mid Motor System
1. Check whether the throttle is in place.
2. Check whether the throttle cable is connected correctly or the cable (from throttle to drive unit) is damaged.
3. Troubleshoot the faulty part:
1) Replace the throttle
2) Replace the drive unit
1. Check whether the nominal voltage of the battery is the same as the drive unit.
2. Troubleshoot the faulty part:
1) Replace the battery
2) Replace the drive unit
Replace the drive unit
Replace the drive unit
Motor overtemperature protection (Only occur when the motor is equipped with the temperature sensor.)
Motor temperature sensor abnormal (Only occur when the motor is equipped with the temperature sensor.)
Controller curent sensor abnormal
Controller overtemperature protection
Controller temperature sensor abnormal
1. If riding for a long time, turn off the system and let the motor cool down.
2. If no ride or riding for a short time, troubleshoot the faulty part:
1) Replace the motor
2) Replace the controller
1. Check whether the motor cable is connected correctly or the cable (from motor to controller) is damaged.
2. Troubleshoot the faulty part:
1) Replace the motor
2) Replace the controller Replace the controller
1. If riding for a long time, turn off the system and let the controller cool down.
2. If no ride or riding for a short time, replace the controller. Replace the controller
1. If riding for a long time, turn off the system and let the drive unit cool down.
2. If no ride or riding for a short time, replace the drive unit.
Replace the drive unit
Replace the drive unit
1. If riding for a long time, turn off the system and let the drive unit cool down.
2. If no ride or riding for a short time, replace the drive unit.
Replace the drive unit
Hub Motor System
1. Check whether the motor cable is connected correctly or the cable (from motor to controller) is damaged.
2. Troubleshoot the faulty part:
1) Replace the motor
2) Replace the controller
(Only occur when the drive system is equipped with the torque sensor.)
1. Check whether the torque sensor cable is connected correctly or the cable (from sensor to controller) is damaged.
2. Troubleshoot the faulty part:
1) Replace the torque sensor
2) Replace the controller
1. Check whether the HMI cable is connected correctly or the cable (from HMI to controller) is damaged.
2. Troubleshoot the faulty part:
1) Replace the controller if the HMI turns off automatically after appearing error code for 20 seconds. Continue next page
Mid Motor System
1. Check whether the spoke magnet has fallen off or the clearance between the spoke magnet and the speed sensor is within the normal range (10-15mm).
2. Check whether the speed sensor cable is connected correctly or the cable (from sensor to drive unit) is damaged.
3. Troubleshoot the faulty part:
1) Replace the speed sensor
2) Replace the drive unit
Replace the drive unit
1. Check whether the HMI cable is connected correctly or the cable (from HMI to drive unit) is damaged.
2. Troubleshoot the faulty part:
1) Replace the drive unit if the HMI turns off automatically after appearing error code for 20 seconds. Continue next page
ON/OFF Button detection circuit abnormal
(Only occur when the drive system is equipped with Bafang CAN communication protocol.)
WDT (Watch Dog Timer) in controller is abnormal
Discharge voltage of battery pack is too low
Discharge voltage of single cell is too low
Voltage difference between single cell
2) Replace the HMI if the HMI doesn't turn off automatically after appearing error code for 20 seconds.
3) If the BESST tool is available, connect it with HMI and controller, read the information of HMI and controller and replace the part that cannot read information.
1. If keep pressing the ON/OFF button when the HMI powers on, the error code will alarm. Release the button and observe whether the code disappears.
2. Troubleshoot the faulty part:
1) Replace the HMI
2) Replace the controller
Replace the controller
1. Charge the battery
2. Replace the battery
1. Charge the battery
2. Replace the battery
Replace the battery
Mid Motor System
2) Replace the HMI if the HMI doesn't turn off automatically after appearing error code for 20 seconds.
3) If the BESST tool is available, connect it with HMI and drive unit, read the information of HMI and drive unit and replace the part
1. If keep pressing the ON/OFF button when the HMI powers on, the error code will alarm. Release the button and observe whether the code disappears.
2. Troubleshoot the faulty part:
1) Replace the HMI
2) Replace the drive unit
Replace the drive unit