
15 minute read
PROJECT NEWS
Projects which inspire others to build their own aircraft Compiled by Mike Slaughter
Project News
slightly different tack for Project News this month, we
Ahave a submission detailing a specific construction technique. As space is tight, let’s get straight into it. Two months ago, we had an update from Andy Best on his long running Blue Two original design, he was reporting difficulty forming a bubble canopy for the aircraft and wondered if any readers could assist with some advice on the subject. I’m delighted to say that a couple of fellow builders were put in touch, and it turned out that Tony Razzell was somewhat further down a parallel path.
We saw Tony’s own build in this column back in early 2018, when he gave us an update on his Nicollier Menestrel II, a rather nice wooden scratch-built type with very ‘Spitfiresque’ wings.
Andy and Tony have been in touch and, fingers crossed, this will get Andy past his difficulty.
One thing led to another, and Tony has kindly given Project News a detailed account of his exploration into the process of forming a complex three-dimensional canopy. So, I’m going to cut the waffle and hand you straight over to Tony
To get in touch with Project News, and tell your story, report a milestone or just to send a picture, email: projectnews@laaarchive.org.uk. Please share your story!
Experiments in forming acrylic sheet – A lockdown project By Tony Razzell
For my Nicollier Menestrel II project, I had reached the point where I needed to start thinking about a canopy. Whilst canopies are available from France, by the time VAT, transport (and now with Brexit, import duties) are taken into account, it starts getting very expensive.
Being someone who likes to get back to first principles and make things from scratch, I wondered how hard it would be to make my own. In this article I describe my journey so far.
Thermoplastic polymers soften when heated and can then be formed to shape, and a wide variety have been developed for different applications. Polymethyl Methacrylate, or PMMA, is a thermoplastic polymer which was developed in the UK in the early 1930s by ICI, and in Germany by Rohm & Haas AG. It is a transparent material that can be either cast or extruded to form thin sheets, the latter being more amenable to vacuum forming, and is widely used for light aircraft windshields and canopies. There are a number of trade names, including the well-known Perspex, Plexiglas, Lucite etc. It is sold widely as ‘acrylic’ sheet, which is the term I will use for this article.
I started by reading up as much as I could about thermoforming acrylic sheet at home, and there is a good range of information available on the internet (bibliography at the end of the article). There are a number of forming methods applicable to light aircraft canopies, summarised in Table 1 as follows:
Table 1 – Acrylic Sheet Forming Methods Method Tooling Comments
Free blown bubble Lower edge of canopy formed by oval hole in 12-18mm ply sheet, pressure boundary formed by another 12-18mm ply panel, seal between rear ply panel and acrylic
Drape forming Male form tool covered in felt and coated with grease to aid slip during forming • Complex cross sections possible • Tooling time & cost • Manual assistance needed for forming (four big blokes) • Mark-off risk on internal surface
• Good optical quality, no ‘mark off’ on surface • Limited to simple cross sections (part of a circle) • Sheet thins significantly at top of canopy • Large sheet needed, significant wastage likely, large oven
Vacuum forming
Drape & Vacuum forming Male or female form tool
Female form tool • Complex cross sections possible • Tooling time & cost • Significant thinning at top of canopy • Risk of mark-off on internal/external surface
• Complex cross sections possible • Draping limits extent of thinning • Risk of mark-off on external surface
I then carried out small scale experiments to explore how hard it would be to form the material and get an idea of the process window (temperature range, time available for forming, pressures/forces etc.).
Experiment 1

The first experiment was drape forming over a quarter scale male form tool, the compound curvature being built up by strip planking over formers in boat-building style. The tool was covered with green baize felt, and a 2mm sheet heated in the kitchen oven (with permission!). While I obtained some compound curvature it was not very satisfactory, the key issues being that the oven temperature distribution was very poor, the material cooled and hardened too quickly, and the felt left imperfections, or ‘mark off’, on the internal surface.
To address the poor temperature distribution I built a small test oven, using a couple of 500W universal heating elements and a very neat temperature controller, which came with a type K thermocouple and a solid-state relay (basically a thyristor module). For the oven I used 50mm foam insulation board, placing the heating elements at the bottom of the oven with the top open to accommodate the acrylic sheet, plus any tooling, with insulation on top of that. I included a circulation fan in the side wall of the oven to help stir the hot air around and make the temperature more uniform. Above Quarter scale model canopy drape forming trial.
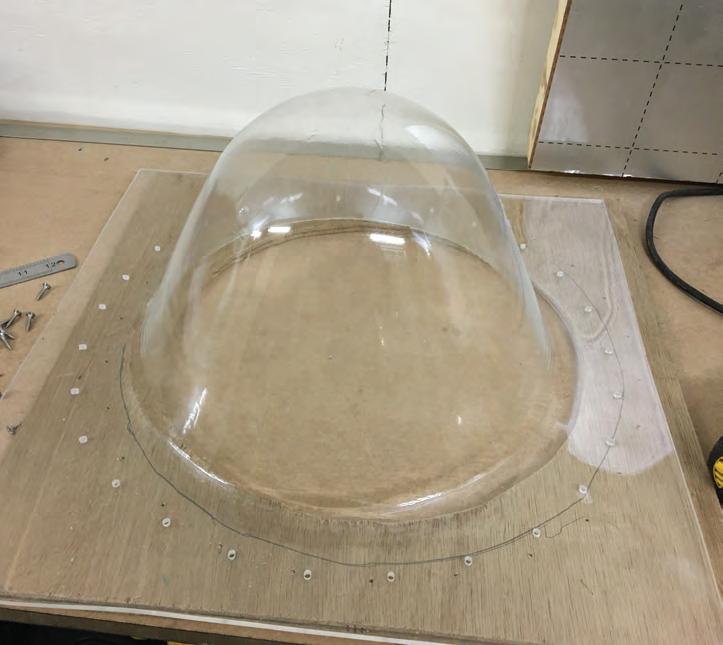
Top right Second attempt at a quarter scale blown bubble canopy.
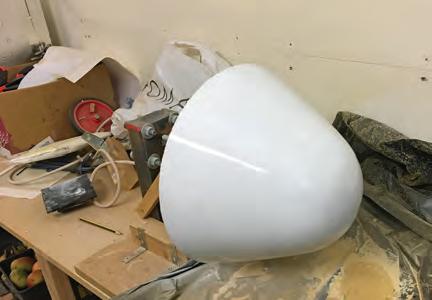
Below right Male form tool for DH88 Comet nose cone, made using a crude homemade lathe.
Experiment 2

I’d read about free blown canopies solving the issue of mark-off, so the next experiment used a piece of 2mm acrylic clamped to a sheet of 12mm ply by an MDF form tool defining the outer rim of the final ‘bubble’, again at quarter scale. The assembly was placed over the open top of the oven, heated up and compressed air was then introduced between the 12mm ply and the acrylic with a needle valve and gauge to monitor pressure (about 5psi). The oven had a small window in the side to allow visual monitoring of the blowing process.
The first attempt showed that the fan was creating a hotspot which stretched more easily than the surrounding material, and prematurely burst the ‘bubble’. I made a multi-channel thermocouple reader with an Arduino microcontroller to map the oven temperature, and found that it was much better without the fan!
I was really encouraged by the second attempt, the only issue being that there was a small blemish at the top of the bubble where the cold air coming in had locally cooled the acrylic.
I then built a rough quarter scale canopy frame to see how well the bubble (which in the cross section is part of a circle) would fit. It was clear that with the more complex compound curvature of the two- seat Menestrel canopy, the free blown approach would not work as the canopy would have to be forced into shape, locking in stresses which could give problems in service.
Experiment 3
One of the articles I read, (no 4, see list at end) suggested vacuum drape forming, where the majority of the simple curvature is created by draping the hot acrylic sheet in a female form tool, and the residual compound or double curvature is created by vacuum forming. I decided to start making the tooling for the full-size canopy as I had learned a considerable amount through the small-scale experiments, and it also left the option for conventional drape moulding open.

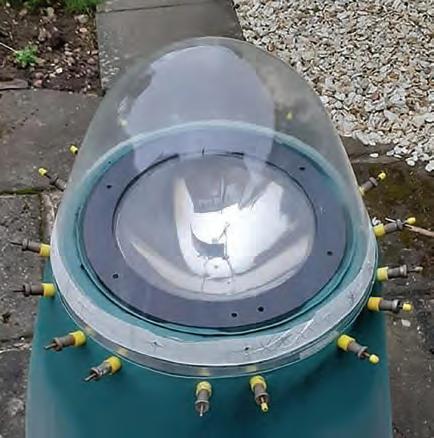
Top GRP female form tool for DH88 Comet nose cone with vacuum pump and control valve.
Above Vacuum formed DH88 Comet nose cone.
Left Finished DH88 Comet nose cone.
Right Full size male form tool for the Menestrel canopy.
It was around this time that Ken Fern contacted me to ask if I could help with acrylic nose cones for the DH88 Comet Racer G-ACSP (Black Magic) project at Derby, and G-RCSR (a replica of G-ACSR) that he is building. I thought it was an ideal way to explore vacuum forming as a close cousin of my chosen vacuum drape forming.
I built up a male form tool from ply and builders’ foam, covered it in filler and sanded it smooth, using a crude homemade lathe. From this I made a female form tool from glass reinforced plastic, also a learning experience as I had not moulded anything from GRP before. I drilled some small holes in the bottom for a vacuum outlet and lined it with soft flannelette material to give a soft surface. I also put a self-adhesive rubber D seal around the rim.
I cut a hole in a sheet of 12mm ply and screwed an acrylic sheet over the hole with lots of small wood screws, again placing the assembly over the oven to heat it. Several cones were formed for the DH88s as I played around with temperatures and tried alternative lining materials. I still had mark-off issues but, as these end up on the external surface, they can be removed after forming with 3200 wet and dry paper, followed by plastic polish. There was also a small witness mark where the hot acrylic had been sucked onto the vacuum outlet, but overall I was pleased with the result. Ken subsequently fitted a cone onto the nose section of his replica Comet G-RCSR and used a plastic polishing kit to improve the surface finish to an acceptable level.
The canopy!

After much filling, sanding, priming, painting and polishing, I had a male form tool for the canopy from which I could make a GRP female form tool. This was done with a GRP moulding kit, consisting of gel coat, chopped strand mat, resin/catalyst and release materials (wax and PVA solution). The finished moulding was a bit floppy so I bonded on some ply frames to stiffen it up, using more mat and resin while it was sitting on the male form tool. The female form tool was lined with fine cotton (from an old bed sheet) attached with photo-mount spray, and soft rubber seals added to allow a vacuum to be formed to pull in the hot acrylic. Reference (4) suggests an additional
tool to push the acrylic sheet against the seals, so I made a sealing frame out of plywood. This was suspended above the tool on a thin rope, with a counterweight to allow it to be quickly pulled down onto the hot acrylic sheet draped in the female form tool.
Full size oven
I needed a much larger oven to handle the 1.7m x 1.1m sheet needed for the full-size canopy. I made this out of 50mm insulation board, which in retrospect is not that satisfactory as it is dimensionally unstable at the required operating temperature and emits a noxious smell. If I rebuild the oven, it will be lined with aluminium sheet and insulated with 100mm of Rockwool. I used a 2kW universal heating element and the thermocouple / controller from the small oven. I designed the oven to be in two halves with an aluminium sheet as a partition between two cavities.
I mounted the heater element in the back cavity with a pair of tangential fans mounted at the bottom taking air from the front cavity and blowing it upwards, past the heater, over the top of the partition and then down over the acrylic sheet. With this arrangement, the temperature variation was found to be less than 10°C over multiple positions in the front cavity for the acrylic, which I thought was acceptable.
The acrylic sheet was mounted on a ‘T’ section of aluminium that runs on rollers mounted in the roof of the oven, allowing the sheet to be quickly withdrawn for moulding through a small side door.
The first two attempts
The first two attempts using 3mm acrylic sheet did not work, partly because it stretched under its own weight in the oven, making it difficult to remove, and partly because we failed to press the edges of the sheet against the rubber seals on the tool. This was principally due to the front and rear edge ‘ruffling’ so I modified the female form tool to have more defined ‘lands’ fore and aft, redesigned the sealing frame and made it out of aluminium strip. To hold it in place over the acrylic sheet, I added toggle clamps around the front and back peripheral edges of the female form tool.
Attempt 3
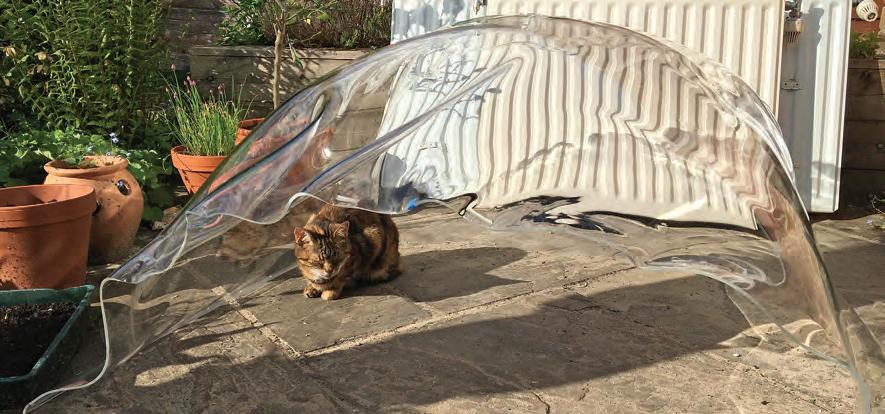
To address the sagging issue, for attempt number three I supported the vertical edges of the acrylic sheet in the oven using thin stranded steel cable (to allow bending during the moulding process) attached to bulldog clips at intervals along the cable. I also switched to 4mm sheet, in part to give a slightly longer working time and more robustness. Unfortunately, the anti-sagging system did not work very well, and the ruffling persisted, although it does make for an unusual if rather expensive cloche!
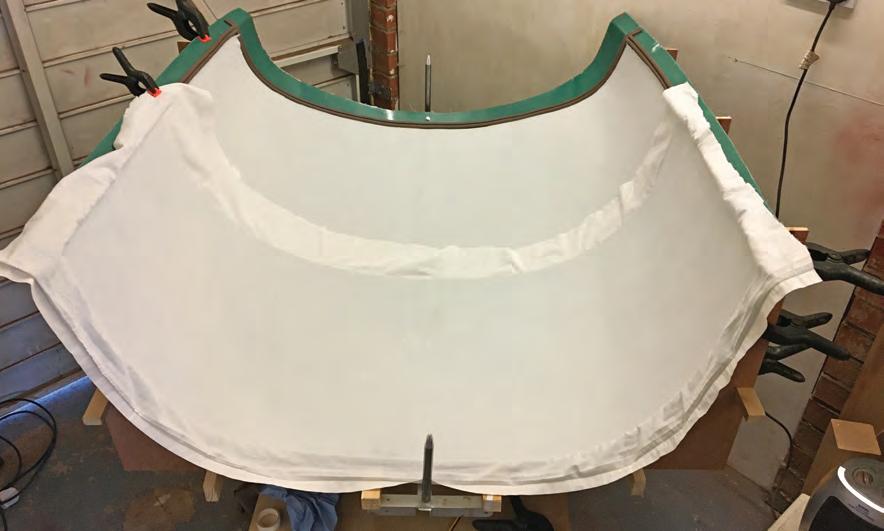
Left Lining the female Menestrel form tool with a cotton sheet.
Below Attempt number three with flexible wire side support – the ruffling on the edges prevents a seal being formed against the tool.
Attempt 4
Having thought about the problem further, I decided to use 2mm thick strips of aluminium to support the vertical edges of the acrylic, forming a complete frame around the edge. It required about 80 M3 nuts and bolts which took a while to fit but attempt number four, again with 4mm acrylic, was largely successful. The ruffling issue was eliminated, and a vacuum seal achieved all around the edge of the tool. This felt like a huge step forward, the vacuum pulling the acrylic sheet down into the tool until it reached the vacuum outlets.
Almost there
While very encouraging, the current outcome is still not quite right. I need to rework the leading edge of the tool as it has a layer of filler that is not as smooth as it needs to be so has left distortion in the leadingedge region of the canopy – which is the one place where distortion is a real issue as you look through it during approach and landing. I also found that in spite of vacuum cleaning the tool before use, some small pieces of debris found their way onto the cotton lining, leaving a number of shallow depressions in the surface. Whilst only about 0.5mm deep, they cause an unacceptable area of visual distortion, so I need to be more rigorous with tool cleanliness, probably vacuum cleaning just prior to forming the acrylic.
Other than these issues, there was minimum mark-off on the external surface of the canopy apart from local witness marks from the vacuum outlets (which I think can be removed with wet and dry plus a good polish).
Once a canopy has been successfully formed, a period of annealing will be required to minimise internal residual stress from the forming process. This is apparently carried out at around 80°C, which avoids bulk deformation and should minimise stress crazing as the acrylic is exposed to sunlight etc. I have yet to work out how to do this, but I’ll probably use an old duvet to insulate it and blow hot air from a fan heater inside, controlled with a thermocouple.
I have had a great deal of encouragement from a number of other Menestrel builders, and fellow members of the East Midlands Strut. Particular thanks to Richard Mole, Richard Teverson and my inspector, Martin Jones.
A huge thanks also to my family for their ideas and support – and coping with my moodiness after the various failures!
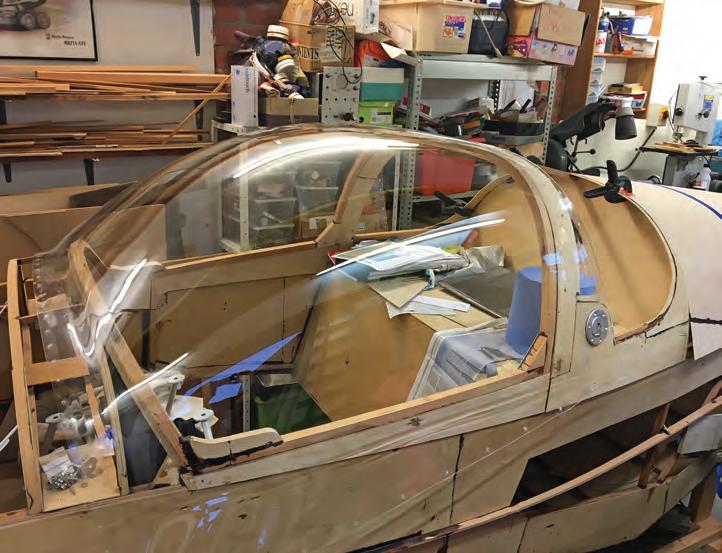
Above Attempt number four, a significant improvement, almost there!
References
1. Blowing Your Own, Paul Moffat, Sport Aviation, January 2002, p94-98, https://tinyurl.com/laacanopyone 2. A Bubble Canopy For Your Homebuilt, Hugh Beckham, https://tinyurl.com/laacanopy2 3. How to Make a Plexiglass Bubble Canopy, Otto Kolisnyk, https://tinyurl.com/laacanopythree 4. Canopy Forming for Homebuilders, Jim Miller, https://tinyurl.com/laacanopyfour
New Projects
If your aircraft has been featured in the New Projects list, please let Project News know of your progress at: projectnews@laa-archive.org. uk
Cleared To Fly
If your aircraft has featured recently in the magazine and has subsequently completed its maiden flight, Project News would like to hear from you at: projectnews@laa-archive.org.uk
n G-CLHJ Supermarine Spitfire MK26B (LAA
324-15249) 14/6/2021
Mr Paul Fowler Trustee Of: Molly Rose Group, 119 Chinnor Road, Thame, OX9 3LP n G-CLNO KFA Safari (LAA 402-15657)
11/6/2021
Sprite Aviation Services Ltd., Inglenook Farm, Roman Road, Maydensole, Dover, CT15 5HP n Sling TSi (LAA 400A-15771) 30/6/2021 Name & Address held by LAA Engineering
n G-CLUI Bristell NG5 Speed Wing (LAA
385-15690) 9/6/2021
Mr James Simpson, Badgers Bower Lane, West Chiltington, Pulborough, RH20 2RH n G-CSDR Corvus CA22 (s/n CA22-010)
2/6/2021
Mr Joseph Mills Trustee Of: Crusader Syndicate, 37 Wedgwood Drive, Warrington, WA4 6GA n G-RVBJ Van’s RV-8A (LAA 303-15692)
11/6/2021
Mr Keith Wingate, 16 Buckwell Road, Kingsbridge, TQ7 1NQ n G-BVVO Yak-50 (s/n 853007) 11/6/2021 Name & Address held by LAA Engineering n G-CLLO Bristell NG5 Speed Wing (LAA
385-15685) 29/6/2021
Name & Address held by LAA Engineering n G-FAZT Glasair IIS RG (s/n 2069) 8/6/2021 Name & Address held by LAA Engineering n G-JPBA Van’s RV-6 (PFA 181A-13517)
21/6/2021
Name & Address held by LAA Engineering n G-LIFB Aeroprakt A32 Vixxen (LAA
411-15723) 11/6/2021
Name & Address held by LAA Engineering


