10 minute read
Fall Recipes
Ovens on, its time for fall favorites Recipes worth turning on your oven
By Kim Shute
It may still be 80 when this magazine comes out, but the calendar is telling us its fall and that’s good enough for me.
Although I bake year around, something about the cusp of autumn really gets me ready for the season. If you’re the same, here’s a few ideas to get you going.
Egg Rolls
Egg rolls are getting a makeover here. Although the classic Chinese appetizer is a favorite, it’s really just a jumping off point since the wrappers lend themselves well to a host of flavors. If you’re looking for a big batch snack to stick in the freezer, or a project for the kiddos to help with this one’s perfect. The recipes here are just guidelines, use the technique as a starting point for your own creations.
1 package egg roll wrappers Fillings for your choice: In this batch, I made pizza egg rolls and Philly cheese egg rolls.
PIZZA:
1 8 oz. package shredded mozzarella or pizza mix cheese 1 jar pizza sauce Assorted pizza toppings Spoon cheese and toppings of your choice onto the lower third of an egg roll wrapper, fold in sides and roll, sealing seam side with a few drops of water then fry in a couple inches of 350-degree vegetable or peanut oil until golden brown. Dip in pizza sauce.

PHILLY CHEESE:
1/2 lb. ground beef 1 8 oz. package provolone 1 small onion 1 small green pepper Brown 1/2 lb. ground beef, 1 small chopped green pepper and one small chopped onion. Add garlic powder, salt and pepper to taste when browned. Drain grease after cooking if not using extra lean ground beef. Stir in provolone. Spread large spoonful of mixture onto lower third of egg roll wrapper, fold in

PHOTO BY KIM SHUTE
sides, roll, seal seam with a few drops of water. Fry at 350-degrees in a couple inches of vegetable or peanut oil until golden. Both can be frozen and reheated in a 400-degree oven until warmed through about 20 minutes.
Recipes continued on page 10
Continued from page 9
PHOTO BY KIM SHUTE Chicago deep dish pizza is closer than you think. This recipe duplicates the flaky, buttery crust the pizza is famous for, and can be made at home in the time it takes to order delivery.
Love the idea of an authentic Chicago deep dish pizza, but don’t feel like a trip to the city? Here’s a recipe that gives you all that authentic taste right in your own kitchen.
PIZZA CRUST (MAKES 2)
3 and 1/4 cups all-purpose flour (spoon & leveled) 1/2 cup yellow cornmeal 1 and 1/4 teaspoons salt 1 tablespoon granulated sugar 2 and 1/4 teaspoons Red Star Platinum yeast (1 standard packet) 1 and 1/4 cups slightly warm water 1/2 cup unsalted butter, divided (1/4 cup melted, 1/4 cups softened) Olive oil for coating
TOMATO SAUCE FOR TWO PIZZAS
2 tablespoons unsalted butter 1 small onion, grated 3/4 teaspoon salt 1 teaspoon dried oregano 1/2 teaspoon crushed red pepper flakes (optional, but recommended) 3 garlic cloves, minced 1 28-ounce can crushed tomatoes 1/4 teaspoon granulated sugar
TOPPINGS FOR TWO PIZZAS
4 cups shredded or sliced (preferred) mozzarella 1/2 cup grated Parmesan cheese, optional Additional toppings of your choice
Instructions
You will need two deep dish 9×2-inch round cake pans if you are making both pizzas at the same time.(I successfully used cast iron skillets). You can also use 9-inch springform pans. For the crust: Combine the flour, cornmeal, salt, sugar and yeast in the bowl of your stand mixer fitted with a dough hook attachment. If you do not have a stand mixer, use your hand mixer and a very large bowl. If you do not have any mixer, you will do this all by hand. Again, use a very large bowl.
Chicago Deep Dish Pizza


Give those ingredients a quick toss with your mixer on low or with a large wooden spoon. Add the warm water and 1/4 cup of melted butter. The warm water should be around 90-degrees Fahrenheit. Make sure it is not very hot or it will kill the yeast. Likewise, make sure the butter isn’t boiling hot. If you melt it in the microwave, let it sit for five minutes before adding. On low speed, beat (or stir) the dough ingredients until everything begins to be moistened. Continuing on low speed (or remove from the bowl and knead by hand if you do not own a mixer), beat the dough until it is soft and supple and gently pulls away from the sides of the bowl and falls off of the dough hook — about four to five minutes. If the dough is too hard (it will be textured from the cornmeal), but if it feels too tough, beat in 1 teaspoon of warm water. Alternatively, if it feels too soft, beat in 1 tablespoon of flour. Remove the dough from the bowl and form into a ball. Lightly grease a large mixing bowl with olive oil and place the dough inside, turning it around so that all sides of the dough are coated in the oil. Cover the bowl tightly with aluminum foil and allow to rise in a warm environment for one to two hours or until double in size. For this warm environment, here is what I do: Preheat oven to 250 degrees Fahrenheit (121°C). Once there, turn oven off. Place bowl inside. Close the oven. The lingering heat will help your dough rise. This is especially ideal on cold winter days. Once the dough is ready, lightly flour a large work surface. Remove dough from the bowl, set the bowl and aluminum foil aside (to use later). Gently punch down the dough to remove any air bubbles and roll the dough into a large 15×12-inch rectangle. Spread 1/4 cup of softened butter on top of the dough. Roll it up lengthwise. Cut the dough log in half. Form the two pieces of dough into balls and place back into your greased bowl. Cover with aluminum foil and allow to rise in the refrigerator (not in a warm place) for one hour until they are puffy as you make the sauce. For the sauce: Place butter in a medium saucepan over medium heat and allow it to melt. Once melted, add the grated onion, salt, oregano and red pepper flakes. Once the onion has slightly browned after about five minutes, add the garlic, tomatoes and sugar. Turn the heat down to low-medium and allow it to simmer until it’s hearty, fragrant and thick — about 30 minutes. You’ll have about 2 and 1/2 cups of sauce at this point. If you have more than that, keep simmering until the amount has reduced. Remove from heat and set aside until ready to be used. You may store the sauce in a tightly covered container in the refrigerator for up to two days if planning to make the pizza another day. You may freeze this sauce for up to two months, as well.
Preheat oven to 425-degrees Fahrenheit. Assemble the pizzas: After the dough balls have risen in the refrigerator, they should be puffy. Keep one ball of dough in the refrigerator as you work with the first one. Roll it out on a lightly floured work surface, working it into a 12-inch circle. Using your rolling pin as a guide, place over a 9×2-inch deep dish cake pan. Using your fingers, press the dough into the cake pan. Make sure it is nice and tight fitting inside the pan. Trim any excess dough off the edges with a small knife. Repeat with second dough. Brush the top edges of the dough with a little olive oil, which gives the crust a beautiful sheen. Fill each pizza with half of the cheese, then your toppings. On top of those optional toppings, is the sauce. Pour about 1 and 1/4 cups of sauce on top of each. If you do not like that much sauce, you can reduce to 3/4 cup per pizza and have leftover sauce. Sprinkle each with 1/4 cup of grated Parmesan cheese. Place the cake pans on top of a large baking sheet, which will catch anything potentially spilling over the sides of the pans. Bake for 20-28 minutes or until the crust is golden brown. Feel free to loosely cover the pizzas with aluminum foil after the 15 minute mark to prevent any heavy browning and uneven baking. Remove the pizzas from the oven and allow to cool in the pans placed on a wire rack for 10 minutes. After 10 minutes, slice, serve and enjoy.
(Courtesy of Sally’s Baking Addiction)
Savory Galette
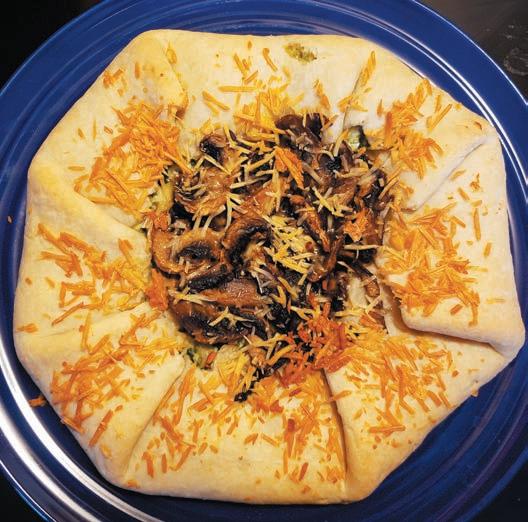
If you’re feeling fancy or want to impress dinner guests, a galette is a perfect choice. It’s really just a rustic savory pie, so if you’re not into precision, this is perfect for you. Once you have down the technique you can let your imagination lead you to your favorite flavor combinations. One of my favorites is spinach ricotta. To start, make your crust. Use whatever pie crust recipe you like, or if you want a cheater version, use store bought. I like to use Smitten Kitchen recipe for all butter pie crust. You can also add cornmeal, spices, ground-up herbs or cheese to the dry ingredients for added flavor when making the crust.
For the filling:
1 cup of ricotta A big handful of shredded parmesan A defrosted and well-squeezed 10 oz. box of frozen spinach

Salt and pepper to taste A pinch of garlic powder Caramelized onions (I already had in the freezer) One egg Combine ingredients. I topped with some sliced fresh mushrooms sauteed in about 1 tbsp. of butter. To assemble, roll out the dough into two disks about 12 to 14-inches in diameter, pile in your fillings, leaving about a 2-inch border. Then fold the edges in, overlapping where necessary-this is a rustic pie so don’t worry about perfection. Bake at 400-degrees for 30-40 minutes until golden. You can also brush with cream or an egg wash before baking to make it extra brown and crisp.
Top students choose IVCC Ag

Spinach ricotta galette is a deceptively easy fall meal. A simple pastry filled with spinach and cheeses pairs well with a fresh salad (and wine) for a dinner party that will impress guests. They’ll have no idea how simple it is to prepare. PHOTO BY KIM SHUTE
Don’t forget dessert on page 22
JEWELERS
La Moille High School Graduate Luke Lovgren

Start a promising career in IVCC’s Ag Program!
www.ivcc.edu/agriculture (815) 224-0413
Diamonds Fine Jewelry Watches Custom Designs Clocks Remounts


74 Years of Service
www.brucejewelers.com

Illinois’ longest operating lumberyard continues to thrive along Peru’s historic riverfront. Maze Lumber has been providing top quality building materials to Illinois Valley contractors and homeowners for 172 years, still owned by the founding fathers (Maze). Located in a 15,000-square foot showroom and office, we offer building materials for the modern home as well as a full line of the traditional lumber items used in home building, commercial construction, and industrial applications. Our experienced sales staff takes pride in their ability to provide knowledgeable assistance along with prompt delivery at reasonable prices.

BUILD IT O
FIREPLACES


BATHROOMS


WINDOWS


