Teacher Manual
Grade 2

NEP 2020 aligned Digital coding platform included


5.
5
1. Loops and Repeat Loops
2. Repeat Loop Activity
3. Draw Waves Activity
4. For Loop
5. Turn a Garden into a Castle
5 Debugging
1. Debugging and Practice

Note: Use the following points to prepare for the session beforehand. Avoid reading the points in the class.
● Wizards and robots used magic and technology to build a planet named Avora.
● Junior wizard Conji and junior robot Mel promised to share their knowledge of computers and magic with each other.
● Lord Ero, the dark lord, didn’t want robots to learn magic.
● Lord Ero froze the entire robot-kind by casting a spell.
● Mel and Conji saved robots using MS Paint and a special spell.
● Conji sees a dragon coming towards him while flying on his broom.
● The dragon is not real. It is Mel who is playing this shadow prank on him.
● Conji advises Mel to be cautious when using magic.
● Mel and Conji reach their classroom and play a quiz on computers.
The content covered in this chapter is aligned with the following CSTA Standard
● 1A-CS–02 Computing Systems
This chapter is divided into the following classroom sessions
1. Introduction to Computers
2. Advantages of a Computer
3. Disadvantages of a Computer
4. The IPO Cycle I
5. The IPO Cycle II
Objectives
In this session, students will learn about –

● Computers
● Uses of Computers
Keywords
● Computer: Machine that makes our life easy
WEBS at a Glance
Warm-Up Engage Build Sum-Up
Revise the story Read the story aloud ahead
min
Discuss computers and their uses
min
Plan
● Recap the story covered in the previous grade.
● Say: Let’s learn how the story moves ahead.
Conclude the concepts
5
min
● Read aloud the story from page 2 to panel 5 of page 5, up to Mel’s words “Okay,......... computer is”.
● Say: Let me explain about computers and their uses.
CS Concepts Explain
Computer
As given in Panel 1 on Page 6
● Present the scenario: Consider you are listening to music online.
● Discuss:
■ What do we use to shop online on a device?
Possible Responses: Apps, Internet
■ How do you search for a particular song?
Possible Responses: By typing the name of the song or using mic
■ Where will you see the song you searched for?
Possible Responses: Screen, Monitor
■ Name an app you can use to listen to music online.
Possible Responses: Gaana, Spotify, Youtube, Amazon Music, Jio Saavan
● Conduct Fill Up section at page 14:
● Say: Conji is confused and needs our help to answer the questions below.
● Read Fill Up – Q1, 3 and 4 aloud, one by one.
10 min
● Invite some students to share their answers and others to validate their peers’ answers.
● Instruct: Fill in the answers in your books.
● Conduct DIY – Fill Up section at page 17:
■ Say: Let’s practise more to revise what we have learned.
■ Read Fill Up – Q1 and 2 aloud, one by one from Across.
■ Invite some students to share their responses.
■ Discuss and validate the answers with the whole class.
■ Instruct: Fill in the answers in your books.
● Conclude: Today, we learned about computers and their uses.
● Ask the following probing questions:
■ What can you do using the Internet on a computer?
Possible Responses: Play games, Shopping, Listen to music
■ When can you use a computer mouse?
Possible Responses: When Playing games, Drawing on MS Paint, Opening a file or application
2. Advantages of a Computer
In this session, students will learn about –
● Advantages of a Computer
● Calculations: Solving maths problems
● Automation: Making machines run by a computer
● Storage: Space to store information online or on computer
● Presentation: Presenting information with images and videos
Revise the story Recall the uses of a computer
● Recap the story covered in the previous session.
● Recall the uses of computers.
Fill Up – Q2 Find the Truth – Q1 Tick the Correct Answer –
Conclude the concepts Homework
● Say: Let me explain the advantages of computers.
Advantages of Computers (Calculation and Speed, Automation, Storage, Teaching and Learning, Presentation)
As given on Page 8 and in Panel 1 of Page 9
● Present the scenario: Consider that you are going on a drive in a car with your family.
● Discuss:
■ What part of the car do you think is running on its own or by pressing buttons?
Possible Responses: Lights, Wipers, etc.
■ How do you listen to songs in the car?
Possible Responses: By using the radio or stereo
■ Do you think the radio is also running because of the computer?
Possible Responses: Yes or No
● Conduct the sections on Page 14:
■ Say: Let’s help Mel and Conji answer some questions.
■ Read Fill Up - Q2 and Find the Truth-Q1 aloud, one by one.
■ Invite some students to share responses.
■ Discuss and validate the answers with the whole class.
■ Instruct: Write the answers in your books.
● Conduct Tick the Correct Answer section on Page 16:
■ Read Q2 aloud.
■ Invite some students to share responses.
■ Discuss and validate the answers with the whole class.
■ Instruct: Write the answers in your books.
● Conduct DIY – Fun Time section on Page 18:
■ Say: Name two mediums of transport you can book tickets for on a computer.
■ Invite some students to share responses.
■ Discuss and validate the answers with the whole class.
■ Instruct: Write the answers in your books.
● If time permits, instruct students to colour the image, or give the task as homework.
● Conclude: Today, we learned about the advantages of computers.
● Ask the following probing questions:
■ Name an advantage of computers.
Possible Responses: Automation, Study, Presentation, etc.
■ Name a machine.
Possible Responses: Washing machine, AC, Car, etc.
● Assign the following from DIY as homework:
■ Fun Time (Colouring Only) - Page 18
In this session, students will learn about –
● Disadvantages of a Computer
● Computer Virus: Makes a computer stop working properly
● Cybercrime: Stealing of data from computers
Revise the story
Recall the advantages of a computer
Read the story aloud
Discuss disadvantages of a computer Find the TruthQ4, 5 Tick the Correct - Q3 Answer in One WordQ1,
Conclude the concepts
● Recap the story covered in the previous session.
● Recall the advantages of computers.
● Read aloud the story in panel 2 on page 9.
● Say: Let me explain about the disadvantages of computers.
Disadvantages of a Computer (Impact on the Environment, Impact on Health, Computer Virus, Cybercrime)
As shown in panel 3, 4 on page 9 and panel 1, 2 on page 10 Read aloud the words “computer virus” and “cybercrime”. Instruct students to repeat these words after you.
● Present the scenario: Consider you are taking online classes on your computer.
● Discuss:
■ What should you do to take care of your health?
Possible Responses: Take breaks, Go for a walk, Stretch for 5 minutes, take screen-off time
■ What will happen to the computer when it has been used for a long time?
Possible Responses: Slow down, Stop working, Shutdown, Hang
■ What should you do if someone asks for your private information online?
Possible Responses: I will not give, Inform my parents or guardian, etc.
● Conduct Find the Truth section on Page 14:
■ Say: Let’s help Conji identify whether the statements given are true or not.
■ Read aloud Q4, 5 one by one.
min
■ Invite some students to share their answers and others to validate their peers’ answers.
■ Instruct: Write answers in your books.
● Conduct Tick the Correct Answer section on Page 16:
■ Say: Let’s help Conji tick the correct answer.
■ Read aloud Q3.
■ Invite some students to share their responses.
■ Discuss and validate the answers with the whole class.
■ Instruct: Tick the answers in your books.
● Conduct Answer in One Word section on Page 16:
■ Say: Let’s practise more questions.
■ Read Q1, 4 aloud, one by one.
■ Invite some students to share their responses.
■ Discuss and validate the answers with the whole class.
■ Instruct: Write answers in your books.
● If time permits, instruct students to attempt DIY: Fill Up Q1, 3, or take them in next session.
● Conclude: Today, we learned about the disadvantages of computers.
● Ask the following probing questions:
■ Name a disadvantage of computers.
Possible Responses: Pollution, health issues, etc.
■ Where do you see people using computers around you?
Possible Responses: At Home, School, Pharmacy, Malls
In this session, students will learn about –
● IPO (Input, Process and Output) Cycle
● IPO Cycle: A cycle describing how a computer works
● Input: Letters, numbers, symbols we enter using a mouse or keyboard
● Process: Applying operations on the input given to get a final result
● Output: The final result we see on the monitor or printed on paper
Revise the story Read the Story aloud Recall the disadvantages of computer
Discuss the IPO of a Computer Fill Up – 5 Find the Truth – 2, 3 Tick the Correct Answer – 1, 4
● Recap the story covered in the previous session.
● Recall the disadvantages of computers.
● Read aloud the story from panel 3 of page 10 to panel 1 of page 11.
● Say: Let me explain about the IPO cycle of a computer.
IPO Cycle of a Computer
As given in panel 2 on page 11
Input As given in panel 4 on page 11
Process As given in panel 1 on page 12
Output As given in panel 1 on page 12
● Say: To better understand the IPO cycle of a computer, let us take an example of our body. (Refer to the example given on page 12 panel 4.)
● Present the scenario: Consider you are calculating something on a calculator.
● Discuss:
■ What will be your input in the calculator?
Possible Responses: Numbers, Digits, Operation + - =
■ What will the calculator do with the given input?
Possible Responses: Process, Addition, Subtraction, Division, Multiplication, Solving the given maths expression/problem
Explanation: The calculator will process the input by applying the given operation to the given input such as addition, multiplication, subtraction or division.
■ What will be the output?
Possible Responses: Result of the calculation, Solution, Answer
■ Where will you see the output after calculation?
Possible Responses: Calculator screen, Answer Bar, Calculator Display Say: Correct! But, we call it Calculator Display.
● Conduct Fill Up section on Page 14:
■ Say: Let’s help Conji answer Q5.
■ Read aloud Q5.
■ Invite some students to share their answers and others to validate their peers’ answers.
■ Instruct: Fill in the final answer in your books.
● Conduct Find the Truth section on Page 14:
■ Say: Let’s help Conji identify if the statements given are true or false.
■ Read aloud Q2 and 3 one by one.
■ Invite some students to share their answers and others to validate their peer answers.
■ Instruct: Write final answers in your books.
● Conduct Tick the Correct Answer section on Page 16:
■ Say: Let’s practise some more questions.
■ Read Q 1 and 4 aloud.
■ Invite some students to share their responses.
■ Discuss and validate the answers with the whole class.
■ Instruct: Tick the final answers in your books.
● If time permits, instruct students to attempt Answer in One Word Q3 on Page 16 and DIY: Fill Up –Q4 on Page 17, or take them in next session.
● Conclude: Today, we learned about the IPO cycle of a Computer.
● Ask the following probing questions:
■ Name a machine that you think follows an IPO cycle.
Possible Responses: Microwave, ATM, Washing Machine, etc.
■ What makes these machines process the given input?
Possible Responses: CPU
In this session, students will recall –
● Computer and it’s IPO (Input, Process and Output) Cycle
Keywords
● Computer: An electronic device that makes our life easy
● IPO Cycle: A cycle describing how a computer works
● Input: Letters, numbers, symbols we enter using the mouse or keyboard
● Process: Applying operations on the input given to get a final result
● Output: The final result we see on the monitor or printed on paper
● Help students recall about computers and their IPO cycle.
● Invite students to give some examples of the IPO cycle from their daily lives.
● Present the following scenarios:
■ Scenario 1: Consider you want to sharpen your pencil.
■ Scenario 2: Consider you want to make orange juice.
● Discuss:
■ What will be input, process and output in the above cases?
Possible Responses:
Scenario 1
Input: Pencil
Process: Sharpening
Output: Pencil waste
● Conduct Match Me section on Page 15:
Scenario 2
Input: Oranges
Process: Squeezing the fruits
Output: Juice
■ Say: Let’s help Conji match the words with the given images.
■ Read the words one by one.
■ Invite some students to share their answers and others to validate their peers’ answers.
■ Instruct: Draw lines from the words to the correct images in your books.
● If any of the additional activity mentioned in earlier session is left unattempted, guide and instruct students to complete them.
● Additional Questions given in earlier sessions:
■ Answer in One Word Q3 on Page 16
■ DIY: Fill Up Q1, 3, 4 on Page 17
● Conclude: Today, we recalled computers and their IPO cycle.
● Ask the following probing questions:
■ Identify the IPO cycle of a plant.
Possible Responses:
Input: Seed, Soil, Water, Sunlight
Process: Photosynthesis
Output: Leaves, Flower, Fruit
■ Identify the IPO cycle of Paining.
Possible Responses:
Input: Pencil, Colours, Scale, Brush, Paper
Process: Sketching, Drawing, Colouring
Output: Painting
Note: Use the following points to prepare for the session beforehand. Avoid reading the points in the class.
● Conji remembered how magic and science had saved Avora.
● Mel tricked Conji with a magical trick.
● Conji advised her to be cautious when using her magical powers.
● Mel was eagerly awaiting their upcoming journey.
● She questioned Conji about computers in the meantime.
● Young wizard Eva becomes friends with Mel and Conji.
● They all three visit the new sci-fi lab in Avora.
● Eva is astounded to see so many computers and gadgets.
● Conji begins by explaining each device to Eva.
The content covered in this chapter is aligned with the following CSTA Standard
● 1A-CS-02 Computing Systems
This chapter is divided into the following classroom sessions
1. Types of Computers
2. Operating a Computer - Part I
3. Operating a Computer - Part II
In this session, students will learn about –
● Different types of computing devices
Keywords
● Desktop: A computer kept on a desk that has different parts such as mouse, keyboard, CPU, speaker, and printer
● Laptop: A small computer that fits on our lap and runs on a battery
● Tablet and Smartphone: Small, flat computers that do not have a keyboard
WEBS at a Glance
Recap the story
Read the story that will be covered in this session aloud
Discuss Desktop, Laptop, Tablet, and Smartphone
Fill Up – Q1, 2, 3, 5 Tick the correct Answer – Q1, 2,
Conclude the concepts Assign homework
● Recap the story covered in the previous chapter.
● Read the story aloud from page 20 to 23 up to the text, “I can try”
● Say: Let me explain the types of computers.
CS Concepts Explain
Desktop
Laptop
Tablets and Smartphones
As given in Panel 4 on Page 23
As given in Panel 3 on Page 24
As given in Panel 2 on Page 25
● Present the scenario: Consider you are in a computer gadgets shop with your father and the shop has desktops, laptops, and tablets.
● Discuss:
■ You want your father to buy a laptop for you. How will you help him choose a laptop over a desktop for you?
Possible Responses: I’ll explain to him why a laptop is preferable to a desktop. A laptop is smaller than a desktop computer. Unlike a laptop, which has a keyboard and mouse built in, a desktop has a separate keyboard and mouse. A desktop computer can be put on a desk and isn’t meant to be carried around like a laptop.
■ What actions will you take to work on a tablet?
Possible Responses: Touch; Tap; Swipe; Scroll; etc.
■ What actions does your father do to unlock his smartphone?
Possible Responses: Type; Press; Tap; Swipe; Scroll; etc.
■ What part of a laptop do you use to point to an item on the screen?
Possible Responses: Touchpad; Mouse.
● Conduct Fill Up on Page 32:
■ Say: Help Eva and Conji fill in the blanks.
■ Read Q1, 2, 3 and 5 aloud, one by one.
10 min
■ Invite some students to share their answers and others to validate their peers’ answers.
■ Instruct: Fill in the final answers in your books.
● Conduct Tick the Correct Answer on Page 34:
■ Say: Let’s practise some more to revise what we have learned.
■ Read Q1 and 2 aloud, one by one.
■ Invite some students to share their responses.
■ Discuss and validate the answers with the whole class.
■ Instruct: Tick the correct answers in your books.
● If time permits, discuss the section DIY Activity - Fun Time, or assign it as homework.
● Conclude: Today, we learned about the different types of computers.
● Ask the following probing questions:
■ When do you think people would prefer to use tablets instead of laptops or desktops?
Possible Responses: Listening to music; Playing games, Reading books; Watching movies; etc.
■ Can we use a tablet as a smartphone?
Possible Responses: Yes; No; Maybe; Some tablets can be used; etc.
● Assign the following from DIY Activity as homework:
■ Fun Time
In this session, students will learn about –
● The steps to switch on a computer
● What a UPS is
Keywords
● UPS: Uninterruptible Power Supply helps a computer work even when the main power supply is turned off
Warm-Up Engage Build Sum-Up
Recap the story
Read the story aloud to be covered in this session
Discuss the steps to switch on a computer, UPS
Fill Up – Q4 Find the Truth - Q1, 4, 5 Answer in One Line – Q1, 2,
Conclude the concepts Assign homework
● Recap the story covered in the previous session.
● Read the story from panel 3 page 25 to panel 1 page 26 up to the text “Oh yes, of course!” aloud.
● Say: Let me explain how to switch on a computer.
CS Concepts Explain
Step 1
Step 2
Step 3
Step 4
UPS
As given in Panel 2 on Page 26
As given in Panel 2 on Page 26
As given in Panel 2 on Page 27
As given in Panel 3 on Page 27
As given in Panel 1 on Page 27
● Present the scenario: Consider your younger brother or sister is having difficulty switching on the computer.
● Discuss:
■ What will you tell them if they press the CPU power supply button first?
Possible Responses: The computer won’t start; You need to follow the steps in the correct order; First, switch on the main power supply, then the UPS and finally the CPU; etc.
■ They switch on all the power supply buttons, but the computer still doesn’t start. What could be the issue?
Possible Responses: The computer is not connected to the power supply; there is no electricity; some of the wires may be loose; etc.
● Conduct Fill-Up on Page 32:
■ Say: Help Eva and Conji fill in the blanks.
■ Read Q4 aloud.
■ Invite some students to share their answers and others to validate their peers’ answers.
■ Instruct: Fill in the final answer in your books.
● Conduct Find the Truth on Page 32:
■ Say: Let’s practise some more to revise what we have learned.
■ Read Q1, 4, and 5 aloud, one by one. Ask the students if the sentences are true or false.
■ Invite some students to share responses.
■ Discuss and validate the answers with the whole class.
■ Instruct: Write the final answers in your books.
● Conduct Answer in One Line on Page 34:
■ Say: Let’s help Conji and Eva answer the questions in one line.
■ Read Q1 and 2 aloud, one by one.
■ Invite some students to share their answers and others to validate their peers’ answers.
■ Instruct: Write the final answers in your books.
Note
● If time permits, discuss Match Me, or assign it as homework.
● Conclude: Today, we learned how to switch on a computer and what a UPS is.
● Ask the following probing questions:
■ How much time does the UPS work for when the main power supply goes off?
Possible Responses: 5 minutes, 10 minutes, 30 minutes, 1 hour, 2 hours, etc.
● Assign the following from Brain Teasers as homework:
■ Match Me
In this session, students will learn about –
● What the desktop on a computer is
● Icons
● How to resize a window
● What the taskbar is
● How to shut down a computer
Keywords
● Desktop: The first screen we see on switching a computer on
● Icons: Small images of files or applications
● Resizing a window: Changing the size of a window
● Taskbar: The thin bar at the bottom of the desktop
● Recap the story covered in the previous session.
● Read the story on page 28 up to the text, “You should tell Eva …. buttons!” aloud
● Say: Let me explain what a desktop, icons, and taskbar are, how to resize a window, and how to shut down a computer.
Desktop
Icons
Resizing a window
Minimise button
Maximise button
CS Concepts Explain
As given in Panel 1 on Page 28
As given in Panel 2 on Page 28
As given in Panel 1 on Page 29
As given in Panel 1 on Page 29
As given in Panel 1 on Page 29
Restore down button
Close button
Taskbar
How to shut down a computer
As given in Panel 1 on Page 29
As given in Panel 2 on Page 29
As given in Panel 1 on Page 29
As given in Panel 2 on Page 30
● Present the scenario: Consider your friend is using the computer in your home.
● Discuss:
■ She is not able to see some apps she opened. What could be the reason?
Possible Responses: The apps were closed; the apps got minimised; the app is not working; etc.
● After she finishes, your friend switches off the main power supply first. What will you say to her?
Possible Responses: This will damage the computer; Always switch off the CPU first; etc.
● Conduct Find the Truth on Page 32:
■ Say: Help Mel mark the given statements as true or false.
■ Read Q2 and 3 aloud.
■ Invite some students to share their answers and others to validate their peers’ answers.
■ Instruct: Write the final answers in your books.
● Conduct Tick the Correct Answer on Page 34:
■ Say: Let’s practise some more to revise what we have learned.
■ Read Q3, 4, and 5 aloud, one by one.
■ Invite some students to share their responses.
■ Discuss and validate the answers with the whole class.
■ Instruct: Tick the correct answers in your books.
● If time permits, discuss DIY - Fill Up, or assign it in the homework.
● Conclude: Today, we learned:
■ What the desktop on a computer is,
■ Icons, taskbar,
■ How to resize a window, and
■ How to shut down a computer.
● Ask the following probing questions:
■ What icons are there on the desktop of your computer?
Possible Responses: Recycle Bin, files, folders, Google Chrome, etc.
■ How can you make out the difference between the minimise, maximise, restore down, and close buttons?
Possible Responses: minimise button is a thin line, maximise button is a square, restore down button is two squares one behind the other, close button is a cross, etc.
● Assign the following as homework:
■ DIY: Fill Up
Note: Use the following points to prepare for the session beforehand. Avoid reading the points in the class.
● Young wizard Eva became friends with Mel and Conji.
● They all three visited the new sci-fi lab in Avora.
● Eva was astounded to see so many computers and gadgets.
● Conji explained each device to Eva.
● Conji learned how to switch the computer on and off.
● Lord Ero visits Elder Robot.
● He threatens to hurt Mel and Conji.
● He tells Elder Robot that he has laid traps for the kids and then flies away.
● Meanwhile, in the lab, Mel accidentally sets a CPU on fire.
● Mel and Conji learn about computer generations and the components of a CPU.
The content covered in this chapter is aligned with the following CSTA Standard
● 1A-CS–02 Computing Systems
This chapter is divided into the following classroom sessions
1. Parts of the Computer
2. Components of the CPU: Part 1
3. Components of the CPU: Part 2
In this session, students will learn about –
● Generations of Computers
● Parts of a Computer
● Generation: Time intervals in which computers have evolved over time
● Monitor: Screen of a computer, which looks like a TV
● Keyboard: Device which contains various keys to input numbers, letters, and symbols to the computers
● CPU: Central Processing Unit, which is basically the brain of a computer
Revise the story and CS concepts covered in the previous session
Read the story aloud
computer generations and parts of the computers
● Recap the story covered in the previous chapter.
● Read the story aloud from Panel 1 on Page 38 to Panel 8 on Page 39 up to the text, “..known as instructions” .
● Say: Let me explain the Generations and Parts of the Computer.
● Present the scenario: You are in a computer museum which has multiple generations of computers.
● Discuss:
■ What changed with each generation of computers?
Possible Responses: Smaller in size; Smarter
■ What can be the possible uses of arrow keys while playing games?
Possible Responses: Move players; Move Vehicles; Position Players.
■ You have to move through a list of games on the screen, how will you do that?
Possible Responses: Mouse scroll wheel; Arrow Keys.
■ What is the purpose of a mouse in a computer system?
Possible Responses: Pointing; Selecting; Clicking.
Note
● If time allows, discuss all four questions, or discuss the first two.
● Conduct Fill Up on Page 47:
■ Say: Help Elder Wizard fill in the blanks.
■ Read Q1, 2, 3, 4 and 5 aloud, one by one.
■ Invite some students to share their answers and others to validate their peers’ answers.
■ Instruct: Fill in the final answers in your books.
Note
● If time permits, discuss the section Find the Truth – Q3, 4, 5 or assign as homework.
● Conclude: Today, we learned about the Different Generations and Parts of Computers.
● Ask the following probing questions:
■ Which mathematical problems do you think a computer can do?
Possible Responses: Addition; Subtraction; Multiplication; Division.
■ What are some parts of computers that you know?
Possible Responses: Mouse; Keyboard; Monitor; CPU; Printer; Scanner etc.
● Assign the following as homework:
■ Find the Truth - Q3, 4, 5
In this session, students will learn about –
● Parts of the CPU
● Memory, Input and Output Units
Keywords
● Memory: Keeps the information and data until you want to delete them
● Input Unit: Part of CPU which accepts the instructions for the computer
● Output Unit: Part of CPU which displays the results after processing
Revise the story and CS concepts covered in the previous session
Read the story aloud
Discuss parts of CPU and their usages
Answer in One Line - Q1, 3, 5 Tick the Correct Answer - Q1, 3
Conclude the concepts Assign homework
● Recap the story covered in the previous session.
● Read the story aloud from Panel 1 on Page 42 to Panel 2 on Page 43 up to the image, “Input... Output” .
● Say: Let me explain the different parts of the CPU.
Memory
Input Unit
Output Unit
As given in Panel 2 on Page 42
As given in Panel 1 on Page 43
As given in Panel 1 on Page 43
● Present the scenario: Consider you are playing a handheld video game in your home with your friends.
● Discuss:
■ What inputs can you use while playing the video game?
Possible Responses: Clicking buttons; Rotating game sticks.
■ How many input devices can you see around you?
Possible Responses: Remote for TV; Keyboard; Mouse; Microphones.
■ Which devices in your surroundings have memory?
Possible Responses: Smart TV; Smartphones; Computers.
■ Name the output units you can see in your surroundings.
Possible Responses: Monitor; Calculator screen; Phone Screen; Printer. Note
● If time allows, discuss all four questions, or discuss the first two.
● Conduct Answer in One Line on Page 48:
■ Say: Help Eva answer the given questions.
■ Read Q1, 3, and 5 aloud, one by one.
■ Invite some students to share their answers and others to validate their peers’ answers.
■ Instruct: Fill in the final answers in your books.
● Conduct Tick the Correct Answer on Page 49:
■ Say: Help Mel select the correct answer.
■ Read Q1 and 3 aloud, one by one.
■ Invite some students to share their responses.
■ Discuss and validate the answers with the whole class.
■ Instruct: Tick the correct options in your books.
Note
● If time permits, discuss the Match Me – Q1, 2, 5 or continue it in next session.
● Conclude: Today, we learned about the different parts of the CPU.
● Ask the following probing questions:
■ What are the various types of memory we use in computers?
Possible Responses: Temporary; Permanent.
■ How do we provide inputs to computers in our daily lives?
Possible Responses: Mouse; Keyboard; Scanner.
● Assign the following as homework:
■ DIY Activity – Fill Up
Objectives
In this session, students will learn about –
● Control Unit
● Arithmetic and Logic Unit (ALU)
Keywords
● Control Unit: Part of the CPU which receives instructions and converts them into signals
● Arithmetic Logic Unit: Part of the CPU which performs mathematical and logical operations
Revise the story and CS concepts covered in the previous session
Read the story aloud
usages
● Recap the story covered in the previous session.
● Read the story aloud from Panel 3 on Page 43 to Panel 4 on Page 45 up to the text, “...tired already” .
● Say: Let me explain the Control unit and ALU.
CS Concepts
Control Unit
ALU
As given in Panel 1 on Page 44
As given in Panel 1 on Page 44
● Present the scenario: Consider you are at a fun fair with your parents, where you can pay and play games. If you win, you get a soft toy.
● Discuss:
■ Can you relate this situation to input, processing and output that we have learnt?
Possible Responses: Yes; No; Maybe
■ What are the possible inputs to start playing the game?
Possible Responses: Money; Currency; Coins
■ What is processing in this scenario?
Possible Responses: Playing games; Setting up the games.
■ What are the possible outcomes in this scenario?
Possible Responses: Winning; losing
● If time allows, discuss all four questions, or discuss the first two.
● Conduct Find the Truth on Page 47:
■ Say: Help the three friends mark the statements as true or false.
■ Read Q1 and Q2 aloud, one by one.
■ Invite some students to share their answers and others to validate their peers’ answers.
■ Instruct: Tick the correct answers in your books.
● Conduct Match Me on Page 48:
■ Say: Help Conji match the parts of the computer with their correct usage.
■ Read Q1, 2, 3, 4, 5 and options on the right, one by one.
■ Invite some students to share their responses.
■ Discuss and validate the answers with the whole class.
■ Instruct: Match the correct answers in your books.
● Conduct Answer in One Line on Page 48:
■ Say: Help Eva answer the given questions.
■ Read Q2 and 5 aloud, one by one.
■ Invite some students to share their answers and others to validate their peers’ answers.
■ Instruct: Fill in the final answers in your books.
● If time permits, discuss the section Tick the correct answer – Q2, 4 and 5 or assign them as homework.
● Conclude: Today, we learned about the different parts of the CPU.
● Ask the following probing questions:
■ Which part of the CPU is used to do mathematical calculations?
Possible Responses: Arithmetic Unit; ALU; Logical Unit.
■ If you were a computer, which body organs do you think would be called input devices?
Possible Responses: Eyes; Mouth; Ears.
● Assign the following as homework:
■ Tick the Correct Answer - Q2, 4 and 5.
■ DIY Activity - Fun Time
Note: Use the following points to prepare for the session beforehand. Avoid reading the points in the class.
● Lord Ero visited Elder Robot.
● He threatened to hurt Mel and Conji.
● He told Elder Robot that he had laid traps for the kids and then flew away.
● Meanwhile, Mel accidentally set a CPU on fire in the lab.
● Mel and Conji learned about computer generations and the components of a CPU.
● Mel and Conji enjoy lunch while discussing Paint and folders.
● Eva overhears them, and asks for their help to create a folder of her own.
● The friends discuss files and folders.
● They learn how to create, rename and delete folders.
● They also learn how to search, copy and paste files in a folder.
The content covered in this chapter is aligned with the following CSTA Standard
● 1A-CS–02 Computing Systems
This chapter is divided into the following classroom sessions
1. Files and Folders
2. Create and Rename Folders
3. Delete and Search
4. Copy and Paste
5. Working with Files and Folders
Objectives
In this session, students will learn about –
● Files
● Folders
Keywords
● Files: Digital copies of paper documents
● Folders: Store and organise files
Revise the story and CS concepts covered in the previous session Read the story aloud
● Recap the story covered in the previous chapter.
● Read the story aloud from Panel 1 on Page 54 to Panel 4 on Page 55 up to the text, “...information in it.”
● Say: Let me explain about files & folders.
CS Concepts
Files
Folders
As given in Panel 1 and 2 on Page 55
As given in Panel 3 on Page 55
● Present the scenario: You visit the school office where you can see multiple files and folders kept on shelves.
● Discuss:
■ What could these folders contain?
Possible Responses: Student files; Teacher files; School events files.
■ What can be there in the student files?
Possible Responses: Attendance; Marks; Sports events records; Student information.
■ Should we keep student files and teachers files in the same folders?
Possible Responses: Yes; No; Maybe.
■ How many files can one store in a folder?
Possible Responses: One; Two; Many; Any number.
● If time allows, discuss all four questions, or discuss the first two.
● Conduct Fill in the blanks on Page 56:
■ Say: Fill in the blanks with the correct word.
■ Read Q1, 2, and 3 aloud, one by one.
■ Invite some students to share their answers and others to validate their peers’ answers.
■ Instruct: Fill the final answer in your books.
● Conduct Fill Up on Page 63:
■ Say: Help Eva fill in the blanks.
■ Read Q1, 2, 3 and 5 aloud, one by one.
■ Invite some students to share their responses.
■ Discuss and validate the answers with the whole class.
■ Instruct: Fill in the final answers in your books.
● If time permits, discuss the sections Find the Truth – Q1, Answer in One Line – Q1 and DIY Activity – Fill Up – Q5 or assign it as homework.
● Conclude: Today, we learned about files and folders in computers.
● Ask the following probing questions:
■ What are the possible things you can store in a file?
Possible Responses: Marksheets; Medical records; School Projects; Photos.
■ What are the possible uses of folders in computers?
Possible Responses: Saving files; Storing files; Organising files.
● Assign the following as homework:
■ DIY Activity (Fill Up) – Q5
■ DIY Activity (Fun Time)
In this session, students will learn about –
● Creating folders
● Renaming folders
Keywords
● Creating Folders: Adding new folders in computers
● New Option: Is used to create a new folder
● Renaming Folders: Setting a new name for existing folders
Revise the story and CS concepts covered in the previous session
Read the story aloud
Discuss creation
● Recap the story covered in the previous session.
● Read the story aloud from Panel 2 on Page 56 to Panel 1 on Page 57 up to the text, “...name of the folder.”
● Say: Let me explain about files and folders.
Create
New
Rename
As given in Panel 3 on Page 56
As given in Panel 3 on Page 56
As given in Panel 1 on Page 57
● Present the scenario: You visit the school office, where there are some new students being admitted to the school. There are many physical files used in this process.
● Discuss:
■ What new things must be created for a new student?
Possible Responses: Records; Files; Folders; ID card.
■ Should the people working in the office place the new student’s file in another student’s folder?
Possible Responses: Yes; No; Maybe.
■ What new record files of a new student must be created?
Possible Responses: Student record; Attendance File.
■ While creating a new file for a student, the office staff puts another student’s name on the file by mistake, how can they correct it?
Possible Responses: Replace; Rename; Edit.
● If time allows, discuss all four questions, or discuss the first two.
● Conduct Fill Up on Page 63:
■ Say: Help Eva fill in the blanks.
■ Read Q4 aloud, one by one.
■ Invite some students to share their answers and others to validate their peers’ answers.
■ Instruct: Fill in the final answers in your books.
● Conduct Find the Truth on Page 63:
■ Say: Help Conji and Eva decide whether the given statements are true or false.
■ Read Q2, 3, 4, 5 aloud, one by one.
■ Invite some students to share their responses.
■ Discuss and validate the answers with the whole class.
■ Instruct: Fill in the final answers in your books.
● If time permits, discuss the sections Mark the Correct Answer – Q2 and DIY Activity (Fill Up) – Q2, 3, 4 or assign it as homework.
● Conclude: Today, we learned about creating and renaming folders on computers.
● Ask the following probing questions:
■ What are the possible cases when you need to rename a folder?
Possible Responses: Mistake; Wrong Name; Name Update; Organising folders.
■ How many times can you rename a folder?
Possible Responses: Once; Twice; Many; Unlimited.
● Assign the following as homework:
■ DIY Activity (Fill Up) – Q2, 3, 4
Objectives
In this session, students will learn about –
● Deleting files or folders
● Searching for files
Keywords
● Recycle Bin: Place to dump files and folders
● Search Box: Feature to find files on a computer
Revise the story and CS concepts covered in the previous session
Read the story aloud
● Recap the story covered in the previous sessions.
● Read the story aloud from Panel 2 on Page 57 to Panel 3 on Page 58 up to Eva’s dialogue, “...so useful.”
● Say: Let me explain deleting and searching.
CS Concepts Explain
Delete
Recycle Bin
Search Box
As given in Panel 6 on Page 57
As given in Panel 4 on Page 57
As given in Panel 3 on Page 58
● Present the scenario: Suppose you are leaving a hotel room in which you were staying during your vacation.
● Discuss:
■ Now that you are leaving the hotel, what should the hotel manager do with your current file on the computer?
Possible Responses: Delete; Remove; Discard.
■ Suppose your record is not currently on the screen, what should be done to open it?
Possible Responses: Search; Find; Get.
■ Suppose your file was in printed form. After removing it, where would it go?
Possible Responses: Recycle Bin; Dustbin; Trash can.
■ How will the hotel staff delete a computer file that is no longer needed?
Possible Responses: Drag it to the recycle bin; Click on file and delete.
● If time allows, discuss all four questions, or discuss the first two.
● Conduct Mark the Correct Answer on Page 65:
■ Say: Mark the correct answer to the following questions.
■ Read Q1, 3, and 4 aloud, one by one.
■ Invite some students to share their answers and others to validate their peers’ answers.
■ Instruct: Mark the correct options in your books.
● Conduct Answer in One Line on Page 65:
■ Say: Help Conji write a one-line answer for these questions.
■ Read Q2 and 4 aloud, one by one.
■ Invite some students to share their responses.
■ Discuss and validate the answers with the whole class.
■ Instruct: Fill in the final answers in your books.
● If time permits, discuss the sections Answer in One Line – Q2 and DIY Activity (Fill Up) – Q1 or assign it as homework.
● Conclude: Today, we learned about deleting and searching for files and folders in computers.
● Ask the following probing questions:
■ When do we need to delete a file?
Possible Responses: When it is created by mistake; When it is no longer needed; To free up space.
■ What do we use to search for a file on the computer?
Possible Responses: Search box; Search Bar.
● Assign the following as homework:
■ DIY Activity (Fill Up) – Q1
In this session, students will learn about –
● Copying files and folders
● Pasting files and folders
Keywords
● Copy: Duplicating a file or a folder
● Paste: Putting a duplicated file or folder in a place
● Resize: Changing the size
Revise the story and CS concepts covered in the previous session
Read the story aloud
Discuss copying and pasting of files and resizing of a folder window
Match me – Q1, 2, 3, 4 Answer in One Line - Q3
Conclude the concepts Assign homework
● Recap the story covered in the previous sessions.
● Read the story aloud from Panel 3 on Page 58 from “...You can also” to Panel 6 on Page 59 up to “..check it out.”
● Say: Let me explain Delete and Search.
CS Concepts
Copy
Paste
Resize
As given in Panel 3 on Page 58
As given in Panel 3 on Page 58
As given in Panel 1 on Page 59
● Present the scenario: Suppose a surprise test is going to happen and the teacher has only one question paper.
● Discuss:
■ What can be done with the question paper, so that each student can get one paper?
Possible Responses: Copy; Xerox; Duplicate; Scan.
■ How many times can the same question paper be copied for all the students?
Possible Responses: Once; Twice; Many; Unlimited.
■ Suppose the font size on the question paper is too big. What can be done to correct it?
Possible Responses: Make it small; Resize; Reduce.
■ If we have fewer sheets of paper than the number of students, should we increase the font size?
Possible Responses: Yes; No; Maybe.
● If time allows, discuss all four questions, or discuss the first two.
● Conduct Match Me on Page 64:
■ Say: Help Eva match the following.
■ Read Q1, 2, 3, and 4 aloud, one by one.
10 min
■ Invite some students to share their answers and others to validate their peers’ answers.
■ Instruct: Match the final answers in your books.
● Conduct Answer in One Line on Page 65:
■ Say: Help Conji answer the following question in one line.
■ Read Q3 aloud.
■ Invite some students to share their responses.
■ Discuss and validate the answers with the whole class.
■ Instruct: Fill the correct answer in your books.
● If time permits, discuss the section Mark the Correct Answer – Q5 or assign it as homework.
● Conclude: Today, we learned about copying, pasting and resizing in computers.
● Ask the following probing questions:
■ What are the possible cases when you need to copy a file?
Possible Responses: Creating duplicates; Saving as backup; Storing in 2 locations.
■ How many times can you copy the same file?
Possible Responses: Once; Twice; Unlimited.
● Assign the following as homework:
■ Mark the Correct Answer – Q5
5 min
In this session, students will apply the learnings from the previous sessions to make a file and a folder as well as edit that file on their computers.
● Files: Digital copies of paper documents
● Folders: Store and organise files
● Creating Folders: Adding new folders in computers
● New Option: Feature to create a new folder
● Renaming Folders: Setting a new name for existing folders
● Say: Do you remember what we learned in the previous session?
● Invite responses from some students.
● Say: Let’s revise what we have learned.
● Instruct: Go to the Panel and open Lab on Working with Files and Folders.
● Show slides one by one and discuss the concepts shown on the slide on the panel.
● Say: Let me explain how to create and work with files and folders.
CS Concepts Demonstrate
Create Explain practically using Panel 3 on Page 56
New
Explain practically using 3 on Page 56
Rename Explain practically using Panel 1 on Page 57
● Discuss the following questions one by one to check students’ understanding:
■ You have to categorise things in your house using folders, what folders you can make?
Possible Responses: Toys; Furniture; Food.
■ How many folders can you create on a computer?
Possible Responses: 5; 10; 20; Many
■ A folder can contain only 10 files?
Possible Responses: Yes; No; Maybe.
■ Can two files in a folder can have the same exact name?
Possible Responses: Yes; No; Maybe.
● Invite answers from as many students as possible.
● Address if students have any other doubts related to the concepts presented in the slides.
● Instruct: We know how create and work with files and folders.
15 min
● Now, let’s practice our learning. Click on the Practice button on the Assignment page to attempt the activity.
● Go to the desktop on your computer, and create a folder using the new folder option.
● Rename the folder as per your class name and the section name.
● Complete the process by pressing the enter key.
● Open the folder by double-clicking on it.
● Create a text file using the new file option.
● Rename the folder as per your class name and the section name.
● Complete the process by pressing the enter key.
● Open the file by double-clicking on it.
● Type information in the file, and after you are done editing, save it using File →Save
Note
● Make the students practice the activity till the concepts covered in the session.
● Walk around in the classroom and observe the activity done by the students.
● Instruct: Submit you file by dragging it to submit box on the tekie platform or browse and select your file.
Note
● If time permits, conduct similar activity to strengthen the concepts.
Sum-Up
● Conclude: Today, we have learned how to practically work with files and folders.
● Instruct: We should practice the same activity at home.
● Assign the following as homework:
Note
5 min
■ Project: Make a folder with your family details file in rename the folder as “Family” and file as “Family file”.
● The project is optional, kindly assign as per feasibility.
Note: Use the following points to prepare for the session beforehand. Avoid reading the points in the class.
● Mel and Conji enjoyed their lunch while discussing Paint and folders.
● Eva overheard them and asked for their help to create a folder of her own.
● The friends discussed files and folders.
● They learned how to create, rename and delete folders.
● They also learned how to search, copy and paste files in a folder.
● Mel, Conji, and Eva are talking about Lord Ero.
● Mel tells them that Ero does not want robots to learn magic.
● Mel also tells them that Ero has laid traps for the three of them.
● Eva recalls a story about a monster who wanted to destroy Avora.
● She also hints about a secret weapon that was used to trap the monster.
The content covered in this chapter is aligned with the following CSTA Standard
● 1A-CS–02 Computing Systems
This chapter is divided into the following classroom and lab sessions
1. MS Paint: Introduction and Tools
2. Your First Drawing
3. Saving and Printing
4. Using Save and Print
5. Basic Drawing Tools
In this session, students will learn about –
● Introduction to MS Paint
● Tools in MS Paint
Keywords
● MS Paint: A drawing application
● Tools: Are used to perform tasks
● Eraser: Is used to erase mistakes and make changes
● Shapes: Is used to create shapes
● Fill Tool: Is used to add colour to shapes
Revise the story and CS concepts covered in the previous session
Read the story aloud
● Recap the story covered in the previous chapter.
● Read the story aloud from Panel 1 on Page 70 to Panel 2 on Page 73 up to the text, “..recreate Avora.”
Warm-Up 10 min
Engage
● Say: Let me explain about MS Paint and some of its tools.
CS Concepts
MS Paint
Pencil
Eraser
Fill tool
Brushes
Shapes
As given in Panel 2 on Page 72
As given in Panel 1 on Page 74
As given in Panel 1 on Page 74
As given in Panel 1 on Page 74
As given in Panel 1 on Page 74
As given in Panel 1 on Page 74
● Present the scenario: You visit a painter’s gallery, where you can see multiple paintings, colours, stencils (cut-outs) and sketches.
● Discuss:
■ What tools will the painter use to make the paintings?
Possible Responses: Brush; Colours; Canvas; Paper; Pencils.
■ What types of stencils may there be with the painter?
Possible Responses: Shapes; Letters; Symbols.
■ What will the painter do after creating a painting using a pencil and shapes only?
Possible Responses: Paint; Fill Colour.
■ Should the painter paint on the same painting multiple times?
Possible Responses: Yes; No; Maybe. Note
If time allows, discuss all four questions, or discuss the first two.
● Conduct Fill Up on Page 81:
■ Say: Help Eva fill in the blanks with the correct words.
■ Read Q1, 3, 4 and 5 aloud, one by one.
■ Invite some students to share their answers and others to validate their peers’ answers.
■ Instruct: Fill in the final answer in your books.
● Conduct Find the Truth on Page 81:
■ Say: Help Conji and Eva decide whether the following statements are true or false.
■ Read Q1, 2, 3 aloud, one by one.
■ Invite some students to share their responses.
■ Discuss and validate the answers with the whole class.
■ Instruct: Tick the final answers in your books.
● Conduct Answer in One Line on Page 81:
■ Say: Help Conji and Eva decide whether the following statements are true or false.
■ Read Q4 aloud, one by one.
■ Invite some students to share their responses.
■ Discuss and validate the answers with the whole class.
■ Instruct: Write the final answers in your books.
If time permits, discuss the sections Tick the Correct Answer – Q1, 4, Find the Truth – Q4 or assign them as homework.
min
● Conclude: Today, we learned about MS Paint and its tools.
● Ask the following probing questions:
■ What does a painter have that is similar to the paint screen when we open a new Paint file?
Possible Responses: Paper; Sheet; Canvas.
■ What can an eraser tool be used for?
Possible Responses: Remove Mistakes; Remove extra lines.
● Assign the following as homework:
■ Tick the Correct Answer – Q1, 4
■ Find the Truth – Q4
■ DIY Activity (Add Colours)
In this session, students will apply what they have learned from the previous session to draw a flower in MS Paint using shapes, eraser and fill tool only
● MS Paint: A drawing application
● Tools: Are used to perform tasks
● Pencil Tool: Is used to draw freehand lines
● Eraser: Is used to erase mistakes and make changes
● Shapes: Is used to create shapes
● Fill Tool: Is used to add colour to shapes
● Say: Do you remember what we learned in the previous session?
● Invite responses from some students.
● Say: Let’s revise what we have learned.
● Instruct: Go to the Panel and open Lab on Starting with Paint – II
● Show slides one by one and discuss the concepts shown on the slide on the panel.
● Discuss the following questions one by one to check students’ understanding:
■ Which shapes will you need to make drawings in Paint?
Possible Responses: Circle; Oval; Square
■ Colours make our drawings______.
Possible Responses: Beautiful; Complete; Vibrant
■ Which colour might you use to make a drawing of your house?
Possible Responses: Black; Blue; Brown; Pink
■ What can you make on the MS Paint application?
Possible Responses: House; Scenery; Flowers
● Invite answers from as many students as possible.
● Address if students have any other doubts related to the concepts presented in the slides.
● Instruct: We know how to open MS Paint and use its tools.
● Now, let’s practise our learning. Click on the Practice button on the Assignment page to attempt the activity.
● Open MS Paint on your computer.
● Walk around in the classroom and observe the activity done by the students.
● Instruct: Click on File->Save to save your work when you are done with the activity.
● Find the location of the saved file and drag and drop the file in the panel.
● Conclude: Today, we have learned how to use Shapes, Fill, and Eraser tools.
● Instruct: We should practise the same activity at home.
● Assign the following as homework:
■ Project: Make a drawing of your house using the tools you learned today.
The project is optional, kindly assign as is feasible.
Objectives
In this session, students will learn about –
● Saving Paint files
● Printing Paint files
Keywords
● Save Option: Helps keep the file for later use
● Print Option: Provides a hard copy on a piece of paper
Revise the story and CS concepts covered in the previous session
Read the story aloud
Discuss how to save and print files in MS Paint
● Recap the story covered in the previous sessions.
● Read the story aloud from Panel 1 on Page 76 to Panel 3 on Page 77 up to the text, “..Absolutely”
● Say: Let me explain about save and print.
CS Concepts
Save
As given in Panel 1 and 2 on Page 77
Print As given in Panel 1 and 2 on Page 78
● Present the scenario: You are in your computer lab and you have made a beautiful scenery in MS Paint.
● Discuss:
■ Suppose you want to save your drawing. Where will you find the save option?
Possible Responses: File; Menu; File Option
■ What can you name the file before saving?
Possible Responses: Drawing; Scenery; Anything.
■ You want to show the drawing to your parents. How can you do that?
Possible Responses: Print; Printout.
■ Which colour would you use for filling the sky?
Possible Responses: Blue; Sky blue; Light blue.
If time allows, discuss all four questions, or discuss the first two.
● Conduct Fill Up on Page 81:
■ Say: Help Eva fill in the blanks.
■ Read Q2 aloud.
■ Invite some students to share their responses.
■ Discuss and validate the answers with the whole class.
■ Instruct: Fill in the final answers in your books.
● Conduct Find the Truth on Page 81:
■ Say: Help Conji and Eva decide whether the following statements are true or false.
■ Read Q5 aloud.
■ Invite some students to share their answers and others to validate their peers’ answers.
■ Instruct: Tick the final answers in your books.
● Conduct Answer in One Line on Page 83:
■ Say: Help Conji and Eva decide whether the following statements are true or false.
■ Read Q1, 2, 3, 5 aloud, one by one.
■ Invite some students to share their answers and others to validate their peers’ answers.
■ Instruct: Write the final answers in your books.
If time permits, discuss the sections Tick the Correct Answer – Q2, 3, 5 or assign it as homework.
● Conclude: Today, we learned about saving and printing in MS Paint.
● Ask the following probing questions:
■ What operations can be performed after you have created a drawing or painting in MS Paint?
Possible Responses: Rename; Save; Print
■ What are the final result/s of printing?
Possible Responses: Printed painting; Hard copy of painting.
● Assign the following as homework:
■ Tick the Correct Answer – Q2, 3, 5
■ DIY Activity – Fill Up – Q1, 2
In this session, students will apply what they have learned from the previous class to complete tasks on MS Paint.
● Brush Tool: Used to paint drawings and paintings
● Pencil Tool: Used to draw freehand lines
● Say: Do you remember what we learned in the previous session?
● Invite responses from some students.
● Say: Let’s revise what we have learned.
● Instruct: Go to the Panel and open Lab on Drawing Tools in Paint – II.
● Show slides one by one and discuss the concepts shown on the slide in the panel.
● Discuss the following questions onebyone to check students’ understanding:
■ What can you draw using pencil in MS Word?
Possible Responses: Drawing; Freehand drawing.
■ Why do we use the Brush tool?
Possible Responses: To Paint shapes and pictures
■ Suppose you have made stars with the sun by mistake, how will you remove them?
Possible Responses: Eraser Tool; Eraser
■ Can we save and print any drawing we make in MS Paint?
Possible Responses: Yes; No; Maybe.
● Invite answers from as many students as possible.
● Address if students have any other doubts related to the concepts presented in the slides.
Build
● Instruct: We know how to use shapes, fill, pencil, brush etc. in MS Paint.

15 min
● Now, let’s practise our learning. Click on the Practice button on the Assignment page to attempt the activity.
● Open MS Paint application, and use shapes, pencil, brush etc. to make a picture of a cupcake.
● Walk around in the classroom and observe the activity done by the students.
● Instruct: Click on File->Save to save your work when you are done with the activity.
● Find the location of the saved file and drag and drop the file in the panel.
Sum-Up
5 min
● Conclude: Today, we have learned how to use shapes, pencil, brush and fill to draw a cupcake.
● Instruct: We should practise the same activity at home.
● Assign the following as homework:
■ Project: Draw a picture of a Christmas tree with the things you have learned and practised today.
Note
● The project is optional, kindly assign as per feasibility.
In this session, students will apply the learnings from the previous classes to revise all the tools and make new drawings as well as save and print them.
● Tools: Are used to perform tasks
● Eraser: Is used to erase mistakes and make changes
● Shapes: Is used to create shapes
● Fill Tool: Is used to add colour to shapes
● Save Option: Helps keep the file for later use
● Print Option: Gives hard copy on a piece of paper
Warm-Up
● Say: Do you remember what we learned in the previous session?
● Invite responses from some students.
● Say: Let’s revise what we have learned.
● Instruct: Go to the Panel and open Lab on Basic Drawing Tools – II
● Show slides one by one and discuss the concepts shown on the slide in the panel.
Engage
● Discuss the following questions onebyone to check students’ understanding:
■ Can you name some drawing tools in MS Paint?
Possible Responses: Pencil; Brush; Eraser
■ On which tool’s drawing can the Eraser tool work?
Possible Responses: Shapes; Brush; Pencil
7 min
■ Can we use multiple tools to create a drawing in MS Paint?
Possible Responses: Yes; No; Maybe
■ Which colours can be used while using the Pencil tool?
Possible Responses: Black; Red; Yellow; Blue; Any colour.

● Invite answers from as many students as possible.
● Address if students have any other doubts related to the concepts presented in the slides.
● Instruct: We know how to use all the tools that we have discussed so far.
● Now, let’s practise what we have learned. Click on the Practice button on the Assignment page to attempt the activity.
● Click on the Attempt button to open the activity page.
● Walk around in the classroom and observe the activity done by the students.
● Instruct: Click on File->Save to save your work when you are done with the activity.
● Find the location of the saved file and drag and drop the file in the panel.
● Conduct Match Me on Page 82:
■ Say: Help Eva match tools with their use.
■ Read options on both sides aloud, one by one.
■ Invite some students to share their answers and others to validate their peers’ answers.
■ Instruct: Match the options in your books.

● Conduct one more drawing only if time permits.
● Instruct: Click on File->Save to save your work when you are done with the activity.
● Find the location of the saved file and drag and drop the file in the panel.
● Conclude: Today, we have revised and used Shapes, Pencil, Brush and Fill tools to make drawings.
● Instruct: Practise the same activity at home.
Note: Use the following points to prepare for the session beforehand. Avoid reading the points in the class.
In the Previous Chapter…
● Mel, Conji, and Eva had a discussion about Lord Ero.
● Mel told them that Ero does not want robots to learn magic.
● Mel also told them that Ero had laid traps for the two of them.
● Eva recalled a story about a monster who wanted to destroy Avora.
● She also hinted about a secret weapon that was used to trap the monster.
● Conji and Mel meet Eva on their way to school.
● Mel uses a recently learned spell to go back in time with her friends.
● In the past, Conji notices a wrong arrow on a signboard.
● They used MS Paint to fix the problem caused by the reverse spell.
The content covered in this chapter is aligned with the following CSTA Standard
● 1A-CS–02 Computing Systems
This chapter is divided into the following classroom and lab sessions
1. Shapes and Flip Tool
2. Fill Tool
3. Colour Picker and Save Formats
4. Draw a Boat
5. Draw a Train
In this session, students will learn about –
● Shapes in MS Paint
● Flip tool in MS Paint
Keywords
● Shapes: A tool used to add various shapes in MS Paint
● Flip: Changes the direction of the shapes
● Text Tool: Used to add words in MS Paint
● Horizontal: Left to right
● Vertical: Top to bottom
Recap the story and the concepts covered in the previous session
Read the story to be covered in the current session aloud
Discuss shapes, text and flip tools of MS Paint
● Say: Let’s learn more about MS Paint and tools in the new session.
● Read the story aloud from Panel 1 on Page 88 to Panel 2 on Page 95 up to Mel’s words “...and type it”.
● Say: Let me explain shapes, text and flip tools
● Present the scenario: One day in school someone changed the direction of the signboard which points towards the school’s emergency exit to its opposite side.
● Discuss:
■ You inform the school staff, and ask what they will do with the sign.
Possible Responses: Correct it; Flip it; Reverse it.
■ Another day, someone spray-painted the text on the signboard. What should be done to correct it?
Possible Responses: Repaint it; Rewrite it.
■ You are asked to design a new green colour board for the school park, which shapes can you use?
Possible Responses: Square; Circle; Arrow; Rectangle.
■ You have to make the sign more informative, what can you use?
Possible Responses: Text; Words; Text tool.
● If time allows, discuss all four questions, or discuss the first two.
● Conduct Find the Truth on Page 100:
■ Say: Help Conji mark the statements as true or false.
■ Read Q1, 4 and 5 aloud, one by one.
■ Invite some students to share their answers and others to validate their peers’ answers.
■ Instruct: Mark the final answer in your books.
● Conduct Answer in One Line on Page 102:
■ Say: Answer the following questions to help Conji escape his invisible cloak.
■ Read Q2 and 4 aloud, one by one.
■ Invite some students to share their answers.
■ Discuss and Validate their answers.
■ Instruct: Fill in the final answer in your books.
● If time permits, discuss the sections Tick the Correct Answer – Q2, 3, 5 or conduct it in next session.
● Conclude: Today, we learned about shapes, flip and text tools.
● Ask the following probing questions:
■ The sign on the first floor of a hospital shows the way to reach the 3rd floor by pointing downwards, what should be done to correct it?
Possible Responses: Flip; Turn; Vertical flip.
■ Which type of flip does sunset and sunrise resemble?
Possible Responses: Vertical flip; Horizontal flip.
● Assign the following as homework:
■ Fill Up – Q1
In this session, students will learn about –
● Fill Tool
● Color Palette
Keywords
● Fill: The tool used for adding colours to shapes
● Color Palette: Space from where we can pick basic colours
● Edit Colours: The process of making your own colour
Recap the story and the concepts covered in the previous session
Read the story to be covered in the current session aloud
● Say: Let’s now continue with a new session and recall CS concepts as well.
● Read the story aloud from Panel 1 on Page 96
● Say: Let me explain the Fill Tool and Colour Palette.
CS Concept Explain
Fill Tool
Color Palette
Edit Colours
As given in Panel 1 on Page 96
As given in Panel 1 on Page 96
As given in Panel 1 on Page 96
● Present the scenario: You visit an amusement park with your parents one day.
● Discuss:
■ You see a white warning signboard with black letters only. Which colour can you fill in that in MS Paint?
Possible Responses: Red; Green; Yellow.
■ There are many small structures like traffic lights in the amusement park. With which colours will they be filled?
Possible Responses: Red; Yellow; Green
■ You have to make a drawing of a water park inside the amusement park. What tool will you use to show water?
Possible Responses: Fill Tool; Color Palette.
■ You want to use a unique colour for buildings in the amusement park. What can be done to use them?
Possible Responses: Edit Colours; Make Colour; Choose Colour.
● If time allows, discuss all four questions, or discuss the first two.
● Conduct Fill Up on Page 100:
■ Say: Help Eva to fill in the blanks.
■ Read Q2 and 3 aloud, one by one.
■ Invite some students to share their answers and others to validate their peers’ answers.
■ Instruct: Fill in the final answer in your books.
● Conduct Tick the Correct Answer on Page 101:
■ Say: Help Eva select the correct answer to find Conji.
■ Read Q1 aloud.
■ Invite some students to share their answers and others to validate their peers’ answers.
■ Instruct: Tick the final answer in your books.
● Conclude: Today, we learned about Fill and Color Palette Tools.
● Ask the following probing questions:
■ Color palette can have colours.
Possible Responses: 2; 5; 10; Many.
■ You cannot find the colour for your drawing in the Color palette, what would you do?
Possible Responses: Edit; Make; Design.
● Assign the following as homework:
■ DIY Activity (Fun Time)
Objectives
In this session, students will learn about –
● Color Picker
● Save Formats
Keywords
● Color Picker: Selects any colour on the screen
● Save Formats: File types in which MS Paint files can be saved
● Say: Let’s start a new session and recall CS concepts as well.
● Read the story aloud from Panel 2 on Page 96 to Panel 4 on Page 98 up to Conji’s words “...of Mel’s spell!”
● Say: Let me explain Color picker and file formats in MS Paint.
Color Picker
Save as
PNG
JPEG
Bitmap
GIF
CS Concept Explain
As given in Panel 3 on Page 96
As given in Panel 3 on Page 97
As given in Panel 3 on Page 97
As given in Panel 3 on Page 97
As given in Panel 3 on Page 97
As given in Panel 3 on Page 97
● Present the scenario: You and your friend are working on a drawing on your computer in MS Paint.
● Discuss:
■ You find a colour used by your friend very pretty, how can you use that colour yourself?
Possible Responses: Pick; Select; Choose.
■ Which tool or tools can you use to select colours?
Possible Responses: Color Palette; Color Picker.
■ Can you use the picked colour using the fill tool?
Possible Responses: Yes; No; Maybe.
■ Which colours do you think you can pick using the color picker?
Possible Responses: Red; Green; Blue; Any.
● If time allows, discuss all four questions, or discuss the first two.
● Conduct Fill Up on Page 100:
■ Say: Help Eva to fill in the blanks.
■ Read Q4 and 5 aloud, one by one.
■ Invite some students to share their answers and others to validate their peers’ answers.
■ Instruct: Fill in the final answer in your books.
● Conduct Match Me on Page 102:
■ Say: Help Mel and Eva to Match the following and save Conji.
■ Read options on both sides aloud, one by one.
■ Invite some students to share their answers and others to validate their peers’ answers.
■ Instruct: Match the final combinations in your books.
● If time permits, discuss the section Tick the Correct Answer – Q4 or assign it as homework.
● Conclude: Today, we learned about color picker and file formats in MS Paint.
● Ask the following probing questions:
■ Can the color picker tool pick colours from anywhere on the computer?
Possible Responses: No; Yes; Maybe.
■ What are possible formats in which we can save our MS Paint files?
Possible Responses: JPEG; PNG; GIF; Bitmap.
● Assign the following as homework:
■ Find the Truth – Q2 and 3
■ Tick the Correct Answer – Q4
In this session, students will apply what they have learned from the previous sessions to draw a boat in MS Paint.
● Shapes: A tool used to add various shapes in MS Paint
● Fill: The tool used for adding colours to shapes
● Color Palette: Space from where we can pick basic colours
● Color Picker: Selects any colour on the screen
● Say: Do you remember what we learned in the previous session?
● Invite responses from some students.
● Say: Let’s revise what we have learned.
● Instruct: Go to the Panel and open Lab on Go boating
● Show slides one by one and discuss the concepts shown on the slide in the panel.
● Say: Let me explain the things we have learned so far.
Pick Colours Tools Menu → Color Picker
Save As File Menu → Save as
● Discuss the following questions one by one to check students’ understanding:
■ Which are possible ways in which flip tools can be used?
Possible Responses: Horizontal Flip; Vertical Flip.
■ Which shapes can Fill color be used to colour?
Possible Responses: Square, Rectangle; Oval; Any.
■ Name a few tools present in the tool menu.
Possible Responses: Fill; Text; Color Picker.
■ Is there only one format in which we can save our files?
Possible Responses: Yes; No; Maybe.
● Invite answers from as many students as possible.
● Address any other doubts that students may have related to the concepts presented in the slides.
● Instruct: We know how to use advanced tools in MS paint.
● Now, let’s practise our learning. Click on the Practice button on the Assignment page to attempt the activity.
● Use the line tool to draw the base of the boat and colour it brown using the fill tool.
● Use the triangle shape to draw the orange part.
● Use the brushes tool with different sizes to draw the waves in the ocean.
● Make the students practise the activity until they understand the concepts covered in the session.
● Walk around in the classroom and observe the activity done by the students.
● Instruct: Save your file in JPEG format and either drag the file to the submission box or browse the file using the browse menu on the Tekie platform.
● Conclude: Today, we have learned how to use advanced tools in MS paint to make a boat.

● Instruct: Practise the same activity at home.
● Assign the following as homework:
■ Project: Draw a bus using the advanced tools in MS paint.
● The project is optional. Assign it if feasible.
In this session, students will apply what they have learned from the previous sessions to draw a train in MS Paint.
● Shapes: A tool used to add various shapes in MS Paint
● Fill: The tool used for adding colours to shapes
● Color Palette: Space from where we can pick basic colours
● Color Picker: Selects any colour on the screen
● Say: Do you remember what we learned in the previous session?
● Invite responses from some students.
● Say: Let’s revise what we have learned.
● Instruct: Go to the Panel and open Lab on Choo-Choo Train.
● Show slides one by one and discuss the concepts shown on the slide in the panel.
● Say: Let me explain the things we have learned up to now.
Flip Shapes
Tools Menu → Flip Option → Select Flip Type
A option in Tools → Click to Place Fill
Add Text
● Discuss the following questions one by one to check students’ understanding:
■ In how many ways can the flip tool be used?
Possible Responses: 1; 2; 3.
■ Which shapes will be used to make a train in MS Paint?
Possible Responses: Square, Rectangle; Circle; Any.
■ Which file format requires a background colour?
Possible Responses: JPEG; GIF; PNG.
■ Should the bed in your bedroom be flipped vertically?
Possible Responses: Yes; No; Maybe.
● Invite answers from as many students as possible.
● Address any other doubts students may have related to the concepts presented in the slides.
15 min
● Instruct: We know how to use advanced tools in MS paint.
● Now, let’s practise our learning. Click on the Practice button on the Assignment page to attempt the activity.
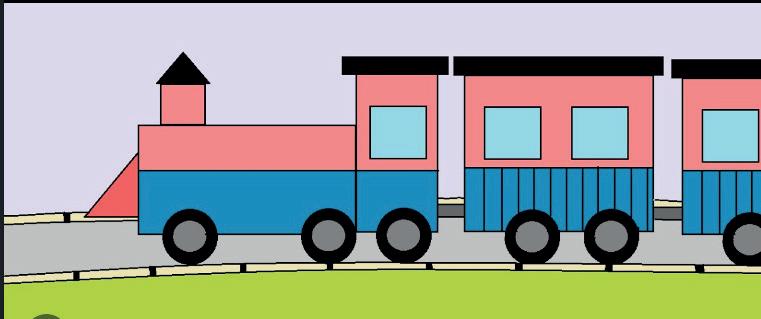
● Use rectangular shapes to make the body of the train.
● Use circles to make the wheels of the train.
● Use squares to make its windows, and use straight lines to make rails.
● Fill in the colour of the train using your favourite colours.
● Make the students practise the activity until they understand the concepts covered in the session.
● Walk around in the classroom and observe the activity done by the students.
● Instruct: Save your file in JPEG format and either drag the file to the submission box or browse the file using the browse menu on the Tekie platform.
● Conduct Answer in One Line on Page 102:
■ Say: Answer the following questions to help Conji escape his invisible cloak.
■ Read Q1 and 3 aloud, one by one.
■ Invite some students to share their answers.
■ Discuss and Validate their answers.
■ Instruct: Fill in the final answer in your books.
● Conclude: Today, we have learned how to use advanced tools in MS paint to draw a train.
● Instruct: Practise the same activity at home.
● Assign the following as homework:
■ Project: Draw Mickey Mouse using the advanced tools in MS paint.
● The project is optional. Assign it if feasible.
Note: Use the following points to prepare for the session beforehand. Avoid reading the points in the class.
● Conji and Mel were talking about spells while walking to their school when they heard Eva calling them.
● Mel used a recently learned spell to go back in time with her friends.
● In the past, Conji noticed a wrong arrow on a signboard.
● They learned to use Flip in the Paint Tools menu to correct the signboard.
● Mel and Conji meet Geebal the Goblin in the Memory Palace.
● They tell him that Lord Ero used black magic to send them there.
● They run after Geebal who wants to find a way to get them back home.
● Mel and Conji learn about Google Docs.
● They also learn how to open, edit, and share documents in Google Docs.
The content covered in this chapter is aligned with the following CSTA Standard
● 1A-DA-05 Storage
This chapter is divided into the following classroom and lab sessions
1. Introduction to Google Docs
2. Open and Create
3. Save and Share
In this session, students will learn about –
● Introduction to Google Docs
● Opening Google Docs
● Creating a new document
● Online Program: A program which runs on the internet
● Text Editor: Type of program to write and edit text
● Notepad: A text editor program
● Document: A file in Google Docs
● Sign in: The process to enter a username and password to enter a website
Revise the story and CS concepts covered in the previous session
Read the story aloud
Discuss Text editor, Notepad, Google Docs, sign-in, creating a document
Fill Up – Q1, 3 Find the Truth – Q2 Tick the Correct Answer – Q1, 2
Action Plan
● Recap the story covered in the previous chapter.
Conclude the concepts Assign homework
● Read the story aloud from Panel 1 on Page 106 to Panel 1 on Page 109 up to the text, “..open Google docs”
● Say: Let me explain the introduction and basics of Google Docs.
CS Concepts
Google Docs
As given in Panel 4 on Page 107 and Panel 1 on Page 108
Document As given in Panel 3 on Page 108
Sign-in
As given in Panel 2 on Page 109
Create As given in Panel 2 on Page 110
● Present the scenario: Suppose you visit your aunt who writes stories for children’s books.
● Discuss:
■ Which tool can she use to work with her editor who is in another place?
Possible Responses: Online text editor; Google Docs.
■ What can she do in Google Docs?
Possible Responses: Write; Edit
■ What can she call a file created in Google Docs?
Possible Responses: Document; Doc.
■ Does Google Docs save the changes automatically?
Possible Responses: Yes; No; Maybe.
If time allows, discuss all four questions, or discuss the first two.
● Conduct Fill Up on Page 116:
■ Say: Help Mel and Conji to fill in the blanks.
■ Read Q1 and 3 aloud, one by one.
■ Invite some students to share their answers and others to validate their peers’ answers.
■ Instruct: Fill in the final answer in your books.
● Conduct Find the Truth on Page 117:
■ Say: Help Geebal to mark the statements as true or false.
■ Read Q2 aloud.
■ Invite some students to share their responses.
■ Discuss and validate the answers with the whole class.
■ Instruct: Write the final answers in your books.
● Conduct Tick the Correct Answer on Page 117:
■ Say: Help Conji to select the correct answers.
■ Read Q1 and 2 aloud, one by one.
■ Invite some students to share their answers and others to validate their peers’ answers.
■ Instruct: Tick the final answers in your books.
If time permits, discuss the sections Answer in One Line – Q1 and Type me or assign it as homework.
● Conclude: Today, we learned about the introduction and basics of Google Docs.
● Ask the following probing questions:
■ What are the two ways in which a new Google Doc can be created?
Possible Responses: Blank document; Document from template.
■ Can multiple people work on the same Google Doc file at the same time?
Possible Responses: Yes; No; Maybe.
● Assign the following as homework:
■ Answer in One Line – Q1
■ DIY Activity – Q1, 2
In this session, students will apply what they have learned from the previous class to sign in, create, rename and edit documents using Google docs.
● Text Editor: Type of program to write and edit text
● Notepad: A text editor program
● Document: A file in Google Docs
● Sign in: Process to get into a user login program
● Create: To make a new document
● Rename: Set a new name for a new/existing file/folder
Discuss the topics covered in the slides Attempt
the activity on
● Say: Do you remember what we learned in the previous session?
● Invite responses from some students.
● Say: Let’s revise what we have learned.
● Instruct: Go to the Panel and open Lab on Starting with Google Docs – II
● Show the slides one by one and discuss the concepts shown on the slide in the panel.
● Say: Let me explain opening, sign in and creating documents in Google Docs.
Opening Google Docs Search Google docs in google search box
Sign in Go to sign-in page for google docs and enter your email ID and password
Create Click on the + icon for blank document or click on any template
Rename Click on the document title, and then set your desired name
● Discuss the following questions one by one to check students’ understanding:
■ A document is created about Mickey Mouse. What should be done to indicate that?
Possible Responses: Rename the document; Set a name for the document.
■ What kind of id is required to sign in to Google docs?
Possible Responses: Gmail; Google.
■ What type of new document can be created?
Possible Responses: Blank; From template
■ Which activities can be performed using Google Docs?
Possible Responses: Edit; Write; Save.
● Invite answers from as many students as possible.
● Address if students have any other doubts related to the concepts presented in the slides.
● Instruct: We know how to open, create and rename a Google Doc as well as how to edit it.
● Now, let’s practise our learning. Click on the Practice button on the Assignment page to attempt the activity.
● Search for and open Google Docs.
● Open and sign into it.
● Create a new blank document, and edit it as instructed.
Make the students practice the activity till the concepts covered in the session.
● Walk around in the classroom and observe the activity done by the students.
● Instruct: (Steps to submit the activity on the Tekie platform)
● Conduct Fill Up on Page 116:
■ Say: Help Mel and Conji to fill in the blanks.
■ Read Q4 aloud
■ Invite some students to share their answers and others to validate their peers’ answers.
■ Instruct: Fill in the final answer in your books.
● Conduct Find the Truth on Page 117:
■ Say: Help Geebal to mark the statements as true or false.
■ Read Q3, 4, and 5 aloud, one by one.
■ Invite some students to share their responses.
■ Discuss and validate the answers with the whole class.
■ Instruct: Write the final answers in your books.
● Conclude: Today, we have learned how to open, create, rename and edit Google Docs.
● Instruct: Practise the same activity at home.
● Assign the following as homework:
■ Answer in One Line – Q3, 4
■ Project: Lab time - A on Page 118
Note
● The project activity is optional. Kindly assign as feasible.
In this session, students will learn and apply saving and sharing documents using Google Docs.
● Save: To store the Google Doc for later use
● Share: To work with another person on the same document
Present the slides on Saving and Sharing in Google Docs –II on Tekie Platform
Discuss the topics covered in the slides
Attempt the activity on the Assignment page
Conclude the concepts Assign homework
● Say: Do you remember what we learned in the previous session?
● Invite responses from some students.
● Say: Let’s revise what we have learned.
● Instruct: Go to the Panel and open Lab on Saving and Sharing in Google Docs – II.
● Show slides one by one and discuss the concepts shown on the slide on the panel.
● Say: Let me explain Saving and Sharing in Google docs.
Save Google docs saves the documents as the user types and updates the document Share Click on the Share button and provide a valid email address
● Discuss the following questions one by one to check students’ understanding:
■ A document is used to save a student’s details. What can its name be?
Possible Responses: Student details; Student record.
■ How are documents saved in Google Docs?
Possible Responses: Periodically; Automatically.
■ What are the steps to share documents in Google Docs?
Possible Responses: Share button; Email Id; Done.
■ With whom can the student records in the school be shared?
Possible Responses: Teachers; Principal; Parents; Office staff.
● Invite answers from as many students as possible.
● Address if students have any other doubts related to the concepts presented in the slides.
● Instruct: We know saving and sharing documents in Google Doc.
● Now, let’s practise our learning.
● Click on the Practice button on the Assignment page to attempt the activity.
● Now, let’s practise our learning.
● Search and open Google Docs.
● Open and sign in.
● Create a new blank document, and edit as instructed.
● Click on the Practice button on the Assignment page to attempt the activity.
Make the students practise the activity until all the concepts covered in the session have been covered.
● Walk around in the classroom and observe the activity done by the students.
● Instruct: Share the document with your friends so that they can read your story.
● Conduct Fill Up on Page 116:
■ Say: Help Mel and Conji to fill in the blanks.
■ Read Q2 and 5 aloud, one by one.
■ Invite some students to share their answers and others to validate their peers’ answers.
■ Instruct: Fill in the final answers in your books.
● If time permits, conduct Answer in One Line on Page 118:
■ Say: Help Mel to answer the following questions in one line.
■ Read Q2 and 5 aloud, one by one.
■ Invite some students to share their responses.
■ Discuss and validate the answers with the whole class.
■ Instruct: Write the final answers in your books.
● Conclude: Today, we have learned saving and sharing Google docs.
● Instruct: Practise the same activity at home.
● Assign the following as homework:
■ Project: Lab time – B
■ Tick the Correct Answer – Q3, 4
● The project is optional, kindly assign as feasible.
● Match Me can be performed in a Revision Session if not in assignment.
Note: Use the following points to prepare for the session beforehand. Avoid reading the points in the class.
● Lord Ero used one of his dark spells to send Mel and Conji to Memory Palace.
● There they met Geebal, who was aware of evil Lord Ero.
● Geebal told them about Google Docs to keep track of events in Nexus.
● Mel and Conji learned how to sign in.
● Geebal guided them to learn the basics of Google Docs.
● Geebal wanted to help Mel and Conji get back to Avora.
● Mr. Time calls Geebal to ask about Mel and Conji, who are disturbing the system.
● Geebal asks Mr. Time’s help to send them back.
● Meanwhile, Mel continues to teach Conji more about Google Docs.
● Geebal returns and takes Mel and Conji to meet Mr. Time.
● Mr. Time shows Mel and Conji the spaceship that will take them back.
The content covered in this chapter is aligned with the following CSTA Standard
● 1A-AP–09 Variables
This chapter is divided into the following classroom sessions
1. Add and Delete Text
2. Copy and Paste
3. Undo and Redo
4. Correction Time
5. Visit to The Jungle Note
● Any activities that cannot be completed within the time allotted for these sessions can be discussed in the revision classes later.
In this session, students will learn about –
● Adding text and spaces in Google Docs
● Adding text in a new line using Enter key
● Deleting text using Backspace or Delete key
● Cursor: The blinking vertical line in a Google Document from where we can start typing
● Spacebar: Key to put spaces between the typed words
● Enter Key: Key to start a new line or push words after the cursor to a new line
● Backspace: Key to delete words
Recap the story and the concepts covered in the previous chapter
Play the video given in the panel or Read the story to be covered in the current session aloud
Discuss adding text, using the spacebar and enter key and deleting text using backspace or delete key
● Recap the story covered in the previous chapter.
● Say: There is a new character in the chapter.
● Introduce Mr. Time to the students.
● Say: Let us start with the story in this chapter.
● Play the video given in the panel or Read the story aloud from Page 122 to Panel 1 on Page 126 up to Mel’s words “Create………. Delete the rest. ”
● Show the slides and discuss the questions given in the panel.
● Conduct Fill up on Page 131:
■ Say: Let’s help Mel and Conji Fill in the Blanks.
■ Read Q1, 2 and 3 aloud, one by one.
■ Invite some students to share their answers and others to validate their peers’ answers.
■ Instruct: Fill in the final answers in your books.
● Conduct the activity named “Colors” given in the panel or in Panel 1 on Page 126:
■ Read the activity aloud and ask students to pair up with the student next to them (e.g. student 1 and 2 are a pair or student 5 and 6 are a pair, etc.)
■ Instruct: Click on the Practice button on the Assignment page to attempt the activity.
■ Instruct: Click on the Attempt button to open the activity page.
■ Walk around in the classroom and observe the activity done by the students.
■ Assist the students if any of them are struggling.
● If time permits, conduct Answer in One Line on Page 133
■ Say: Let’s help Mel answer the questions given.
■ Read Q1, 2 and 4 aloud, one by one.
■ Discuss and validate the answers with the whole class.
■ Instruct: Fill in the final answers in your books.
● Conclude: Today, we have learned how to add text, use the enter key and delete text
● Ask students to practise the same activities at home if possible and revise the answers filled in during class.
In this session, student will learn about –
● Cutting text and pasting it in a new position
● Dragging text from one position to another
● Copying text and pasting it to create duplicates
● Cursor: The blinking vertical line in a Google Document from where we can start typing
Recap the concepts covered in the previous session
Play the video given on the panel or read the story to be covered in the current session aloud
● Say: Do you remember what we learned in the previous session?
● Invite responses from some students. Follow up with a quick Recap.
● Say: Let’s continue to read ahead.
● Play the video given in the panel or Read the story aloud from Panel 2 on Page 126 to Page 127 up to the end of the page.
● Show the slides and discuss the questions given in the panel.
● Conduct Fill up on Page 131
■ Say: Let’s help Mel and Conji fill in the blanks.
■ Read Q4 and 5 aloud, one by one.
■ Invite some students to share their answers and others to validate their peers’ answers.
■ Instruct: Fill in the final answers in your books.
● Conduct the activity given in the panel.
■ Instruct: Click on the Practice button on the Assignment page to attempt the activity.
■ Instruct: Click on the Attempt button to open the activity page.
■ Walk around in the classroom and observe the activity done by the students.
■ Assist the students if any of them are struggling.
● If time permits, conduct Match Me on Page 131
■ Say: Let’s help Mel identify some icons we’ve used on Google Docs.
■ Discuss and validate the answers with the whole class.
■ Instruct: Fill in the final answers in your books.
● Conclude: Today, we have learned how to cut, copy, paste and drag text from one position to another.
● Ask students to practise the same activities at home if possible and revise the answers filled in during class.
In this session, students will learn about –
● How the undo function works
● How the redo function works
● Cursor: The blinking vertical line in a Google Document from where we can start typing
● Undo: The tool to cancel or reverse the last command executed
● Redo: The tool to restore any actions that were previously undone using undo
Recap the story and the concepts covered in the previous session
Play the video or read the story to be covered in the current session aloud
Discuss how undo and redo work Find the Truth The activity given in the panel
Conclude the session Assign the homework
● Recap the story and the concepts covered in the previous session.
● Say: Let’s continue to read ahead.
● Play the video given in the panel or Read the story aloud from Panel 1 on Page 128 to Page 129 up to the end of the page.
● Show the slides to explain how undo and redo work.
● Discuss the questions given in the panel.
● Conduct Find the truth on Page 132:
■ Say: Let’s help the Elder Wizard mark the statements as true or false.
■ Read the questions aloud, one by one.
■ Invite some students to share their answers and others to validate their peers’ answers.
■ Instruct: Fill in the final answers in your books.
● Conduct the activity given in the panel:
■ Explain the activity to the students.
■ Instruct: Click on the Practice button on the Assignment Page to attempt the activity.
■ Instruct: Click on the Attempt button to open the activity page.
■ Walk around in the classroom and observe the activity done by the students. Assist the students if any of them are struggling.
● Conclude: Today, we have learned how to undo and redo commands in Google Docs.
● Ask students to practise the same activities at home if possible and revise the answers filled in during class.
● Assign Fun Time on Page 134 as homework.
In this session, student will learn about –
● Cutting and pasting words in a new position
● Adding spaces where necessary
● Deleting words using Spacebar or Delete key
● Cursor: The blinking vertical line in a Google Document from where we can start typing
Show the slides to recap the concepts of cut, paste, delete and add space
● Show the slides to recall the concepts of cut, paste, delete and add space.
● Discuss the questions given in the panel.
● Conduct the Lab Time as given on Page 135 in the book or in the panel:
■ Explain the activity to the students.
■ Instruct: Click on the Practice button on the Assignment page to attempt the activity.
■ Instruct: Click on the Attempt button to open the activity page.
■ Walk around in the classroom and observe the activity done by the students.
■ Assist the students if any of them are struggling.
● Conduct Tick the Correct Answer on Page 132:
■ Say: Let’s help Conji select the right option out of the ones given.
■ Read the questions aloud, one by one.
■ Invite some students to share their answers, validate and discuss.
■ Instruct: Fill in the final answers in your books.
Note
● If time permits, conduct Match Me on Page 134 or assign it as homework.
● Conclude: Today, we practised some important functions of Google Docs.
● Ask students to practise the same activities at home if possible and revise the answers filled in during class.
● Assign Match Me on Page 134 as homework.
In this session, students will learn about –
● Copy and pasting texts in the appropriate positions
● Cursor: The blinking vertical line in a Google Document from where we can start typing
Show the slides to recap the concepts of adding text, cutting, pasting and moving text
Discuss questions given in the panel Lab Time: Visit to the Jungle Answer in One Line – Q3, 5
the session
● Show the slides to recap the concepts of adding text, cutting, pasting and moving text.
● Discuss the questions given on the panel
● Conduct the activity given in the panel.
■ Explain the activity to the students.
■ Instruct: Click on the Practice button on the Assignment page to attempt the activity.
■ Instruct: Click on the Attempt button to open the activity page.
■ Walk around in the classroom and observe the activity done by the students.
■ Assist the students if any of them are struggling.
● Conduct Answer in One Line on Page 133:
■ Say: Let’s help Mel answer the questions provided.
■ Read Q3 and 5 aloud, one by one.
■ Discuss and Validate the answers.
■ Instruct: Fill in the final answers in your books.
● Conclude: Today, we practised adding text, copying, pasting and moving text in a Google Doc.
● Ask students to practise the same activities at home if possible and revise the answers filled in during class.
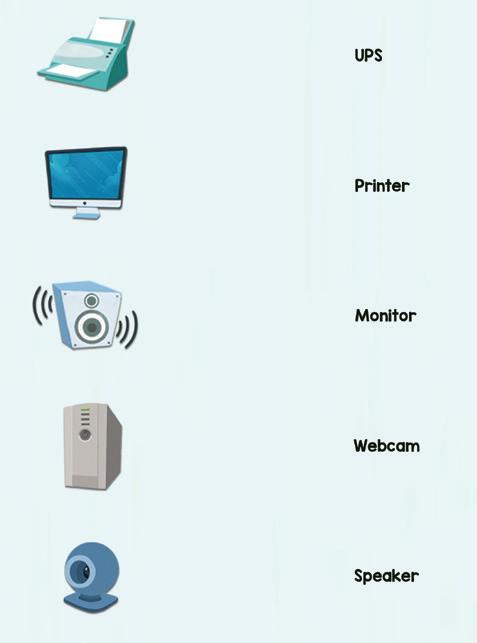
D Tick the Correct Answer
E Answer in One Line
a. A laptop is a small computer that fits on our lap and runs on a battery.
b. The first step to switch on a computer is to switch on the main power supply button.
c. We can minimise the window by clicking the minimise button on the taskbar.
d. Icon help us open any file or application on the computer.
A Fill Up
1. Helps to click
2. Helps to type
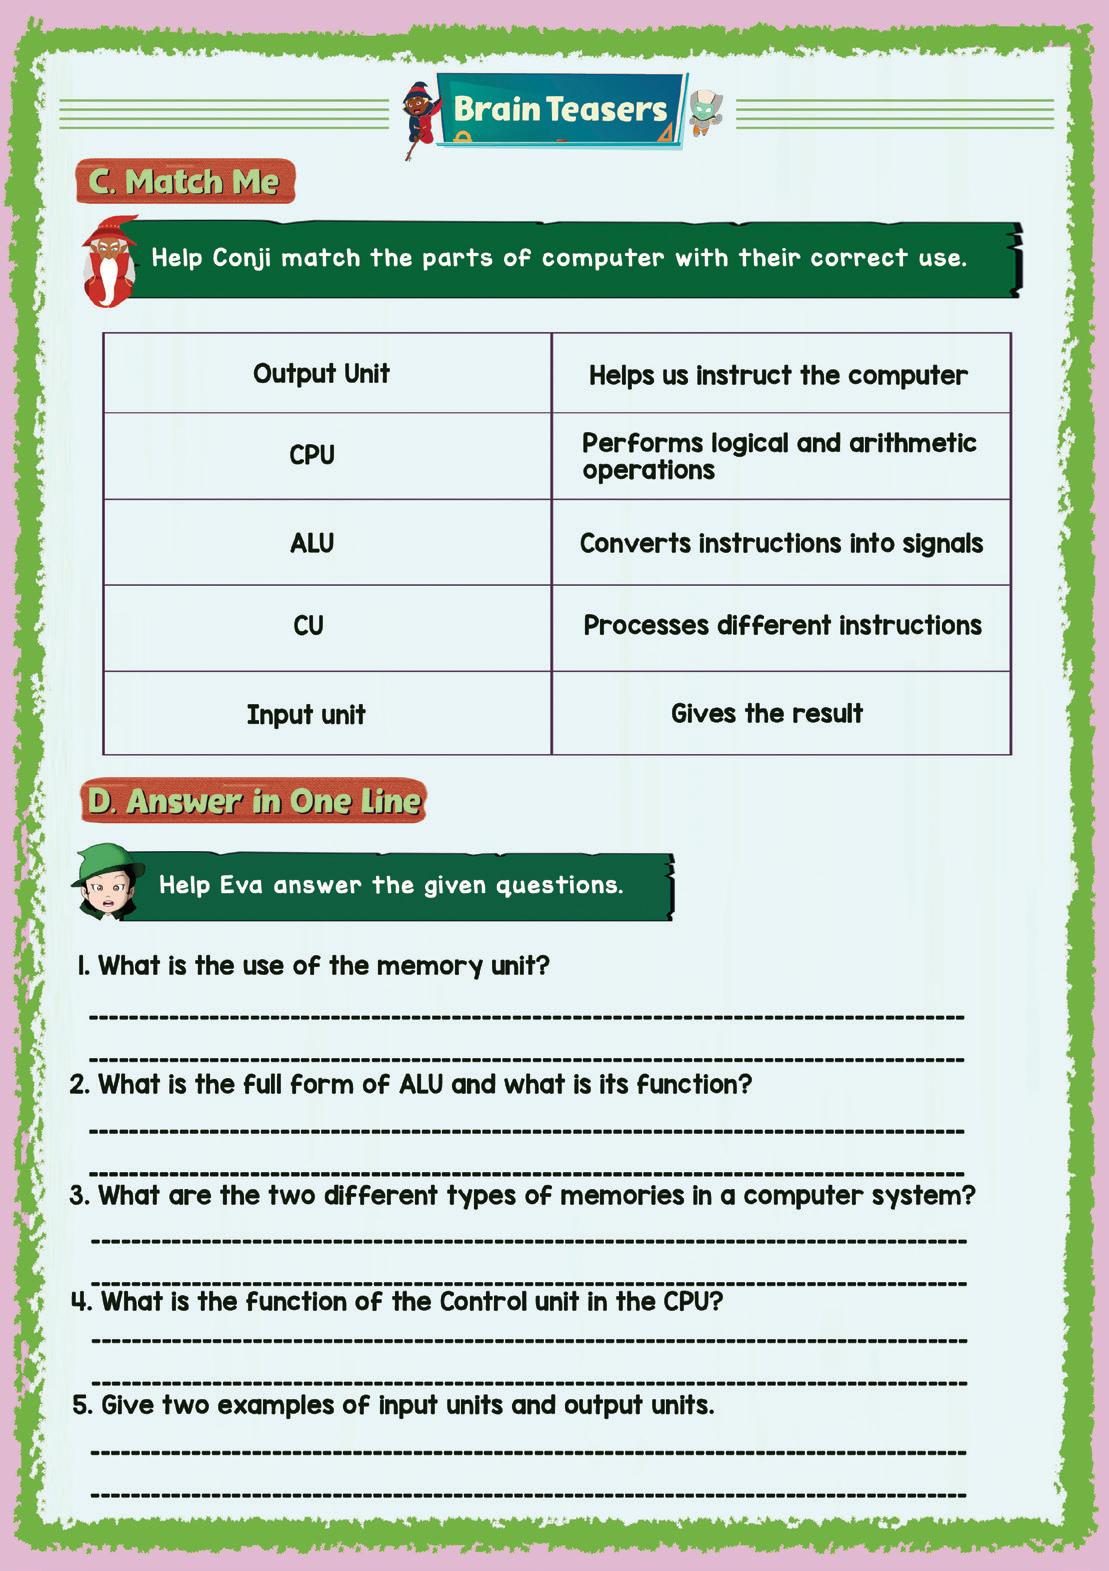
3. Helps in listening to songs
4. Prints documents
B Fun Time Down
1. Mouse
2. Storage Across
1. CPU
2. Keyboard
A Fill Up
1. Throughout its evolution, the computer has become smaller and faster
2. Keyboards have alphabetic, numeric, and special keys.
3. A mouse is used to double click and open
B Find the Truth
C Match Me
D Answer in One Line
Brain Teasers
1. Memory is used by the CPU to remember things.
2. The ALU (Arithmetic and Logic Unit) performs arithmetic and logic operations.
3. The two types of memory in computer system
E Tick the Correct Answer
B Fun Time
A Fill Up
B Find the Truth
C Match Me
Section Name
Dirty Clothes Washing Machine Clean Clothes
Mango Juice Maker Juice
Water Refrigerator Ice Cubes
1. Input Unit: Coin
2. Processing Unit: Weighing Machine
3. Output Unit: Ticket with weight printed
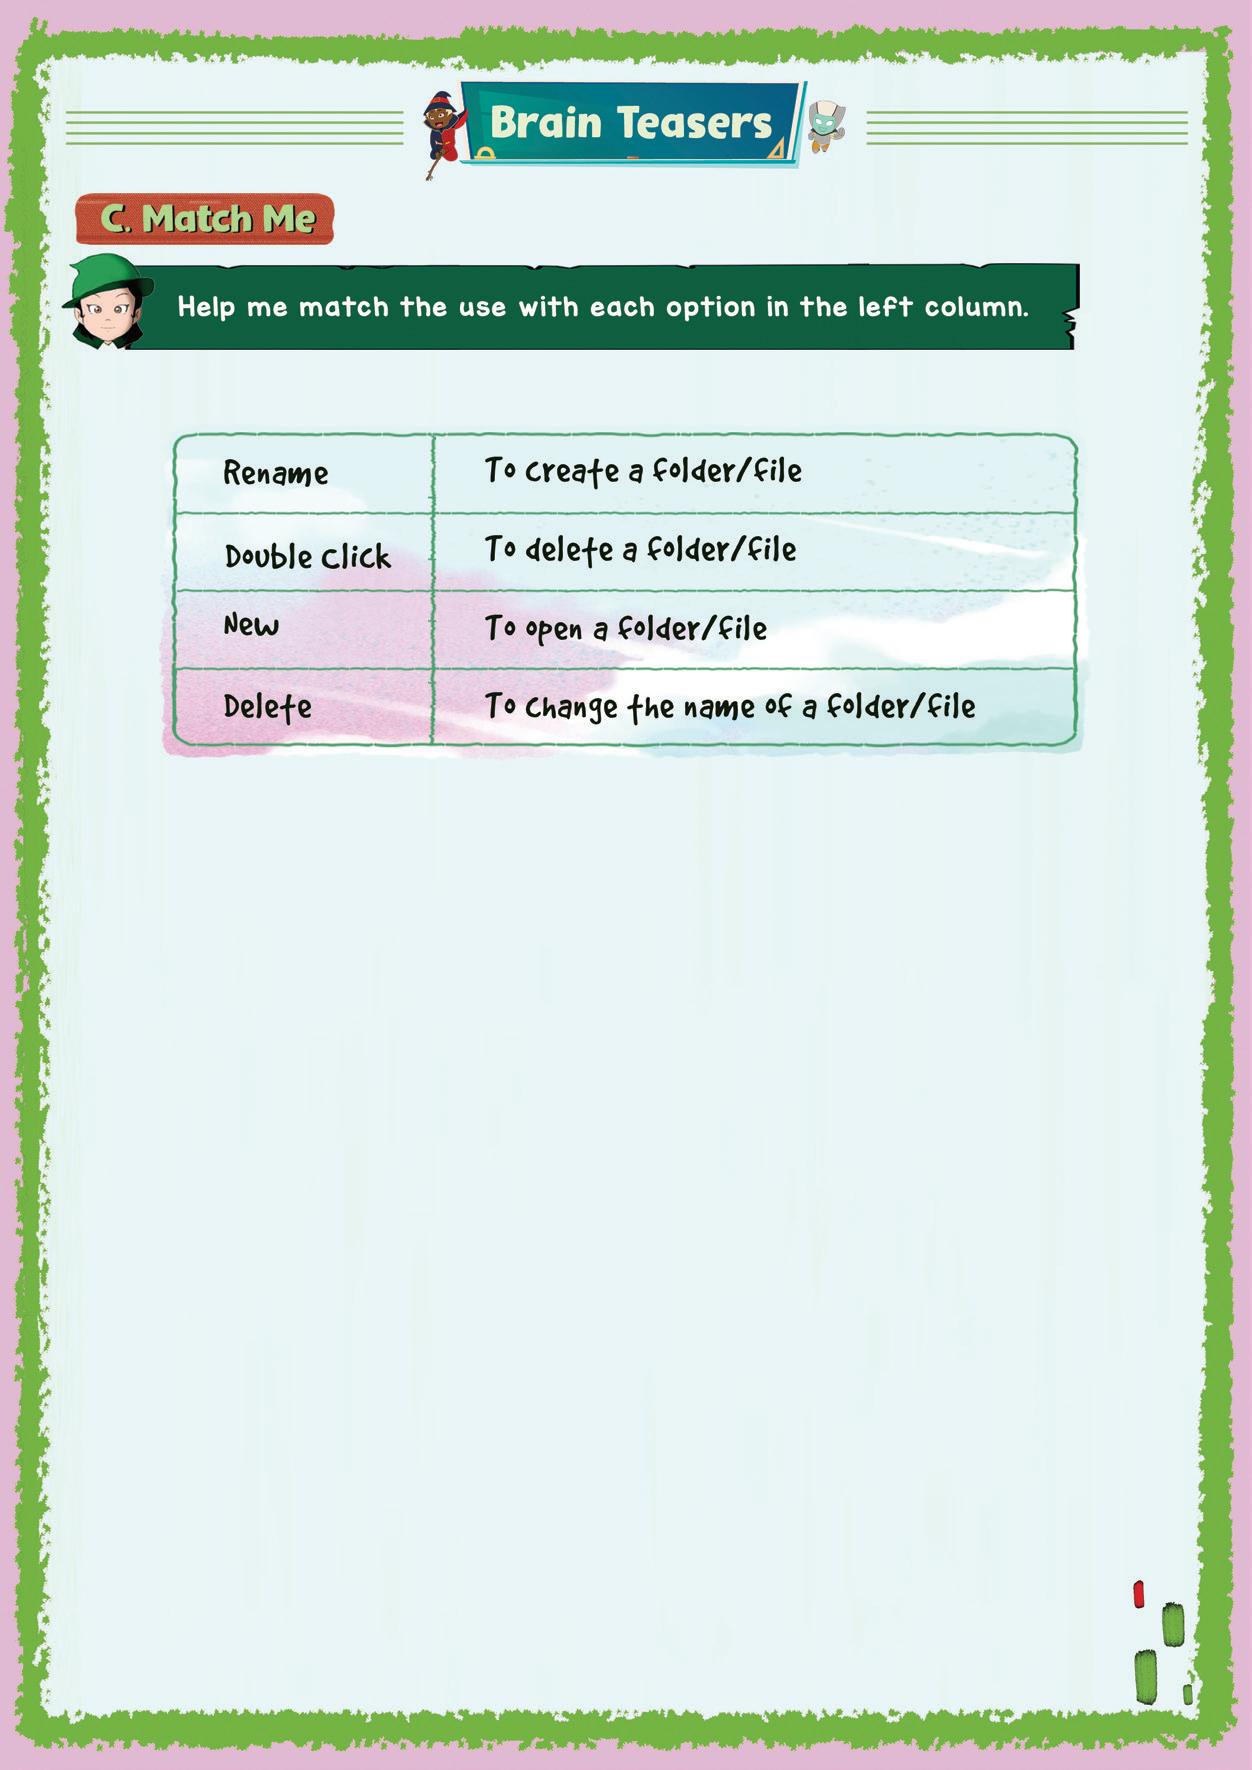
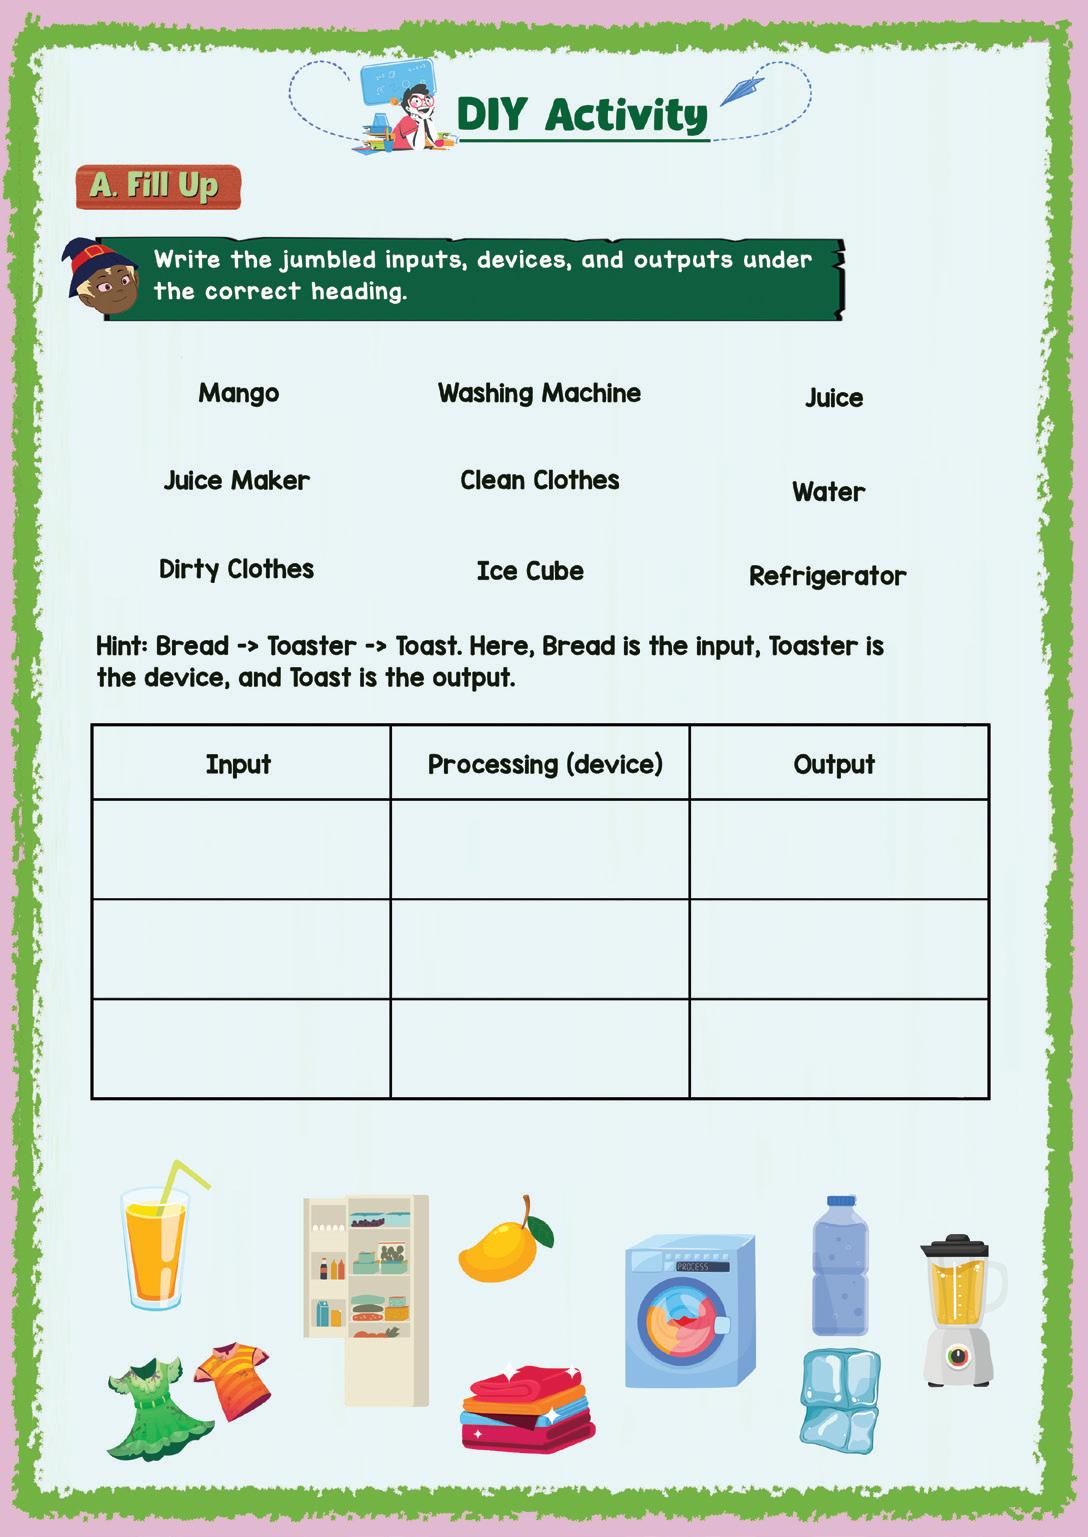
Note: Q6 in the book is a repeat. Please skip this.
Brain Teasers
D Mark the Correct Answer
E Answer in One Line
1. c. Recycle Bin 2. a. Right-click -> Rename
3. c. Search box 4. c. Delete 5. b. Ctrl+V
1. Folders are storage spaces in computers. We keep files in them.
2. We can delete files and folders using the Delete key on the keyboard.
3. We can copy a file using the right click then selecting the copy option or using Ctrl+C on the keyboard.

4. Folders can be searched using the Search box beside the start button.
5. We can get details of files and folders by right-clicking on them and selecting properties.
1. Shapes
2. Conji can erase the wrong petals using the Eraser tool.
3. Conji can fill the petals with colours using the Fill tool.
4. Blue, Yellow, Purple (Answer may vary. Allow students to mention the colour of their choice.)
E Answer in One Line
1. The second method of saving the file apart from the save option in MS paint is using CTRL + S.
2. The Print option in MS paint is used for taking printouts of the drawing we create or edit in MS print.
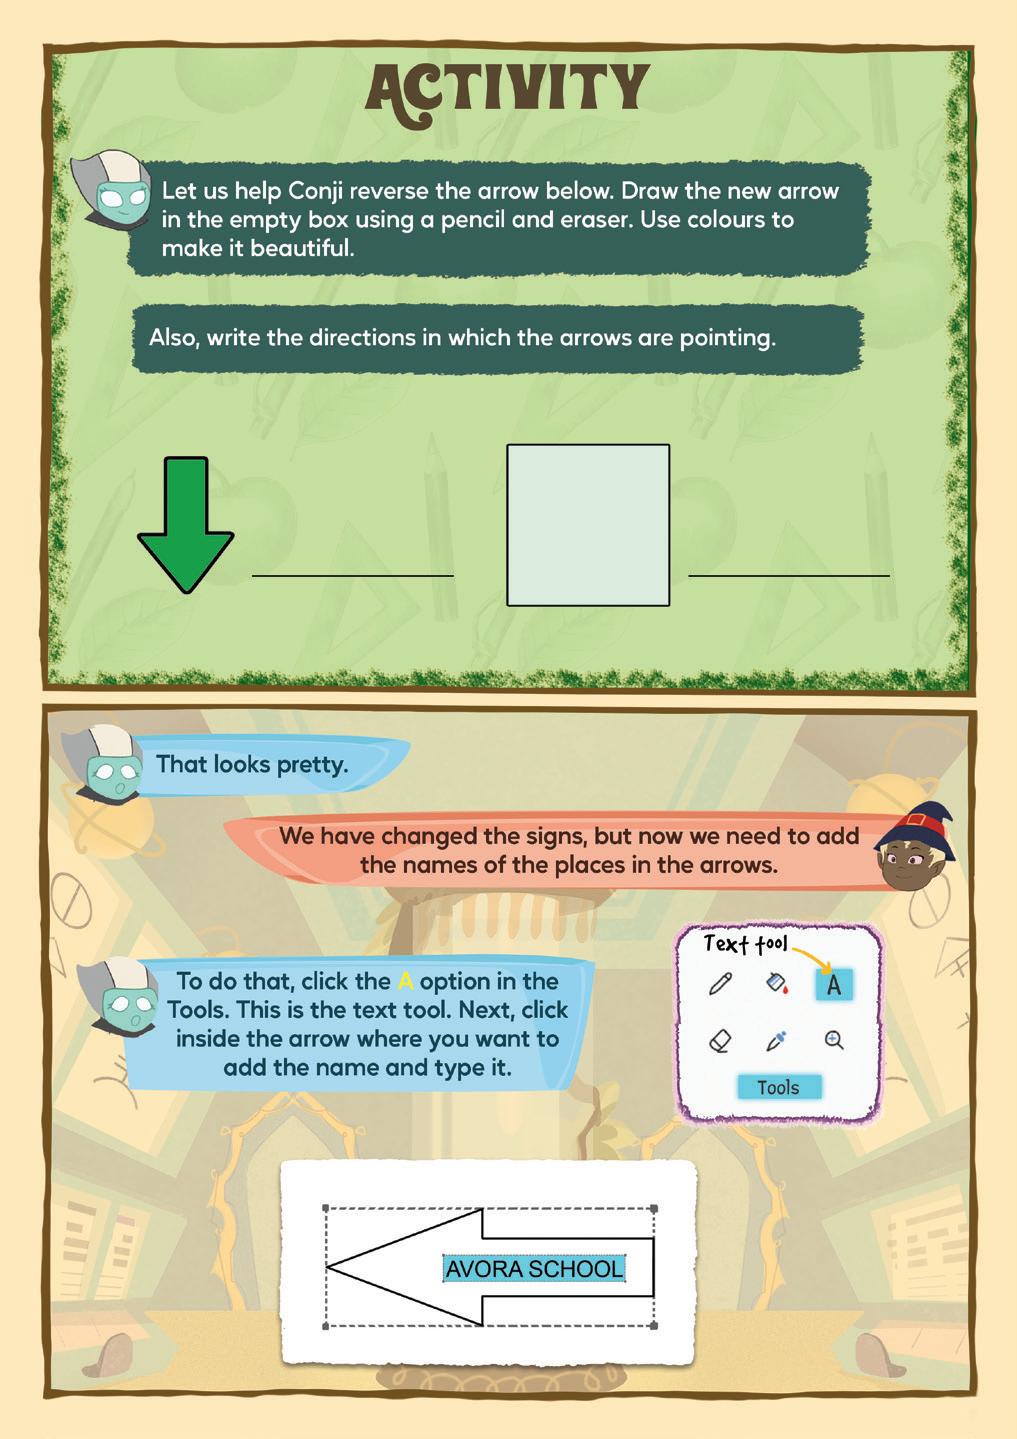
3. Before saving a file, we must give it a name so that later we can find it easily by searching for its name.
4. The fill tool helps us to add colours to the shapes.
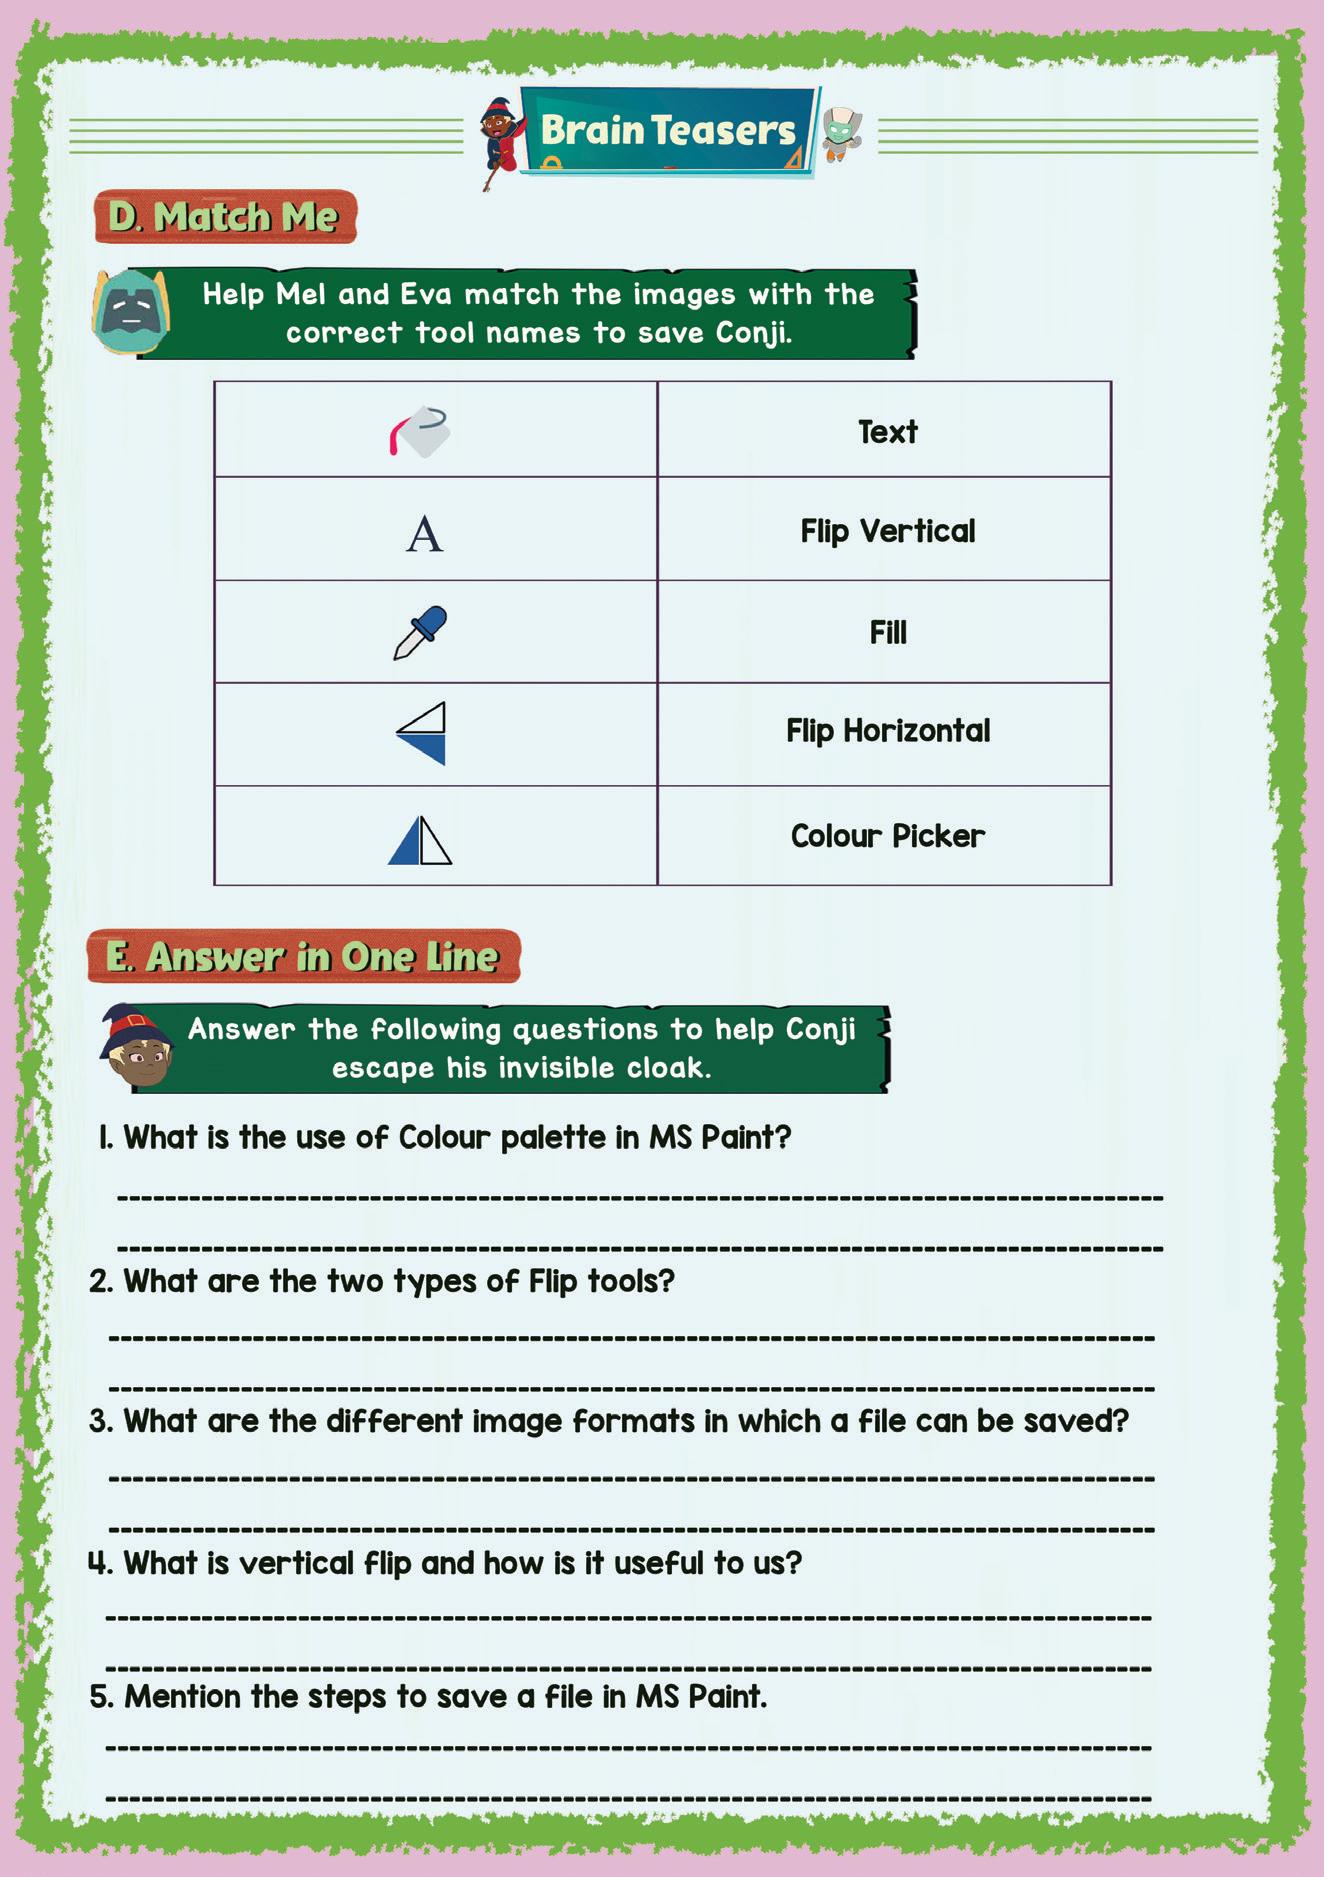
5. Pencil tool in MS paint is used to create freehand drawings.
1. Horizontal means going left to right in a straight line.
2. The fill tools are used to add colours to the shapes.
3. More colours can be added using the Edit colours option.
1. The online program which is used to store data from all over the universe is known as Google Docs.
2. A file saved in Google Docs is called a document.
3. The Add option (+ icon) can be used to create a blank document.
4. The two ways of creating a Google doc are using the Add option (+ icon) and templates.
5. We use the share feature to send documents to our friends.
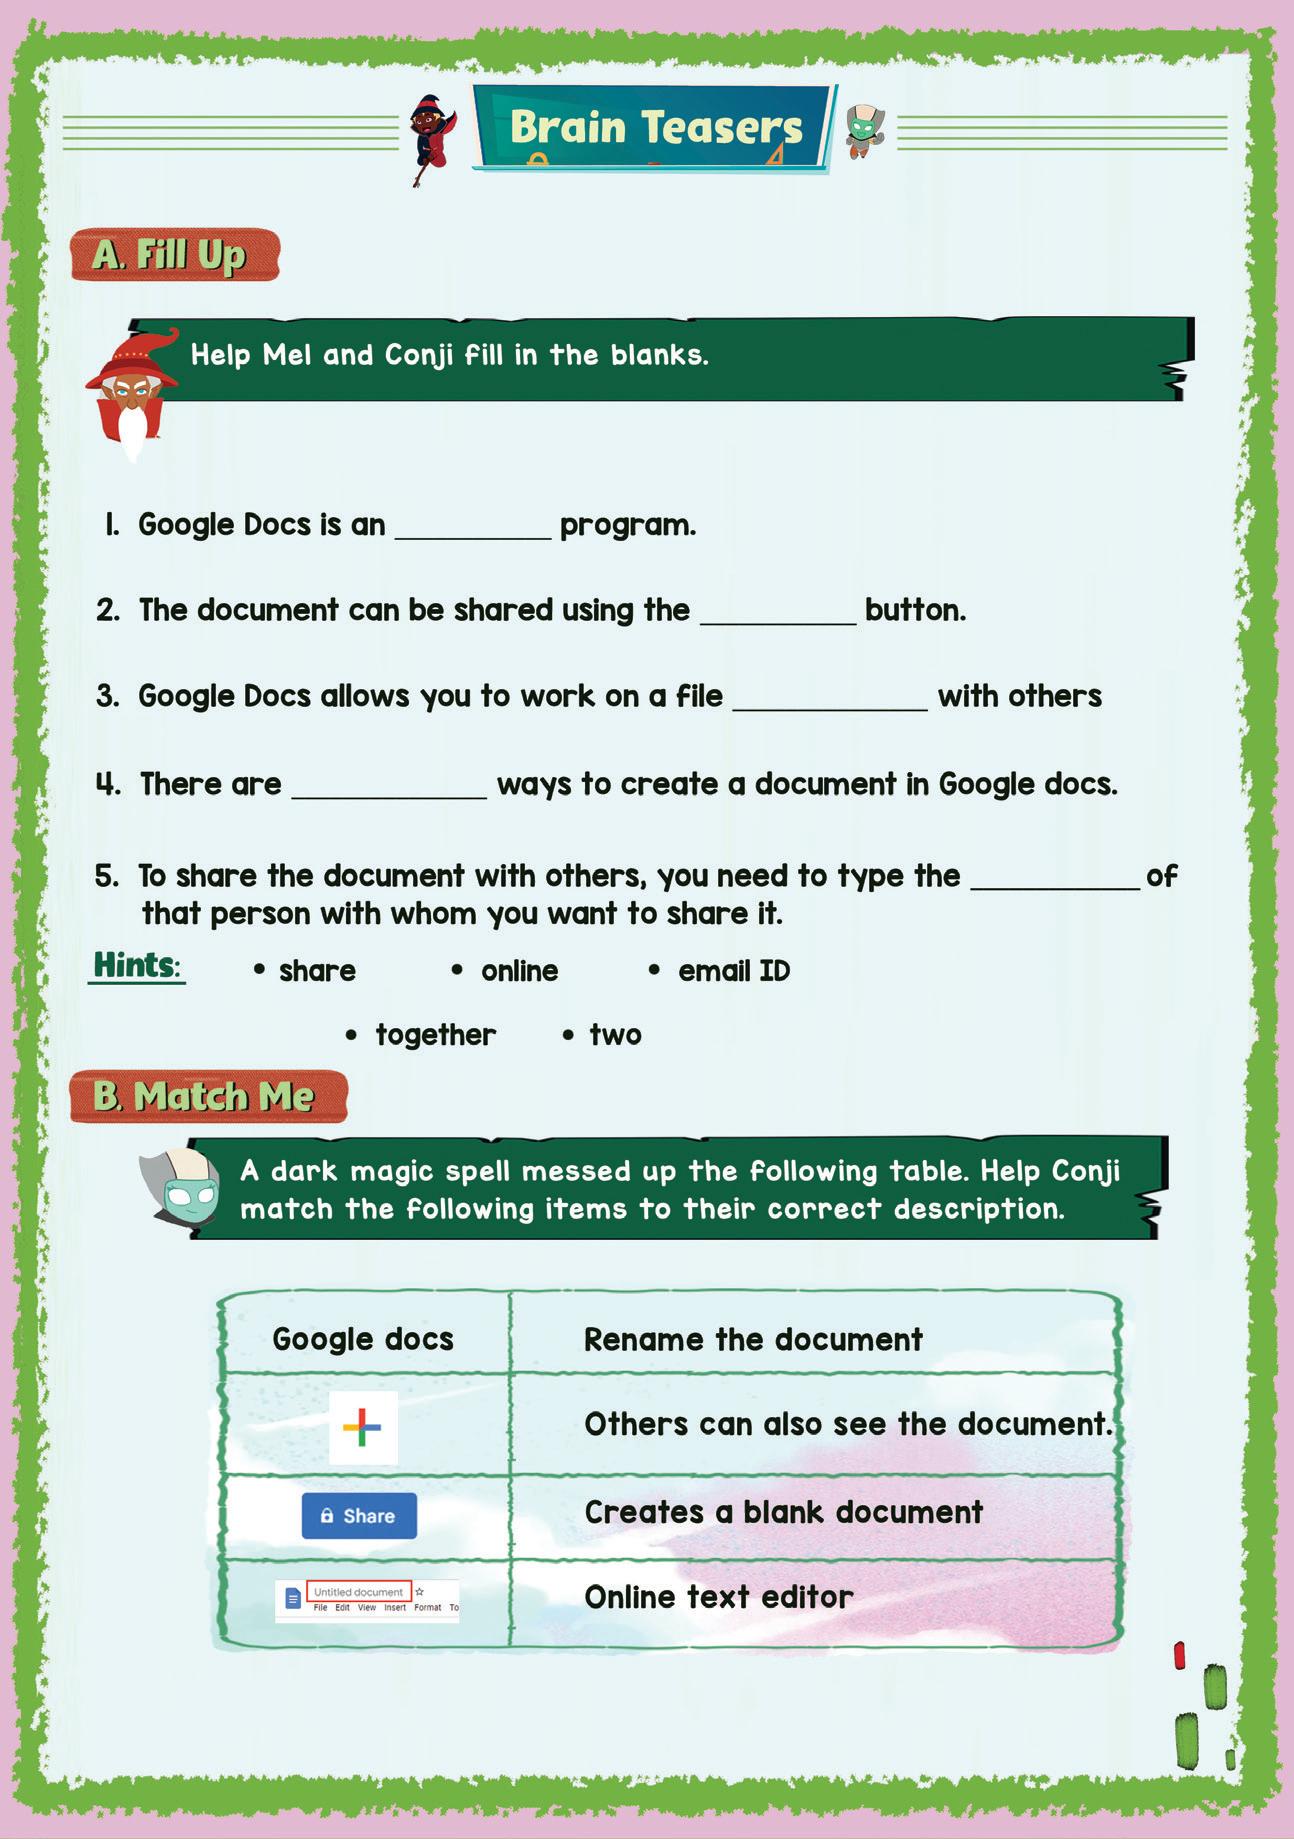


E Answer in One Line
1. The Delete key is used to delete text to the right of the cursor.
2. The Enter key is used to move the text to a new line.
3. The Edit menu has the cut and copy paste
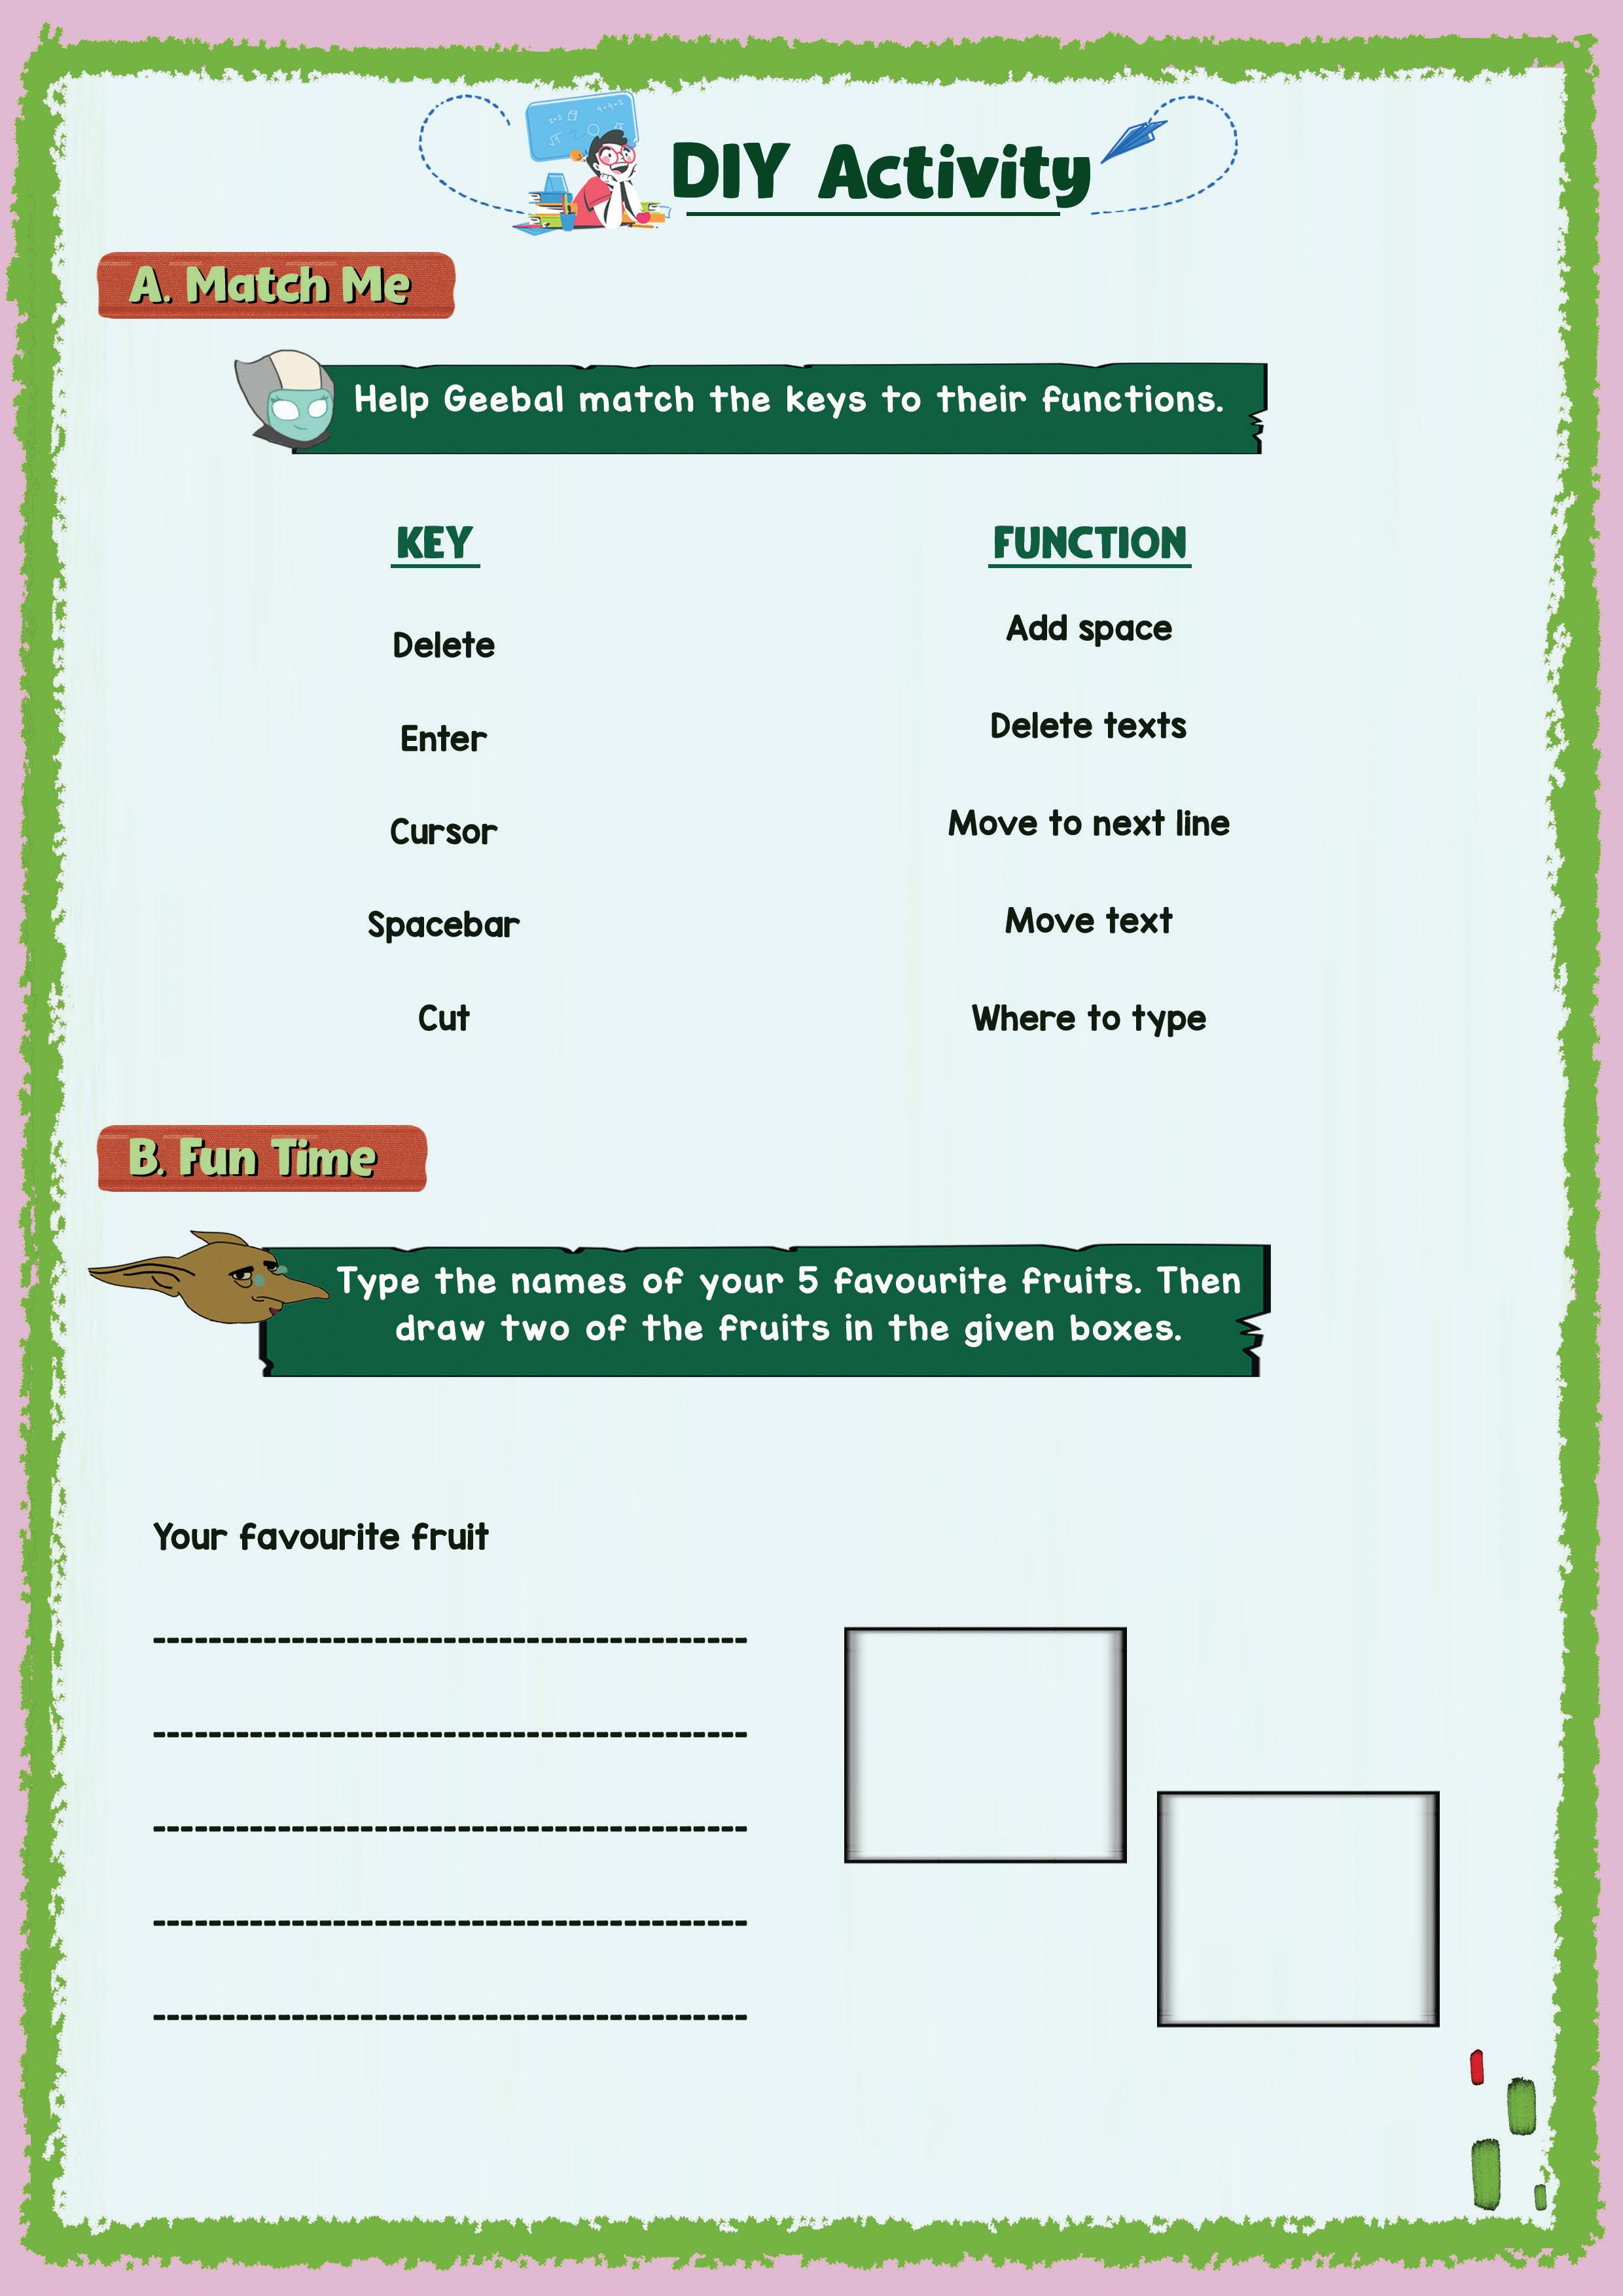
The content covered in this chapter is aligned with the following CSTA Standard
● 1A-AP–08 Algorithms
● 1A-AP–10 Control
This chapter is divided into the following lab sessions
1. Introduction to Coding
2. Drag and Drop
3. Command and Sequence
4. Puzzle Code Studio
In this session, students will learn about –
● Coding
● Purpose of Learning Coding
● Block-based Coding
Keywords
● Coding: Telling the computer what to do in a language the computer understands
● Block-based Coding: A drag-and-drop learning environment to code animated stories or games
Introduce students to the word “Coding”
Discuss the key concepts covered
Conduct the “Build a house” scenario Conclude the concepts
● Say: Today, we will learn about Coding. What does the word “coding” mean?
● Invite 1 or 2 responses from the students, but don’t give the correct answer yet.
● Say: Let’s read the chapter story to understand in simple words and we will come up with a definition of “coding” afterwards.
● Read the text aloud on page 1.
● Say: Computers do not understand human languages. That is why we need to learn to code so that we can communicate with computers.
● Explain the following concepts –
Why should we learn coding?
Block-Based Coding
As given on Pages 1 and 2
As given on Page 3
As given on Page 4
● Draw one triangle and two rectangles of different shapes on the board.
● Present the scenario: Consider these shapes as blocks. Now, build a house in your notebooks using these shapes.
1. Allow some time for kids to do this activity.
2. Once most of the students have drawn the house, summarise the learning outcomes as follows –
■ Blocks in block-based coding are like the shapes given to you.
■ Just as you have simply arranged the shapes to build a house, we have to arrange the blocks to make computers do a task. That is Block Coding.
■ Block-based coding is fun and easy to learn.
● Conclude: Today, we learned about Coding. We were introduced to a coding method called block-based coding.
● Ask the following probing questions:
■ Do you think a computer would understand my instructions if I gave the instructions in any language?
Possible Responses: Yes; No.
Explanation: No. The computer would not understand all the languages. It would only understand my instructions if I used the language the computer understands.
■ How would learning coding help us?
Possible Responses: Understand problems; think of solutions; make a computer do a task; solve a question in many ways.
In this session, students will learn about –
● Drag and Drop
● Jigsaw Puzzle
● Code.org: An educational platform where we learn how to code
Warm-Up Engage Build Sum-Up
Revise the concepts from the previous coding class
Tell them about Code.org
Show the video “Drag and Drop” on the panel
Discuss the key concepts covered
Attempt the Puzzle-Solving Challenge
Conclude the concepts
● Say: Do you remember what we learned in the previous session?
● Invite responses from some students.
● Revise the concepts learned in the previous class.
● Introduce Code.org and help the students log in.
● Show the video “Say Hi to Koi!” in the panel and discuss the key concepts covered.
● Help the students to open the activity under the heading “Solve the Jigsaw Puzzle” on the panel.
● Discuss the Activity and show them how to Drag and Drop.
● Help the students open the activity under the heading “Puzzle-Solving Challenge”.
● Allow them some time to complete the challenge.
● Invite answers from as many students as possible.
● Walk around in the classroom and observe the activity done by the students.
Sum-Up
2 min
● Conclude: Today, we have learned how to Drag and Drop in the Code.org platform. Additionally, we have solved the Jigsaw puzzle.
In this session, students will learn about –
● Commands
● Sequences
Keywords
● Commands: Instructions given to the computer to do something
● Sequences: More than one command in an order
Revise the concepts from the previous coding class
Show the video “Introduction to Sequencing” on the panel Discuss the key concepts covered
Attempt the activities related to Sequencing on the panel
Conclude the concepts Assign homework
● Say: Do you remember what we learned in the previous session?
● Invite responses from some students.
● Revise the drag-and-drop functionality learned in the previous class.
● Help the students to go to the Panel and open the Lab on Introduction to Sequencing.
● Play the video “Koi gets late for class” on the panel. Let the students watch the complete video.
● Discuss the concepts of Commands and Sequences.
● Discuss Practice questions 1 and 2 given on the Panel.
● Invite answers from as many students as possible.
● Discuss the Practice questions from the Picture Sequencing given on the Panel.
● Ask the students to attempt the question on their own.
● Invite answers from as many students as possible.
● Walk around in the classroom and observe the activity done by the students.
● Conclude: Today, we have learned about Commands and Sequences.
● Instruct: We should practice Q1 on page 14 in the book as homework.
In this session, students will learn about –
● Puzzle Code Studio
Keywords
● Play Area: The area where the program will run
● Workspace: Where you will drag the blocks from Toolbox to code
● Instructions: Steps to solve the problem
Revise the concepts from the previous coding class
Introduce the students to Puzzle Code Studio
Explain the parts, one by one
Discuss and attempt the coding challenge Conclude the concepts
● Say: Do you remember what we learned in the previous session?
● Invite responses from some students.
● Revise the concept of Command and Sequences which we learned in the previous class.
● Help the students open the Puzzle Code Studio.
● Highlight and Explain the parts, one by one.
● Discuss the concepts of Fixed Sequences and Flexible Sequences.
● Discuss the Example questions given on page number 16 and 17.
● Explain and Invite answers from as many students as possible.
● Help the students to open the Activity as given on Page 18 in the book.
● Attempt the Coding Challenge with students.
● Walk around in the classroom and observe the activity done by the students.
2 min
● Conclude: Today, we have learned about Puzzle Code Studio.
The content covered in this chapter is aligned with the following CSTA Standards
● 1A-AP-11 Modularity
● 1A-AP-12 Program Development
This chapter is divided into the following classroom and lab sessions
1. Algorithms and Story Building
2. Tour of Sprite Lab
3. Creating a Scene
4. Adding Moving Behaviour
In this session, students will learn about –
● Introduction to algorithms
● Elements of a story
Keywords
● Algorithm: Set of steps given in an order to solve a problem
the students to what an algorithm is, how it helps us. Talk about the elements of a story
● Say: Today, we will learn about algorithms and how a story is built.
● Say: Let’s read the chapter to understand in simple words and then we can discuss the meaning of algorithms better.
● Read the text aloud on Page 19 and Page 23.
● Say: Any problem needs to be broken down into steps to solve it properly. Similarly every story can be broken down into a few basic elements that make it enjoyable.
● Explain the following concepts.
CS Concepts Explain Algorithm
5 elements of a story
As given on Page 20
As given on Page 22
● Present this scenario for the students: You and your dad want to make a special Mother’s Day breakfast for your mom. You decide to make pancakes as they are your mom’s favourite. You and your dad start cooking together in the kitchen.
● Discuss:
■ Can you identify the characters in this story?
Possible Responses: Mom; Dad; Myself.
■ Where is the story set and at what time?
Possible Responses: House; Kitchen; on Mother’s Day; In the morning; Before breakfast
■ What is the main problem in the story?
Possible Responses: Making the breakfast; Cooking etc.
■ Write the algorithm to solve this problem.
Possible Responses: Make the pancake batter → Switch on the stove → Grease the pan → Pour some batter in → Let it cook → Flip → Arrange on a plate
● Write the steps as discussed on the board so the students can connect the steps.
● Conclude: Today, we learned about how to build a story, identify a problem and write an algorithm to solve the problem.
● Ask the following probing questions: (Conduct this activity only if time permits)
■ Why do you think algorithms are important?
Possible Responses: Make the problem easy to solve; Give steps to solve the problem.
■ What are the five elements of a story?
Possible Responses: Character; Setting; Time; Problem; Solution
In this session, student will learn about –
● What is a sprite
● Familiarise themselves with Sprite lab
● Set up a scene
● Algorithm: Set of steps given in an order to solve a problem
● Sprite: A character used in coding
Recap the concepts from previous sessions
Tell the students about “Sprite Lab”
Show the video “Tour of Sprite Lab”
Discuss the key concepts covered
Encourage the students to open Sprite Lab on their computers as they browse around
Conclude the session
● Say: Do you remember what we learned in the previous session?
● Invite responses from some students.
● Say: Let’s learn about Sprites.
● Read from Page 24 to Page 28.
● Say: Let’s learn about sprites and setting a scene.
What is a Sprite
Sprite Lab
Set up a scene
As given on Page 24
Show the video on “Tour of Sprite Lab” and explain
As given on Page 28
● Encourage the students to open Sprite Lab, sign in and look at the basic workspace.
● Discuss the steps to set up a scene using an algorithm.
● Present the scenario on Page 28 and discuss.
● Conclude: Today we learnt what sprites are, how Sprite Lab works, and what the steps are that we need to set up a scene.
● Ask the following probing questions: (Conduct this activity only if the time permits)
■ What are characters in coding called?
Possible Responses: Sprites
■ What is the first step to setting a scene?
Possible Responses: Character; Set/Add background
In this session, students will learn practically how to create a scene in Sprite Lab.
● Algorithm: Set of steps given in an order to solve a problem
● Sprite: A character used in coding
Recap the concepts from previous sessions Show the video on “Creating a scene”
Discuss the steps shown
Conduct
● Say: Do you remember what we learned in the previous session?
● Invite responses from some students and recap the concepts learnt.
● Help the students open the Lab in the panel on Creating a Scene.
● Play the video in the panel related to this topic
● Discuss the steps explained in the video.
● Conduct the activity given in the Coding Booklet from Page 29 to Page 36
■ Explain the activity to the students.
■ Instruct: Click on the Practice button on the Assignment page to attempt the activity.
■ Instruct: Click on the Attempt button to open the activity page.
■ Walk around in the classroom and observe the activity done by the students.
■ Assist the students if any of them are struggling.
● Conclude: Today, we learnt about setting up a scene in Sprites Lab.
● Ask the following probing questions:
■ What are the two elements that make up a scene in Sprite Lab?
Possible Responses: Background; Sprites.
■ How do you change the location of a sprite?
Possible Responses: Move the cursor on the play area and click where you want to place the sprite
In this session, students will learn how to add moving behaviour to sprites.
● Algorithm: Set of steps given in an order to solve a problem
● Sprite: A character used in coding
Recap the concepts from previous sessions
● Say: Do you remember what we learned in the previous session?
● Invite responses from some students and recap the concepts learnt.
● Help the students open the Lab on the panel on Add Moving Behaviour.
● Play the video on the panel related to this topic.
● Discuss the steps explained in the video.
● Conduct the activity given in the Coding Booklet from Page 37 to Page 40
■ Explain the activity to the students.
■ Instruct: Click on the Practice button on the Assignment page to attempt the activity.
■ Instruct: Click on the Attempt button to open the activity page.
■ Walk around in the classroom and observe the activity done by the students.
■ Assist the students if any of them are struggling.
● Conclude: Today, we learnt about adding moving behaviour to sprites.
● Ask the students to practise what has been covered in this chapter at home.
The content covered in this chapter is aligned with the following CSTA Standard
● 1A-AP-11 Modularity
● 1A-AP-12 Program Development
This chapter is divided into the following lab and classroom sessions
1. Defining an Event
2. Adding Events to the Story
3. Practice Activity
In this session, students will learn about –
● What is an event
● How to define an event
Keywords
● Event: A situation that creates an appropriate action
● Action: Result of an event
● Say: Today, we will learn about Events and Actions.
● Say: Let us read the chapter story to understand it in simple words and then we can define an event better.
● Read the text aloud from Page 41 to Page 43.
● Say: Event tells us when action will happen.
● Explain the following concepts
Event and actions
Defining an event
CS Concept Explain
As given on Pages 41 and 42
As given on Page 43
min
● Present this scenario for the students: You and your best friend meet in a park. When you shake hands with your friend, he says “Hello!”
● Discuss:
■ Q1 Can you identify the Sprites?
Possible Responses: Friend, Myself, etc.
■ Q2 What is the background for the setting?
Possible Responses: Park, Garden, etc.
■ Q3 What is the event?
Possible Responses: Meeting; Shaking hands
■ Q4 Define the event and its action in an algorithm.
Possible Responses: When I touch a friend → friend says hello
● Write the steps as discussed on the board so that students can connect the steps.
2 min
● Conclude: Today, we learned about events and actions.
In this session, students will practically apply what they learned from the last class using Sprite Lab.
● Event: A situation that creates an appropriate action
● Action: Result of an event
Recap the concepts from previous sessions. Show the video on the panel on “Adding Events” Discuss the key concepts covered
● Say: Do you remember what we learned in the previous session?
● Invite responses from some students and recap the previous session.
● Help the students open the Lab on the panel on Adding Events.
● Play the video on the panel related to this topic.
● Discuss the steps explained in the video.
● Conduct the activity given in the Coding Booklet from Page 44 to Page 48
■ Explain the activity to the students.
■ Instruct: Click the Practice button on the Assignment page to attempt the activity.
■ Instruct: Click on the Attempt button to open the activity page.
■ Walk around in the classroom and observe the activity done by the students.
■ Assist the students if any of them are struggling.
● Conclude: Today we learned how to add events and actions in Sprite Lab.
In this session, students will apply their knowledge in a new practice activity.
● Event: A situation that creates an appropriate action
● Action: Result of an event
Recap the concepts from previous sessions Discuss the concepts the students will practice Conduct the Activity given in the panel
● Say: Do you remember what we learned in the previous session?
● Invite responses from some students and recap the concepts learnt.
● Discuss the following activity:
● In this activity we have two sprites – a bear and a bee.
● These sprites will interact with each other.
■ The bee will touch the bear.
■ The bear will respond with “Ouch!”.
● Conduct the activity given in the Panel.
■ Explain the activity to the students.
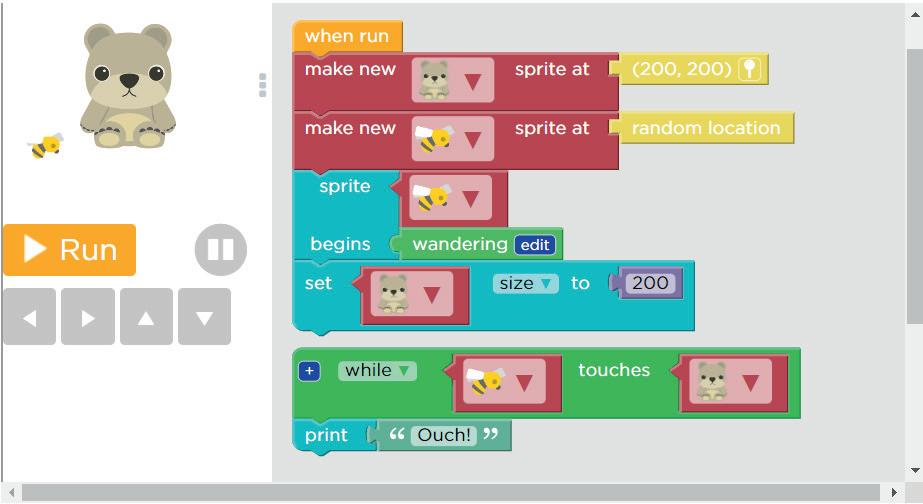
■ Instruct: Click the Practice button on the Assignment page to attempt the activity.
■ Instruct: Click on the Attempt button to open the activity page.
■ Walk around in the classroom and observe the activity done by the students.
■ Assist the students if any of them are struggling.
● Conclude: Today, we practiced adding events and actions.
The content covered in this chapter is aligned with the following CSTA Standards
● 1A-AP-10 Control
● 1A-AP-12 Program Development
This chapter is divided into the following classroom and lab sessions
1. Loops and Repeat Loops
2. Repeat Loop
3. Draw Waves
4. For Loop
5. Turn a Garden into a Castle
In this session, students will learn about –
● A loop and its definition
● Repeat loop and its use
Keywords
● Loop: An action of doing something over and over again
● Say: Today, we will learn about loops and repeat loops.
● Say: Let us read the chapter to understand in simple words and then we can discuss the meaning of loops better.
● Read the text aloud from Page 49 to Page 53.
● Say: Loops help us repeat a task as many times as we require.
● Explain the following concepts.
Loop
Definition of a loop
Repeat loops
CS Concepts Explain
As given on Page 49
As given on Page 50
As given on Page 51 and Page 52
min
● Present this scenario for the students: Your local ATM only carries only 500-rupee notes. Your dad wants to withdraw 2000 rupees.
● Discuss:
■ What software is the ATM machine using that decides how many notes to give out?
Possible Responses: Loop; Repeated counting.
■ How many notes will the machine give out?
Possible Responses: Four.
■ How does the machine know when to stop?
Possible Responses: When the notes given out are equal to 2000 rupees together.
■ Define this loop used by the ATM software
Possible Responses: 1. Give out 500-rupee notes 2. Stop when the value is equal to 2000 rupees.
● Write the conditions as discussed on the board so that the students can connect them.
● Conclude: Today, we learned how loops work and what defines a loop.
In this session, students will learn to apply their knowledge of the loop practically with an activity.
● Loop: An action of doing something over and over again
Recap the concepts from previous sessions.
Show the video on “Draw Lines”
Encourage the students to open the link mentioned in the Coding Booklet on their computers as they browse around
Action
● Say: Do you remember what we learned in the previous session?
● Invite responses from some students and recap the concepts learnt.
● Help the students open the Lab in the panel on Draw Lines.
● Play the video in the panel related to this topic.
● Discuss the steps explained in the video.
● Conduct the activity given in the Coding Booklet from Page 54 to Page 56.
■ Explain the activity to the students.
■ Instruct: Click on the Practice button on the Assignment page to attempt the activity.
■ Instruct: Click on the Attempt button to open the activity page.
■ Walk around in the classroom and observe the activity done by the students.
■ Assist the students if any of them are struggling.
● Conclude: Today we learnt how to use loops and create them.
In this session, students will learn how to use loops to draw waves.
● Loop: An action of doing something over and over again
● Say: Do you remember what we learned in the previous session?
● Invite responses from some students and recap the concepts learnt.
● Help the students open the Lab on the panel on Draw Waves.
● Play the video on the panel related to this topic.
● Discuss the steps explained in the video.
● Conduct the activity given in the Coding Booklet from Page 57 to Page 59.
■ Explain the activity to the students.
■ Instruct: Click the Practice button on the Assignment page to attempt the activity.
■ Instruct: Click on the Attempt button to open the activity page.
■ Walk around in the classroom and observe the activity done by the students.
■ Assist the students if any of them are struggling.
● Conclude: Today, we learnt how to draw waves using loops.
In this session, students will learn about –
● For Loop
● Parameters of For Loop
Keywords
● Loop: An action of doing something over and over again
● Say: Do you remember what we learned in the previous session?
● Invite responses from some students.
● Read from Page 61 to Page 63
12 min Engage
● Say: Let us learn about For Loop with examples
CS Concept Explain
For Loop
Parameters of For Loop
As given on Page 61 and Page 62 up to “A For Loop is…interval”
As given on Page 63
● Conduct the practice activity given in the Coding Booklet on Page 63.
■ Explain the activity to the students.
■ Invite some responses from the students.
■ Discuss and validate.
■ Instruct the students to write the answers in the booklet.
● Conclude: Today, we learnt about the For Loop.
In this session, students will learn how to apply the knowledge of For Loop practically in an activity.
● Loop: an action of doing something over and over again
● Say: Do you remember what we learned in the previous session?
● Invite responses from some students and recap the concepts learnt.
● Help the students open the Lab on the panel on Turn Garden into Castle.
● Read the contents on Page 64 and discuss the steps to write an algorithm for the scenario given.
● Play the video on the panel related to this topic.
● Discuss the steps explained in the video.
● Conduct the activity given in the Coding Booklet from Page 65 to Page 69.
■ Explain the activity to the students.
■ Instruct: Click on the Practice button on the Assignment page to attempt the activity.
■ Instruct: Click on the Attempt button to open the activity page.
■ Walk around in the classroom and observe the activity done by the students.
■ Assist the students if any of them are struggling.
● Conclude: Today, we learnt how to turn a Garden into a Castle.
● Ask the students to practice what has been covered in this chapter at home.
The content covered in this chapter is aligned with the following CSTA Standard
● 1A-AP-14 Program Development
This chapter is divided into the following lab sessions
1. Debugging and Practice
In this session, students will learn about –
● Bugs
● Debugging
● Learn how to debug a code
● Bugs: Errors in the code
● Debug: Finding and correcting bugs in the code
Recall the concepts covered in the previous coding chapter
Play the video given in the panel to introduce the concepts to be covered in this session
Discuss the meaning of bugs and debugging. How to debug a code
Conduct the activity given in the panel
Conclude the session Assign homework
● Say: Do you remember what we learned in the previous chapter?
● Invite responses from some students and recap the concepts learnt.
● Play the video in the panel related to this topic.
● Discuss the concepts explained in the video.
● Discuss the Quiz questions given in the Panel.
● Invite answers from as many students as possible.
● Conduct Practice Activity – Example given in the Coding Booklet from Page 74 to Page 79
■ Explain the activity to the students.
■ Instruct: Click the Practice button on the Assignment page to attempt the activity.
■ Instruct: Click on the Attempt button to open the activity page.
■ Walk around in the classroom and observe the activity done by the students.
■ Assist the students if any of them are struggling.
■ Instruct: Click on the Yes button to submit the activity.
Note
● If time permits, conduct the additional activity given in the Coding Booklet from Page 80 to Page 82
● Ask the following probing questions:
■ Q1 When a programmer says she is debugging the code, what exactly does she mean?
Possible Responses: She is finding the errors in the code (bugs) and correcting them; She is looking at what could have gone wrong; She is trying to find out why the program is not working.
■ Q2 How do we know when to debug a code?
Possible Responses: When we do not get the correct/desired/needed outcome; When the program does not work correctly?
● Assign the following project as homework:
■ Practice the activity given in the Coding Booklet from Page 83 to Page 84.
Note
● The project is optional. Assign it if feasible.
This Teacher Manual has been designed to implement Tekie, the storytelling-based Coding and Computer Science program. The manual consists of lesson plans within each chapter that teachers transact within classrooms and computer labs. Each lesson is based on a research-based ‘WEBS’ framework that simplifies pedagogical practices for teachers and enables them to deliver effectively.
• Sharp Lesson Planning: Each lesson plan focuses on specific sub-learning outcomes within a chapter and are designed for delivery within the stipulated class or lab time.
• Real-life and Application-based Questions: Additional questions that link Computer Science to real-life contexts and assist teachers to develop learners’ conceptual understanding and application skills.
• Support and Detailed Solutions: In-depth solutions for in-class and post-class activities to reinforce learning.
Uolo partners with K12 schools to bring technology-based learning programs. We believe pedagogy and technology must come together to deliver scalable learning experiences that generate measurable outcomes. Uolo is trusted by over 8,000 schools with more than 3 million learners across India, South East Asia, and the Middle East.
hello@uolo.com