


Academic Authors: Ayushi Jain, Neha Verma
Creative Directors: Bhavna Tripathi, Mangal Singh Rana, Satish
Book Production: Rakesh Kumar Singh
Project Lead: Jatinder Kaur
VP, Learning: Abhishek Bhatnagar
All products and brand names used in this book are trademarks, registered trademarks or trade names of their respective owners.
© Uolo EdTech Private Limited
First impression 2023
Second impression 2024
Third impression 2025
This book is sold subject to the condition that it shall not by way of trade or otherwise, be lent, resold, hired out, or otherwise circulated without the publisher’s prior written consent in any form of binding or cover other than that in which it is published and without a similar condition including this condition being imposed on the subsequent purchaser and without limiting the rights under copyright reserved above, no part of this publication may be reproduced, stored in or introduced into a retrieval system, or transmitted in any form or by any means, electronic, mechanical, photocopying, recording or otherwise, without the prior written permission of both the copyright owner and the above-mentioned publisher of this book.
Book Title: Tekie Computer Science Teacher Manual 4
ISBN: 978-81-984882-6-8
Published by Uolo EdTech Private Limited
Corporate Office Address:
85, Sector 44, Gurugram, Haryana 122003
CIN: U74999DL2017PTC322986
Illustrations and images: www.shutterstock.com, www.stock.adobe.com and www.freepik.com
All suggested use of the internet should be under adult supervision.
Uolo’s Tekie program offers a coding-focused curriculum for grades 1 to 8, preparing students for the technology-driven world. We present a carefully crafted Teacher Manual to assist teachers in delivering effective and engaging lessons to students. Rather than prescribing teaching methods, the manual provides examples and demonstrates how and why teachers can apply these examples in their classes.
The Teacher Manual includes a suggested implementation plan to help teachers navigate the curriculum better throughout the academic year. Within the academic year, the Tekie program prescribes the following types of chapters and sessions:
Familiarisation: this period builds familiarity with the Tekie program and the digital platform.
Theory: these periods are dedicated to the Computer Science Theory chapters. These topics are mostly delivered in the classroom.
Tools: these periods are dedicated to the Computer Tools chapters. These topics involve almost equal numbers of classroom and computer labs sessions.
Coding: these periods are dedicated to the Coding chapters. These topics have more computer lab sessions.
Additional Hands-on Time: these are additional computer lab periods that teachers can use to revise topics or dedicate for completion of projects.
Revision: these are additional classroom periods that teachers can use to revise topics or cover syllabus backlogs.
Each chapter in this manual is structured to provide a comprehensive lesson plan. The chapters are divided into multiple sessions, each following the Warm up, Engage, Build, and Sum up (WEBS) strategy. The Warm up phase sets the stage for learning by connecting to prior knowledge and building curiosity. The Engage phase captures the students’ attention and motivates them to participate actively. In the Build phase, questions from various sections are discussed to build the understanding of the students. Finally, the Sum up phase reinforces learning through easy-to-recall activities and questions. Time duration for each section has been suggested based on the requirements of the students. Additionally, an answer key for every chapter is provided to assist teachers in assessing their students’ understanding and guiding their learning effectively.
Lastly, we understand that the Indian education landscape is quite diverse. To suit the needs of all types of schools, we have built-in extra higher-order chapters in the content books. These extra chapters are clearly marked in the table of contents of this manual. We suggest that the teacher completes the main chapters first and then move to higher-order optional chapters only if there is sufficient time left in the academic year and learners are ready for more challenging content.
We hope that this teacher manual will empower teachers to use the curriculum effectively, support the learning of all students thoroughly, create learning opportunities and design interactive learning environments that cater to the students’ needs and interests.
1 How Computers Store Data ������������� 1
Understanding Computers
Computer Memory: Primary Memory
Computer Memory: Secondary Memory
2 Learn about Operating Systems ����� 9
Operating Systems and Windows 10
Desktop Elements and Shortcut Keys
Desktop Settings
3 Working with Files and Folders ����� 16
Introduction to files and folders
Renaming and Selecting Files and Folders
Duplicating and Moving Files and Folders & Shortcut Icons
Deleting and Restoring Files and Folders
Good Practices While Using a Computer
4 Browsing the Internet �������������������� 27
About the Internet and Basic Requirements
Basic Terminologies of the Internet
5 Formatting Documents ������������������ 33
Introduction to Word Processor
Formatting Documents 1
Formatting Documents 2
Formatting Documents 3
Formatting Documents 4
Formatting Documents 5
Formatting Documents 6
Formatting Documents 7
6 Using Graphics in Word Processor ��51
Using Graphics in Word Processor 1
Using Graphics in Word Processor 2
Using Graphics in Word Processor 3
Using Graphics in Word Processor 4
Using Graphics in Word Processor 5
Using Graphics in Word Processor 6
with Presentations ���������� 64
Presentations 1
Presentations 2
Presentations 3
Presentations 4
Presentations 5 Presentations 6
Internet of Things
Smart Homes
Fun with AI: Using Object Detection
Introduction to Coding
Creating a Project and Components of Scratch 2
Sprites
Ways to Add a Backdrop
Events Block
Making a Sprite Say Something
Motion Blocks
Loops, Control, and Sensing Blocks
Moving and Making a Sprite Fall
Sensing Blocks 1
Sensing Blocks 2

Mel and Conji, young wizards, start on a journey to rescue their friend, Eva and save their magical world, Avora. After a mysterious attack pulls Eva into a computer, they discover that Lord Ero is behind the Dark Magic. Guided by the Elders, they explore the Hidden Library, where they learn about the MagiTech Keystone, a powerful object Lord Ero seeks to destroy Avora. The Keystone’s scattered pieces can only be gathered by pure-hearted wizards. Mel and Conji set off on their journey, with the help of the Elders to find the pieces before Lord Ero could. They use different programmes and graphics to find those pieces.
Facing traps and challenges, Mel and Conji recover the pieces and free Eva, who was brainwashed by Lord Ero. She attacks Mel, Conji and even the Elders, who escape the situation narrowly. In the final battle, they use their combined strength and activate the Keystone to stop Lord Ero. Lord Ero had taken away the power of all the machines in Avora. They use AI to link the machines to the power of the Keystone and restore all of them. Their bravery and teamwork save Avora and bring lasting peace.
● Conji reminds Mel that she promised to teach him about computers.
● Mel jokingly tells him that she wishes to use a spell to erase that from his memory.
● Conji requests that Mel keeps her magic away from him. Mel agrees to this.
● Conji asks her if she kept the ingredients of the magic drink safely in the storage room.
● Mel tells him that she always stores her data properly.
● Conji doesn’t understand what Mel means.
● Mel then pulls out a book from the library to teach Conji about data and storage in computers.
This chapter is divided into the following classroom sessions
1. Understanding Computers
2. Computer Memory: Primary Memory
3. Computer Memory: Secondary Memory
At the end of the session, the students will be able to:
● describe ancient devices and modern smart devices, including computers.
● describe the concept of Data, Processing, and Information.
Keywords
● Devices: Things around us that perform specific tasks are called devices.
● Computer: It is an electronic device or a machine that performs various calculations and carries out different tasks for us based on the instructions that we give it.
● Data: It is facts, numbers, or symbols that we collect and enter into the computer.
● Information: It is the knowledge or understanding that we gain when the computer analyses and puts together the data that we entered into it.
● CPU: The CPU is like the brain of the computer. It takes our inputs and processes them.
Ask the students what devices were there in ancient times, for instance, to know the time of the day.
Ask the students what devices are used in modern times and how the present-day devices are different from the older ones.
Explain about the various devices, including computers.
Explain about data, processing, and information. Think and Tell
Warm Up
● Ask the students what devices were there in ancient times to know the time of the day.
● Tell the students that people used sundials. They used the sun’s shadow to know what time it was.
● Ask the students what devices are used in modern times and how these devices are different from the old ones. Tell them that nowadays smartwatches are being used that not only tell us the time but also allow the use of the internet. Tell them that a computer is also one of these smart devices.
Explain the following concepts:
Describe ancient devices and modern smart devices, including computers.
Describe the concept of Data, Processing, and Information.
Tell them that things around us that perform specific tasks are called devices. Explain ancient and smart devices as given on pages 4 and 5.
Tell the students that a computer takes inputs from us in the form of ‘data’, processes them, and finally provides us with output in the form of ‘information’. Then explain the concept of Data, Processing, and Information as given on pages 5, 6, and 7.
● Read aloud the questions provided in the Do It Yourself 1A section and encourage the students to solve the questions. Instruct the students to write the answers in their book.
Correct Responses:
1. a. Virus
2. a. F
b. T
c. F
d. T
3. Steps
b Processing the input
c Looking at the movement of the mouse on the screen
a Moving the mouse on the table
● Ask the students to give the answer to the question, “Name a few devices around you and say how you use them.” asked in the Think and Tell section, given on page 4.
Possible Responses: I use Television to watch educational shows and cartoons. I use my parents’ smartphone to call my friends, take photos, and access educational apps to make learning fun.
● Conduct a group discussion in the class among the students based on the topic, ‘‘Give one example of data and information.” provided in the Discuss section as mentioned on page 6.
Possible Response: Data: (32°C, 50% chances of rain), Information: It’s warm, and it might rain today.
● Ask the students to give the answer to the question, “Can you think of some more examples of input and output in computers?” asked in the Think and Tell section, given on page 7.
Possible Response: Input: Typing on the keyboard and Output: Displaying text on the monitor screen.
3 mins
Sum Up
● Conclude the session by summarising that the things around us that perform specific tasks are called devices. Similarly, computers perform various calculations and carry out different tasks based on the instructions that we give them. A computer takes inputs from us in the form of ‘data’, processes them, and finally provides us with the output in the form of ‘information’.
● Assign the following questions from the Chapter Checkup given at the end of the chapter as homework.
A. Fill in the Blanks: Questions 1 and 2
C. Who Am I?: Question 2
E. Answer the Following Questions: Questions 1 and 5
At the end of the session, the students will be able to:
● describe computer memory.
● describe primary memory and its types.
Keywords
● Memory: A computer has memory to store data and information.
● Bytes: Computer memory is measured in units called bytes.
Ask the students to name the devices that can be used for storage, such as your diary, where you store all the details about your day-to-day activities.
Explain to the students what computer memory is. Explain to them about the primary memory and its types. Think and Tell Conclude the concepts Assign homework
5 mins
Warm Up
● Ask the students to name a few storage devices from their surroundings.
● Tell them that similar to the diary that stores the details of your entire day, a computer has memory to store the data and information. Everything that we do on the computer is stored in its memory.
Explain the following concepts:
Learning Outcomes
Explanation
Describe computer memory. Tell the students that the computer has a memory to store data and information, as given on page 8. Also tell them about the various units of computer memory.
Describe primary memory and its types.
Explain to the students that the primary memory is the computer’s internal memory where it stores data related to currently running programs. Also tell them that the primary memory is of two types—RAM and ROM, as given on pages 9 and 10.
● Read aloud the questions provided in the Do It Yourself 1B section, Question 2 and encourage the students to solve the questions. Instruct the students to write the answers in their book.
Correct Responses:
2. a. RAM
b. ROM
c. ROM
d. RAM
Build
7 mins
● Ask the students to give the answer to the question, “Sometimes, our computers hang, or programs suddenly crash. Is this problem related to RAM or ROM?” asked in the Think and Tell section, given on page 10.
Correct Response: RAM
Sum Up
3 mins
● Conclude the session by summarising that everything that we do on the computer is stored in its memory, for example, saving a file, storing pictures, and downloading something from the internet. Primary memory is the computer’s internal memory where it stores data related to currently running programs.
● Assign the following from the Chapter Checkup given at the end of the chapter as homework.
A. Fill in the Blanks: Questions 3 and 4
B. Tick the Correct Option: Questions 3 and 4
C. Who Am I?: Question 3
D. Write T for True and F for False: Questions 1 and 4
F. Apply Your Learning: Question 3
At the end of the session, the students will be able to:
● describe secondary memory and secondary storage devices.
Keyword
● Cloud storage: It is like a big storage space on the internet where you can keep all your files and access them anytime, anywhere, and from any device as long as you are connected to the internet.
Ask students: Since our mind’s memory is limited, how do you think we store information to ensure it is not lost? Can you relate this to how computers manage their memory?
Explain to the students about the secondary memory and the various secondary storage devices. Group discussion Conclude the concepts Assign homework
Warm Up
● Ask students: Since our mind’s memory is limited, how do you think we store information to ensure it is not lost? Can you relate this to how computers manage their memory?
● Tell students that we store information in a diary to retain things. The diary is an example of secondary memory in computers.
Explain the following concepts:
Learning Outcome
Describe secondary memory and secondary storage devices.
Explanation
Explain to the students about the secondary memory and secondary storage devices, like Hard Disk Drive (HDD), Pen Drive, Memory Card, etc., as given on pages 10 to 12.
● Read aloud the questions provided in the Do It Yourself 1B section, Questions 1 and 3 and encourage the students to solve the questions. Instruct the students to write the answers in their book.
1. a. CD: Secondary Memory Device
b. HDD: Secondary Memory Device
c. DVD: Secondary Memory Device
d. ROM: Primary Memory
e. Pen Drive: Secondary Memory Device
f. RAM: Primary Memory
3. Cloud Storage HDD Pen Drive DVD CD
Note: These are general trends and the actual storage capacity may vary from model to model and with advancements in technology.
Build
7 mins
● Conduct a group discussion in the class among the students on the topic ‘How to increase the memory of your computer’.
Correct Response: The memory of your computer can be increased using secondary storage devices.
3 mins
● Conclude the session by summarising that the Secondary memory, also known as auxiliary memory, is the computer’s external storage beyond the primary memory. It is used to store data and programs that are not immediately needed by the computer’s processor. Some examples of secondary storage devices are external hard disks, pen drives, and SD cards.
● Assign the following from the Chapter Checkup given at the end of the chapter as homework.
A. Fill in the Blanks: Question 5
B. Tick the Correct Option: Questions 1 and 2
C. Who Am I?: Questions 1 and 4
D. Write T for True and F for False: Questions 2 and 3
E. Answer the Following Questions: Questions 2, 3, and 4
F. Apply Your Learning: Questions 1 and 2
Mel and Conji, young wizards, start on a journey to rescue their friend, Eva and save their magical world, Avora. After a mysterious attack pulls Eva into a computer, they discover that Lord Ero is behind the Dark Magic. Guided by the Elders, they explore the Hidden Library, where they learn about the MagiTech Keystone, a powerful object Lord Ero seeks to destroy Avora. The Keystone’s scattered pieces can only be gathered by pure-hearted wizards. Mel and Conji set off on their journey, with the help of the Elders to find the pieces before Lord Ero could. They use different programmes and graphics to find those pieces.
Facing traps and challenges, Mel and Conji recover the pieces and free Eva, who was brainwashed by Lord Ero. She attacks Mel, Conji and even the Elders, who escape the situation narrowly. In the final battle, they use their combined strength and activate the Keystone to stop Lord Ero. Lord Ero had taken away the power of all the machines in Avora. They use AI to link the machines to the power of the Keystone and restore all of them. Their bravery and teamwork save Avora and bring lasting peace.
● Mel and Conji decide to inform the Elders of the incident with Eva right away.
● On hearing them, Elder Wizard tells them that they must learn about computers and technology in order to understand the secret message.
● Elder Robot advises them to explore the school’s hidden library in order to acquire the knowledge they need.
● In the library, they meet Ms Idea. The library looked magical, as if they could talk to the books and ask for help.
● Mel’s last word, ‘help’ echoes through the library and leads them to a special book named ‘Operating System’.
● Both lean into the book to learn about operating systems. This chapter is divided into the following classroom sessions
1. Operating Systems and Windows 10
2. Desktop Elements and Shortcut Keys
3. Desktop Settings
At the end of the session, the students will be able to:
● describe an operating system and its features.
● describe about the Windows 10 operating system.
Keywords
● Operating system: An Operating System is a software that helps us to communicate with the computer and tell it what to do.
● Software: It is a set of instructions that tells a computer what to do.
● Booting: When you press the power button to turn on your computer, the computer starts getting the system ready for you to use it. This process is called booting.
Ask the students what things they can do on a computer.
Ask the students if they know what makes a computer run smoothly and do multiple things.
Explain to the students about the operating system and its features.
Also tell them about the popular operating system— Windows 10.
Think and Tell Conclude the concepts
Assign homework
● Ask students what tasks they can do on a computer.
● Tell the students that they can do a lot of things on computers—play music, watch videos, play games, etc. And then tell them that the operating system makes the computer run smoothly.
15 mins
Engage
Explain the following concepts:
Learning Outcomes
Describe an operating system and its features.
Explanation
Explain to the students that an operating system is a software that helps us communicate with the computer and tell it what to do. Also, explain its features, as given on page 21.
Describe about the Windows 10 operating system.
Introduce the students to the Windows 10 operating system and tell them the steps to start a computer with this operating system. Also, brief them about the taskbar, start button, icons and wallpaper, as given on pages 22 and 23.
● Read aloud the questions provided in Do It Yourself 2A. Encourage the students to solve the questions. Instruct the students to write the answers in their book.
Correct Responses:
1. d. All of the above
3
2. a. F b. T c. T
3. Match the Columns.
Column A
Desktop
Column B
Manages computer software
Booting Process of starting the computer
Taskbar Area where you see icons and wallpapers
Build
7 mins
● Ask the students to give the answer to the question ‘’Which icons do you think we should have on our desktop?’’ asked in the Think and Tell section, as given on page 23.
Possible Responses: Recycle bin, Google Chrome
Sum Up
3 mins
● Conclude the session by summarising that an operating system helps us to communicate with the computer and tell it what to do. An operating system has features such as easy-to-use interface, file management, multitasking, etc. Booting is the process that starts getting the system ready for you to use it when you turn on the computer. The Taskbar is the bar in the bottom of the window.
● Assign the following questions from the Chapter Checkup given at the end of the chapter as homework.
A. Fill in the Blanks: Questions 1, 2, and 3
B. Tick the Correct Option: Questions 2 and 4
C. Who Am I?: Questions 1, 2, and 3
D. Write T for True and F for False: Question 1
E. Answer the Following Questions: Questions 1 , 2, and 3
F. Apply Your Learning: Question 2
At the end of the session, the students will be able to:
● discuss the different elements of the Windows 10 desktop.
● apply few shortcut keys for Windows 10.
Ask the students the names of different elements they studied in the previous session. Explain the students about the different elements of the desktop. and the Windows 10 shortcut keys.
Group discussion Conclude the concepts Assign homework
● Ask the students the names of different elements they studied in the previous session.
● Now, build the concept by discussing the different elements of the Windows 10 desktop.
Explain the following concepts:
Discuss the different elements of the Windows 10 desktop.
Apply few shortcut keys for Windows 10.
Explain to the students about the taskbar and its components. Describe the Aero Peek feature of Windows 10. Also, tell them the steps to change the taskbar location, as given on pages 24 and 25.
Tell the students that the windows key is a special key at the bottom-left of the keyboard. Also, tell them about a few shortcut keys and their functions, as given on page 26.
● Read aloud the questions provided in Do It Yourself 2B section. Encourage the students to solve the questions. Instruct the students to write the answers in their book.
Correct Response: Do It Yourself 2B
1. c. Using Aero Peek 2.

● Conduct a group discussion in the class among the students based on the topic “Is the functionality of the desktop show/hide button and Aero Peek feature the same?'' provided in the Discuss section, as mentioned on page 24.
Possible Response: Yes, both the desktop show/hide button and Aero Peek feature allow you to view the desktop, but Aero Peek also lets you temporarily preview the desktop without minimizing open windows.
● Conclude the session by summarising different elements of a desktop such as taskbar and its components, aero peek, changing taskbar location. Also tell them that the windows key is used in combination with other keys to make the shortcut keys.
● Assign the following questions from the Chapter Checkup given at the end of the chapter as homework.
A. Fill in the Blanks: Questions 4 and 5
B. Tick the Correct Option: Questions 1 and 3
C. Who Am I? Question 4
D. Write T for True and F for False: Questions 3 and 4
E. Answer the Following Questions: Questions 4 and 5
F. Apply Your Learning: Question 3
At the end of the session, the students will be able to:
● set the theme colour and theme font of the desktop.
● set date and time.
Ask the students if they know that they can change the theme colour of the desktop. Explain to the students how to set the theme colour and theme font of the desktop. Also, tell them how to set the date and time.
Think and Tell Conclude the concepts Assign homework
● Ask the students if they know that they can change the theme colour of the desktop.
● Then, build the concept by telling them how to customise the colours on their computer.
5 mins
15 mins Engage
Explain the following concepts:
Learning Outcomes
Explanation
Set the theme colour and theme font of the desktop. Tell the students the steps to customise the colours on their computers. Also tell them the steps to adjust fonts on their computers, as given on pages 27 to 29.
Set date and time. Explain to the students the steps to set the date and time, as given on page 29.
● Ask the following questions from the students to check for understanding.
1. How can you set the date and time on your computer?
a. Go to the Control Panel and select “Date and Time”.
b. Right-click on the taskbar and choose “Date and Time Settings”.
c. Use the shortcut key “Ctrl + D”.
d. Open the Start menu and click on “Time and Date”.
2. Write T for True and F for False.
a. The theme setting colour can be changed.
b. The theme font style can be changed.
Correct Responses:
1. d. Open the Start menu and click on “Time and Date”.
2. a. T b. T
● Conduct a group discussion in the class among the students based on the topic “How to customise the colours on your computer”.
Possible response:
Click the Start button and select the Settings menu The Windows Settings opens. Choose the Personalization option from the menu Select Colors option from the sidebar Choose a colour of your choice from the Windows colors palette The changes will take effect right away.
3 mins
● Conclude the session by summarising that we can apply various settings such as theme colour, font, date and time, on the computer desktop, etc.
● Assign the following questions from the Chapter Checkup given at the end of the chapter as homework.
D. Write T for True and F for False: Question 2
F. Apply Your Learning: Questions 1 and 4
Mel and Conji, young wizards, start on a journey to rescue their friend, Eva and save their magical world, Avora. After a mysterious attack pulls Eva into a computer, they discover that Lord Ero is behind the Dark Magic. Guided by the Elders, they explore the Hidden Library, where they learn about the MagiTech Keystone, a powerful object Lord Ero seeks to destroy Avora. The Keystone’s scattered pieces can only be gathered by pure-hearted wizards. Mel and Conji set off on their journey, with the help of the Elders to find the pieces before Lord Ero could. They use different programmes and graphics to find those pieces. Facing traps and challenges, Mel and Conji recover the pieces and free Eva, who was brainwashed by Lord Ero. She attacks Mel, Conji and even the Elders, who escape the situation narrowly. In the final battle, they use their combined strength and activate the Keystone to stop Lord Ero. Lord Ero had taken away the power of all the machines in Avora. They use AI to link the machines to the power of the Keystone and restore all of them. Their bravery and teamwork save Avora and bring lasting peace.
● Mel and Conji are in a dark chamber with a mysterious voice echoing around them.
● Mel is scared of the dark and asks Conji to cast a spell to bring light into the chamber.
● Conji uses the spell “LUMIS,” and the lights return, revealing a computer screen and books.
● They find files on the computer and a pile of books on the table, but everything is disorganized.
● Mel suggests organizing files into folders and subfolders for easier access to information.
● Conji plans to create magical labels for the books to help organize them.
● Mel and Conji feel excited about working together to find new information that may lead them to Eva.
This chapter is divided into the following classroom sessions.
1. Introduction to Files and Folders
2. Renaming and Selecting Files and Folders
3. Duplicating and Moving Files and Folders & Shortcut Icons
4. Deleting and Restoring Files and Folders
5. Good Practices While Using a Computer
At the end of the session, the students will be able to:
● work with files and folders.
● create a file, folder, and subfolder on the desktop.
Keywords
● File: A file is a digital space used to store different types of information on a computer. It acts like a container for items, like images, videos, texts, etc.
● Folder: A folder is a container that stores files. Folders help organise files, making them easier to find.
Ask the students how they keep their toys or books organised and why do they think it is important to have a designated place for everything.
Describe that just like we organise our physical belongings, we also organise our digital information on a computer using files and folders. Also, explain the steps to create files, folders, and subfolders to the students.
Group discussion Conclude the concepts
● Ask the students that how they keep their toys or books organised and why do they think it is important to have a designated place for everything.
● Relate the concept of organising the items on the computer to files and folders.
Explain the following concepts:
Learning Outcomes
Explanation
Work with files and folders. Explain the concept of files and folders to students. Describe how all the information is stored in files on a computer system. A file is a digital space used to store different types of information on a computer and a folder is a container that stores files and other folders, as given on page 41.
Create a file, folder, and subfolder on the desktop.
Explain the steps to create a Word file, folder, and sub-folder to the students as given on pages 42 and 43.
● Read aloud the questions provided in the Do It Yourself 3A section and encourage the students to solve the questions. Instruct the students to write the answers in the book.
Correct Responses:
The steps to create a folder are:
a. Right click on the desktop.
b. Position the cursor over the New option.
c. Click on the Folder option.
d. Give it a name.
Build
7 mins
● Conduct a group discussion in the class among the students based on the topic ”When we are at school, we take notes in our notebooks. Can we compare a computer file with a notebook?” provided in the Discuss section as mentioned on page 41.
Possible Responses: Yes, we can compare a computer file with a notebook. Just like we write and store information in a notebook at school, we can create and save information in a computer file. Both notebooks and computer files help us keep our thoughts, ideas, and important information organised and accessible.
Sum Up
3 mins
● Conclude the session by summarising that files are digital containers that store different kinds of information on a computer, and folders help us organise these files. We learnt how to create a Microsoft Word file and folders or subfolders on the desktop to manage information effectively on a computer.
● Assign the following questions from the Chapter Checkup given at the end of the chapter as homework.
A. Fill in the Blanks: Questions 1 and 3
B. Tick the Correct Option: Questions 1, 2, 3, and 4
C. Who Am I?: Questions 1 and 2
D. Write T for True and F for False: Questions 1 and 2
E. Answer the Following Questions: Question 1
F. Apply Your Learning: Question 4
At the end of the session, the students will be able to:
● rename files and folders.
● select files and folders.
Keyword
● Renaming: Renaming a folder or a file means changing the name of the digital files and folders.
Ask the students if they label the boxes containing their important things.
Now, relate them to the concept of renaming the files and folders according to their preferences.
Explain to the students how to rename files and folders and how to select them.
Think and Tell Conclude the concepts
Assign homework
Warm Up
● Ask the students if they label the boxes containing their important things.
● Now, relate them to the concept of renaming the files and folders according to their preferences.
Engage
Explain the following concepts:
Learning Outcomes
Explanation
Rename files and folders. Explain to the students that the new files and folders are assigned the default names once they are created. However, they can be renamed later, according to our preferences. Describe the steps to do so as given on pages 43 and 44.
Select files and folders. Explain that to do any operation on a file or folder, we first need to select it. Discuss that there are various methods to select single or multiple files and folders, as given on pages 45 and 46.
● Read aloud the questions provided in Do It Yourself 3B section Questions 1, 2, and 3. Encourage the students to solve the questions. Instruct the students to write the answers in the book.
Correct response
1. Left 2. Ctrl 3. Shift
Build
7 mins
● Ask the students to give the answer to the question “Why do you think it is important to give correct names to folders?” asked in the Think and Tell section given on page 44.
Possible Response: Giving correct names to folders is important for efficient organisation and easy access to files.
3 mins
Sum Up
● Conclude the session by summarising that we can rename the files and folders in our computer. We need to select the files before performing any operations on them.
● Assign the following questions from the Chapter Checkup given at the end of the chapter as homework.
A. Fill in the Blanks: Question 4
At the end of the session, the students will be able to:
● duplicate files and folders.
● move files and folders.
● describe how to create shortcut icons on the desktop.
Keywords
● Duplicate: To duplicate is to make an exact copy of a file or folder.
● Move: To move is to transfer a file or folder to a different location.
● Shortcut icons: Shortcut icons are quick-access symbols on the desktop for frequently used
or folders.
Ask the students if they ever copied the same assignment in their school.
Explain how to create a duplicate file and how to move a file or folder to a different location. Also, describe how to create shortcut icons on the desktop.
Think and Tell Conclude the concepts Assign homework
● Ask the students if they ever copied the same assignment in their school.
● Then, build the concept by telling them how to duplicate a file in the computer.
Explain the following concepts:
Learning Outcomes
Explanation
Duplicate files and folders. Explain to the students that we can create a duplicate file or a folder by using the Copy and Paste options as given on pages 46 and 47. Also, describe the steps to do so.
Move files and folders. After that, explain the concept of moving a file or folder to a different location on the computer along with the steps as given on page 48. Create shortcut icons on desktops. Explain to the students that the shortcut icon helps us quickly open a file or folder, as given on page 48. Also, describe the steps to do so as given on page 49.
● Read aloud the questions provided in the Do It Yourself 3B section Questions 4 and 5. Encourage the students to solve the questions. Instruct the students to write the answers in the book. Correct Responses: 4. Copy 5. Cut
7 mins
● Ask the students to give the answer to the question “How is moving files and folders different from duplicating them?” asked in the Think and Tell section given on page 48.
Possible Response: Moving files and folders relocates them, while duplicating creates copies of them.
3 mins
● Conclude the session by summarizing that we can also create duplicate files using the Copy and Paste options and move the files using the Cut and Paste options. At last, revise the steps of creating the shortcut icons on the desktop.
● Assign the following questions from the Chapter Checkup given at the end of the chapter as homework.
A. Fill in the Blanks: Question 5
C. Who Am I?: Question 4
D. Write T for True and F for False: Questions 3 and 4
E. Answer the Following Questions: Questions 2 and 3
F. Apply Your Learning: Question 4
At the end of the session, the students will be able to:
● deleting files and folders.
● restoring files and folders.
Keywords
● Delete: Deleting a folder or file means removing it from our computer.
● Restoring: Restoring a folder or file means getting it back to the previous location from the recycle bin.
Ask the students in order to keep their home organised and clean, have they keep throwing away things that are not in use anymore. Explain how to delete a file and folder. Also, tell them how to restore it.
Group discussion Conclude the concepts Assign homework
● Ask the students in order to keep their home organised and clean, do they keep throwing away things that are not in use anymore?
● Then, build the concept by telling them how to delete a file or folder from a computer.
Engage
Explain the following concepts:
Learning Outcomes
15 mins
Explanation
Deleting files and folders. Explain to the students that deleting a folder or file means removing it from our computer, as given on page 50. Also, describe the steps to do so.
Restoring files and folders. Explain to the students that you can restore the deleted folder or file. Restoring means to bring something back along with the steps as given on page 50.
● Read aloud the questions provided in the Do It Yourself 3C section. Encourage the students to solve the questions. Instruct the students to write the answers in the book.
Correct Responses: 1. T 2. T 3. F 4. F
7 mins
● Conduct a group discussion in the class among the students based on the topic “What is a recycle bin?”
Possible Response: The Recycle Bin is a special folder on a computer where deleted files and folders are temporarily stored. It allows you to recover files that were deleted by mistake.
3 mins
● Conclude the session by summarizing that deleting a folder or file means removing it from our computer and restoring means to bring something back.
● Assign the following questions from the Chapter Checkup given at the end of the chapter as homework.
A. Fill in the Blanks: Question 2
C. Who Am I?: Question 3
F. Apply Your Learning: Question 2
At the end of the session, the students will be able to:
Ask the students whether they follow the teacher’s instructions to move in a line or to keep quiet in the class. Tell them that just as they practice good manners in daily life, we also have a few good practices when using a computer.
Discuss the various good practices with the students that they should follow while using the computer.
● Ask the students whether they follow the teacher’s instructions to move in a line or to keep quiet in the class.
● Tell them that just as they practice good manners in daily life, we also have a few good practices when using a computer.
● follow good practices while using a computer. 15 mins Engage
Explain the following concepts:
Learning Outcome
Follow good practices while using a computer.
Explanation
Explain to the students that they should follow a few good practices when using a computer, such as naming and storing the files and folders properly, organising the files in labelled folders, being respectful of others’ files, etc., as given on page 51.
Ask additional questions to the students to check for understanding.
1. Give any two good practices that we should follow while using a computer.
Possible response: Organise the files in labelled folders. This will help you locate a file quickly.
2. Be respectful of others’ files. Do not delete or change the files that belong to someone else without their permission.
7 mins
● Conduct a group discussion in the class among students based on the topic provided below:
Discuss why it is important to name and store files properly.
Possible Responses: It helps to keep the computer organised, especially when many people share one computer.
3 mins
● Conclude the session by summarising that students should follow a few good practices when using a computer, such as naming and storing the files and folders properly, organising the files in labelled folders, being respectful of others’ files, etc.
● Assign the following questions from the Chapter Checkup given at the end of the chapter as homework.
F. Apply Your Learning: Questions 1 and 3
Mel and Conji, young wizards, start on a journey to rescue their friend, Eva and save their magical world, Avora. After a mysterious attack pulls Eva into a computer, they discover that Lord Ero is behind the Dark Magic. Guided by the Elders, they explore the Hidden Library, where they learn about the MagiTech Keystone, a powerful object Lord Ero seeks to destroy Avora. The Keystone’s scattered pieces can only be gathered by pure-hearted wizards. Mel and Conji set off on their journey, with the help of the Elders to find the pieces before Lord Ero could. They use different programmes and graphics to find those pieces.
Facing traps and challenges, Mel and Conji recover the pieces and free Eva, who was brainwashed by Lord Ero. She attacks Mel, Conji and even the Elders, who escape the situation narrowly. In the final battle, they use their combined strength and activate the Keystone to stop Lord Ero. Lord Ero had taken away the power of all the machines in Avora. They use AI to link the machines to the power of the Keystone and restore all of them. Their bravery and teamwork save Avora and bring lasting peace.
● Mel and Conji are in the computer lab looking for a document that has some strange name.
● They find the document as it has a strange name called ‘Infinity Stone’, so they decide to open it.
● The document talks about a magical keystone with unimaginable power.
● Conji is curious about the MagiTech keystone and wants to learn more.
● Mel suggests using the internet to find information about MagiTech.
● Conji is interested in the internet and asks Mel to tell more about it.
● Mel explains that the internet is easy to use and very useful for finding information.
This chapter is divided into the following classroom sessions
1. About the Internet and Basic Requirements
2. Basic Terminologies of the Internet
At the end of the session, the students will be able to:
● define internet.
● identify the basic requirements for an internet connection.
Keywords
● Internet: The internet is a network of networks that connects computers and devices from all over the world.
● Network: A network is a group of computers connected to each other.
Ask the students what makes it possible to video call a friend who may be in a different part of the world.
Explain the term ‘internet’ to the students. Also, discuss the basic requirements for an internet connection.
Think and Tell Group discussion Conclude the concepts Assign homework
Action Plan
5 mins
Warm Up
● Ask the students what makes it possible to video call a friend who may be in a different part of the world.
● Then relate the concept by telling them that internet helps them do so.
Engage
Explain the following concepts:
Learning Outcomes
15 mins
Explanation
Define internet. Explain to the students that the internet is a network of networks that connects computers and devices from all over the world. Also, get them familiar with the term network, as given on page 59.
Identify the basic requirements for an internet connection.
Tell the students that we need a computer and an internet connection to start exploring the internet. Tell them to set up an internet connection, we need a modem, ISP, and communication media as given on pages 59 and 60.
● Read aloud the questions provided in the Do It Yourself 4A and encourage students to solve them. Instruct them to write the answers in their notebook.
Correct Responses: 1.
● Ask the students to answer the question, “Can you think of more examples of Analog and Digital signals?” asked in the Think and Tell section on page 60.
Possible Responses: Analog signals: Human voice transmitted through airwaves. Digital signals: Text message sent over a cellular network.
● Conduct a group discussion in the class based on the topic “Find out which type of internet connection your house or school has.” provided in the Discuss section on page 60.
Possible Response: Cable networks are used in homes. A cable from a local central office (CO) runs to our homes or schools and provides internet.
● Conclude the session by summarising that the internet is like a web that connects computers and phones all over the world, letting us send messages, pictures, and even see each other on video calls. It started many years ago with just a few computers and has grown so much that we can now shop online, learn new things, and make friends in faraway places. To connect to the web, our computers
use a special box called modem and an ISP. The fastest connection is through fibre optic cables as they carry information in the form of light.
● Assign the following questions from the Chapter Checkup given at the end of the chapter as homework.
A. Fill in the Blanks: Questions 1 and 2
B. Tick the Correct Option: Question 1
C. Who Am I?: Questions 4 and 5
D. Write T for True and F for False: Questions 1, 2, 3, 4, and 5
E. Answer the Following Questions: Questions 1 and 2
F. Apply Your Learning: Questions 1 and 2
At the end of the session, the students will be able to:
● define the basic terminologies of internet.
● Describe about Google Chrome, search engines, URL, and Net Surfing.
Tell the students that whenever they pick a new hobby, they need to learn some basic terms about it. Similarly, before using the internet, they need to know some basic terms about it.
Discuss the basic terminologies of the internet such as Web page, Website, WWW, Web browser, Search Engine, URL, and Net Surfing. Discuss Google chrome and the steps to use Chrome and its components.
Group discussion Conclude the concepts Assign homework
● Tell the students that whenever they pick a new hobby, they need to learn some basic terms about it. Similarly, before using the internet, they need to know some basic terms about it.
● Build the concept to introduce and explain to them the basic terminologies of internet.
Explain the following concepts:
Define the basic terminologies of internet.
Describe the basic terminologies of the internet, such as webpages, websites, WWW, etc., to students, as given on pages 61 and 62. Describe about Google Chrome, search engines, URL, and Net Surfing.
Explain to the students that Google Chrome is a web browser made by Google. It is one of the most popular browsers in the world. Explain the steps to open Chrome. Also, describe about search engines, URL, and net surfing to students, as explained on pages 62 to 64.
● Read aloud the questions provided in the Do It Yourself 4B and encourage the students to solve them. Instruct them to write the answers in their notebook.

c Web World Wide
Correct Responses:
Match the column:
1. b. World Wide Web
2. a World Wild Web
Column A


Build


7 mins
● Conduct a group discussion in the class on the topic ‘Net Surfing’.
Possible Responses: Net surfing is used to visit websites, watch videos, listen to music, and shopping. We require an internet connection and web browser for it.
3 mins
Sum Up
● Conclude the session by summarising that digital documents, called webpages, when grouped together, form a website. We use programs called web browsers to explore websites and find information through search engines such as Google Chrome, all by typing in unique addresses called URLs. Net surfing involves using a computer or mobile device with an internet connection and a web browser to visit websites, watch videos, listen to music, and discover new things online.
● Assign the following questions from the Chapter Checkup given at the end of the chapter as homework.
A. Fill in the Blanks: Questions 3, 4, and 5
B. Tick the Correct Option: Questions 2, 3, and 4
C. Who Am I?: Questions 1, 2, and 3
E. Answer the Following Questions: Questions 3 and 5
F. Apply Your Learning: Questions 3 and 4
Mel and Conji, young wizards, start on a journey to rescue their friend, Eva and save their magical world, Avora. After a mysterious attack pulls Eva into a computer, they discover that Lord Ero is behind the Dark Magic. Guided by the Elders, they explore the Hidden Library, where they learn about the MagiTech Keystone, a powerful object Lord Ero seeks to destroy Avora. The Keystone’s scattered pieces can only be gathered by pure-hearted wizards. Mel and Conji set off on their journey, with the help of the Elders to find the pieces before Lord Ero could. They use different programmes and graphics to find those pieces. Facing traps and challenges, Mel and Conji recover the pieces and free Eva, who was brainwashed by Lord Ero. She attacks Mel, Conji and even the Elders, who escape the situation narrowly. In the final battle, they use their combined strength and activate the Keystone to stop Lord Ero. Lord Ero had taken away the power of all the machines in Avora. They use AI to link the machines to the power of the Keystone and restore all of them. Their bravery and teamwork save Avora and bring lasting peace.
● Mel and Conji go to the Museum to look for more clues, and to find Eva as well as the pieces of the keystone.
● Over there, they find one piece of the keystone shining in the distance.
● A magic portal opens behind them and Eva comes out of it.
● Eva asks Mel and Conji to hand the piece of the keystone over to her if they want to save themselves from the Lord Ero.
● Eva tells them that she has decided to serve Lord Ero as she has realised the true strength of dark magic. She also tells them that she is no longer their friend.
● Conji then uses a spell to put Eva to sleep in order to restore her memories.
● Mel compiles Eva’s memories into a Google Doc.
● Conji then used a powerful spell to try and restore Eva’s memory. However, the spell does not work.
● Mel then tells Conji that the spell did not work probably because the document is not clear and that they need to format it properly.
● Mel then explains to Conji what formatting a document means.
At the end of the session, the students will be able to:
● describe what a word processor is.
● create a document.
● identify the components of a Google document.
● add text in a Google document.
● format text.
Keywords
● Word processor: A word processor is a software used to type and edit text.
● Google Docs: It is a free online word processor that is easy to use. It allows you to work together with your friends.
● Formatting: Formatting refers to the process of changing the appearance and layout of a written document or text to make it more visually appealing, organised, and easier to read and understand.
Ask the students how they would write a paragraph on the topic ‘Hockey’ on a computer.
Explain to the students what a word processor is. Then, guide them through the steps to create a Google document. Explain the different components of a Google document and show them how to add and format text in Google Docs.
Think and Tell Conclude the concepts Assign homework
● Ask the students how they would write a paragraph on the topic ‘Hockey’ on a computer.
● Tell the students that a word processor is a software which is used to type and edit text. Microsoft Word and Google Docs are the two of the most popular ones.
Explain the following concepts:
Describe what a word processor is.
Tell the students that a word processor is a software that is used to type and edit text. Also, explain the features of Google Docs, as given on page 74.
Create a document. Explain the steps to create a Google doc, as given on page 74.
Identify the components of a Google document.
Add text.
Format text.
Tell the students about the different components of the Google document window, such as the menu bar, toolbar, working area, etc., as given on page 75.
Explain to the students how to add text in a Google document, as given on page 75.
Tell the students what formatting text means and explain the steps to format text, as given on pages 76 and 77.
● Read aloud the questions provided in the Do It Yourself 5A section, Questions 1 and 2. Encourage the students to solve the questions. Instruct them to write the answers in their book.
Correct Response:
1. Google Docs
2. Bold
Build
7 mins
● Ask the students to answer the question, “Would you ever make the title of your paragraph bold? Why or why not?” given in the Think and Tell section on page 77.
Possible Responses: Yes/No
Correct Response: Yes, because the title of the paragraph should look thicker and darker than the rest of the text.
Sum Up
3 mins
● Conclude the session by stating that a word processor is a software which is used to type and edit a text. The two most popular ones are Microsoft Word and Google Docs. There are different components of the Google document window, such as the menu bar, toolbar, working area, etc. Formatting text refers to the process of changing the appearance and layout of a written document or piece of text to make it more visually appealing, organised, and easier to read and understand. Also, summarise the steps to create a Google document and how to add and format text.
● Assign the following questions from the Chapter Checkup given at the end of the chapter as homework.
A. Fill in the Blanks: Questions 1 and 4
B. Tick the Correct Option: Question 1
C. Who Am I?: Question 1
D. Write T for True and F for False: Questions 3, 4, and 5
E. Answer the Following Questions: Questions 1 and 4
At the end of the session, the students will be able to:
● describe what a word processor is.
● create a document.
● identify the components of a Google document.
● add text in a Google document.
● format text.
Keywords
● Word processor: A word processor is a software used to type and edit text.
● Google Docs: It is a free online word processor that is easy to use. It allows you to work together with your friends.
● Formatting: Formatting refers to the process of changing the appearance and layout of a written document or piece of text to make it more visually appealing, organised, and easier to read and understand.
Let the students watch the video or the learning slides related to the topic on the digital panel.
Explain to the students what a word processor is. Then, demonstrate the steps to create a Google document. Explain the different components of a Google document and show them how to add and format text in Google Docs.
Attempt the activity given on the Assignment page.
Conclude the concepts Assign homework
Warm Up
● Instruct the students to go to the Tekie’s Digital platform and open a Lab session on Formatting Documents 1.
● Show the Learning slides or the video and discuss the concepts shown on the panel.
Explain the following concepts:
Describe what a word processor is.
Tell the students that a word processor is a software used to type and edit text. Then, explain the features of Google Docs, as given on page 74.
Create a document. Demonstrate to the students the steps to create a Google document, as given on page 74.
Identify the components of a Google document. Tell the students about the different components of the Google document window, such as the menu bar, toolbar, working area, etc., as given on page 75.
Add text. Demonstrate to the students how to add text to a Google document, as given on page 75.
Format text. Explain to the students what formatting text means. Demonstrate to them how to format text, as given on pages 76 and 77.
● Ask the questions provided on the slides one by one to assess the students’ understanding. Discuss the answers to the questions with the students. If necessary, ask additional relevant questions.
7 mins
Build
● Instruct the students to attempt the assignment by clicking on the Assignment tab.
● Explain the activity to the students.
3
● Conclude the session by summarising that a word processor is a software which is used to type and edit text. There are different components of the Google document window, such as the menu bar, toolbar, working area, etc. Formatting text refers to the process of changing the appearance and layout of a written document or piece of text to make it more visually appealing, organised, and easier to read and understand. Also, summarise the steps to create a Google document and how to add and format text.
● Assign the additional activity given on the panel to the students as homework.
At the end of the session, the students will be able to:
● use the Paint format tool.
● use superscript and subscript formatting styles.
Keywords
● Paint format: This tool helps us copy the formatting from one piece of text and apply it to another text.
● Superscript: It is a formatting style where the text or number is made smaller and raised above the regular text line.
● Subscript: It is a formatting style where the text or number is made smaller and lowered below the regular text line.
Ask the students if they want to apply the same formatting to all the texts in the document. Should they repeat the steps one by one all over again?
Explain to the students how to apply the Paint format, superscript, and subscript features.
Action Plan
Think and Tell Conclude the concepts
Warm Up
● Ask the students if they want to apply the same formatting to all the texts in the document. Should they repeat the steps one by one all over again?
● Tell them that they can use the Paint Format tool. This tool will help to format in a quicker way.
Engage
Explain the following concepts:
Learning Outcomes
Use the Paint format tool.
Explanation
Tell the students that the Paint Format tool helps us copy the formatting from one piece of text and apply it to another text. Explain the steps to use the Paint Format tool, as given on pages 77 and 78.
Use superscript and subscript formatting styles. Tell the students that applying a superscript makes the text or number smaller and raised above the regular text line, while applying a subscript makes it smaller and lowered below the regular text line. Explain the steps to apply these two features, as given on pages 78 and 79.
● Read aloud the questions provided in the Do It Yourself 5A section, Questions 3 and 4. Encourage the students to solve the questions. Instruct them to write the answers in their book.
Correct Responses:
3. Paint format
4. Superscript, Subscript
Build
7 mins
● Conduct a group discussion in the class on the topic, ‘How can superscript and subscript enhance the readability of scientific or mathematical documents?’
Correct Response: They make formulas, equations, and references clear and professional, helping the reader easily distinguish elements like powers and indices.
3 mins
● Conclude the session by summarising that the Paint Format tool helps us copy the formatting from one piece of text and apply it to another text. Applying a superscript makes the text or number smaller and raised above the regular text line, and applying a subscript makes it smaller and lowered below the regular text line.
● Assign the following questions from the Chapter Checkup given at the end of the chapter as homework.
A. Fill in the Blanks: Questions 2 and 5
B. Tick the Correct Option: Question 3
C. Who Am I?: Question 2
At the end of the session, the students will be able to:
● use the Paint format tool.
● use superscript and subscript formatting styles.
Keywords
● Paint format: This tool helps us copy the formatting from one piece of text and apply it to another text.
● Superscript: It is a formatting style where the text or number is made smaller and raised above the regular text line.
● Subscript: It is a formatting style where the text or number is made smaller and lowered below the regular text line.
Let the students watch the video or the learning slides related to the topic on the digital panel.
Demonstrate to the students how to apply the Paint format, superscript, and subscript features. Attempt the activity given on the Assignment page.
Conclude the concepts Assign homework
Warm Up
● Instruct the students to go to the Tekie’s Digital platform and open a Lab session on Formatting Documents 3.
● Show the Learning slides or the video one by one and discuss the concepts shown on the panel.
Explain the following concepts:
Learning Outcomes
Explanation
Use the Paint format tool. Tell the students that the Paint Format tool helps us copy the formatting from one piece of text and apply it to another text. Explain the steps to use the Paint Format tool, as given on pages 77 and 78.
Use superscript and subscript formatting styles.
Tell the students that applying a superscript makes the text or number smaller and raised above the regular text line, while applying a subscript makes it smaller and lowered below the regular text line. Explain the steps to apply these two features, as given on pages 78 and 79.
● Ask the questions provided on the slides one by one to assess the students’ understanding. Discuss the answers to the questions with the students. If necessary, ask additional relevant questions.
7 mins
● Instruct the students to attempt the assignment by clicking on the Assignment tab.
● Explain the activity to the students. Sum Up
3 mins
● Conclude the session by summarising that the Paint Format tool helps us copy the formatting from one piece of text and apply it to another text. Applying a superscript makes the text or number smaller and raised above the regular text line, and applying a subscript makes it smaller and lowered below the regular text line.
● Assign the additional activity given on the panel to the students as homework.
At the end of the session, the students will be able to:
● add a header and a footer to a document.
● insert a page break in a document.
● Insert a line break in a document.
Keywords
● Header: The text that appears at the top of every page in a document.
● Footer: The text that appears at the bottom of every page in a document.
● Page break: It is an instruction to the computer that tells it where to start a new page, when writing or printing.
● Line break: It is an instruction to start a new line.
Ask the students if they have noticed the page number on every page in all the books.
Explain the use and the steps to apply the header and footer, page break, and line break.
Think and Tell Conclude the concepts Assign homework
● Ask the students if they have noticed the page number on every page in all the books.
● Now, tell the students that this is possible because of a feature called footer in word processors.
Engage
Explain the following concepts:
Add a header and footer to a document.
Explanation
Tell the students that the header is the text that appears at the top of every page, and the footer is the text that appears at the bottom of every page in a document. Also tell them the steps to add a header and footer to a document, as given on page 80.
Insert a page break in a document.
Insert a line break in a document.
Explain the steps to insert a page break, as given on page 80.
Explain the steps to insert a line break, as given on page 81.
● Ask the following questions to the students to check their understanding.
1. Differentiate between a header and a footer.
Correct Response: The header is the text that appears at the top of every page in a document, whereas the footer is the text that appears at the bottom of every page in a document.
2. What is a page break?
Correct Response: A page break is an instruction to the computer that tells it where to start a new page, when writing or printing.
3. Define line break.
Correct Response: The line break is an instruction to start a new line.
7 mins
● Ask the students to answer the question “What information can you include in headers and footers?” given in the Think and Tell section on page 80.
Possible Responses: The header can include the company logo, title of the document, author name, etc., while the footer can include the page number, notes, etc.
3 mins
● Conclude the session by summarising that the header is the text that appears at the top, and the footer is the text that appears at the bottom of every page in a document. Also, tell them the steps to use the header, footer, page break, and line break in Google Docs.
● Assign the following questions from the Chapter Checkup given at the end of the chapter as homework
A. Fill in the Blanks: Question 3
B. Tick the Correct Option: Questions 2, 4, and 5
C. Who Am I?: Question 4
D. Write T for True and F for False: Questions 1 and 2
E. Answer the Following Questions: Question 3
F. Apply Your Learning: Questions 1, 2, and 3
At the end of the session, the students will be able to:
● add a header and a footer to a document.
● insert a page break in a document.
● Insert a line break in a document.
● Header: The header is the text that appears at the top of every page in a document.
● Footer: The footer is the text that appears at the bottom of every page in a document.
● Page break: A page break is an instruction to the computer that tells it where to start a new page, when writing or printing.
● Line break: The line break is an instruction to start a new line.
Let the students watch the video or the learning slides related to the topic on the digital panel.
Demonstrate to the students how to apply the header and footer, page break, and line break.
Attempt the activity given on the Assignment page. Conclude the concepts Assign homework
● Instruct the students to go to the Tekie’s Digital platform and open a Lab session on Formatting Documents 5.
● Show the Learning slides or the video and discuss the concepts shown on the panel.
Engage
Explain the following concepts:
Learning
Add a header and footer to a document.
Explanation
Tell the students that the header is the text that appears at the top and the footer at the bottom of every page in a document. Also demonstrate to them the steps to add a header and a footer to a document, as given on page 80.
Insert a page break in a document.
Insert a line break in a document.
Demonstrate the steps to insert a page break, as given on page 80.
Demonstrate the steps to insert a line break, as given on page 81.
● Ask the questions provided on the slides one by one to assess the students’ understanding. Discuss the answers to the questions with the students. If necessary, ask additional relevant questions.
7 mins
Build
● Instruct the students to attempt the assignment by clicking on the Assignment tab.
● Explain the activity to the students. Sum Up
3 mins
● Conclude the session by summarising that the header is the text that appears at the top, and the footer is the text that appears at the bottom of every page in a document. Also, tell them the steps to use header, footer, page break, and line break in Google Docs.
● Assign the additional activity given on the panel to the students as homework.
At the end of the session, the students will be able to:
● insert a column in a document.
● set the page orientation.
Keyword
● Page Orientation: It refers to the direction in which a document is displayed.
Warm
Ask the students if they have ever noticed how a newspaper is set up.
Explain the steps to insert a column and set the page orientation in a document.
Group discussion Conclude the concepts Assign homework
Warm Up
● Ask the students if they have ever noticed how a newspaper is set up.
● Tell them that newspapers use a column format. We can use the column format in Google Docs as well.
15 mins
Engage
Explain the following concepts:
Learning Outcomes
Insert a column in a document.
Set the page orientation.
Explanation
Tell the students the benefits of using a column format in a document. Explain to them the steps to use the column format in Google Docs, as given on page 81.
Tell the students that the page orientation refers to the direction in which a document is displayed. Explain to them the steps to set the page orientation, as given on page 82.
● Ask the following questions to the students to check their understanding.
1. What refers to the direction in which a document is displayed?
Correct Response: Page orientation
2. Name the two types of page orientation.
Correct Response: Portrait, landscape
Build
7 mins
● Conduct a group discussion in the class among the students on the topic “Benefits of using a column format”.
Correct Response: Easy reading, organised look, space saving, etc.
3 mins
● Conclude the session by summarising that newspapers use a column format and page orientation refers to the direction in which a document is displayed.
● Assign the following questions from the Chapter Checkup given at the end of the chapter as homework.
C. Who Am I?: Question 3
E. Answer the Following Questions: Question 2
At the end of the session, the students will be able to:
● insert a column in a document.
● set the page orientation.
Keyword
● Page Orientation: It refers to the direction in which a document is displayed.
Warm Up Engage Build Sum Up
Let the students watch the video or the learning slides related to the topic on the digital panel.
Demonstrate to the students how to insert a column and set page orientation in a document.
Attempt the activity given on the Assignment page. Conclude the concepts Assign homework
Action Plan
Warm Up
● Instruct the students to go to the Tekie’s Digital platform and open a Lab session on Formatting Documents 7.
● Show the Learning slides or the video and discuss the concepts shown on the panel.
Engage
Explain the following concepts:
Learning Outcomes
Insert a column in a document.
Change the page orientation of a document.
Explanation
Tell the students the benefits of using a column format in a document. Also, demonstrate to them how to use the column format in Google Docs, as given on page 81.
Tell the students that page orientation refers to the direction in which a document is displayed. Also, demonstrate to them how to set the page orientation, as given on page 82.
● Ask the questions provided on the slides one by one to assess the students’ understanding. Discuss the answers to the questions with the students. If necessary, ask additional relevant questions.
7 mins
● Instruct the students to attempt the assignment by clicking on the Assignment tab.
● Explain the activity to the students. Sum
3 mins
● Conclude the session by summarising that newspapers use a column format and page orientation refers to the direction in which a document is displayed.
● Assign the additional activity given on the panel to the students as homework.
Mel and Conji, young wizards, start on a journey to rescue their friend, Eva and save their magical world, Avora. After a mysterious attack pulls Eva into a computer, they discover that Lord Ero is behind the Dark Magic. Guided by the Elders, they explore the Hidden Library, where they learn about the MagiTech Keystone, a powerful object Lord Ero seeks to destroy Avora. The Keystone’s scattered pieces can only be gathered by pure-hearted wizards. Mel and Conji set off on their journey, with the help of the Elders to find the pieces before Lord Ero could. They use different programmes and graphics to find those pieces. Facing traps and challenges, Mel and Conji recover the pieces and free Eva, who was brainwashed by Lord Ero. She attacks Mel, Conji and even the Elders, who escape the situation narrowly. In the final battle, they use their combined strength and activate the Keystone to stop Lord Ero. Lord Ero had taken away the power of all the machines in Avora. They use AI to link the machines to the power of the Keystone and restore all of them. Their bravery and teamwork save Avora and bring lasting peace.
● Mel and Conji are in the Council Room, telling the Elders about the events at the museum.
● Elders are surprised that Eva disappeared, and Mel explains they couldn’t break Lord Ero’s spell.
● Conji asks if the Elders are hiding something, and Mel questions why the keystone piece was left in the museum.
● The Elders reveal that the keystone was created with dark magic by Lord Ero to steal magic from Avora.
● Elder Wizard defeated Lord Ero, split the keystone, and cast a spell so only a pure wizard could reunite its pieces.
● Mel realizes Lord Ero is using Eva because of the spell on the keystone.
● Elder Robot explains he built a program to locate the next pieces of the keystone.
● Conji emphasizes the urgency to find the pieces before Lord Ero does.
● Elder Robot completes the program and gives a sheet with locations to Mel.
● Mel suggests entering the locations into a word processor and adding graphics to create a map.
● Conji asks what graphics are.
This chapter is divided into the following classroom and lab sessions
1. Using Graphics in Word Processor 1
2. Using Graphics in Word Processor 2
3. Using Graphics in Word Processor 3
At the end of the session, the students will be able to:
● work with shapes in Google Docs.
● insert shapes in Google Docs.
Keywords
● Shapes: Shapes are the outlines of things we see around us.
● 2D shapes: 2D shapes are flat shapes with only length and width, such as circles and squares.
● 3D shapes: 3D shapes are shapes with depth, like spheres and cubes.
Ask the students whether they have ever thought about how they can make their documents more interesting by adding shapes, like circles, squares, etc.
Discuss what shapes are and how to insert shapes in Google Docs.
Group discussion
Conclude the concepts
Assign homework
5 mins
Warm Up
● Ask the students whether they have ever thought about how they can make their documents more interesting by adding shapes, like circles, squares, etc.
● Build the concept of shapes and how to insert them in a document. 15
Engage
Explain the following concepts:
Learning Outcomes
Explanation
Work with shapes in Google Docs. Shapes are the outlines of things we see around us. Shapes can be 2D or 3D shapes. Explain working with shapes to the students, as given on page 91.
Insert shapes in Google Docs.
Explain the steps to insert shapes in a document to the students as given on pages 91 and 92.
● Ask the following questions to the students to check their understanding.
1. What are flat shapes and shapes with depth, also known as?
Correct Response:
The two types of shapes mentioned are 2D (flat) shapes and 3D (shapes with depth).
2. To colour the shape, which tool should be used?
Correct Response:
To colour the shape, use the Fill color tool.
Build
7 mins
● Conduct a group discussion in the class among the students based on the topic “What is the benefit of inserting shapes in a word processor?”
Possible Responses:
The benefit of inserting shapes in a word processor is to enhance visual appeal, organize content, and highlight important information.
3 mins
Sum Up
● Conclude the session by summarising that shapes are the outlines of things we see around us. Shapes can be flat or have depth. Flat shapes are called 2D shapes. They only have length and width, but no depth. Examples of 2D shapes are circles, squares, and triangles. Shapes with depth are called 3D shapes. Examples of 3D shapes are spheres, cubes, and cones. Also, revise them how to insert shapes in a word processor.
● Assign the following questions from the Chapter Checkup given at the end of the chapter as homework.
A. Fill in the Blanks: Question 1
D. Write T for True and F for False: Questions 4 and 5
F. Apply Your Learning: Questions 1, 4, and 5
At the end of the session, the students will be able to:
● work with shapes in Google Docs.
● insert shapes in Google Docs.
Keywords
● Shapes: Shapes are the outlines of things we see around us.
● 2D shapes: 2D shapes are flat shapes with only length and width, such as circles and squares.
● 3D shapes: 3D shapes are shapes with depth, like spheres and cubes.
Let the students watch the video or the learning slides related to the topic on the digital panel.
Demonstrate to the students how to insert shapes in a Google document. Attempt the activity on the Assignment page.
Conclude the concepts Assign homework
5 mins
Warm Up
● Instruct the students to go to the Tekie’s Digital platform and open a Lab session on Using Graphics in Word Processor 2
● Show the learning slides one by one and discuss the concepts shown on the slides in the panel.
10 mins
Engage
Explain the following concepts:
Learning Outcomes
Explanation
Work with shapes in Google Docs. Explain the different types of shapes, like 2D shapes and 3D shapes, to the students, as given on page 91. Give examples, too.
Insert shapes in Google Docs.
Demonstrate the steps of inserting shapes in a Google document to the students as given on pages 91 and 92.
● Ask the questions provided on the slides one by one to assess the students’ understanding. Discuss the answers to the questions with the students. If necessary, ask additional relevant questions.
12 mins
Build
● Instruct the students to attempt the assignment by clicking on the Assignment tab.
● Explain the activity to the students. Sum Up
3 mins
● Conclude the session by summarising that shapes are the outlines of things we see around us. Shapes can be flat or have depth. Flat shapes are called 2D shapes. They only have length and width, but no depth. Examples of 2D shapes are circles, squares, and triangles. Shapes with depth are called 3D shapes. Examples of 3D shapes are spheres, cubes, and cones. Also, summarise the steps to insert shapes in a Google document.
● Assign the additional activity given on the panel to the students as homework.
At the end of the session, the students will be able to:
● insert images in Google Docs.
● crop images.
Keywords
● Image: An image or a picture is a visual representation. It can be a drawing, painting, or photograph.
Ask the students that why do they find the comics more interesting than their school books.
● Cropping: Cropping is to remove unwanted parts of an image. 5 mins
Explain the different ways of inserting images in a Google document.
Explain how to crop an image.
Group discussion Conclude the concepts Assign homework
● Ask the students that why do they find the comics more interesting than their school books.
● Relate the question to the concept of images and importance of adding an image in an existing document.
Engage
Explain the following concepts:
Learning Outcomes
Explanation
Insert images in Google documents. Explain to the students that an image or a picture is a visual representation. It can be a drawing, painting, or photograph. Images are used to show people, objects, places, or ideas in a visual way. Also tell them the ways to insert images from different sources, such as from your computer and the web, to the students, as given on pages 92 to 94.
Crop images. Explain that cropping an image means removing unwanted parts of an image. Also, discuss the steps to crop an image in a Google document with the students, as given on pages 94 and 95.
● Read aloud the questions provided in the Do It Yourself 6A section and encourage the students to solve the questions. Instruct the students to write the answers in their book.
Correct Responses:
● Conduct a group discussion in the class among students based on the topic “What is the difference between an image and a shape?” provided in the Discuss section, as mentioned on page 95. Possible Response: An image or a picture is a visual representation. It can be a drawing, painting, or photograph. Images are used to show people, objects, places, or ideas in a visual way. Shapes are the outlines of things we see around us. Shapes can be flat or have depth.
● Conclude the session by summarising that in documents, you can add pictures from your computer or the internet to your projects. Also, summarise that if a picture is too big or has unwanted parts, you can use the crop tool to cut it just the way you like it.
● Assign the following questions from the Chapter Checkup given at the end of the chapter as homework.
A. Fill in the Blanks: Question 4
B. Tick the Correct Option: Questions 1 and 2
C. Who Am I?: Question 1
D. Write T for True and F for False: Question 3
E. Answer the Following: Questions 3 and 4
F. Apply Your Learning: Question 3
At the end of the session, the students will be able to:
● insert images in Google Docs.
● crop images.
Keywords
● Image: An image or a picture is a visual representation. It can be a drawing, painting, or photograph.
● Cropping: Cropping is to remove unwanted parts of an image.
Warm Up
Let the students watch the video or the learning slides related to the topic on the digital panel.
Engage Build Sum Up
Explain to the students what images are. Also, demonstrate the steps to insert images in a Google document.
Demonstrate how to crop an image in a document.
Attempt the activity on the Assignment page. Conclude the concepts Assign homework
5 mins
Warm Up
● Instruct the students to go to the Tekie’s Digital platform and open a Lab session on Using Graphics in Word Processor 4
● Show the learning slides one by one and discuss the concepts shown on the slides in the panel.
Engage
Explain the following concepts:
Learning Outcomes
Insert images in Google documents.
Explanation
Demonstrate how to insert images from different sources, such as from a computer and from web to the students, as given on pages 92 to 94.
10 mins
Crop images. Demonstrate how to use the Crop tool to crop the unwanted parts of an image to the students, as given on pages 94 and 95.
● Ask the questions provided on the slides one by one to assess the students’ understanding. Discuss the answers to the questions with the students. If necessary, ask additional relevant questions.
● Instruct the students to attempt the assignment by clicking on the Assignment tab.
● Explain the activity to the students.
● Conclude the session by summarising that in documents, you can add pictures from your computer or the internet to your projects. Also, summarise the steps of cropping an image to remove the unwanted parts using the Crop tool.
● Assign the additional activity given on the panel to the students as homework.
At the end of the session, the students will be able to:
● wrap text in different styles in a document.
Keyword
● Text Wrap: Text wrap refers to the automatic adjustment of text in a text editor, such as Google Docs, to ensure that it fits neatly without exceeding the boundaries.
Ask the students how they wrap a gift. Then, relate the topic to wrapping text around images. Explain how text can be wrapped in different styles.
Group discussion
Conclude the concepts
Assign homework
● Ask the students how they wrap a gift.
● Relate the above question to the concept of text wrapping.
Explain the following concepts:
Learning Outcome
Explanation
Wrap text in different styles in a document. Explain text wrapping to the students. Also, explain to them the default text wrapping style for a shape or an image, as given on pages 95 and 96.
● Read aloud the questions provided in the Do It Yourself 6B section and encourage the students to solve the questions. Instruct the students to write the answers in the book.
Responses:


● Conduct a group discussion in the class among the students based on the topic “Difference between behind text and in front of text styles”.
Possible response: Behind text is when the image is positioned at a specific spot on the page, and the text does not wrap around it but appears over it. In front of text the image is positioned at a specific spot on the page, and the text does not wrap around it but behind it.
● Conclude the session by summarising that we can make our text wrap around pictures in different ways, like having the text go around the image or behind it.
● Assign the following questions from the Chapter Checkup given at the end of the chapter as homework.
A. Fill in the Blanks: Questions 2, 3, and 5
B. Tick the Correct Option: Questions 3 and 4
C. Who Am I?: Questions 2, 3, and 4
D. Write T for True and F for False: Questions 1 and 2
E. Answer the Following: Questions 1, 2, and 5
F. Apply Your Learning: Question 2
At the end of the session, the students will be able to:
● wrap text in different styles in a document.
Keyword
● Text Wrap: Text wrap refers to the automatic adjustment of text within a given space, such as a text editor or a web page, to ensure that it fits neatly without exceeding the boundaries.
Let the students watch the video or the learning slides related to the topic on the digital panel.
Demonstrate text wrapping with different styles to the students.
Attempt the activity on the Assignment page.
Conclude the concepts
Assign homework
Warm Up
● Instruct the students to go to the Tekie’s Digital platform and open a Lab session on Using Graphics in Word Processor 6.
● Show the learning slides one by one and discuss the concepts shown on the slides in the panel. 10 mins
Engage
Explain the following concepts:
Learning Outcomes
Wrap text in different styles in a document.
Explanation
Demonstrate text wrapping to the students, as given on pages 95 and 96. Also, demonstrate how to change the text wrapping style in the document.
● Ask the questions provided on the slides one by one to assess the students’ understanding. Discuss the answers to the questions with the students. If necessary, ask additional relevant questions.
● Instruct the students to attempt the assignment by clicking on the Assignment tab.
● Explain the activity to the students.
● Conclude the session by summarising that we can make our text wrap around pictures in different ways, like having the text go around the image or behind it.
● Assign the additional activity given on the panel to the students as homework.
Mel and Conji, young wizards, start on a journey to rescue their friend, Eva and save their magical world, Avora. After a mysterious attack pulls Eva into a computer, they discover that Lord Ero is behind the Dark Magic. Guided by the Elders, they explore the Hidden Library, where they learn about the MagiTech Keystone, a powerful object Lord Ero seeks to destroy Avora. The Keystone’s scattered pieces can only be gathered by pure-hearted wizards. Mel and Conji set off on their journey, with the help of the Elders to find the pieces before Lord Ero could. They use different programmes and graphics to find those pieces. Facing traps and challenges, Mel and Conji recover the pieces and free Eva, who was brainwashed by Lord Ero. She attacks Mel, Conji and even the Elders, who escape the situation narrowly. In the final battle, they use their combined strength and activate the Keystone to stop Lord Ero. Lord Ero had taken away the power of all the machines in Avora. They use AI to link the machines to the power of the Keystone and restore all of them. Their bravery and teamwork save Avora and bring lasting peace.
● Eva casts a dark spell, Destrcto, on Mel, Conji, and the elders.
● Elder Wizard protects them with magic but falls after Eva’s second spell.
● Elder Robot shoots a laser beam, but it does not harm Eva; she casts another dark spell, causing him to malfunction.
● Eva warns Mel and Conji, but Ms. Idea arrives to help after seeing the battle through magic.
● Ms. Idea informs them that wizards found pieces of the MagiTech Keystone.
● Eva demands the keystone from Ms. Idea and attacks her with a spell.
● Ms. Idea protects herself and tells Mel and Conji to restore Eva’s memory using the keystone.
● Mel asks how, and Ms. Idea summons an ancient scroll with activation spells.
● Ms. Idea gives the scroll to Mel and keeps Eva busy so they can escape.
● Conji asks how to share spells with wizards holding the keystone pieces.
● Mel suggests creating a presentation to explain the spells.
● Conji asks about presentations, and Mel offers to explain on the way to the computer lab.
This chapter is divided into the following classroom and lab sessions
1. Presentations 1
2. Presentations 2
3. Presentations 3
4. Presentations 4
5. Presentations 5
6. Presentations 6
At the end of the session, the students will be able to:
● define and identify the uses of a presentation.
● create a presentation.
● identify the components of the Google Slides window.
● provide a name and add a title to a presentation.
Keywords
● Presentation: It is a tool to create, showcase and share information in an interactive, interesting, and visually appealing way.
● Slide workspace: It is the main area where you can add and arrange content like text, pictures, and videos on a slide.
● Slides panel: It is a section where you can see small versions of all your slides, helping you to navigate through your presentation easily.
● Speaker notes: It is a space to write notes for each slide that can help the presenter remember what to say during the presentation.
Ask the students how they will share the information in a more presentable and interesting way. Introduce them to what presentations are and the uses of presentations. Introduce Google Slides to make the presentations and explain its components. Introduce how to name a presentation and add title to a presentation.
Think and Tell Conclude the concepts Assign homework
● Ask the students how they will share the information in a more presentable and interesting way.
● Build the concept that a presentation is a tool to share information in a more presentable and interesting way.
Explain the following concepts:
Define and identify the uses of a presentation.
Explain that a presentation is a tool to create, showcase and share information in an interactive, interesting, and visually appealing way. Discuss with them that presentations are used to share information, add visuals, stay organised, visualise and present. Presentations are used at various places like education, training, workshops, etc. as given on page 107.
Create a presentation. Tell them Google Slides is an online presentation tool that lets you create and share exciting presentations as given on page 108.
Identify the components of the Google Slides window.
Provide a name and add a title to a presentation.
Explain the components of Google Slides windows to the students as given on pages 108 and 109. Also, get them familiar with using Google Slides.
Explain that before adding more things to the presentation, they should give a name to the presentation. After giving a name, add the title to the presentation as given on page 109.
● Read aloud the questions provided in the Do It Yourself 7A section and encourage the students to solve the questions. Instruct the students to write the answers in their notebook.
● Ask the students to answer the question “Where else can we use presentations?” given in the Think and Tell section on page 107.
Possible Responses: marketing, seminars, hospitals, etc. Sum
● Conclude the session by summarising that a presentation is a tool to create, showcase and share information in an interactive, interesting, and visually appealing way. Presentations are used to share information, add visuals, stay organised, visualise and present. Presentations are used at various places like education, training, workshops, etc. Google Slides is an online presentation tool that lets you create and share exciting presentations. Google Slides window has various components like Rename box, Menu bar, Toolbar, Slide workspace, Speaker notes, etc. Everything we do gets saved automatically, and we can identify a presentation by giving a name and adding a title to it.
● Assign the following questions from the Chapter Checkup given at the end of the chapter as homework.
A. Fill in the Blanks: Questions 1, 3, and 4
B. Tick the Correct Option: Questions 1 and 2
C. Who Am I?: Question 1
D. Write T for True and F for False: Questions 1 and 2
At the end of the session, the students will be able to:
● define and identify the uses of a presentation.
● create a presentation.
● identify the components of the Google Slides window.
● provide a name and add a title to a presentation.
Keywords
● Presentation: It is a tool to create, showcase and share information in an interactive, interesting, and visually appealing way.
● Slide workspace: It is the main area where you can add and arrange content like text, pictures, and videos on a slide.
● Slides panel: It is a section where you can see small versions of all your slides, helping you to navigate through your presentation easily.
● Speaker notes: It is a space to write notes for each slide that can help the presenter remember what to say during the presentation.
Let the students watch the video or the learning slides related to the topic on the digital panel.
Introduce them to what are presentations and the uses of presentations.
Introduce Google Slides to make the presentations and explain its components.
Introduce how to name a presentation and add title to a presentation.
Attempt the activity on the Assignment page.
Conclude the concepts
Assign homework
5 mins
Warm Up
Instruct the students to go to Tekie’s Digital platform and open a Lab session on Presentations 2 Show the learning slides one by one and discuss the concepts shown on the slides in the panel.
Explain the following concepts:
Define and identify the uses of a presentation.
Explain that a presentation is a tool to create, showcase and share information in an interactive, interesting, and visually appealing way. Discuss with them that presentations are used to share information, add visuals, stay organised, visualise and present. Presentations are used at various places like education, training, workshops, etc. as given on page 107.
Create a presentation. Tell them that Google Slides is an online presentation tool that lets you create and share exciting presentations as given on page 108.
Identify the components of the Google slides window.
Provide a name and add a title to a presentation.
Show the components of the Google Slides windows to the students as given on pages 108 and 109. Also, get them familiar with using Google Slides.
Demonstrate that before adding more things to the presentation, they should give a name to the presentation. After giving a name, add the title to the presentation as given on page 109.
● Ask the questions provided on the slides one by one to assess the students’ understanding.
● Discuss the answers to the questions with the students. If necessary, ask additional relevant questions.
12 mins
Build
● Instruct the students to attempt the assignment by clicking on the Assignment tab.
● Explain the activity to the students.
Sum Up
3 mins
● Conclude the session by summarising that a presentation is a tool to create, showcase and share information in an interactive, interesting, and visually appealing way. Presentations are used to share information, add visuals, stay organised, visualise and present. Presentations are used at various places like education, training, workshops, etc. Google Slides is an online presentation tool that lets you create and share exciting presentations. Google Slides window has various components like Rename box, Menu bar, Toolbar, Slide workspace, Speaker notes, etc. Everything we do gets saved automatically, and we can identify a presentation by giving a name and adding a title to it.
● Assign the additional activity given on the panel to the students as homework.
At the end of the session, the students will be able to:
● add and change the position of the text box after adding text in it.
● add new slides.
● work with shapes on a slide.
● work with images in a slide.
Keyword
● Text box: A space on the slide where you can add text.
Ask the students to imagine preparing a presentation on renewable energy. Do you think incorporating visual aids could enhance the impact of their presentation and make the concepts more accessible?
Explain the text box to add text and get them familiar with changing the position of the text box. Introduce adding new slides to an existing presentation.
Introduce working with shapes in a slide and also, get them familiar with working with images.
Group discussion Conclude the concepts
Assign homework
Warm Up
Ask the students to imagine preparing a presentation on renewable energy. Do you think incorporating visual aids could enhance the impact of their presentation and make the concepts more accessible?
Build the concept that Google Slides allows us to add visuals to our presentations which makes the presentation more attractive and informative.
Explain the following concepts:
Learning
Add and change the position of the text box after adding text to it.
Explanation
Explain to the students how to add a text box and move the position of the text box after adding text to it as given on page 110.
Add new slides.
Describe to the students how to add new slides as given on page 111.
Work with shapes on a slide. Discuss with the students how to insert, move, resize and colour shapes on a slide as given on pages 112 and 113.
Work with images in a slide. Explain to the students how to add and edit image in a presentation as given on pages 113 to 115.
● Read aloud the questions provided in the Do It Yourself 7A and Do It Yourself 7B sections and encourage the students to solve the questions. Instruct the students to write the answers in their notebook.
Do It Yourself 7A
Correct Response: 4. a Do It Yourself 7B
Correct Responses: 1. Insert 2. Resizing 3. crop
Build
7 mins
● Conduct a group discussion in the class among students based on the topic ‘How would you decide which shapes to use for each planet, and what colours would you choose to make a presentation on Solar System?’
Possible Responses: For the sun, we should use a big yellow circle because the sun is really big and bright. For Earth, we can use a smaller circle but colour it blue and green to show the water and land. For Saturn, we should also use a circle but add rings around it. Mars can be a red circle because it’s called the Red Planet. Jupiter is the biggest planet, so we should make its circle bigger than the others, except for the sun. Venus is similar to Earth in size, so we can use a circle of the same size as Earth. For Mercury, we need a small grey circle because it’s the smallest planet and Uranus and Neptune can be light blue and dark blue circles because they’re known as ice giants and have a lot of water and ice.
3 mins
Sum Up
● Conclude the session by summarising how to work with text boxes, slides, shapes, and images in a presentation. It explains how to add text, move text boxes and shapes by clicking and dragging with the mouse, add new slides and add images. It also covers resizing shapes and images by clicking and dragging the blue squares, and cropping images using the Crop tool.
● Assign the following questions from the Chapter Checkup given at the end of the chapter as homework.
A. Fill in the Blanks: Question 2
B. Tick the Correct Option: Questions 3 and 4
C. Who Am I?: Questions 2, 3, and 4
D. Write T for True and F for False: Question 3
E. Answer the Following Questions: Questions 1, 3, and 4
F. Apply Your Learning: Questions 1, 3, and 4
At the end of the session, the students will be able to:
● add and change the position of the text box after adding text to it.
● add new slides.
● work with shapes on a slide.
● work with images in a slide.
Keyword
● Text box: A space on the slide where you can add more text in it.
Let the students watch the video or the learning slides related to the topic on the digital panel.
Demonstrate to the students how to add a text box and change position of text box after adding text in it.
Demonstrate adding new slides and working with shapes on a slide.
Demonstrate how to work on an image on a slide.
Action Plan
Attempt the activity on the Assignment page.
Conclude the concepts
Assign homework
Warm Up
Instruct the students to go to Tekie’s Digital platform and open a Lab session on Presentations 4.
Show the learning slides one by one and discuss the concepts shown on the slides in the panel.
Explain the following concepts:
Learning Outcomes
Add and change the position of the text box after adding text to it.
Explanation
Demonstrate to the students how to add a text box and move the position of the text box after adding text to it as given on page 110.
Add new slides. Show them how to add new slides as given on page 111.
Work with shapes on a slide. Demonstrate to the students how to insert, move, resize and colour shapes on a slide as given on pages 112 and 113.
Work with images in a slide. Tell them how to add and edit images in a presentation as given on pages 113 to 115.
● Ask the questions provided on the slides one by one to assess the students’ understanding.
● Discuss the answers to the questions with the students. If necessary, ask additional relevant questions.
12 mins
Build
● Instruct the students to attempt the assignment by clicking on the Assignment tab.
● Explain the activity to the students.
3 mins
● Conclude the session by summarising how to work with text boxes, slides, shapes, and images in a presentation.
● Assign the additional activity given on the panel to the students as homework.
At the end of the session, the students will be able to:
● create a copy of a slide.
● delete a slide.
● showcase a presentation.
● close and open a presentation.
Ask the students what a photocopy machine does. Introduce how to duplicate a slide. Explain the steps to delete a slide. Also, get them familiar with presenting slides and steps to close and open an existing presentation. Group discussion Conclude the concepts Assign homework
Ask the students what a photocopy machine does. Build the concept that like the photocopy machine Google Slides allows us to duplicate a slide.
Explain the following concepts:
Learning Outcomes Explanation
Create a copy of a slide. Explain to the students how to create a duplicate slide as given on page 115. Delete a slide. Discuss the steps of deleting a slide if it’s not needed anymore in the presentation as given on page 116.
Showcase a presentation. Tell them how to showcase a presentation as given on page 116.
Close and Open a presentation.
Explain to the students how to close and open a presentation as given on pages 116 and 117.
● Read aloud the questions provided in the Do It Yourself 7B section and encourage the students to solve the questions. Instruct the students to write the answers in their notebook.
Correct Responses: 4. Duplicate 5. Deleted
7 mins
● Conduct a group discussion in the class among the students based on the topic “Will you be able to retrieve the presentation, if you accidentally deleted your presentation?”
Possible Response: Deleted presentations go to a “Trash” or “Recycle Bin” where they stay for a while before they’re deleted permanently. Yes, a deleted presentation can be restored.
3 mins
● Conclude the session by summarising how to make a copy of a slide, delete a slide that we don’t need, show the presentation to others. Also, describe them how to close and open an existing presentation.
● Assign the following questions from the Chapter Checkup given at the end of the chapter as homework.
D. Write T for True and F for False: Question 4
E. Answer the Following Questions: Question 2
F. Apply Your Learning: Question 2
At the end of the session, the students will be able to: create a copy of a slide. delete a slide.
showcase a presentation. Close and open a presentation.
Let the students watch the video or the learning slides related to the topic on the digital panel.
Demonstrate to the students how to duplicate a slide. Explain the steps to delete a slide. Also, get them familiar with presenting slides and steps to close and open an existing presentation.
Attempt the activity on the Assignment page.
Conclude the concepts Assign homework
● Instruct the students to go to the Tekie’s Digital platform and open a Lab session on Presentations 6.
● Show the Learning slides one by one and discuss the concepts shown on the slides in the panel.
Engage
Explain the following concepts:
Learning Outcomes
Explanation
Create a copy of a slide. Demonstrate to the students how to create a duplicate slide as given on page 115.
Delete a slide. Demonstrate to them the steps of deleting a slide if it’s not needed anymore in the presentation as given on page 116.
Showcase a presentation. Demonstrate to them how to showcase a presentation as given on page 116.
Close and Open a presentation. Explain to the students how to close and open a presentation as given on pages 116 and 117.
Ask the questions provided on the slides one by one to assess the students’ understanding. Discuss the answers of the questions with the students. If necessary, ask additional relevant questions.
12 mins
Build
● Instruct the students to click on the Practice button on the Assignment page to attempt the activity. Then, click on the Attempt button to open the activity page.
● Instruct the students to click on the Confirm button to submit their work when they are done with the activity.
3 mins
● Conclude the session by summarising how to make a copy of a slide, delete a slide that we don’t need, show the presentation to others. Also, describe them how to close and open an existing presentation.
● Assign the additional activity given on the panel to the students as homework.
Mel and Conji, young wizards, start on a journey to rescue their friend, Eva and save their magical world, Avora. After a mysterious attack pulls Eva into a computer, they discover that Lord Ero is behind the Dark Magic. Guided by the Elders, they explore the Hidden Library, where they learn about the MagiTech Keystone, a powerful object Lord Ero seeks to destroy Avora. The Keystone’s scattered pieces can only be gathered by pure-hearted wizards. Mel and Conji set off on their journey, with the help of the Elders to find the pieces before Lord Ero could. They use different programmes and graphics to find those pieces. Facing traps and challenges, Mel and Conji recover the pieces and free Eva, who was brainwashed by Lord Ero. She attacks Mel, Conji and even the Elders, who escape the situation narrowly. In the final battle, they use their combined strength and activate the Keystone to stop Lord Ero. Lord Ero had taken away the power of all the machines in Avora. They use AI to link the machines to the power of the Keystone and restore all of them. Their bravery and teamwork save Avora and bring lasting peace.
● The skies turn dark as Lord Ero arrives.
● Lord Ero accuses the heroes of turning his servant against him.
● Eva confronts Lord Ero, blaming him for forcing her to harm her friends.
● Conji attacks with Constricto, but Lord Ero counters with Repelio.
● Lord Ero disables all machines in Avora with a dark wave.
● Elder Wizard and Elder Robot arrive to challenge Lord Ero.
● Elder Wizard offers to fight Lord Ero and free the children.
● Eva apologizes, and the Elder Wizard reassures her about the spell.
● Elder Robot tells the heroes to restore power using AI and the keystone.
● The heroes run to the Supercomputer Lab to complete the mission.
● Conji wonders how to use the keystone’s power.
● Mel explains the role of AI and IoT in connecting machines.
● Eva asks about IoT, and Mel begins to explain.
At the end of the session, the students will be able to:
● explain the internet of things.
● describe features of IoT.
● describe trending IoT-enabled devices.
Keyword
● Internet of Things: It is a system where everyday objects are connected to the internet and share data with each other.
Ask the students for the full form of the internet. Also, ask them to define the term internet.
Describe the Internet of Things to the students along with its features. Also, describe IoT-enabled devices.
Group Discussion Conclude the concepts Assign homework
● Ask the students for the full form of the internet. Also, ask them to define the term internet.
● Now, build the concept that, similar to the internet: IoT is a system where everyday objects are connected to the internet and share data with each other.
Engage
Explain the following concepts:
Learning Outcomes
Explain the internet of things.
Explanation
Tell the students that the Internet of Things (IoT) is a system where everyday objects are connected to the internet and share data with each other, as given on page 126.
Describe features of IoT. Explain to the students about features of IoT like connectivity, automation and control, sensors, and data exchange, as given on page 126.
Describe IoT-enabled devices.
Discuss with the students about various IoT-enabled devices such as smartphones, smart speakers, smartwatch, smart TV, etc., as given on pages 127 and 128.
Additional questions to Check for Understanding
● What do you mean by Data Exchange?
Correct Response: The collected data can be analysed to check performance and create more efficient processes.
● Explain some features of the smartwatch.
Correct Response: Smartwatches can track your fitness, monitor your health, show notifications from your smartphone, and even run apps.
7 mins
Build
● Conduct a group discussion in the class among the students on the topic “The use of IoT- enabled devices - smart speaker”.
Possible Responses: A smart speaker is a device that listens to our voice commands to play music, answer questions, and make phone calls. It can also set reminders, play voice games, and control other connected home gadgets.
3 mins
● Conclude the session by summarising that the Internet of Things (IoT) is a system where everyday objects are connected to the internet and share data. Describe the features of IoT, like connectivity, automation and control, sensors, and data exchange. Also, discuss that there are various IoTenabled devices such as smartphones, smart speakers, smartwatches, smart TVs.
● Assign the following questions from the Chapter Checkup given at the end of the chapter as homework.
A. Fill in the Blanks: Questions 1, 2, 3 and 4
B. Tick the Correct Option: Questions 1, 2, 3, and 4
C. Who Am I?: Questions 1, 3 and 4
D. Write T for True and F for False: Questions 1, 2, 3 and 4
E. Answer the Following Questions: Questions 1, 2, 3 and 4
F. Apply Your Learning: Questions 1, 2, and 3
At the end of the session, the students will be able to:
● describe the smart homes.
Keyword
● Smart Homes: A smart home uses technology to automate and control various aspects of a household.
Ask the students to name some IOT-enabled devices.
Describe smart homes to the students. Group discussion Conclude the concepts
Assign homework
Warm Up
● Ask the students to name some IOT-enabled devices.
● Now, build the concept that: a smart home uses technology to automate and control various aspects of a household.
Engage
Explain the following concepts:
Learning Outcomes
Explanation
Explain smart homes. Tell the students that a smart home uses technology to automate and control various aspects of a household. Explain to the students about features of smart homes like you can remotely control these devices, set schedules, receive notifications, etc., as given on page 128.
● Explain some features of smart home technology.
Correct Response: Through smart home technology, you can remotely control these devices, set schedules, receive notifications, and create customised settings to make your home more convenient and secure.
● Conduct a group discussion in the class among the students on the topic “What do you think we would need to have such a smart home?”.
Possible Responses: We would need Internet Connectivity, Power Sources, smart devices such as smart refrigerators, smart phones, etc.
● Conclude the session by summarising that a smart home uses technology to automate and control various aspects of a household. Also, discuss through smart home technology, you can remotely control these devices, set schedules, receive notifications, and create customised settings to make your home more convenient and secure. Tell the students that smart homes include devices and systems like smart lights, security cameras, smart TVs, smart refrigerators, and voice assistants, all connected to the internet.
● Assign the following questions from the Chapter Checkup given at the end of the chapter as homework.
C. Who Am I?: Question 2
F. Apply Your Learning: Question 4
At the end of the session, the students will be able to:
● play the Fun with AI game.
Let the students revise the chapter. Demonstrate to the students how to play the game for which the link is provided on the panel.
Attempt the activity on the Assignment page.
Conclude the concepts
5 mins
Warm Up
● Instruct the students to go to the Tekie’s Digital platform and open a Lab session on Fun with AI: Using Object Detection.
Engage
● Demonstrate to the students how to play the game for which the link is provided on the panel.
Ask the questions related to the AI game.
● Instruct the students to click on the Start practice button on the Assignment page to attempt the activity. Then, click on the Attempt button to open the activity page.
● Instruct the students to click on the Confirm button to submit their work when they are done with the activity.
3
Sum Up
● Conclude the session by summarising that AI can be used to detect objects in photos or videos. For example, if you want to detect any object using AI. Before starting the activity, you have to turn on your camera. Once you turn on the camera, the AI gets ready to detect objects. According to the object, it will give a prompt. It will speak aloud using the speaker and also display the message.
This chapter is divided into the following lab sessions
1. Introduction to Coding
2. Creating a Project and Components of Scratch
At the end of the session, the students will be able to:
● explain what coding is.
● describe block-based coding.
● explain about Scratch 3.0.
Keywords
● Coding: Coding is a way of giving instructions to tell a computer what to do.
● Block-based coding: It is a computer language where we use colourful coding blocks to make computers do a task.
● Scratch 3.0: Scratch 3.0 is a free and simple platform where we use colourful blocks to create our own games, stories, and art.
Let the students watch the video or the learning slides related to the topic on the digital panel. Explain to them what coding is; tell them about block-based coding; and introduce them to Scratch 3.0.
Attempt the activity on the Assignment page.
Conclude the concepts
Assign homework
● Instruct the students to go to the Tekie’s Digital platform and open a Lab session on Introduction to Coding.
● Show the learning slides or the Video and discuss the concepts shown on the panel. 15
Explain the following concepts:
Learning Outcomes
Explanation
Explain what coding is. Tell the students that coding is a way of giving instructions to tell a computer what to do, as given on page 1.
Describe block-based coding. Tell the students that block-based coding is is a computer language that uses colourful coding blocks to make computers do a task, as given on page 2.
Explain about Scratch 3.0. Introduce students to Scratch 3.0. Tell them it is a free and simple platform that lets you create your own games, stories, and art, as given on page 2.
● Ask the questions provided on the slides one by one to assess the students’ understanding. Discuss the answers to the questions with the students. If necessary, ask additional relevant questions.
● Instruct the students to attempt the assignment by clicking on the Assignment tab.
● Explain the activity to the students.
● Conclude the session by summarising that coding is a way of giving instructions to tell a computer what to do. Block-based coding, such as Scratch 3.0, employs colourful coding blocks to create games and perform tasks. It’s a free and simple platform that allows individuals to create their own games, stories, and art.
● Assign the additional activity given on the panel to the students as homework.
● Assign the following questions from the Chapter Checkup given at the end of the chapter as homework.
A. Fill in the Blanks: Question 1
E. Answer the Following Questions: Questions 1 and 2
F. Apply Your Learning: Question 1
At the end of the session, the students will be able to:
● create a project in Scratch.
● identify and define the components of the Scratch window.
Keywords
● Sprite: A sprite can be a character or an object in a Scratch project.
● Script: A script is a set of blocks that are placed on top of each other to make a sprite do something.
Warm Up
Engage
Build Sum Up
Let the students watch the video or the learning slides related to the topic on the digital panel. Explain to the students how to create a project in Scratch and the various components of the Scratch window. Attempt the activity on the Assignment page. Conclude the concepts Assign homework
Warm Up
● Instruct the students to go to the Tekie’s Digital platform and open a Lab session on Creating a Project and Components of Scratch.
● Show the learning slides or the Video and discuss the concepts shown on the panel.
Engage
Explain the following concepts:
Learning Outcomes
Explanation
Create a project in Scratch. Demonstrate to the students how to create a project in Scratch, as given on pages 2 and 3.
Identify and define the components of the Scratch window.
Introduce the students to the various components of the Scratch window, such as the Menu bar, Tabs, Blocks panel, Blocks palette, Coding area, Backdrop, etc., as given on pages 3 and 4.
● Ask the questions provided on the slides one by one to assess the students’ understanding. Discuss the answers of the questions with the students. If necessary, ask additional relevant questions.
● Read aloud the questions provided in the Do It Yourself 1A section and encourage the students to solve the questions. Instruct the students to write the answers in their book.
Correct Responses:
a. Sprite
b. Sprites pane
c. Blocks panel
d. Coding area
e. Blocks palette
● Instruct the students to attempt the assignment by clicking on the Assignment tab.
● Explain the activity to the students.
Sum Up
7 mins
3 mins
● Conclude the session by summarising how to create a project in Scratch. The Scratch editor holds all the components needed to create and run a Scratch project. Some of these components are Menu bar, Tabs, Blocks panel, Blocks palette, Coding area, Backdrop, etc. Revise these components with the students.
● Assign the additional activity given on the panel to the students as homework.
● Assign the following from the Chapter Checkup given at the end of the chapter as homework.
A. Fill in the Blanks: Questions 2, 3, 4, and 5
B. Tick the Correct Option: Questions 1, 2, 3, 4, and 5
C. Who Am I?: Question 1
D. Write T for True and F for False: Questions 1, 2, 3, 4, and 5
E. Answer the Following Questions: Questions 3, 4, and 5
F. Apply Your Learning: Questions 2, 3, 4, and 5
This chapter is divided into the following lab sessions:
1. Sprites
2. Ways to Add a Backdrop
At the end of the session, the students will be able to:
● explain what a sprite is.
● add sprites from the sprites library.
● delete a sprite.
Keywords
● Sprite: A character or an object on the stage.
● Costume: It is the appearance of a sprite.
● describe the ways to add a sprite.
● choose a sprite.
● rename a sprite.
● Sprites library: A collection of ready-to-use sprite images.
Let the students watch the video or the learning slides related to the topic on the digital panel.
Explain to the students what a sprite is; tell them about the costumes and sprites library; show them how to delete a sprite; describe them the ways to add a sprite; tell them how can they choose a sprite and how to rename the sprite’s name.
Attempt the activity on the Assignment page.
Conclude the concepts Assign homework
Warm Up
● Instruct the students to go to the Tekie’s Digital platform and open a Lab session on Sprites.
5 mins
● Show the Learning slides one by one and discuss the concepts shown on the slides in the panel.
Explain the following concepts:
Explain what a sprite is. Tell the students that a sprite is a character or an object on the stage in Scratch, as given on page 9.
Add sprites from the sprites library.
Describe the ways to add a sprite.
Explain to students that they can add sprites from the sprites library of scratch, as given on pages 9 and 10.
Delete a sprite. Demonstrate to the students the steps to delete a sprite, as given on page 10.
Discuss the different ways to add a sprite as given on page 11.
Choose a sprite. Demonstrate to the students the steps to choose a sprite for the project as given on pages 11 and 12.
Rename a sprite. Demonstrate to them the steps to rename the sprites for the project as given on pages 12 and 13.
● Ask the questions provided on the slides one by one to assess the students’ understanding. Discuss the answers to the questions with the students. If necessary, ask additional relevant questions.
● Instruct the students to click on the Practice button on the Assignment page to attempt the activity. Then, click on the Attempt button to open the activity page.
● Instruct the students to click on the Confirm button to submit your work when you are done with the activity.
3 mins
● Conclude the session by summarising that sprites are characters that can move, talk, and do things on the stage in a project. Also, explain to the students the steps to add a sprite from the sprites library and delete a sprite. Tell them about different ways to add a sprite, how to choose a sprite, and how to rename it on the stage.
● Assign the additional activity given on the panel to the students as homework. 8
● Assign the following questions from the Chapter Checkup given at the end of the chapter as homework.
A. Fill in the Blanks: Questions 1, 2, and 3
B. Tick the Correct Option: Questions 1, 2, 3 and 5
C. Who Am I?: Questions 2, 3, and 4
D. Write T for True and F for False: Questions 1, 2, 3 and 5
E. Answer the Following Questions: Questions 1, 3, and 4
F. Apply Your Learning: Question 4
At the end of the session, the students will be able to:
● describe the ways to add a backdrop.
● choose a backdrop.
● paint a backdrop.
Let the students watch the video or the learning slides related to the topic on the digital panel.
Explain to the students different ways to add a backdrop; demonstrate to them how to choose and paint a backdrop.
Attempt the activity on the Assignment page. Conclude the concepts Assign homework
● Instruct the students to go to the Tekie’s Digital platform and open a Lab session on Ways to add a backdrop.
● Show the Learning slides one by one and discuss the concepts shown on the slides in the panel. 15 mins
Engage
Explain the following concepts:
Learning Outcomes
Describe the ways to add a backdrop.
Explanation
Explain to the students that there are four ways to add a backdrop, as given on page 13.
Choose a backdrop. Demonstrate the steps to the students on how to choose a backdrop, as given on pages 13 and 14.
Paint a backdrop. Demonstrate the steps to the students on how to paint a backdrop, as given on pages 15 to 17.
● Ask the questions provided on the slides one by one to assess the students’ understanding. Discuss the answers to the questions with the students. If necessary, ask additional relevant questions.
● Read aloud the questions provided in the Do It Yourself 2A section and encourage students to solve them. Instruct them to write the answers in their book.
Correct Responses:


Build
7 mins
● Instruct the students to click on the Practice button on the Assignment page to attempt the activity. Then, click on the Attempt button to open the activity page.
● Instruct the students to click on the Confirm button to submit your work when you are done with the activity.
3 mins
Sum Up
● Conclude the session by summarising the ways to add a backdrop in Scratch. Also, discuss the steps on how to choose and paint a backdrop.
● Assign the additional activity given on the panel to the students as homework.
● Assign the following questions from the Chapter Checkup given at the end of the chapter as homework.
A. Fill in the Blanks: Questions 4 and 5
B. Tick the Correct Options: Question 4
C. Who Am I?: Questions 1 and 5
D. Write T for True and F for False: Question 4
E. Answer the Following Questions: Questions 2 and 5
F. Apply Your Learning: Questions 1, 2, and 3
This chapter is divided into the following lab sessions:
1. Events Block
2. Making a Sprite Say Something
3. Motion Blocks 4. Loops, Control, and Sensing Blocks 5. Moving and Making a Sprite Fall
At the end of the session, the students will be able to:
● explain what an event and action is.
● explain what Events blocks do.
Keywords
● Event: They tell us when an action will happen.
● Action: An action happens when an event occurs.
Let the students watch the video or the learning slides related to the topic on the digital panel. Explain to them what an event and action is. Also, tell them about various Events blocks and their description.
Attempt the activity on the Assignment page.
Conclude the concepts Assign homework
5 mins
Warm Up
● Instruct the students to go to the Tekie’s Digital platform and open a Lab session on Events Blocks.
● Show the learning slides or the video and discuss the concepts shown on the panel.
Engage
Explain the following concepts:
Explain what an event and action are.
Explain what Events blocks do.
15 mins
Explanation
Tell the students that an event tells us when an action will happen, as given on page 22.
Tell the students that Events blocks tell the computer when to run a script. Also, tell them about some of the Events blocks and their description, as given on page 22.
● Ask the questions provided on the slides one by one to assess the students’ understanding. Discuss the answers to the questions with the students. If necessary, ask additional relevant questions.
7 mins
Build
● Instruct the students to attempt the assignment by clicking on the Assignment tab.
● Explain the activity to the students.
Sum Up
3 mins
● Conclude the session by summarising that an event tells us when an action will happen. An action happens when an event occurs. The Events blocks tell the computer when to run a script. Also, describe different Events blocks used in Scratch.
● Assign the additional activity given on the panel to the students as homework.
● Assign the following questions from the Chapter Checkup given at the end of the chapter as homework.
A. Fill in the Blanks: Question 5
D. Write T for True and F for False: Questions 1 and 5
E. Answer the Following Questions: Question 3
At the end of the session, the students will be able to:
● explain what Looks blocks do.
● make a sprite say something.
Let the students watch the video or the learning slides related to the topic on the digital panel. Explain to the students what Looks blocks do. Also, demonstrate the steps to make a sprite say something. Attempt the activity on the Assignment page.
Conclude the concepts
Assign homework
Warm Up
● Instruct the students to go to the Tekie’s Digital platform and open a Lab session on Making a Sprite Say Something
● Show the learning slides or the video and discuss the concepts shown on the panel.
Engage
Explain the following concepts:
Learning Outcomes
Explain what Looks blocks do.
Make a sprite say something.
Explanation
Explain to the students that these blocks are used to control how a sprite looks, as given on page 23.
Demonstrate to the students how to make a sprite say something, as given on pages 23 and 24.
● Ask the questions provided on the slides one by one to assess the students’ understanding. Discuss the answers to the questions with the students. If necessary, ask additional relevant questions.
● Instruct the students to attempt the assignment by clicking on the Assignment tab.
● Explain the activity to the students. Sum Up
3 mins
● Conclude the session by summarising that the Looks blocks are used to control how a sprite looks. Their colour is purple. The Say block makes the sprite talk. The Say block is found in the Looks category of blocks. Also, revise the steps to make a sprite say something.
● Assign the additional activity given on the panel to the students as homework.
● Assign the following questions from the Chapter Checkup given at the end of the chapter as homework.
B. Tick the Correct Option: Question 5
D. Write T for True and F for False: Question 2
F. Apply Your Learning: Question 3
At the end of the session, the students will be able to:
● explain what Motion blocks do.
● move the sprite to the specified position.
Let the students watch the video or the learning slides related to the topic on the digital panel.
Explain to the students what Motion blocks are. Explain to them about different Motion blocks. Demonstrate to them the steps to move a sprite to a specified position.
Attempt the activity on the Assignment page.
Conclude the concepts
Assign homework
● Instruct the students to go to the Tekie’s Digital platform and open a Lab session on Motion blocks.
● Show the learning slides or the video and discuss the concepts shown on the panel. 15 mins
Engage
Explain the following concepts:
Learning Outcomes
Explain what Motion blocks do.
Move a sprite to a specified position.
Explanation
Tell the students that Motion blocks control the movement of the sprites on the stage. Also, tell them that a sprite’s X position is its location on the X (horizontal) axis of the stage, and the Y position is where the sprite is on the Y (vertical) axis of the stage. Tell them the uses of some of the Motion blocks, as given on pages 24 and 25.
Demonstrate to the students the steps to move a sprite to a specified position using Motion blocks, as given on pages 25 and 26.
● Ask the questions provided on the slides one by one to assess the students’ understanding. Discuss the answers to the questions with the students. If necessary, ask additional relevant questions.
● Read aloud the questions provided in the Do It Yourself 3A section and encourage students to solve them. Instruct them to write the answers in their book.
1. Correct Responses:

2. a. Events Blocks
b. Looks Blocks
c. Motion Blocks
● Instruct the students to attempt the assignment by clicking on the Assignment tab.
● Explain the activity to the students. Sum Up
7 mins
3 mins
● Conclude the session by summarising that the Motion blocks control the movement of the sprite on the stage. Revise the various Motion blocks and the steps to move a sprite to a specified position.
● Assign the additional activity given on the panel to the students as homework.
● Assign the following questions from the Chapter Checkup given at the end of the chapter as homework.
A. Fill in the Blanks: Questions 1 and 4
B. Tick the Correct Option: Question 3
C. Who Am I?: Questions 2 and 3
D. Write T for True and F for False: Question 4
E. Answer the Following Questions: Question 2
F. Apply Your Learning: Question 4
At the end of the session, the students will be able to:
● explain what a loop is.
● explain what Control blocks do.
● describe Sensing blocks.
Let the students watch the video or the learning slides related to the topic on the digital panel. Explain to the students what a loop is; tell them about various Control blocks and Sensing blocks. Attempt the activity on the Assignment page.
● Loop: A loop means doing something over and over again. 5 mins
Conclude the concepts Assign homework
● Instruct the students to go to the Tekie’s Digital platform and open a Lab session on Loops, Control, and Sensing Blocks.
● Show the learning slides or the video and discuss the concepts shown on the panel. 15 mins
Engage
Explain the following concepts:
Explain what a loop is. Tell the students that a loop means doing something over and over again, as given on page 27.
Explain what Control blocks do.
Tell the students that the Control blocks are used to control the flow of scripts based on some criteria. Tell them the uses of some of the Control blocks, as given on page 27.
Describe Sensing blocks. Explain to students that Sensing blocks are the blocks that are used to detect when two sprites touch each other. They also detect the colours on stage, keypress, mouse click, etc., as given on pages 27 and 28.
● Ask the questions provided on the slides one by one to assess the students’ understanding. Discuss the answers to the questions with the students. If necessary, ask additional relevant questions.
7 mins
Build
● Instruct the students to attempt the assignment by clicking on the Assignment tab.
● Explain the activity to the students.
3 mins
● Conclude the session by summarising that loop means doing something over and over again. The Control blocks are used to control the flow of scripts based on a criterion and these blocks appear in orange colour. Sensing blocks are used to detect when two characters touch each other. Their colour is light blue.
● Assign the additional activity given on the panel to the students as homework.
● Assign the following questions from the Chapter Checkup given at the end of the chapter as homework.
A. Fill in the Blanks: Questions 2 and 3
B. Tick the Correct Option: Question 4
C. Who Am I?: Question 1
D. Write T for True and F for False: Question 3
E. Answer the Following Questions: Questions 1 and 5
At the end of the session, the students will be able to:
● move a sprite.
Let the students watch the video or the learning slides related to the topic on the digital panel.
● make a sprite fall. 5 mins
Warm Up
Demonstrate to the students how to write a script to move a sprite and make a sprite fall.
Attempt the activity on the Assignment page.
Conclude the concepts
Assign homework
● Instruct the students to go to the Tekie’s Digital platform and open a Lab session on Moving and Making a Sprite Fall.
● Show the learning slides or the video and discuss the concepts shown on the panel. 15 mins
Engage
Explain the following concepts:
Learning Outcomes
Explanation
Move a sprite. Demonstrate to the students how to move a sprite, as given on pages 28 and 29.
Make a sprite fall. Demonstrate to the students how to make a sprite fall, as given on pages 29 and 30.
● Ask the questions provided on the slides one by one to assess the students’ understanding. Discuss the answers to the questions with the students. If necessary, ask additional relevant questions.
● Read aloud the questions provided in the Do It Yourself 3B section and encourage students to solve them. Instruct them to write the answers in their book.
Correct Response:
1. a.
● Instruct the students to attempt the assignment by clicking on the Assignment tab.
● Explain the activity to the students.
7 mins
3 mins
● Conclude the session by summarising the steps to move a sprite and make a sprite fall.
● Assign the additional activity given on the panel to the students as homework.
● Assign the following questions from the Chapter Checkup given at the end of the chapter as homework.
B. Tick the Correct Option: Questions 1 and 2
E. Answer the Following Questions: Question 4
F. Apply Your Learning: Questions 1 and 2
This chapter is divided into the following lab sessions:
1. Sensing Blocks 1
2. Sensing Blocks 2
At the end of the session, the students will be able to:
● make a sprite disappear by touching another sprite.
Let the students watch the video or the learning slides related to the topic on the digital panel.
Explain to the students how to make a sprite disappear by touching another sprite.
Attempt the activity on the Assignment page. Conclude the concepts Assign
● Instruct the students to go to the Tekie’s Digital platform and open a Lab session on Sensing Blocks 1.
● Show the learning slides or the video and discuss the concepts shown on the panel.
Explain the following concepts:
Make a sprite disappear by touching another sprite.
Demonstrate to the students how to make a sprite disappear by touching another sprite and then come back from a random place, as given on pages 36 to 38.
● Ask the questions provided on the slides one by one to assess the students’ understanding. Discuss the answers to the questions with the students. If necessary, ask additional relevant questions.
● Instruct the students to attempt the assignment by clicking on the Assignment tab.
● Explain the activity to the students.
Sum Up
● Assign the additional activity given on the panel to the students as homework.
3 mins
● Conclude the session by summarising the steps to make a sprite disappear by touching another sprite.
● Assign the following questions from the Chapter Checkup given at the end of the chapter as homework.
A. Fill in the Blanks: Questions 1, 2, 3, and 4
B. Tick the Correct Option: Questions 1, 3, and 5
D. Write T for True and F for False: Questions 1, 2, 3, 4, and 5
E. Answer the Following Questions: Questions 1 and 3 8 mins
At the end of the session, the students will be able to:
● make a sprite display a message on touching a colour.
Let the students watch the video or the learning slides related to the topic on the digital panel.
Demonstrate to the students how to make a sprite display a message on touching a colour.
Attempt the activity on the Assignment page.
Conclude the concepts
Assign homework
5 mins
● Instruct the students to go to the Tekie’s Digital platform and open a Lab session on Sensing Blocks 2
● Show the learning slides or the video and discuss the concepts shown on the panel. 8 mins
Explain the following concepts:
Learning Outcome
Make a sprite display a message on touching a colour.
Explanation
Demonstrate to the students how to make the Trash sprite display a message if it touches the sea bed, as given on pages 38 to 40.
● Read aloud the questions provided in the Do It Yourself 4A section and encourage students to solve them. Instruct them to write the answers in their book.
Correct Response: Do yourself
● Ask the questions provided on the slides one by one to assess the students’ understanding. Discuss the answers to the questions with the students. If necessary, ask additional relevant questions.
● Instruct the students to attempt the assignment by clicking on the Assignment tab.
● Explain the activity to the students.
Sum Up
3 mins
● Conclude the session by summarising the steps to make a sprite display a message on touching a colour.
● Assign the additional activity given on the panel to the students as homework.
● Assign the following questions from the Chapter Checkup given at the end of the chapter as homework.
B. Tick the Correct Option: Questions 2 and 4
C. Who Am I?: Questions 1, 2 and 3
E. Answer the Following Questions: Question 2
F. Apply Your Learning: Questions 1, 2 and 3
Chapter Checkup
A. Fill in the Blanks.
1. Data 2. information 3. 1024 4. RAM 5. Primary, Secondary
B. Tick () the Correct Option.
1. a. Hard Drive 2. b. Cloud Storage 3. a. Byte 4. b. Two 5. b. The user clicks on the Print command.
C. Who Am I?
1. Memory Card 2. Data 3. RAM 4. Cloud Storage
D. Write T for True and F for False.
1. F 2. F 3. T 4. T
E. Answer the Following Questions.
1. Yes, a computer is an electronic device or machine that performs various calculations and carries out different tasks for us based on the instructions that we give it.
2. There are two types of computer memories—Primary and Secondary.
Primary Memory is the computer’s internal memory where it stores data related to currently running programs. It is the built-in memory of the computer. It is always accessible to the CPU.
Secondary memory is the computer’s external storage beyond the primary memory. It is used to store data and programs that are not in use by the computer’s processor.
3. Secondary memory, also called auxiliary memory, is the computer’s external storage beyond the primary memory. It is used to store data and programs that are not in use by the computer’s processor. Some examples are hard disk drive (HDD), pen drive, memory card, etc.
4. Cloud Storage is a digital space where you can store your files and get them whenever you want, using the internet.
Some advantages are as follow:
● Cloud Storage can provide large storage capacity. Often, we get free Cloud Storage of up to a few GBs
● It is like a big storage space on the internet where you can keep all your files and access them from any device, anywhere, and anytime , as long as you are connected to the internet.
5. Data:
● Data is facts, numbers, or symbols that we collect and enter into the computer.
● Data takes up less space.
Information:
● Information is the knowledge or understanding that we gain when the computer analyses and puts together the data that we entered in it.
● Information may require more storage due to added context and structure.
F. Apply Your Learning.
1. Cloud Storage
2. She should keep in mind the capacity of the RAM and hard disk or SSD.
3. No, Rahul will not find his document exactly as he left it when he turns his computer on again after the power cut. When a computer unexpectedly shuts down, such as during a power cut, any unsaved work or changes made since the last save will be lost.
Chapter Checkup
A. Fill in the Blanks.
1. Operating system 2. booting 3. desktop 4. aero peek 5. notification
B. Tick () the Correct Option.
1. d. Windows Key + D 2. a. Tracks Memory Usage 3. b. Search Bar 4. a. Icons
C. Who Am I?
1. Operating System 2. Desktop 3. Icon 4. Taskbar
D. Write T for True and F for False.
1. F 2. F 3. T 4. T
E. Answer the Following Questions.
1. An Operating System is a software that helps us to communicate with the computer and tell it what to do.
2. The two features of the Windows 10 operating system are:
● Search Button: The Search button is a handy tool next to the Start button. It allows you to search for files, programs, settings, and even search the internet.
● Aero Peek: Aero Peek is a feature in Windows that lets you see your desktop without actually minimising any of your open windows. To use Aero Peek, you just need to hover your mouse over open applications in the taskbar.
3. When we press the power button to turn on a computer, the computer starts getting the system ready for use. This process is called booting.
4. The Search button is a handy tool next to the Start button. It allows you to search for files, programs, settings, and even search the internet.
5. Aero Peek is a feature in Windows that lets you see your desktop without actually minimising any of your open windows. To use Aero Peek, you just need to hover your mouse over open applications in the taskbar.
F. Apply Your Learning.
1. Anika can customise the colour and font settings of her Windows 10 interface, by following the given steps:
i. Click the Start button and select the Settings option.
ii. Choose the Personalization option from the menu.
iii. Select the Colors option from the sidebar and choose a colour of your choice.
iv. Now, select the Fonts option from the sidebar and choose the font style and size.
v. Preview the font as you make the changes.
2. The operating system allows multitasking, enabling Shrishti to open the painting application and the music player at the same time. She can switch between these apps or use them side by side.
3. Urmi can pin shortcuts on the dock area of the taskbar to quickly open her favourite apps. This way, she can access them directly with a single click.
4. John should change the time zone on his computer to India Standard Time (IST) to match the local time. He can do this from the Date and Time settings.
5. John should change the date and time settings on his computer by following the given steps:
i. Open Settings from the Start button.
ii Select the Time & Language option.
iii. Select the Date & Time option.
iv. Toggle the switch to turn on the automatic time settings.
Chapter Checkup
A. Fill in the Blanks.
1. containers 2. Recycle Bin 3. information 4. Ctrl 5. Cut
B. Tick () the Correct Option.
1. a. Opens it 2. b. Group similar files together 3. a. Digital containers of information
4. a. folder inside another folder
C. Who Am I?
1. Folder 2. File 3. Recycle Bin 4. Cut and Paste
D. Write T for True and F for False.
1. T 2. F 3. T 4. F
E. Answer the Following Questions.
1 A file is a digital space used to store different types of information on a computer. It acts like a container for items like images, videos, texts, and so on. A folder is a container that stores and organises files and other folders.
2. Moving a File
Moving a file means removing it from its original position and pasting it to another location.
When we want to move a file on a computer, we can use a special command called Cut and Paste.
Duplicating a File
Duplicating a file means making an exact copy of a file and pasting the copied file into a different location.
When we want to duplicate a file on a computer, we can use a special command called Copy and Paste.
3. Shortcut icon helps us quickly open a file or folder. Shortcut icons are usually kept on the desktop to open the most frequently used items.
F. Apply Your Learning.
1. Avni should not explore the folder without Nishant’s permission because one must be respectful of others’ files. One must not explore the files that belong to someone else without their permission.
2. Raj can get the deleted picture back by restoring the file using the following steps:
i. Opening the Recycle Bin on his computer.
ii. Right-clicking on the file he wants to restore.
iii. Selecting the Restore option from the pop-up menu.
3. No, it is not a wise thing to do because folders are used to organise files and make them easier to find. Tanya should therefore, store the maths homework in the ‘Maths’ folder only.
4. Satish must follow the given steps to create a new folder:
i. Right-click on an empty space on the desktop. A pop-up menu will appear.
ii. Select the New option.
iii. Click on the Folder option.
Chapter Checkup
A. Fill in the Blanks.
1. computers 2. fibre optic 3. websites 4. information 5. Uniform Resource Locator
B. Tick () the Correct Option.
1. d. All of the above
2. a. A program that lets you see websites on the internet
3. a. Browsing the internet to visit various websites
4. a. To access websites on the internet
C. Who Am I?
1. URL 2. Search Engines 3. Web browser 4. Modem 5. DSL
D. Write T for True and F for False.
1. T 2. T 3. T 4. F 5. T
E. Answer the Following Questions.
1. The internet is a network of networks that connects computers and devices from all over the world. It allows people to collect and share information, and communicate with each other.
2. Just as we can do only two things with the switch on the switchboard—turn it on or turn it off, similarly, a digital signal either comes in or does not come in.
Just as how a regulator on the switchboard changes the speed at which the fan spins—we can have the fan spin at the fastest speed, reduce it to a slower speed and finally switch it off. That is how analog signal is.
3. A webpage is a digital document on the internet. It can have text, images, videos, and other content.
4. Search engines are used to find information on the internet. Some examples of search engines are Google, Bing, etc.
F. Apply Your Learning.
1. Riya can use the email service on the internet to wish her friend on his/her birthday. She would need a modem, an ISP and a communication media to connect to and use the internet.
2. DSL
3. Yes, I can help Rohan by telling him that:
a. A webpage is a single document on the internet that can have text, images, videos, and other content whereas, a website is a collection of multiple webpages that are all related to each other.
4. Some popular search engines that Lovey can use are:
a. Google b. Yahoo c. Bing
Chapter Checkup
A. Fill in the Blanks.
1. plus (+) 2. subscript 3. top 4. bold 5. paint format
B. Tick () the Correct Option.
1. b. Working area
2. b. The text at the bottom of every page
3. a. Select the text and click on Superscript in the Format menu
4. a. Line break
5. c. Insert menu
C. Who Am I?
1. Google Docs 2. Paint Format 3. Page Orientation 4. Header
D. Write T for True and F for False.
1. F 2. F 3. T 4. F 5. T
E. Answer the Following Questions.
1. One of the features of Google Docs is that you get to see all the changes that your friends make online.
2. Page orientation refers to the direction in which a document is displayed.
Steps to change the page orientation:
a. Click on File, and then select Page setup.
b. In the Page setup dialog box, in the Orientation section, select the Portrait or Landscape option.
c. Click on OK.
3. Steps to insert a page break:
a. Click where you want the page break to appear.
b. Click on the Insert menu and select Break.
c. Select the Page break. A page break will be inserted at the current cursor location within the document.
4. Formatting text refers to the process of changing the appearance and layout of a written document or piece of text. This makes it more visually appealing, organised, and easier to read and understand.
F. Apply Your Learning.
1. Aman can add his name and roll number in the Header so that it appears on every page of the document.
2. Simran can use the Page Break feature.
3. Rahul can use a line break to separate his poem into different stanzas.
Chapter Checkup
A. Fill in the Blanks.
1. Image 2. Drawing 3. text flow 4. Crop
B. Tick () the Correct Option.
1. b. length and width, but no depth
2. c.
3. b.


4. b. Adjusting the text around an image
C. Who Am I?
1. Crop tool 2. Text Wrap 3. Shapes 4. Inline with text
D. Write T for True and F for False.
1. T 2. F 3. T 4. F
E. Answer the Following Questions.
1. Shapes are the outlines of things we see around us. Shapes can be flat or have depth. Flat shapes are called 2D shapes. They only have length and width, but no depth. Examples of 2D shapes are circles, squares, and triangles. Shapes with depth are called 3D shapes. Examples of 3D shapes are spheres, cubes, and cones.
2. Different text-wrapping styles are:
● Inline with text
● Wrap text
● Break text
● Behind text
● In front of text
3. Cropping an image means to remove unwanted parts of an image.
4. We can insert an image from the Web: Click Insert → Image → Search the web. In the search box, type the name of the image you want to insert and then click on the Insert button.
F. Apply Your Learning.
1. Click Insert → Drawing → New → Select shape → Click and drag in the drawing area → Fill color tool → Fill colours in the shape.
2. Sonam can either insert images from the computer or the web.
From Computer: Click Insert → Image → Upload from computer. From the Web: Click Insert → Image → Search the web. .
3. Mahi can create a shape album in Google Docs by inserting shapes and images and arranging them.
Chapter Checkup
A. Fill in the Blanks.
1. presentation 2. move 3. Toolbar 4. automatically
B. Tick () the Correct Option.
1. b. Sharing information with others
2. d. Paint
3. a. By clicking on the + button on the toolbar
4. a. Insert
C. Who Am I?
1. Google Slides 2. Crop tool 3. Resize 4. Fill color tool
D. Write T for True and F for False.
1. F 2. T 3. F 4. T
E. Answer the Following Questions.
1. Click on the Insert tab in the menu bar → Image menu → Select “Upload from computer” → Select the image you want to add to the slide.
2. Steps to duplicate a slide:
● Select the slide you want to duplicate from the Slides Panel.
● Right-click on the slide, and then select the Duplicate slide option.
3. Click on Insert tab → Text box → Move the mouse cursor on the screen where you want to add the text box, then press the left button on the mouse.
4. The method to insert a shape in Google Slides is:
● Click on the Insert tab in the menu bar.
● Select the Shape option from the drop-down menu. Then, select the Shapes option.
● Click on the shape you want. It will appear on your slide.
F. Apply Your Learning.
1. Shikha can add an image to her slide with text by following these steps: Click on the Insert tab → Image → select “Upload from computer” option.
A selection window opens. She can then select the image to put on the slide.
To display text, Shikha should click on Insert tab → Text box → Move the mouse cursor on the part of the image where she wants to add the text box, then press the left button on the mouse and type text.
2. Rahul can add shapes to his slides by clicking on Insert → selecting Shape → selecting any of the options in Shapes
3. Resizing is changing the size of image from small to large and vice versa, whereas Cropping means to remove those parts of the image that we do not want to show.
4. Jyoti can add colour to the shapes on her Google Slide in the following way:
● Select the part of the shape that you want to colour.
● Click on the Fill color tool on the toolbar and select the colour of your choice.
Chapter Checkup
A. Fill in the Blanks.
1. smartphones 2. smart doorbells 3. humans 4. IoT
B. Tick () the Correct Option.
1. b. Internet of Things
2. b. Traditional light bulb
3. b. Suggesting recipes
4. c. Smart video doorbell
C. Who Am I?
1. Internet of Things 2. Smart Homes 3. Smart Speakers 4. Self-driving car.
D. Write T for True and F for False.
1. T 2. F 3. T 4. T
E. Answer the Following Questions.
1. IoT contains sensors that collect data from their environment.
2. A smart speaker interacts with other devices using the Internet of Things (IoT). It listens to voice commands to control other connected home gadgets, such as TVs, air conditioners, and doorbells.
3. Smart TVs are AI-enabled TVs. Smart TV allows its users to play music, and films, or change channels using the internet. You can control a smart TV with your voice. Traditional TVs cannot connect to the internet or be controlled with voice commands.
4. A smart refrigerator is an AI-enabled refrigerator that connects to the internet and offers various advanced features. It can monitor and manage its contents, suggest recipes based on what is inside, and notify you when you are running low on certain items.
F. Apply Your Learning.
1. Smartphone
2. Smart refrigerator
3. Smartwatch
4. Smart Homes
Chapter Checkup
A. Fill in the Blanks.
1. Coding 2. Blocks Palette 3. Stage 4. Sprites Pane 5. Stop
B. Tick () the Correct Option.
1. d. All of these 2. a. Make changes to the sound 3. a. Coding Area 4. b. run the script
5. d. All of these
C. Who Am I?
Sprites Pane
Backdrop Pane
Blocks Panel
Blocks Palette
Holds nine categories of blocks
Shows backdrops and sprites in action
Shows the details of sprites
Adds backgrounds
Stage Holds all blocks of each block category
D. Write T for True and F for False. 1. F 2. T 3. F 4. T 5. T
E. Answer the Following Questions.
1. Block-based coding is a computer language where we use colourful coding blocks to make computers do a task.
2. Scratch 3.0 is a free and simple platform where we use colourful blocks to create our own games, stories, and art.
3. The Code tab has different code blocks and the Coding Area, where we can drag and join the blocks to make the sprite move and do things.
4. The Add Extensions button provides additional blocks that can be integrated into the Scratch editor’s block palette, expanding its functionality.
5. The green flag is the Go button. You can click on it to run the script. The red button is the Stop button. You can click on it to stop the script from running.
F. Apply Your Learning.
1. She can start with block-based coding like Scratch 3.0. It is a free and simple platform where we use colourful blocks to create our own games, stories, and art.
2. Sprite
3. Add Extensions button
4. Change costumes
5. Backdrops Pane
Chapter Checkup
A. Fill in the Blanks.
1. Sprite 2. Sprites Library 3. Costume 4. Upload Backdrop 5. four
B. Tick () the Correct Option.
1. c. Upload Sprite
2. a. Fill
3. b. Size
4. c.
5. c. Add a sprite
C. Who Am I?
1. Backdrop
2. Delete 3. Sprite text box
4. Surprise
5. Upload Backdrop
D. Write T for True and F for False.
1. T 2. T 3. F 4. T 5. F
E. Answer the Following Questions.
1. In Scratch, the sprite is a character that can act. Ways to add a sprite to a project are:
Choose a Sprite
Paint
Surprise
Upload Sprite
2. The Backdrop Pane is used to add, upload, edit, or delete backdrops in our project.
3. Steps to delete a sprite are:
Select the thumbnail of the sprite you want to delete from the Sprite List.
Delete icon will appear.
Click the delete icon to delete the sprite.
4. Follow the given steps to rename a sprite:
Click on the sprite you want to rename in the Sprites Pane.
Click on the Sprite text box and delete the default name.
Type in the new name for your sprite.
Press Enter or click outside the text box.
The new name will be reflected in the Sprites Pane.
5. There are four ways to add a backdrop.
Choose a Backdrop – To choose a backdrop from the Scratch Backdrops Pane.
Paint – To create a backdrop using Paint Editor.
Surprise – To add a random backdrop.
Upload Backdrop – To upload a backdrop from the computer.
F. Apply Your Learning.
1. a. Delete b. Backdrop Pane
2. 1. Upload Backdrop
2. Paint
3. Choose a Backdrop
3. Paint
4. Upload Sprite
Chapter Checkup
A. Fill in the Blanks.
1. go to random position
2. loop
3. repeat
4. blue
5. event
B. Tick () the Correct Option.
b.


c. Looks
C. Who Am I?

D. Write T for True and F for False.
1. T 2. T 3. F 4. T 5. T
E. Answer the Following Questions.
1. In Scratch, the repeat blocks help us to repeat the actions of a sprite for a specified number of times.
2. a. “change x by 100” will move the sprite forward by 100 steps.
b. “change y by -100” will move the sprite downwards by 100 steps.
3. In Scratch, Events blocks tell the computer when to run a script.
4. The sprite will move backwards by 10 steps on pressing the left arrow key.
5. Repeat Block: A loop that repeats for the specified number of times.
Forever Block: Runs the given set of blocks forever until the Stop button is pressed.
F. Apply Your Learning.
1.

The sprite will move upwards by 2 steps forever until the Stop button is pressed.

4. The Penguin sprites are moving along the x-axis because they are going right.
Chapter Checkup
A. Fill in the Blanks.
1. Sensing 2. light blue 3. touching mouse pointer 4. 18
B. Tick () the Correct Option.
1. b. Sensing blocks
2. b. It should display a message
3. d. touching mouse pointer
4. a. To catch the trash
5. c. Control
C. Who Am I?

D. Write T for True and F for False.
1. T 2. T 3. T 4. F 5. T
E. Answer the Following Questions.
1. In Scratch, Sensing blocks are blocks that are used to detect when two characters touch each other. They are also used to detect other sprites, colours on stage, keypress, mouse click, and user input.
2. The ‘touching color’ block activates the blocks below it when a sprite touches the specified colour.
3. We can use the ‘touching mouse-pointer’ block of the Sensing category in Scratch to make a character react when you click on it.
F. Apply Your Learning.
1.

2. When the Basketball sprite touches the green colour of the ground, then the ‘go to random position’ block will prompt the sprite to go to a random position on the stage.
3. When the green flag is clicked, the Andie sprite will display a message in the speech bubble that says “Sports build character and teamwork” for 2 seconds. Here, the ‘When green flag clicked’ block belongs to the Events block category and the ‘Say for 2 seconds’ block belongs to the Looks block category.
A. Fill in the Blanks.
1. Devices. 2. Windows 3. Subfolder 4. Web pages
B. Tick () the Correct Option.
1. c. 1 GB 2. a. DSL 3. a. Deleting
C. Write T for True and F for False.
1. T 2. T 3. F 4. F
D. Answer the Following Questions.
1. Cloud storage is a digital space where you can store your files and get them whenever you want, using the internet.
2. An operating system is a software that helps us to communicate with the computer and tell it what to do.
3. Restoring a folder or file means getting it back from the Recycle Bin and moving to the previous location.
4. Search engines help you find information on the internet. The internet has billions of websites. So you can find almost anything instantly. Example: - Google, Bing, Yahoo
E. Apply Your Learning.
1. Move the mouse pointer to the taskbar and right-click on it.
Choose the Taskbar settings option from the pop-up menu.
The Settings window opens up for the taskbar features. Scroll down to the option ‘Taskbar location on screen’.
Choose Right from the dropdown menu.
The taskbar will move to the right side of the screen.
2. Right-click on an empty space on the desktop. A pop-up menu will appear.
Place the cursor over the New option.
Click on the Folder option.
A new folder will be created with a default name—New folder.
Type a name for the folder (e.g., "Personal Documents") and press Enter
To create a folder quickly, press the Ctrl+Shift+N keys together.
3. A web browser is a program that lets you see websites on the internet. Whereas, a website is a collection of web pages that are all related to each other.
A. Fill in the Blanks.
B. Tick () the Correct Option.
d.
C. Write T for True and F for False. 1. T 2. F 3. T 4. T
D. Answer the Following Questions.
1. Formatting text refers to the process of changing the appearance and layout of a written document or piece of text. This makes it more visually appealing, organised, and easier to read and understand.
2. Click on Rename box. Type the new name for your file.
Press the Enter key and the file will be automatically saved.
3. A car which uses AI to travel between destinations without human help are called self-driving car. It has sensors and cameras that enable it to drive independently.
E. Apply Your Learning.
1. Atishay should use the subscript formatting option to make the "2" appear below the the regular text line, as in CO2
2. Sakshi can resize an image by:
Click the image to select it.
The blue squares at the corners of the image will appear.
Press the left mouse button on a blue square and drag it inwards to make it smaller or outwards to make it larger.
3. Pragati can use a smart video doorbell to see and interact with visitors remotely using her smartphone.
A. Fill in the Blanks.
1. Go button 2. Surprise 3. Action 4. Sensing
B. Tick () the Correct Option.
1. a. Fill 2. a. Coding area 3. c. Motion 4. b. Costume
C. Write T for True and F for False.
1. T 2. F 3. T 4. T
D. Answer the Following Questions.
1. The Sprites Pane is below the stage. It shows all the details of sprites, like their name, location, and size. You can use it to add, upload, edit, or delete sprites.
2. The Control blocks are used to control the flow of scripts based on some criteria.
3. It activates the blocks below it when a sprite touches the specified object.
4. Sensing blocks are used to detect when two characters touch each other. They are also used to detect other sprites, colours on stage, keypress, mouse click, and user input.
E. Apply Your Learning.
1. When (green flag) clicked Say (Health is wealth) for 2 seconds
2. Eat an apple
3. Upload Backdrop.
ROBOTICS (ABot Kit)
Experiment 1: Bot Movements Using Motor Control
A. Tick () the Correct Option.
1. b. Workspace
2. a. True
3. b. Right
B. Answer the Following.
1. The delay function is used to suspend the execution of a program for a particular time.
2. Blocks in the Motor category are used to control motor movements, such as direction and speed.
C. Apply Your Learning.
1. Bot movements are used in real-life applications like autonomous vehicles and robotic arms.
2. If the “Repeat while” block is not used, the robot will not continuously follow the commands in a loop.
A. Tick () the Correct Option.
1. a. ON
2. a. Forward
3. a. Control
B. Answer the Following.
1. The robot needs to turn four times to make a square.
2. Yes, loop helps to reduce repeated steps.
C. Apply Your Learning.
1. No, since the repeat while loop is an infinite loop, and we cannot restrict it to four times.
2. This code can be used in robotic path tracing applications like floor-cleaning robots.
Experiment 3: Hand Follower/Repeller
A. Tick () the Correct Option.
1. c. Motor
2. a. Repeat while true
3. b. High
B. Answer the Following.
1. Configure the first Move Motor at the block at Port1 as clockwise by selecting the Clockwise option from the drop-down. For the second Move Motor at block, select Port2 from the drop-down menu. Configure this block as
Anticlockwise. This will move the bot in the forward direction.
2. The IR sensor detects a hand nearby, and if its value is above 800, the bot moves forward accordingly.
C. Apply Your Learning.
1. This concept is used in automatic doors and gesture-controlled robots.
2. Without the Time block, the bot would continuously move without pauses.
A. Tick () the Correct Option.
1. d. Variables
2. a. Using the Settings icon
3. c. 6
B. Answer the Following.
1. The equal operator block checks if two values are the same.
2. The “play tone of frequency” block is used to generate a sound from the buzzer.
C. Apply Your Learning.
1. Without a time delay, actions may execute too fast for proper response.
2. The else block ensures a different action happens when the condition is false.
A. Tick () the Correct Option.
1. b. Repeat while
2. b. To store IR sensor data from the left sensor
3. b. Plays a buzzer tone
B. Answer the Following.
1. The “wait” block creates a delay in the program.
2. The LED color and brightness can be set using the “LED block” from the Indicators category. Select the colour from the color palette you want your LED should display and set its brightness to ‘100’.
C. Apply Your Learning.
1. To add another LED color based on an IR sensor value, place an if block inside the Repeat while loop and use the greater than operator to check if the IR sensor value exceeds 400. Then, add a
set LED block, choose a new color, and set the brightness to 100. Repeat for different sensor values to change the LED color dynamically.
2. To make the buzzer play for 200 milliseconds instead of 100 milliseconds in the Piano Bot experiment, modify the “play tone of frequency” block. Change the time value from 100 ms to 200 ms in the block settings. This will extend the buzzer sound duration.
Experiment 6: Rope Car Robot
A. Tick () the Correct Option.
1. b. Repeat while
2. c. 1250 ms
3. d. Indicators
B. Answer the Following.
1. Setting one motor clockwise and the other anticlockwise allows the rope car to move smoothly along the thread, simulating a pulley system.
2. The Time block controls how long the motors run, determining the distance the rope car moves before stopping.
C. Apply Your Learning.
1. To slow down the rope car’s speed, reduce the motor speed to medium or low in the “Move Motor at” block.
2. Pulley-based mechanisms like cable car systems are used in mountains, amusement parks, ski resorts, and construction sites for transporting people or materials.
Maker Board Kit
Experiment 1: Print Your Name on Digital Display
A. Tick () the Correct Option.
1. b. A grid of addressable RGB LEDs
2. c. Show character
3. c. By using the wait block with a delay time
B. Answer the Following.
1. The “show scrolling text” block allows moving text display on the LED matrix.
2. To add a new letter, drag the “show character” block, enter the letter, set the color, and add a wait block for delay.
C. Apply Your Learning.
1. Real-life examples: Digital clocks and LED displays at airports.
2. A 1000 ms delay is added to ensure each letter is visible before changing.
Experiment 2: Flag Book
A. Tick () the Correct Option.
1. b. Control
2. b. To set a time delay between actions
3. c. 100
B. Answer the Following.
1. Animation is a method in which figures are manipulated to appear as moving images.
2. The Maker Board needs to be connected to a computer via USB to run the program.
3. The clear display block removes previous visuals before displaying the next animation frame.
C. Apply Your Learning.
1. Real-life examples: Cartoons and mobile games.
2. Reduce the wait block time to make animations appear faster.
Experiment 3: Colour Using AI
A. Tick () the Correct Option.
1. d. Speech Recognition
2. b. Red
3. c. Get detected AI label
B. Answer the Following.
1. Training the AI model with specific hand gestures helps ensure accurate recognition and response.
2. The “includes” block checks if a text contains a specific word or phrase.
C. Apply Your Learning:
1. Examples of computer vision in real life: Face recognition and self-driving cars.
2. To add “blue” as a new color command:
Train the AI model to recognize “blue” as a valid input.
Use the “includes” block to check for “blue” in speech input.
Add a show LEDS block to display blue color when detected.
This answer key has been designed for schools who have opted for the Robotics course.
A. Tick () the Correct Option.
1. a. My Program
2. b. step by step
3. a. Both motors clockwise
B. Answer the Following.
1. The “move robot in” block is used to move the robot in a specified direction for a given time.
2. The “Repeat while” block is used to repeat a set of instructions continuously while a condition is true.
C. Apply Your Learning.
1. A moving robot can be seen in daily life in automatic vacuum cleaners, delivery robots, and toy cars.
2. If the “Repeat while” block is not used, the bot will not continue moving indefinitely and will stop after completing one movement.
A. Tick () the Correct Option.
1. b. stop robot for time
2. a. 4
3. a. To draw shapes
B. Answer the Following.
1. The default value of the “set pen” block is ON.
2. The “stop robot” block is required to stop the motors.
C. Apply Your Learning.
1. Yes, other shapes can be drawn by changing movement and turn values in the code using count loop. Example, rectangle shape.
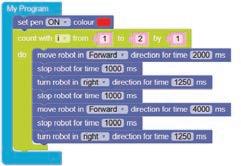
2. No, this code cannot be created using the “Repeat while” loop as it is an infinite loop, and we cannot restrict it to run only four times. However, this code can be created using the “count” block, which is also a loop block.

A. Tick () the Correct Option.
1. a. IR Sensor
2. a. 0
B. Answer the Following.
1. The bot uses its two infrared (IR) sensors to detect a nearby hand. If the left IR sensor detects a hand, the bot moves forward. If the right IR sensor detects a hand, the bot moves backward.
2. If both IR sensors do not detect a hand, the bot remains stationary and does not move.
C. Apply Your Learning.
1. A robotic vacuum cleaner is a real-life example that follows or repels objects based on proximity detection.
2. Bots with proximity detection can enhance safety in public places by avoiding obstacles and preventing collisions.
A. Tick () the Correct Option.
1. c. Print Data
2. a. True
3. c. Ultrasonic Sensor
B. Fill in the Blanks.
1. Display 2. Compile
3. moves backward 4. Variables
C. Apply Your Learning.
1. The reverse parking assistant bot helps a driver avoid obstacles while reversing by detecting objects using an ultrasonic sensor.
2. Two devices a self-driving car might use for reversing are LIDAR sensors and ultrasonic sensors.
A. Tick () the Correct Option.
1. b. set to
2. d. Sensor
3. a. settings
B. Answer the Following.
1. The “greater than” block checks if one value is larger than another.
2. The “Print Data” block displays messages or values on the screen.
C. Apply Your Learning.
1. A message can be displayed in a program using the “Print Data” block.
2. One real-life application of an object avoider is self-driving cars that avoid obstacles.
A. Tick () the Correct Option.
1. a. Repeat while 2. a. Count
B. Answer the Following.
1. To attach the motors and wheels to the chassis:
Step 1: Attach axles to the motors.
Step 2: Screw motors to the chassis.
Step 3: Add wheels and secure with axle locks.
2. The “if” and “else if” conditions create different dance moves by checking the number of times the touch sensor is pressed and executing a specific set of motor movements.
C. Apply Your Learning.
1. To add a fourth dance move, modify the program by adding another “else if” condition checking if the count equals 4 and assigning new motor movements.
2. To stop the robot after a set number of touches, include a condition to reset the count to 0 after a specific number of inputs.
A. Tick () the Correct Option.
1. b. set to 2. d. Time
B. Answer the Following.
1. The touch sensor detects when it is pressed and sends signals to the bot to kick the ball.
2. The bot stops when the count variable reaches 3 and is reset to 0.
C. Apply Your Learning.
1. The sports industry can benefit from soccer bot technology for robotic training simulations.
2. If the bot misses the ball, adjust the timing and motor speed to align the kick properly.
A. Tick () the Correct Option.
1. a.
2. a. Read Touch Sensor
3. c. Variables
B. Fill in the Blanks.
1. Control
2. My Program
3. Touch Sensor
4. True, false
C. Apply Your Learning.
1. A table fan robot can help in demonstrating the working of a windmill by showing how a rotating structure converts motor energy into airflow, similar to how windmills generate power.
2. The energy conversion that takes place in the table fan robot is from electrical energy to mechanical energy, where the motor converts electricity into motion to rotate the fan blades.
Experiment 9: Bot Movement AI
A. Tick () the Correct Option.
1. b. Palm
2. a. The bot stops moving
3. b. Natural Language Processing
B. Answer the Following.
1. Training the AI model with hand gestures is important because it helps the model recognize different gestures accurately and respond with the correct movement actions. Without training, the AI might not detect gestures properly
2. The purpose of NLP in this experiment is to convert spoken commands into actions that the robot can perform, such as moving forward, backward, left, or right.
C. Apply Your Learning.
1. To make the bot stop when there is no command, modify the code by adding a condition in the “else” part of the if-else structure. Set the motor direction to Stop if no valid gesture or voice command is detected.
2. Face recognition in smartphones and Self-driving cars
1: Print Your Name on Digital Display
A. Tick () the Correct Option.
1. b. A grid of addressable RGB LEDs
2. c. Show character
3. c. By using the wait block with a delay time
B. Answer the Following.
1. The “show scrolling text” block allows moving text display on the LED matrix.
2. To add a new letter, drag the “show character” block, enter the letter, set the color, and add a wait block for delay.
C. Apply Your Learning.
1. Real-life examples: Digital clocks and LED displays at airports.
2. A 1000 ms delay is added to ensure each letter is visible before changing.
A. Tick () the Correct Option.
1. b. Control
2. b. To set a time delay between actions
3. c. 100
B. Answer the Following.
1. Animation is a method in which figures are manipulated to appear as moving images.
2. The Maker Board needs to be connected to a computer via USB to run the program.
3. The clear display block removes previous visuals before displaying the next animation frame.
C. Apply Your Learning.
1. Real-life examples: Cartoons and mobile games.
2. Reduce the wait block time to make animations appear faster.
A. Tick () the Correct Option.
1. d. Speech Recognition
2. b. Red
3. c. get detected AI label
B. Answer the Following.
1. Training the AI model with specific hand gestures helps ensure accurate recognition and response.
2. The “includes” block checks if a text contains a specific word or phrase.
C. Apply Your Learning:
1. Examples of computer vision in real life: Face recognition and self-driving cars.
2. To add “blue” as a new color command:
Train the AI model to recognize “blue” as a valid input.
Use the “includes” block to check for “blue” in speech input.
Add a show LEDS block to display blue color when detected.
This answer key has been designed for schools who have opted for the Robotics Plus course.
This teacher manual has been designed to implement Tekie, the storytelling-based Coding and Computer Science program. The manual consists of lesson plans within each chapter that teachers transact within classrooms and computer labs. Each lesson is based on a research-based ‘WEBS’ framework that simplifies pedagogical practices for teachers and enables them to deliver effectively.
• Sharp Lesson Planning: Each lesson plan focuses on specific sub-learning outcomes within a chapter and are designed for delivery within the stipulated class or lab time.
• Real-life and Application-based Questions: Additional questions that link Computer Science to real-life contexts and assist teachers to develop learners’ conceptual understanding and application skills.
• Support and Detailed Solutions: In-depth solutions for in-class and post-class activities to reinforce learning.
Uolo partners with K-12 schools to provide technology-enabled learning programs. We believe that pedagogy and technology must come together to deliver scalable learning experiences that generate measurable outcomes. Uolo is trusted by over 15,000+ schools across India, Southeast Asia, and the Middle East.
ISBN 978-81-984882-6-8
