


Academic Authors: Ayushi Jain, Neha Verma
Creative Directors: Bhavna Tripathi, Mangal Singh Rana, Satish
Book Production: Rakesh Kumar Singh
Project Lead: Jatinder Kaur
VP, Learning: Abhishek Bhatnagar
All products and brand names used in this book are trademarks, registered trademarks or trade names of their respective owners.
© Uolo EdTech Private Limited
First impression 2023
Second impression 2024
Third impression 2025
This book is sold subject to the condition that it shall not by way of trade or otherwise, be lent, resold, hired out, or otherwise circulated without the publisher’s prior written consent in any form of binding or cover other than that in which it is published and without a similar condition including this condition being imposed on the subsequent purchaser and without limiting the rights under copyright reserved above, no part of this publication may be reproduced, stored in or introduced into a retrieval system, or transmitted in any form or by any means, electronic, mechanical, photocopying, recording or otherwise, without the prior written permission of both the copyright owner and the above-mentioned publisher of this book.
Book Title: Tekie Computer Science Teacher Manual 5
ISBN: 978-81-984882-4-4
Published by Uolo EdTech Private Limited
Corporate Office Address:
85, Sector 44, Gurugram, Haryana 122003
CIN: U74999DL2017PTC322986
Illustrations and images: www.shutterstock.com, www.stock.adobe.com and www.freepik.com
All suggested use of the internet should be under adult supervision.
Uolo’s Tekie program offers a coding-focused curriculum for grades 1 to 8, preparing students for the technology-driven world. We present a carefully crafted Teacher Manual to assist teachers in delivering effective and engaging lessons to students. Rather than prescribing teaching methods, the manual provides examples and demonstrates how and why teachers can apply these examples in their classes.
The Teacher Manual includes a suggested implementation plan to help teachers navigate the curriculum better throughout the academic year. Within the academic year, the Tekie program prescribes the following types of chapters and sessions:
Familiarisation: this period builds familiarity with the Tekie program and the digital platform.
Theory: these periods are dedicated to the Computer Science Theory chapters. These topics are mostly delivered in the classroom.
Tools: these periods are dedicated to the Computer Tools chapters. These topics involve almost equal numbers of classroom and computer labs sessions.
Coding: these periods are dedicated to the Coding chapters. These topics have more computer lab sessions.
Additional Hands-on Time: these are additional computer lab periods that teachers can use to revise topics or dedicate for completion of projects.
Revision: these are additional classroom periods that teachers can use to revise topics or cover syllabus backlogs.
Each chapter in this manual is structured to provide a comprehensive lesson plan. The chapters are divided into multiple sessions, each following the Warm up, Engage, Build, and Sum up (WEBS) strategy. The Warm up phase sets the stage for learning by connecting to prior knowledge and building curiosity. The Engage phase captures the students’ attention and motivates them to participate actively. In the Build phase, questions from various sections are discussed to build the understanding of the students. Finally, the Sum up phase reinforces learning through easy-to-recall activities and questions. Time duration for each section has been suggested based on the requirements of the students. Additionally, an answer key for every chapter is provided to assist teachers in assessing their students’ understanding and guiding their learning effectively.
Lastly, we understand that the Indian education landscape is quite diverse. To suit the needs of all types of schools, we have built-in extra higher-order chapters in the content books. These extra chapters are clearly marked in the table of contents of this manual. We suggest that the teacher completes the main chapters first and then move to higher-order optional chapters only if there is sufficient time left in the academic year and learners are ready for more challenging content.
We hope that this teacher manual will empower teachers to use the curriculum effectively, support the learning of all students thoroughly, create learning opportunities and design interactive learning environments that cater to the students’ needs and interests.
1 The Journey of Computers ��������������� 1
History of Computers
Generations of Computers
Characteristics and Limitations of Computers
2 Communicating Online �������������������� 9
Internet and Its Uses, Ways to connect to the Internet and Browsing the Internet
Communication over the Internet
Electronic Mail and Netiquette
3 Working with Tables in Word Processor������������������������������������������ 17
Creating a Table, Entering, and Editing Data 1
Creating a Table, Entering, and Editing Data 2
Formatting Tables in Google Docs 1
Formatting Tables in Google Docs 2
Formatting Tables in Google Docs 3
Formatting Tables in Google Docs 4
4 Themes and Layouts in Presentations ���������������������������������� 31
Basics of Google Slides, Themes and Layout 1
Basics of Google Slides, Themes and Layout 2
Tables and Charts in Google Slides 1
Tables and Charts in Google Slides 2
Diagrams and Master Slide 1
Diagrams and Master Slide 2
5 Animations
Applying Animation in Google Slides 1
Applying Animation in Google Slides 2
Applying Transition in Google Slides 1
Applying Transition in Google Slides 2
Adding Audio and Video to a Presentation 1
Adding Audio and Video to a Presentation 2
6 Starting with Spreadsheets ����������� 58
Basics of Google Sheets 1
Basics of Google Sheets 2
Entering Data, Saving, Closing, and Opening a Sheet 1
Entering Data, Saving, Closing, and Opening a Sheet 2
7 Editing Data in a Spreadsheet ������� 68
Interacting with Spreadsheets 1
Interacting with Spreadsheets 2
Copying, Moving, and Deleting Cell Data 1
Copying, Moving, and Deleting Cell Data 2
8 Artificial Intelligence and Its Domains*
Introduction to AI and Domains of AI: Data Science
Fun with AI: Using Tic Tac Toe
Domains of AI: Computer Vision
Fun with AI: Using AutoDraw!
Domain of AI: NLP
Fun with AI: Using Wordtune Scratch 3.0 III
1 Introduction to Scratch 3�0 ������������ 91
Introduction to Scratch 3.0 and Its Components
Sprites
Backdrops
2 Variable and Looks Blocks ������������� 98
Variables Blocks
Looks Blocks
3 Using Operators, Sensing, and Control Blocks
Sensing and Operator Blocks
Control Blocks
4 Sound Blocks*�������������������������������� 106
Sound Blocks
Finalising the Project

5
8
Mel and Conji start their summer vacation with a visit to the Computer Museum, learning about the history of computers. At the Library, they search for a book on Avora’s creation but find it missing. Elder Wizard and Elder Robot suggest looking online, introducing them to the internet as a vast information network. They visit Eva, who’s struggling to organize her birthday party. Mel teaches her to use Google Docs and Slides, and with help from Ms Idea at the Idea Centre, they settle on a robotic theme. Eva creates stunning invitations using Google Slides, and Elder Wizard and Elder Robot teach them to manage a budget using Google Sheets. As the party plans wrap up, they receive a surprise gift for Eva from Mr Fate and a life lesson about happiness. Later, a mysterious message leads them to the “Enchanted Doorway,” where they discover a magical game room. Playing “Space Explorer,” they learn about AI, sparking excitement to explore more of their magical world.
● It is a very beautiful day in Avora.
● Mel and Conji are flying over Avora and feeling excited.
● Mel and Conji decide to visit the newly opened Computer Museum.
● Soon, they land in front of the Computer Museum.
● Conji is very surprised after looking at computers of different shapes and sizes in the Computer Museum.
● Pointing to a computer, Mel tells Conji that this is the first computer that was ever made.
● Conji is very excited to learn more about computers.
● Mel teaches Conji about computers.
This chapter is divided into the following classroom sessions
1. History of Computers
2. Generations of Computers
3. Characteristics and Limitations of Computers
At the end of the session, the students will be able to:
● explain why computers are important.
● describe examples of some early computers.
Keywords
● Abacus: Abacus is one of the earliest counting device.
● ENIAC: ENIAC was one of the first programmable, general-purpose electronic digital computer.
Ask the students about some early counting methods or devices. Explain to the students that just like humans are evolving, computers are also evolving day by day.
Discuss some early computers with the students.
Group discussion Conclude the concepts
Assign homework
Action Plan
Warm Up
● Ask the students about some early counting methods and devices.
● Relate the concept that computers are also used for counting and for various types of complex calculations.
● Now, build the concept that, just like the early counting devices, like Abacus and Napier’s Bones, computers are also used to perform counting and mathematical operations.
Engage
Explain the following concepts:
Learning Outcomes
Explain why computers are important.
Explanation
Discuss with the students that computers have become an integral part of our lives. They help us in almost every sphere of life these days. We cannot even imagine a world without computers, as given on page 4.
Describe examples of some early computers.
Explain to the students about some early computers, like Abacus, Napier’s Bones, Pascaline, Stepped Reckoner or Leibniz Wheel, Difference Engine and Analytical Engine, Tabulating Machine, Differential Analyzer, Mark I, ENIAC, and UNIVAC, as given from pages 4 and 5.
Additional Questions to Check your Understanding
1. Who was the developer of Napier’s Bones?
Possible response: Blaise Pascal, John Napier, Vannevar Bush
Correct response: John Napier
2. Name the earliest counting device.
Correct response: Abacus
● Conduct a group discussion in the class among students on the topic ‘Early Computers’ Possible Responses: Abacus, Napier’s Bones, Pascaline, Stepped Reckoner or Leibniz Wheel, Difference Engine and Analytical Engine, Tabulating Machine, Differential Analyzer, Mark I, ENIAC, and UNIVAC.
● Conclude the session by summarising that the computers have become an integral part of our lives. Early computers were not like the computers that we see today. They are evolving year by year. Name some of the early counting devices and computers, like Abacus, Napier’s Bones, Pascaline, Stepped Reckoner or Leibniz Wheel, Difference Engine and Analytical Engine, Tabulating Machine, Differential Analyzer, Mark I, ENIAC, and UNIVAC.
● Assign the following questions from the Chapter Checkup given at the end of the chapter as homework.
A. Fill in the Blanks: Questions 1 and 2
B. Tick the Correct Option: Question 4
C. Who Am I?: Questions 1, 3, 4, and 5
D. Write T for True and F for False: Questions 1 and 2
E. Answer the Following Questions: Questions 1 and 2
F. Apply Your Learning: Questions 1, 2, and 3
At the end of the session, the students will be able to:
● discuss about the computers of the first generation.
● describe the second generation of computers.
● explain the third generation of computers.
● discuss the computers of the fourth generation.
● explain the fifth generation of computers.
Keywords
● Generations of computers: Generations are various stages of advancement in computer technology.
● Integrated Circuits (ICs): ICs are circuits of many electronic components together on a silicon chip.
● Microprocessor: Microprocessor is a chip containing about 1,00,000 electronic components.
Ask the students about the advancements in the living styles and foods of their earlier family members, such as grandparents, parents, and themselves.
Discuss about all generations of computers with the students. Group discussion Conclude the concepts
Assign homework
5 mins
Ask the students about advancements in the living styles and foods of their earlier family members, such as grandparents, parents, and themselves.
● Build the concept that, just like we have parental generations, computers also have generations. Tell them that we are currently in the fifth generation of computers. Also, discuss with them about the different generations of computers and their features.
Explain the following concepts:
Discuss about the computers of the first generation.
Describe the second generation of computers.
Explain the third generation of computers.
Discuss the computers of the fourth generation.
Explain the fifth generation of computers.
Explain to the students that the computers developed in the first generation used vacuum tubes, which consisted of thin filaments. They were huge in size, had less memory, and were very costly. They required a lot of maintenance and were programmed using the complex machine language or the assembly language. The popular first generation computers include ENIAC and UNIVAC, as given on page 6.
Discuss with the students that the computers of the second generation were relatively smaller because they used tiny transistors. They are faster and cheaper. They stored information using magnetic core memory, used punched cards for input, and were programmed using the assembly languages. The famous computers from this time were the CDC 3600 and IBM 7090, as given on pages 6 and 7.
Describe that the computers of the third generation used Integrated Circuits (ICs), which reduced the size of the computers. Integrated circuits are circuits of many electronic components together on a chip. They used core memory, which was faster and more reliable. Keyboards and friendlier interfaces were introduced for the users. These computers were programmed using languages, like Common Business-Oriented Language (COBOL), Formula Translation (FORTRAN), and Beginner’s All-purpose Symbolic Instruction Code (BASIC). Popular third generation computers were IBM’s System/360 and DEC’s PDP-11, as given on page 7.
Explain to the students that the computers of the fourth generation used integrated circuits with VLSI, which stands for Very Large Scale Integration. This chip is also known as a Microprocessor. They used faster and more reliable Random Access Memory (RAM), keyboards and mouses, and programmed using languages like C, Pascal, and FORTRAN. Popular computers from this era include the IBM PC, HP 9000 Series, and DEC 10, as given on pages 7 and 8.
Discuss with the students that the computers of the fifth generation use Artificial Intelligence (AI) and Machine Learning (ML) as their main technologies and have advanced memory to store large amounts of data. Advanced input and output methods, like voice recognition, gesture control, augmented reality, virtual reality, and brain-computer interfaces, are used and these computers are programmed using languages like R, Python, and Julia, as given on page 8.
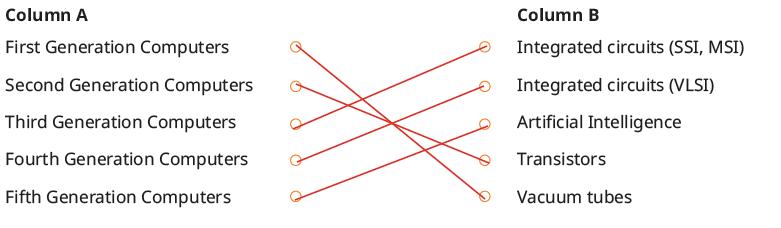
● Read aloud the questions provided in the Do It Yourself 1A and encourage the students to solve the questions. Instruct the students to match the correct answers in their book.
Correct Response:
Build 5 mins
● Conduct a group discussion in the class among students on the topic ‘Input and output methods in the fifth generation of computers’.
Possible Response: Input and output methods include voice recognition, gesture control, augmented reality, virtual reality, and brain-computer interfaces.
3 mins
● Conclude the session by summarising that, based on the time period and the advancements in the technology, computers are broadly classified into five generations: first generation, second generation, third generation, fourth generation, and fifth generation. Different devices, like vacuum tubes, transistors, integrated circuits, and microprocessors, are used in different generations.
● Assign the following questions from the Chapter Checkup given at the end of the chapter as homework.
A. Fill in the Blanks: Questions 3, 4, and 5
B. Tick the Correct Option: Questions 1, 2, and 3
C. Who Am I?: Question 2
D. Write T for True and F for False: Question 3
E. Answer the Following Questions: Question 3
F. Apply Your Learning: Question 4
Learning Outcomes
At the end of the session, the students will be able to:
● explain various characteristics of computers.
● discuss the limitations of computers.
Keywords
● Storage: It is the memory of a computer in which it stores pictures, documents, videos, and more.
Warm Up Engage Build Sum Up
Ask the students about their characteristics. Discuss about different characteristics and limitations of computers.
● Multitasking: Working of a computer on various tasks at the same time is called multitasking. 5 mins
Warm Up
Group discussion Conclude the concepts Assign homework
Action Plan
● Ask the students about their characteristics.
● Build the concept that, just like you have characteristics like curiosity, adaptability, creativity, and intelligence, computers also have characteristics like speed, accuracy, storage, multitasking, being automatic, and used in communication.
● Also, tell them that computers are incredibly powerful and versatile machines, but they also have several limitations, like they cannot think like humans, need maintenance, and lack emotional intelligence.
Engage
Explain the following concepts:
Learning Outcomes
Explain various characteristics of computers.
Discuss with students about the different characteristics of computers, like they are superfast at doing things, being accurate, have a huge memory, do things on their own, multitasking, being automatic, and used in communication, as given on page 9. 15 mins
Explanation
Discuss the limitations of computers. Explain about the different limitations of computers, like they cannot think like humans, need maintenance, and lack emotional intelligence, as given on pages 9 and 10.
● Read aloud the question provided in the Do It Yourself 1B section and encourage the students to solve the question. Instruct the students to write the answers in their book.
Correct Responses:
Build
7 mins
● Conduct a group discussion in the class among students based on the topic, “What tasks can be done using a computer?” given in the Discuss section, as mentioned on page 11.
Possible Response: Computers are used for communication, playing games, listening to music, doing calculations, reading books, etc.
3 mins
Sum Up
● Conclude the session by summarising that the computers have characteristics, like speed, accuracy, storage, multitasking, automatic, and communication. It also has some limitations, like a computer cannot think itself, it needs maintenance, and it lacks emotional intelligence.
● Assign the following questions from the Chapter Checkup given at the end of the chapter as homework.
B. Tick the Correct Option: Question 5
D. Write T for True and F for False: Questions 4 and 5
E. Answer the Following Questions: Questions 4 and 5
F. Apply Your Learning: Question 5
Mel and Conji start their summer vacation with a visit to the Computer Museum, learning about the history of computers. At the Library, they search for a book on Avora’s creation but find it missing. Elder Wizard and Elder Robot suggest looking online, introducing them to the internet as a vast information network. They visit Eva, who’s struggling to organize her birthday party. Mel teaches her to use Google Docs and Slides, and with help from Ms Idea at the Idea Centre, they settle on a robotic theme. Eva creates stunning invitations using Google Slides, and Elder Wizard and Elder Robot teach them to manage a budget using Google Sheets. As the party plans wrap up, they receive a surprise gift for Eva from Mr Fate and a life lesson about happiness. Later, a mysterious message leads them to the “Enchanted Doorway,” where they discover a magical game room. Playing “Space Explorer,” they learn about AI, sparking excitement to explore more of their magical world.
● Mel and Conji rushed to inform the elders about the missing book.
● Conji told them that they had gone to the library to read about the history of Avora but the book was missing from the shelf.
● Elder Wizard suggested that someone else must have taken the book.
● Conji, then, asked the Elders if the book could have been taken by Lord Ero, but according to Elder Robot, Lord Ero already had a copy of the book.
● Conji wanted to read about Avora and how it was created.
● Elder Robot told them that they can use the internet to learn about Avora.
● Conji did not know about the internet.
● Elder Wizard tells him that the internet is a vast network of computers connected to each other. It helps us to communicate online and share information.
● Mel tells him more about the internet.
This chapter is divided into the following classroom sessions
1. Internet and Its Uses, Ways to Connect to the Internet, and Browsing the Internet
2. Communication over the Internet
3. Electronic Mail and Netiquette
At the end of the session, the students will be able to:
● explain what the internet is.
● describe the uses of the internet.
● describe ways to connect to the internet.
● browse the internet.
Keywords
● Internet: It is a huge network of millions of computers connected worldwide.
● Browsing the internet: Browsing the internet refers to using a web browser to search for and access information on the World Wide Web (WWW), which is a part of the internet.
Ask the students how people are socially connected with each other. Explain to the students what the internet is. Also, explain its uses.
Describe them the ways to connect to the internet. Also explain them how to browse the internet.
Group discussion
Think and Tell Conclude the concepts Assign homework
Warm Up
● Ask the students how people are socially connected with each other.
● Now, develop the concept that, similar to people, computers are also connected with each other to form the internet.
Explain the following concepts:
Learning Outcomes
Explanation
Explain what the internet is. Explain to the students that the internet is a huge network of millions of computers connected worldwide, as given on page 19.
Describe the uses of the internet.
Describe ways to connect to the internet.
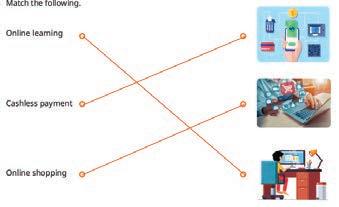
Explain to the students the uses of the internet, such as online shopping, cashless payment, online learning, online communication, etc., as given on pages 19 and 20.
Describe to the students several ways to connect to the internet, such as wired connection, wireless connection, cellular connection, etc., as given on page 21.
Browse the internet. Tell students that browsing the internet refers to using a web browser to search for and access information on the WWW, as given on page 22.
● Read aloud the questions provided in the Do It Yourself 2A and Do It Yourself 2B sections and encourage the students to solve the questions. Instruct the students to write the answers in their book.
Do It Yourself 2A
Correct Responses:
2. a. Amazon
b. YouTube
c. Instagram Do It Yourself 2B
Correct Response:
1. Web browser
2. Wired connection
3. Cellular connection
● Conduct a group discussion in the class among the students on the topic ‘Internet for Entertainment’.
Correct Response: The internet provides many ways to have fun and be entertained. You can watch videos, play games, and listen to your favourite songs online. There are apps, like Netflix, Hotstar, and YouTube, that let you stream various kinds of videos.
● Ask the students to answer the question “What are some other ways to connect to the internet?” asked in the Think and Tell section, as given on page 21.
Possible Responses: community networks, high-flying balloons or drones, etc.
● Conclude the session by summarising that the internet is a huge network of millions of computers connected worldwide. There are various uses of the internet, such as online shopping, cashless payment, online learning, online communication, etc. Some of the ways to connect to the internet are wired connection, wireless connection, cellular connection, satellite, dial-up, etc. Browsing the internet refers to using a web browser to search for and access information on the WWW.
● Assign the following questions from the Chapter Checkup given at the end of the chapter as homework.
A. Fill in the Blanks: Questions 1, 2, and 4
B. Select the Correct Option: Questions 1, 2, 4, and 5
C. Who Am I?: Questions 1 and 3
D. Write T for True and F for False: Question 1
E. Answer the Following Questions: Questions 1 and 2
At the end of the session, the students will be able to:
● learn different ways to communicate online.
Keywords
● Web browser: Email: Email, short for electronic mail allows users to send text messages, attachments, and multimedia to one or more recipients over the internet.
● Video conferencing: Video conferencing allows multiple participants to engage in live video and audio communication.
● Social Media: Social media platforms are used for personal communication, networking, and content sharing.
● Forums: Forums are online discussion boards where users can post messages and engage in conversations on various topics.
Ask students how do they communicate online. Explain to the students about ways to communicate online such as Email, messaging apps, video conferencing, etc. Group discussion Conclude the concepts Assign homework
● Ask students how do they communicate online.
● Now, build the concept that they can communicate online using any of the methods such as Email, messaging apps, video conferencing, social media, etc.
Explain the following concepts:
Learning Outcome
Learn different ways to communicate online.
Explanation
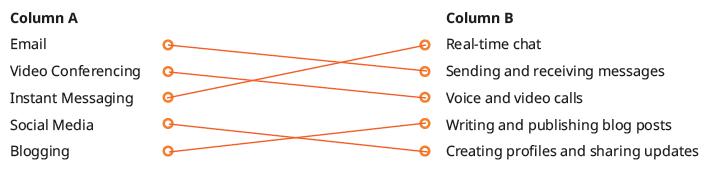
Explain to the students about ways to communicate online such as Email, messaging apps, video conferencing, social media, blogging and microblogging, and online forums. Also tell features of each of these, as given on pages 22 to 25.
● Read aloud the questions provided in the Do It Yourself 2C section and encourage the students to solve the questions. Instruct the students to write the answers in their book.
7 mins
● Conduct a group discussion in the class among the students on the topic, ‘Features of Video Conferencing’.
Correct Response: Video conferencing is used to conduct meetings with colleagues working from different locations. It facilitates online learning with live video interactions between teachers and students. Users can present their screen to other participants and record meetings as well.
3 mins
● Conclude the session by summarising that Email (electronic mail) allows users to send text messages, attachments, and multimedia to one or more recipients over the internet. Messaging apps offer real-time communication through text messages, voice calls, and even video conferencing. Video conferencing allows multiple participants to engage in live video and audio communication. Social media platforms are used for personal communication, networking, and content sharing. Blogging platforms allow users to create and maintain blogs, which are regularly updated with content such as articles, photos, and videos. Forums are online discussion boards where users can post messages and engage in conversations on various topics.
● Assign the following questions from the Chapter Checkup given at the end of the chapter as homework.
A. Fill in the Blanks: Question 3
C. Who Am I?: Question 4
D. Write T for True and F for False: Question 3
E. Answer the Following Questions: Question 4
F. Apply Your Learning: Questions 2, 4, and 5
At the end of the session, the students will be able to:
● create an email account using Gmail.
● send an email.
● practice good netiquette.
Keywords
● Gmail: Gmail is a free and popular email service offered by Google.
● Netiquette: Netiquette, shortform for Internet etiquette, refers to a set of guidelines and rules for polite and respectful behaviour when communicating online.
Ask the students if they have ever used Gmail to send mails.
Ask the students what they do when they see a pop-up on the computer screen regarding an advertisement while accessing the internet.
Explain to the students how to create an email account using Gmail and send an Email.
Also, tell them about the netiquettes they must follow.
Group discussion
Conclude the concepts
Assign homework
● Ask the students if they have ever used Gmail to send mails. Tell them that Gmail is a free and popular email service offered by Google.
● Ask the students what they do when they see a pop-up on the computer screen regarding an advertisement while accessing the internet. Now, build the concept by explaining that the internet has brought so many benefits and opportunities, but it also comes with a range of threats and risks.
Engage
Explain the following concepts:
Learning Outcomes
Create an email account using Gmail.
Explanation
Explain to the students the steps to create a Gmail account, as given on pages 25 to 28.
Send an email. Explain to the students the steps to send an email. Also tell them the components of the New Message window, as given on pages 29 and 30.
Practice good netiquette. Explain to the students that netiquette refers to a set of guidelines and rules for polite and respectful behaviour when communicating online. Also tell them some important netiquette principles for the internet users, as given on page 30.
● Read aloud the questions provided in the Do It Yourself 2D section and encourage the students to solve the questions. Instruct the students to write the answers in their book.
Correct Response:
i. Receiver
ii. Cc (Carbon Copy)
iii. Netiquette
iv. Spamming
Build
7 mins
● Conduct a group discussion in the class among the students on the topic ‘Activities that invade the privacy of an online user’.
Possible Response: Entering someone’s private information, watching what they do online without their permission, sharing their personal data without asking, etc., are all activities that invade the privacy of an online user.
3 mins
● Conclude the session by summarising that Gmail is a free and popular email service offered by Google. Then, revise the steps to create a Gmail account and send an email. Practising good netiquette is essential for a positive and productive online environment. One should be kind and respectful, use good language, not share personal information, be careful of what they post, respect other people’s privacy, not spam, etc., while using the internet.
● Assign the following questions from the Chapter Checkup given at the end of the chapter as homework.
A. Fill in the Blanks: Question 5
B. Select the Correct Option: Question 3
C. Who Am I?: Questions 2 and 5
D. Write T for True and F for False: Questions 2, 4, and 5
E. Answer the Following Questions: Questions 3 and 5
F. Apply Your Learning: Questions 1 and 3
Mel and Conji start their summer vacation with a visit to the Computer Museum, learning about the history of computers. At the Library, they search for a book on Avora’s creation but find it missing. Elder Wizard and Elder Robot suggest looking online, introducing them to the internet as a vast information network. They visit Eva, who’s struggling to organize her birthday party. Mel teaches her to use Google Docs and Slides, and with help from Ms Idea at the Idea Centre, they settle on a robotic theme. Eva creates stunning invitations using Google Slides, and Elder Wizard and Elder Robot teach them to manage a budget using Google Sheets. As the party plans wrap up, they receive a surprise gift for Eva from Mr Fate and a life lesson about happiness. Later, a mysterious message leads them to the “Enchanted Doorway,” where they discover a magical game room. Playing “Space Explorer,” they learn about AI, sparking excitement to explore more of their magical world.
● After reading about the evolution of Avora, Mel and Conji decide to go to Eva’s room to share this.
● Eva is making a list for her birthday party when Mel and Conji enter her room.
● Mel and Conji tell Eva that they have learnt on the internet how Avora was created.
● Eva tells them that she is busy planning for her birthday party, but it is very difficult to plan everything.
● Conji wants Mel to help Eva.
● Mel suggests using tables in Google Docs to reduce work.
● Conji and Eva both want to learn about tables in Google Docs.
This chapter is divided into the following classroom and lab sessions
1. Creating a Table, Entering, and Editing Data 1
2. Creating a Table, Entering, and Editing Data 2
3. Formatting Tables in Google Docs 1
4. Formatting Tables in Google Docs 2
5. Formatting Tables in Google Docs 3
6. Formatting Tables in Google Docs 4
At the end of the session, the students will be able to:
● create a table in Google Docs.
● enter data into a table.
● edit a table.
Keywords
● Table: A table is a grid made up of rows and columns.
● Cell: A cell refers to the intersection of a row and a column.
Ask the students to observe the structure of the timetable of their class.
Explain to the students what a table is and how we can create it. Also, tell them how to enter data into the table and how to edit it.
Group discussion Conclude the concepts Assign homework
● Ask the students to observe the structure of the timetable of their class.
● Build the concept that a table is like a grid made up of rows and columns.
Engage
Explain the following concepts:
Create a table in Google Docs.
Explanation
Tell the students that a table is like a grid made up of rows and columns, as given on pages 39 and 40. Also, explain the steps to create a table.
Enter data into a table. Explain the steps to enter data into a table to the students, as given on pages 40 and 41. Explain how to use the Tab key to move to the next cell and Shift + Tab key to move to the previous cell.
Edit a table.
Discuss with the students that editing a table means making some modifications to the table structure or changing the data in it, as given on page 41.
● Read aloud the questions provided in the Do It Yourself 3A section and encourage the students to solve the questions. Instruct the students to write the answers in their books.
Correct Responses:
1. Ask the students to solve this question by themselves. Responses may vary.
2. a. Tab
b. Shift + Tab
Build
7 mins
● Conduct a group discussion in the class among students on the topic ‘How to Edit Data in a Table’.
Possible Response: Locate the cell, click on it to edit, and make the required changes.
Sum Up
3 mins
● Conclude the session by summarising that a table is like a grid made up of rows and columns. The intersection of a row and a column is called a cell. Tables can be created using the Table option from the Insert menu. After creating a table, you can enter data in it. Editing a table means making some modifications to the table structure or changing the data in it. You can click on a cell to edit its data.
● Assign the following questions from the Chapter Checkup given at the end of the chapter as homework.
A. Fill in the Blanks: Questions 1 and 2
B. Tick the Correct Option: Question 1
C. Who Am I?: Question 2
D. Write T for True and F for False: Questions 1 and 2
E. Answer the Following Questions: Questions 1 and 2
F. Apply Your Learning: Questions 1, 2, 3, and 4
At the end of the session, the students will be able to:
● create a table in Google Docs.
● enter data into a table.
● edit a table.
Keywords
● Table: A table is a grid made up of rows and columns.
● Cell: A cell refers to the intersection of a row and a column.
Let the students watch the video or the learning slides related to the topic on the digital panel.
Discuss what a table is. Demonstrate the steps to create a table and enter data into it. Also, show them how to edit a table.
Attempt the activity on the Assignment page.
Conclude the concepts Assign homework
5 mins
Warm Up
● Instruct the students to go to the Tekie’s Digital platform and open a Lab session on Creating a Table, Entering, and Editing Data 2.
● Show the learning slides one by one and discuss the concepts shown on the slides in the panel.
15 mins
Engage
Explain the following concepts:
Learning Outcomes
Create a table in Google Docs.
Explanation
Tell the students that a table is like a grid made up of rows and columns, as given on pages 39 and 40. Also, explain the steps to create a table.
Enter data into a table. Explain the steps to enter data into a table to the students, as given on pages 40 and 41. Explain how to use the Tab key to move to the next cell and Shift + Tab key to move to the previous cell.
Edit a table. Discuss with the students that editing a table means making some modifications to the table structure or changing the data in it, as given on page 41.
● Ask the questions provided on the slides one by one to assess the students’ understanding. Discuss the answers of the questions with the students. If necessary, ask additional relevant questions.
7 mins
Build
● Instruct the students to click on the Start practice button on the Assignment page to attempt the activity.
● Instruct the students to click on the Confirm button to submit their work when they are done with the activity.
3 mins
Sum Up
● Conclude the session by summarising that a table is like a grid made up of rows and columns. The intersection of a row and a column is called a cell. Tables can be created using the Table option from the Insert menu. After creating a table, you can enter data in it. Editing a table means making some modifications to the table structure or changing the data in it. You can click on a cell to edit its data.
● Assign the additional activity given on the panel to the students as homework.
At the end of the session, the students will be able to:
● format a table.
● change row height and column width in a table.
● split and merge cells in a table.
Keywords
● Formatting: It means to change the overall appearance of a table.
● Row: A horizontal arrangement of cells is known as a row.
● Column: A vertical arrangement of cells is known as a column.
Ask the students whether they can modify the height of the rows and the width of the columns once the table is drawn on paper or not.
Explain about different types of formatting options for tables like changing row height/column width and splitting/merging cells. Group discussion Conclude the concepts
Assign homework
● Ask the students to draw a table in their notebooks. Now, ask them whether they can modify the height of the rows and the width of the columns once the table is drawn on paper or not.
● Now, relate the concept that while you cannot change the row height and column width of a table created on paper, Google Docs allows you to alter the overall appearance of a table. This includes the ability to modify row heights, column widths, and perform actions, such as merging and splitting cells.
Explain the following concepts:
Format a table. Explain to the students that formatting means to change the overall appearance of a table, as given on page 42.
Change row height. Discuss with the students that row height is the vertical distance between the top and bottom borders of a row in a table, as given on pages 42 and 43. Also, demonstrate the steps to do so.
Change column width. Define that column width is the horizontal distance between the left and right borders of a column in a table, as given on page 44. Also, demonstrate the steps to do so.
Split cells. Explain to the students that splitting cells in a table can help us separate and categorise information in a clear and structured way, as given on page 45.
Merge cells. Discuss with the students that merging cells is like combining two or more cells in a table to create a single, larger cell, as given on page 46.
● Read aloud the questions provided in the Do It Yourself 3B section Question 1 and encourage the students to solve the questions. Instruct the students to write the answers in their books.
Correct Responses:
Merging cells is like combining two or more cells in a table to create a single cell.
Splitting cells in a table can help you separate and categorise information in a clear and structured way.
● Rohit wants to increase the horizontal distance between the left and right borders of a column in a table. Which option from the Table properties pane should he use to do this?
Possible Response: He can use Column width option under the Column category.
● If you want to change the height of a row in a table, you need to open Table properties pane. How can you open it from the menu bar?
Possible Response: By selecting Format → Table → Table properties option
● Ravi wants to divide a cell into two parts. Which option should he use to do so?
Possible Response: Split cell
Note: Ask the students the additional questions, if time permits.
● Conduct a group discussion in the class among students on the topic ‘The significance of changing the row height and column width’.
Possible Response: You can change the height of the rows and width of the columns to make things easier to read and more organised.
3 mins
Sum Up
● Conclude the session by summarising that formatting means to change the overall appearance of a table which includes changing row height, column width, and merging and splitting cells. Tell them how to change the row height and column width. Also, discuss with them the process of splitting and merging cells in a table.
● Assign the following questions from the Chapter Checkup given at the end of the chapter as homework.
A. Fill in the Blanks: Questions 3 and 4
B. Tick the Correct Option: Questions 2 and 4
C. Who Am I?: Questions 1 and 3
D. Write T for True and F for False: Question 3
E. Answer the Following Questions: Question 3
At the end of the session, the students will be able to:
● format a table.
● change row height and column width in a table.
● split and merge cells in a table.
Keywords
● Formatting: It means to change the overall appearance of a table.
● Row: A horizontal arrangement of cells is known as a row.
● Column: A vertical arrangement of cells is known as a column.
Warm Up Engage Build Sum Up
Let the students watch the video or the learning slides related to the topic on the digital panel.
Discuss the concepts given in slides. Attempt the activity given on the Assignment page.
Conclude the concepts Assign homework
Warm Up
● Instruct the students to go to the Tekie’s Digital platform and open a Lab session on Formatting Tables in Google Docs 2.
● Show the learning slides one by one and discuss the concepts shown on the slides in the panel.
Explain the following concepts:
Learning Outcomes
Explanation
Format a table. Explain to the students that formatting means to change the overall appearance of a table, as given on page 42.
Change row height. Discuss with the students that row height is the vertical distance between the top and bottom borders of a row in a table, as given on pages 42 and 43. Also, demonstrate the steps to do so.
Change column width. Define that column width is the horizontal distance between the left and right borders of a column in a table, as given on page 44. Also, demonstrate the steps to do so.
Split cells. Explain to the students that splitting cells in a table can help you separate and categorise information in a clear and structured way, as given on page 45.
Merge cells. Discuss with the students that merging cells refers to combining two or more cells in a table to create a single, larger cell, as given on page 46.
● Ask the questions provided on the slides one by one to assess the students’ understanding. Discuss the answers of the questions with the students. If necessary, ask additional relevant questions.
7 mins
Build
● Instruct the students to click on the Start practice button on the Assignment page to attempt the activity.
● Instruct the students to click on the Confirm button to submit their work when they are done with the activity.
3 mins
Sum Up
● Conclude the session by summarising that formatting means to change the overall appearance of a table which includes changing row height, column width, and merging and splitting cells. Tell them how to change the row height and column width. Also, discuss with them the process of splitting and merging cells in a table.
● Assign the additional activity given on the panel to the students as homework.
At the end of the session, the students will be able to:
● add and delete rows and columns in a table.
● apply border and shading to a table.
Keywords
● Border: The border refers to a dark outline around any text or picture that makes it look a little standout.
● Shading: Shading means to set the background colour of a cell.
Warm Up Engage Build Sum Up
Ask the students to recall the concept of formatting a table.
Discuss how to add and delete rows or columns to and from a table.
Group discussion
Conclude the concepts
Assign homework 5 mins 15 mins 7 mins 3 mins 5 mins
Action Plan
Warm Up
● Ask the students to recall the concept of formatting a table.
● Now, build the concept that once the table is created, you can format the table by adding/deleting rows and columns, applying border and shading, aligning text horizontally and vertically.
Engage
Explain the following concepts:
Learning Outcomes
Explanation
Adding rows and columns to a table. Tell the students that after creating a table, they can add more rows and columns by right-clicking on the row/column and selecting the appropriate option, as given on pages 46 and 47.
Deleting rows and columns from a table.
Discuss with them that they can remove a row/column from a table by right-clicking on the row/column and selecting the appropriate option, as given on page 47.
Applying borders and shading.
Describe that applying borders and shading to a table in Google Docs can enhance its visual appeal and make it stand out, as given on pages 47 to 49.
● Read aloud the questions provided in the Do It Yourself 3B section Question 2 and encourage the students to solve the question. Instruct the students to write the answers in their books.
Correct Response: The border is like a dark outline around any text or picture that makes it look a little standout.
7 mins
Build
● Conduct a group discussion in the class among students on the topic, ‘Why do we need to Align Text horizontally and vertically in the table?’.
Possible Response: Aligning text both horizontally and vertically in the table improves the readability of the content and gives a polished and professional look to the table.
3 mins
● Conclude the session by summarising that you can add and remove rows and columns from a table by right-clicking on row/column and selecting the desired option. Tell them that they can apply border and shading to a table to enhance visual appeal and make it stand out.
● Assign the following questions from the Chapter Checkup given at the end of the chapter as homework.
B. Tick the Correct Option: Question 3
C. Who Am I?: Questions 4
D. Write T for True and F for False: Question 4
E. Answer the Following Questions: Questions 3 and 4
F. Apply Your Learning: Question 5
At the end of the session, the students will be able to:
● add and delete rows and columns in a table.
● apply border and shading to a table.
Keywords
● Border: The border refers to a dark outline around any text or picture that makes it look a little standout.
● Shading: Shading means to set the background colour of a cell.
Warm Up Engage Build Sum Up
Let the students watch the video or the learning slides related to the topic on the digital panel.
Demonstrate how to add and delete rows or columns to and from a table.
Attempt the activity on the Assignment page. Conclude the concepts Assign homework
Warm Up
● Instruct the students to go to the Tekie’s Digital platform and open a Lab session on Formatting Tables in Google Docs 4.
● Show the Learning slides one by one and discuss the concepts shown on the slides in the panel.
Explain the following concepts:
Learning Outcomes
Adding rows and columns to a table.
Explanation
Tell the students that after creating a table, they can add more rows and columns by right-clicking on the row/column and selecting the appropriate option, as given on pages 46 and 47.
Deleting rows and columns from a table. Discuss with them that they can remove a row/column from a table by right-clicking on the row/column and selecting the appropriate option, as given on page 47.
Applying borders and shading.
Describe that applying borders and shading to a table in Google Docs can enhance its visual appeal and make it stand out, as given on pages 47 to 49.
● Ask the questions provided on the slides one by one to assess the students’ understanding. Discuss the answers of the questions with the students. If necessary, ask additional relevant questions.
12 mins
Build
● Instruct the students to click on the Practice button on the Assignment page to attempt the activity. Then, click on the Attempt button to open the activity page.
● Instruct the students to click on the Confirm button to submit their work when they are done with the activity.
3 mins
Sum Up
● Conclude the session by summarising that you can add and remove rows and columns from a table by right-clicking on row/column and selecting the desired option. Tell them that they can apply border and shading to a table to enhance visual appeal and make it stand out.
● Assign the additional activity given on the panel to the students as homework.
Mel and Conji start their summer vacation with a visit to the Computer Museum, learning about the history of computers. At the Library, they search for a book on Avora’s creation but find it missing. Elder Wizard and Elder Robot suggest looking online, introducing them to the internet as a vast information network. They visit Eva, who’s struggling to organize her birthday party. Mel teaches her to use Google Docs and Slides, and with help from Ms Idea at the Idea Centre, they settle on a robotic theme. Eva creates stunning invitations using Google Slides, and Elder Wizard and Elder Robot teach them to manage a budget using Google Sheets. As the party plans wrap up, they receive a surprise gift for Eva from Mr Fate and a life lesson about happiness. Later, a mysterious message leads them to the “Enchanted Doorway,” where they discover a magical game room. Playing “Space Explorer,” they learn about AI, sparking excitement to explore more of their magical world.
● Mel, Conji, and Eva are planning Eva’s birthday party but are stuck on choosing a theme.
● Eva wants a unique theme that will captivate all the guests but is having trouble deciding.
● They consider using the princess theme but dismiss it as too common.
● Cartoons are suggested but also rejected as overused.
● They decide to seek help from Ms. Idea at the Idea Centre for suggestions.
● Ms. Idea introduces them to the Google Slides, where they explore modifying themes and layouts to find inspiration for Eva’s birthday party theme.
This chapter is divided into the following classroom and lab sessions
1. Basics of Google Slides, Themes and Layout 1
2. Basics of Google Slides, Themes and Layout 2
3. Tables and Charts in Google Slides 1
4. Tables and Charts in Google Slides 2
5. Diagrams and Master Slide 1
6. Diagrams and Master Slide 2
At the end of the session, the students will be able to:
● explain the purpose and impact of presentations.
● create a presentation using Google Slides and define its key components.
● apply and modify themes in their presentation.
● describe layouts and learn how to choose and apply them.
Keywords
● Presentation: Presentation is a way to share information, ideas, or stories using a combination of pictures, text, and sometimes even audio or video.
● Themes: Themes are like special designs for your slides. They make the presentation look colourful and interesting.
● Layouts: Layouts determine how your content, such as titles, text, and images, is organised on the slide.
Ask the students what comes to their minds when they hear the word ‘presentation’? How do they think different colours and images can impact a presentation?
Explain about presentations and how to create them.
Describe the steps needed to apply themes and modify them.
Elaborate the steps to apply layouts.
Group discussion Conclude the concepts Assign homework
● Ask the students what comes to their minds when they hear the word ‘presentation’?
● How do they think different colours and images can impact a presentation?
● Now build the concept that a well-designed presentation can make information easier to understand and more engaging for the audience.
Explain the following concepts:
Explain the purpose and impact of presentations.
Create a presentation using Google Slides and define its key components.
Apply and modify themes in their presentation.
Describe layouts and learn how to choose and apply them.
Describe that a presentation is a way to share information, ideas, or stories using a combination of pictures, text, and sometimes even audio or video to the students, as given on page 58.
Discuss how to create a presentation and the key components of a Google Slides window such as presentation title, menu bar, toolbar, etc, as given on pages 58 and 59.
Discuss with them that themes are like special designs for your slides. They make the presentation look colourful and interesting. Also tell them how we can apply and modify it in our presentation, as given on pages 60 and 61.
Explain to the students that layouts determine how your content, such as titles, text, and images, is organised on the slide and how we can choose and apply it in our presentation, as given on pages 62 and 63.
● Read aloud the questions provided in the Do It Yourself 4A section and encourage the students to solve the questions. Instruct the students to write the answers in the book.
Correct Responses:
1. Choose the correct answers.
a. i. Presentation title b. iv. Slide workspace c. ii. Toolbar
2. Match the following.
Theme
It is used to change the background of the slides.
Layout It is like a special design for your slide.
Slide → Change background It is an online presentation-making app.
Google Slides It determines how your content is organised on the slide.
Build
7 mins
● Conduct a group discussion in the class among students based on the topic, “How do you think presentations could help your teacher during a class?” provided in the Discuss section, as mentioned on page 58.
Possible Responses:
1. Presentations help the teacher show us pictures and videos to make learning more fun.
2. They can explain things better with slides and make it easier for us to understand.
3. Sometimes, presentations make the lesson more exciting and easier to remember.
● Conclude the session by summarising that the presentation is a way to share information with your classmates or teacher using slides or visual aids. It has various components, which include the presentation title, menu bar, toolbar, slide workspace, slide navigation pane, speaker notes and slideshow button. Themes help in making presentation look more attractive, interesting and appealing. The layout helps to organise data in your presentation.
● Assign the following questions from the Chapter Checkup given at the end of the chapter as homework.
A. Fill in the Blanks: Questions 1, 2, and 3
B. Tick the Correct Option: Questions 1, 2, and 3
C. Who Am I?: Questions 1 and 2
D. Write T for True and F for False: Questions 1 and 2
E. Answer the Following Questions: Questions 1, 2, 3, and 4
F. Apply Your Learning: Questions 1 and 3
At the end of the session, the students will be able to:
● explain the purpose and impact of presentations.
● create a presentation using Google Slides and define its key components.
● apply and modify themes in their presentation.
● describe layouts and learn how to choose and apply them.
● Presentation: Presentation is a way to share information, ideas, or stories using a combination of pictures, text, and sometimes even audio or video.
● Themes: Themes are like special designs for your slides. They make the presentation look colourful and interesting.
● Layouts: Layouts determine how your content, such as titles, text, and images, is organised on the slide.
Let the students watch the video or the learning slides related to the topic on the digital panel
Explain about presentations and how to create them.
Demonstrate how to apply themes and modify it.
Demonstrate how to apply layouts.
Attempt the activity on the Assignment page. Conclude the concepts
● Ask the students to go to Tekie’s Digital platform and open a Lab session on Basics of Google Slides, Themes and Layout 2
● Show the learning slides or the video and discuss the concepts shown on the panel.
Explain the following concepts:
Explain the purpose and impact of presentations.
Create a presentation using Google Slides and define its key components.
Apply and modify themes in their presentation.
Describe layouts and learn how to choose and apply them.
Describe that a presentation is a way to share information, ideas, or stories using a combination of pictures, text, and sometimes even audio or video with the students, as given on page 58.
Demonstrate to the students how to a create presentation and the key components of a Google Slides window, such as the presentation title, menu bar, toolbar, etc, as given on pages 58 and 59.
Discuss with them that themes are like special designs for your slides. They make the presentation look colourful and interesting. Also demonstrate to them how we can apply and modify it in our presentation, as given on pages 60 and 61.
Explain to the students that layouts determine how your content, such as titles, text, and images, is organised on the slide and how we can choose and apply it in our presentation, as given on pages 62 and 63.
● Ask the questions provided on the slides one by one to assess the students’ understanding. Discuss the answers of the questions with the students. If necessary, ask additional relevant questions.
7 mins
Build
● Instruct the students to click on the Start practice button on the Assignment page to attempt the activity. Then, click on the Attempt button to open the activity page.
● Instruct the students to click on the Confirm button to submit your work when you are done with the activity.
3 mins
Sum Up
● Conclude the session by summarising the presentation, which is a way to share information with your classmates or teacher using slides or visual aids. It has various components, which includes the presentation title, menu bar, toolbar, slide workspace, slide navigation pane, speaker notes and slideshow button. Themes help is making presentation look more attractive, interesting and appealing. Layout helps to organise data in your presentation.
● Assign the additional activity given on the panel to the students as homework.
At the end of the session, the students will be able to:
● use tables for organising information.
● use charts for presenting data visually.
● Tables: Tables are used to organise information neatly and in an easy-to-understand manner. Tables helps to put information in rows and columns.
● Charts: Charts are graphics or visual representations that are used to display and compare data easily.
Ask students to think of a time when they used a table to organise their homework or chores. How did it help them?
Imagine you are making a presentation about a fun trip you took. How could you use the charts to show the exciting parts of your adventure to your classmates?
Explain about tables, charts and discuss how to insert them into the presentation.
● Ask students to think of a time when they used a table to organise their homework or chores. How did it help them?
● Imagine you are making a presentation about a fun trip you took. How could you use the charts to show the exciting parts of your adventure to your classmates?
● Now, build the concept that tables and charts play an important role in sharing information in a presentation.
Explain the following concepts:
Use tables for organising information.
Use charts for presenting data visually.
15 mins
Describe to the students that tables are used to organise information neatly and in an easy-to-understand manner. Tables help to put information in rows and columns, as given on pages 64 and 65.
Describe to the students that charts are graphics or visual representations that are used to display and compare data easily, as given on pages 65 to 68.
● Read aloud the questions provided in the Do It Yourself 4B section, Question 1 parts a, b, and c and encourage the students to solve the questions. Instruct the students to write the answers in the book.
Correct Responses:
a. Table
b. Charts
c. Vertical
Build
7 mins
● Conduct a group discussion in the class among students on the topic ‘How can tables be utilised to organise information?’
Possible Response: Tables can be used to organise information clearly by arranging it into rows and columns, making it easy to read and compare. This helps in presenting facts, numbers, or categories neatly and quickly during a presentation.
3 mins
● Conclude the session by summarising tables, used to arrange the data in rows and columns which makes it easy to understand. Charts are graphics or visual representations that are used to display and compare data easily.
● Assign the following questions from the Chapter Checkup given at the end of the chapter as homework.
A. Fill in the Blanks: Question 4
B. Tick the Correct Option: Questions 4 and 5
C. Who Am I?: Questions 3 and 5
D. Write T for True and F for False: Question 3
E. Answer the Following Questions: Question 5
F. Apply Your Learning: Question 2
At the end of the session, the students will be able to:
● use tables for organising information.
● use charts for presenting data visually.
Keywords
● Tables: Tables are used to organise information neatly and in an easy-to-understand manner. Tables help to put information in rows and columns.
● Charts: Charts are graphics or visual representations that are used to display and compare data easily.
Let the students watch the video or the learning slides related to the topic on the digital panel.
Explain tables and charts and how to insert them into the presentation.
Attempt the activity on the Assignment page. Conclude the concepts Assign homework
Warm Up
● Instruct the students to go to Tekie’s Digital platform and open a Lab session on Tables and Charts in Google Slides 2.
● Show the learning slides or the video and discuss the concepts shown on the panel.
Explain the following concepts:
Use tables for organising information.
Explanation
Describe to the students that tables are used to organise information neatly and in an easy-to-understand manner. Tables help to put information in rows and columns. Demonstrate to them how to insert tables in a presentation, as given on pages 64 and 65.
Use charts for presenting data visually.
Describe that charts are graphics or visual representations used to display and compare data easily for the students. Also demonstrate to them how to insert a chart in a presentation, as given on pages 65 to 68.
● Ask the questions provided on the slides one by one to assess the students’ understanding. Discuss the answers to the questions with the students. If necessary, ask additional relevant questions.
7 mins
Build
● Instruct the students to click on the Start practice button on the Assignment page to attempt the activity. Then, click on the Attempt button to open the activity page.
● Instruct the students to click on the Confirm button to submit your work when you are done with the activity.
3 mins
Sum Up
● Conclude the session by summarising tables are used to arrange the data in row and column form which makes it easy to understand the data. Charts are graphics or visual representations that are used to display and compare data easily.
● Assign the additional activity given on the panel to the students as homework.
At the end of the session, the students will be able to:
● use diagrams in a presentation.
● incorporate Slide Master in a presentation.
● change the order of slides.
Keywords
● Diagram: Diagrams are colourful pictures that help you show how things are connected, explain processes, or display information in a clear and organised way.
● Master Slide: The Master Slide is like a main slide, which allows you to change the appearance of your entire presentation all at once.
Have you ever seen a colourful picture that helped you understand a game’s rules or how something works?
Explain about diagrams and how to insert them into the presentation. Elaborate about the Master Slide and how to use the Master Slide. Also explain how to change the order of slides.
● Have you ever seen a colourful picture that helped you understand a game’s rules or how something works? Share that picture among your classmates or describe it.
● Now build the concept that diagrams are colourful pictures that help you show how things are connected, explain processes, or display information in a clear and organised way.
Explain the following concepts:
Learning Outcomes
Use diagrams in a presentation.
Explanation
Describe diagrams are colourful pictures that help you show how things are connected, explain processes, or display information in a clear and organised way to the students, as given on pages 68 and 69.
Incorporate Slide Master in a presentation.
Discuss master slide is like a main slide, which allows you to change the appearance of your entire presentation all at once and how to use it, as given on pages 70 and 71.
Change the order of slides. Explain to the students changing the order of the slides means to rearrange the slides in a desired order, as given on page 72.
● Read aloud the question provided in the Do It Yourself 4B section, Question 1 part d and Question 2 and encourage the students to solve the questions. Instruct the students to write the answers in the book.
Correct Responses:
1. d. Master Slide
7 mins
Build
● Conduct a group discussion in the class among students on the topic ‘How diagrams and symbols help in learning?’.
Possible Response: Diagrams and symbols make learning easier by providing visual representations and simplifying information. Symbols act like a secret code, aiding memory in subjects like math. Additionally, these visual elements make learning more engaging and enjoyable, turning it into a fun puzzle or game.
3 mins
Sum Up
● Conclude the session by summarising that diagrams are colourful pictures that help you show how things are connected, explain processes, or display information in a clear and organised way. Slide Master allows you to control the appearance and layout of multiple slides consistently. Changing the order of the slides means rearranging the slides in a desired order.
● Assign the following questions from the Chapter Checkup given at the end of the chapter as homework.
A. Fill in the Blanks: Question 5
C. Who Am I?: Question 4
D. Write T for True and F for False: Questions 4 and 5
F. Apply Your Learning: Questions 4 and 5
At the end of the session, the students will be able to:
● use diagrams in a presentation.
● incorporate Slide Master in a presentation.
● change the order of slides.
Keywords
● Diagram: Diagrams are colourful pictures that help you show how things are connected, explain processes, or display information in a clear and organised way.
Let the students watch the video or the learning slides related to the topic on the digital panel.
Explain about diagram and how to insert them into the presentation. Elaborate about the Master Slide and how to use the Master Slide. Also demonstrate how to change the order of slides.
Attempt the activity on the Assignment page.
the concepts
● Instruct the students to go to the Tekie’s Digital platform and open a Lab session on Diagrams and Master Slide 2.
● Show the learning slides or the video and discuss the concepts shown on the panel.
● Master Slide: The Master Slide is like a main slide, which allows you to change the appearance of your entire presentation all at once. 15 mins
Engage
Explain the following concepts:
Learning Outcomes
Use diagrams in a presentation.
Explanation
Describe diagrams are colourful pictures that help you show how things are connected, explain processes, or display information in a clear and organised way to the students. Also demonstrate to them how to insert diagrams in a presentation, as given on pages 68 and 69.
Incorporate Slide Master in a presentation.
Change the order of slides.
Discuss master slide is like a main slide, which allows you to change the appearance of your entire presentation all at once and how to use it, as given on pages 70 and 71.
Explain to the students changing the order of the slides means to rearrange the slides in a desired order, as given on page 72.
● Ask the questions provided on the slides one by one to assess the students’ understanding. Discuss the answers to the questions with the students. If necessary, ask additional relevant questions.
7 mins
Build
● Instruct the students to click on the Start practice button on the Assignment page to attempt the activity. Then, click on the Attempt button to open the activity page.
● Instruct the students to click on the Confirm button to submit your work when you are done with the activity.
3 mins
Sum Up
● Conclude the session by summarising diagram are the colourful pictures that helps you show how things are connected, explain processes, or display information in a clear and organised way. Slide Master allows you to control the appearance and layout of multiple slides consistently. Changing the order of the slides means to rearrange the slides in a desired order.
● Assign the additional activity given on the panel to the students as homework.
Mel and Conji start their summer vacation with a visit to the Computer Museum, learning about the history of computers. At the Library, they search for a book on Avora’s creation but find it missing. Elder Wizard and Elder Robot suggest looking online, introducing them to the internet as a vast information network. They visit Eva, who’s struggling to organize her birthday party. Mel teaches her to use Google Docs and Slides, and with help from Ms Idea at the Idea Centre, they settle on a robotic theme. Eva creates stunning invitations using Google Slides, and Elder Wizard and Elder Robot teach them to manage a budget using Google Sheets. As the party plans wrap up, they receive a surprise gift for Eva from Mr Fate and a life lesson about happiness. Later, a mysterious message leads them to the “Enchanted Doorway,” where they discover a magical game room. Playing “Space Explorer,” they learn about AI, sparking excitement to explore more of their magical world.
● Friends Mel, Conji, and Eva plan a robotics-themed party after a suggestion from Ms. Idea.
● Excited about the theme, they decide to work on invitation cards using Google Slides.
● Eva feels unsure about using Slides but gets encouraged to explore its creative possibilities.
● They plan to create a unique invitation with a designed card, a video message, and a birthday song.
● Mel explains animations and transitions in Google Slides, introducing these concepts to Eva and Conji.
● The group heads to the computer lab to learn and implement these features for their party invitations.
● The friends collaboratively design an elegant robotics-themed invitation using Google Slides, successfully sending it to all their guests, marking it as the major task completed for the party planning.
This chapter is divided into the following classroom and lab sessions
1. Applying Animation in Google Slides 1
2. Applying Animation in Google Slides 2
3. Applying Transition in Google Slides 1
4. Applying Transition in Google Slides 2
5. Adding Audio and Video to a Presentation 1
6. Adding Audio and Video to a Presentation 2
At the end of the session, the students will be able to:
● define animation.
● apply animation.
Keyword
Ask students if they remember those cool cartoons with moving characters. Explain the concept of animation. Brief about the steps to add animation to the presentation.
● Animation: Animation is a process through which you can bring still objects such as text, shapes, images, charts, logos, etc, ‘to life’ by making them move. 5 mins
Group discussion Conclude the concepts Assign homework
● Ask them if they remember those cool cartoons with moving characters.
● Tell them that animation can bring still objects ‘to life’ by making them move.
● Tell the benefits of using animation in presentations, like highlighting key points, engaging the audience, and making information more memorable. 15 mins
Engage
Explain the following concepts:
Define animation. Describe animation as a process through which you can bring still objects such as text, shapes, images, charts, logos, etc, ‘to life’ by making them move to the students, as given on page 82.
Apply animation. Elaborate the steps to apply animation in slides to the students, as given on pages 82 and 83.
● Read aloud the question provided in the Do It Yourself 5A section, Question 1 parts a, b, and c and encourage the students to solve the questions. Instruct the students to write the answers in the book.
Correct Responses:

Build
7 mins
● Conduct a group discussion in the class among students on the topic ‘How animation brings slides to life!’.
Possible Responses: Animation makes slides exciting by adding movement, like bringing characters or objects to life. It grabs attention and helps explain ideas in a fun way, making presentations more interesting for everyone. With animation, our slides become like a mini-movie, making learning or sharing information super cool.
3 mins
● Conclude the session by summarising an animation is a process through which you can bring still objects such as text, shapes, images, charts, logos, etc, ‘to life’ by making them move.
● Assign the following questions from the Chapter Checkup given at the end of the chapter as homework.
A. Fill in the Blanks: Questions 1, 2, and 4
B. Tick the Correct Option: Question 3
C. Who Am I?: Question 1
D. Write T for True and F for False: Question 1
E. Answer the Following Questions: Questions 1 and 2
F. Apply Your Learning: Question 1
At the end of the session, the students will be able to:
● define animation.
● apply animation.
Keyword
● Animation: Animation is a process through which you can bring still objects such as text, shapes, images, charts, logos, etc, ‘to life’ by making them move.
Let the students watch the video or the learning slides related to the topic on the digital panel.
Explain the concept of animation. Brief about the steps to add animation to the presentation.
Attempt the activity on the Assignment page. Conclude the concepts Assign homework
● Instruct the students to go to Tekie’s Digital platform and open a Lab session on Applying Animation in Google Slides 2
● Show the learning slides or the video and discuss the concepts shown on the panel.
Engage
Explain the following concepts:
Explanation
Define animation. Describe animation as a process through which you can bring still objects such as text, shapes, images, charts, logos, etc, ‘to life’ by making them move to the students, as given on page 82.
Apply animation. Demonstrate to the students how to apply animation in slides, as given on pages 82 and 83.
● Ask the questions provided on the slides one by one to assess the students’ understanding. Discuss the answers of the questions with the students. If necessary, ask additional relevant questions.
7 mins
● Instruct the students to click on the Start practice button on the Assignment page to attempt the activity. Then, click on the Attempt button to open the activity page.
● Instruct the students to click on the Confirm button to submit your work when you are done with the activity.
3 mins
● Conclude the session by summarising that animation is a process through which you can bring still objects such as text, shapes, images, charts, logos, etc, ‘to life’ by making them move.
● Assign the additional activity given on the panel to the students as homework.
At the end of the session, the students will be able to:
● describe transition.
● add transition effect into the presentation.
Keyword
Warm Up Engage Build Sum Up
Ask students if they ever played a video game where scenes change quickly or slowly depending on the action. Why do you think they do that?
● Transition: Transition is a way to move smoothly from one slide to next. 5 mins
Warm Up
Explain the concept of transition. Brief about the steps to add transitions to the presentation.
Think and Tell Group discussion Conclude the concepts Assign homework
Action Plan
● Ask students if they ever played a video game where scenes change quickly or slowly depending on the action. Why do you think they do that?
● Now, build the concept that a slide transition provides a visual effect that takes place when one slide changes to another during a presentation.
15 mins
Engage
Explain the following concepts:
Learning Outcomes
Explanation
Describe transition. Describe transition as a way to move smoothly from one slide to the next to the students, as given on page 84.
Add the transition effect into the presentation. Elaborate on the steps to apply transition in slides to the students, as given on page 84.
a Animation can be added to every object on the slide.
● Read aloud the question provided in the Do It Yourself 5A section Question 1 parts c and d and Question 2 and encourage the students to solve the questions. Instruct the students to write the answers in the book.
b When we select the starting condition as “After previous”, the animation starts once the previous animation ends.
Correct Responses:
1.
c Applying too many animations distracts the audience from the actual content.
d The speed of a transition can be controlled.
e A Cube is a type of transition.
2. Select the Transition option from the drop-down list.
Click the Slide menu from the menu bar.
Set the transition’s Duration.
Click the Play button.
Select the Transition type from the Motion pane.
7 mins
Build
● Ask the students to answer the question “Why are transitions important? ” asked in the Think and Tell section, as given on page 85.
Correct Response: A slide transition provides a visual effect that takes place when one slide changes to another during a presentation. You can control its speed, add sound, and personalise the appearance of these transition effects.
● Conduct a group discussion in the class among students on the topic “Difference between animation and transition”.
Possible Responses: In Google Slides, animation is when things move on a slide, like characters or objects. Transition, on the other hand, is how one slide changes to the next, like a fade or slide effect.
3 mins
Sum Up
● Conclude the session by summarising that transition is a way to move smoothly from one slide to next.
● Assign the following questions from the Chapter Checkup given at the end of the chapter as homework.
A. Fill in the Blanks: Question 3
B. Tick the Correct Option: Question 1
C. Who Am I?: Questions 2, 4, and 5
D. Write T for True and F for False: Question 5
E. Answer the Following Questions: Question 3
F. Apply Your Learning: Questions 2, 3, and 5
At the end of the session, the students will be able to:
● describe transition.
● add the transition effect into the presentation.
Keyword
● Transition: Transition is a way to move smoothly from one slide to the next.
Let the students watch the video or the learning slides related to the topic on the digital panel.
Explain the concept of transition.
Demonstrate to the students how to add transitions to the presentation.
Attempt the activity on the Assignment page.
Conclude the concepts Assign homework
5 mins
● Instruct the students to go to Tekie’s Digital platform and open a Lab session on Applying Transition in Google Slides 2
● Show the learning slides or the video and discuss the concepts shown on the panel.
Explain the following concepts:
Learning Outcomes
15 mins
Explanation
Describe transition. Describe transition as a way to move smoothly from one slide to the next to the students, as given on page 84.
Add the transition effect into the presentation.
Demonstrate to the students how to apply transition in slides, as given on page 84.
● Ask the questions provided on the slides one by one to assess the students’ understanding. Discuss the answers to the questions with the students. If necessary, ask additional relevant questions.
● Instruct the students to click on the Start practice button on the Assignment page to attempt the activity. Then, click on the Attempt button to open the activity page.
● Instruct the students to click on the Confirm button to submit their work when they are done with the activity. Sum Up
3 mins
● Conclude the session by summarising that transition is a way to move smoothly from one slide to the next.
● Assign the additional activity given on the panel to the students as homework.
At the end of the session, the students will be able to:
● add audio to a presentation.
● add video to a presentation.
Ask the students whether they find audio and visual content more interesting than the text.
Explain the importance of adding audio and video in a presentation. Also, discuss the steps to add audio and video in a presentation.
Group discussion
Think and Tell Conclude the concepts Assign homework
● Ask the students whether they find audio and visual content more interesting than the text.
● Then, explain the importance of adding audio and video in a presentation.
Engage
Explain the following concepts:
Learning Outcomes
5 mins
15 mins
Explanation
Add audio to a presentation. Explain to the students that adding audio and video elements to your presentation can add a new dimension to it. Then, explain the steps to add an audio file from Google Drive, as given on pages 85 to 87.
Add video to a presentation.
Discuss with the students that using videos, you can showcase the video content in your presentation. Also, explain the two different ways of adding video that is from YouTube and from Google Drive, as given on pages 87 to 89.
● Read aloud the question provided in the Do It Yourself 5B section and encourage the students to solve the questions. Instruct the students to write the answers in the book.
Correct Responses:
Terms Meaning
YouTube tab
1. Match the following:
Allows to play audio/video on the slide
Audio format
YouTube tab-Used to add videos from YouTube
.mp4
.mp4-Video format
Play button
Video format
Play button-Allows to play audio/video on the slide
.mp3
.mp3-Audio format
Used to add videos from YouTube
2 Rearrange the steps of adding a YouTube video to a slide.
2.
Select the Video option from the drop-down list.
Search for the video you want to add.
Select a video and click on the Insert button.
Click on the Insert menu.
In the Insert video window, select the YouTube tab.
Build
7 mins
1 With the animations, you can make objects like text, images, and shapes move on your slides.
2 A single object can have multiple animation effects applied to it. But too many animations can cause distraction.
● Conduct a group discussion in the class among students based on the topic, “Are different types of background sounds important in presentations?” provided in the Discuss section as mentioned on page 87.
3 Transitions are visual effects that can be applied to slides when one slide changes to another.
Correct Response: Yes, adding different types of background sounds in presentations makes them more engaging and informative.
4 The speed of transitions can be changed, and the same transition effect can be applied to all the slides or any individual slide.
● Ask the students to give the answer of the question, “How do you think inserting a video in your presentation can give the audience a better understanding of the topic?” asked in the Think and Tell section, as given on page 89.
5 The most commonly used audio format is .mp3, while the most popular video format is .mp4.
6 Audios can be added as background music, voice narration, or sound effects in your presentation.
7 Any video from Google Drive or YouTube can be inserted into the presentation.
Possible Response: Videos in presentations help people understand better by showing things, keeping them interested, making them feel connected, showing real examples, and demonstrating steps clearly.
A. Fill in the Blanks.
● Conclude the session by summarising that adding audio and video elements to your presentation can add a new dimension to it. Also, make the students revise the steps to add audio and video files from various sources to the presentations.
Hints on click animation audios slide transition videos objects
● Assign the following questions from the Chapter Checkup given at the end of the chapter as homework.
1 In a presentation, animations can be applied on .
A. Fill in the Blanks: Question 5
2 To add an animation effect to a presentation, go to the Insert menu and choose option.
B. Tick the Correct Option: Questions 2, 4, and 5
C. Who Am I?: Question 3
3 A provides a visual effect that takes place when one slide changes to another during a presentation.
D. Write T for True and F for False: Questions 2, 3, and 4
Chapter 6 • Animations and Transitions on Google Slides 113
E. Answer the Following Questions: Questions 4 and 5
F. Apply Your Learning: Question 4
At the end of the session, the students will be able to:
● add audio to a presentation.
● add video to a presentation.
Let the students watch the video or the learning slides related to the topic on the digital panel.
Demonstrate to the students how to add Audio to the presentation.
Demonstrate to the students how to add Video to the presentation.
Attempt the activity on the Assignment page.
Conclude the concepts Assign homework 5 mins 15 mins
5 mins
● Instruct the students to go to Tekie’s Digital platform and open a Lab session on Adding Audio and Video to a Presentation 2.
● Show the learning slides or the video and discuss the concepts shown on the panel.
Engage
Explain the following concepts:
Learning Outcomes
Add audio to the presentation.
Add video to the presentation.
15 mins
Explanation
Elaborate that audio refers to sound, typically in the form of speech, music, or other sounds that can be heard. Demonstrate to the students how to add audio in slides, as given on pages 85 to 87.
Elaborate that video refers to moving visual images that are typically accompanied by audio. Demonstrate to the students how to add video in a presentation, as given on pages 87 to 89.
● Ask the questions provided on the slides one by one to assess the students’ understanding. Discuss the answers to the questions with the students. If necessary, ask additional relevant questions.
7 mins
Build
● Instruct the students to click on the Start practice button on the Assignment page to attempt the activity. Then, click on the Attempt button to open the activity page.
● Instruct the students to click on the Confirm button to submit their work when they are done with the activity.
3 mins
● Conclude the session by summarising that the most commonly used audio format is mp3 and the most popular video format is mp4. Audio can be added as background music, voice narration, or sound effects in your presentation while any video can be inserted into the presentation to make it more attractive.
● Assign the additional activity given on the panel to the students as homework.
Mel and Conji start their summer vacation with a visit to the Computer Museum, learning about the history of computers. At the Library, they search for a book on Avora’s creation but find it missing. Elder Wizard and Elder Robot suggest looking online, introducing them to the internet as a vast information network. They visit Eva, who’s struggling to organize her birthday party. Mel teaches her to use Google Docs and Slides, and with help from Ms Idea at the Idea Centre, they settle on a robotic theme. Eva creates stunning invitations using Google Slides, and Elder Wizard and Elder Robot teach them to manage a budget using Google Sheets. As the party plans wrap up, they receive a surprise gift for Eva from Mr Fate and a life lesson about happiness. Later, a mysterious message leads them to the “Enchanted Doorway,” where they discover a magical game room. Playing “Space Explorer,” they learn about AI, sparking excitement to explore more of their magical world.
● Mel, Conji, and Eva are finishing birthday party planning after sending out invitations.
● Elder Wizard and Elder Robot enter the Computer Lab and hear about the trio’s great experience.
● Conji and Mel express curiosity about this experience, while Eva mentions planning her upcoming birthday party.
● Elder Wizard congratulates Eva and assures her they will try to attend, offering their blessings.
● However, Eva realises she forgot about the fixed budget she got.
● Elder Robot suggests using Google Sheets to manage expenses.
● Mel then explains the concept of Google Sheets and its uses to Eva and Conji.
This chapter is divided into the following classroom and lab sessions
1. Basics of Google Sheets 1
2. Basics of Google Sheets 2
3. Entering Data, Saving, Closing, and Opening a Sheet 1
4. Entering Data, Saving, Closing, and Opening a Sheet 2
At the end of the session, the students will be able to:
● describe Google Sheets.
● discuss the uses of Spreadsheets.
● explain the advantages of using Google Sheets.
● create a Google Sheet.
● explain components of Google Sheets window.
● move around in a spreadsheet.
Keywords
● Spreadsheet: A spreadsheet is a digital table that helps you organise and work with numbers, data, and information in a neat and structured way.
● Cell Pointer: A cell pointer is an active cell in a spreadsheet.
Imagine you are planning a class pizza party! How would you organise all the orders and toppings? Have you ever used a calendar or schedule? How do you use it to remember important dates and activities? What if you had a lot of events all at once?
Elaborate about Google Sheets and how to create it. Also, define the components of Google Sheets window and explain how to move around in a spreadsheet.
Group discussion
Think and Tell
Conclude the concepts Assign homework
● Imagine you are planning a class pizza party! How would you organise all the orders and toppings?
● Have you ever used a calendar or schedule? How do you use it to remember important dates and activities? What if you had many events all at once?
● Tell students that spreadsheet helps us in arranging information in rows and columns which makes it easier to see patterns and keep track of details.
Explain the following concepts:
Describe Google Sheets. Tell the students that a spreadsheet is a digital table that helps you organise and work with numbers, data, and information in a neat and structured way. Google Sheets is a free, online spreadsheet tool, as given on page 99.
Discuss the uses of Spreadsheets.
Explain the advantages of using Google Sheets.
Explain spreadsheets serve as versatile tools for organising and analysing data, enabling tasks such as data organisation, mathematical calculations, and visualisation through tables and charts, as given on page 99.
Describe Google Sheets facilitates real-time collaboration, coupled with features like Smart Fill and Autocomplete, etc., as given on page 99.
Create a Google Sheet. Describe the steps to create a Google Sheet, as given on page 100.
Explain components of Google Sheets window.
Move around in a spreadsheet.
Explain to the students about different components of Google Sheets such as spreadsheet title, row, column, cell, Name box, etc., as given on pages 101 and 102.
Describe that you can move from one cell to another by using the mouse or various key combinations such as arrow keys, Tab, Ctrl + End, as given on pages 103 and 104.
● Read aloud the questions provided in the Do It Yourself 6A and 6B sections and encourage the students to solve the questions. Instruct the students to write the answers in the book.
Correct Responses:
● Conduct a group discussion in the class among students based on the topic, ‘What are some other things you can do with Google Sheets?’ provided in the Discuss section, as mentioned on page 100.
Possible Responses:
i. Organise and track information. iv. Collaborate and share.
ii. Create visual representations. v. Generate reports and documents.
iii. Perform calculations. vi. Manage tasks and workflows.
● Ask the students to answer the question “Observe the following text: ‘ZZ10’. Can this be a cell address on Google Sheets?” asked in the Think and Tell section, as given on page 102.
Possible Response: No, it is not a standard cell address in Google Sheets.
● Conclude the session by summarising that Google Sheets is a free, online spreadsheet tool. It has various components, some of which are spreadsheet titles, rows, columns, active cells and Name box. A cell pointer is an active cell in a spreadsheet and you can move a cell pointer from one cell to another using a mouse or various key combinations.
● Assign the following questions from the Chapter Checkup given at the end of the chapter as homework.
A. Fill in the Blanks: Questions 1, 2, 3, and 5
B. Tick the Correct Option: Questions 1, 2, and 3
C. Who Am I?: Questions 1, 2, 3, 4, and 5
D. Write T for True and F for False: Questions 1, 2, 3, 4, and 5
E. Answer the Following Questions: Questions 1, 2, 3, 4, and 5
F. Apply Your Learning: Questions 1, 2, 4, and 5
At the end of the session, the students will be able to:
● describe Google Sheets.
● discuss the uses of Spreadsheets.
● explain the advantages of using Google Sheets.
● create a Google Sheet.
● explain the components of Google Sheets window.
● move around in a spreadsheet.
Keywords
● Spreadsheet: A spreadsheet is a digital table that helps you organise and work with numbers, data, and information in a neat and structured way.
● Cell Pointer: A cell pointer is an active cell in a spreadsheet.
Let the students watch the video or the learning slides related to the topic on the digital panel.
Elaborate about Google Sheets and how to create it. Also, define the components of Google Sheets and explain how to move around in a spreadsheet.
Attempt the activity on the Assignment page.
Conclude the concepts Assign homework
5 mins
Warm Up
● Instruct the students to go to the Tekie’s Digital platform and open a Lab session on Basics of Google Sheets 2
● Show the learning slides or the video and discuss the concepts shown on the panel.
Explain the following concepts:
Describe Google Sheets. Tell the students that a spreadsheet is a digital table that helps you organise and work with numbers, data, and information in a neat and structured way. Google Sheets is a free, online spreadsheet tool, as given on page 99.
Discuss the uses of Spreadsheets.
Explain the advantages of using Google Sheets.
Explain spreadsheets serve as versatile tools for organising and analysing data, enabling tasks such as data organisation, mathematical calculations, and visualisation through tables and charts, as given on page 99.
Describe Google Sheets facilitates real-time collaboration, coupled with features like Smart Fill and Autocomplete, etc., as given on page 99.
Create a Google Sheet. Describe the steps to create a Google Sheet, as given on page 100.
Explain components of Google Sheets window.
Move around in a spreadsheet.
Explain to the students about different components of Google Sheets such as spreadsheet title, row, column, cell, Name box, etc., as given on pages 101 and 102.
Describe that you can move from one cell to another by using the mouse or various key combinations such as arrow keys, Tab, Ctrl + End, as given on pages 103 and 104.
● Ask the questions provided on the slides one by one to assess the students’ understanding. Discuss the answers to the questions with the students. If necessary, ask additional relevant questions.
● Instruct the students to click on the Start practice button on the Assignment page to attempt the activity. Then, click on the Attempt button to open the activity page.
● Instruct the students to click on the Confirm button to submit their work when they are done with the activity.
3 mins
● Conclude the session by summarising that Google Sheets is a free, online spreadsheet tool. It has various components, some of which are spreadsheet titles, rows, columns, active cells and Name box. A cell pointer is an active cell in a spreadsheet and you can move a cell pointer from one cell to another using a mouse or various key combinations.
● Assign the additional activity given on the panel to the students as homework.
At the end of the session, the students will be able to:
● enter data in Google Sheets.
● save and close the sheet.
● open the existing sheet.
Keyword
● Auto save: It means that you do not need to save the sheet repeatedly. It will be saved automatically.
Ask students the question: What is the significance of automatic saving in Google Sheets, and how does it differ from manual saving?
Tell students how to enter data in Google Sheets. Tell students how to save and close the sheet.
Also, discuss with students how to open the existing sheets.
Group discussion Conclude the concepts Assign homework
Warm Up
● Ask students the question: What is the significance of automatic saving in Google Sheets, and how does it differ from manual saving?
● Now, build the concept that Google Sheets automatically saves the data you entered.
Engage
Explain the following concepts:
Learning Outcomes
Enter data in Google Sheets.
Explanation
Explain to the students how to enter data in Google Sheets, as given on page 104.
Save and close the sheet. Discuss with the students how to save and close a spreadsheet, as given on page 105.
Open an existing sheet. Explain the steps to open the existing sheet, as given on pages 105 and 106.
Do It Yourself 7C
● Read aloud the question provided in the Do It Yourself 6C section and encourage the students to solve the questions. Instruct the students to write the answers in the book.
Correct Responses:
1.
1 Match the Following. Component Description
Key ↓
Saving a Sheet
Entering Data
Start typing in the active cell.
Moves the active cell down.
Google Sheets has an auto save feature.
2 What key combination do you use to go to the next row when entering data?
2. Down arrow key Build 7 mins
1 A spreadsheet is a digital table that helps you organise and work with numbers, data, and information in a neat and structured way.
● Conduct a group discussion in the class among students based on the topic “What can happen if you close the sheet without saving it?”, provided in the Discuss section, as mentioned on page 105. Possible Response: Google Sheets will automatically save your work continuously as you edit.
2 Google Sheets is a popular web-based spreadsheet application.
3 Google Sheets auto-saves your work and it also allows you to work offline.
4 The horizontal group of cells in the spreadsheet is called rows. Rows are numbered 1, 2, 3, and so on.
3 mins
5 A column is a vertical group of cells denoted by letters. These letters range from A to Z, followed by AA, AB, through to AZ, and so on.
● Conclude the session by summarising that:
6 Cells are at the intersections of rows and columns.
7 The cell address format is the column letter followed by the row number, such as A1, B2, or C3.
Google Sheets automatically saves your data, removing the need for manual saving. The “Saving...” icon in the top right corner indicates ongoing saving, followed by a cloud icon with a checkmark () upon completion. To close the spreadsheet, click the X button on the browser tab. Access or add more data by launching Google Chrome, visiting Google Sheets, finding the desired sheet at the bottom or using the Search bar, and clicking on the sheet to open it—changes are automatically saved and marked by the cloud icon with a checkmark.
8 The currently selected cell in a spreadsheet where you can enter or edit data is called an active cell.
9 The formula bar is where you can enter and edit formulae or cell contents in an active cell.
10 The menu bar provides a range of tools to create, edit, format, and manage the spreadsheet.
11 The toolbar is a set of tools or options in Google Sheets that allows users to perform various actions or tasks such as editing text, zooming, and printing.
● Assign the following questions from the Chapter Checkup given at the end of the chapter as homework.
A. Fill in the Blanks: Question 4
12 The Share button helps you to share your spreadsheet with your friends and work together with them.
B. Tick the Correct Option: Questions 4 and 5
F. Apply Your Learning: Question 3
At the end of the session, the students will be able to:
● enter data in Google Sheets.
● save and close the sheet.
● open the existing sheet.
Keyword
● Auto save: It means that you do not need to save the sheet repeatedly. It will be saved automatically.
Let the students watch the video or the learning slides related to the topic on the digital panel.
Demonstrate to the students how to enter data in Google Sheets. Tell them how to save and close the sheet.
Also, demonstrate to the students how to open the existing sheets.
Attempt the activity on the Assignment page.
Conclude the concepts
Assign homework
5 mins
Warm Up
● Instruct the students to go to Tekie’s Digital platform and open a Lab session on Entering Data, Saving, Closing and Opening a Sheet 2.
● Show the learning slides or the video and discuss the concepts shown on the panel.
Engage
Explain the following concepts:
Learning Outcomes
Enter data in Google Sheets.
Explanation
Demonstrate to the students how to enter data in Google Sheets, as given on page 104.
Save and close the sheet. Demonstrate to the students how to save and close a spreadsheet, as given on page 105.
Open the existing sheet. Demonstrate to the students how to open the existing sheet, as given on pages 105 and 106.
● Ask the questions provided on the slides one by one to assess the students’ understanding. Discuss the answers to the questions with the students. If necessary, ask additional relevant questions.
7 mins
● Instruct the students to click on the Start practice button on the Assignment page to attempt the activity. Then, click on the Attempt button to open the activity page.
● Instruct the students to click on the Confirm button to submit their work when they are done with the activity. Sum Up
3 mins
● Conclude the session by summarising the steps for saving and closing the sheets. Google Sheets automatically saves your data, removing the need for manual saving. The “Saving...” icon in the top right corner indicates ongoing saving, followed by a cloud icon with a checkmark () upon completion. To close the spreadsheet, click the X button on the browser tab. Access or add more data by launching Google Chrome, visiting Google Sheets, finding the desired sheet at the bottom or using the Search bar, and clicking on the sheet to open it—changes are automatically saved and marked by the cloud icon with a checkmark.
● Assign the additional activity given on the panel to the students as homework.
Mel and Conji start their summer vacation with a visit to the Computer Museum, learning about the history of computers. At the Library, they search for a book on Avora’s creation but find it missing. Elder Wizard and Elder Robot suggest looking online, introducing them to the internet as a vast information network. They visit Eva, who’s struggling to organize her birthday party. Mel teaches her to use Google Docs and Slides, and with help from Ms Idea at the Idea Centre, they settle on a robotic theme. Eva creates stunning invitations using Google Slides, and Elder Wizard and Elder Robot teach them to manage a budget using Google Sheets. As the party plans wrap up, they receive a surprise gift for Eva from Mr Fate and a life lesson about happiness. Later, a mysterious message leads them to the “Enchanted Doorway,” where they discover a magical game room. Playing “Space Explorer,” they learn about AI, sparking excitement to explore more of their magical world.
● Elder Wizard gifts children with a magical present in the Computer Lab.
● The gift is an early birthday surprise from Mr Fate, head of the Ministry of Happiness.
● Eva reads a letter from Mr Fate, emphasising the importance of the gift and sharing a life lesson.
● The magical wand is part of the gift, and everyone is intrigued about its powers.
● The Elders play a crucial role in the children’s lives, reflecting Mr Fate’s commitment to happiness.
● The concept of adding and deleting memories reminds Mel of editing in Google Sheets, leading to a discussion cut short as the Elders need to leave urgently.
This chapter is divided into the following classroom and lab sessions
1. Interacting with Spreadsheets 1
2. Interacting with Spreadsheets 2
3. Copying, Moving, and Deleting Cell Data 1
4. Copying, Moving, and Deleting Cell Data 2
At the end of the session, the students will be able to:
● select the cell content.
● enter numbers as text.
● enter the date and time.
Keywords
● change cell data.
● use Undo and Redo commands.
● Google Sheets: It is a spreadsheet application which is used to process complex mathematical calculations. It also allows you to store, organise and analyse data.
● Entering number as text: It refers to a situation where you enter a number in such a way that it is considered as a text rather than a number.
Ask students: Have you ever fixed wrong data in a spreadsheet cell? How did you do it?
Tell the students how to select the cell, enter the number as text, enter the date and time and change cell data. Also tell the use of Undo and Redo. Group discussion Conclude the concepts Assign homework
● Have you ever fixed wrong data in a spreadsheet cell? How did you do it?
● Now, build the concept that you can select, modify cell content and delete cell data in Google Sheets.
15 mins
Engage
Explain the following concepts:
Learning Outcomes
Select the cell content.
Explanation
Discuss with the students how to select the content of a cell, as given on pages 118 and 119.
Enter numbers as text.
Enter date and time.
Explain to them that entering number as text refers to a situation where you enter a number in such a way that it is considered as a text rather than a number, as given on page 119.
Discuss with the students how to modify the date format in a cell, as given on pages 119.
Change cell data. Tell them how to modify cell content, as given on pages 120 and 121.
Use Undo and Redo.
Discuss with them that Undo helps you to cancel the effect of the last action that you performed, while Redo helps when you want to reverse the action of the Undo command. It allows you to bring back the data you previously removed or changed, as given on page 122.
● Read aloud the questions provided in the Do It Yourself 7A section and encourage the students to solve the questions. Instruct the students to write the answers in the book.
Correct Responses:
Question 1
(a) Right aligned. (b) Right aligned. (c) Left aligned.
Question 2
(a) Selecting cell (b) Changing cell data
Build
7 mins
● Conduct a group discussion in the class among students based on the topic ‘If you have entered a wrong date, how will you change it?’ provided in the Discuss section, as mentioned on page 121.
Correct Response: Click the cell, type the correct date, and press Enter.
● Conduct a group discussion in the class among students based on the topic ’Do the Undo and Redo features apply only to spreadsheets, or do they apply to other applications as well?’ provided in the Discuss section, as mentioned on page 122.
Possible Responses: The undo and redo features apply to various applications, not just spreadsheets. Word processors and presentation tools as examples of where these features are commonly found.
3 mins
Sum Up
● Conclude the session by summarising that Google Sheets is a spreadsheet application which is used to process complex mathematical calculations. It also allows you to enter text, number, date and time. To modify cell content, choose the desired cell, then input the new information and save by pressing the Enter key. Undo helps you to cancel the effect of the last action that you performed, while Redo helps when you want to reverse the action of the Undo command. It allows you to bring back the data you previously removed or changed.
● Assign the following questions from the Chapter Checkup given at the end of the chapter as homework.
A. Fill in the Blanks: Questions 1, 2, 3, and 5
E. Answer the Following Questions: Questions 2
B. Tick the Correct Option: Questions 1, 2, 3, 4, and 5 and 3
C. Who Am I?: Questions 1 and 4
D. Write T for True and F for False: Questions 3 and 4
F. Apply Your Learning: Questions 1, 2, 4, and 5
At the end of the session, the students will be able to:
● select the cell content.
● enter numbers as text.
● enter date and time.
● change cell data.
● use undo and redo.
Keywords
● Google Sheets: It is a spreadsheet application which is used to process complex mathematical calculations. It also allows you to store, organise and analyse data.
● Entering number as text: It refers to a situation where you enter a number in such a way that it is considered text rather than a number.
Let the students to watch the video or the learning slides related to the topic on the digital panel.
Tell the students how to select the cell, enter the number as text, enter the date and time and change cell data. Also tell the use of undo and redo.
Attempt the activity on the Assignment page.
Conclude the concepts Assign homework
Warm Up
● Instruct the students to go to Tekie’s Digital platform and open a Lab session on Interacting with Spreadsheet 2.
● Show the learning slides or the video and discuss the concepts shown on the panel.
Explain the following concepts:
Select the cell content.
Enter numbers as text.
Enter date and time.
15 mins
Discuss with the students how to select the content of a cell, as given on pages 118 and 119.
Explain to them that entering number as text refers to a situation where you enter a number in such a way that it is considered as a text rather than a number, as given on page 119.
Discuss with the students how to modify the date format in a cell, as given on pages 119.
Change cell data. Tell them how to modify cell content, as given on pages 120 and 121.
Use Undo and Redo.
Discuss with them that Undo helps you to cancel the effect of the last action that you performed, while Redo helps when you want to reverse the action of the Undo command. It allows you to bring back the data you previously removed or changed, as given on page 122.
● Ask the questions provided on the slides one by one to assess the students’ understanding. Discuss the answers to the questions with the students. If necessary, ask additional relevant questions.
7 mins
Build
● Instruct the students to click on the Start practice button on the Assignment page to attempt the activity. Then, click on the Attempt button to open the activity page.
● Instruct the students to click on the Confirm button to submit their work when they are done with the activity.
3 mins
● Conclude the session by summarising that Google Sheets is a spreadsheet application which is used to process complex mathematical calculations. It also allows you to enter text, number, date and time. To modify cell content, choose the desired cell, then input the new information and save by pressing the Enter key. Undo helps you to cancel the effect of the last action that you performed, while Redo helps when you want to reverse the action of the Undo command. It allows you to bring back the data you previously removed or changed.
● Assign the additional activity given on the panel to the students as homework.
At the end of the session, the students will be able to:
● copy cell data.
● move cell data.
● delete cell data.
Keywords
● Copying cell: It means making an exact duplicate of the data.
● Moving cell: It refers to the process of relocating data from one cell or a range of cells to another.
● Deleting cell: It refers to removing the content that is currently in a cell.
Ask students: Imagine you have a chart in Google Sheets with names and scores. If someone moves to a new position, how would you update their information—would you erase and rewrite it, or move it in some way?
Explain to the students how they can copy the data, move the cell data, or delete the cell data.
● Ask students: Imagine you have a chart in Google Sheets with names and scores. If someone moves to a new position, how would you update their information—would you erase and rewrite it, or move it in some way?
● Now, build the concept that Google Sheets allows you to copy, move and delete data.
Explain the following concepts:
Learning Outcomes
Explanation
Copy data. Explain to the students copying data means making an exact duplicate of the data, as given on pages 122 and 123.
Move cell data. Tell the students that moving cell data refers to the process of relocating data from one cell or a range of cells to another, as given on pages 123 and 124.
Delete cell data. Describe deleting cell data refers to removing the content that is currently in a cell, as given on pages 124 to 126.
● Read aloud the question provided in the Do It Yourself 7B section and encourage the students to solve the questions. Instruct the students to write the answers in the book.
Correct Responses: Match the following shortcut keys.
7 mins
Build
● Ask the students to answer the questions “Can only one cell be copied at a time in Google Sheets?” and “How do you move data from one cell to another?” asked in the Think and Tell section, as given on pages 123 and 126, respectively.
Possible Responses: No, multiple cells can be copied. By using the Cut option or Ctrl + X and then pasting the cell contents to another using the Paste option or Ctrl + V.
3 mins
● Conclude the session by summarising copying data means making an exact duplicate of the data. Moving cell data refers to the process of relocating data from one cell or a range of cells to another. Deleting cell data refers to removing the content that is currently in a cell.
● Assign the following questions from the Chapter Checkup given at the end of the chapter as homework.
A. Fill in the Blanks: Question 4
B. Who Am I?: Questions 2, 3, and 5
C. Write T for True and F for False: Questions 1, 2, and 5
D. Answer the Following Questions: Questions 1, 4, and 5
E. Apply Your Learning: Question 3
At the end of the session, the students will be able to:
● copy data.
● move cell data.
● delete cell data.
Keywords
● Copying cell: It means making an exact duplicate of the data.
● Moving cell: It refers to the process of relocating data from one cell or a range of cells to another.
● Deleting cell: It refers to removing the content that is currently in a cell.
Warm Up Engage Build Sum Up
Let the students watch the video or the learning slides related to the topic on the digital panel. Demonstrate to the students how they can copy the data, move the cell data, or delete the cell data.
Attempt the activity on the Assignment page. Conclude the concepts
Assign homework
Warm Up
● Instruct the students to go to Tekie’s Digital platform and open a Lab session on Copying, Moving and Deleting Cell 2
● Show the learning slides or the video and discuss the concepts shown on the panel.
Explain the following concepts:
Learning Outcomes
Explanation
Copy data. Explain to the students copying data means making an exact duplicate of the data, as given on pages 122 and 123.
Move cell data. Tell the students that moving cell data refers to the process of relocating data from one cell or a range of cells to another, as given on pages 123 and 124.
Delete cell data. Describe deleting cell data refers to removing the content that is currently in a cell, as given on pages 124 to 126.
● Ask the questions provided on the slides one by one to assess the students’ understanding. Discuss the answers to the questions with the students. If necessary, ask additional relevant questions.
7 mins
Build
● Instruct the students to click on the Start practice button on the Assignment page to attempt the activity. Then, click on the Attempt button to open the activity page.
● Instruct the students to click on the Confirm button to submit their work when they are done with the activity.
3 mins
Sum Up
● Conclude the session by summarising that copying data means making an exact duplicate of the data. Moving cell data refers to the process of relocating data from one cell or a range of cells to another. Deleting cell data refers to removing the content that is currently in a cell.
● Assign the additional activity given on the panel to the students as homework.
Mel and Conji start their summer vacation with a visit to the Computer Museum, learning about the history of computers. They search for a book on Avora’s creation at the Library but find it missing. Elder Wizard and Elder Robot suggest looking online, introducing them to the internet as a vast information network. They visit Eva, who’s struggling to organise her birthday party. Mel teaches her to use Google Docs and Slides, and with help from Ms Idea at the Idea Centre, they settle on a robotic theme. Eva creates stunning invitations using Google Slides, and Elder Wizard and Elder Robot teach them to manage a budget using Google Sheets. As the party plans wrap up, they receive a surprise gift for Eva from Mr Fate and a life lesson about happiness. Later, a mysterious message leads them to the “Enchanted Doorway,” where they discover a magical game room. Playing “Space Explorer,” they learn about AI, sparking excitement to explore more of their magical world.
● The trio reaches the Enchanted Doorway, where Eva wonders if Lord Ero has done something to ruin her birthday.
● Mel reassures her that it might be possible, but the party will proceed as planned.
● They enter the magical doorway and are amazed to find a room combining magic and smart technology.
● A voice welcomes them to the Wonder Room with magical drinks and exciting games.
● As they explore, they find the Space Explorer game.
● Conji starts the game, and the voice provides instructions on how to play.
● Mel explains to Eva and Conji that the voice is powered by AI and its various domains.
This chapter is divided into the following classroom and lab sessions
1. Introduction to AI and Domains of AI: Data Science
2. Fun with AI: Using Tic Tac Toe
3. Domains of AI: Computer Vision
4. Fun with AI: Using AutoDraw!
5. Domains of AI: NLP
6. Fun with AI: Using Wordtune
At the end of the session, the students will be able to:
● define Artificial Intelligence
● know the domains of AI
● define data science
● explain applications of data science.
Keywords
● Artificial Intelligence: AI can be defined as a branch of computer science concerned with creating intelligent machines that can learn from data, solve problems, and make decisions.
● Domains of AI: AI is an umbrella term that has different domains or areas where it can be used.
● Data: Data is a collection of raw facts that can be transformed into useful information. It can be in the form of text, images, audio, or video.
● Data Science: Data science is a vast and interdisciplinary field that involves extracting knowledge and insights from data.
Ask students: Have you ever used a voice assistants like Siri or Alexa? How do you think they understand what you say and give you helpful answers?
Describe the Artificial Intelligence and its domains. Also, tell them about data science and its applications.
Warm Up
● Ask students: Have you ever used a voice assistant like Siri or Alexa? How do you think they understand what you say and give you helpful answers?
● Tell the students that Siri or Alexa are voice assistants that use Artificial Intelligence.
Explain the following concepts:
Describe Artificial Intelligence. Tell the students that AI can be defined as a branch of computer science concerned with creating intelligent machines that can learn from data, solve problems, and make decisions, as given on page 135.
Explain the Domains of AI. Tell students that AI is an umbrella term that has different domains or areas where it can be used. The three main domains of AI are Data Science, Computer Vision, and Natural Language Processing (NLP), as given on page 135.
Define Data Science. Explain to students that Data science is a vast and interdisciplinary field that involves extracting knowledge and insights from data, as given on pages 135 and 136.
Explain applications of Data Science.
Data science is used in many industries and applications, including marketing, public health scientific research etc., as given on page 136.
● What does AI stand for?
Correct Response: AI stands for Artificial Intelligence.
● Where is AI used in daily life?
Correct Response: AI is everywhere. Think of your phone’s voice assistant like Siri or Alexa. They use AI to understand your voice commands. Google Maps shows you the shortest route to your home; or when streaming platforms, like Netflix or YouTube, give you recommendations based on your viewing history.
Build
● Conduct a group discussion in the class among the students on the topic “Applications of data science”.
Possible Responses: Data science is used in many industries and applications, including marketing, public health, scientific research and comparing prices online. Sum Up
● Conclude the session by summarising that AI can be defined as a branch of computer science concerned with creating intelligent machines that can learn from data, solve problems, and make decisions. Data science is a vast and interdisciplinary field that involves extracting knowledge and insights from data.
● Assign the following questions from the Chapter Checkup given at the end of the chapter as homework.
A. Fill in the Blanks: Questions 1 and 3
B. Tick the Correct Option: Questions 1, 2, and 3
C. Write T for True and F for False: Question 2
D. Answer the Following Questions: Questions 1 and 4
At the end of the session, the students will be able to:
● understand how AI learns from data by exploring the Tic Tac Toe game.
Keyword
● Tic Tac Toe: Tic Tac Toe game is an interactive online game based on data for AI where the machine tries to predict the next move of the participant by learning from their previous moves.
Warm Up Engage Build Sum Up
Let the students revise the chapter. Demonstrate to the students how to play the game for which the link is provided on the panel.
Attempt the activity on the Assignment page.
Conclude the concepts
Warm Up
● Instruct the students to go to Tekie’s Digital platform and open a Lab session on Fun with AI: Using Tic Tac Toe.
Engage
● Demonstrate to the students how to play the game for which the link is provided on the panel.
● Explain the following concepts:
Explain Tic Tac Toe. Explain to the students that the Tic Tac Toe game is an interactive online game based on data for AI where the machine tries to predict the next move of the participant by learning from their previous moves, as given on page 136.
● Ask the questions related to the activity.
● Instruct the students to click on the Start practice button on the Assignment page to attempt the activity. Then, click on the Attempt button to open the activity page.
● Instruct the students to click on the Confirm button to submit their work when they are done with the activity. Sum Up 3 mins
● Conclude the session by summarising how AI learns from data. Also, tell them that the Tic Tac Toe game is an online game based on the Data Science domain of AI. This game is a digital translation of the classic Xs and Os game played on a 3x3 grid. In this game, two players take turns to mark the spaces with either an X or an O. The one who creates a line of three with these symbols either horizontally, vertically, or diagonally on the grid wins the game.
At the end of the session, the students will be able to:
● define computer vision.
● explain applications of computer vision.
Keyword
● Computer Vision: Computer Vision is another important domain of AI which uses cameras to see and understand visual information.
Ask students: Have you ever had a security camera in your home Did you know it can analyse videos, like detecting motion or recognising faces?
Describe the Computer Vision. And also tell them about applications of computer vision. Group discussion Conclude the concepts Assign homework
● Have you ever had a security camera in your home? Did you know it can analyse videos, like detecting motion or recognising faces?
● Tell the students that these CCTV cameras use computer vision.
Engage
Explain the following concepts:
Learning Outcomes
Describe Computer Vision.
Explain applications of Computer Vision.
Explanation
Tell students that Computer Vision is another important domain of AI which uses cameras to see and understand visual information, as given on page 137.
Tell students that Computer Vision has numerous applications across various fields like autonomous vehicles, healthcare, retail, security and surveillance, as given on page 138.
● Are CCTV cameras crucial for home security, and how do they use video analysis to enhance safety?
Correct Response: Yes, CCTV cameras are an essential component of home security. With video analysis powered by Computer Vision, they can detect motion, recognise faces, and even send alerts about unusual activity, making homes safer and more secure.
● Conduct a group discussion in the class among the students on the topic “How computer vision is useful in the healthcare sector?”
Correct Response: In medical imaging, computer vision aids in diagnostics by analysing images from X-rays, MRIs, and CT scans to detect anomalies and assist medical professionals in making accurate diagnoses.
● Conclude the session by summarising Computer Vision is another important domain of AI which uses cameras to see and understand visual information. Computer vision has numerous applications across various fields including autonomous vehicles, healthcare, retail, security and surveillance.
● Assign the following questions from the Chapter Checkup given at the end of the chapter as homework.
A. Fill in the Blanks: Question 2
B. Tick the Correct Option: Question 5
C. Write T for True and F for False: Questions 1 and 3
D. Answer the Following Questions: Question 3
E. Apply Your Learning: Questions 1 and 2
At the end of the session, the students will be able to:
● explain AI using AutoDraw!
Keyword
● AutoDraw: AutoDraw is a fun and free online drawing tool based on computer vision. It uses AI to guess your drawing and provides suggestions to turn your scribbles into complete drawings.
Let the students revise the chapter.
Demonstrate to the students how to play the game for which the link is provided on the panel.
Attempt the activity on the Assignment page.
Conclude the concepts
● Instruct the students to go to Tekie’s Digital platform and open a Lab session on Fun with AI: Using AutoDraw!
● Demonstrate to the students how to play the game for which the link is provided on the panel.
● Explain the following concepts:
Learning Outcomes
Explanation
Explain AutoDraw. Explain to the students that AutoDraw is a fun and free online drawing tool based on computer vision. It uses AI to guess your drawing and provides suggestions to turn your scribbles into complete drawings, as given on page 138.
● Ask the questions related to the activity.
Build
7 mins
● Instruct the students to click on the Start practice button on the Assignment page to attempt the activity. Then, click on the Attempt button to open the activity page.
● Instruct the students to click on the Confirm button to submit their work when they are done with the activity.
Sum Up
3 mins
● Conclude the session by summarising how AI uses computer vision to see and understand things. In this game, as soon as you begin to scribble in the drawing area, the AutoDraw tool will make use of computer vision to guess your drawing.
Learning Outcomes
At the end of the session, the students will be able to:
● define NLP.
● explain applications of NLP.
Keyword
Ask the students for the full form of NLP. Also, ask them to define the term NLP.
● NLP: Natural Language Processing (NLP) is a domain of AI that enables computers to understand human language and generate appropriate responses when we interact with them. 5 mins
Warm Up
Describe NLP and also tell them about its applications.
Group discussion Conclude the concepts
Assign homework
● Ask the students for the full form of NLP. Also, ask them to define the term NLP.
Engage
Explain the following concepts:
Learning Outcomes
15 mins
Explanation
Describe NLP. Tell the students that Natural Language Processing (NLP) is a domain of AI that enables computers to understand human language and generate appropriate responses when we interact with them, as given on page 139.
Explain applications of NLP.
Explain to students that NLP has numerous applications across various fields like language translation, sentiment analysis, chatbots and virtual assistants, and information extraction, as given on pages 139 and 140.
● Read aloud the question provided in the Do It Yourself 8A section and encourage the students to solve the questions. Instruct the students to write the answers in their books.
Correct Response:
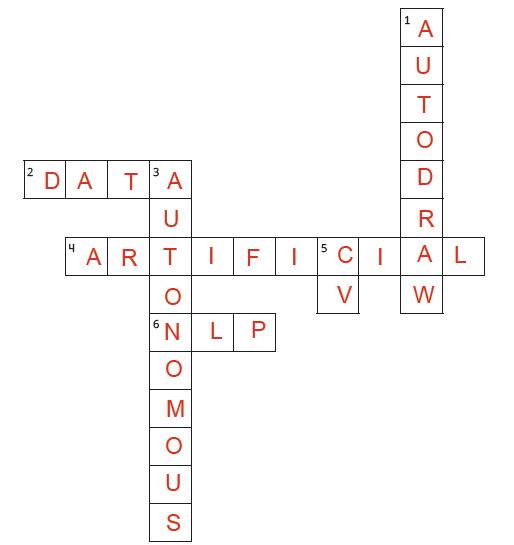
● Write some popular examples for NLP applications.
Correct Response: Popular examples of NLP applications include Google Assistant, Siri, Alexa, Google Translate, etc.
7 mins
● Conduct a group discussion in the class among the students on the topic “How does Google Translate assist us in daily life?”
Correct Response: Google Translate processes and translates text from one language to another, preserving context and meaning.
3 mins
● Conclude the session by summarising that Natural Language Processing (NLP) is a domain of AI that enables computers to understand human language and generate appropriate responses when we interact with them. NLP has numerous applications across various fields including language translation, sentiment analysis, chatbots and virtual assistants, and information extraction.
● Assign the following questions from the Chapter Checkup given at the end of the chapter as homework.
A. Fill in the Blanks: Question 4
B. Tick the Correct Option: Question 4
C. Write T for True and F for False: Question 4
D. Answer the Following Questions: Question 2
E. Apply Your Learning: Question 3
At the end of the session, the students will be able to:
● explain AI using Wordtune.
Keyword
Let the students revise the chapter.
● Wordtune: Wordtune is an AI-powered writing assistant that helps users improve their writing in various ways. 5 mins
Warm Up
Demonstrate to the students how to play the game for which the link is provided on the panel.
Attempt the activity on the Assignment page.
Conclude the concepts
Action Plan
● Instruct the students to go to Tekie’s Digital platform and open a Lab session on Fun with AI: Using Wordtune.
15 mins
Engage
● Demonstrate to the students how to play the game for which the link is provided on the panel.
● Explain the following concepts:
Learning Outcomes
Explanation
Explain Wordtune Explain to the students that Wordtune is an AI-powered writing assistant that helps users improve their writing in various ways. It suggests alternative ways to phrase sentences, offer synonyms and different sentence structures, and maintain the original meaning., as given on page 140.
● Ask the questions related to the activity.
Build
7 mins
● Instruct the students to click on the Start practice button on the Assignment page to attempt the activity. Then, click on the Attempt button to open the activity page.
● Instruct the students to click on the Confirm button to submit their work when they are done with the activity.
3 mins
Sum Up
● Conclude the session by summarising how AI makes use of NLP. Wordtune suggests alternative ways to phrase sentences, offer synonyms and different sentence structures and maintain the original meaning. When prompted, Wordtune can generate additional text to elaborate on ideas and create new content that aligns with the existing text.
This chapter is divided into the following lab sessions
1. Introduction to Scratch 3.0 and Its Components
2. Sprites
3. Backdrops
At the end of the session, the students will be able to:
● explain what coding is.
● describe block-based coding.
● explain about Scratch 3.0.
● start Scratch 3.0.
● identify the components of the Scratch window.
Keywords
● Coding: The process of creating sets of instructions that a computer can understand and execute.
● Scratch: An application program that lets you create your own games, stories, and animations.
● Stage: The area where sprites interact and display the results of your code.
Warm Up
Let the students watch the video or the learning slides related to the topic on the digital panel.
Engage
Build Sum Up
Explain to them what coding is; tell them about block-based coding; introduce them to Scratch 3.0; tell them how to start Scratch and explain the components of the Scratch window. Attempt the activity on the Assignment page. Conclude the concepts Assign homework
5 mins
Warm Up
● Instruct the students to go to the Tekie’s Digital platform and open a Lab session on Introduction to Scratch 3.0 and Its Components.
● Show the learning slides one by one and discuss the concepts shown on the slide in the panel.
15 mins
Engage
Explain the following concepts:
Explanation
Explain what coding is. Tell the students that coding is the process of creating sets of instructions that a computer can understand and execute, as given on page 1.
Describe block-based coding. Tell the students that block-based coding is like putting together a fun and colourful jigsaw puzzle, as given on page 2.
Explain about Scratch 3.0.
Introduce the students to Scratch 3.0. Tell them it is an application program that lets you create your games, stories, and animations, as given on page 2.
Start Scratch 3.0. Demonstrate the steps to start Scratch 3.0 to the students, as given on page 3.
Identify the components of the Scratch window.
Introduce students to the various components of the Scratch window such as block panel, blocks palette, coding area, stage, etc., as given on pages 4 and 5.
● Ask the questions provided on the slides one by one to assess the students’ understanding. Discuss the answers to the questions with the students. If necessary, ask additional relevant questions.
● Read aloud the questions provided in the Do It Yourself 1A and 1B sections and encourage the students to solve the questions. Instruct the students to write the answers in their books.
Correct Responses:
Do It Yourself 1A
1. coding
2. blocks
3. block-based
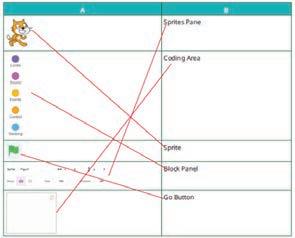
● Instruct the students to click on the Start practice button on the Assignment page to attempt the activity. Then, click on the Attempt button to open the activity page.
● Instruct the students to click on the Confirm button to submit their work when they are done with the activity.
● Conclude the session by summarising that coding is the process of creating sets of instructions that a computer can understand and execute. Block-based coding is like putting together a fun and colourful jigsaw puzzle. Scratch 3.0 is a free platform where you can show your creative skills. Also, revise them on how to start Scratch and its various components.
● Assign the additional activity given on the panel to the students as homework.
● Assign the following questions from the Chapter Checkup given at the end of the chapter as homework.
A. Fill in the Blanks: Questions 3, 4, and 5
B. Who Am I?: Questions 1, 2, 4, and 5
D. Write T for True and F for False: Questions 1 and 4
E. Answer the Following Questions: Questions 1, 2, and 4
At the end of the session, the students will be able to:
● add a sprite and change its costume.
● animate a sprite.
● duplicate a costume and a sprite.
Keyword
● Sprite: The main character that performs all the actions in your project.
Let the students watch the video or the learning slides related to the topic on the digital panel. Demonstrate how can a new sprite be added, animated and duplicated. Demonstrate how can the costume of the sprite be changed and duplicated. Attempt the activity on the Assignment page.
Conclude the concepts Assign homework
5 mins
Warm Up
Instruct the students to go to the Tekie’s Digital platform and open a Lab session on Sprites. Show the learning slides one by one and discuss the concepts shown on the slides in the panel.
15 mins
Engage
Explain the following concepts:
Learning Outcomes
Add a sprite and change its costume.
Explanation
Explain to the students that they can change or add more sprites to their project as per their choice. Also, they can change the costume of their sprite to give it a different look, as given on pages 6 to 7.
Animate a sprite. Demonstrate to them the steps to animate a sprite, as given on pages 7 and 8.
Duplicate a costume and a sprite. Demonstrate to the students the steps to duplicate a costume and a sprite, as given on pages 9 and 10.
● Ask the questions provided on the slides one by one to assess the students’ understanding. Discuss the answers of the questions with the students. If necessary, ask additional relevant questions.
● Read aloud the questions provided in the Do It Yourself 1C and 1D section and encourage the students to solve the questions. Instruct the students to write the answers in their books.
Correct Responses:
Do It Yourself 1C
A. 1. Sprite 2. next costume
3. Choose a sprite 4. When clicked, next costume
B. 1. False 2. True 3. True 4. False
Do It Yourself 1D
1. You can switch between costumes using the switch costume to block. You need to specify the names of the costume in this block.
2. next costume block is used to change the costume of a sprite.
3. These blocks are used to animate a sprite.
Build 7 mins
● Instruct the students to click on the Start practice button on the Assignment page to attempt the activity. Then, click on the Attempt button to open the activity page.
● Instruct the students to click on the Confirm button to submit their work when they are done with the activity.
Sum Up 3 mins
● Conclude the session by summarising how to add a sprite, change a costume, animate a sprite, duplicate a costume, and duplicate a sprite.
● Assign the additional activity given on the panel to the students as homework.
● Assign the following questions from the Chapter Checkup given at the end of the chapter as homework.
A. Fill in the Blanks: Question 1
B. Who Am I?: Question 3
C. Explain the Function of the Icon: Questions 1, 3, 4, and 5
D. Write T for True and F for False: Questions 2 and 5
E. Answer the Following Questions: Questions 3 and 5
F. Apply Your Learning: Questions 1, 3, and 4
At the end of the session, the students will be able to:
● add a backdrop.
● change a backdrop.
Keyword
● Backdrop: Backdrops are the background scenes for your sprites to interact with.
Warm Up Engage Build Sum Up
Let the students watch the video or the learning slides related to the topic on the digital panel.
Demonstrate how can a backdrop be added and changed.
Attempt the activity on the Assignment page.
Conclude the concepts
Assign homework
5 mins
Warm Up
● Instruct the students to go to the Tekie’s Digital platform and open a Lab session on Backdrops.
● Show the learning slides one by one and discuss the concepts shown on the slides in the panel.
15 mins
Engage
Explain the following concepts:
Learning Outcomes
Explanation
Add a backdrop. Tell the students that you can add backgrounds, also known as backdrops, to your project to create various settings or scenes for your sprites to interact with, as given on pages 11 and 12.
Change a backdrop. Tell the students that if they want to change the background while their project is running, they can use special code blocks to do it, as given on page 12.
● Ask the questions provided on the slides one by one to assess the students’ understanding. Discuss the answers to the questions with the students. If necessary, ask additional relevant questions.
● Instruct the students to click on the Start Practice button on the Assignment page to attempt the activity. Then, click on the Attempt button to open the activity page.
● Instruct the students to click on the Confirm button to submit their work when they are done with the activity.
● Conclude the session by summarising that they can add backdrops to their project to create various settings or scenes for their sprites to interact with. Revise with them on how to add a backdrop. Also tell them if they want to change the background while their project is running, they can use special code blocks to do it.
● Assign the additional activity given on the panel to the students as homework.
● Assign the following questions from the Chapter Checkup given at the end of the chapter as homework.
A. Fill in the Blanks: Question 2
C. Explain the Function of the Icon: Question 2
D. Write T for True and F for False: Question 3
F. Apply Your Learning: Questions 2 and 5
This chapter is divided into the following classroom and lab sessions
1. Variables Blocks
2. Looks Blocks
At the end of the session, the students will be able to:
● describe Variable blocks
● add a variable
● set value of the variable
Keyword
● Variable blocks: These are the blocks that help a computer store a value that can be changed throughout a project.
Ask the students what a variable is.
Explain to the students what Variable blocks are. Describe how to add, set, and change variable values.
● Ask the students what a variable is and what two types of values a variable can contain.
● Tell students that a variable is a named storage location in a computer’s memory that holds a value, such as a number or a word.
Explain the following concepts:
Describe Variable blocks. Define Variable blocks to the students and tell them that in Scratch, a variable can contain two types of values: numeric and textual or string, as given on page 17
Add variables. Describe to the students the steps to add a variable ‘Score’ to the project, as given on pages 17 and 18.
Set value of the variable. Describe to them the steps to set a variable value. Tell them that they can just add the ‘set variable’ to block to set the variable value, as given on pages 18 and 19.
Ask the following questions to the students to check their understanding:
1. Name the two types of values that a variable can contain. Correct Response: Numeric variable and string variable
2. Name the block that can be edited to change the variable value. Correct response: Set the variable to
7 mins
● Conduct a group discussion in the class among students based on the topic “Different blocks in Variables blocks category”.
Possible Responses: Set my variable to
Sum Up
3 mins
● Conclude the session by summarising that Variable blocks are the blocks that help a computer store a value that can be changed throughout a project. In Scratch, a variable can contain two types of values: numeric and textual or string. We can add, set, and change the value of a variable.
● Assign the following questions from the Chapter Checkup given at the end of the chapter as homework.
A. Fill in the blanks: Questions 1 and 2
B. Tick the correct option: Questions 1 and 2
C. Who am I?: Question 2
D. Write T for True and F for False: Questions 3 and 4
E. Answer the Following Questions: Questions 1, 2, and 4
F. Apply your Learning: Question 1
At the end of the session, the students will be able to:
● Describe Looks blocks
● Use the different Looks blocks
Keyword
● Looks block: The Looks block category contains various blocks that are used to change the looks of the sprite and to make the sprite say something.
Let the students watch the video or the learning slides related to the topic on the digital panel.
Explain to students what Looks blocks can do. Also, tell them how to make a sprite say something. Attempt the activity on the Assignment page.
Conclude the concepts Assign homework
5 mins
Instruct the students to go to Tekie’s Digital platform and open a Lab session on Looks Blocks. Show the learning slides or the video and discuss the concepts shown on the panel.
Engage
Explain the following concept:
Describe Looks blocks.
Use looks blocks.
15 mins
Explain to the students what Looks blocks are. Also tell them about the various blocks in the category like the say() for () seconds block, next costume, show block, etc., as given on page 20.
Demonstrate to the students how in Scratch, you can make a sprite say something such as “Hello”, as given on page 21.
● Ask the questions provided on the slides one by one to assess the students’ understanding. Discuss the answers to the questions with the students. If necessary, ask additional relevant questions.
● Read aloud the question provided in the Do It Yourself 2A section and encourage the students to solve the questions. Instruct the students to write the answers in the book.
Correct Responses:
1. Events, run/execute
2. 2 seconds
Build
7 mins
● Instruct the students to click on the Practice button on the Assignment page to attempt the activity. Then, click on the Attempt button to open the activity page.
● Instruct the students to click on the Confirm button to submit their work when they are done with the activity.
3 mins
Sum Up
● Conclude the session by summarising that the Looks block category contains various blocks that are used to change the looks of the sprite and to make the sprite say something. This category of blocks is used to create dialogues in the game or the project.
● Assign the additional activity given on the panel to the students as homework.
● Assign the following questions from the Chapter Checkup given at the end of the chapter as homework.
A. Fill in the Blanks: Questions 3 and 4
B. Tick the Correct Option: Questions 3 and 4
C. Who Am I?: Questions 1, 3, and 4
D. Write T for True and F for False: Questions 1 and 2
E. Answer the Following Questions: Questions 3 and 5
F. Apply Your Learning: Questions 2 and 3
This chapter is divided into the following classroom and lab sessions:
1. Sensing and Operator Blocks
2. Control Blocks
At the end of the session, the students will be able to:
● describe the Sensing blocks and their usage.
● describe Operators blocks and its types.
Keywords
● Sensing Blocks: These blocks are used to sense conditions in the environment, such as the background colour or the sprite touching status.
● Operators Blocks: The Operators blocks are used to compare variables and values, perform calculations with numbers, and work with strings (text).
Ask the students how can they check if a sprite is touching a specific colour or a sprite on the stage.
Explain Sensing blocks and their usage to the students. Also, tell them about various Operators blocks.
Action Plan
Warm Up
● Ask the students how can they check if a sprite is touching a specific colour or a sprite on the stage.
● Build the concept by telling them that they can use the ‘touching color’ block to check the same. It is a block in the Sensing category.
Explain the following concept:
Describe the sensing blocks and their usage.
Describe Operators blocks and its types.
Tell students that the Sensing blocks are used to sense conditions in the environment, such as the background colour or the sprite touching status. Also tell the usage of some Sensing blocks like touching colour, answer, key pressed, etc. Also tell them about ask and answer blocks, as given on pages 25 and 26.
Tell students that the Operators blocks are used to compare variables and values, perform calculations with numbers, and work with strings (text).
Also explain them various types of Operators blocks such as Mathematical, Comparison, etc., as given on pages 27 and 28.
Ask the following questions to the students to check their understanding:
● Which block is used to retrieve the response given by the user to a previous ‘ask and wait’ block?
Correct response: answer block
● Which block is used to combine two string values?
Correct response: join block
Build
7 mins
● Conduct a group discussion in the class among students on the topic “Different blocks in Sensing blocks category”.
Possible Responses: touching color, ask and wait, reset timer, etc.
3 mins
● Conclude the session by summarising that the Sensing blocks are used to sense conditions in the environment, such as the background colour or the sprite touching status. Discuss the various sensing blocks. Explain them about Operators blocks and its types. Also tell them the use of these blocks.
● Assign the following questions from the Chapter Checkup given at the end of the chapter as homework.
A. Fill in the Blanks: Questions 2, 3, and 4
B. Tick the Correct Option: Questions 1, 2 and 4
C. Who Am I? : Question 1
D. Write T for True and F for False: Questions 2, 3, and 4
E. Answer the Following Questions: Questions 3 and 4
F. Apply Your Learning: Question 1
At the end of the session, the students will be able to:
● describe Control blocks and their various categories.
Keyword
● Control blocks: These blocks allow a program to perform a test based on a given condition and then take actions based on the result of that test.
Let the students watch the video or the learning slides related to the topic on the digital panel. Explain to them what Control blocks are. Discuss various Control blocks.
Attempt the activity on the Assignment page.
Conclude the concepts
Assign homework
5 mins
Warm Up
● Instruct the students to go to the Tekie’s Digital platform and open a Lab session on Control Blocks.
● Show the Learning slides or the Video and discuss the concepts shown on the panel.
Engage
Explain the following concept:
Describe Control blocks and their various categories.
15 mins
Explanation
Tell the students that the blocks from the Control category allow a program to perform a test based on a given condition and then take actions based on the result of that test. Discuss their various categories, such as if-then, if-thenelse, repeat, forever, repeat until, wait seconds, wait until, and stop all with the students. Also, demonstrate to them the usage of the various Control blocks in a project, as given on pages 28 to 31.
Coding Challenge. Ask the students to attempt the Coding Challenge, as given on page 31.
● Ask the questions provided on the slides one by one to assess the students’ understanding. Discuss the answers to the questions with the students. If necessary, ask additional relevant questions.
● Read aloud the questions provided in the Do It Yourself 3A section and encourage students to solve them. Instruct them to write the answers in the book.
Correct Responses:
1. Control, wait for 0.5 seconds
2. Looks, Hello, 1
Build
7 mins
● Instruct the students to click on the Practice button on the Assignment page to attempt the activity. Then, click on the Attempt button to open the activity page.
● Instruct the students to click on the Confirm button to submit their work when they are done with the activity.
3 mins
● Conclude the session by summarising that the Control blocks allow a program to perform a test based on a given condition and then take actions based on the result of that test. Also revise them the various categories of the Control block, such as if-then, if-then-else, repeat, forever, etc.
● Assign the additional activity given on the panel to the students as homework.
● Assign the following questions from the Chapter Checkup given at the end of the chapter as homework.
A. Fill in the Blanks: Question 1
B. Tick the Correct Answer: Question 3
C. Who Am I?: Questions 2, 3, and 4
D. Write T for True and F for False: Question 1
E. Answer the Following Questions: Questions 1 and 2
This chapter is divided into the following classroom and lab sessions:
1. Sound Blocks
2. Finalising the Project
At the end of the session, the students will be able to:
● explain Sound blocks.
Keyword
● Sound Blocks: Sound blocks are used to control sound.
Ask the students if they are aware that, in Scratch, sprites can be made to play sounds like ‘meow’ or other effects.
Explain to the students what Sound blocks are.
Describe the types of Sound blocks in Scratch.
Group Discussion
Think and tell.
Action Plan
Conclude the concepts. Assign homework.
Warm Up
● Ask the students if they are aware that, in Scratch, sprites can be made to play sounds like ‘meow’ or other effects.
● Tell them that they can use Sound blocks for this purpose.
Explain the following concepts:
Describe Sound blocks. Tell the students that Sound blocks are used to control sound. Also, tell them about various Sound blocks such as start sound, change volume by and stop all sounds, as given on page 35.
● Read aloud the questions provided in the Do It Yourself 5A section and encourage the students to solve the questions. Instruct the students to write the answers in their book.
Correct Response:
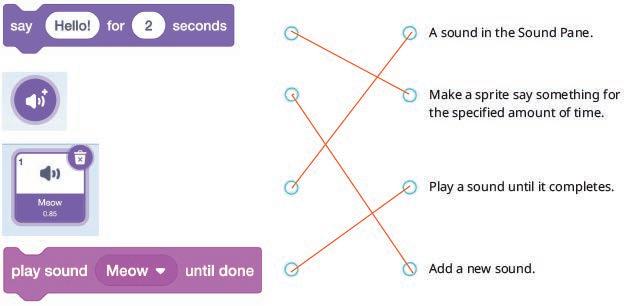
● Name the block that sets the volume to a specific percentage. Correct Response: set volume to () block
● Conduct a group discussion in class on the topic “How do Sound blocks make your project feel different?”, as given in the Discuss section on page 35.
Possible Responses: Sound blocks make your project in Scratch feel more engaging and livelier by adding auditory effects like ‘meow’ or ‘clap’. For example, a ‘meow’ sound can make a cat sprite feel more real, while a ‘clap’ sound can celebrate success or an achievement in the project.
● Conclude the session by summarising that Sound blocks are used to control sound. In Scratch, there are nine Sound blocks like ‘play sound until done’, ‘start sound’, ‘stop all sounds’, ‘clear sound effects’, ‘change volume by ()’, etc.
● Assign the following questions from the Chapter Checkup given at the end of the chapter as homework.
A. Fill in the Blanks: Questions 1 and 2
B. Tick the Correct Option: Questions 1, 2, 3, and 4
C. Who Am I?: Questions 1, 2, and 3
D. Write T for True and F for False: Question 1
E. Answer the Following Questions: Questions 1, 2, and 3
At the end of the session, the students will be able to:
● use Sound blocks in a project.
● duplicate scripts.
Let the students watch the video or the learning slides related to the topic on the digital panel.
Demonstrate to the students how to use Sound blocks in a project. Also, explain to them how to duplicate the script.
Attempt the activity on the Assignment page. Conclude the concepts. Assign homework.
● Instruct the students to go to Tekie’s Digital platform and open a Lab session on Finalising the Project.
● Show the learning slides or the video and discuss the concepts shown on the panel.
Explain the following concepts:
Learning Outcomes
Use Sound blocks in a project.
Explanation
Explain to the students how to finalise a project using Sound blocks, as given on pages 36, 37 and 38.
Duplicate scripts. Explain to the students how to duplicate a script, as given on pages 38 and 39. Coding Challenge Ask the students to attempt the Coding Challenge, as given on page 40.
● Ask the questions provided on the slides, one by one, to assess the students’ understanding. Discuss the answers to the questions with the students. If necessary, ask additional, relevant questions.
● Instruct the students to click on the Start practice button on the Assignment page to attempt the activity. Then, click on the Attempt button to open the activity page.
● Instruct the students to click on the Confirm button to submit their work once they complete the activity.
● Conclude the session by summarising how to use various Sound blocks and duplicate the script.
● Assign the additional activity, given on the panel, to the students as homework.
● Assign the following questions from the Chapter Checkup given at the end of the chapter as homework.
A. Fill in the Blanks: Questions 3 and 4
C. Who Am I?: Question 4
D. Write T for True and F for False: Questions 2, 3, and 4
E. Answer the Following Questions: Question 4
F. Apply Your Learning: Question 1
Chapter Checkup
A. Fill in the Blanks.
1. Abacus 2. ENIAC 3. Vacuum Tubes 4. Integrated Circuits 5. Artificial Intelligence
B. Tick () the Correct Option.
1. a. Magnetic core memory 2. b. Third generation 3. a. Python 4. a. Charles Babbage 5. d. Multitasking
C. Who Am I?
1. Charles Babbage 2. First generation 3. Pascaline 4. Leibniz 5. ENIAC
D. Write T for True and F for False.
1. T 2. T 3. T 4. T 5. F
E. Answer the Following Questions.
1. The abacus is one of the earliest counting devices. It was a wooden frame divided into two parts. Both the parts have rods on which the beads move and are used for basic mathematical calculations.
2. Pascaline is the first mechanical and automatic calculator. It is also called the Arithmetic Machine or Adding Machine. It was invented between 1642 and 1644 by Blaise Pascal, a French mathematician and philosopher. It can perform only addition and subtraction.
3. Fifth generation computers use Artificial Intelligence (AI) and Machine Learning (ML) as their main technologies.
4. Characteristics of computers are speed, accuracy, storage, automatic operation, multitasking, and communication.
5. Some of the key limitations of computers are:
a. Computers cannot think like humans.
b. Maintenance cost
c. Lack of emotional intelligence
F. Apply Your Learning.
1. Abacus and Pascaline
2. Napier’s Bones
3. Charles Babbage, Abacus
4. Memory
5. Multitasking
Chapter Checkup
A. Fill in the Blanks.
1. computers 2. Amazon 3. email 4. wi-fi 5. netiquette
B. Tick () the Correct Option.
1. c. Google Classroom
2. b. Cellular
3. a. Blind Carbon Copy
4. c. Netflix
5. b. To browse the internet
C. Who Am I?
1. Online Shopping 2. Bcc (Blind Carbon Copy) 3. Wi-Fi 4. Microblogging platforms 5. netiquette
D. Write T for True and F for False.
1. F 2. T 3. F 4. T 5. F
E. Answer the Following Questions.
1. The internet is a huge network of millions of computers connected worldwide. It allows communication and the sharing of information.
2 Two popular apps for online shopping are Amazon and Flipkart.
3. a. Cc: The full form of Cc is Carbon Copy. In this case, all the recipients can see to whom you have sent the same message.
b. Bcc: Bcc stands for Blind Carbon Copy. In this case, every recipient will get the message but will not be able to know who the other recipient of the same message are.
4. Two common video conferencing apps are Google Meet and Zoom.
5. Netiquette is important because it helps create a positive and respectful online environment. By following netiquette principles, individuals can communicate politely, avoid misunderstandings, and maintain privacy and safety. It encourages kindness, prevents harmful behavior like bullying and spamming, and ensures thoughtful and considerate interactions.
F. Apply Your Learning.
1. To send a picture to your friend using email, you will use the attachment feature.
2. Raima should use video conferencing.
3. The CC (Carbon Copy) field in the email shows this information.
4. Shailja must use the social media platform.
5. Lovey must use online forums.
Chapter Checkup
A. Fill in the Blanks.
1. grid 2. rows, columns 3. vertical 4. adjacent
B. Tick () the Correct Option.
1. b. Click on the Insert menu.
2. c. Dividing a cell into smaller parts.
3. c. To make the table visually appealing and stand out.
4. c. By adjusting the row height value in the Table properties pane.
C. Who Am I?
1. Format 2. Column 3. Column width 4. Border
D. Write T for True and F for False.
1. F 2. F 3. T 4. F
E. Answer the Following Questions.
1. The intersection of a row and a column is called a cell.
2. A row is a horizontal arrangement of cells or boxes that runs from left to right. On the other hand, a column is a vertical arrangement of cells or boxes that run from top to bottom.
3. Two methods to open the Table properties pane are: Method 1:
a. Right-click on any cell of your table.
b. Select the Table properties option. The Table properties pane will appear.
Method 2:
Select the Format menu Table Table properties option from the menu bar.
4. The Border dash option is used to change the type of border of a table.
F. Apply Your Learning.
1. Do it yourself.
2. Do it yourself.
3. Do it yourself.
4. Do it yourself.
5. Merging cells.
Chapter Checkup
A. Fill in the Blanks.
1. Menu 2. Themes 3. Apply layout 4. Columns 5. Master
B. Tick () the Correct Option.
1. c. Speaker notes 2. a. To change the design of the presentation 3. b. Slide menu
4. b. Displaying information neatly in rows and columns 5. a. Bar Chart
C. Who Am I?
1. Slideshow Button 2. Themes Pane 3. Insert menu 4. Diagrams 5. Line Chart
D. Write T for True and F for False.
1. T 2. F 3. F 4. F 5. F
E. Answer the Following Questions.
1. Three Presentation applications are: Canva, PowerPoint, Google Slides.
2. Slide Navigation Pane is a place where you can see thumbnails or miniature images of all the slides of your presentation.
3. Themes are special design layouts for your slides. They make the presentation look colourful and interesting whereas layouts determine how your content, such as titles, text, and images is organised on your slide.
4. The Edit theme option is present in the Slide menu.
5. A pie chart represents data using ‘Slices’ of a whole circle. The size of each ‘slice’ shows how much value that specific ‘slice’ holds.
F. Apply Your Learning.
1. To make her presentation on her favourite book look good, Shaina can use features like different themes, background colours, layouts, fonts and add relevant images or icons.
2. Himank should use the ‘Table’ feature in Google Slides to organise information about animals’ names, habitats and diets in rows and columns.
3. Vamika can use the ‘Slideshow Button’ in Google Slides to showcase pictures of various sports in full-screen mode during her school’s annual sports day.
4. Komal should use the Master Slide feature. For this, she must select the ‘Edit theme’ option in the ‘Slide’ menu to ensure that a specific image, such as a planet, appears consistently on all the slides in her presentation on the solar system.
5. Saharsh can click and drag the slides in the sidebar to change the order in which the slides were arranged for his presentation on famous monuments around the world.
Chapter Checkup
A. Fill in the Blanks.
1. objects 2. animation 3. slide transition 4. on click 5. audios, videos
B. Tick () the Correct Option.
1. b. Slide 2. b. Sound is attached to the presentation 3. a. Click on Insert → Animation
4. a. Click on Insert → Audio 5. a. Upload an audio to Google drive
C. Who Am I?
1. Animation 2. Transition 3. Audio 4. Duration 5. Apply to all slides
D. Write T for True and F for False.
1. F 2. F 3. F 4. T 5. F
E. Answer the Following Questions.
1. Animation is a process through which you can bring still objects, such as text, shapes, images, charts, logos, etc., ‘to life’ by making them move. Animation is a great tool by which you can make your presentation lively and engaging. It enables you to control the flow of information presented or convey processes and alterations with greater efficiency. It also helps you connect with your audience in a better way.
2. Yes, you can add animations to both text and objects in a presentation.
3. A slide transition provides visual effects that take place when one slide changes to another during a presentation. To view the transition effect, click on the Play button.
4. You can add videos from YouTube and Google Drive.
5. The purpose of adding a video to a presentation is to make it more engaging, informative, and visually appealing. Videos can help explain complex concepts, provide real-life examples, capture the audience’s attention, and enhance the overall understanding of the topic being presented.
F. Apply Your Learning.
1. Siya should use animations in her presentation.
2. Rita should use transitions in her presentation.
3. Raju should use the Duration options - ‘Medium’ or ‘Fast’ to increase the speed.
4. Yes, Suman can add that video in her presentation from YouTube.
5. Preeti should use the option of ‘Apply to all slides’ from the Motion Pane.
Chapter Checkup
A. Fill in the Blanks.
1. Columns 2. Formula 3. share 4. autosave 5. name box
B. Tick () the Correct Option.
1. d. By renaming the Untitled spreadsheet 2. c. Sheets tab 3. a. Rows
4. c. It displays a cloud icon with a check mark 5. a. The X button
C. Who Am I?
1. Cell 2. Menu bar 3. Ctrl + Home 4. Down arrow key 5. Active cell
D. Write T for True and F for False.
1. F 2. T 3. F 4. F 5. F
E. Answer the Following Questions.
1. A spreadsheet is a digital table that helps you organise and work with numbers, data and information in a neat and structured way.
2. Some advantages of using Google Sheets are:
● Google Sheets allows multiple people to work on the same spreadsheet at the same time.
● Google Sheets can be accessed from any computer worldwide.
● Google Sheets offers Smart Fill and Autocomplete features which means it can help you complete words in your spreadsheet.
● Google Sheets automatically saves your work.
3. Components of Google sheet are:
a. Spreadsheet title b. Row c. Column d. Cell e. Name box f. Active cell
g. Menu bar h. Toolbar i. Formula bar j. Sheet tabs k. Share button
4. The horizontal group of cells in a spreadsheet is called rows. Rows are numbered 1,2,3 and so on whereas a column is a vertical group of cells denoted by letters. These letters range from A to Z, followed by AA, AB through to AZ and so on.
5. Two methods to move around in a spreadsheet are:
● Using a mouse- Click the cell directly.
● Using a keyboard- You can use various key combinations to move around.
F. Apply Your Learning.
1. Google Sheets
2. A4
3. Autosave
4. Yes. Google Sheets will help Mishi and Richa organise their study schedule and work on it together. They can use it to keep track of subjects, study times, and progress easily.
5. Arrow (up, down, left, right) key.
Chapter Checkup
A. Fill in the Blanks.
1. Ctrl + A 2. text 3. undo 4. Copying 5. Enter
B. Tick () the Correct Option.
1. d. All of these
2. d. Cell
3. d. Ctrl+Z
4. b. Reverse the action of Undo
5. a. Shift + (up and down) arrow keys
C. Who Am I?
1. Ctrl+A 2. Cut and Paste 3. Copy and Paste
4. Custom date and time option 5. Delete
D. Write T for True and F for False.
1. T 2. T 3. T 4. T 5. F
E. Answer the Following Questions.
1. You can delete the content in the cell in two ways:
a. Select the cell and right-click on it. Select the ‘Delete cells’ option from the context menu. Now, select any option from the Delete cells menu, i.e., ‘Delete cells and shift left’ or ‘Delete cells and shift up’ options. b. You can also delete cells by pressing the Delete key on the keyboard.
2. You can select multiple cells at the same time using the Shift + (Up and Down) Arrow keys. Or to select multiple cells using the mouse, click on the first cell and drag your mouse over the cells to be selected. Release the mouse button.
3. When you enter a number as text in a cell, the spreadsheet program treats it as text, not a number. This means it cannot be used for calculations, and it will be left-aligned in the cell by default.
4. Ctrl+ X (Cut) and Ctrl+ V (Paste) are two shortcut keys which are involved in moving the cell data.
5. Copying cell data means making an exact duplicate of data. The shortcut key to do the same is Ctrl + C (Copy) and then Ctrl + V (Paste). Whereas, moving data in a spreadsheet refers to the process of relocating data from one cell or range of cells to another. The shortcut key to move data is Ctrl + X (Cut) and Ctrl + V (Paste).
F. Apply Your Learning.
1. Deleting the cell data/Undo
2. Format menu
3. Ctrl+ X and then Ctrl+ V
4. By deleting the cell data which consist of wrong input and typing the correct data.
5. By using Undo option
Chapter Checkup
A. Fill in the Blanks.
1. Artificial Intelligence 2. computer vision 3. John Mccarthy 4. Google Lens
B. Tick () the Correct Option.
1. d. All of these
2. c. Computational Power
3. a. Data
4. b. Alexa
5. a. Computer Vision
C. Write T for True and F for False.
1. T 2. T 3. F 4. T
D. Answer the Following Questions.
1. Artificial Intelligence (AI) can be defined as a branch of computer science concerned with creating intelligent machines that can learn from data, solve problems, and make decisions.
2. Natural Language Processing (NLP) is a domain of AI that enables computers to understand human language and generate appropriate responses when we interact with them.
3. Computer Vision is a domain of AI which uses cameras to see and understand visual information.
4. Data is a collection of raw facts that can be transformed into useful information. It can be in the form of text, images, audio, or video.
F. Apply Your Learning.
1. Computer Vision
2. Her father can explain that Computer vision enables self-driving cars to perceive and understand their surroundings, identifying objects like pedestrians, traffic signs, and other vehicles to navigate autonomously.
3. Natural Language Processing (NLP).
Chapter Checkup
A. Fill in the Blanks.
1. Sprite 2. Backdrops library 3. Scratch 4. Stop sign 5. Sprites pane
B. Who Am I?
1. Coding 2. Blocks palette 3. Event category 4. Scratch 5. Coding area
C. Explain the Function of the Icon.
1. when (green flag) clicked – It is an Event category block. It helps the script run when the green flag is clicked.
2. Choose a Backdrop Button – The Choose a Backdrop button helps you add backgrounds to your projects.
3. Costumes – This tab allows you to customise and edit the costumes of your sprites or backdrops.
4. create clone of (myself) – This block allows you to create a clone (copy) of the sprite on the stage.
5. next costume – This block allows you to change the next costume (pose) of the sprite.
D. Write T for True and F for False.
1. T 2. F 3. T 4. T 5. F
E. Answer the Following Questions.
1. Scratch 3.0 is an application program that lets you create your games, stories, and animations.
2. The Sprites Pane contains details about sprites, including name, size, and location.
3. To add a sprite to a project, the Choose a Sprite option is used.
4. The coding area is the area where you assemble coding blocks to create scripts and make your sprites perform actions.
5. To duplicate a costume in Scratch for a sprite, follow the given steps:
● Click on the sprite you want to duplicate a costume for in the Sprites pane.
● Select the Costumes tab.
● Click the costume to select it.
● Right-click the selected costume. A context menu appears.
● In this menu, click duplicate, and a copy of the costume is created.
F. Apply Your Learning.
1. Do it yourself.
2. Follow the given steps to choose a background:
● Click on the Choose a Backdrop button in the bottom right corner of the interface.
● Select Choose a Backdrop
● The Choose a Backdrop dialog box opens. You can scroll through the library to find the ‘forest’ backdrop.
● Click the backdrop. The selected backdrop appears on the stage.
3. To duplicate a costume in Scratch for a sprite, follow the given steps:
● Click on the sprite you want to duplicate a costume for in the Sprites pane.
● Select the Costumes tab.
● Click the costume to select it.
● Right-click the selected costume. A context menu appears.
● In this menu, click duplicate, and a copy of the costume is created.
4. Tanu can use the created clone of (myself) block to add the same sprite five times.
5. To change the background while your project is running, you can use special code blocks to do it.
● Drag the when clicked block from the Events category.
● Drag the next backdrop from the Looks category and snap it below the when clicked block.
A. Fill in the Blanks.
1. store 2. Variables 3. say 4. Looks
B. Tick () the Correct Option.
1. c. Variable block 2. c. Two 3. a. show 4. b. switch costume to costume2
C. Who Am I?
1. say () for () seconds 2. set my variable to () 3. change size by () 4. switch backdrop to ()
D. Write T for True and F for False.
1. F 2. F 3. T 4. F
E. Answer the Following Questions.
1. 1. Variable blocks are the blocks that help a computer store a value that can be changed throughout a project.
2. Two types of variables can be created in scratch: Numeric Variable and String Variable.
3. The Looks block category contains various blocks that are used to change the looks of the sprite and to make the sprite say something. This category of blocks is used to create dialogues in the game or the project.
4. The given block is used to set the value of a variable.
5. Switch costume to: Changes the sprite’s costume to the specified one. Next costume: Change the sprite’s costume to the next one in the costume list.
F. Apply Your Learning.
1. Variable blocks are the blocks that help a computer store a value that can be changed throughout a project. The different types of values that can be stored in a variable are Numeric and Textual or String.
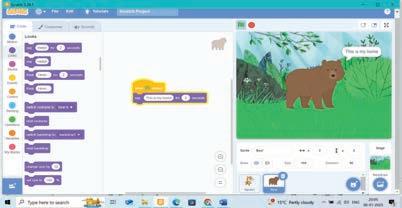

Chapter Checkup
A. Fill in the Blanks.
1. decisions 2. user’s response 3. four 4. add
B. Tick () the Correct Option.
1. c. 2. b. Operators 3. a. Forever 4. c. answer
C. Who Am I?
1. ask and wait 2. if-then-else 3. wait() seconds block 4. repeat()
D. Write T for True and F for False.
1. T 2. F 3. T 4. T
E. Answer the Following Questions.
1. The blocks from the Control category allow a program to perform a test based on a given condition and then take actions based on the result of that test.
2. If block is used to check the given condition. If the condition is true, the blocks inside the if-then block are executed; if it is false, the blocks are not executed. Whereas, if-else block is an extension of the if-then block. If the given condition is true, then the blocks inside the if-then section are executed. If the condition is false, then the blocks inside the else part are executed.
3. Ask and wait block displays a message or a question for the user and waits for their input.
4. Equal to block returns true when the two numbers are equal; it returns false when they are not equal.
F. Apply Your Learning.
1. Events 2. Motion 3. ask and wait 4. 5.
Chapter Checkup
A. Fill in the Blanks.


1. start sound 2. Sound 3. Sensing 4. Choose a Sound
B. Tick () the Correct Option.
1. c. Nine 2. b. play sound until done 3. c. Sound 4. c. Add music or sound effects.
C. Who Am I?
1. start sound block 2. set volume to () 3. ‘Choose a Sound’ option in the ‘Sounds’ tab
4. duplicate
D. Write T for True and F for False.
1. F 2. F 3. F 4. T
E. Answer the Following Questions.
1. Sound blocks are used to control sound.
2. (i) play sound until done
(ii) start sound
(iii) stop all sounds
(iv) clear sound effects
(v) change volume by ()
3. ‘Play sound block’ plays a sound and pauses the script until the sound is finished.
4. Follow the given steps to duplicate a script. i. Right-click on the block that you want to duplicate.
ii. Select the Duplicate option to copy the code.
iii. Drag the mouse and click where you want to paste the duplicated code.
F. Apply Your Learning.
1. Events
2. Control
3. go to random position
4. wait (2) seconds
5. Events
6. start sound
7. change my variable by (1)
A. Fill in the Blanks.
1. Pascaline 2. Radio 3. Row height 4. Layout
B. Tick () the Correct Option.
1. d. Napier’s bones 2. b. Cellular 3. b. Shift + Tab 4. c. Change appearance of entire presentation
C. Write T for True and F for False.
1. T 2. T 3. F 4. F
D. Answer the Following Questions.
1. After ENIAC, John Mauchly and J. Presper Eckert developed the Universal Automatic Computer (UNIVAC) and delivered it to the Census Bureau on March 31, 1951. It is one of the earliest commercial computers. It replaced the punch card accounting machines. It was the fastest machine developed in its time.
2. The full form of Cc is Carbon Copy. In this case, all the recipients can see to whom you have sent the same message. Whereas, Bcc stands for Blind Carbon Copy. In this case, every recipient will get the message but will not be able to know who the other recipient of the same message are.
3. Merging cells is combining two or more cells in a table to create a single, larger cell. Merging cells in a table can help you combine information and create headings, improving the clarity and organisation of the table.
4. Modifying themes in a presentation is important because it allows you to customise the presentation to look exactly the way you want it to by changing colours, fonts, effects, and background styles.
E. Apply Your Learning.
1. This is possible in the fifth generation of computers. This generation focuses on Artificial Intelligence.
2. Manu must use the Bcc (Blind Carbon Copy) feature of Gmail.
3. Rama must increase the column width of the cells.
A. Fill in the Blanks.
1. On click 2. Spreadsheet 3. Undo 4. Artificial Intelligence (AI)
B. Tick () the Correct Option.
1. c. .mp3 2. b. cells 3. d. Google Slides 4. c. Ctrl + A
C. Write T for True and F for False.
1. F 2. T 3. T 4. T
D. Answer the Following Questions.
1. Undo helps you to cancel the effect of the last action that you performed. The shortcut key to use the Undo feature is Ctrl +Z. Whereas, Redo helps when you want to reverse the action of the Undo command. The shortcut key to use the Redo feature is Ctrl + Y.
2. The Autosave feature of Google Sheets ensures that your data is saved automatically without needing to save it repeatedly. This keeps your data safe and prevents loss of work.
3. Moving data in a spreadsheet refers to the process of relocating data from one cell or range of cells to another. The shortcut key to move data is Ctrl + X (Cut) and Ctrl + V (Paste). Whereas, copying cell data means making an exact duplicate of data. The shortcut key to do the same is Ctrl + C (Copy) and then Ctrl + V (Paste).
4. Computer vision enhances home security through video surveillance by monitoring in real-time, detecting suspicious activities, recognising faces, and sending alerts about potential threats to homeowners or authorities.
E. Apply Your Learning.
1. Ayushi can move the data to another spreadsheet by using the Cut and Paste feature. She can select the cells with the temperatures, cut them, open the other spreadsheet, and paste the data into the desired location.
2. Mayra must use Google Sheets, as it is free to use and does not require any license fee.
3. Domain of AI that assists researchers in the medical field to analyse massive datasets is Data Science.
4. Happy should use the Animations feature in Google Slides to add visual effects to elements on his slides.
A. Fill in the Blanks.
1. Coding 2. Looks 3. Join 4. start sound
B. Tick () the Correct Option.
1. b. Stage 2. c. show 3. a. Comparison
C. Write T for True and F for False.
1. T 2. F 3. T 4. T
D. Answer the Following Questions.
1. Coding area is where you assemble coding blocks to create scripts and make your sprites perform actions. It is also known as the scripts area.
2. Variable blocks are the blocks that help a computer store a value that can be changed throughout a project. Variables can be used to store numbers and text.
3. The pick random number block is used to choose random numbers between the smallest and largest numbers (including those numbers).
E. Apply Your Learning.
1. Akshit should follow these steps to duplicate a sprite in Scratch:
a. In the Sprites pane, click the sprite you want to duplicate.
b. Right-click the sprite, which opens a menu.
c. Select the duplicate option to create a copy of the selected sprite.
2. Ana should follow these steps to animate a sprite in Scratch:
a. Click on the Events category and drag the when clicked block.
b. Click on the Looks category and drag the next costume block, snapping it below the when clicked block.
c. Click the green flag button to see the sprite change its costume with every click.
3. Rohit must use the Sound blocks. He may use the play sound until done or start sound blocks.
ROBOTICS (ABot Kit)
Experiment 1: Bot Movements Using Motor Control
A. Tick the Correct Option.
1. b. Workspace
2. a. True
3. b. Right
B. Answer the Following.
1. The Time delay function is used to suspend the execution of a program for a particular time.
2. The blocks in the Motor category are used to control the direction and speed of the bot’s motors.
C. Apply Your Learning.
1. The bot movement can be seen in automated cleaning robots.
2. Without the “Repeat while” block, the bot will not keep moving continuously.
Experiment 2: Draw Shapes
A. Tick () the Correct Option.
1. a. ON
2. a. Forward
3. a. Control
B. Answer the Following.
1. The robot needs to turn four times to make a square.
2. Yes, loop helps to reduce repeated steps.
C. Apply Your Learning.
1. No, since the repeat while loop is an infinite loop, and we cannot restrict it to four times.
2. This code can be used in robotic path tracing applications like floor-cleaning robots.
Experiment 3: Edge Avoider
A. Tick () the Correct Option.
1. b. High
2. c. Motor
3. a. My Program
B. Answer the Following.
1. Variables are used to store information to be referenced and manipulated in a computer program.
2. An infrared (IR) sensor is an electronic device that measures and detects infrared radiation in
its surrounding environment. Everything around us, including our bodies and objects, gives off heat in the form of infrared radiation. Warmer objects emit more infrared radiation than cooler ones. In the IR sensor, the sensor state is high when a reflective object is in front of it. Black or dark-coloured objects do not reflect the IR rays.
C. Apply Your Learning.
1. If the Time block is not added after the Move Motor at block, the motor will keep running indefinitely without any pause, which may cause the bot to react incorrectly to sensor inputs.
2. The Edge Avoider concept is commonly used in automatic vacuum cleaners, which prevent falling from stairs or edges by detecting surfaces.
A. Tick the Correct Option.
1. a. When it is pressed or touched
2. c. Math
3. b. The sensor will not detect the object near it
B. Answer the Following.
1. The IR sensor state get “high” when a reflective object is detected.
2. The “and” operator block is used to check if two conditions are true at the same time. The program executes the action inside the block only if both conditions are true.
C. Apply Your Learning.
1. Touch sensors are used in ATMs and elevators.
2. If the IR sensor value is greater than 400, the sensor detects an object, and the bot stops.
A. Tick the Correct Option.
1. b. It stores the sensor reading from the right IR sensor.
2. a. Forward
B. Answer the Following.
1. Click on “Create Variable” button. A pop-up box appears. Enter a suitable variable name. Click on the OK button.
2. The If block checks conditions and controls bot movement accordingly.
C. Apply Your Learning.
1. If both IR sensors detect a black line, the bot stops.
2. Swap motor directions in the code.
Experiment 6: Dancer Car
A. Tick () the Correct Option.
1. b. To track the number of times the touch sensor is pressed
2. c. Delay between actions
B. Answer the Following.
1. The condition count == 3 stops both motors, making the bot halt its movement.
2. Changing the LED color helps identify if the bot is following the correct steps during execution.
C. Apply Your Learning.
1. To add a fourth unique action when count == 4, create another else if block, set a new motor movement, and adjust the LED display accordingly.
2. Increasing the Time block delay to 2000 milliseconds will make the bot respond more slowly to the touch sensor.
Maker Board
Experiment 1: Calculator
A. Tick () the Correct Option.
1. b. If button
2. a. Math
3. d. W
B. Answer the Following.
1. The D button is used for multiplication in this program.
2. The variables “Num1” and “Num2” are set using the set Num1 to and set Num2 to blocks from the Variables category.
C. Apply Your Learning.
1. Calculators are used in billing systems and mobile apps.
2. To display the result of addition in a different color, use the show number block and select a color from the color palette.
A. Tick () the Correct Option.
1. a. To set the pin as either input or output
2. c. Continuously check conditions
3. d. LEDs 1 and 2
B. Answer the Following.
1. The If button block checks which button is pressed and executes the respective LED pattern.
2. The LED Matrix pattern changes with each button press by using different show pattern blocks.
C. Apply Your Learning.
1. Blinking LEDs are observed in traffic signals and emergency indicators.
2. To turn off all LEDs and patterns when no button is pressed, use an else block and set all LED pins to Low.
A. Tick () the Correct Option.
1. d. Both a and b (Palm and Fist)
2. b. To improve the model’s accuracy in predicting the type of hand posture
3. b. Microphone
B. Answer the Following.
1. When the AI detects a palm hand posture, the LEDs on the Maker Board light up.
2. To observe the output on the Maker Board, connect it to the computer via USB, run the AI model, and allow microphone access if using speech recognition. Then, test hand gestures or voice commands, and observe the LEDs lighting up based on the detected input.
C. Apply Your Learning.
1. A voice command can be integrated by using speech recognition to control the LED circuit.
2. The model detects “None” as input when no valid hand gesture is recognized.
This answer key has been designed for schools who have opted for the Robotics course.
Experiment 1: Bot Movements Using Motor Control
A. Tick () the Correct Option.
1. a. My Program
2. b. step by step
3. a. Both motors clockwise
B. Answer the Following.
1. To turn the bot to the right, configure the motor at Port4 and Port3 as Anticlockwise and add a delay of 1100 ms by adding a Time block.
2. The “Repeat while” block is used to repeat a set of instructions continuously while a condition is true.
C. Apply Your Learning.
1. A moving robot can be seen in daily life in automatic vacuum cleaners, delivery robots, and toy cars.
2. If the “Repeat while” block is not used, the bot will not continue moving indefinitely and will stop after completing one movement.
Experiment 2: Draw Shapes
A. Tick () the Correct Option.
1. b. stop robot for time
2. a. 4
3. a. To draw shapes
B. Answer the Following.
1. The default value of the “set pen” block is ON.
2. The “stop robot” block is required to stop the motors.
C. Apply Your Learning.
1. Yes, other shapes can be drawn by changing movement and turn values in the code using count loop. Example, rectangle shape.
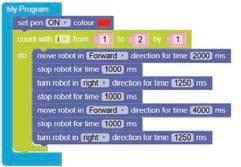
2. No, this code cannot be created using the “Repeat while” loop as it is an infinite loop, and we cannot restrict it to run only four times.
However, this code can be created using the “count” block, which is also a loop block.
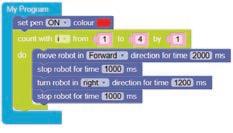
A. Tick the Correct Option:
1. c. Sets the sensor state to HIGH
2. c. If block
B. Answer the Following:
1. Variables store values that can change during the program execution.
2. The “If” block checks conditions and executes commands accordingly.
C. Apply Your Learning:
1. To program a robot to avoid puddles, the IR sensor can be used to detect changes in surface reflection. When the robot moves forward, the IR sensor reads the surface. If the reflection value is lower than a set threshold, it indicates a puddle. The robot then stops, moves backward, and turns left or right to avoid the puddle. After changing direction, the robot resumes moving forward.
2. If the robot’s IR sensor detects an edge, it means there is no surface below to reflect the infrared light. To program it to stop and turn safely, the IR sensor value is continuously checked. If the sensor value drops below a set threshold, the robot stops immediately. Using the “if” block, the program ensures the robot reacts quickly to avoid falling off edges.
A. Tick the Correct Option:
1. c. More
2. b. Touch
3. c. Display
B. Answer the Following:
1. The “and” operator block checks if both conditions are true before executing a command. If even one condition is false,
the action will not run. Whereas, the “or” operator block checks if at least one condition is true. If either condition is true, the action will execute.
2. An infrared (IR) sensor is an electronic device that measures and detects infrared radiation in its surrounding environment. Whereas, touch sensor works like a push button or a limit switch. It simply gets triggered when it is touched or pressed.
C. Apply Your Learning:
1. If the sensor car moves on the road, it may face challenges like uneven surfaces, bright light affecting sensor readings, moving obstacles, and slippery roads. These issues can impact navigation and require proper sensor calibration for better performance.
2. Yes, the sensor car can be used in self-driving vehicles to detect obstacles and navigate safely. It is also useful in automated warehouse robots for transporting goods while avoiding collisions.
A. Tick the Correct Option:
1. b. Greater than 400
2. d. Stops
B. Answer the Following:
1. Two IR sensors help track the line more precisely.
2. “RightIR” and “LeftIR” store the sensor values to determine movement.
C. Apply Your Learning:
1. If the bot detects a white line with only the right IR sensor, it means the bot is drifting off the path. To stay on the line, the bot should turn left by stopping the right motor and moving the left motor forward (clockwise).
2. To make the bot turn left only when the left IR sensor detects the black line, use an “if” block to check if the left IR sensor value is less than the threshold. If true, set the left motor to stop and the right motor to move forward by configuring: Left motor as stop and right motor as Clockwise (forward).
A. Tick () the Correct Option.
1. b. To use touch sensors to make the robot perform dance moves
2. b. To continuously check if the touch sensor is pressed
3. b. It keeps track of the number of times the touch sensor is pressed
B. Answer the Following.
1. To attach the motors and wheels to the chassis:
Step 1: Attach axles to the motors.
Step 2: Screw motors to the chassis.
Step 3: Add wheels and secure with axle locks.
2. The “if” and “else if” conditions create different dance moves by checking the number of times the touch sensor is pressed and executing a specific set of motor movements.
C. Apply Your Learning.
1. To add a fourth dance move, modify the program by adding another “else if” condition checking if the count equals 4 and assigning new motor movements.
2. To stop the robot after a set number of touches, include a condition to reset the count to 0 after a specific number of inputs.
A. Tick the Correct Option:
1. a. Sensor
2. c. IR_Sensor
3. a. The blocks under the else block
B. Fill in the Blanks:
1. 5 2. Left
3. Math 4. High
C. Apply Your Learning:
1. Paper shredders in offices help in document disposal.
2. Shredding helps prevent identity theft and protects privacy.
A. Tick the Correct Option:
1. c. Create a lift mechanism to lift and drop objects
2. c. A touch sensor
3. b. Track the number of touches detected
B. Answer the Following:
1. In the Construction Site Lift experiment, the touch sensor is used to detect user input and control the lift’s movement.
2. The motor is controlled based on the touch sensor input. When the touch sensor is pressed, the motor rotates in one direction to lift the object. When the sensor is released, the motor stops. If the sensor is pressed again, the motor rotates in the opposite direction to drop
the object. This setup ensures smooth and controlled movement of the lift.
C. Apply Your Learning:
1. A motor and pulley system is useful in elevators, where motors pull the cabin up and down using strong cables and pulleys. It is also used in cranes to lift heavy materials at construction sites.
2. To increase the lift speed after 10 touches, modify the program by adding an “if” block to check if the count variable is greater than 10. If true, set the motor speed to High; otherwise, keep it at Medium. This ensures the lift moves faster after multiple touches.
Experiment 9: Construction Site Lift AI
A. Tick the Correct Option:
1. b. AI
2. b. Get recognised speech
3. d. Palm
B. Answer the Following:
1. The lift stops when no hand gesture is detected.
2. NLP converts speech to text for command execution.
C. Apply Your Learning:
1. Add a “Stop” voice command to pause the lift.
2. Without “None,” the bot would not reset when no hand is detected.
Experiment 1: Calculator
A. Tick () the Correct Option.
1. b. If button
2. a. Math
3. d. W
B. Answer the Following.
1. The D button is used for multiplication in this program.
2. The variables “Num1” and “Num2” are set using the set Num1 to and set Num2 to blocks from the Variables category.
C. Apply Your Learning.
1. Calculators are used in billing systems and mobile apps.
2. To display the result of addition in a different color, use the show number block and select a color from the color palette.
Experiment 2: Blinking of LEDs
A. Tick () the Correct Option.
1. a. To set the pin as either input or output
2. c. Continuously check conditions
3. d. LEDs 1 and 2
B. Answer the Following.
1. The If button block checks which button is pressed and executes the respective LED pattern.
2. The LED Matrix pattern changes with each button press by using different show pattern blocks.
C. Apply Your Learning.
1. Blinking LEDs are observed in traffic signals and emergency indicators.
2. To turn off all LEDs and patterns when no button is pressed, use an else block and set all LED pins to Low.
Experiment 3: Blink LED AI
A. Tick () the Correct Option.
1. d. Both a and b (Palm and Fist)
2. b. To improve the model’s accuracy in predicting the type of hand posture
3. b. Microphone
B. Answer the Following.
1. When the AI detects a palm hand posture, the LEDs on the Maker Board light up.
2. To observe the output on the Maker Board, connect it to the computer via USB, run the AI model, and allow microphone access if using speech recognition. Then, test hand gestures or voice commands, and observe the LEDs lighting up based on the detected input.
C. Apply Your Learning.
1. A voice command can be integrated by using speech recognition to control the LED circuit.
2. The model detects “None” as input when no valid hand gesture is recognized.
This answer key has been designed for schools who have opted for the Robotics Plus course.
This teacher manual has been designed to implement Tekie, the storytelling-based Coding and Computer Science program. The manual consists of lesson plans within each chapter that teachers transact within classrooms and computer labs. Each lesson is based on a research-based ‘WEBS’ framework that simplifies pedagogical practices for teachers and enables them to deliver effectively.
• Sharp Lesson Planning: Each lesson plan focuses on specific sub-learning outcomes within a chapter and are designed for delivery within the stipulated class or lab time.
• Real-life and Application-based Questions: Additional questions that link Computer Science to real-life contexts and assist teachers to develop learners’ conceptual understanding and application skills.
• Support and Detailed Solutions: In-depth solutions for in-class and post-class activities to reinforce learning.
Uolo partners with K-12 schools to provide technology-enabled learning programs. We believe that pedagogy and technology must come together to deliver scalable learning experiences that generate measurable outcomes. Uolo is trusted by over 15,000+ schools across India, Southeast Asia, and the Middle East.
ISBN 978-81-984882-4-4