Academic Authors: Ayushi Jain, Neha Verma
Creative Directors: Bhavna Tripathi, Mangal Singh Rana, Satish
Book Production: Rakesh Kumar Singh
Project Lead: Jatinder Kaur
VP, Learning: Abhishek Bhatnagar
All products and brand names used in this book are trademarks, registered trademarks or trade names of their respective owners.
© Uolo EdTech Private Limited
First impression 2023
Second impression 2024
Third impression 2025
This book is sold subject to the condition that it shall not by way of trade or otherwise, be lent, resold, hired out, or otherwise circulated without the publisher’s prior written consent in any form of binding or cover other than that in which it is published and without a similar condition including this condition being imposed on the subsequent purchaser and without limiting the rights under copyright reserved above, no part of this publication may be reproduced, stored in or introduced into a retrieval system, or transmitted in any form or by any means, electronic, mechanical, photocopying, recording or otherwise, without the prior written permission of both the copyright owner and the above-mentioned publisher of this book.
Book Title: Tekie Computer Science Teacher Manual 8
ISBN: 978-81-984882-9-9
Published by Uolo EdTech Private Limited
Corporate Office Address:
85, Sector 44, Gurugram, Haryana 122003
CIN: U74999DL2017PTC322986
Illustrations and images: www.shutterstock.com, www.stock.adobe.com and www.freepik.com
All suggested use of the internet should be under adult supervision.
Uolo’s Tekie program offers a coding-focused curriculum for grades 1 to 8, preparing students for the technology-driven world. We present a carefully crafted Teacher Manual to assist teachers in delivering effective and engaging lessons to students. Rather than prescribing teaching methods, the manual provides examples and demonstrates how and why teachers can apply these examples in their classes.
The Teacher Manual includes a suggested implementation plan to help teachers navigate the curriculum better throughout the academic year. Within the academic year, the Tekie program prescribes the following types of chapters and sessions:
Familiarisation: this period builds familiarity with the Tekie program and the digital platform.
Theory: these periods are dedicated to the Computer Science Theory chapters. These topics are mostly delivered in the classroom.
Tools: these periods are dedicated to the Computer Tools chapters. These topics involve almost equal numbers of classroom and computer labs sessions.
Coding: these periods are dedicated to the Coding chapters. These topics have more computer lab sessions.
Additional Hands-on Time: these are additional computer lab periods that teachers can use to revise topics or dedicate for completion of projects.
Revision: these are additional classroom periods that teachers can use to revise topics or cover syllabus backlogs.
Each chapter in this manual is structured to provide a comprehensive lesson plan. The chapters are divided into multiple sessions, each following the Warm up, Engage, Build, and Sum up (WEBS) strategy. The Warm up phase sets the stage for learning by connecting to prior knowledge and building curiosity. The Engage phase captures the students’ attention and motivates them to participate actively. In the Build phase, questions from various sections are discussed to build the understanding of the students. Finally, the Sum up phase reinforces learning through easy-to-recall activities and questions. Time duration for each section has been suggested based on the requirements of the students. Additionally, an answer key for every chapter is provided to assist teachers in assessing their students’ understanding and guiding their learning effectively.
Lastly, we understand that the Indian education landscape is quite diverse. To suit the needs of all types of schools, we have built-in extra higher-order chapters in the content books. These extra chapters are clearly marked in the table of contents of this manual. We suggest that the teacher completes the main chapters first and then move to higher-order optional chapters only if there is sufficient time left in the academic year and learners are ready for more challenging content.
We hope that this teacher manual will empower teachers to use the curriculum effectively, support the learning of all students thoroughly, create learning opportunities and design interactive learning environments that cater to the students’ needs and interests.
1 Networking Fundamentals�������������� 1
Introduction to Computer Networks
Network Terminologies and Devices
Types of Computer Networks and Topologies
Network Architectures and Protocols
Shared Drive and Network Security
2 Cyber Ethics and Safety ������������������ 12
Introduction to Cyber Ethics and Unethical Practices
Online Safety Measures
Digital Footprints and Digital Citizenship
3 Introduction to Blockchain������������ 20
Introduction and Working of Blockchain
Cryptocurrency: A Blockchain Case Study
4 Let Us Develop Apps ����������������������� 26
Introduction to Apps and Accessing Apps
Classification of Mobile Apps
Developing an App
5 New and Emerging Technologies �� 34
AR, VR, and Metaverse
Robotics, 3D Printing, Biotechnology, Brain Computer Interfaces, and Generative AI
6 Introduction to Database Management System ��������������������� 41
Databases and DBMS 1
Databases and DBMS 2
Structured Query Language 1
Structured Query Language 2
More SQL Queries 1
More SQL Queries 2 7 Video Editing in Canva�������������������� 55
Canva 1
Canva 2
AI and Data Science
Fun with AI: Rock, Paper, Scissors
Applications of Data Science
Fun with AI: Using AI Story Generator
NLP and Its Applications
MIT App Development
Introduction to Python, Data Types, and Variables
Operators
Conditional Statements
lterative Statements 2 Strings in Python����������������������������� 88
Strings
String Manipulation in Python 3 Lists and Tuples in Python
Lists Tuples
Basics of HTML
Basic Tags of HTML
Understanding CSS
How to Use CSS in a Web 5 Creating Forms in
Creating Forms in HTML 1
Creating Forms in HTML 2 6 Inserting Multimedia in
Adding Images and Creating Links
Inserting Audio and Video in a Web page

31
Video Editing in Canva Canva 3
46 Ch-7 Video Editing in Canva Canva 4
47 Ch-8 AI: Data Science AI and Data Science
48 Ch-8 AI: Data Science Fun with AI: Rock, Paper, Scissors
49 Ch-8 AI: Data Science Applications of Data Science
52 Ch-5 Creating Forms in HTML* Creating Forms in HTML 1 Coding Lab
53 Ch-3 Introduction to Blockchain* Introduction and Working of Blockchain
54 Ch-5 Creating Forms in HTML* Creating Forms in HTML 2
55 Ch-3 Introduction to Blockchain* Cryptocurrency: A Blockchain Case Study
56 Ch-9 AI—Natural Language Processing* Fun with AI: Using AI Story Generator Theory Lab
57 Ch-9 AI—Natural Language Processing* NLP and Its Applications
58 Ch-9 AI—Natural Language Processing* The MIT App Inventor
59 Revision 6
60 Additional Hands-on Time 6
In the magical world of Avora, three friends—Mel, Conji, and Eva—discover that the Magical Garden is trapped in endless winter due to a dark spell cast by Lord Ero. Fairy Joy, under the spell, reveals that Ero has hacked the magical network to control all magic in Avora. The trio seeks guidance from the Elders, who explain that Ero exploited magical technologies, similar to how hackers manipulate systems.
To stop him, they visit the Space Centre, a hub of magical knowledge, where they learn about blockchain and cybersecurity to secure the fairy network. However, Ero initiates his attack, forcing the trio to use a time-travel spell to prevent his rise. They design an app to track Ero, encrypt their magic, and build protective firewalls, paralleling digital security measures.
In a final showdown, they confront Ero, learning he is the estranged son of the Elder Wizard, driven by bitterness. With teamwork, courage, and their understanding of magic and technology, they defeat Ero, restore balance, and revive the Magical Garden. The story highlights the ethical use of power and the importance of responsibility in both magic and technology.
● Mel, Conji and Eva enjoy the amazing morning breeze in Avora.
● Conji suggests visiting the Magical Garden where they can meet Joy.
● The colours are missing from Magical Garden and it is too cold when they reach.
● They feel that something terrible has happened with Joy and the Magical Garden.
● Suddenly Mel saw a letter stating that the magical garden and the network of fairies had fallen under Lord Ero’s spell. Joy was hidden in a safe place to restore the magical network of fairies.
● Mel was surprised when she heard the term “magical network of fairies”.
● Conji told Mel that the magical network of fairies is a way fairies communicate with each other.
● But Conji is confused about computer networks.
● Mel explains the computer network to Conji.
5.
At the end of the session, the students will be able to:
● describe computer networks and their need.
● describe the uses of computer networks.
● explain the advantages and disadvantages of computer networks.
Keywords
● Computer network: A way to connect computers using communication devices so that they can exchange data and resources with each other.
● Server: A central computer in a network in which data is stored.
Ask the students how roads are connected to form a network.
Explain the concept of computer networks, the need of computer networks, the uses of computer networks, the advantages and disadvantages of computer networks. Group discussion Conclude the concepts
Assign homework
● Ask the students how roads are connected to form a network.
● Just like road networks, computers can also be connected to form a computer network.
● Now, build the concept that a computer network is a way to connect computers using communication devices so that they can exchange data and resources with each other.
Explain the following concepts:
Describe computer networks and their need.
Describe the uses of computer networks.
Explain the advantages and disadvantages of computer networks.
Tell the students that a computer network is a way to connect computers using communication devices so that they can exchange data and resources with each other. Also, tell the need for a computer network, as given on pages 5 and 6.
Tell the students that computer networks are used for different purposes in our daily lives like file sharing, resource sharing, communication, etc., as given on pages 6 and 7.
Tell the students that computer networks are beneficial to us in many ways but also have some disadvantages, as given on pages 7 and 8.
● Read aloud the questions provided in the Do It Yourself 1A section and encourage students to solve them. Instruct them to write the answers in the book.
Correct Responses:
1. Resource sharing is the use of a computer network to allow multiple users or devices to share a single resource, such as a printer.
2. Through file sharing
3. One scanner is sufficient since computer networks allow resource sharing.
● Conduct a group discussion in the class among students on the topic ‘Benefits of resource sharing in a computer network’.
Possible Responses: Cost savings, resource optimisation, etc.
● Conclude the session by summarising that a computer network is a way to connect computers using communication devices so that they can exchange data and resources with each other. It has many uses such as file sharing, communication, database access, data backup, etc. Also, tell the students about various advantages and disadvantages of computer networks.
● Assign the following questions from the Chapter Checkup given at the end of the chapter as homework.
A. Fill in the Blanks: Questions 1 and 4
B. Tick the Correct Option: Questions 1, 2, and 3
C. Write T for True and F for False: Question 4
D. Answer the Following Questions: Question 2
E. Apply Your Learning: Questions 4 and 5
At the end of the session, the students will be able to:
● describe network terminologies.
● explain network devices.
Keywords
● Node: A device in a computer network which is used to send or receive data.
● Packet: A unit of data or information that is transferred over a network.
● Bandwidth: The amount of data or information that can be transmitted over the internet or network.
● Hub: A networking device that transmits the received information to and from all the devices on the network.
● Router: It is a device which routes the data or information over a network.
Ask the students about the devices at home which are connected to a network. Explain about terminologies and devices associated with computer networks.
Group discussion
Conclude the concepts
homework
5 mins
Warm Up
● Ask the students about the devices at home which are connected to a network.
● Now, build the concept that there are different devices used within a computer network. Some networking devices are network interface card (NIC), hub, switch, router, etc.
Explain the following concepts:
Describe network terminologies.
Explain to the students the various network terminologies, such as node, link, packet, protocol, etc., as given on page 9.
Explain network devices. Tell the students that computer network devices are hardware components that are required for computers to communicate with one another over the network. Also tell them about the various network devices such as the Network Interface Card (NIC), Modem, Hub, etc., as given on pages 9 and 10.
● Read aloud the questions provided in the Do It Yourself 1B section and encourage students to solve them. Instruct them to write the answers in the book.
Correct Responses:
1. a. Modem b. Ethernet networking cable
2. NIC, Modem, Hub, Switch, etc.
Build
● Conduct a group discussion in the class among students on the topic ‘Role of a modem in modern communication systems’.
Possible Response: A modem enables data transmission by converting digital signals into analog signals for travel over communication lines and vice versa. This ensures seamless connectivity between digital devices and networks.
● Conclude the session by summarising that there are various network terminologies, such as node, link, packet, protocol, etc. Also, tell them that computer network devices are hardware components that are required for computers to communicate with one another over the network.
● Assign the following questions from the Chapter Checkup given at the end of the chapter as homework.
B. Tick the Correct Option: Question 5
C. Write T for True and F for False: Question 3
D. Answer the Following Questions: Question 3
At the end of the session, the students will be able to:
● explain different types of computer networks.
● describe various types of network topologies.
Keywords
● Wireless network: A type of Local Area Network (LAN) that uses wireless communication technology to connect various devices.
Ask students if they have heard about any type of network before.
Explain to the students about types of computer networks and topologies.
● Topology: The configuration of how computer systems or network devices are connected to one another is known as a topology. 5 mins
Think and Tell Group discussion
Conclude the concepts
Assign homework 5 mins 15 mins 7 mins 3 mins
Action Plan
Warm Up
● Ask students if they have heard about any type of network before.
● Now, build the concept that there are different types of networks, which are categorised according to the geographical area they cover. They are PAN, LAN, MAN, and WAN.
Engage
Explain the following concepts:
Learning Outcomes
Explain different types of computer networks.
Describe various types of network topologies.
Explanation
Tell the students that there are different types of networks, which are categorised according to the geographical area they cover. Also, tell them about the wireless network, as given on page 11.
Tell the students that a topology is a physical and logical layout of different devices (nodes) and connections in a network. Also, explain its different types, as given on pages 12 and 13.
● Read aloud the questions provided in the Do It Yourself 1C section, Question 2 and encourage students to solve them. Instruct them to write the answers in the book.
Correct Response:
a. PAN b. LAN c. MAN d. WAN
Build
7 mins
● Ask the students to answer the question “Which type of network will you recommend in your school to share hardware devices?” asked in the Think and Tell section on page 12.
Correct Response: LAN
● Conduct a group discussion in the class among students on the topic “How is a tree topology better than a ring topology?“ as mentioned in the Discuss section on page 13.
Possible Responses: In tree topology, nodes are connected in a parent-child hierarchical manner. Whereas, in ring topology, the nodes are connected forming a ring. Therefore, tree topology provides more flexibility and scalability by allowing multiple paths and avoiding a single point of failure. But in ring topology, if any one node fails, the entire network will fail.
● Conclude the session by summarising that computer networks are of many types, such as PAN, LAN, MAN, WAN and wireless. Also, revise with them about different topologies of computer networks such as bus, star, ring, tree, and mesh topology.
● Assign the following questions from the Chapter Checkup given at the end of the chapter as homework.
A. Fill in the Blanks: Questions 2 and 3
B. Tick the Correct Option: Question 4
C. Write T for True and F for False: Questions 1, 2, and 5
D. Answer the Following Questions: Questions 1, 4, and 5
E. Apply Your Learning: Questions 1, 2, and 3
At the end of the session, the students will be able to:
● discuss types of network architecture.
● discuss network protocols.
Keywords
● Server: A computer in a network which has all the resources and provides services to other computers.
● Clients: The computers in a network which use services provided by the server.
● Network protocol: A set of rules which governs the communication between the computers over a network.
Warm Up Engage Build Sum Up
Ask the students how computers are connected within a network.
Explain the concept of network architecture and network protocols to the students.
Group discussion Conclude the concepts
Assign homework
5 mins
Warm Up
● Ask the students how computers are connected within a network.
● Now, build the concept by introducing students to the types of network architectures: peer-to-peer and client-server architectures.
15 mins
Engage
Explain the following concepts:
Learning Outcomes
Discuss types of network architecture.
Explanation
Tell the students about peer-to-peer architecture and client-server architecture used to design networks, as given on pages 13 and 14.
Discuss network protocols.
Tell them that network protocol is a set of rules which governs the communication between the computers over a network and explain some of the network protocols, as given on pages 14 and 15.
● Read aloud the questions provided in the Do It Yourself 1C section, Question 1 and encourage students to solve them. Instruct them to write the answers in the book.
Correct Response:
Ask the following additional questions to the students to check their understanding:
● Give one example of peer-to-peer architecture.
Possible Response: Bitcoin is an example of P2P architecture.
● Ritu has sent a file to her friend using a network. Which protocol would be used in this situation?
Possible Response: FTP
Build
● Conduct a group discussion in the class among students on the topic ‘Client-server architecture’.
Correct Responses: In this architecture, one or more nodes serve as a server and all other nodes behave as clients.
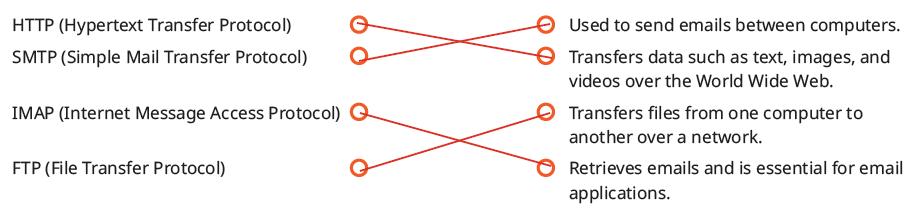
● Conclude the session by summarising the two types of network architectures, i.e., peer-to-peer architecture and client-server architecture that are used to design networks. Also, revise the different internet protocols: TCP/IP, HTTP, FTP, SMTP, and IMAP.
● Assign the following questions as homework.
■ What are clients in a client-server architecture?
Correct Response: The computers which use services provided by the server are known as clients.
■ Shreya is searching for some information on the internet. Which protocol would be used in this situation?
Correct Response: HTTP
■ What is the full form of IMAP?
Correct Response: Internet Message Access Protocol Sum Up
At the end of the session, the students will be able to:
● store and share a file on Google Drive.
● describe some security measures to secure a network.
Keywords
● Google Drive: A virtual space where you can save and share files.
● Firewall: A network security device that monitors and filters incoming and outgoing network traffic based on an organisation’s previously established security policies.
Ask the students how they share their school notebooks to complete the work.
Ask the students how they secure themselves from bacteria and infections.
Explain the concept of shared drive and network security. Group discussion Conclude the concepts
Assign homework
Action Plan
Warm Up
● Ask the students how they share school notebooks to complete the work.
● Ask the students how they secure themselves from bacteria and infections.
● Now, build the concept that Google Drive is a virtual space where we can save our files and share them with others.
● Also tell them that because of security breaches on the network, it is necessary to use some network security measures.
Explain the following concepts:
Describe how to access a file from a shared drive.
Describe some security measures to secure a network.
Tell the students that they can share their data with other users even if they are living in a very faraway place through Google Drive. Tell them how to store and share a file on Google Drive, as given on pages 15 to 17.
Tell students that because of security breaches on the network, it is necessary to use some network security measures. Discuss safe online practices, as given on page 18.
Ask the following questions to the students to check their understanding:
● Tom wants to share some photos with his friend. Where can he share the photos?
Possible Response: He can use Google Drive to share photos.
● Name some antiviruses.
Possible Responses: AVG, Quick Heal, Norton, McAfee, Avast, etc.
Build
7 mins
● Conduct a group discussion in the class among students on the topic ‘Safe Online Practices’.
Possible Responses: Clear browser cookies, remove unknown or unwanted applications, regularly update all applications and software, etc.
3 mins
Sum Up
● Conclude the session by summarising that students can share their data with other users even if they are living in a very faraway place through Google Drive. Revise how to store and share a file on Google Drive. Also, tell them that a firewall is a network security device that monitors and filters incoming and outgoing network traffic. Discuss some of the safe online practices also.
● Assign the following from the Chapter Checkup given at the end of the chapter as homework.
A. Fill in the Blanks: Question 5
Additional questions
● Can a receiver of the file shared via Google Drive edit the file?
Correct Response: Yes, if permission is given.
● What are some examples of firewalls?
Possible Responses: Sophos Firewall, Check Point Firewall, pfSense Plus, WatchGuard, etc.
● Why are antiviruses necessary?
Correct Response: Computers are vulnerable to attacks or viruses when they are connected to a network. Therefore, it is necessary to install antivirus software on the computer system.
In the magical world of Avora, three friends—Mel, Conji, and Eva—discover that the Magical Garden is trapped in endless winter due to a Dark Spell cast by Lord Ero. Joy, under the spell, reveals that Ero has hacked the magical network to control all magic in Avora. The Trio seeks guidance from the Elders, who explain that Ero exploited magical technologies, similar to how hackers manipulate systems. To stop him, they visit the Space Centre, a hub of magical knowledge, to locate an ancient magical spell that can counter Lord Ero’s Dark Magic. There, they learn about blockchain and cybersecurity to secure the fairy network. However, Lord Ero initiates his attack, forcing the Trio to use a time-travel spell to prevent his rise. They design an app to track him and encrypt their magic. In a final showdown, they confront Ero, learning he is the estranged son of Elder Wizard, driven by bitterness. With teamwork, courage, and their understanding of magic and technology, they defeat Lord Ero, restore balance, and revive the Magical Garden. The story highlights the ethical use of power and the importance of responsibility in both magic and technology.
● The Trio reaches the Council Room, seeking help to find their missing fairy friend, Joy.
● Elder Wizard welcomes them, noticing their worried expressions.
● Conji explains that Joy has gone missing, and the Magical Garden is stuck in winter.
● Eva shares that Joy left behind a mysterious riddle as their only clue.
● Elder Wizard finds it strange that Joy couldn’t use her magic to prevent winter.
● Mel reveals that a Dark Spell has affected the fairies' magical network, likely due to Lord Ero’s interference.
● Elder Wizard deduces that Lord Ero hacked the secure network by stealing a secret password.
● Mel highlights the breach as a serious violation of cyber ethics, leaving Conji confused about its meaning.
● Elder Robot stresses the need to uncover how Lord Ero gained access and why he did it.
● Elder Wizard emphasizes the urgency of restoring the fairies’ magical network to prevent the winter from spreading across Avora.
● Conji asks for an explanation of cyber ethics, and Mel offers to explain its importance in using technology responsibly.
This chapter is divided into the following classroom sessions
1. Introduction to Cyber Ethics and Unethical Practices
2. Online Safety Measures
3. Digital Footprints and Digital Citizenship
At the end of the session, the students will be able to:
● explain cyber ethics.
● describe some key aspects of cyber ethics.
● beaware of different problems in achieving cyber ethics.
● describe some unethical practices.
Keywords
● Cyber ethics: The study of appropriate behaviour and moral principles in the digital sphere is known as cyber ethics.
● Cyberbullying: It refers to using the internet to harass, scare, or hurt people.
● Phishing: It is a dishonest internet practice in which attackers pretend to be reliable organisations and trick people into disclosing personal information.
Ask the students which ethics they follow in their lives. Explain the concept of cyber ethics and unethical practices.
● Ask the students which ethics they follow in their lives.
● Now, build the concept that you must follow some ethics while working on the computer which are known as cyber ethics, also referred to as internet ethics or online ethics.
Explain the following concepts:
Explain cyber ethics. Discuss with the students that the study of appropriate behaviour and moral principles in the digital sphere is known as cyber ethics, also referred to as internet ethics or online ethics, as given on page 27.
Describe some key aspects of cyber ethics.
Explain to them that these ethical principles are essential to ensure responsible and ethical conduct in the use of technology and the online environment, as given on pages 27 and 28.
Aware of different problems in achieving cyber ethics. Tell them about some issues in achieving cyber ethics, as given on page 28.
Describe some unethical practices.
Identity theft happens when someone pretends to be someone else. He/she does this often to steal money, data, or other important information, like credit card details, bank details, etc. This can really hurt people, causing them emotional and financial problems.
Describe some unethical practices that are prevalent in society these days, like cyberbullying, cyberstalking, plagiarism, phishing, hacking, spamming, and identity theft, as given on pages 28 to 30.
● Read aloud the question provided in the Do It Yourself 2A section and encourage the students to solve the questions. Instruct the students to write the answers in their book.
Correct Responses:
Match the following.
Spamming
Pretending to be a reliable source in order to trick others into disclosing their passwords or personal information.
Phishing Sending emails or messages that are meaningless and unnecessary.
Identity theft When an unauthorised person tries to access a computer system, a network, or data.
Hacking Stealing someone’s personal information to commit fraud.
● Pihu is working on the computer. Which cyber ethics should she follow to be a responsible user of the technology?
Possible responses: Privacy Safeguards, Online Behaviour, Digital Security, Bridging the Digital Divide, and Accountability.
Online safety measures are safeguards and behaviour designed to keep your security, privacy, and personal information safe when using the internet. Here are some important tips for online safety:
● Rohan, a school teacher, wants to implement cyber ethics in his school. What possible problems he may face in achieving this?
Possible Responses: Restriction, Interpretation, Enforcement, Anonymity, and Evolving Technology.
Use Secure Passwords: Create strong, challenging passwords for each of your accounts and change them frequently. Use a combination of symbols, numbers, and letters.
● Naina has copied Ranbir’s content without his permission and represented it as her creation. Is she following unethical practices?
Possible Response: Yes, copying someone’s content without permission is called plagiarism.
Phishing Alert: Be wary of emails, messages, or websites that request private data, such as passwords or credit card numbers. Before sharing any personal information, make sure the sender or website is genuine.
Regularly Update Software: Update your operating system, antivirus program, and other programs on a regular basis. Security fixes are frequently included in software updates.
Use Secure Wi-Fi: Avoid accessing sensitive accounts or disclosing personal information when using public Wi-Fi networks.
Protect Personal Information: Exercise caution while disclosing personal information on websites and social media. Do not disclose too much personal information to the public.
● Conduct a group discussion in the class among students on the topic “Think of issues on which people might disagree regarding online behaviour”, as given in the Discuss section on page 28.
Possible Responses: Privacy, Cyberbullying, Online Harassment, Freedom of Speech, Intellectual Property, etc. are some issues on which people might disagree regarding online behaviour.
● Conduct a group discussion in the class among students on the topic “Is it ethical to copy any data for your project from the internet?”, as given in the Discuss section on page 29.
Possible Responses: Copying data from the internet without the permission of the creator is an unethical practice.
● Conclude the session by summarising that the study of appropriate behaviour and moral principles in the digital sphere is known as cyber ethics, also referred to as internet ethics or online ethics. These ethical principles are essential to ensure the responsible and ethical conduct in the use of technology and the online environment. Also, describe some issues in achieving cyber ethics, such as restrictions, interpretation, enforcement, anonymity, and evolving technology.
● Assign the following questions from the Chapter Checkup given at the end of the chapter as homework.
A. Fill in the Blanks: Questions 1, 2, 3, 4, and 5
B. Tick the Correct Option: Questions 2, and 4
C. Who Am I?: Questions 1, 3, and 4
D. Write T for True and F for False: Questions 1, 2, and 5
E. Answer the Following Questions: Questions 1, 4, and 5
F. Apply Your Learning: Questions 1, 2, 3, 4, and 5
At the end of the session, the students will be able to:
● explain some online safety measures.
Keyword
Ask the students if they have ever shared their personal information online.
● Online safety measures: These refer to safeguards and behaviours designed to keep your security, privacy, and personal information safe when using the internet. 5
Warm Up
Explain online safety measures to the students.
Think and Tell Conclude the concepts Assign homework
● Ask the students: Have you ever shared your personal information online?
● Now, build the concept that you should follow some online safety measures to be safe while working on the internet.
Explain the following concepts:
Learning Outcome
Explanation
Explain some online safety measures. Discuss with the students that online safety measures are safeguards and behaviours designed to keep your security, privacy, and personal information safe when using the internet, as given on pages 30 to 32.
Ask the Additional Questions to the students to Check for Understanding:
● Name some online safety measure that you should follow.
Possible response: Use secure passwords, regularly update softwares, use secure wifi, etc.
● Mahi wants to set a strong password for her email account. What should she do to make the password strong?
Possible Responses: She can use a combination of symbols, numbers, and letters to make the password strong.
● Ask the students to answer the question “What measures should you follow while shopping online?”, asked in the Think and Tell section on page 32.
Possible Responses: Use secure passwords, shop from trusted websites, beware of phishing scams, use secure payment methods, protect personal information, etc., are some security measures that should be followed.
● Conclude the session by summarising that online safety measures are safeguards and behaviours designed to keep your security, privacy, and personal information safe when using the internet.
● Assign the following questions from the Chapter Checkup given at the end of the chapter as homework.
B. Tick the Correct Option: Question 1
E. Answer the Following Questions: Question 3
At the end of the session, the students will be able to:
● describe digital footprints.
● describe digital citizenship.
Keywords
● Digital footprints: It is an online activity trail which may include everything you do online, like sending emails, publishing on social media, and even just surfing websites.
● Digital citizenship: The term used to describe the ethical and responsible use of technology is known as digital citizenship.
Ask the students if they have ever noticed that the things they search for on the internet appear as advertisements while scrolling through social media apps.
Explain digital footprints and digital citizenship to the students.
● Ask the students if they have ever noticed that the things they search for on the internet appear as advertisements while scrolling through social media apps.
● Now, build the concept by telling them about digital footprints.
Explain the following concepts:
Learning Outcomes
Describe digital footprints.
Explanation
Tell them that your digital footprint reveals where you have been online, just like your footprints in the sand do, as given on page 33.
In India, when someone writes a book, creates music, or makes art, their work is protected by copyright. This protection lasts for their whole life, and then an additional 60 years. If there are many authors, it lasts for 60 years after the last author passes away.
Describe digital citizenship. Explain to them that by engaging in good digital citizenship, we help create a more secure and civilised online community for everyone, as given on page 33.

● Read aloud the question provided in the Do It Yourself 2B section and encourage the students to solve the questions. Instruct the students to write the answers in their book.
Correct Responses:
Tick () the activity that will contribute to the digital footprint:
Shopping for a school bag
Posting a comment on a friend's picture on social media
Watching a movie on television
Searching for a topic on the internet
Talking to a friend over the phone
● What are some examples of a digital footprint?
The study of appropriate behaviour and moral principles in the digital sphere is known as cyber ethics, also referred to as internet ethics or online ethics.
Possible Responses: Social media posts, online shopping, emails, search history, online comments and reviews are some examples of digital footprint.
While using the internet, you have to be very careful and respect others’ privacy.
● Hina is posting some offensive messages on her social media account. What would you suggest to her about this action?
Using the internet to harass, scare, or hurt people is referred to as cyberbullying.
Cyberstalking is the practice of constantly following someone’s online activity, mostly with the intention of frightening or upsetting them.
Possible Response: To be a good digital citizen, she should avoid posting any kind of offensive or dangerous material on social media.
or getting
and trick information. people, often to make
When someone copies another person’s ideas, work, or content without giving proper credit or getting permission, it is called plagiarism.
Phishing is a dishonest internet practice in which attackers pretend to be reliable organisations and trick people into disclosing personal information, such as passwords or financial information.
● Conduct a group discussion in the class among students on the topic “Examples of Digital Citizenship”. Possible Responses: Respecting others, privacy protection, use reliable sources, online etiquette.
Hacking involves unauthorised access to computer systems, networks, or devices.
Spamming refers to sending lots of unwanted and annoying messages to many people, often to make money or promote something.
● Conclude the session by summarising that an online activity trail is what a digital footprint looks like. It includes everything you do online, including sending emails, publishing on social media, and even just surfing websites. Digital citizenship is the term used to describe the ethical and responsible use of technology.
● Assign the following questions from the Chapter Checkup given at the end of the chapter as homework.
11/24/2023 6:53:53 PM
B. Tick the Correct Option: Questions 3 and 5
C. Who Am I?: Questions 2 and 5
D. Write T for True and F for False: Questions 3 and 4
E. Answer the Following Questions: Question 2
In the magical world of Avora, three friends—Mel, Conji, and Eva—discover that the Magical Garden is trapped in endless winter due to a Dark Spell cast by Lord Ero. Joy, under the spell, reveals that Ero has hacked the magical network to control all magic in Avora. The Trio seeks guidance from the Elders, who explain that Ero exploited magical technologies, similar to how hackers manipulate systems. To stop him, they visit the Space Centre, a hub of magical knowledge, to locate an ancient magical spell that can counter Lord Ero’s Dark Magic. There, they learn about blockchain and cybersecurity to secure the fairy network. However, Lord Ero initiates his attack, forcing the Trio to use a time-travel spell to prevent his rise. They design an app to track him and encrypt their magic. In a final showdown, they confront Ero, learning he is the estranged son of Elder Wizard, driven by bitterness. With teamwork, courage, and their understanding of magic and technology, they defeat Lord Ero, restore balance, and revive the Magical Garden. The story highlights the ethical use of power and the importance of responsibility in both magic and technology.
● The Trio arrives at the spaceship, excited to visit the Space Centre where magic and technology were first combined.
● Conji mentions the honour of being among the few to visit the Outer Space.
● As they approach the spaceship door, they find it locked with an advanced screen requiring access.
● Mel explains that the lock prevents Dark Wizards from entering and is guarded by a combination of magic and technology.
● Suddenly, the Space Station is struck by lightning, and they realize Lord Ero has begun his attack on Avora.
● Eva asks if there is a special key to unlock the door, and Mel reveals it is connected to Blockchain Technology, which requires permission to access.
● Conji casts PROTECTO to stop the lightning storm, buying them time.
● Eva and Conji express confusion about Blockchain Technology and how to gain permission.
● Mel explains that Blockchain Technology secures systems by storing unique identities, and they need to prove their identities to access the spaceship.
● Seeing their confusion, Mel offers to explain Blockchain Technology further.
This chapter is divided into the following classroom sessions
1. Introduction and Working of Blockchain
2. Cryptocurrency: A Blockchain Case Study
At the end of the session, the students will be able to:
● describe blockchain.
● explain the features of blockchain.
● explain the working of blockchain.
● explain the challenges of blockchain.
Keyword
● Blockchain: The technology that stores information in the form of blocks connected through a chain one after another.
Ask the students if they have worked on a shared document. Explain the meaning of the term blockchain and its features. Explain to them about the workings and challenges of blockchain.
Group discussion Think and Tell
Conclude the concepts Assign homework
Warm Up
● Ask the students if they have worked on a shared document. Then, explain to them that if they make any changes to the document, it will be visible to all.
● Relate the concept of Blockchain technology so that it also works in the same manner.
Engage
Explain the following concepts:
Explanation
Describe blockchain. Describe to the students that blockchain helps computers to keep important information safe by connecting the pieces of information together in a way that is hard to cheat. Give examples to communicate the correct meaning of the given terms, as given on page 43.
Explain the features of blockchain. Tell the students that there are many features of blockchain. Explain the meaning of each feature of blockchain, like decentralisation, security and immutability, transparency, user privacy, and security. Discuss the various features of blockchain, as given on page 44.
Explain the workings of blockchain.
Explain the challenges of blockchain.
Explain the step-by-step process of buying and selling artwork using blockchain. Describe the working mechanism of blockchain to the students by explaining the example, as given on pages 44 to 46.
Describe the challenges of blockchain technology, as given on page 46.
● Read aloud the questions provided in the Do It Yourself 3A section and encourage the students to solve the questions. Instruct the students to write the answers in their book.
Correct Responses:
1. c. A decentralised digital book of records
2. a. F
b. T
c. F
d. F
3. No, because once information is added to a block in the blockchain, it cannot be changed without everyone knowing.
1. What is a block in blockchain technology?
2. Explain the meaning of “Blockchain is transparent in nature.”
Correct Responses:
1. A blockchain is a decentralised database that keeps an ever-expanding collection of organised records known as blocks. These blocks are interconnected through cryptography.
2. Blockchain technology is transparent in nature as information is not hidden from the user.
7 mins
Build
● Conduct a group discussion in the class among the students based on the topic “What would happen if one or two individuals of the group could add details in the diary that were not accurate?” provided in the Discuss section on page 43.
Possible Response: The accuracy and integrity of the diary’s information would be compromised, leading to potential misinformation or confusion.
● Ask the students to answer the question “What information is so important on the agreement that the blockchain should not allow any party to change it? ” asked in the Think and Tell section given on page 45.
Possible response: The blockchain ensures critical information like ownership, transactions, or contracts remains immutable to maintain trust and security.
● Conclude the session by summarising that blockchain technology is used to keep the information safe from the hands of the intruders. There are many features of blockchain technology, as it is decentralised, secure, immutable, and transparent. Give examples to explain the workings and challenges of the blockchain to the students.
● Assign the following questions from the Chapter Checkup given at the end of the chapter as homework.
A. Fill in the Blanks: Questions 1, 2, 3, and 4
B. Tick the Correct Option: Questions 1, 2, 3, and 4
C. Who Am I?: Questions 1 and 3
D. Write T for True and F for False: Questions 1, 2, and 3
E. Answer the Following Questions: Questions 1, 2, 3, 4, and 5
F. Apply Your Learning: Questions 1, 2, and 4
At the end of the session, the students will be able to:
● describe cryptocurrency.
● describe how cryptocurrency works on the blockchain.
Keyword
● Cryptocurrency: It is a purely digital or virtual currency that can work as a medium to exchange.
Ask the students if they can recall what blockchain technology is and the challenges that can be faced while using it. Explain the students what cryptocurrency is. Describe how cryptocurrency works on the blockchain. Group discussion Conclude the concepts Assign homework
● Ask the students if they can recall what blockchain technology is and the challenges that can be faced while using this technology. Tell the students that cryptocurrency is an application of blockchain technology.
Explain the following concepts:
Learning Outcomes
Explanation
Describe cryptocurrency. Tell the students about the INR as the national currency of India. Explain the difference between cryptocurrency and normal currency. Describe cryptocurrency to the students, as given on page 47.
Describe how cryptocurrency works on the blockchain.
Describe how to implement cryptocurrency using blockchain technology. Explain how buying and selling using cryptocurrency is different from the usual or traditional method, as given on pages 47 to 49.
● Read aloud the questions provided in the Do It Yourself 3B section and encourage the students to solve the questions. Instruct the students to write the answers in their book.
Correct Responses:
1. Cryptocurrency: Digital currency that works on blockchain.
Bitcoin: A famous example of cryptocurrency.
Traditional currency: Physical coins and banknotes used for buying.
2. Similarities:
● Both traditional currencies and cryptocurrencies can be used to buy goods and services.
● They both have value and can be exchanged for other currencies or assets.
Differences:
● Traditional currencies are regulated by governments but cryptocurrencies are decentralised.
● Traditional currency transactions go through banks, whereas, cryptocurrency transactions are recorded on a public ledger.
7 mins
Build
● Conduct a group discussion in the class on the topic “Importance of Cryptocurrency”.
Possible Response: Cryptocurrency replaces the traditional banking method for buying and selling of products.
3 mins
● Conclude the session by summarising that blockchain technology is very important, and its application is cryptocurrency which ditches the traditional banking system, and also makes buying and selling of products easier and safer.
● Assign the following questions from the Chapter Checkup given at the end of the chapter as homework.
A. Fill in the Blanks: Question 5
C. Who Am I?: Questions 2, 4, and 5
D. Write T for True and F for False: Questions 4 and 5
F. Apply Your Learning: Question 3
In the magical world of Avora, three friends—Mel, Conji, and Eva—discover that the Magical Garden is trapped in endless winter due to a Dark Spell cast by Lord Ero. Joy, under the spell, reveals that Ero has hacked the magical network to control all magic in Avora. The Trio seeks guidance from the Elders, who explain that Ero exploited magical technologies, similar to how hackers manipulate systems. To stop him, they visit the Space Centre, a hub of magical knowledge, to locate an ancient magical spell that can counter Lord Ero’s Dark Magic. There, they learn about blockchain and cybersecurity to secure the fairy network. However, Lord Ero initiates his attack, forcing the Trio to use a time-travel spell to prevent his rise. They design an app to track him and encrypt their magic. In a final showdown, they confront Ero, learning he is the estranged son of Elder Wizard, driven by bitterness. With teamwork, courage, and their understanding of magic and technology, they defeat Lord Ero, restore balance, and revive the Magical Garden. The story highlights the ethical use of power and the importance of responsibility in both magic and technology.
● After using computational and algorithmic thinking to open the door to the spaceship, the trio of Mel, Conji, and Eva went to the Space Centre to find the ancient spell.
● The trio desperately wants to stop Lord Ero’s destructive plans.
● Conji suggests using a banned technique, time travel, to prevent Lord Ero’s actions. Despite the danger, they agree it’s their only option.
● Mel suggests using the power of the spell to develop an app to track the digital presence of the Dark Magic. Eva then asks what an app is and how it can be developed.
● Though they are unfamiliar with technology, they are willing to learn and combine magic and technology to achieve their goal.
This chapter is divided into the following classroom and lab sessions.
1. Introduction to Apps and Accessing Apps
2. Classification of Mobile Apps
3. Developing an App
At the end of the session, the students will be able to:
● discuss what an app is.
● explain different types of apps.
● access apps.
Keywords
● Apps: They are software programs or mobile applications that can be downloaded and installed on electronic devices like smartphones, tablets, and computers.
● Mobile Apps: Mobile apps are programs you install on your phone to make it more fun or helpful for whatever you want to do.
● Desktop Apps: Desktop apps are like the computer version of the apps that you use on your phone, but they are designed to work on your computer and do all sorts of things, from writing documents to playing games or editing pictures.
● Web Apps: A web app is a software application that operates on web servers and is accessed by users through web browsers over the internet.
Ask the students if they have played games on their parents’ mobile.
Explain to the students the concept of apps.
Discuss different types of apps. Tell them about different methods to access the apps.
● Ask students if they have played games on their parents’ mobile.
● Tell the students that the game they played is an app.
Explain the following concepts:
Discuss apps. Discuss with the students that an app refers to a program or software application designed to perform specific tasks or functions on a computer, smartphone, tablet, or other kinds of digital devices, as given on page 58.
Explain different types of apps.
Explain to the students about different types of apps like social networking apps, productivity apps, gaming apps, food delivery and cooking apps, as given on pages 58 to 60.
Access apps. Tell the students that they can access apps from their mobile phones, desktops, or directly from the web, as given on pages 60 to 62.
● Read aloud the question provided in the Do It Yourself 4A section and encourage the students to solve the questions. Instruct the students to write the answers in the book.
Correct Responses: Types of App Example
Social networking app

app


● Ask the students to answer the question “What are the most popular apps according to you?”, asked in the Think and Tell section on page 60.
Possible Responses: Zomato, Microsoft Word, Facebook, Google Drive, Temple Run, etc.
● Conduct a group discussion in the class among students based on the topic “Why do you think apps were invented? How do they make our lives easy?”, as given in the Discuss section on page 61.
Possible Responses: Apps were invented to provide users with convenient access to specific functionalities or services on digital devices such as smartphones, tablets, and computers. These apps make our lives easy as they can be used for playing games, accessing social media, learning, productivity, communication, and many other activities.
Sum Up
3 mins
● Conclude the session by summarising an app refers to a program or software application designed to perform specific tasks or functions on a computer, smartphone, tablet, or other kinds of digital devices. There are different types of apps like social networking apps, productivity apps, gaming apps, food delivery and cooking apps. One can access apps from their mobile phones, desktops, or directly from the web.
● Assign the following questions from the Chapter Checkup given at the end of the chapter as homework.
A. Fill in the Blanks: Questions 1 and 5
B. Who Am I?: Question 3
C. Write T for True and F for False: Questions 1 and 3
D. Answer the Following Questions: Question 3
E. Apply Your Learning: Question 4
At the end of the session, the students will be able to:
● classify mobile apps.
Keywords
● Native apps: They are specifically designed for particular types of phones, such as iPhones or Android phones.
● Hybrid apps: They can work on different types of phones and use web technologies, allowing them to work on multiple platforms and access device features.
● Educational apps: These apps are software applications designed to facilitate learning and provide educational content on various subjects and skills.
● Social networking apps: These apps are like virtual platforms where you can meet and talk to your friends and even make new ones.
● Entertainment apps: These apps are online portals for having fun and enjoyment on your phone or tablet.
● Banking apps: These apps are like a virtual bank branch on your phone or tablet.
● E-commerce apps: These are online stores on your phone or tablet.
Ask the students to name any app that they have used for entertainment. Discuss how to classify apps based on how they are created and used.
● Ask the students to name any app that they have used for entertainment.
● Relate to the concept that today we have apps for almost everything. Tell them there are educational apps, social networking apps, entertainment apps, banking apps, and e-commerce apps.
Explain the following concepts:
Classify mobile apps. Discuss with the students that the apps can be classified based on the technology used to create them, and their usage, as given on pages 63 to 65.
● Read aloud the question provided in the Do It Yourself 4B section and encourage the students to solve the questions. Instruct the students to write the answers in the book.
Correct Responses:
1. Native apps: Camera, Gallery, Clock, Maps
Hybrid apps: Uber, Zomato, Instagram, Telegram, and X (formerly known as Twitter) I use native apps the most.
2. a. Educational apps
b. Social networking apps
c. Banking apps
d. E-commerce apps
e. Entertainment apps
● Conduct a group discussion in the class among students based on the topic “How can we get hybrid apps on our phones? Is it similar to how we get the native apps?”, as given in the Discuss section on page 64.
Possible Responses: We can download hybrid apps from the app stores. Getting hybrid apps on your phone is generally similar to getting native apps.
● Conclude the session by summarising that apps can be classified based on the technology used to create them as native and hybrid. Based on their usage, apps can be classified as educational apps, social networking apps, entertainment apps, banking apps, and e-commerce apps.
● Assign the following questions from the Chapter Checkup given at the end of the chapter as homework.
A. Fill in the Blanks: Questions 2, 3, and 4
B. Who Am I?: Questions 1, and 5
C. Write T for True and F for False: Questions 2 and 4
D. Answer the Following Questions: Questions 1, 2, and 4
E. Apply Your Learning: Questions 2, 3, and 5
At the end of the session, the students will be able to:
● create an app.
● create code for the app.
● test the app.
Keyword
● MIT App Inventor: It is a visual development platform that allows users to create mobile applications for Android devices without the need to write traditional codes.
Let the students watch the video or the learning slides related to the topic on the digital panel.
Demonstrate to the students how to develop an app using MIT App Inventor.
Attempt the activity on the Assignment page.
Conclude the concepts Assign homework
Warm Up
● Instruct the students to go to the Tekie’s Digital platform and open a Lab session on Developing an app.
● Show the Learning slides one by one and discuss the concepts shown on the slides in the panel.
15 mins
Engage
Explain the following concepts:
Explanation
Create an app. Explain to the students that MIT App Inventor is a visual development platform that allows users to create mobile applications for Android devices without the need to write any traditional codes, as given on page 66. Also, demonstrate to them how to create an app, as given on pages 66 to 70.
Create code for the app.
Test the app.
Tell the students that they can create code for their app by using various blocks present in the Blocks Editor. Demonstrate to them the steps to create code for the app, as given on pages 71 and 72.
Demonstrate to them the steps to test an app, as given on pages 72 and 73.
● Read aloud the question provided in the Do It Yourself 4C section and encourage the students to solve the questions. Instruct the students to write the answers in the book.
Correct Responses:
1. Do it yourself in the Lab
7 mins
● Instruct the students to click on the Practice button on the Assignment page to attempt the activity. Then, click on the Attempt button to open the activity page.
● Instruct the students to click on the Confirm button to submit their work when they are done with the activity. Sum Up
3 mins
● Conclude the session by summarising that MIT App Inventor is a visual development platform that allows users to create mobile applications for Android devices without the need to write traditional codes. Also summarise how to create an app, create code for the app, and test the app.
● Assign the additional activity given on the panel to the students as homework.
● Assign the following questions from the Chapter Checkup given at the end of the chapter as homework.
B. Who Am I?: Questions 2 and 4
C. Write T for True and F for False: Question 5
D. Answer the Following Questions: Question 5
E. Apply Your Learning: Question 1
In the magical world of Avora, three friends—Mel, Conji, and Eva—discover that the Magical Garden is trapped in endless winter due to a Dark Spell cast by Lord Ero. Joy, under the spell, reveals that Ero has hacked the magical network to control all magic in Avora. The Trio seeks guidance from the Elders, who explain that Ero exploited magical technologies, similar to how hackers manipulate systems. To stop him, they visit the Space Centre, a hub of magical knowledge, to locate an ancient magical spell that can counter Lord Ero’s Dark Magic. There, they learn about blockchain and cybersecurity to secure the fairy network. However, Lord Ero initiates his attack, forcing the Trio to use a time-travel spell to prevent his rise. They design an app to track him and encrypt their magic. In a final showdown, they confront Ero, learning he is the estranged son of Elder Wizard, driven by bitterness. With teamwork, courage, and their understanding of magic and technology, they defeat Lord Ero, restore balance, and revive the Magical Garden. The story highlights the ethical use of power and the importance of responsibility in both magic and technology.
● Eva leaves for Avora on a spaceship.
● Mel and Conji start searching for a spell and notice strange symbols on the control panel.
● The power goes out in the Space Centre, and Conji restores it with magic.
● Conji says we need to search for how Lord Ero was able to shut down their computer from far away.
● Mel suggests Lord Ero used advanced technology to disrupt their computers from a distance.
● Conji is unaware of modern technologies and asked Mel to tell him about them.
This chapter is divided into the following classroom sessions
1. AR, VR, and Metaverse
2. Robotics, 3D Printing, Biotechnology, Brain Computer Interfaces, and Generative AI
At the end of the session, the students will be able to:
● describe new technologies.
● explain augmented reality with its uses, advantages, and disadvantages.
● explain virtual reality and its uses.
● explain metaverse and its uses.
Keywords
● Augmented Reality: AR makes your world more fun and interactive with the help of gadgets and clever computer tricks!
● Virtual Reality: Virtual reality is a technology that uses special goggles or headsets and sometimes even gloves or controllers to make you feel as if you’re inside a computer-generated environment.
● Metaverse: The Metaverse is a virtual space where people interact in real time using augmented and virtual reality technologies.
What comes to your mind when you hear the term ‘new technologies’?
Can you name a few technologies that you use every day, and how have they changed over the past few years?
Tell the students about the new technologies. Also, explain about the Augmented reality the Virtual reality and the Metaverse.
Think and Tell Group discussion
Conclude the concepts Assign homework
● What comes to your mind when you hear the term “new technologies”?
● Can you name a few technologies that you use every day, and how have they changed over the past few years?
Explain the following concepts:
Describe new technologies.
Explain augmented reality with its uses, advantages, and disadvantages.
Explain virtual reality and its uses.
Explain metaverse and its uses.
Tell the students about the innovative advancements like AR, VR, 3D Printing and Robots which have changed the way of playing and learning, as given on page 81.
Describe to the students that augmented reality uses a special device, like a smartphone or AR glass, to add cool and fun things to the real world you see around you. Tell them about its various uses, advantages and disadvantages, as given on pages 81 to 83.
Elaborate to the students that virtual reality or VR is like stepping into a whole new world without actually going anywhere. Tell them about where is VR being used, as given on pages 83 and 84.
Describe to the students that the Metaverse is a virtual space where people interact in real time using augmented and virtual reality technologies. Tell them about the uses of metaverse as given on pages 85 and 86.
● Read aloud the questions provided in the Do It Yourself 5A, Do It Yourself 5B, and Do It Yourself 5C, Question 1 sections and encourage the students to solve the questions. Instruct the students to write the answers in their book.
Correct Responses: Do It Yourself 5A
1. Gaming and Shopping
2. Screen time and Cost
Correct Responses: Do It Yourself 5B
1. a. Historical sites, planets, stars b. Landmarks, museums, cities
2. Picture a is showcasing VR, as with the headset, it feels like you’re inside a computer-generated environment. When you put on a VR headset, it covers your eyes, and you cannot see the real world anymore. Instead, you see and hear everything in the virtual world.
Correct Responses: Do It Yourself 5C
1. Metaverse is used in social interaction and gaming.
● Ask the students to give the answer to the question “What is one experience that you would like to have throughout augmented reality?”, asked in the Think and Tell section on page 82.
Possible Responses: Exploring historical landmarks and ancient civilizations as if I were actually there, with interactive overlays providing historical context and immersive storytelling.
● Conduct a group discussion in the class among the students based on the topic “Can you think of any industries or fields where the use of VR will really help flourish or where it will be particularly useful?”, provided in the Discuss section on page 84.
Possible Responses: Virtual Reality (VR) could greatly benefit industries like education by creating immersive learning experiences, and healthcare for medical training simulations, enhancing skills and knowledge in a more engaging way.
● Conclude the session by summarising that technological advancements transforms the way we play and learn. Augmented Reality (AR) employs devices like smartphones or AR glasses to add cool elements to the real world, making learning fun and engaging, although drawbacks include increased screen time, costs, and privacy concerns. Virtual Reality (VR), using special goggles or headsets, creates immersive computer-generated environments, with applications ranging from gaming and education to training, virtual tours, and architecture. These innovations bring unique experiences, offering both advantages and considerations. Also, tell them that the metaverse is a virtual space where people interact in real time using augmented and virtual reality technologies.
● Assign the following questions from the Chapter Checkup given at the end of the chapter as homework.
A. Fill in the Blanks: Questions 4 and 5
B. Who Am I?: Questions 3 and 5
C. Write T for True and F for False: Question 5
D. Answer the Following Questions: Questions 1 and 4
E. Apply Your Learning: Question 2
At the end of the session, the students will be able to:
● describe about robotics and the robots that we see every day.
● describe about 3D printing and its working.
● describe biotechnology.
● explain brain computer interfaces.
● describe generative AI.
Keywords
● Robotics: It is a field that combines technology, engineering, and creativity to make our lives easier and more efficient.
● 3D Printing: It is like a magical machine that can create real, intangible objects from a computer design.
● Biotechnology: It is a stream of science that uses living things, like cells and bacteria, to make useful things.
● Brain-computer interfaces: BCIs are like magic hats for our brains. It let our thoughts and brains talk to computers and machines.
● Generative AI: It refers to algorithms and models, particularly those based on deep learning techniques, that can create new content such as text, images, music, or even videos.
What comes to your mind when you hear the word “robot”? Can you think of any robots you’ve seen in movies, TV shows, or real life? Tell the students about Robotics, 3D Printing, Biotechnology, Brain Computer Interfaces, and Generative AI along with their working. Think and Tell Conclude the concepts Assign homework
Action Plan
5 mins
Warm Up
What comes to your mind when you hear the word “robot”? Can you think of any robots you’ve seen in movies, TV shows, or real life?
Now, build the concept by telling them about robotics and robots that we see everyday.
Explain the following concepts:
Describe about robotics and the robots that we see every day.
Describe about 3D printing and its working.
Tell the students that robotics is a field that combines technology, engineering, and creativity to make our lives easier and more efficient. Some of the robots we see every day include vacuum cleaners, medical devices, drones etc., as given on pages 86 to 88.
Explain students that 3D printing is like a magical machine that can create real, intangible objects from a computer design. Also, discuss the working of a 3D printer, as given on page 89.
Describe biotechnology. Describe to the students that biotechnology is a stream of science that uses living things, like cells and bacteria, to make useful things. Also, describe the role of computers in biotechnology, as given on pages 90 and 91.
Explain brain computer interfaces.
Explain that BCIs are like magic hats for our brains. It let our thoughts and brains talk to computers and machines, as given on pages 91 and 92.
Describe generative AI. Explain to the students that Generative AI refers to algorithms and models, particularly those based on deep learning techniques, that can create new content such as text, images, music, or even videos. Also, tell them about the fields where generative AI can be used as given on page 92.
● Read aloud the questions provided in the Do It Yourself 5C Question 2, Do It Yourself 5D, Do It Yourself 5E, and Do It Yourself 5F sections and encourage the students to solve the questions. Instruct the students to write the answers in their book.
Correct Responses: Do It Yourself 5C
2. This is a medical drone. Medical drones are used to deliver medicines, vaccines, blood, and medical supplies quickly to remote or emergency areas, saving time and lives.
Correct Responses: Do It Yourself 5D
1. A digital 3D model is created using CAD software.
2. The 3D model file is converted into a .STL format and sliced into thin horizontal layers by slicing software.
3. The 3D printer reads the sliced file and begins printing the object layer by layer.
4. Each layer is printed on top of the previous one, and the material solidifies to form a solid object.
Correct Responses: Do it Yourself 5E
1. Software, algorithms
2. Mixing chemicals, running experiments, samples
3. Data, DNA
Correct Responses: Do it Yourself 5F
1. Signal Acquisition: Sensors pick up electrical activity from the brain.
Signal Processing: Raw signals are filtered and processed to extract meaningful data.
Translation to Commands: Processed signals are converted into commands that control devices. Feedback and Control: The system responds to commands, often providing feedback to the user.
2. a. Creating unique and dynamic game environments
7 mins
● Ask the students to give the answer of the question “Are robots a boon or a bane to humans?”, asked in the Think and Tell section on page 88.
Possible Responses: Robots can be both a boon and a bane to humans, depending on how they are developed, deployed, and regulated.
● Ask the students to give the answer of the question “In case you get an opportunity to use a BCI what game would you like to play and what commands would you give the computer through this technology?”, provided in the Think and Tell section on page 92.
Possible Responses: An exciting BCI gaming choice would be an adventure game with commands like “Move forward,” “Jump,” “Activate magic,” and “Interact.” The experience would include exploring magical worlds, solving mysteries, and interacting with the virtual environment through personalised commands.
Sum Up
3 mins
● Conclude the session by summarising that Robotics combines technology, engineering, and creativity to enhance our lives with every day robots like vacuum cleaners, medical devices, and drones. On the other hand, 3D printing acts like a magical machine, creating tangible objects from computer designs. In a 3D printer, you begin with a computer program to create a 3D model. The printer reads the design, builds the object layer by layer, and as each layer is added, the object takes shape. The melted material solidifies quickly, creating real, physical objects. Biotechnology is a stream of science that uses living things, like cells and bacteria, to make useful things. High-performance computing is used to process the enormous amount of data generated during DNA sequencing. BCIs are like magic hats for our brains. It lets our thoughts and brains talk to computers and machines. Also, tell them that Generative AI refers to algorithms and models, particularly those based on deep learning techniques, that can create new content such as text, images, music, or even videos.
● Assign the following questions from the Chapter Checkup given at the end of the chapter as homework.
A. Fill in the Blanks: Questions 1, 2, and 3
B. Who Am I?: Questions 1 , 2 and 4
C. Write T for True and F for False: Questions 1, 2, 3 and 4
D. Answer the Following Questions: Question 2, 3 and 5
E. Apply Your Learning: Questions 1, 3, 4 and 5
In the magical world of Avora, three friends—Mel, Conji, and Eva—discover that the Magical Garden is trapped in endless winter due to a dark spell cast by Lord Ero. Fairy Joy, under the spell, reveals that Ero has hacked the magical network to control all magic in Avora. The trio seeks guidance from the Elders, who explain that Ero exploited magical technologies, similar to how hackers manipulate systems.
To stop him, they visit the Space Centre, a hub of magical knowledge, where they learn about blockchain and cybersecurity to secure the fairy network. However, Ero initiates his attack, forcing the trio to use a time-travel spell to prevent his rise. They design an app to track Ero, encrypt their magic, and build protective firewalls, paralleling digital security measures.
In a final showdown, they confront Ero, learning he is the estranged son of the Elder Wizard, driven by bitterness. With teamwork, courage, and their understanding of magic and technology, they defeat Ero, restore balance, and revive the Magical Garden. The story highlights the ethical use of power and the importance of responsibility in both magic and technology.
● The spaceship with Mel, Conji, and Eva landed in Avora two days before its destruction started.
● Everyone was enjoying the spring season in Avora, and the trio decided to protect the people at any cost.
● Mel decided to trace the location of Lord Ero using the app they created to see where Lord Ero is right now.
● The trio realised that Lord Ero already knew that they were going to travel back in time with the ancient spell, and he was heading towards them.
● Conji suggested finding out the place where Lord Ero will attack first, and Mel suggested using DBMS for this purpose.
● DBMS will help to observe the pattern in which Lord Ero attacks and give a list of all the possible locations.
● Eva and Conji have no idea about Database Management System (DBMS), so Mel decided to explain the concept to them.
This chapter is divided into the following classroom and lab sessions 1. Databases and DBMS 1 2. Databases and DBMS 2 3. Structured Query Language 1
At the end of the session, the students will be able to:
● describe databases and its advantages.
● describe the concept of Database Management System.
Keywords
● Database: Data organised and structured in a digital form on a computer.
● DBMS: A database management system (DBMS) is a software application that enables you to construct, operate, and interact with databases.
● Data: It is a collection of fundamental facts and figures that are recorded in a database.
● Database Access Language: It is a language that allows users to give commands to a database to operate the stored data.
Ask the students about the importance of the library. Also, ask them how they fetch a book in a library. Explain to the students the meaning of the databases and their advantages. Explain to them the meaning of the term DBMS—its role, types, and different components.
● Ask the students about the importance of the library.
5 mins
● Ask the students about the process of fetching a type of book. For example, if he/she wants to find a science fiction book, then in what column will they search for the book?
● Tell the students that just like how books are properly organised in a library, data stored in a computer are also organised in the form of a database.
15 mins
Engage
Explain the following concepts:
Learning
Explanation
Describe database and its advantages. Explain to the students that a database is a collection of tables, where each table consists of rows and columns. Explain the structure of a table. Also, explain the advantages of databases, as given on the pages 101 and 102.
Describe the concept of a DBMS. Explain the concept of DBMS to the students. Also, tell them about its role. Tell the students that there are four types of DBMS, such as HDBMS, RDBMS, OODBMS, and NDBMS. Tell them about the various components of a DBMS, such as data, hardware, software, users, procedures and Database Access Language, as given on pages 102 to 104.
● Read aloud the questions provided in the Do It Yourself 6A section and encourage the students to solve the questions. Instruct the students to write the answers in their book.
Correct Responses:
1. The components of DBMS are data, hardware, software, users, procedures, and Database Access Language.
2. There are four types of DBMS, such as HDBMS (Hierarchical Database Management System), RDBMS (Relational Database Management System), OODBMS (Object-oriented Database Management System), and NDBMS (Network Database Management System).
7 mins
Build
● Conduct a group discussion in the class among the students based on the topic “Is it important for data to be organised”, provided in the Discuss section on page 102.
Correct Responses: Organising data is essential to facilitate readability and streamline work processes. Analysing raw data can be challenging, so arranging it systematically is crucial to effectively representing and interpreting information.
● Ask the students to give the answer to the question “Where have you seen the use of a database in your daily life?”, asked in the Think and Tell section on page 101.
Possible Responses: School
Correct Responses: School, shops, mall, office, and hospital
● Ask the students to give the answer to the question “Do you think that a person with special knowledge of databases is required to handle it?”, asked in the Think and Tell section on page 103.
Possible Responses: Yes, No
Correct Response: Yes. Databases are complex systems that require expertise to manage, design, and maintain.
3 mins
● Conclude the session by summarising that a database is a collection of tables that helps to organise data. A database management system (DBMS) is a software application that enables you to construct, operate, and interact with databases.
● Assign the following questions from the Chapter Checkup given at the end of the chapter as homework.
A. Fill in the Blanks: Questions 1, 2, and 3
B. Tick the Correct Option: Questions 1, 2, 3, and 4
D. Write T for True and F for False: Questions 1, 2, and 4
E. Answer the Following Questions: Questions 1, 3, and 4
At the end of the session, the students will be able to:
● describe databases and its advantages.
● know the concepts related to Database Management System.
Keywords
● Database: Data organised and structured in a digital form on a computer.
● DBMS: A database management system (DBMS) is a software application that enables you to construct, operate, and interact with databases.
● Data: It is a collection of fundamental facts and figures that are recorded in a database.
● Database Access Language: It is a language that allows users to give commands to a database to operate the stored data.
Let the students watch the video or the learning slides related to the topic on the digital panel.
Explain to the students the meaning of the databases and their advantages. Explain to them the meaning of the term DBMS—its role, types, and different components. Attempt the activity on the Assignment page. Conclude the concepts Assign homework
● Instruct the students to go to the Tekie’s Digital platform and open a Lab session on Databases and DBMS 2.
● Show the learning slides or the video and discuss the concepts shown on the panel.
Engage
Explain the following concepts:
Learning
Describe the meaning of the term database.
Explanation
Explain to the students that a database is a collection of tables, where each table consists of rows and columns. Explain the structure of a table. Also, explain the advantages of database, as given on pages 101 and 102.
Demonstrate the concepts related to Database Management System.
Explain the concept of DBMS to the students. Also, tell them about its role. Tell the students that there are four types of DBMS, such as HDBMS, RDBMS, OODBMS, and NDBMS. Tell them about the various components of a DBMS, such as data, hardware, software, users, procedures, and Database Access Language, as given on pages 102 to 104.
● Ask the questions provided on the slides one by one to assess the students’ understanding. Discuss the answers to the questions with the students. If necessary, ask additional relevant questions.
● Instruct the students to attempt the assignment by clicking on the Assignment tab.
● Explain the activity to the students.
● Conclude the session by summarising that a database is a collection of tables that helps to organise data. A database management system (DBMS) is a software application that enables you to construct, operate, and interact with databases.
● Assign the additional activity given on the panel to the students as homework.
At the end of the session, the students will be able to:
● know what SQL is.
● know the types of SQL statements.
● know the main data types used in SQL.
● identify the keys defined for a table.
● revise the basic SQL commands learnt in the previous grade.
Keywords
● SQL: SQL, or Structured Query Language, is a powerful tool used for managing and manipulating data in databases.
● Keys: Keys in a database are used to define any constraints on the table. Keys are also used to establish and identify relationships between tables.
Ask students how they can retrieve specific data from databases. Explain to the students what SQL is. Explain the types of SQL statements and the data types in SQL. Explain the different keys in a database. Revise the basic SQL commands learnt in the previous grade.
● Ask the students how they can retrieve specific data from databases.
5 mins
● Tell them that they can use SQL, or Structured Query Language for managing and manipulating data in databases.
Explain the following concepts:
Explain SQL and types of SQL statements.
Explain main data types used in SQL.
Describe the keys in a database.
Revise some basic SQL commands learnt in the previous grade.
Explain to the students that SQL is a powerful tool used for managing and manipulating data in databases. Explain to them the types of SQL statements, i.e., DDL and DML, as given on pages 104 and 105.
Explain to the students the main data types used in SQL, such as number, character, varchar, date, and time, as given on page 105.
Explain to them the main keys that can be defined for a table, such as the primary key, candidate key, composite key, and the foreign key, as given on page 106.
Revise with students some of the basic SQL commands such as the ‘Create Table’, ‘Insert’, and ‘Select’ commands, as given on pages 106 and 107.
Ask the following additional questions to check the students’ understanding:
● What is the full form of DDL?
Correct Response: Data Definition Language
● What is a primary key?
Correct Response: The primary key is the attribute or set of attributes in a table that uniquely identifies a row in that table.
● Which statement is used to query the database and retrieve specific data?
Possible Responses: Create Table/Insert/Select
Correct Response: Select
Build
7 mins
● Conduct a group discussion in the class on the topic “SQL: A Powerful Tool for Database Management and Operations”
Correct Response: SQL provides a way to communicate with and manipulate databases through the following main operations:
i. Data Querying: Allows users to retrieve specific data from databases.
ii. Data Manipulation: Includes commands to insert, update, and delete data.
iii. Data Definition: Enables users to define and modify the structure of the database objects, such as creating, altering, and dropping tables.
● Conclude the session by summarising that SQL, or Structured Query Language, is a powerful tool used for managing and manipulating data in databases. SQL statements are classified into two categories: Data Definition Language (DDL) and Data Manipulation Language (DML). The main data types used in SQL are number, character, varchar, date, and time. Keys in a database are used to define any constraints on the table. Basic SQL commands used are ‘Create Table’, ‘Insert’, and ‘Select’ commands.
● Assign the following questions from the Chapter Checkup given at the end of the chapter as homework.
A. Fill in the Blanks: Question 5
B. Tick the Correct Option: Question 5
E. Answer the Following Questions: Question 2
F. Apply Your Learning: Questions 1 and 5
At the end of the session, the students will be able to:
● know what SQL is.
● know the types of SQL statements.
● know the main data types used in SQL.
● identify the keys defined for a table.
● revise the basic SQL commands learnt in the previous grade.
Keywords
● SQL: SQL, or Structured Query Language, is a powerful tool used for managing and manipulating data in databases.
● Keys: Keys in a database are used to define any constraints on the table. Keys are also used to establish and identify relationships between tables.
Let the students watch the video or the learning slides related to the topic on the digital panel.
Explain to the students what SQL is. Explain the types of SQL statements and the data types in SQL. Explain the different keys in a database. Revise the basic SQL commands learnt in the previous grade.
Attempt the activity on the Assignment page.
Conclude the concepts
Assign homework
Warm Up
● Instruct the students to go to the Tekie’s Digital platform and open a Lab session on Structured Query Language 2
● Show the learning slides or the video and discuss the concepts shown on the panel.
Explain the following concepts:
Explain SQL and types of SQL statements.
Explain main data types used in SQL.
Describe the keys in a database.
Revise some basic SQL commands learnt in the previous grade.
Explain to the students that SQL is a powerful tool used for managing and manipulating data in databases. Explain to them the types of SQL statements, i.e., DDL and DML, as given on pages 104 and 105.
Explain to the students the main data types used in SQL, such as number, character, varchar, date, and time, as given on page 105.
Explain to them the main keys that can be defined for a table, such as the primary key, candidate key, composite key, and the foreign key, as given on page 106.
Revise with students some of the basic SQL commands such as the ‘Create Table’, ‘Insert’, and ‘Select’ commands, as given on pages 106 and 107.
● Ask the questions provided on the slides one by one to assess the students’ understanding. Discuss the answers to the questions with the students. If necessary, ask additional relevant questions.
7 mins
Build
● Instruct the students to attempt the assignment by clicking on the Assignment tab.
● Explain the activity to the students.
Sum Up
3 mins
● Conclude the session by summarising that SQL, or Structured Query Language, is a powerful tool used for managing and manipulating data in databases. SQL statements are classified into two categories: Data Definition Language (DDL) and Data Manipulation Language (DML). The main data types used in SQL are number, character, varchar, date, and time. Keys in a database are used to define any constraints on the table. Basic SQL commands used are ‘Create Table’, ‘Insert’, and ‘Select’ commands.
● Assign the additional activity given on the panel to the students as homework.
At the end of the session, the students will be able to:
● use the ‘Select’ statement with additional clauses.
● update data in a table.
● delete data from a table.
● use aggregate functions.
● search for specific data in a MySQL database.
Keyword
● Wildcard operators: These operators are special characters in SQL for pattern matching in text data.
Warm Up Engage Build Sum Up
Ask the students how they can modify existing records in a table.
Explain to the students some more SQL queries. Group discussion Conclude the concepts Assign homework
Action Plan
Warm Up
● Ask the students how they can modify existing records in a table.
● Tell the students that the ‘Update’ command modifies existing records. Also, tell them that they can delete data from a table, use aggregate functions to perform calculations on a set of values, and many other operations.
Engage
Explain the following concepts:
Learning Outcomes
Use the ‘Select’ statement with additional clauses.
Explanation
Explain to the students that there are some more clauses which can be used with the ‘Select’ statement other than the ‘Where’ clause. Tell them about the ‘Order By’ clause and the ‘Distinct’ clause, as given on pages 107 and 108.
Update data in a table.
Explain to the students that the ‘Update’ command modifies existing records, as given on page 108.
Delete data from a table. Tell the students that the ‘Delete’ command removes records from a table, as given on page 108.
Use aggregate functions.
Search for specific data in a MySQL database.
Explain to the students about common aggregate functions to perform calculations, such as Count(), Sum(), Avg(), Max(), and Min(), as given on pages 108 and 109.
Tell the students that they can use SQL queries by specifying some condition to search for specific data using the ‘Where’ clause or the wildcard operators, as given on pages 109 and 110.
● Read aloud the questions provided in the Do It Yourself 6B section and encourage the students to solve the questions. Instruct them to write the answers in their book.
Correct Response:
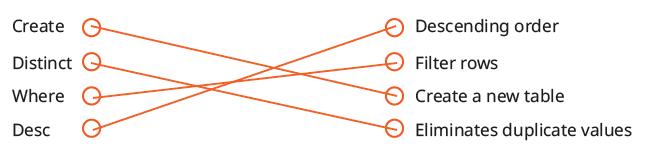
Build
7 mins
● Conduct a group discussion in the class on the topic ‘Aggregate Functions to Perform Calculations using SQL’.
Correct Responses: Count(), Sum(), Avg(), Max(), Min() Sum
3 mins
● Conclude the session by summarising that the ‘Order By’, ‘Distinct’, and ‘Where’ clause are some of the clauses that can be used with the ‘Select’ statement. The ‘Delete’ command removes records from a table. Aggregate functions perform calculations on a set of values and return a single value. To search for specific data in a MySQL database, use the ‘Where’ clause or the wildcard operators.
● Assign the following questions from the Chapter Checkup given at the end of the chapter as homework.
A. Fill in the Blanks: Question 4
C. Who Am I?: Questions 1, 2, 3, 4, and 5
D. Write T for True and F for False: Questions 3 and 5
E. Answer the Following Questions: Question 5
F. Apply Your Learning: Questions 2, 3, and 4
At the end of the session, the students will be able to:
● use the ‘Select’ statement with additional clauses.
● update data in a table.
● delete data from a table.
● use aggregate functions.
● search for specific data in a MySQL database.
Keyword
Let the students watch the video or the learning slides related to the topic on the panel.
● Wildcard operators: These operators are special characters in SQL for pattern matching in text data. 5 mins
Warm Up
Explain to the students some more SQL queries. Attempt the activity on the Assignment page.
Conclude the concepts
Assign homework
Action Plan
● Instruct the students to go to the Tekie’s Digital platform and open a Lab session on More SQL Queries 2.
● Show the learning slides or the video and discuss the concepts shown on the panel.
Engage
Explain the following concepts:
Learning Outcomes
Use the ‘Select’ statement with additional clauses.
Explanation
Explain to the students that there are some more clauses which can be used with the ‘Select’ statement other than the ‘Where’ clause. Tell them about the ‘Order By’ clause and the ‘Distinct’ clause, as given on pages 107 and 108.
Update data in a table.
Delete data from a table.
Use aggregate functions.
Search for specific data in a MySQL database.
Demonstrate to the students how the ‘Update’ command modifies existing records, as given on page 108.
Demonstrate to the students how the ‘Delete’ command removes records from a table, as given on page 108.
Explain to the students about common aggregate functions to perform calculations, such as Count(), Sum(), Avg(), Max(), and Min(), as given on pages 108 and 109.
Demonstrate to the students how they can use SQL queries by specifying some condition to search for specific data using the ‘Where’ clause or the wildcard operators, as given on pages 109 and 110.
● Ask the questions provided on the slides one by one to assess the students’ understanding. Discuss the answers to the questions with the students. If necessary, ask additional relevant questions.
7 mins
● Instruct the students to attempt the assignment by clicking on the Assignment tab.
● Explain the activity to the students.
3 mins
● Conclude the session by summarising that the ‘Order By’, ‘Distinct’, and ‘Where’ clause are some of the clauses that can be used with the ‘Select’ statement. The ‘Delete’ command removes records from a table. Aggregate functions perform calculations on a set of values and return a single value. To search for specific data in a MySQL database, use the ‘Where’ clause or the wildcard operators.
● Assign the additional activity given on the panel to the students as homework.
In the magical world of Avora, three friends—Mel, Conji, and Eva—discover that the Magical Garden is trapped in endless winter due to a Dark Spell cast by Lord Ero. Joy, under the spell, reveals that Ero has hacked the magical network to control all magic in Avora. The Trio seeks guidance from the Elders, who explain that Ero exploited magical technologies, similar to how hackers manipulate systems. To stop him, they visit the Space Centre, a hub of magical knowledge, to locate an ancient magical spell that can counter Lord Ero’s Dark Magic. There, they learn about blockchain and cybersecurity to secure the fairy network. However, Lord Ero initiates his attack, forcing the Trio to use a time-travel spell to prevent his rise. They design an app to track him and encrypt their magic. In a final showdown, they confront Ero, learning he is the estranged son of Elder Wizard, driven by bitterness. With teamwork, courage, and understanding of magic and technology, they defeat Lord Ero, restore balance, and revive the Magical Garden. The story highlights the ethical use of power and the importance of responsibility in both magic and technology.
● Conji, Mel and Eva confronts Lord Ero, warning him to leave in peace.
● Lord Ero reveals that the ancient spell can only be used by someone with the blood of the Elders.
● The Trio is confused as Lord Ero demands the symbols, but they refuse.
● Lord Ero attacks with DESTRUCTO, but Joy shields the Trio just in time.
● Joy reveals she escaped Lord Ero’s spell using a riddle that led Elder Robot to her.
● Mel realizes Joy’s fairy magic can help defeat Lord Ero.
● Conji questions the absence of the Elders, as only they can use the ancient spell.
● Lord Ero casts BLASTOS, but Eva counters with PROTECTO and holds him off with Joy.
● Eva tells Mel and Conji to send the symbols to the Elders by any means.
● Mel suggests using Canva to create a video of the symbols and send it to the Elders.
● Conji agrees and they quickly retreat to complete their mission.
This chapter is divided into the following classroom and lab sessions
At the end of the session, the students will be able to:
● create a video in Canva.
● define components of a video editor in Canva.
● add videos in Canva.
Keyword
Warm Up Engage
Have you ever watched a video that captivated you with its visuals and made you feel something?
What made it so effective? Tell the students about the Canva video editor and its components. Also explain to them about adding videos by using upload and Canva’s video library.
● Video Editing: It is a process of arranging and modifying video clips to create a video project. 5 mins
Action Plan
Build Sum Up
Group discussion Conclude the concepts Assign homework
Warm Up
● Ask the students if they have ever watched a video that captivated them with its visuals and made them feel something. What made it so effective?
● Now, build the concept by telling them how to create a video in Canva. 15 mins
Engage
Explain the following concepts:
Learning Outcomes
Create a video in Canva.
Define components of a video editor in Canva.
Explanation
Define the concept of a video editor to the students. Tell them how to create a video in Canva as given on pages 120 and 121.
Discuss the components of video editor like canvas, timeline, zoom control, grid view, preview, elements, text tool, uploads, draw, projects, notes and Canva assistant as given on pages 121 and 122.
Add videos in Canva. Discuss with the students how to add the video in Canva using upload and Canva’s video library, as given on pages 122 and 123.
● Ask the following questions to the students provided in the Do It Yourself 7A section and encourage the students to solve the questions. Instruct the students to write the answers in their book.
Correct Responses:
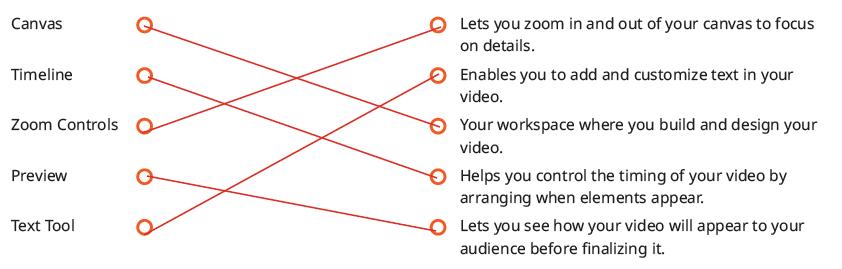
Build
7 mins
● Conduct a group discussion in the class among the students based on the topic ‘Canva’s Timeline feature’.
Possible responses: The timeline is a critical component that allows you to control the timing of your video. You can arrange elements on the timeline to determine when they appear and for how long. It helps you arrange objects like text, images and videos in the desired sequence.
3 mins
● Conclude the session by summarising the process of creating a video and explaining the components of the video editor in Canva such as timeline, zoom controls, grid view, etc. Explore the steps to add a video into Canva by using upload and Canva’s video library options.
● Assign the following questions from the Chapter Checkup given at the end of the chapter as homework.
A. Fill in the Blanks: Questions 1, 2, 3, and 5
B. Tick the Correct Option: Questions 1 and 4
C. Who Am I?: Questions 1, 2, 4, and 5
D. Write T for True and F for False: Questions 1 and 4
E. Answer the Following Questions: Questions 1, 2, and 4
F. Apply Your Learning: Questions 4 and 5
At the end of the session, the students will be able to:
● create a video in Canva.
● define components of video editor in Canva.
● add videos in Canva.
● Video editing: It is the process of arranging and modifying video clips to create a video project.
Engage
Let the students watch the video or the learning slides related to the topic on the digital panel. Tell the students about the Canva video editor and its components. Also demonstrate to them the steps to add video using upload and canva’s video library. Attempt the activity on the Assignment page. Conclude the concepts Assign homework
5 mins
Warm Up
● Demonstrate the students to go to Tekie’s Digital platform and open a Lab session on Canva 2
● Show the learning slides one by one and discuss the concepts shown on the slides in the panel.
15 mins
Engage
Explain the following concepts:
Explanation
Create a video in Canva. Define the concept of a video editor and demonstrate to the students how to create a video in Canva as given on pages 120 and 121.
Define components of a video editor in Canva.
Demonstrate to the students various components of video editor like canvas, timeline, zoom control, grid view, preview, elements, text tool, uploads, draw, projects, notes and Canva assistant as given on pages 121 and 122.
Add videos in canva. Demonstrate to the students how to add the video in canva using upload and Canva’s video library, as given on pages 122 and 123.
● Ask the questions provided on the slides one by one to assess the students’ understanding.
● Discuss the answers to the questions with the students. If necessary, ask additional relevant questions.
7 mins
Build
● Demonstrate the students to attempt the assignment by clicking on the Assignment tab.
● Explain the activity to the students. Sum Up
3 mins
● Conclude the session by summarising the process of creating a video and explaining the components of the video editor in Canva such as timeline, zoom controls, grid view, etc. Explore the steps to add a video into the Canva by using upload and Canva’s video library options.
● Assign the additional activity given on the panel to the students as homework.
At the end of the session, the students will be able to:
● use basic video editing tools.
● apply effects on videos.
● download and share a video.
Keywords
● Animation: It makes video more dynamic.
● Downloading: It lets you save your video.
● Sharing: It helps you show videos to others or collaborate on it.
Ask students the meaning of editing. Tell the students about basic video editing tool and effects on video like by applying filters. Also explain adding text and graphics and using animation. Describe the steps to download and share videos in Canva. Group discussion Think and Tell Conclude the concepts Assign homework
● Ask students the meaning of editing.
● Now, build the concept by telling them the meaning of editing and then tell them about basics of video editing.
Explain the following concepts:
Learning Outcomes
Explanation
Use basic video editing tools. Explain the students about some basic video editing tools like trimming, splitting resizing, and cropping video along with the steps to do so. Tell them about adding and edit audio in Canva as given on pages 123 to 125.
Apply effects on videos.
Download and share a video.
Tell the students that you can enhance your video in Canva by applying filters, adding text and graphics, and using animation along with their steps, as given on pages 125 and 126.
Tell the students that downloading lets you save your video, while sharing helps you show it to others or collaborate on it. Explain the steps in downloading and sharing, as given on page 127.
● Ask the following questions to the students provided in the Do It Yourself 7B section and encourage the students to solve the questions. Instruct the students to write the answers in their book.
Correct responses:
1. Fill in the blanks:
a. Upload b. timeline c. Elements d. beginning or end e. share
2. Solve the following crossword using the given hints: Across:
1. Filter 4. Split 6. Play Down:
2. Resize 3. Upload 5. MP4
Build
7 mins
● Ask the students to answer the question “Have you ever used the preview option in any application before finalizing your video?”, in the Think and Tell section on page 127. Possible Response: Yes/ No.
● Conclude the session by summarizing the steps to use basic video editing tools such as trimming and splitting a video, resizing and cropping a video, and adding and editing audio. Additionally, explain the steps to apply effects to videos, including using filters and effects, adding text and graphics, applying animations, and downloading and sharing the video.
● Assign the following questions from the Chapter Checkup given at the end of the chapter as homework.
A. Fill in the Blanks: Question 4
B. Tick the Correct Option: Questions 2, 3, and 5
C. Who Am I?: Question 3
D. Write T for True and F for False: Questions 2, 3, and 5
E. Answer the Following Questions: Questions 3 and 5
F. Apply Your Learning: Questions 1, 2, and 3
At the end of the session, the students will be able to:
● Use basic video editing tool
● Apply effects on videos
● downloading and sharing a video
Keywords
● Animation: It makes video more dynamic.
● Downloading: It lets you save your video.
● Sharing: It helps you show videos to others or collaborate on it.
Ask students what the purpose of downloading and sharing videos or images is. Tell the students about basic video editing tool and effects on video like by applying filters. Also explain adding text and graphics and using animation. Describe the steps to downloading and sharing videos in Canva.
Group discussion Think and Tell Conclude the concepts Assign homework
● Demonstrate the students to go to Tekie’s Digital platform and open a Lab session on Canva 4
● Show the learning slides one by one and discuss the concepts shown on the slides in the panel. 15 mins
Engage
Explain the following concepts:
Learning Outcomes
Explanation
Use basic video editing tools. Demonstrate to the students the steps of basic video editing tools like trimming, splitting, resizing, and cropping video along with the steps to do so. Tell them about adding and edit audio in Canva as given on pages 123 to 125.
Apply effects on videos.
Download and share a video.
Demonstrate to the students that you can enhance your video in Canva by applying filters, adding text and graphics, and using animation along with their steps, as given on pages 125 and 126.
Demonstrate to the students that downloading lets you save your video, while sharing helps you show it to others or collaborate on it. Explain the steps in downloading and sharing, as given on page 127.
● Ask the questions provided on the slides to assess the students’ understanding.
Build
● Demonstrate the students to attempt the assignment by clicking on the Assignment tab.
● Explain the activity to the students.
7 mins
3 mins
● Discuss the answers to the questions with the students. If necessary, ask additional relevant questions. Sum Up
● Conclude the session by summarizing the steps to use basic video editing tools such as trimming and splitting a video, resizing and cropping a video, and adding and editing audio. Additionally, explain the steps to apply effects to videos, including using filters and effects, adding text and graphics, applying animations, and downloading and sharing the video.
● Assign the additional activity given on the panel to the students as homework.
In the magical world of Avora, three friends—Mel, Conji, and Eva—discover that the Magical Garden is trapped in endless winter due to a Dark Spell cast by Lord Ero. Joy, under the spell, reveals that Ero has hacked the magical network to control all magic in Avora. The Trio seeks guidance from the Elders, who explain that Ero exploited magical technologies, similar to how hackers manipulate systems. To stop him, they visit the Space Centre, a hub of magical knowledge, to locate an ancient magical spell that can counter Lord Ero’s Dark Magic. There, they learn about blockchain and cybersecurity to secure the fairy network. However, Lord Ero initiates his attack, forcing the Trio to use a time-travel spell to prevent his rise. They design an app to track him and encrypt their magic. In a final showdown, they confront Ero, learning he is the estranged son of Elder Wizard, driven by bitterness. With teamwork, courage, and understanding of magic and technology, they defeat Lord Ero, restore balance, and revive the Magical Garden. The story highlights the ethical use of power and the importance of responsibility in both magic and technology.
● The heroes face Lord Ero, who attacks with powerful spells.
● Elder Wizard reflects an attack at Lord Ero using magic.
● Lord Ero summons a lightning storm to stop the heroes.
● Elder Robot instructs Mel to use Data Science to organize symbols and create the spell.
● Eva asks Mel, what data science is.
● Mel explains data science to the team and completes the spell.
This chapter is divided into the following classroom and lab sessions
1. AI and Data Science
2. Fun with AI: Rock, Paper, Scissors
3. Applications of Data Science
At the end of the session, the students will be able to:
● describe what AI is and its applications.
● describe data and AI.
Keywords
● Artificial Intelligence: AI can be defined as a branch of computer science concerned with creating intelligent machines that can learn from data, solve problems, and make decisions.
● Data Science: It is a domain of computer science that helps us learn things from data by using scientific methods, algorithms, and statistics.
Ask the students if they have ever heard about the term AI.
Tell the students about AI and its applications. Explain to the students what data and AI is.
Think and Tell Conclude the concepts Assign homework
Action Plan
Warm Up
● Ask the students if they have ever heard about the term AI.
● Now, build the concept by explaining that AI can be defined as a branch of computer science concerned with creating intelligent machines that can learn from data, solve problems, and make decisions.
Engage
Explain the following concepts:
Learning Outcomes
Describe what AI is and its applications.
Explanation
Tell the students that artificial intelligence (AI) is a technology that has transformed how we live, work, and interact with machines around us. Also, explain various applications of AI, as given on page 137.
Describe data and AI. Describe to the students that artificial intelligence depends on data for its effectiveness. Explain to them the concept of data science, tell them about processes in data science, components of data science, and why is data science important, as given on pages 137 to 140.
● Read aloud the questions provided in the Do It Yourself 8A section and encourage the students to solve the questions. Instruct the students to write the answers in their books.
Possible response: Do It Yourself
7 mins
● Ask the students to answer the question “What is the difference between data science and data analytics? asked in the Think and Tell section on page 138.
Possible Responses: Data science is a domain of computer science that helps us learn things from data by using scientific methods, algorithms, and statistics. Whereas, data analytics focuses on analysing and interpreting existing data to find patterns, trends, and actionable insights.
3 mins
Sum Up
● Conclude the session by summarising that AI can be defined as a branch of computer science concerned with creating intelligent machines that can learn from data, solve problems, and make decisions. Various applications of AI include virtual assistants, image recognition, natural language processing, recommendation systems, and autonomous vehicles. Data science is a domain of computer science that helps us learn things from data by using scientific methods, algorithms, and statistics. Data science can be considered the study of data. It involves collecting the data, analysing the data, and using data to solve problems or make data-driven decisions. There are different components of data science, which include statistics, visualisation, machine learning, and deep learning. With the help of data science, we can make informed decisions, solve problems, and create new opportunities.
● Assign the following questions from the Chapter Checkup given at the end of the chapter as homework.
A. Fill in the Blanks: Questions 1, 4, and 5
B. Tick the Correct Option: Question 1
C. Who Am I? Question 1
D. Write T for True or F for False: Questions 2, 4, and 5
E. Answer the Questions Following: Questions 1 and 3
At the end of the session, the students will be able to:
● play the fun with the AI game.
Let the students revise the chapter.
Demonstrate to the students how to play the game for which the link is provided on the panel.
Attempt the activity on the Assignment page.
Conclude the concepts
Warm Up
● Instruct the students to go to Tekie’s Digital platform and open a Lab session on Fun with AI: Rock, Paper, Scissors
Engage
● Demonstrate to the students how to play the game for which the link is provided on the panel.
Ask the questions related to the activity.
Build
● Instruct the students to click on the Practice button on the Assignment page to attempt the activity. Then, click on the Attempt button to open the activity page.
● Instruct the students to click on the Confirm button to submit their work when they are done with the activity.
● Conclude the session by summarising that the objective of this interactive AI-based game is for students to build their understanding of the AI domain, particularly focusing on how AI can analyse data to make predictions where data, acts as an input to the machine and how the machine interprets and learns from this data.
At the end of the session, the students will be able to:
● describe applications of data science.
Ask the students what data science is. Describe applications of data science to the students.
Group discussion Conclude the concepts Assign homework
Warm Up
● Ask the students what data science is.
● Now, build the concept by explaining the applications of data science.
Explain the following concepts:
Describe applications of data science.
Describe to the students that data science is used in many fields and impacts our daily lives in many ways, as given on pages 140 to 142.
● Read aloud the questions provided in the Do It Yourself 8B section and encourage the students to solve the questions. Instruct the students to write the answers in their books.
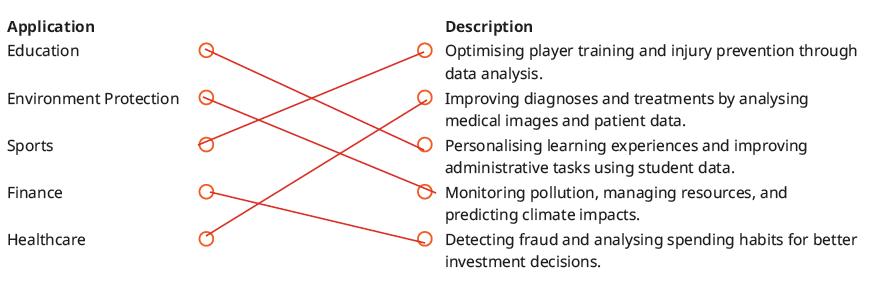
7 mins
● Conduct a group discussion in the class among the students on the topic “Role of data science in the field of entertainment”.
Possible response: Data science makes the entertainment sector more personalised by analysing data to understand what people like or dislike. For example, streaming services like Netflix use data on what films or shows you watch to recommend new films and shows you might enjoy. Music apps like Spotify create personalised playlists by analysing what you listen to more frequently. Video games also use data science to tailor game experiences to your preferences. Sum Up
3 mins
● Conclude the session by summarising that there are various applications of data science in different fields such as education, healthcare, entertainment, sports, environment protection, retail, finance, transport, and social media.
● Assign the following questions from the Chapter Checkup given at the end of the chapter as homework.
A. Fill in the Blanks: Questions 2 and 3
B. Tick the Correct Option: Questions 2, 3, 4, and 5
C. Who Am I? Questions 2, 3, 4, and 5
D. Write T for True or F for False: Questions 1 and 3
E. Answer the Following Questions: Questions 2, 4 and 5
F. Apply Your Learning: Questions 1, 2, 3, 4, and 5
In the magical world of Avora, three friends—Mel, Conji, and Eva—discover that the Magical Garden is trapped in endless winter due to a Dark Spell cast by Lord Ero. Joy, under the spell, reveals that Ero has hacked the magical network to control all magic in Avora. The Trio seeks guidance from the Elders, who explain that Ero exploited magical technologies, similar to how hackers manipulate systems. To stop him, they visit the Space Centre, a hub of magical knowledge, to locate an ancient magical spell that can counter Lord Ero’s Dark Magic. There, they learn about blockchain and cybersecurity to secure the fairy network. However, Lord Ero initiates his attack, forcing the Trio to use a time-travel spell to prevent his rise. They design an app to track him and encrypt their magic. In a final showdown, they confront Ero, learning he is the estranged son of Elder Wizard, driven by bitterness. With teamwork, courage, and understanding of magic and technology, they defeat Lord Ero, restore balance, and revive the Magical Garden. The story highlights the ethical use of power and the importance of responsibility in both magic and technology.
● The darkness clears, and spring returns to Avora.
● Elder Wizard holds Lord Ero’s hat, revealing Lord Ero is his son.
● The group expresses sympathy, and they rush to help Elder Robot.
● Mel suggests using the ancient spell to heal Elder Robot.
● Mel explains using Natural Language Processing (NLP) and AI to translate the spell into code for Elder Robot’s system.
● Sparks fly, and Elder Robot comes back to life, feeling energized.
● The group celebrates Mel’s success in combining magic and AI to restore Elder Robot.
● Joy thanks everyone for restoring the network of fairies and bringing spring back to Avora.
● The friends rejoice as happiness and warmth return to the land.
This chapter is divided into the following classroom and lab sessions
1. Fun with AI: Using AI Story Generator
2. NLP and Its Applications
3. The MIT App Development
At the end of the session, the students will be able to:
● play the fun with the AI game.
Let the students revise the chapter. Demonstrate to the students how to play the game for which the link is provided on the panel.
Attempt the activity on the Assignment page.
Conclude the concepts
● Instruct the students to go to Tekie’s Digital platform and open a Lab session on Fun with AI: Using AI Story Generator.
Engage
● Demonstrate to the students how to play the game for which the link is provided on the panel.
Ask the questions related to the activity. Build
● Instruct the students to click on the Practice button on the Assignment page to attempt the activity. Then, click on the Attempt button to open the activity page.
● Instruct the students to click on the Confirm button to submit their work when they are done with the activity.
● Conclude the session by summarising that you have to write the idea of your story in the story plot section. For example, ‘A librarian finds a book that brings stories to life, pick the creativity level and length of the story. It will automatically create a story.
At the end of the session, the students will be able to:
● describe what NLP is.
● describe applications of NLP.
Keyword
● NLP: NLP makes the machine understand your language and respond to you in a way that makes sense.
Ask the students have you ever wondered how AI assistants like Alexa or Siri listen to your commands and respond? Tell the students about natural language processing and its applications. Think and Tell Conclude the concepts
Warm Up
● Ask the students have you ever wondered how AI assistants like Alexa or Siri listen to your commands and respond?
● Now, build the concept by explaining about NLP.
Explain the following concepts:
Learning
Explanation
Describe what NLP is. Tell the students that NLP makes the machine understand your language and respond to you in a way that makes sense, as given on page 154.
Describe applications of NLP.
Describe to the students that with its wide range of useful applications, NLP transforms our day-to-day interaction with technology, as given on pages 154 and 155.
● Read aloud the questions provided in the Do It Yourself 9A section and encourage the students to solve the questions. Instruct the students to write the answers in their books.
Correct response:
1. The search engines use NLP to understand the words you type into the search bar and then direct you to relevant web pages. NLP helps search engines comprehend the meaning and context of your search and help you find what you are looking for.
2. NLP can be used to analyse the sentiment or emotion expressed in the text. For example, businesses might use sentiment analysis to analyse customer feedback and preferences for their products and services across reviews on social media platforms and product remarks on online stores. This insightful data can help companies enhance their products, services, or customer experiences.
3. Spam-detecting algorithms employ NLP to identify patterns or characteristics common to spam emails, such as certain keywords or phrases and then filter spam from reaching your inbox.
● Ask the students to answer the question, “Imagine you have a computer that has NLP. How would you use it to make your daily life easier?” asked in the Think and Tell section given on page 154.
Possible Responses: Using NLP, we can control devices with voice commands, dictate text, translate languages, and interact with smart assistants to simplify tasks.
3 mins
● Conclude the session by summarising that NLP makes the machine understand your language and respond to you in a way that makes sense. With its wide range of useful applications, NLP transforms our day-to-day interaction with technology. Some of these are virtual assistance, search engines, sentiment analysis, autocorrect, etc.
● Assign the following questions from the Chapter Checkup given at the end of the chapter as homework.
A. Fill in the Blanks: Questions 1, 2, 3, 4, and 5
B. Tick the Correct Option: Questions 1, 2, 3, 4, and 5
C. Write T for True or F for False: Questions 1, 2, 3, 4, and 5
D. Answer the Questions Following: Questions 1, 2, 3, and 4
E. Apply Your Learning: Questions 1, 2, and 3
At the end of the session, the students will be able to:
● describe the MIT app inventor.
● create an app.
Keyword
● MIT App Inventor: The MIT App Inventor is an online platform for creating apps for mobile phones and tablets.
Let the students watch the video or the learning slides related to the topic on the digital panel. Tell the students about the MIT app inventor. Demonstrate to them how to create an app.
Attempt the activity on the Assignment page.
Conclude the concepts Assign homework 5 mins 15 mins
5 mins
Warm Up
● Instruct the students to go to Tekie’s Digital platform and open a Lab session on MIT App Development.
● Show the Learning slides one by one and discuss the concepts shown on the slides in the panel.
15 mins
Engage
Explain the following concepts:
Learning Outcomes
Explanation
Describe the MIT app inventor. Describe to the students that MIT App Inventor is an online platform for creating apps for mobile phones and tablets. It is a very easy and simple platform to learn app creation and coding, as given on page 157.
Create an app. Demonstrate to them how to create an app and start the project, how to work with the Palette section, and how to code and test an app, as given on pages 157 to 163.
● Ask the questions provided on the slides one by one to assess the students’ understanding. Discuss the answers to the questions with the students. If necessary, ask additional relevant questions.
7 mins
● Instruct the students to click on the Practice button on the Assignment page to attempt the activity. Then, click on the Attempt button to open the activity page.
● Instruct the students to click on the Confirm button to submit their work when they are done with the activity.
3 mins
● Conclude the session by summarising that MIT App Inventor is an online platform for creating apps for mobile phones and tablets. It is a very easy and simple platform to learn app creation and coding. Demonstrate to them the steps to create an app how to work with the Palette section, and how to code and test an app.
● Assign the additional activity given on the panel to the students as homework.
● Assign the following questions from the Chapter Checkup given at the end of the chapter as homework.
D. Answer the Following Questions: Question 5
This chapter is divided into the following lab sessions
1. Introduction to Python, Data Types, and Variables
2. Operators
3. Conditional Statements
4. Iterative Statements
At the end of the session, the students will be able to:
● explain Python, its features, and syntax.
● describe Python data types.
● describe what a variable is, create a variable, and name a variable.
● describe the print function, multiple assignment and dynamic typing.
Keywords
● Python: Python is a high-level dynamic programming language that is interpreted, and focused on code readability.
● Data types: The data type specifies the kind of information that will be kept in a variable.
● Variables: The reserved memory areas used to hold values in a Python program are known as variables.
Let the students watch the video or the learning slides related to the topic on the digital panel.
Explain to them what Python is. Get them familiar with Python’s features, data types, and variables.
Attempt the activity on the Assignment page.
Conclude the concepts Assign homework
Warm Up
5 mins
● Instruct the students to go to Tekie’s Digital platform and open a Lab session on Introduction to Python, Data Types, and Variables
● Show the learning slides or the video and discuss the concepts shown on the panel.
Explain the following concepts:
Explain Python, its features, and syntax.
15 mins
Tell the students that Python is a dynamic programming language. Also explain the features and syntax of Python, as given on page 1.
Describe Python data types. Explain the various Python data types to students, such as int, float, string, list, etc., as given on pages 1 and 2.
Describe what a variable is, create a variable, and name a variable.
Describe the print function, multiple assignment and dynamic typing.
Tell the students that the reserved memory areas used to hold values in a Python program are known as variables. Also, tell them how to create a variable and how to name them, as given on pages 2 and 3.
Tell students that the print function can be used to output a Python variable. Demonstrate to them how they can create several variables in a single statement with Python. Also, explain the concept of dynamic typing, as given on pages 3 and 4.
● Ask the questions provided on the slides one by one to assess the students’ understanding.
● Read aloud the questions provided in the Do It Yourself 1A section and encourage the students to solve the questions. Instruct the students to write the answers in their book.
7
● Instruct the students to attempt the assignment by clicking on the Assignment tab.
● Explain the activity to the students.
3
● Conclude the session by summarising that Python is a dynamic programming language. Various data types in Python are int, float, string, etc. The variables are the containers for storing data of various types. The print() function can be used to output a Python variable. Python specifies the kind of variable used during program execution. This concept is known as dynamic typing.
● Assign the additional activity given on the panel to the students as homework.
● Assign the following questions from the Chapter Checkup given at the end of the chapter as homework.
A. Fill in the Blanks: Questions 1 and 5
B. Tick the Correct Option: Questions 1 and 2
C. Who Am I?: Question 5
D. Write T for True and F for False: Question 1
E. Answer the Following Questions: Questions 3 and 4
F. Apply Your Learning: Question 1
At the end of the session, the students will be able to:
● perform operations using different types of operators.
Keyword
● Operators: Operators are predefined symbols that perform operations on one or more operands.
Let the students watch the video or the learning slides related to the topic on the digital panel. Discuss the concept of operators. Discuss arithmetic, assignment, comparison, and logical operators. Attempt the activity on the Assignment page.
Conclude the concepts Assign homework
Warm Up
● Instruct the students to go to the Tekie’s Digital platform and open a Lab session on Operators.
● Show the learning slides or the video and discuss the concepts shown on the panel.
Engage
Explain the following concepts:
Learning Outcome
Perform operations using different types of operators.
Explanation
Explain to the students that operators are predefined symbols that perform operations on one or more operands. Discuss various types of operators and their precedence rule, as given on pages 4 to 6.
● Ask the questions provided on the slides one by one to assess the students’ understanding.
● Discuss the answers to the questions with the students. If necessary, ask additional relevant questions.
● Instruct the students to attempt the assignment by clicking on the Assignment tab.
● Explain the activity to the students.
Sum Up 3 mins
● Conclude the session by summarising that operators are predefined symbols that perform operations on one or more operands. Discuss various types of operators and their precedence rules.
● Assign the additional activity given on the panel to the students as homework.
● Assign the following questions from the Chapter Checkup given at the end of the chapter as homework.
A. Fill in the Blanks: Question 2
B. Tick the Correct Option: Question 3
C. Who Am I?: Question 1
D. Write T for True and F for False: Question 2
At the end of the session, the students will be able to:
Let the students watch the video or the learning slides related to the topic on the digital panel. Discuss the concept of conditional statements. Discuss the if, if-else, and if-elif-else statements. Attempt the activity on the Assignment page.
● use different types of conditional statements in Python programming. 5 mins
Warm Up
Conclude the concepts
Assign homework
● Instruct the students to go to the Tekie’s Digital platform and open a Lab session on Conditional Statements.
● Show the learning slides or the video and discuss the concepts shown on the panel.
Engage
Explain the following concepts:
Learning Outcome
Use different types of conditional statements.
15 mins
Explanation
Describe to the students what are conditional statements. Elaborate each type of conditional statements, i.e., if statement, if-else statement, if-elif-else statement, as given on pages 6 to 9.
● Ask the questions provided on the slides one by one to assess the students’ understanding. Discuss the answers to the questions with the students. If necessary, you may ask additional relevant questions.
● Instruct the students to attempt the assignment by clicking on the Assignment tab.
● Explain the activity to the students. Sum Up 3 mins
● Conclude the session by summarising that the programming languages use conditional statements that make decisions to control the direction or flow of the program execution. Types of conditional statements used in Python are: if statement, if-else statement, and if-elif-else statement.
● Assign the additional activity given on the panel to the students as homework.
● Assign the following questions from the Chapter Checkup given at the end of the chapter as homework.
B. Tick the Correct Option: Questions 4 and 5
C. Who Am I?: Question 2
D. Write T for True and F for False: Questions 3 and 4
E. Answer the Following Questions: Question 5
At the end of the session, the students will be able to:
● use different types of iterative statements in Python programming.
Let the students watch the video or the learning slides related to the topic on the digital panel. Discuss the concept of iterative statements.
Discuss the while loop and for loop. Attempt the activity on the Assignment page.
Conclude the concepts Assign homework
mins
5 mins
Warm Up
● Instruct the students to go to the Tekie’s Digital platform and open a Lab session on Iterative Statements.
● Show the learning slides or the video and discuss the concepts shown on the panel.
Engage
Explain the following concepts:
Learning Outcome
15 mins
Explanation
Use different types of iterative statements. Tell the students that loops are useful in Python because they allow you to execute a block of code repeatedly. Describe the two primitive loop statements of Python, i.e., while loop and for loop, along with their syntax, flowcharts, and codes, as given on pages 9 to 13.
Attempt the Coding Challenge. Encourage students to attempt the coding challenge to write a Python program to create a geometry calculator, as given on page 14.
● Ask the questions provided on the slides one by one to assess the students’ understanding. Discuss the answers to the questions with the students. If necessary, you may ask additional relevant questions.
● Read aloud the questions provided in the Do It Yourself 1B section and encourage the students to solve the questions. Instruct them to write the answers in their book.
Correct Responses:
1. # Python program to compute sum of digits in a number. # Function to get sum of digits def getSum(n): sum = 0 for digit in str(n): sum += int(digit) return sum
n = 12345
print(getSum(n))
2. num = int(input(“ Enter a number : “)) # using the for loop to generate the multiplication tables print(“Table of: “) for a in range(1,11): print(num,’x’,a,’=’,num*a)
3. metres = float(input(“Enter the value in metres: “))
centimetres = metres * 100 print(metres, “metres is equal to”, centimetres, “centimetres.”)
Build
● Instruct the students to attempt the assignment by clicking on the Assignment tab.
● Explain the activity to the students.
● Conclude the session by summarising that loops are useful in Python because they allow you to execute a block of code repeatedly. Describe the two primitive loop statements of Python, i.e., while loop and for loop, along with their syntax, flowchart, and code.
● Assign the additional activity given on the panel to the students as homework.
● Assign the following questions from the Chapter Checkup given at the end of the chapter as homework.
A. Fill in the Blanks: Questions 3 and 4
C. Who Am I?: Questions 3 and 4
D. Write T for True and F for False: Question 5
E. Answer the Following Questions: Questions 1 and 2
F. Apply Your Learning: Questions 2, 3, and 4
This chapter is divided into the following classroom and lab sessions:
1. Strings
2. String Manipulation in Python
At the end of the session, the students will be able to:
● describe what strings are.
● explain different types of strings.
● use an eval function.
● create strings in Python.
Keyword
● String: A string is a data type that represents a sequence of characters.
Ask the students what they think the meaning of the word ‘string’ is.
Tell the students what strings are. Explain to them the different types of strings. Also, explain to them how to create strings in Python.
Action Plan
Warm Up
● Ask the students what they think the meaning of the word ‘string’ is.
● Now, build the concept by telling them a string is a data type that represents a sequence of characters.
Explain the following concepts:
Describe what strings are.
Explain different types of strings.
Tell the students that a string is a data type that represents a sequence of characters. In Python, strings are enclosed in single quotes (' ') or double quotes (" ")., as given on page 18.
Describe to the students that there are two types of strings: Single-line string and multi-line string, as given on page 18.
Use an eval function. Describe to the student that the eval() function evaluates a string expression and returns the result. Also, tell them about its syntax and example, as given on page 19.
Create strings in Python.
Describe to the student that in Python, single, double, or even triple quotes can be used to create strings, as given on page 19.
Ask additional questions from the students to check for understanding.
1. Name the two types of strings.
2. What is the syntax of the eval() function?
Correct Responses:
1. Single-line string and Multi-line string
2. Syntax: result = eval(expression)
Build
7 mins
● Conduct a group discussion in the class among the students on the topic “Difference between single-line and multi-line strings.”
Possible Responses: A single-line string can be enclosed in either single quotes or double quotes. Whereas, a multi-line string can be enclosed in either three single quotes (''' ''') or three double quotes (""" """).
3 mins
Sum Up
● Conclude the session by summarising that a string is a data type that represents a sequence of characters. In Python, strings are enclosed in single quotes. (' ') or double quotes (" "). These values can be words, symbols, characters, numbers, or a combination of all these. There are two types of strings in Python i.e., single-line string and multi-line string. In Python, single, double, or even triple quotes can be used to create strings.
● Assign the following questions from the Chapter Checkup given at the end of the chapter as homework.
A. Fill in the Blanks: Questions 1 and 2
B. Tick the Correct Option: Questions 1 and 4
C. Who Am I?: Questions 1 and 2
D. Write T for True and F for False: Questions 1 and 4
E. Answer the Following Questions: Questions 1 and 4
F. Apply Your Learning: Question 4
At the end of the session, the students will be able to:
● manipulate the string using various methods.
● solve the given examples.
Let the students watch the video or the learning slides related to the topic on the digital panel. Discuss the various methods to manipulate strings in Python. Also, help them solve the given examples. Attempt the activity on the Assignment page.
Conclude the concepts Assign homework
5 mins
● Instruct the students to go to Tekie’s Digital platform and open a Lab session on String Manipulation in Python.
● Show the Learning slides one by one and discuss the concepts shown on the slides in the panel.
15 mins
Engage
Explain the following concepts:
Learning Outcomes
Manipulate the string using various methods.
Explanation
Demonstrate to them how to concatenate two or more strings, replicate a string, replace a string, find the length of a string, access characters in a string, do string slicing, use in-built string methods and make decisions using string methods, as given on pages 20 to 24.
Solve the given examples. Tell the students to solve the examples, as given on page 25.
● Ask the questions provided on the slides one by one to assess the students’ understanding. Discuss the answers to the questions with the students. If necessary, ask additional relevant questions.
● Read aloud the questions provided in the Do It Yourself 2A section and encourage students to solve them. Instruct them to write the answers in the book.
Correct Responses:
1. user_input = input("Enter a string: ")
letters = 0
digits = 0 for char in user_input: if char.isalpha(): letters += 1 elif char.isdigit():
digits += 1
print("Number of letters:", letters)
print("Number of digits:", digits)
2. letter = input("Enter a letter: ").lower() if letter in 'aeiou': print("The letter is a vowel.") else:
print("The letter is a consonant.") else:
print(“The letter is a consonant.”)
Build
7 mins
● Instruct the students to click on the Practice button on the Assignment page to attempt the activity. Then, click on the Attempt button to open the activity page.
● Instruct the students to click on the Confirm button to submit their work when they are done with the activity.
3 mins
Sum Up
● Conclude the session by summarising that how to concatenate two or more strings, replicate a string, replace a string, find the length of a string, access characters in a string, do string slicing, use in-built string methods and make decisions using string methods.
● Assign the following questions from the Chapter Checkup given at the end of the chapter as homework.
A. Fill in the Blanks: Questions 3 and 4
B. Tick the Correct Option: Questions 2 and 3
C. Who Am I?: Questions 3 and 4
D. Write T for True and F for False: Questions 2 and 3
E. Answer the Following Questions: Questions 2 and 3
F. Apply Your Learning: Questions 1, 2, and 3
This chapter is divided into the following lab sessions
1. Lists
2. Tuples
At the end of the session, the students will be able to:
● explain what a list is.
● describe the characteristics of a list.
● create a list in Python.
● access elements of a list.
● use a set of built-in methods on lists.
Keywords
● List: It is a collection of various kinds of values. It can hold multiple values in a single variable.
● Indexing: It is used in Python to access list elements.
Let the students watch the video or the learning slides related to the topic on the digital panel.
Explain to the students about a list and its characteristics. Also demonstrate to them how to create a list, access elements of a list, and use a set of built-in methods on lists.
Attempt the activity on the Assignment page.
Conclude the concepts
Assign homework
● Instruct the students to go to the Tekie’s Digital platform and open a Lab session on Lists
5 mins
● Show the learning slides one by one and discuss the concepts shown on the slides in the panel.
Explain the following concepts:
Learning Outcomes
Explanation
Explain what a list is. Explain to the students that lists are a fundamental data type in Python. It is a collection of various kinds of values, as given on page 29.
Describe the characteristics of a list.
Create a list in Python.
Access elements of a list.
Use a set of built-in methods on lists.
Tell the students the various characteristics of a list that are ordered, accessed via the index, allow duplicate values, mutable, and variable size, as given on page 29.
Demonstrate to the students how to create a list in Python by enclosing the values or elements within square brackets [ ], separated by commas. Also tell them how to create a list with duplicate elements and mixed types of elements, as given on pages 29 and 30.
Tell the students that indexing is used in Python to access list elements. Demonstrate how to access elements of a list by writing Python codes, as given on page 30.
Tell the students that Python has a set of built-in methods that you can use on lists, for example, append(), clear(), count(), pop(), remove, etc. Demonstrate how to use these methods on lists by writing Python codes, as given on pages 31 to 33.
● Ask the questions provided on the slides one by one to assess the students’ understanding. Discuss the answers to the questions with the students. If necessary, ask additional relevant questions.
● Read aloud Question 2 provided in the Do It Yourself 3A section and encourage the students to solve the question. Instruct the students to write the answers in their book. Correct Response: list = [‘hat’, ‘shoes’, ‘belt’, ‘watch’, ‘jeans’] list.sort() print(“Items to buy (alphabetically sorted):”) print(list)
● Instruct the students to attempt the assignment by clicking on the Assignment tab.
● Explain the activity to the students.
● Conclude the session by summarising that lists are a fundamental data type in Python. It is a collection of various kinds of values. Revise the various characteristics of a list that are ordered, accessed via the index, allow duplicate values, mutable, and variable size. Indexing is used in Python to access list elements. Python has a set of built-in methods that you can use on lists.
● Assign the additional activity given on the panel to the students as homework.
● Assign the following questions from the Chapter Checkup given at the end of the chapter as homework.
A. Fill in the Blanks: Questions 1, 3, and 5
B. Tick the Correct Option: Questions 1, 2, 3, and 4
C. Who Am I?: Questions 1, 2, 3, and 4
D. Write T for True and F for False: Questions 1, 3, 4, and 5
E. Answer the Following Questions: Questions 1 and 3
F. Apply Your Learning: Questions 2, 4, and 5
At the end of the session, the students will be able to:
● explain what a tuple is.
● describe the characteristics of a tuple.
● create a tuple in Python.
● access elements of a tuple.
● use built-in methods on tuples.
● delete elements of a tuple.
● differentiate between lists and tuples.
Keyword
● Tuple: A tuple is an ordered, immutable collection of things or values.
Let the students watch the video or the learning slides related to the topic on the digital panel. Explain to the students about a tuple and its characteristics. Demonstrate to them how to create a tuple, access elements of a tuple, use built-in methods on tuples, and delete elements of a tuple. Tell them the differences between lists and tuples.
Attempt the activity on the Assignment page.
Conclude the concepts Assign homework
● Instruct the students to go to the Tekie’s Digital platform and open a Lab session on Tuples.
5 mins
● Show the learning slides one by one and discuss the concepts shown on the slides in the panel.
Explain the following concepts:
Explain what a tuple is. Tell the students that a tuple is an ordered, immutable collection of things or values, as given on page 33.
Describe the characteristics of a tuple.
Create a tuple in Python.
Access elements of a tuple.
Use Python has two built-in methods that you can use on tuples.
Delete elements of a tuple.
Differentiate between lists and tuples.
Explain to the students the characteristics of a tuple that are ordered, accessed via the index, immutable, and allows duplicate values, as given on page 33.
Tell the students that they can create a tuple by placing the values or elements inside the parentheses ( ), separated by commas. Demonstrate to them how to create a tuple with a single item, duplicate elements, and mixed elements, as given on pages 33 and 34.
Tell the students that indexing is used in Python to access tuple elements. Demonstrate to them how to access elements in a tuple, as given on page 34.
Demonstrate to the students how to use built-in methods count() and index() on tuples, as given on pages 34 and 35.
Tell the students that the tuple items are immutable. However, in order to delete the elements of a tuple, you can convert the tuple into a list, change the list, and convert the list back into a tuple. Demonstrate how to delete the elements of a tuple using the same concept, as given on pages 35 and 36.
Explain to the students that lists and tuples are both used to store items and organise data. But in lists, the elements can be changed after they are defined, while in tuples, the elements cannot be changed at all, as given on page 36.
● Ask the questions provided on the slides one by one to assess the students’ understanding. Discuss the answers to the questions with the students. If necessary, ask additional relevant questions.
● Read aloud Question 1 provided in the Do It Yourself 3A section and encourage the students to solve the question. Instruct the students to write the answers in their book.
Correct Response:
tuple = (‘potato’, ‘tomato’, ‘brinjal’, ‘ginger’, ‘garlic’) print(tuple)
Build
● Instruct the students to attempt the assignment by clicking on the Assignment tab.
● Explain the activity to the students.
7 mins
● Conclude the session by summarising that a tuple is an ordered, immutable collection of things or values. Revise the characteristics of a tuple that they are immutable, ordered, accessed via the index, and allow duplicate values. Revise about indexing in Python to access tuple elements. Python has two built-in methods that you can use on tuples: count() and Index(). To delete elements of a tuple, you need to first convert the tuple into a list. Also revise the differences between lists and tuples.
● Assign the additional activity given on the panel to the students as homework.
● Assign the following questions from the Chapter Checkup given at the end of the chapter as homework.
A. Fill in the Blanks: Questions 2 and 4
B. Tick the Correct Option: Question 5
C. Who Am I?: Question 5
D. Write T for True and F for False: Question 2
E. Answer the Following Questions: Questions 2, 4, and 5
F. Apply Your Learning: Questions 1 and 3
This chapter is divided into the following classroom and lab sessions:
Basics of HTML
Basic Tags of HTML
At the end of the session, the students will be able to:
● define HTML.
● explain about tags.
● discuss about elements.
● explain attributes.
● tell the structure of an HTML document.
Keywords
Understanding CSS
How to Use CSS in a Web
● HTML: HTML, the short form for HyperText Markup Language, is a markup language used to design web pages.
● Markup language: It refers to a language which creates a layout of web pages and applies formatting to them.
● Text editor: It is a software used to write the code of HTML documents.
● Web browser: A web browser is used to access and view web pages.
● Web page: It is a document placed on the World Wide Web (WWW) as a part of a website.
Ask the students if they know what a web page is.
Discuss HTML and its basic terminologies such as tags, elements, attributes, etc., with the students.
Think and Tell Conclude the concepts Assign homework
5 mins
Warm Up
● Ask the students if they know what a web page is.
● Now, build the concept by telling them that HTML is a markup language used to design web pages.
15 mins
Engage
Explain the following concepts:
Learning Outcomes
Explanation
Define HTML. Discuss with the students that HTML stands for HyperText Markup Language. HTML is a markup language used to design web pages. It defines the structure of a web page and tells the web browser how and where to display the content of the web page, as given on page 40.
Explain about tags. Describe that a tag is a basic building block of an HTML document that specifies how the content is displayed on the web page, as given on page 40.
Discuss elements. Explain to the students that the combination of the opening tag, content and closing tag is known as an element. There are two types of elements in HTML which are container elements and empty elements, as given on page 41.
Explain attributes. Describe to the students that an attribute provides additional information about an HTML element and modifies its behaviour, as given on page 41.
Tell the structure of an HTML document.
Explain to them that the structure of an HTML document is divided into two main parts: the head and the body, as given on pages 41 and 42.
● Read aloud the questions provided in the Do It Yourself 4A Question 1 section and encourage the students to solve the questions. Instruct the students to write the answers in their book.
Correct Responses:
1. <html></html>, <head></head>, and <body></body>
Build
7 mins
● Ask the students to answer the question, “How are tags and attributes different?”, mentioned in the Think and Tell section on page 41.
Possible Responses: A tag is a basic building block of an HTML document that specifies how the content is displayed on the web page. Whereas, an attribute provides additional information about an HTML element and modifies its behaviour.
● Conclude the session by summarising that HTML stands for HyperText Markup Language. HTML is a markup language used to design web pages. A tag is a basic building block of an HTML document that specifies how the content is displayed on the web page. The combination of an opening tag, content and closing tag is known as an element. An attribute provides additional information about an HTML element and modifies its behaviour. The structure of an HTML document is divided into two main parts: the head and the body.
● Assign the following questions from the Chapter Checkup given at the end of the chapter as homework.
A. Fill in the Blanks: Questions 1 and 2
B. Tick the Correct Option: Question 1
D. Write T for True and F for False: Question 1
E. Answer the Following Questions: Questions 1 and 2
At the end of the session, the students will be able to:
● explain and use basic tags of HTML.
Let the students watch the video or the learning slides related to the topic on the digital panel.
Demonstrate how to use basic HTML tags to create a web page.
Attempt the activity on the Assignment page.
Conclude the concepts
Assign homework 5 mins 15 mins 7 mins 3 mins
5 mins
● Instruct the students to go to Tekie’s Digital platform and open a Lab session on Basic Tags of HTML.
● Show the Learning slides one by one and discuss the concepts shown on the slides in the panel.
15 mins
Engage
Explain the following concepts:
Learning Outcome
Explain and use basic tags of HTML.
Explanation
Discuss some basic tags in HTML like <h1> to <h6>, <sub>, <sup>, <b>, etc. Also demonstrate how to use these tags to create a web page, as given on pages 42 and 43.
● Ask the questions provided on the slides one by one to assess the students’ understanding. Discuss the answers to the questions with the students. If necessary, ask additional relevant questions.
● Read aloud the questions provided in the Do It Yourself 4A Question 2 section and encourage students to solve them. Instruct them to write the answers in the book.
Correct Responses: 2. a. <b> b. <p> c. <i>
● Instruct the students to click on the Practice button on the Assignment page to attempt the activity. Then, click on the Attempt button to open the activity page.
● Instruct the students to click on the Confirm button to submit their work when they are done with the activity.
3 mins
Sum Up
● Conclude the session by summarising the basic tags of HTML like <h1> to <h6>, <sub>, <sup>, <b>, etc. Give them an example to explain each tag.
● Assign the additional activity given on the panel to the students as homework.
● Assign the following questions from the Chapter Checkup given at the end of the chapter as homework.
A. Fill in the Blanks: Question 3
B. Tick the Correct Option: Questions 2 and 3
C. Who Am I? : Question 1
D. Write T for True and F for False: Questions 3 and 4
F. Apply Your Learning: Question 1
At the end of the session, the students will be able to:
● define CSS.
● discuss about CSS selectors.
● explain properties and values.
Keyword
● CSS: CSS, the short form for Cascading Style Sheets, is a language used to style HTML elements.
Ask the students if they know how can they change the look and feel of a web page.
Explain about CSS, selectors, properties and values to the students.
Group discussion Conclude the concepts Assign homework
● Ask the students if they know how they can change the look and feel of a web page.
5 mins
● Now, build the concept that Cascading Style Sheets (CSS) is a language used to style the HTML elements. It allows us to change the look and feel of the web pages.
15 mins
Engage
Explain the following concepts:
Learning Outcomes
Explanation
Define CSS. Describe that Cascading Style Sheets (CSS) is a language used to style the HTML elements. It allows us to change the look and feel of the web pages, as given on page 43.
Discuss about CSS selectors. Tell the students that CSS uses selectors to target HTML elements. Selectors can target elements by tag name, class, ID, attribute, and more, as given on page 43.
Explain properties and values.
Discuss with the students that CSS is used in a property-value pair. CSS properties define the styles that are to be applied to the selected elements, and values specify the settings for those properties. Explain about different CSS properties, as given on pages 43 and 44.
Ask the following questions to the students to check for understanding.
Describe the following properties.
1. padding
2. margin
3. opacity
4. text-align
Correct responses:
1. Padding sets the space around the content of the element.
2. Margin sets the space around the element itself.
3. Opacity specifies the transparency of the element.
4. Text-align aligns the text horizontally within a box.
Build
7 mins
● Conduct a group discussion in the class among the students on the topic ‘ What is the use of selectors?’
Possible Responses: CSS uses selectors to target HTML elements. Selectors can target elements by tag name, class, ID, attribute, and more.
3 mins
Sum Up
● Conclude the session by summarising that Cascading Style Sheets (CSS) is a language used to style HTML elements. CSS uses selectors to target HTML elements. Selectors can target elements by tag name, class, ID, attribute, etc. CSS is used in a property-value pair.
● Assign the following questions from the Chapter Checkup given at the end of the chapter as homework.
B. Tick the Correct Option: Question 4
C. Who Am I? : Questions 2 and 4
D. Write T for True and F for False: Question 2
E. Answer the Following Questions: Questions 3 and 4
At the end of the session, the students will be able to:
● use CSS on a web page.
Let the students watch the video or the learning slides related to the topic on the digital panel.
Discuss different ways to use CSS on a web page.
Attempt the activity on the Assignment page.
Conclude the concepts
Assign homework
5 mins
● Instruct the students to go to Tekie’s Digital platform and open a Lab session on How to Use CSS in a Web Page
● Show the Learning slides one by one and discuss the concepts shown on the slides in the panel.
15 mins
Engage
Explain the following concepts:
Learning Outcome
Explanation
Use CSS on a web page. Tell the students that CSS can be used in three ways on a web page which are, Inline CSS, Internal CSS, and External CSS, as given on pages 44 and 45.
● Ask the questions provided on the slides one by one to assess the students’ understanding. Discuss the answers to the questions with the students. If necessary, ask additional relevant questions.
● Instruct the students to click on the Practice button on the Assignment page to attempt the activity. Then, click on the Attempt button to open the activity page.
● Instruct the students to click on the Confirm button to submit their work when they are done with the activity.
● Conclude the session by summarising that CSS can be used in three ways on a web page which are, Inline CSS, Internal CSS, and External CSS.
● Assign the additional activity given on the panel to the students as homework.
● Assign the following questions from the Chapter Checkup given at the end of the chapter as homework.
A. Fill in the Blanks: Question 4
C. Who Am I? : Question 3
F. Apply Your Learning: Question 2
This chapter is divided into the following lab sessions
1. Creating Forms in HTML 1
2. Creating Forms in HTML 2
At the end of the session, the students will be able to:
● describe HTML forms.
● discuss about the various elements of a form.
● create and display a form.
● use the attributes of the <form> element.
● validate a form.
Keywords
● HTML form: HTML forms are commonly used when websites need to gather information from users.
● Form validation: Form validation is to ensure that users provide the correct type of information.
Let the students watch the video or the learning slides related to the topic on the digital panel.
Describe to the students about HTML forms. Explain to them about the various form attributes. Discuss with them how to validate a form.
Attempt the activity on the Assignment page.
Conclude the concepts
Assign homework
● Instruct the students to go to the Tekie’s Digital platform and open the Lab session on Creating Forms in HTML 1
● Show the learning slides one by one and discuss the concepts shown on the slides in the panel.
Engage
Explain the following concepts:
Describe HTML forms. Tell the students that HTML forms are used to collect information from users, such as their names, email addresses, and hobbies, as given on page 48. Discuss about the various elements of a form.
Create and display a form.
Use the attributes of the <form> element.
Explain the various form elements like <input>, <textarea>, <button>, and <select>. Demonstrate the usage of elements and options in forms, as given on pages 48 to 51.
Demonstrate to them how to use different elements to create a form, as given on pages 51 and 52.
Demonstrate the different attributes used to control the behaviour of the form, as given on page 53.
Validate a form. Tell the students that form validation means checking the form details provided by the user, as given on page 53.
● Ask the questions provided on the slides one by one to assess the student’s understanding. Discuss the answers to the questions with the students. If necessary, ask additional relevant questions.
● Read aloud the questions provided in the Do It Yourself 5A section and encourage the students to solve the questions. Instruct the students to solve the answers in their books.
Correct Answers:
1. a. Radio b. Action
2. a. Method attribute specifies the Hyper Text Transfer Protocol (HTTP) method to be used.
b. The Radio button option allows users to select one option from a list.
Build
● Instruct the students to attempt the assignment by clicking on the Assignment tab.
● Explain the activity to the students.
7 mins
● Conclude the session by summarising that HTML forms are used to collect information from users. <input>, <textarea>, <button>, and <select> are the various form elements. We have various form attributes that are used to control form elements. Also, validation of the form means checking the form details provided by the user.
● Assign the following questions from the Chapter Checkup given at the end of the chapter as homework.
A. Fill in the Blanks: Questions 1, 2, 3, and 4
B. Tick the Correct Option: Questions 1, 2, 3, 4, and 5
C. Write T for True and F for False: Questions 1, 2, 3, 4, and 5
D. Answer the Following Questions: Questions 1, 2, 4, and 5
E. Apply Your Learning: Questions 2 and 3
At the end of the session, the students will be able to:
● develop an HTML form.
● decorate the form using internal CSS.
Keyword
● Internal CSS: You can make your HTML forms look attractive and arrange them on a web page by using the style element.
Let the students watch the video or the learning slides related to the topic on the digital panel.
Describe CSS and the usage of CSS in HTML. Explain how to style a form using internal CSS.
Attempt the activity on the Assignment page Conclude the concepts Assign homework
Action Plan
Warm Up
● Instruct the students to go to the Tekie’s Digital platform and open the Lab session on Creating Forms in HTML 2
● Show the learning slides one by one and discuss the concepts shown on the slides in the panel.
Explain the following concept:
Learning Outcome
Explanation
Use internal CSS. Demonstrate the usage of internal CSS to style a form in HTML, as given on pages 53 to 55.
● Ask the questions provided on the slides one by one to assess the student’s understanding. Discuss the answers to the questions with the students. If necessary, ask additional relevant questions.
● Read aloud the question provided in the Do It Yourself 5A section and encourage the students to solve it. Instruct the students to write the answer in their books.
Correct Answer:
Question 1: c. <style>
● Instruct the students to attempt the assignment by clicking on the Assignment tab.
● Explain the activity to the students. Sum Up
● Conclude the session by summarising the importance of CSS in forms.
7 mins
3 mins
● Assign the following questions from the Chapter Checkup given at the end of the chapter as homework.
A. Fill in the Blanks: Question 5
D. Answer the Following Questions: Question 3
E. Apply Your Learning: Question 1
This chapter is divided into the following classroom and lab sessions:
1. Adding Images and Creating Links
2. Inserting Audio and Video in a Web page
At the end of the session, the students will be able to:
● add images.
● create links.
Keyword
● Link: A link, also known as a hyperlink, is a text with the functionality to navigate you to some other web pages of the website.
Ask the students importance of adding images.
add images and create links on the web pages.
Warm Up
● Ask the students importance of adding images.
● Now, build the concept by telling them multimedia elements like images, links, audio, and video are used to enhance the user experience on a web page.
Explain the following concepts:
Learning Outcomes
Explanation
Add images. Tell them that they need to use the <img> tag to add images to a web page, as given on pages 58 to 60.
Create links. Describe that the <a> tag is used to create links in HTML. Tell them how to create links on a web page, as given on pages 60 and 61.
● Read aloud the questions provided in the Do It Yourself 6A section and encourage the students to solve the questions. Instruct the students to write the answers in their book.
Correct Responses:
1. a. <img src=”flower.jpg” alt=”Flower”>
b. <a download href=”flower1.jpg”> Flower </a>
2. img { border: 10px solid } Build
7 mins
● Conduct a group discussion in the class among the students on the topic “What are the attributes of <a> tag?”
Possible Responses: href and download
Sum Up
3 mins
● Conclude the session by summarising that the <img> tag of HTML allows us to add images to the web page. A link, also known as a hyperlink, is a text with the functionality that helps you to navigate some other web page of the website. The <a> tag is used to create links in HTML.
● Assign the following questions from the Chapter Checkup given at the end of the chapter as homework.
A. Fill in the Blanks: Questions 1 and 2
B. Tick the Correct Option: Questions 1 and 3
C. Who Am I?: Question 1
D. Write T for True and F for False: Questions 1, 3, and 4
E. Answer the Following Questions: Questions 1 and 3
F. Apply Your Learning: Questions 1, 3, and 4
At the end of the session, the students will be able to:
● add audio on a web page.
● add video on a web page.
Up Engage Build Sum Up
Let the students watch the video or the learning slides related to the topic on the digital panel.
Discuss how to add audio and video on a web page.
Attempt the activity on the Assignment page.
Warm Up Action Plan
● Instruct the students to go to Tekie’s Digital platform and open a Lab session on Inserting Audio and Video in a Web page.
● Show the Learning slides one by one and discuss the concepts shown on the slides in the panel.
Explain the following concepts:
Learning Outcomes
Add audio on a web page.
Add video on a web page.
Explanation
Demonstrate to the students that HTML provides the <audio> tag to insert audio files on a web page. Explain to them the various attributes of the <audio> tag. Also demonstrate to them how to create a web page to add an audio file, as given on page 62.
Tell the students that HTML allows us to add a video on a web page using the <video> tag. Explain to them the attributes of the <video> tag. Demonstrate to them how to create a web page to add a video, as given on page 63.
● Ask the questions provided on the slides one by one to assess the students’ understanding. Discuss the answers to the questions with the students. If necessary, ask additional relevant questions.
● Read aloud the questions provided in the Do It Yourself 6B section and encourage students to solve them. Instruct them to write the answers in the book.
Correct Responses: 1.
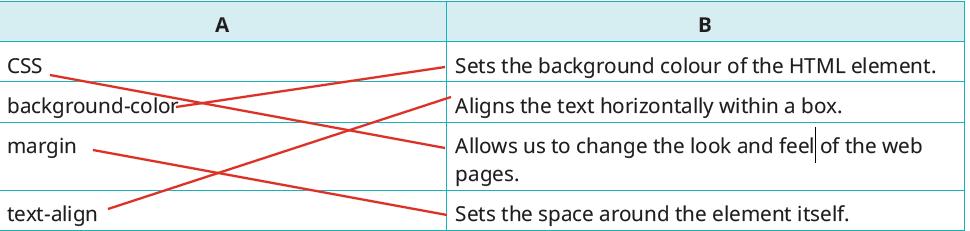
2. Autoplay, Controls, Loop
Build
7 mins
● Instruct the students to click on the Practice button on the Assignment page to attempt the activity. Then, click on the Attempt button to open the activity page.
● Instruct the students to click on the Confirm button to submit their work when they are done with the activity.
3 mins
● Conclude the session by summarising that HTML provides the <audio> tag to insert audio files on a web page. The <source> tag is used with the <audio> tag to specify the path of the audio file. HTML allows us to add a video on a web page using the <video> tag. The <source> tag is used with the <video> tag to specify the path of the video file.
● Assign the following questions from the Chapter Checkup given at the end of the chapter as homework.
A. Fill in the Blanks: Questions 3 and 4
B. Tick the Correct Option: Questions 2 and 4
C. Who Am I?: Questions 2, 3, and 4
D. Write T for True and F for False: Question 2
E. Answer the Following Questions: Questions 2 and 4
F. Apply Your Learning: Question 2
Chapter Checkup
A. Fill in the Blanks.
1. Computer network 2. Bus 3. MAN 4. Inconsistency 5. Antivirus
B. Tick () the Correct Option.
1. c. High maintenance cost 2. a. Data, Resources 3. d. Redundancy 4. a. LAN 5. c. Router
C. Write T for True and F for False.
1. T 2. F 3. F 4. F 5. T
D. Answer the Following Questions.
1. WAN (Wide Area Network) connects computers from various countries and continents. WAN connects different LANs and MANs from across the globe. The internet is an example of a WAN.
2. Following are the advantages of computer networks:
a. Cost Reduction: Because the hardware resources (printers and scanners) are shared among all the computers on the network, the cost of additional equipment is saved.
b. Less Data Redundancy: Data redundancy occurs when the same piece of data exists in multiple places. All the data on the computer network is stored on the server. Therefore, there is less redundancy in the network.
c. Less Data Inconsistency: Data inconsistency means when the same data exists in different formats at different places. Since data redundancy is reduced, it also reduces data inconsistency.
d. Data Centralisation: All the data in a computer network is stored on a server at a centralised location. This centralised storage of data provides easy accessibility to all users.
e. Data Recovery: The server’s capability of taking regular data backup helps with easy data recovery in case of data loss or network failure.
3. A hub is a networking device that transmits the received information to all the devices on the network. A router is a device which routes the data or information over a network.
4. In star topology, the nodes are connected to a centralised hub, switch, or a computer, forming a star. The disadvantage of the star topology is that if the central computer fails, the whole network will be disabled.
5. Following are the differences between bus and ring topologies:
In a bus topology, all the nodes are connected to a single common cable. In ring topology, the nodes are connected to each other, forming a ring.
A node puts a message on the cable that is sent to all other nodes in a network.
E. Apply Your Learning.
1. She should use a WAN.
2. Ring topology
A node forwards the message received from the previous node to the following node.
3. Wi-Fi is more beneficial than a wired network because it uses wireless communication technology to connect various devices like computers, smartphones, tablets, etc., to the internet without the need for physical cables.
4. Three disadvantages of computer networks are security concerns, data loss in case of a network failure, and complex architecture.
5. Connecting computers to computer networks brings many benefits, such as file sharing, communication, database access, data backup, etc.
Chapter Checkup
A. Fill in the Blanks.
1. Cyberbullying 2. Permission 3. Sensitive 4. Harmful 5. Identity
B. Tick () the Correct Option.
1. b. To imitate trusted entities 2. b. Ethical hacking 3. a. To track your online actions
4. c. Financial gain and dishonest behaviour 5. c. Acting ethically and responsibly online
C. Who Am I?
1. Digital Citizen 2. Online Etiquette 3. Cyberbullying 4. Plagiarism 5. Digital Footprints
D. Write T for True and F for False.
1. T 2. T 3. F 4. T 5. F
E. Answer the Following Questions.
1 Using the internet to harass, scare, or hurt people is referred to as cyberbullying. Cyberbullying can happen if you send or receive messages to humiliate or threaten someone, spread untrue rumours, post embarrassing images, or create fake profiles.
2. Digital citizenship is the term used to describe the ethical and responsible use of technology. Digital citizenship is important for young internet users because, by engaging in good digital citizenship, they help create a more secure and civilised online community for everyone.
3. Three online safety measures that can help protect personal information and privacy are:
i. Use Secure Passwords: Create strong, challenging passwords for each of your accounts and change them frequently. Use a combination of symbols, numbers, and letters.
ii. Protect Personal Information: Exercise caution while disclosing personal information on websites and social media. Do not disclose too much personal information to the public.
iii. Privacy Settings: Limit who can view your information, review and modify the privacy settings on social media sites and online accounts.
4. Intellectual property refers to the ownership and protection of creative and unique ideas, inventions, and digital works over the internet. Examples include copyrights, patents, trademarks, and trade secrets.
5. The advantages of cyber ethics are:
i. Privacy Safeguards: Cyber ethics emphasises on protecting people’s privacy online. This includes respecting user consent, handling sensitive data securely, and preventing unauthorised access or data breaches.
ii. Online Behaviour: Cyber ethics promotes respectful and responsible online communication. This involves refraining from cyberbullying and other harmful types of behaviour.
iii. Digital Security: Intellectual property refers to the ownership and protection of creative and unique ideas, inventions, and digital works over the internet. It is very important to respect and not use people’s digital work online, such as videos, music, and software, without permission.
iv. Bridging the Digital Divide: Not all sections of society have the same access to technology. The poor, for example, have limited access. Ethical use of technology promotes equitable access to technology for all members of society.
v. Accountability: People and organisations need to be accountable for their online behaviour in the digital age. This includes taking responsibility for errors, making changes for harm done, and upholding moral principles in all online activities.
F. Apply Your Learning.
1. Sneha's classmates are exhibiting inappropriate behaviour, which falls under cyberbullying. Using the internet to harass, scare, or hurt people is referred to as cyberbullying. This is unethical behaviour as it can cause emotional distress and harm self-esteem.
2. The name of the activity is spamming. Spamming refers to sending lots of unwanted and annoying messages to many people, often to make money or promote something.
3. Prabha should not respond to the email asking for her bank account details. This might be an attempt at phishing, which is a dishonest internet practice in which attackers pretend to be reliable organisations and trick people into disclosing personal information like their financial information. The attackers can then use this information to do malicious things, like steal money or identities. The most common form of phishing is email phishing.
4. Ravi should be aware of and follow the given ethical practices while being online to search for information:
i. Privacy protection: Digital citizens should keep their information private, including passwords and communications.
ii. Using reliable sources: Always verify the reliability of information before sharing it to stop the spread of false information.
iii. Copyright awareness: Be aware of copyright and refrain from using other people’s work frequently. Do not use anybody else’s work without their consent or due attribution.
iv. Cybersecurity: Follow practices such as using secure passwords and keeping software up-to-date to attain a secure working environment.
5. We should not believe and respond to an email stating that we have won an iPhone. This might be an attempt of email phishing, which is a dishonest internet practice in which attackers pretend to be reliable organisations and trick people into disclosing personal information like their financial information. The attackers can then use this information to do malicious things, like steal money or identities.
Chapter Checkup
A. Fill in the Blanks.
1. block 2. blockchain 3. privacy 4. individuals 5. bank
B. Tick () the Correct Option.
1. a. Anyone can easily change information in a blockchain
2. b. Transparency
3. b. Every individual on the blockchain
4. d. Difficulty in communication between different blockchains
C. Who Am I?
1. Blockchain 2. Cryptocurrency 3. Banking system 4. Indian Rupee, or INR 5. Block
D. Write T for True and F for False.
1. F 2. T 3. T 4. F 5. F
E. Answer the Following Questions.
1. Blockchain is a shared, unchangeable record that helps track transactions and assets in a business network. It is a digital technology for storing and securing information. For example, cryptocurrencies do not have a banking system that records transactions. They work on blockchain.
2. Cryptocurrency is a purely digital or virtual currency that can also work as a medium of exchange. But, it exists only in digital form and doesn’t have physical coins or banknotes. Bitcoin is the name of a famous Cryptocurrency.
3. Blockchains ensure security and immutability as they do not allow any user to change or delete the information. Also, no user can see each other’s personal information.
4. Transparency, means that everyone who is a part of that blockchain can see all the information, and nothing is kept hidden from them. This helps to build trust among the users.
5. Following are the challenges of blockchains: i. Long Validation Process: Blockchains can provide accurate information, but the process of validation itself is sometimes very cumbersome.
ii. Slow Speed in Working with Large Amounts of Information: If there are too many transactions that involve several people, then maintaining verified information at each step would become very difficult. So, while working on a larger scale, maintaining speed with security is difficult.
iii. Interoperability: Blockchains are decentralised, and different blockchains can be fundamentally different in the way they have been designed and created. This sometimes makes it difficult for different blockchains to communicate with one another.
iv. Legal Challenges: Laws related to IT and technology tend to vary from country to country, so legal situations while dealing with blockchains might be complicated.
F. Apply Your Learning.
1. Decentralised system
2. Using blockchain for library book management enables immutable records of book transactions, ensuring accuracy in borrowing and returning processes. Decentralisation enhances reliability and accessibility for all users.
3. If anyone could change their cryptocurrency balance to show that they have more money than they actually do, the system would become unreliable. To prevent this, blockchain ensures that all transactions are verified and securely recorded. We do not have a bank in the case of cryptocurrencies, but the information regarding the amount is held within the blockchain. This information has been verified by multiple users, and records can be doublechecked at any time and from any place.
4. The INR is the national currency of our country. When we make a digital transaction, the bank digitally certifies that we have the money and lets us make the purchase. Once the purchase is made, the money is immediately debited from our bank account. Blockchain often involves using cryptocurrencies, like Bitcoin, for payment. Unlike traditional currencies, cryptocurrencies do not have a banking system that records transactions. Information regarding the amount is held within the blockchain. This information can be verified by multiple users, and records can be double-checked at any time and from any place.
Chapter Checkup
A. Fill in the Blanks.
1. app 2. E-commerce 3. Hybrid 4. palette 5. social networking
B. Who Am I?
1. Banking app 2. MIT App Inventor 3. App 4. Properties section 5. Hybrid
C. Write T for True and F for False. 1. T 2. T 3. F 4. T 5. T
D. Answer the Following Questions.
1. Banking apps are like a virtual bank branch on your phone or tablet. They are the special apps provided by your bank to help you do immediate money transactions without going to the bank in person.
2. Hybrid apps can work on different types of phones and use web technologies, allowing them to work on multiple platforms and access device features. They are compatible with both iPhones and Android phones and can be downloaded and installed from their respective app stores, such as the Google Play Store for Android phones and the App Store for iPhones.
3. Difference between web apps and desktop apps:
Desktop Apps
Desktop apps are like the computer version of the apps you use on your phone, but they are designed to work on your computer and do all sorts of different things, from writing documents to playing games or editing pictures.
Web Apps
A web app is a software application that operates on web servers and is accessed by users through web browsers over the internet.
Desktop apps can be used on a computer or a laptop where they are installed and run locally. Since web apps are hosted on web servers, users can access them from anywhere, using various devices, without the need for installation
Skype, Microsoft PowerPoint, Paint, Microsoft Excel, and iTunes are a few examples of desktop apps.
Padlet, YouTube, Gmail, and Google Drive are a few examples of web apps.
4. Native apps are specifically designed for a particular type of phone, such as iPhones or Android phones. They are known for their high speed and excellent performance because they are designed exclusively for your phone. Examples of native apps include Camera, Gallery, Clock, Maps, and Settings.
5. MIT App Inventor is a visual development platform that allows users to create mobile applications for Android devices without the need to write traditional codes. It provides a visual, drag-and-drop interface for designing the user interface and functionality. Users can assemble components and connect blocks to create the app’s logic.
E. Apply Your Learning.
1. Ramesh can visit the following website: https://appinventor.mit.edu/
2. E-commerce apps are online stores on your phone or tablet. They are special apps that let you shop for all sorts of things without having to go to a physical store. A few examples are Amazon, Flipkart, etc.
3. Umang can download an app from the Apple App Store.
4. Web apps, short for web applications, are software applications that run on web servers and are accessed through web browsers over the internet.
5. Meher has installed a hybrid app.
Chapter Checkup
A. Fill in the Blanks.
1. control, interact 2. automated 3. tangible 4. Augmented Reality 5. Headset
B. Who Am I?
1. Generative AI 2. Brain-computer Interfaces 3. Augumented Reality 4. 3D printer
5. Virtual Reality
C. Write T for True and F for False.
1. F 2. T 3. T 4. F 5. T
D. Answer the Following Questions.
1. Here are some practical uses of AR:
Gaming: With AR games, you can see and interact with virtual objects in your real surroundings.
Shopping: You can try on clothes, makeup, or spectacles, etc., virtually without going to a store.
Navigation: Using AR, you can find easy way in a new city, discover nearby places of interest, or get realtime information while driving.
Science and Experiments: AR helps you understand complex ideas by showing them visually.
2. Robots in daily life:
Vacuum Cleaners: These are autonomous vacuum-cleaning robots that navigate your home and clean the floors without human intervention.
Medical Devices: In some healthcare settings, robots assist in surgeries, deliver medications, or help with rehabilitation exercises.
Drones: Unmanned aerial vehicles (UAVs) or drones are used for tasks such as aerial photography, surveillance, and even package delivery.
Traffic Lights and Road Signs: Some traffic management systems use sensors and automation to optimise traffic flow and improve safety.
Automated Coffee Machines: Coffee shops and vending machines often use robotic systems to grind beans, brew coffee, and serve drinks.
3. Brain-computer interfaces (BCIs) are a fascinating area of technology that allow direct communication between the brain and a computer. They work by translating brain signals into commands that can control devices or software.
4. The Metaverse is a virtual space where people interact in real time using augmented and virtual reality technologies. It combines aspects of social media, online gaming, and virtual worlds, allowing users to work, play, shop, and socialise in an immersive, 3D digital environment.
5. Biotechnology is a stream of science that uses living things, like cells and bacteria, to make useful things. It is like using tiny living factories to create medicines, food, and other amazing things that can help people and the environment.
E. Apply Your Learning.
1. Robots in daily life:
Vacuum Cleaners: These are autonomous vacuum-cleaning robots that navigate your home and clean the floors without human intervention.
Medical Devices: In some healthcare settings, robots assist in surgeries, deliver medications, or help with rehabilitation exercises.
Drones: Unmanned aerial vehicles (UAVs) or drones are used for tasks such as aerial photography, surveillance, and even package delivery.
Traffic Lights and Road Signs: Some traffic management systems use sensors and automation to optimise traffic flow and improve safety.
Automated Coffee Machines: Coffee shops and vending machines often use robotic systems to grind beans, brew coffee, and serve drinks.
2. Augmented Reality (AR) is a technology that overlays digital content, like images, text, or animations, onto the real world. This is done using devices such as smartphones, tablets, or AR glasses. Whereas, Virtual reality is a technology that creates a fully immersive, computer-generated environment that users can interact with. Users wear VR headsets that block out the real world and replace it with a digital environment, giving the sensation of being in a different place or world.
3. Soumya can include the following points in her presentation:
● Brain-computer interfaces (BCIs) are a fascinating area of technology that allow direct communication between the brain and a computer.
● They work by translating brain signals into commands that can control devices or software.
● The primary purpose of BCIs is to enable individuals to control and interact with computers, robotic systems, or other devices directly using their brain activity without the need for traditional input methods like keyboards or mouse.
4. Manish can take the following steps:
a. Design Creation: Start by creating a digital 3D model using CAD software.
b. File Preparation: Convert the 3D model into a .STL file, then use slicing software to divide it into thin horizontal layers.
c. Printing Process: Load the sliced file into the 3D printer, which will print the object layer by layer by depositing material like plastic, resin, or metal.
d. Layer Formation: Each layer solidifies or cures as it is printed, building up the solid object until complete.
e. Post-Processing: After printing, remove any support structures, sand the object, or paint it to finalise the physical product.
5. Role of Computers in Biotechnology:
a. Machine learning and artificial intelligence are increasingly used in biotechnology. They can help in drug discovery, predicting disease outbreaks, and even analysing medical images like X-rays and MRIs.
b. DNA sequencing, which is crucial for understanding genetics, relies heavily on computer algorithms. High-performance computing is used to process the enormous amount of data generated during DNA sequencing.
c. Biotechnology labs often use automated equipment controlled by computers. Robots can perform repetitive tasks like mixing chemicals, running experiments, and even handling samples, making research more efficient and accurate.
Chapter Checkup
A. Fill in the Blanks.
1. data 2. column 3. DBMS 4. percent 5. SQL
B. Tick () the Correct Option.
1. b. A collection of organised information 2. c. Oracle 3. d. Network
4. c. A row in a database table 5. b. Composite Key
C. Who Am I?
1. Wildcard operator: A special character for pattern matching in text data
2. DBMS: A software application that helps users create, manage, and access databases
3. Different types of DBMS: Relational, hierarchical, and network
4. Components of a DBMS: Data, hardware, software, users, procedures, and database access language
5. Attribute: A column in a database table
D. Write T for True and F for False.
1. T 2. T 3. T 4. F 5. F
E. Answer the Following Questions.
1. Relational Database Management System (RDBMS) holds data in the form of tables, which are made up of rows and columns.
2. The SQL statements or commands that are used to insert, delete, or update data in the table of the database are called DML commands. For example, insert, delete, update, etc.
3. Here are some of the advantages of using a database:
● It can carry vast quantities of data.
● It can organise data in a manner that makes it easier to retrieve.
● It can be used to modify and erase data rapidly.
● It can be used to share data with others.
4. A database management system (DBMS) is a software application that enables you to construct, operate, and interact with databases. Some common examples of DBMSs are MySQL, Microsoft SQL Server, and Oracle.
5. Wildcard operators in SQL are special characters for pattern matching in text data. They help in finding data that matches a pattern, not just an exact value. They are used with the ‘like’ clause in an SQL query. Two main wildcard characters used in SQL are ‘%’ (matches multiple characters) and ‘_’ (matches a single character).
F. Apply Your Learning.
1. Select Emp_ID, Emp_Name From Employee;
2. Select Emp_Name From Employee Where Salary<23000;
3. Select Emp_ID, Emp_Name From Employee Where Salary>23000;
4. Select Max(Salary), Min(Salary) From Employee;
5. Insert into Employee (Emp_ID, Emp_Name, Salary) Values (5, 'Raman', 27500); Insert into Employee (Emp_ID, Emp_Name, Salary) Values (6, 'Smita', 24300);
Chapter Checkup
A. Fill in the Blanks.
1. uploads 2. create a design 3. preview 4. trim and split 5. canvas
B. Tick () the Correct Option.
1. b. The timing of video elements
C. Who Am I?
1. Timeline 2. Canvas 3. Animate 4. Grid view 5. Elements
D. Write T for True and F for False.
1. T 2. F 3. F 4. T 5. T
E. Answer the Following Questions.
1. Video editing is the process of arranging and modifying video clips to create a video project. It involves cutting, adding and enhancing clips to make the video more interesting and effective.
2. Timeline helps arrange objects like text, images and images in the desired sequence.
3. Basic video editing tools are trimming, splitting, resizing, and cropping video.
4. The Preview option allows you to see how your video will appear to your audience. It is a valuable tool for reviewing your video before finalizing it, ensuring everything looks and sounds just right.
5. Steps to add a text:
1. Click on the Text option in the sidebar.
2. Select a text style and click on it to add it to the canvas.
3. Double-click on the text box to edit the text. Change the font, size, colour and position as needed.
4. Click on the Elements option in the sidebar. Search for graphics or stickers and drag them onto the canvas.
F. Apply Your Learning.
1. She can resize the video clip from its ends to fit it according to the dimensions.
2. Kavita can addthe background music to her video by clicking on the Audio effects option on the top of the canvas.
3. Rahul wants to add captions to his video by clicking on the text option to add text.
4. Ravi needs to ensure that video elements appear at the right times. Timeline tool is used in Canva to manage the timing of these elements.
5. Arjun uses the Draw tool to create a drawing using his imagination.
Chapter Checkup
A. Fill in the Blanks.
1. intelligent 2. medical images 3. transport 4. social media 5. math
B. Tick () the Correct Option.
1. c. visualisation 2. b. Predicting weather patterns 3. b. Performances 4. a. Vehicle sensors
5. a. Inventory
C. Who Am I?
1. Data Science in Retail 2. Data Science in Entertainment 3. Data Science in Transport
4. Data Science in Transport 5. Data Science in Environment Protection
D. Write T for True and F for False.
1. T 2. F 3. T 4. F 5. T
E. Answer the Following Questions.
1. AI can be defined as a branch of computer science concerned with creating intelligent machines that can learn from data, solve problems, and make decisions.
2. Data science plays an important role in the healthcare sector. Data science algorithms analyse medical images to detect symptoms of diseases with high accuracy, helping doctors diagnose their patients in the early stages of a disease. It uses patient data, such as their medical history, to predict which patients are at risk of developing chronic diseases and recommends preventive measures for these diseases.
3. Data science involves the following processes:
● Collecting the data
● Analysing the data
● Using data to solve problems or make data-driven decisions
For example: Suppose your school wants to find out which sports or games students like the most. Here are the steps they could follow.
Collecting data: The school distributes a survey to every student, asking about their favourite sport.
Analysing data: After collecting responses, they examine the survey results to identify the most popular sport. Making data-driven decisions: With this information, the school can decide which sport or game to organise more frequently.
This process ensures that decisions are based on data, leading to better outcomes that align with students’ preferences.
4. Data science has transformed the sports industry by enhancing performance analysis, strategy development, and fan engagement. It helps study players’ performances in terms of various parameters, like speed and technique, to optimise training and game strategies. For example, data on batting patterns and defensive moves in cricket helps coaches develop better game plans. Smart wearable devices help to track athletes’ health and fitness data in real-time to personalise training needs and prevent injuries.
5. Data science makes the entertainment sector more personalised by analysing data to understand what people like or dislike. For example, streaming services like Netflix use data on what films or shows you watch to recommend new films and shows you might enjoy. Music apps like Spotify create personalised playlists by analysing what you listen to more frequently. Video games also use data science to tailor game experiences to your preferences.
F. Apply Your Learning.
1. Data science can analyse usage patterns to identify wastage and suggest energy-saving measures.
2. Analyse patient flow and optimise staff allocation to reduce waiting periods.
3. Use performance data to tailor training plans and prevent injuries.
4. Analyse customer behaviour to offer personalised recommendations and improve services.
5. Use real-time traffic data to optimise signal timings and reduce congestion.
Chapter Checkup
A. Fill in the Blanks.
1. Autocorrect 2. Siri 3. spam 4. Google Translate 5. NLP
B. Tick () the Correct Option.
1. a. Search Engines 2. d. Dictating to Microsoft Word 3. b. Natural Language Processing
4. c. Assessing customer feedback on products 5. d. All of these
C. Write T for True and F for False.
1. T 2. T 3. F 4. T 5. T
E. Answer the Following Questions.
1. Natural Language Processing, or NLP, is a domain of AI that makes the machine understand your language and respond to you in a way that makes sense. NLP helps computers understand us and talk to us like people.
2. A virtual assistant is an AI tool that understands and responds to voice commands or text inputs, such as questions and requests or performs tasks for you.
3. NLP enables automated assessment of students’ work and provides them with instant feedback and assistance in identifying areas for improvement, saving educators’ time. ChatGPT, for example, offers personalised learning experiences by adapting to individual learning styles.
4. NLP can be used to analyse the sentiment or emotion expressed in the text. For example, businesses might use sentiment analysis to analyse customer feedback and preferences for their products and services across reviews on social media platforms and product remarks on online stores. This insightful data can help companies enhance their products, services, or customer experiences.
5. The MIT App Inventor is an online platform for creating apps for mobile phones and tablets. It is a very easy and simple platform to learn app creation and coding. This platform focuses on teaching everyone, especially young children, to create their apps.
F. Apply Your Learning.
1. The ‘Read Aloud’ feature in Microsoft Word makes use of NLP algorithms to read all or part of your document, highlighting each word as it is read.
2. Autocorrect
3. A virtual assistant can be used to set alarms, check the weather, answer questions, or even tell you jokes.
Chapter Checkup
A. Fill in the Blanks.
1. indentation 2. precedence 3. iterate 4. end 5. dictionary
B. Tick () the Correct Option.
1. a. Guido van Rossum 2. d. Sequence Types 3. a. Exponentiation 4. d. Decision-making 5. a. Greater
C. Who Am I?
1. == 2. if-elif-else 3. break 4. range() 5. Boolean
D. Write T for True and F for False.
1. T 2. F 3. T 4. F 5. T
E. Answer the Following Questions.
1. A while loop runs as long as a specified condition is true, making it ideal when the number of iterations is unknown. In contrast, a for loop iterates over a sequence or range, making it suitable when the number of iterations is predetermined. While loops can risk infinite looping if the condition is not updated, for loops handle iteration automatically.
2. The Python continue statement returns control to the beginning of the loop. Whereas, the Python break statement brings control out of the loop..
3. Following are the rules to define a variable:
● A variable name starts with a letter or the underscore character. It cannot start with a number or any special character like $, (, *, %, etc.
● A variable name can only contain alpha-numeric characters.
● Python variable names are case-sensitive, which means str1 and STR1 are two different variables in Python.
● Python keywords cannot be used as variable names.
4. The data type specifies the kind of information that will be stored in a variable. The various data types available in Python are int, float, strings, list, tuple, dictionary, boolean, set, etc.
5. Conditional statements in programming languages make decisions to control the direction or flow of the program execution.
In the if-else condition, if the condition is true, a block of statements inside the if block will be executed; but if the condition is false, the blocks in the else statement will be executed.
F. Apply Your Learning.
1. <class 'bool'>
2. for num in range(1, 11): print(num)
3. side_length = 7 area = (3**0.5 / 4) * side_length**2 print("The area of the equilateral triangle is:", area)
4. number = int(input("Enter a number: ")) next_number = number + 1 previous_number = number - 1 print("Next number is:", next_number) print("Previous number is:", previous_number)
Chapter Checkup
A. Fill in the Blanks.
1. single, double 2. changed 3. indexing 4. concatenate
B. Tick () the Correct Option.
1. c. Both a and b 2. b. string[-1] 3. b. replace() 4. a. '''This is a multi-line string'''
C. Who Am I?
1. String 2. eval() 3. * (asterisk) operator 4. Indexing
D. Write T for True and F for False.
1. T 2. F 3. F 4. T
E. Answer the Following Questions.
1. A single-line string can be enclosed in either single quotes or double quotes. Whereas, a multi-line string can be enclosed in either three single quotes (''' ''') or three double quotes (""" """).
2. Through indexing, characters at the beginning of the string can be accessed using positive address references, starting from 0 for the first character, 1 for the next character, and 2 for the next to the next character. Characters at the end of the string can be accessed using negative address references such as –1 for the last character, –2 for the next-to-last character, and so on.
3. The string slicing function in Python is used to access a selection of characters in a string using the slicing operator (:). It includes the character at the start index but excludes the character at the end index. Indexes start at 0 from the beginning of the string and -1 from the end.
4. Strings in Python are immutable, meaning once a string is created, its content cannot be changed. Any operation that modifies a string creates a new string instead of altering the original one.
F. Apply Your Learning.
1. str1 = "Hello" str2 = "World" result = str1 + " " + str2 print(result)
2. string = "Learning Python is fun!"
print("\nExtracted substring 'Python':")
print(string[9:15])
3. sentence = "Learning Python is fun!" print(sentence)
print(sentence.replace("fun", "awesome"))
4. expression = "3 + 4" result = eval(expression) print(result)
Chapter Checkup
A. Fill in the Blanks.
1. unlimited 2. faster 3. mutable 4. immutable 5. reverse
B. Tick () the Correct Option.
1. b. remove the last element from the list.
2. a. There is no limit to the size of a list, c. A list may contain the same type of objects.
3. b. L.remove(3) and d. L.pop(3) 4. b. List and d. Set 5. b. 2
C. Who Am I?
1. sort() 2. Tuple 3. List 4. append() 5. ‘*’ operator
D. Write T for True and F for False.
1. F 2. T 3. F 4. T 5. F
E. Answer the Following Questions.
1. The characteristics of the lists are given below:
Ordered: In a list, the values or items have a defined order, and this order does not change. If you add new values to a list, they are placed at the end of the list.
Accessed via the Index: You can access list elements using an index, which starts at 0. Hence, the first element of a list is present at index 0, not 1. Allows Duplicate Values: A list can contain duplicate values. Since values are indexed in a list, it can have items with the same value but a different index.
2. To create a tuple with a single item, you have to add a comma after the item; otherwise, Python will not recognise it as a tuple.
Example: mytuple = ("Delhi",) print(mytuple)
3. Difference between pop() and remove() methods: pop() method
pop(): This method is used to remove the element at the specified position.
Syntax: list.pop(position)
list = [3, 4, 9, 3, 8, 9] list.pop(2) print(list)
Output: [3, 4, 3, 8, 9]
remove() method
remove(): This method is used to remove the first occurrence of the specified element.
Syntax: list.remove(element)
list = [3, 4, 9, 3, 8, 9] list.remove(3) print(list)
Output: [4, 9, 3, 8, 9]
4. Difference Between Lists and Tuples Lists Tuples
Lists are mutable. Tuples are immutable.
You can easily insert or delete data items in a list. You cannot directly insert or delete data items in a tuple.
Lists have several built-in methods. Due to immutability, a tuple does not have many built-in methods.
Lists are generally slightly slower than tuples because of their mutability. Tuples are faster than lists.
Lists are created using square brackets [].
Example: list1 = [1, 2, 3]
5. Three characteristics of a tuple are:
Tuples are created using parentheses ().
Example: tuple1 = (1, 2, 3)
● Ordered: In a tuple, the values or items have a defined order, and this order does not change.
● Accessed via the Index: The tuple element can be accessed via the index. It means that the tuple index always starts with 0. Hence, the first element of a tuple is present at index 0, not 1.
● Immutable: The tuple items are immutable. The meaning of immutable is “unable to be changed”. It means that we cannot add, modify, or remove items in a tuple after it has been created.
F. Apply Your Learning.
1. Code to covert the given list to tuple:
L = [1, 5, 8, 9, 15] T = tuple(L) print(T)
2. Code to create a list with single element: my_list = [42] print(my_list)
3. Code to create a tuple T with the given data: T = (9, 'Ram', 7, 5, 'Hema') print(T)
4. Adding a student’s name, “Sushma”, at the end of the given list: Stu_list = ["Lata", "Rama", "Ankit", "Vishal"] Stu_list.append("Sushma") print(Stu_list)
5. Creating a list of strings and access the elements using index: my_list = ["apple", "banana", "cherry", "date"] print(my_list[0]) print(my_list[1]) print(my_list[2]) print(my_list[3])
Chapter Checkup
A. Fill in the Blanks.
1. HTML 2. element 3. <sub> 4. inline
B. Tick () the Correct Option.
1. a. To write the code of web pages 2. b. closing 3. a. <title> and </title> 4. b. padding
C. Who Am I?
1. <em> 2. colon (:) 3. External CSS 4. Opacity
D. Write T for True and F for False.
1. F 2. T 3. T 4. F
E. Answer the Following Questions.
1. The term ‘markup language’ refers to a language which creates the layout of web pages and applies formatting to them. It makes the objects on the web page like text, image, audio, etc., more interactive, and it also enriches the look and feel of the web pages.
2. The syntax to add an attribute is as follows: <element attribute=”value”>Content</element>
Where,
Element: The HTML element to which the attribute belongs. Attribute: The name of the attribute.
Value: The value assigned to the attribute.
3. The padding property sets the space around the content of the element. Whereas, the margin property sets the space around the element itself.
4. CSS uses selectors to target HTML elements. Selectors can target elements by tag name, class, ID, attribute, and more.
F. Apply Your Learning.
1. HTML code to display the following output: a3 − b3 Factorisation: (a − b) × (a2 + ab + b2) <!DOCTYPE html>
<html>
<head>
<title>Factorisation</title>
</head>
<body>
<p>a<sup>3</sup> - b<sup>3</sup> Factorisation: (a - b) × (a<sup>2</sup> + ab + b<sup>2</sup>)</p> </body>
</html>
2. CSS code to create a box using <div> tag: <!DOCTYPE html>
<html>
<head>
<title>Box Example</title> <style>
.box { height: 400px; width: 500px; border: 5px solid grey; }
</style>
</head>
<body>
<div class="box"></div>
</body>
</html>
Chapter Checkup
A. Fill in the Blanks.
1. form 2. <textarea> 3. radio 4. required 5. inline
B. Tick () the Correct Option.
1. b. <form> 2. b. text 3. a. <select> 4. d. pattern 5. c. To submit the form
C. Who Am I?
1. Arithmetic operator 2. document.write() 3. JavaScript 4. if… else… if statement
D. Write T for True and F for False.
1. T 2. T 3. F 4. T 5. T
E. Answer the Following Questions.
1. An HTML <form> element is used to create fields where users can provide information in an interactive way. It includes fields where users can type text, numbers, email addresses, and passwords, and indicate choices like selecting check boxes or clicking buttons.
2. Form validation is crucial to ensure that users provide the correct type of information. HTML introduced built-in form validation, using attributes like required, min, max, and pattern. For example: <label for=”age”>Age:</label> <input type=”number” id=”age” name=”age” required min=”18” max=”99”>
3. Setting properties of a form using internal CSS is also known as embedded CSS or inline CSS. You can make your HTML forms look attractive and arrange them on your web page by using the <style> element. This <style> element is placed in the <head> section of your HTML document. Steps to set properties of a form using internal CSS are:
1. Open an HTML Document: Start by creating a standard HTML document structure, including the <!DOCTYPE html>, <html>, <head>, and <body> elements.
2. Include the <style> Element: Inside the <head> section of your HTML document, include a <style> element.
3. Select the Form Element: To target the form you want to style, use the form selector.
4. Define CSS Properties: Within the selected form CSS block, you can define various CSS properties to control the appearance of the form.
5. Style Form Elements: Inside a form block, you can target specific form elements such as labels, input fields, buttons, and other related elements.
6. Save and Apply: When you have defined your internal CSS rules, save the HTML document.
4. Forms can have various attributes to control the behaviour of a form:
Action: Specifies the URL to which form data will be submitted.
Method: Specifies the HyperText Transfer Protocol (HTTP) method to be used (either “GET” or “POST”).
Name: Assigns a name to the form for easy identification.
Target: Specifies where to display the response after form submission.
5. The <input> element is used to create various fields to collect different types of information from users, such as text, email addresses, passwords, and more. The <label> element is used to attach a text with the input fields. Some common types of input fields are:
Text Input: It is used to take textual information from the user like name, age, roll number, etc.
Email Input: It is used to take the email address as information from the user.
1. <html>
<head>
<title>Parents' Feedback Form</title>
<style>
/* Internal CSS styles for the form */ form {
width: 450px; /* Set the width of the form */ margin: 0 auto; /* Center-align the form */ padding: 30px; /* Add padding for spacing */ background-color: #e8f4f8; /* Set a light background color */ border: 2px solid #ccc; /* Add a border */ border-radius: 8px; /* Rounded corners */ }
/* Style for form labels */ label {
display: block; /* Display labels as block elements for better spacing */ margin-bottom: 10px; /* Add space between labels */ font-weight: bold; /* Make labels bold */ font-family: Arial, sans-serif; /* Set font family */ }
/* Style for form input fields */ input[type="text"], input[type="email"], input[type="number"], textarea {
width: 100%; /* Set input fields to 100% width */ padding: 10px; /* Add padding for input fields */ margin-bottom: 15px; /* Add space between input fields */ border: 1px solid #ccc; /* Add a border to input fields */ border-radius: 4px; /* Rounded corners */ }
/* Style for the submit button */ button[type="submit"] { background-color: #28a745; /* Set background color for the button */
}
color: #fff; /* Set text color to white */ padding: 10px 20px; /* Add padding for the button */ border-radius: 5px; /* Rounded corners for the button */ border: none; /* Remove border */ font-size: 16px; /* Increase font size */
</style> </head> <body>
<h1>Parents' Feedback Form</h1> <form>
<label for="student_name">Student Name:</label> <input type="text" id="student_name" name="student_name" required><br>
<label for="parent_name">Parent Name:</label> <input type="text" id="parent_name" name="parent_name" required><br>
<label for="class">Class:</label>
<input type="text" id="class" name="class" required><br>
<label for="section">Section:</label>
<input type="text" id="section" name="section" required><br>
<label for="email">Email Address:</label>
<input type="email" id="email" name="email" required><br>
<label for="comments">Feedback/Comments:</label> <textarea id="comments" name="comments" rows="4" required></textarea><br>
<button type="submit" value="Submit">Submit</button> </form> </body> </html>
2. <html>
<head>
<title>Favourite Subject Survey</title>
<style>
/* Internal CSS styles for the form */ form {
width: 400px; /* Set the width of the form */
margin: 0 auto; /* Center-align the form */
padding: 30px; /* Add padding for spacing */
background-color: #f1f1f1; /* Set a light background color */
border: 2px solid #ccc; /* Add a border */
border-radius: 8px; /* Rounded corners */ }
/* Style for form labels */ label {
display: block; /* Display labels as block elements for better spacing */
margin-bottom: 10px; /* Add space between labels */
font-weight: bold; /* Make labels bold */
font-family: Arial, sans-serif; /* Set font family */ }
/* Style for radio buttons */ input[type="radio"] {
margin-right: 10px; /* Add some space between the radio button and the label */ }
/* Style for the submit button */ button[type="submit"] {
background-color: #007bff; /* Set background color for the button */ color: #fff; /* Set text color to white */ padding: 10px 20px; /* Add padding for the button */
border-radius: 5px; /* Rounded corners for the button */ border: none; /* Remove border */
font-size: 16px; /* Increase font size */ } </style>
</head>
<body>
<h1>Favourite School Subject Survey</h1> <form>
<label for="math">Mathematics:</label>
<input type="radio" id="math" name="subject" value="Mathematics" required><br>
<label for="science">Science:</label>
<input type="radio" id="science" name="subject" value="Science" required><br>
<label for="history">History:</label>
<input type="radio" id="history" name="subject" value="History" required><br>
<label for="english">English:</label>
<input type="radio" id="english" name="subject" value="English" required><br>
<button type="submit" value="Submit">Submit</button> </form> </body> </html>
3. <html> <head>
<title>Ice-Cream Parlour Order</title> <style>
/* Internal CSS styles for the form */ form { width: 400px; /* Set the width of the form */ margin: 0 auto; /* Center-align the form */ padding: 30px; /* Add padding for spacing */ background-color: #f1f1f1; /* Set a light background color */ border: 2px solid #ccc; /* Add a border */ border-radius: 8px; /* Rounded corners */ }
/* Style for form labels */ label { display: block; /* Display labels as block elements for better spacing */ margin-bottom: 10px; /* Add space between labels */ font-weight: bold; /* Make labels bold */
font-family: Arial, sans-serif; /* Set font family */ }
/* Style for checkboxes */ input[type="checkbox"] { margin-right: 10px; /* Add space between the checkbox and the label */ }
/* Style for the submit button */ button[type="submit"] {
background-color: #007bff; /* Set background color for the button */ color: #fff; /* Set text color to white */ padding: 10px 20px; /* Add padding for the button */ border-radius: 5px; /* Rounded corners for the button */ border: none; /* Remove border */ font-size: 16px; /* Increase font size */ }
</style> </head>
<body>
<h1>Choose Your Favourite Ice-Cream Flavours</h1>
<form>
<label for="chocolate">Chocolate</label>
<input type="checkbox" id="chocolate" name="flavours" value="chocolate">
<label for="vanilla">Vanilla</label>
<input type="checkbox" id="vanilla" name="flavours" value="vanilla">
<label for="choco-chip">Choco-Chip</label>
<input type="checkbox" id="choco-chip" name="flavours" value="choco-chip">
<label for="strawberry">Strawberry</label>
<input type="checkbox" id="strawberry" name="flavours" value="strawberry">
<label for="butterscotch">Butterscotch</label>
<input type="checkbox" id="butterscotch" name="flavours" value="butterscotch">
<button type="submit" value="Submit">Submit</button>
</form> </body> </html>
Chapter Checkup
A. Fill in the Blanks.
1. images 2. URL 3. audio 4. controls
B. Tick () the Correct Option.
1. b. src 2. c. autoplay 3. c. anchor tag 4. a. .mp4
C. Who Am I?
1. <a> tag 2. <audio> tag 3. <video> tag 4. controls
D. Write T for True and F for False.
1. F 2. T 3. T 4. F
E. Answer the Following Questions.
1. Alt attribute is used to specify the alternate text which appears only if the specified image is not loaded due to some reason.
2. You can specify multiple audio sources in an <audio> tag by using multiple <source> elements inside the <audio> tag. Each <source> element can specify a different audio file format to ensure compatibility with various browsers.
3. The <nav> tag allows us to create a set of links.
4. The controls attribute in the <audio> and <video> tags adds built-in playback controls, such as play, pause, etc., making it easier for users to interact with the media directly without needing external tools.
F. Apply Your Learning.
1. <img src="ramanujan.jpg" alt="Srinivasa Ramanujan" width="300" height="400">
2. <a href="https://www.wikipedia.org" target="_blank">Go to Wikipedia</a>
3. <audio controls>
<source src="example.mp3" type="audio/mp3"> </audio>
4. <img src="image.jpg" alt="Sample Image" width="300" height="200"> <a href="image.jpg" download>Download this image</a>
A. Fill in the Blanks.
1. Computer Network 2. Digital citizenship 3. Bitcoin 4. Social Media
B. Tick () the Correct Option.
1. a. Data redundancy 2. b. Cyberstalking 3. c. Mobile
C. Write T for True and F for False.
1. T 2. T 3. F 4. F
D. Answer the Following Questions.
1. Network interface card (NIC) is a hardware component installed on a computer to connect a computer to a network. It is a circuit board or a chip without which a computer cannot connect with another computer on a network.
2. Blockchain is a shared, unchangeable record that helps track transactions and assets in a business network.
3. Hybrid apps can work on different types of phones and use web technologies, allowing them to work on multiple platforms and access device features. They are compatible with both iPhones and Android phones and can be downloaded and installed from their respective app stores, such as the Google Play Store for Android phones and App Store for iPhones.
4. Educational apps, social networking apps, entertainment apps, banking apps, and e-commerce apps.
F. Apply Your Learning.
1. Hub is a networking device that transmits the received information to all the devices on the network. A hub has many ports in it. A computer that intends to be connected to the network is plugged into one of these ports. Whereas, a switch is a device that connects different computers on a network. It transfers data from one computer to another. A switch receives data from one computer, processes that data, and forwards that data to the destination device.
2. No, you should not trust the message. It is likely a phishing attempt to steal personal information. Always be cautious with unsolicited messages and links.
3. Transparency means that everyone who is a part of that blockchain can see all the information, and nothing is kept hidden from them. This helps to build trust among the users.
4. Kashika has downloaded a mobile app. These are apps that are installed from an app store, not preinstalled on the phone.
A. Fill in the Blanks.
1. Augmented Reality (AR) 2. Data Manipulation 3. Elements 4. Natural Language Processing
B. Tick () the Correct Option.
1. c. Metaverse 2. a. Number 3. d. Virtual assistant
C. Write T for True and F for False.
1. T 2. F 3. T 4. T
D. Answer the Following Questions.
1. The primary purpose of BCIs is to enable individuals to control and interact with computers, robotic systems, or other devices directly using their brain activity without the need for traditional input methods like keyboards or mouse. They can help people control robotic arms with their thoughts.
2. Here are some of the key roles or functions of a DBMS:
Storing Data: A DBMS can retain a huge amount of data in an organised form. This makes it easy and simple to access and recover the data when necessary.
Managing Data: A DBMS can manage the data in a database, such as adding, removing, modifying, and restoring data. It may also help to ensure that the data is genuine and consistent.
Protecting Data: A DBMS can protect the data in a database from unauthorised entry, change, or loss. It can do this by applying security measures such as user login and encryption.
Querying Data: You can access a specified piece of information from the database by making use of queries. This means that users may ask questions about the data, and the DBMS will deliver the results of the query.
3. Data science is a domain of computer science that helps us learn things from data by using scientific methods, algorithms, and statistics.
4. Speech Recognition: NLP algorithms analyse audio input from speech and transcribe it into text, enabling hands-free interaction with devices, such as smartphones or voice-controlled appliances. Speech recognition technology is used in applications like voice search, home automation, voice dictation, voice biometric, etc. The ‘Read Aloud’ feature in Microsoft Word makes use of NLP algorithms to read all or part
of your document, highlighting each word as it is read. You may also dictate your documents in Word. Dictating within Microsoft Word automatically translates your spoken words into text.
E. Apply Your Learning.
1. In some healthcare settings, robots assist in surgeries, deliver medications, or help with rehabilitation exercises.
2. Relational Database Management System (RDBMS) are the most commonly used type of DBMS. They hold data in the form of tables, which are made up of rows and columns. Each row represents a record, and each column indicates a field. RDBMS are highly efficient in preserving and locating data, and they are also quite adaptable. Some notable RDBMSs include MySQL, Oracle, and Microsoft SQL Server. Object-Oriented Database Management System (OODBMS) stores data in the form of objects. Objects are like records, but they may also have methods, which are like functions. OODBMS is well-suited for keeping complicated data, such as data that is tied to things in the real world.
3. Data science has transformed the sports industry by enhancing performance analysis, strategy development, and fan engagement. It helps study players’ performances in terms of various parameters, like speed and technique, to optimise training and game strategies.
4. Raghav can use Google Translate to translate a paragraph from English to French.
A. Fill in the Blanks.
1. Syntax 2. single, double 3. list 4. Web browser
B. Tick () the Correct Option.
1. c. Floor division 2. b. Subscript 3. b. <form>.
C. Write T for True and F for False.
1. T 2. T 3. F 4. T
D. Answer the Following Questions.
1. In the Python programming language, the types of conditional statements are:
1. The if statement
2. The if-else statement
3. The if-elif-else statement
2. Indexing is used in Python to access list elements. Suppose there are n number of elements in a list. Therefore, the list indexing will start at 0 for the first element and n-1 for the last element. You can use these index values to access the items in the list. The index must be an integer.
3. Forms can have various attributes to control the behaviour of a form:
Action: Specifies the URL to which form data will be submitted.
Method: Specifies the HyperText Transfer Protocol (HTTP) method to be used (either "GET" or "POST"). GET is better for submitting non-sensitive information, whereas POST is used to submit sensitive information.
Name: Assigns a name to the form for easy identification.
Target: Specifies where to display the response after form submission (e.g., in the same window or in a new one). It takes any one value from the _blank, _self, _parent and _top values
F. Apply Your Learning.
1. string1 = "Good" string2 = "Morning" result = string1 + " " + string2 print(result)
2. The formula for the area of an equilateral triangle is:

Following is the program:
side = 10
area = (3**0.5 / 4) * (side** 2)
print("The area of the equilateral triangle is:", area)
ROBOTICS (ABot Kit)
Experiment 1: Bot Movements Using Motor Control
A. Tick () the Correct Option.
1. b. Workspace
2. a. True
3. b. Right
B. Answer the Following.
1. Time delay function is used to suspend the execution of a program for a particular time.
2. Motor category blocks control motor movements.
C. Apply Your Learning.
1. In self-driving cars, toy robots, etc.
2. The bot will stop after executing the last block.
Experiment 2: Line Follower
A. Tick () the Correct Option.
1. b. It stores the sensor reading from the right IR sensor.
2. a. Forward
B. Answer the Following.
1. Click on “Create Variable” button. A pop-up box appears. Enter a suitable variable name. Click on the OK button.
2. The If block checks conditions and controls bot movement accordingly.
C. Apply Your Learning.
1. The bot stops.
2. Swap motor directions in the code.
Maker Board Kit
Experiment 1: Count till 10
A. Tick () the Correct Option.
1. b. Store and label data
2. c. My Program block
3. b. Wait block
B. Answer the Following.
1. Variables store and label data in a program.
2. To transfer code to the Maker Board for execution.
C. Apply Your Learning.
1. Speed in online games, traffic signals, digital wristwatches.
2. Change the loop range from 1-10 to 1-5.
Experiment 2: Calculator Using Functions
A. Tick () the Correct Option.
1. c. To trigger specific actions based on user input
2. c. S
3. c. To decide the flow of the program based on true or false conditions
B. Answer the Following.
1. It increases the value of number1 by 1 to get the desired number using the Variables category and displays it.
2. The division result is displayed on the LED matrix.
C. Apply Your Learning.
1. To modify the “Calculator Using Functions” program to calculate the square of a single number when the “A” key is pressed, follow these steps:
Create a New Function and name the function “Square”.
Set the value of the variable result to the square of number1 (result = number1 * number1).
Display the result using the show number block from the Display category.
Drag the If button block from the Button category.
Select the “A” key.
Call the function “Square” when the “A” key is pressed.
2. A real-life example of conditional blocks in apps other than calculators is mobile banking apps. For example, when you try to log in:
If the username and password are correct, then you are granted access.
Else if the password is incorrect, then the app shows a “Wrong password” message.
Else if multiple incorrect attempts are made, then the app locks the account for security.
A. Tick () the Correct Option.
1. b. Detects air quality
2. b. MQ135 Gas Sensor
3. d. Hazardous air quality
B. Answer the Following.
1. The MQ135 Gas Sensor detects air quality by using a sensing element housed in a steel exoskeleton. A heating current ionizes nearby gases, which are then absorbed by the sensing element. This changes its resistance, altering the output current value.
2. Safe (Green), Unsafe (Yellow), Dangerous (Blue), Hazardous (Red).
C. Apply Your Learning.
1. To modify the program to display a custom LED pattern when the air quality value is below 100 (very safe range), follow these steps:
Drag an if block from the Control category and place it before the existing conditions.
Set the condition: If airQualitySensorValue < 100
Drag the show LEDS block from the Display category and place it inside the new if block.
Customize the LED matrix with a unique color and pattern to indicate a very safe range.
Set the brightness to an appropriate level.
This new condition should be checked before other air quality conditions (100-300, 300-600, etc.).
2. Industrial gas detection like NO2, CO2, O3
A. Tick () the Correct Option.
1. d. All of these
2. c. Controller
3. b. P0
B. Answer the Following.
1. The servo motor is a special type of motor with a shaft that can move to a specific position and at a specific speed based on the received input.
2. The boom barrier lifts up.
C. Apply Your Learning.
1. An automatic boom barrier enhances security and convenience by controlling vehicle entry in restricted areas like car parks, toll booths, and private roads. It ensures authorized access, smooth traffic flow, and improved safety.
2. The purpose of using automatic boom barriers at toll booths is to control vehicle entry, ensure smooth traffic flow, and automate toll collection. They allow vehicles to pass only after the toll is paid, preventing unauthorized access and reducing manual intervention.
A. Tick () the Correct Option.
1. b. P1
2. c. sound_sensor
3. b. To detect input from the sound sensor
B. Answer the Following.
1. The if condition executes when the sound sensor senses sound, and the else condition runs when no sound is detected, ensuring the program responds correctly in both cases.
2. The LED lights up and the buzzer sounds.
C. Apply Your Learning.
1. Fire safety system
2. To use this system in a library, the alarm tone frequency should be set to a lower value (e.g., 500 Hz) to make it less loud. The LED brightness should also be reduced to a dim level (e.g., 50), ensuring it alerts the staff quietly without disturbing others.
A. Tick () the Correct Option.
1. b. Detect the presence of water
2. b. Provide mechanical power to move the rain shed
3. b. P0
B. Answer the Following.
1. Motor, sensor, controller.
2. Connect positive terminal to the Vin and negative terminal to the GND.
C. Apply Your Learning.
1. To add a buzzer when rain is detected: Circuit Changes:
Connect the positive terminal of the buzzer to an available output pin (e.g., P2) on the Maker Board.
Connect the negative terminal of the buzzer to GND.
Program Modifications:
Drag the configure pin block from the Hardware category.
Set P2 as Output.
Inside the if block (where rain is detected), add the play tone block from the Sound category.
Set the buzzer frequency (e.g., 1000 Hz for 500 ms).
Set P2 to Low to turn off the buzzer when no rain is detected.
2. Troubleshooting steps if the Servo Motor does not respond when water is detected:
Check wiring of servo motor and water sensor.
Verify power supply and battery connection.
Test water sensor for proper detection.
Run a servo test program to check movement.
Ensure correct code logic for triggering the servo.
Recompile and burn the code again.
Experiment 7: Calculator Using Functions with AI
A. Tick () the Correct Option.
1. b. Palm
2. b. get recognised speech
3. c. To add number1 and number2
B. Answer the Following.
1. Computer vision is an AI technology that enables machines to understand and interpret visual
data. In this project, computer vision is used to recognize hand gestures such as Palm, Fist, ThumbsUp, and Peace to perform arithmetic operations.
2. Setting initial values to 0 ensures that calculations start correctly without using undefined or previous values, preventing errors.
C. Apply Your Learning.
1. Add an additional else if condition in the speech recognition code to check if the user says “plus” and call the addition function accordingly.
2. Step 1: Create a new function named “Multiplication” in the Functions category.
Step 2: Set the value of result to number1 × number2
Step 3: Use the show number block to display the result on the Maker Board.
This answer key has been designed for schools who have opted for the Robotics course.
A. Tick () the Correct Option.
1. a. My Program
2. b. Step by step
3. a. Both motors clockwise
B. Answer the Following.
1. To move the robot in the right direction, configure the motor at Port4 and Port3 as anticlockwise.
2. The Repeat while block is used to repeat a set of instructions as long as a certain condition is true.
C. Apply Your Learning.
1. Moving robots are used in automatic vacuum cleaners and delivery robots.
2. Without the Repeat while block, the robot will execute the instructions only once and stop.
A. Tick () the Correct Option
1. b. Greater than 400
2. d. Stops
B. Answer the Following
1. Two IR sensors are used to detect the left and right edges of the line to program the robot to accurately track and follow a specific line.
2. Variables like rightIR and leftIR store the right and the left sensor readings respectively to decide the robot’s direction.
C. Apply Your Learning
1. If only the right IR sensor detects the white line, the bot should turn left to stay on the line.
2. Set both motors to turn left by configuring the motors at Port1 and Port2 as Clockwise. This will instruct the bot to turn left as long as the left IR sensor is on top of the black line.
A. Tick () the Correct Option
1. a. Math
2. b. >
3. c. Port4 (Advance)
B. Answer the Following
1. Variables are used to store information to be referenced and manipulated in a computer program.
2. The touch sensor detects when the gripper bot holds an object or drops an object.
C. Apply Your Learning
1. Without the Time block, the motor will continue moving indefinitely without a pause between two actions, which can cause the motor to perform uncontrolled movements.
2. Gripper bots are used in warehouse automation to pick and place objects.
Experiment 4: Sweeper Line Follower
A. Tick () the Correct Option
1. c. IR_Left and IR_Right
2. b. count = 3
3. d. The bot moves backwards and the hightorque motor stops
B. Answer the Following
1. The Repeat while block is used to continuously execute a set of instructions as long as a specified condition remains true.
2. The count variable stores the number of objects the bot has cleared.
C. Apply Your Learning
1. The bot can use IR sensors to detect nearby bots and stop to avoid collisions.
2. A real-life application is automatic street cleaning robots.
Experiment 5: Gripper Bot AI
A. Tick () the Correct Option
1. b. Natural Language Processing
2. c. Print Data
3. b. Palm
B. Answer the Following
1. The purpose of Natural Language Processing (NLP) in this experiment is to enable the robot to understand spoken commands like “forward”, “backward”, “turn”, “pick” or “drop” and convert them into actions that the robot can perform.
2. The Move Motor at block controls the robot’s movements by setting the direction and speed of the motors, allowing the robot to move forward, backward, left, right, or stop.
C. Apply Your Learning
1. To slow down the robot’s movements, change the Speed parameter in the Move Motor at block to Slow instead of Medium or High.
2. The get recognised speech block should be checked first to ensure that the robot is correctly detecting the “forward” command from the user’s voice. We can also try repeating the commands so that AI detects the voice correctly.
Experiment 1: Count till 10
A. Tick () the Correct Option.
1. b. Store and label data
2. c. My Program block
3. b. Wait block
B. Answer the Following.
1. Variables are used to store information to be referenced and manipulated in a computer program. They also provide a way of labelling data with a descriptive name, so our programs can be understood more clearly by the reader and ourselves.
2. The Maker Board should be connected using a USB cable to run the program on the hardware.
C. Apply Your Learning.
1. Real-life examples of variables:
i. Temperature in a Digital Thermometer: The variable stores the current temperature value and updates continuously as the temperature changes.
ii. Score in a Video Game: The variable stores the player’s score, which increases when the player earns points during the game.
iii. Steps Count in a Fitness Tracker: The variable stores the number of steps taken by the user and updates each time a step is detected.
2. Steps to make a program count to 5 on the Maker Board instead of 10:
i. Drag and drop the My Program block from the Control category.
ii. Create a variable named count using the Variables category and set its value to 1.
iii. Use the Count with block from the Loops category, set the range from 1 to 5 skipped by 1.
iv. Add the Show Number block from the Display category to display the value of the variable.
v. Set the brightness and color from the options available.
vi. Add a Wait block to give a delay of 700 milliseconds between each count.
vii.Save, compile, and burn the program onto the Maker Board.
A. Tick () the Correct Option
1. c. To trigger specific actions based on user input
2. c. S
3. c. To decide the flow of the program based on true or false conditions
B. Answer the Following
1. The Generate num1 function increments the variable number1 by 1. It then displays this incremented number on the LEDs with a specific colour and brightness. When the Division function is triggered, the result of dividing number1 by number2 is displayed on the LEDs with a specific colour and brightness.
C. Apply Your Learning
1. Program to calculate the square of a single number when the “A” key is pressed. Here, for example the single number is 5.
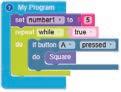
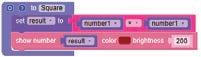
2. Real-life applications of conditionals include e-commerce apps for discounts and weather apps for alerts.
Experiment 3: Pollution Badge
A. Tick () the Correct Option.
1. b. Detects air quality
2. b. MQ135 Gas Sensor
3. d. Hazardous air quality
B. Answer the Following.
1. The MQ135 Gas Sensor detects air quality by using a sensing element housed in a steel exoskeleton. A heating current ionizes nearby gases, which are then absorbed by the sensing element. This changes its resistance, altering the output current value.
2. Safe (Green), Unsafe (Yellow), Dangerous (Blue), Hazardous (Red).
C. Apply Your Learning.
1. To modify the program to display a custom LED pattern when the air quality value is below 100 (very safe range), follow these steps:
i. Drag an if block from the Control category and place it before the existing conditions.
ii. Set the condition: If airQualitySensorValue < 100
iii. Drag the show LEDS block from the Display category and place it inside the new if block.
iv. Customise the LED matrix with a unique color and pattern to indicate a very safe range.
v. Set the brightness to an appropriate level.
vi. This new condition should be checked before other air quality conditions (100-300, 300-600, etc.).
2. Industrial gas detection like NO2, CO2, O3
A. Tick () the Correct Option.
1. d. All of these
2. c. Controller
3. b. P0
B. Answer the Following.
1. The servo motor is a special type of motor with a shaft that can move to a specific position and at a specific speed based on the received input.
2. The boom barrier lifts up.
C. Apply Your Learning.
1. An automatic boom barrier enhances security and convenience by controlling vehicle entry in restricted areas like car parks, toll booths, and private roads. It ensures authorised access, smooth traffic flow, and improved safety.
2. The purpose of using automatic boom barriers at toll booths is to control vehicle entry, ensure smooth traffic flow, and automate toll collection. They allow vehicles to pass only after the toll is paid, preventing unauthorised access and reducing manual intervention.
Burglar Alarm with LED
A. Tick () the Correct Option
1. b. P1
2. c. sound_sensor
3. b. To detect input from the sound sensor
B. Answer the Following
1. Both if and else conditions are important to execute different actions based on whether sound is detected or not. If sound is detected by the sound sensor, it triggers the buzzer to make a noise else the LEDs glow on the Maker Board.
2. When the sound sensor detects sound, the buzzer produces sound at different frequencies.
C. Apply Your Learning
1. Burglar alarms are used in homes and offices for security.
2. To use this system in a library, lower the alarm frequency and LED brightness to avoid disturbing people.
6: Automatic Rain Shed
A. Tick () the Correct Option.
1. b. Detect the presence of water
2. b. Provide mechanical power to move the rain shed
3. b. P0
B. Answer the Following.
1. Motor, sensor, controller.
2. Connect positive terminal to the Vin and negative terminal to the GND.
C. Apply Your Learning.
1. To add a buzzer when rain is detected: Circuit Changes:
Connect the positive terminal of the buzzer to an available output pin (e.g., P2) on the Maker Board.
Connect the negative terminal of the buzzer to GND.
Program Modifications:
Drag the configure pin block from the Hardware category.
Set P2 as Output.
Inside the if block (where rain is detected), add the play tone block from the Sound category.
Set the buzzer frequency (e.g., 1000 Hz for 500 ms).
Set P2 to Low to turn off the buzzer when no rain is detected.
2. Troubleshooting steps if the Servo Motor does not respond when water is detected:
Check wiring of servo motor and water sensor.
Verify power supply and battery connection.
Test water sensor for proper detection.
Run a servo test program to check movement.
Ensure correct code logic for triggering the servo.
Recompile and burn the code again.
Experiment 7: Calculator Using Functions with AI
A. Tick () the Correct Option.
1. b. Palm
2. b. get recognised speech
3. c. To add number1 and number2
B. Answer the Following.
1. Computer vision is an AI technology that enables machines to understand and interpret visual data. In this project, computer vision is used to recognise hand gestures such as Palm, Fist, ThumbsUp, and Peace to perform arithmetic operations.
2. Setting initial values to 0 ensures that calculations start correctly without using undefined or previous values, preventing errors.
C. Apply Your Learning.
1. Add an additional else if condition in the speech recognition code to check if the user says “plus” and call the addition function accordingly.
2. i. Step 1: Create a new function named “Multiplication” in the Functions category. ii. Step 2: Set the value of result to number1 × number2.
iii. Step 3: Use the show number block to display the result on the Maker Board.
This answer key has been designed for schools who have opted for the Robotics Plus course.
This teacher manual has been designed to implement Tekie, the storytelling-based Coding and Computer Science program. The manual consists of lesson plans within each chapter that teachers transact within classrooms and computer labs. Each lesson is based on a research-based ‘WEBS’ framework that simplifies pedagogical practices for teachers and enables them to deliver effectively.
• Sharp Lesson Planning: Each lesson plan focuses on specific sub-learning outcomes within a chapter and are designed for delivery within the stipulated class or lab time.
• Real-life and Application-based Questions: Additional questions that link Computer Science to real-life contexts and assist teachers to develop learners’ conceptual understanding and application skills.
Uolo partners with K-12 schools to provide technology-enabled learning programs. We believe that pedagogy and technology must come together to deliver scalable learning experiences that generate measurable outcomes. Uolo is trusted by over 15,000+ schools across India, Southeast Asia, and the Middle East.
• Support and Detailed Solutions: In-depth solutions for in-class and post-class activities to reinforce learning. hello@uolo.com
ISBN 978-81-984882-9-9