20-credit supporting journal
 rachael mackay
 Visual showing the tunnel space
Developing the Idea
Plans
Research: Lighting and Colour in Film
Designing the Tunnel Experience
The Journey: The Film
contents 1 3 15 17 33 45
Introduction
The Tunnel, known as the Glasgow Harbour Tunnel, was originally one of three tunnels which linked the two Rotundas. Built between 1890-95, the three tunnels transported pedestrians, vehicles and horses across the River Clyde. The Rotundas were built to cover the lift shafts and stairs, transporting passengers approximately 24 metres down to the tunnel. Eventually, the tunnels became disused and the two vehicle tunnels were closed in 1943. In 1986, the opening of a nearby bridge offered pedestrians easier access across the Clyde. The following year, the two vehicle tunnels were filled in, and a water mains pipe was installed in the pedestrian tunnel.


When the Rotundas were originally built, they had no ground floor, and instead had stairs and lift shafts which were directly accessible from external doors. The entrance still remains on the South Rotunda, however there is no access to the public. In my proposal, as I decided to keep the current ground floor levels of both Rotundas, I designed new stairs and lift shafts to access the tunnel.
I also chose to remove and relocate the water mains pipe in order to create a more immersive experience for audiences visiting the tunnel.
1 20 credittunnel
introduction
I decided to include the tunnel in my proposal as I felt it was an integral part of the site, not only linking the Rotundas but also existing as an experience itself. Without the tunnel, there would have been no need for the Rotundas. Therefore, I believe that to preserve the history of the site it would be an important inclusion to a new proposal for the buildings.
From the beginning of the project, I wanted the Tunnel to be both a journey and a destination. I aimed to create a cinematic experience, using lighting to exaggerate the already-dramatic forms of the space.


Scan the QR code to access my pinterest inspiration board for the project.
https://www.pinterest.co.uk/rmackay02/obscura/

obscura 2
developing the idea

Sketches exploring zoning and layout of tunnel
Initially, I planned to split the tunnel into different parts, including one section of film booths. Due to the tunnel’s length, I believed splitting the space may create a more engaging experience. However, I also considered whether simplifying the tunnel journey would create a more immersive experience for visitors.


3 20 credittunnel
Original ideas for a full-tunnel experience

Exploring options for splitting the tunnel

obscura 4
Initial sketches showing film booths in tunnel


As the tunnel is the connecting space between the two Rotundas, I focused on the idea of the tunnel as a journey. This led me to compare the tunnel to a train journey from one place to another. Though the film booths were relocated to the South Rotunda, this influence remains in both South Rotunda and Tunnel.

5 20 credittunnel
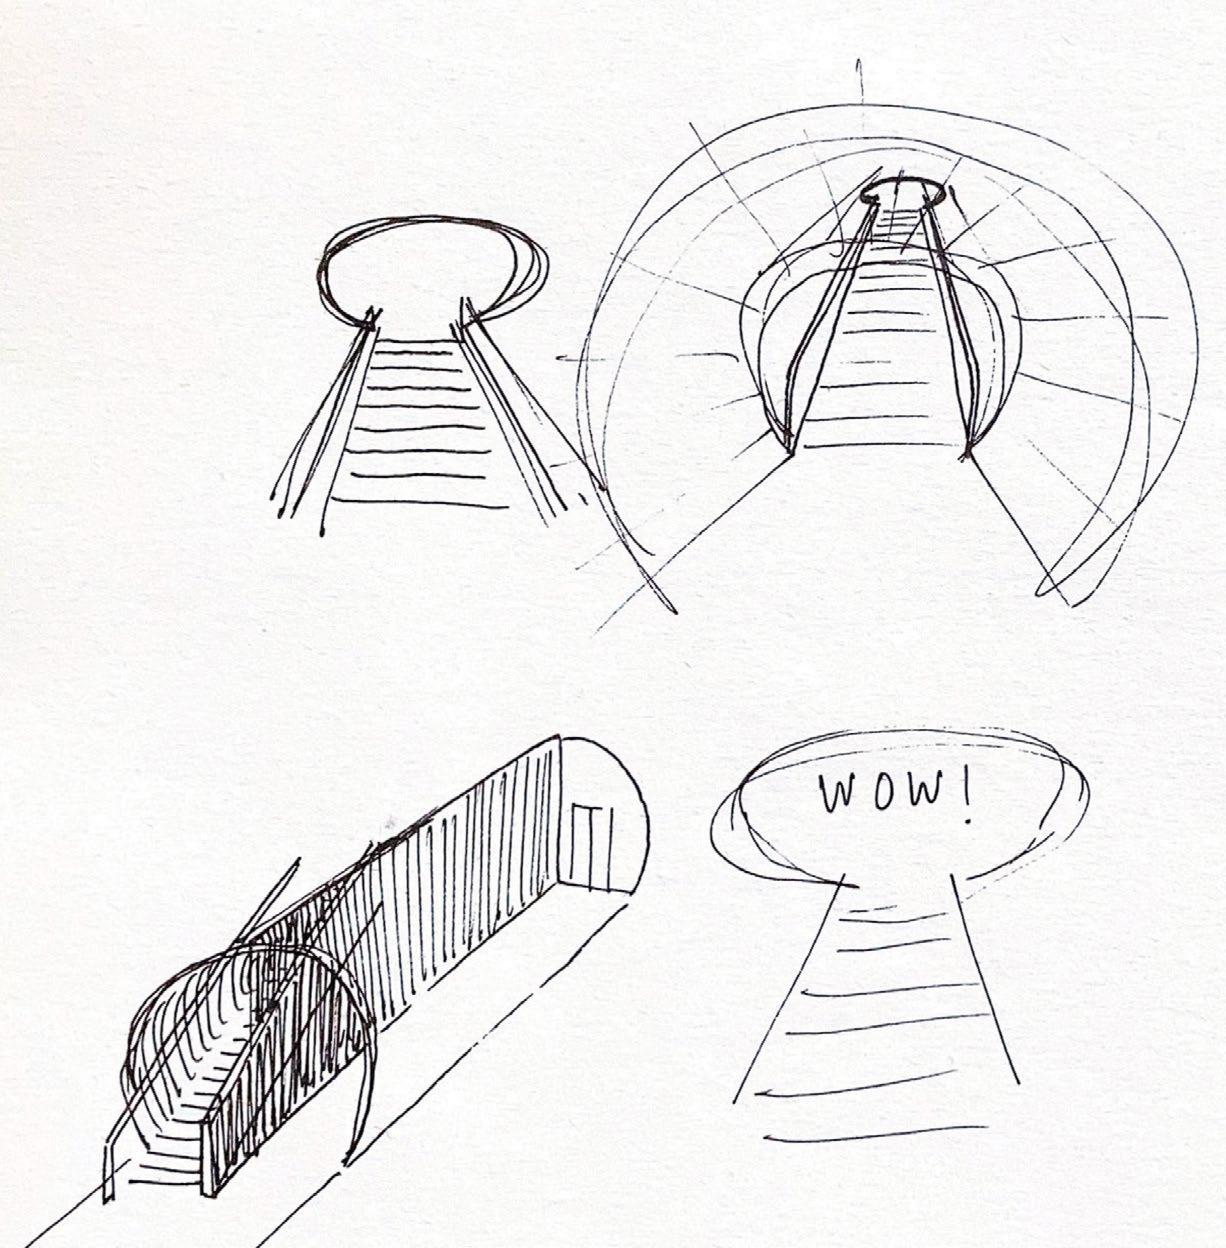
Sketches exploring the emotional journey of travelling through and exiting the tunnel

The combination of the large open spaces in each Rotunda and the long, narrow tunnel creates a dramatic contrast which I aimed to exaggerate through the tunnel journey. This led to the base of the North Rotunda consisting of smaller, dimly lit spaces, building anticipation towards the tunnel base at the South Rotunda, which is much more open and bright.
obscura 6
I found that visiting the tunnel as a journey was also comparable to the journey of watching a film. This led me to consider the space as an experience itself, an immersive space with a beginning, middle and end.
The beginning of the tunnel experience is the discovery of the tunnel. As the tunnel and South Rotunda are hidden spaces, they are discovered by visitors to the North Rotunda. Therefore, the entrance to the stairwell and lift shaft leading to the tunnel are hidden in the basement of the film museum. The tunnel can also be discovered using the cafe menu, museum tickets and museum map, in secret adverts which can only be read when visitors are wearing the 3D glasses which they were given upon entering the Rotunda.
One of my favourite films is Amélie, in which the central character finds a book of discarded photobooth photographs, leading her on a quest to find the owner of the book and solve the mystery of the man in the photographs. Inspired by the photobooth as the beginning of an adventure, I chose to design the hidden entrance to the tunnel as a photobooth.
7 20 credittunnel
Sketches exploring the discovery of the tunnel


obscura 8
Storyboarding the tunnel experience from beginning to end


9 20 credittunnel


obscura 10
The tunnel is a journey within a journey. The North Rotunda can be seen as “home”, a space of belonging and the beginning of an adventure, whereas the South is the “new world”, a space for discovery and exploration. The tunnel is therefore both an experience on its own and a linking space between these two worlds.
When designing the tunnel bases I aimed to create this transition between spaces, through the design of the stairwell and lift shafts in both bases.

In the North Rotunda, the stairwell is narrow, with the lift shaft in the centre. Though the staircase is still wide enough to feel comfortable, it is compact, with corridor spaces at the bottom rather than open space. This builds anticipation towards the tunnel experience and the cinema which awaits on the other side.
The circulation route within the South Rotunda’s tunnel base is the direct opposite of the North. A wide staircase winds around the edge of the space, with a semi-transparent glass-walled lift shaft in the middle. This space is open and dramatic, with a viewing platform halfway up for visitors to rest and enjoy the journey.
11 20 credittunnel

obscura 12
Sketch of the tunnel staircases and lift shafts in both buildings
Sketches for the North Rotunda tunnel base, exploring lighting and signage inspired by classic cinema theatres


13 20 credittunnel

obscura 14
This is a dimly-lit space which feels secretive and hidden. The stairs wind down the lift shaft in the centre of the building. This is the central lift shaft and stairwell which winds up to the top floor of the building, however this section is subtly hidden.

The stairwell and corridors are lit by castoroil resin strip lights. These give a warm glow, and are also made from environmentally conscious materials.

lift
Office Tunnel
Seating
Box
Plan for the North Rotunda Tunnel Base
plans up 15 20 credittunnel
Castor-Oil Resin Strip Light, Éstudio Rain
Plan for the South Tunnel Base

This is a bright, open space, which contrasts dramatically with the narrow, long tunnel space. The stairs wind up the outside of the tunnel shaft, leading to the atrium on the Ground Floor of the South Rotunda. The Lift Shaft is encased in an amber-coloured glass wall. Visitors can see lifts moving up and down the lift shaft, and lift-users can see the space through the semi-opaque glass.
A similar lift shaft in NON-Standard Hotel, Russia

lifts up Feature Stair Tunnel
obscura 16
research: lighting and colour in film
I wanted the tunnel journey to be immersive and exciting, a different experience on every visit. Therefore, I began to consider how the tunnel experience could link to the South Rotunda. Tailoring the space to the film showing in the cinema would mean an ever-changing tunnel experience, which would bring visitors back regularly.
This led me to research how lighting and colour contribute to the tone and emotional experience of watching a film.
17 20 credittunnel

Lighting obscura 18
Lighting is a key element of films and filmmaking, due to it’s ability to exaggerate and create dramatic environments.
Lighting is used in horror, thriller and mystery films to create drama and suspense. Key characteristics of these genres are:
- Uplighting
- Silhouettes
- Spotlighting
- Underexposure and low-key lighting
- Harsh lighting
- Prominent shadows
- Chiaroscuro (high-contrast lighting)
Harsh, direct lighting is used in The Blair Witch Project, highlighting the main characters’ facial expressions and creating a torch-like effect, enhancing the foundfootage style of the film. This is also used in Get Out to emphasise the intensity of the central character’s experience.

Underexposure in films like Hereditary and Zodiac takes advantage of the fear of the dark, or rather the fear of the unknown, to create tension and unease in the audience.
Films including Vertigo, Psycho and 12 Angry Men use silhouettes and chiaroscuro to create a dramatic setting and emphasise the tension which builds throughout the film.

19 20 credittunnel
Upper Left - Vertigo (1958)

Upper Right - Get Out (2017)

Lower - Hereditary (2018)

Overleaf:
Both Images - The Blair Witch Project (1999)
obscura 20
Upper Left - 12 Angry Men (1957)

Lower Left - Psycho (1960)


Both Right - Zodiac (2007)

21 20 credittunnel
Fantasy, adventure and romance films, including Midnight in Paris and the Lord of the Rings and Before Sunrise series, often use soft lighting to create a natural and happy atmosphere.

Upper Right - Lord of the Rings: The Fellowship of the Ring (2001)

Lower Right - Before Sunrise (1995)
Below - Midnight in Paris (2011)

obscura 22


23 20 credittunnel
Sci-fi films like Blade Runner and Blade Runner 2049 often use high contrast, monochromatic lighting and accentuated shadows to create futuristic and dramatic environments parallel to the characters emotional journey throughout the film.


Top two images - Blade Runner 2049 (2017) Bottom three images - Blade Runner (1982)

obscura 24
Though colour was first introduced in film in the 1900s, due to it’s costly and time-consuming nature, colour films were not widely produced until the 1930s. The introduction of colour in film expanded the creative possibilities, allowing filmmakers to bring to life both believable and dramatically unbelievable environments on screen.
25 20 credittunnel
colour

obscura 26
Left three images - The Shining (1980)


Above two images - Good Time (2017)

Overleaf - Joker (2019)

27 20 credittunnel
Colour is used effectively to create believable or visually striking environments and enhance the emotional experience of a film.
Exaggerated, high-contrast colour palettes are often used in horror and thriller films, including The Shining and Joker, to create unsettling environments and heighten suspense.

Crime dramas such as Good Time use high contrast colours to emphasise intense environments and convey the emotional experience of the characters.

obscura 28


29 20 credittunnel
In adventure and fantasy films like Amelie and The Fall, colour is used to create a sense of wonder and emphasise the characters’ unique views of the world.


Colour is often used in these genres to help the audience distinguish between places, time periods and stories, like in The Grand Budapest Hotel, Hero and Little Women.


Above - Hero (2002)
Below - The Grand Budapest Hotel (2014)

Overleaf:
Left side - Amelie (2001)
Right side - The Fall (2006)
obscura 30
Fantasy and romance films like the Narnia series often use saturated natural colours to create rich environments which still feel somewhat familiar to the audience.


Sci-fi films often use bold, contrasting colours alongside dramatic lighting to create futuristic and otherworldly environments, such as in 2001: A Space Odyssey and Blade Runner 2049.

31 20 credittunnel
Upper RightBlade Runner 2049 (2017)

Bottom two images2001: A Space Odyssey (1968)


Overleaf:
Top two imagesLittle Women (2019)
Bottom two imagesThe Chronicles of Narnia (2005-10)
obscura 32
DESIGNING THE TUNNEL EXPERIENCE

When designing the experience within the tunnel, I chose to focus on the horror genre, however this is just one example of what the experience could be like. Lighting, projection and motion sensors allow the space to be flexible for different experiences.
Sketches exploring how the space might look if an action film was playing in the cinema
33 20 credittunnel
Sketches showing where lighting and curtains could be fixed in the tunnel.


A combination of spotlights, projectors and strip lights light the space, and removable curtains allow the tunnel to be split into three sections or opened up into one space.
Motion sensors in the first section are linked with lighting and projectors to create lighting which corresponds to movement.
Frames fixed along the ceiling of the second section allow objects to be suspended from the rafters. Curtains hung on either side of this section divide the tunnel into three parts.
obscura 34
Sketches exploring lighting the tunnel, focusing on horror and thriller genres

35 20 credittunnel
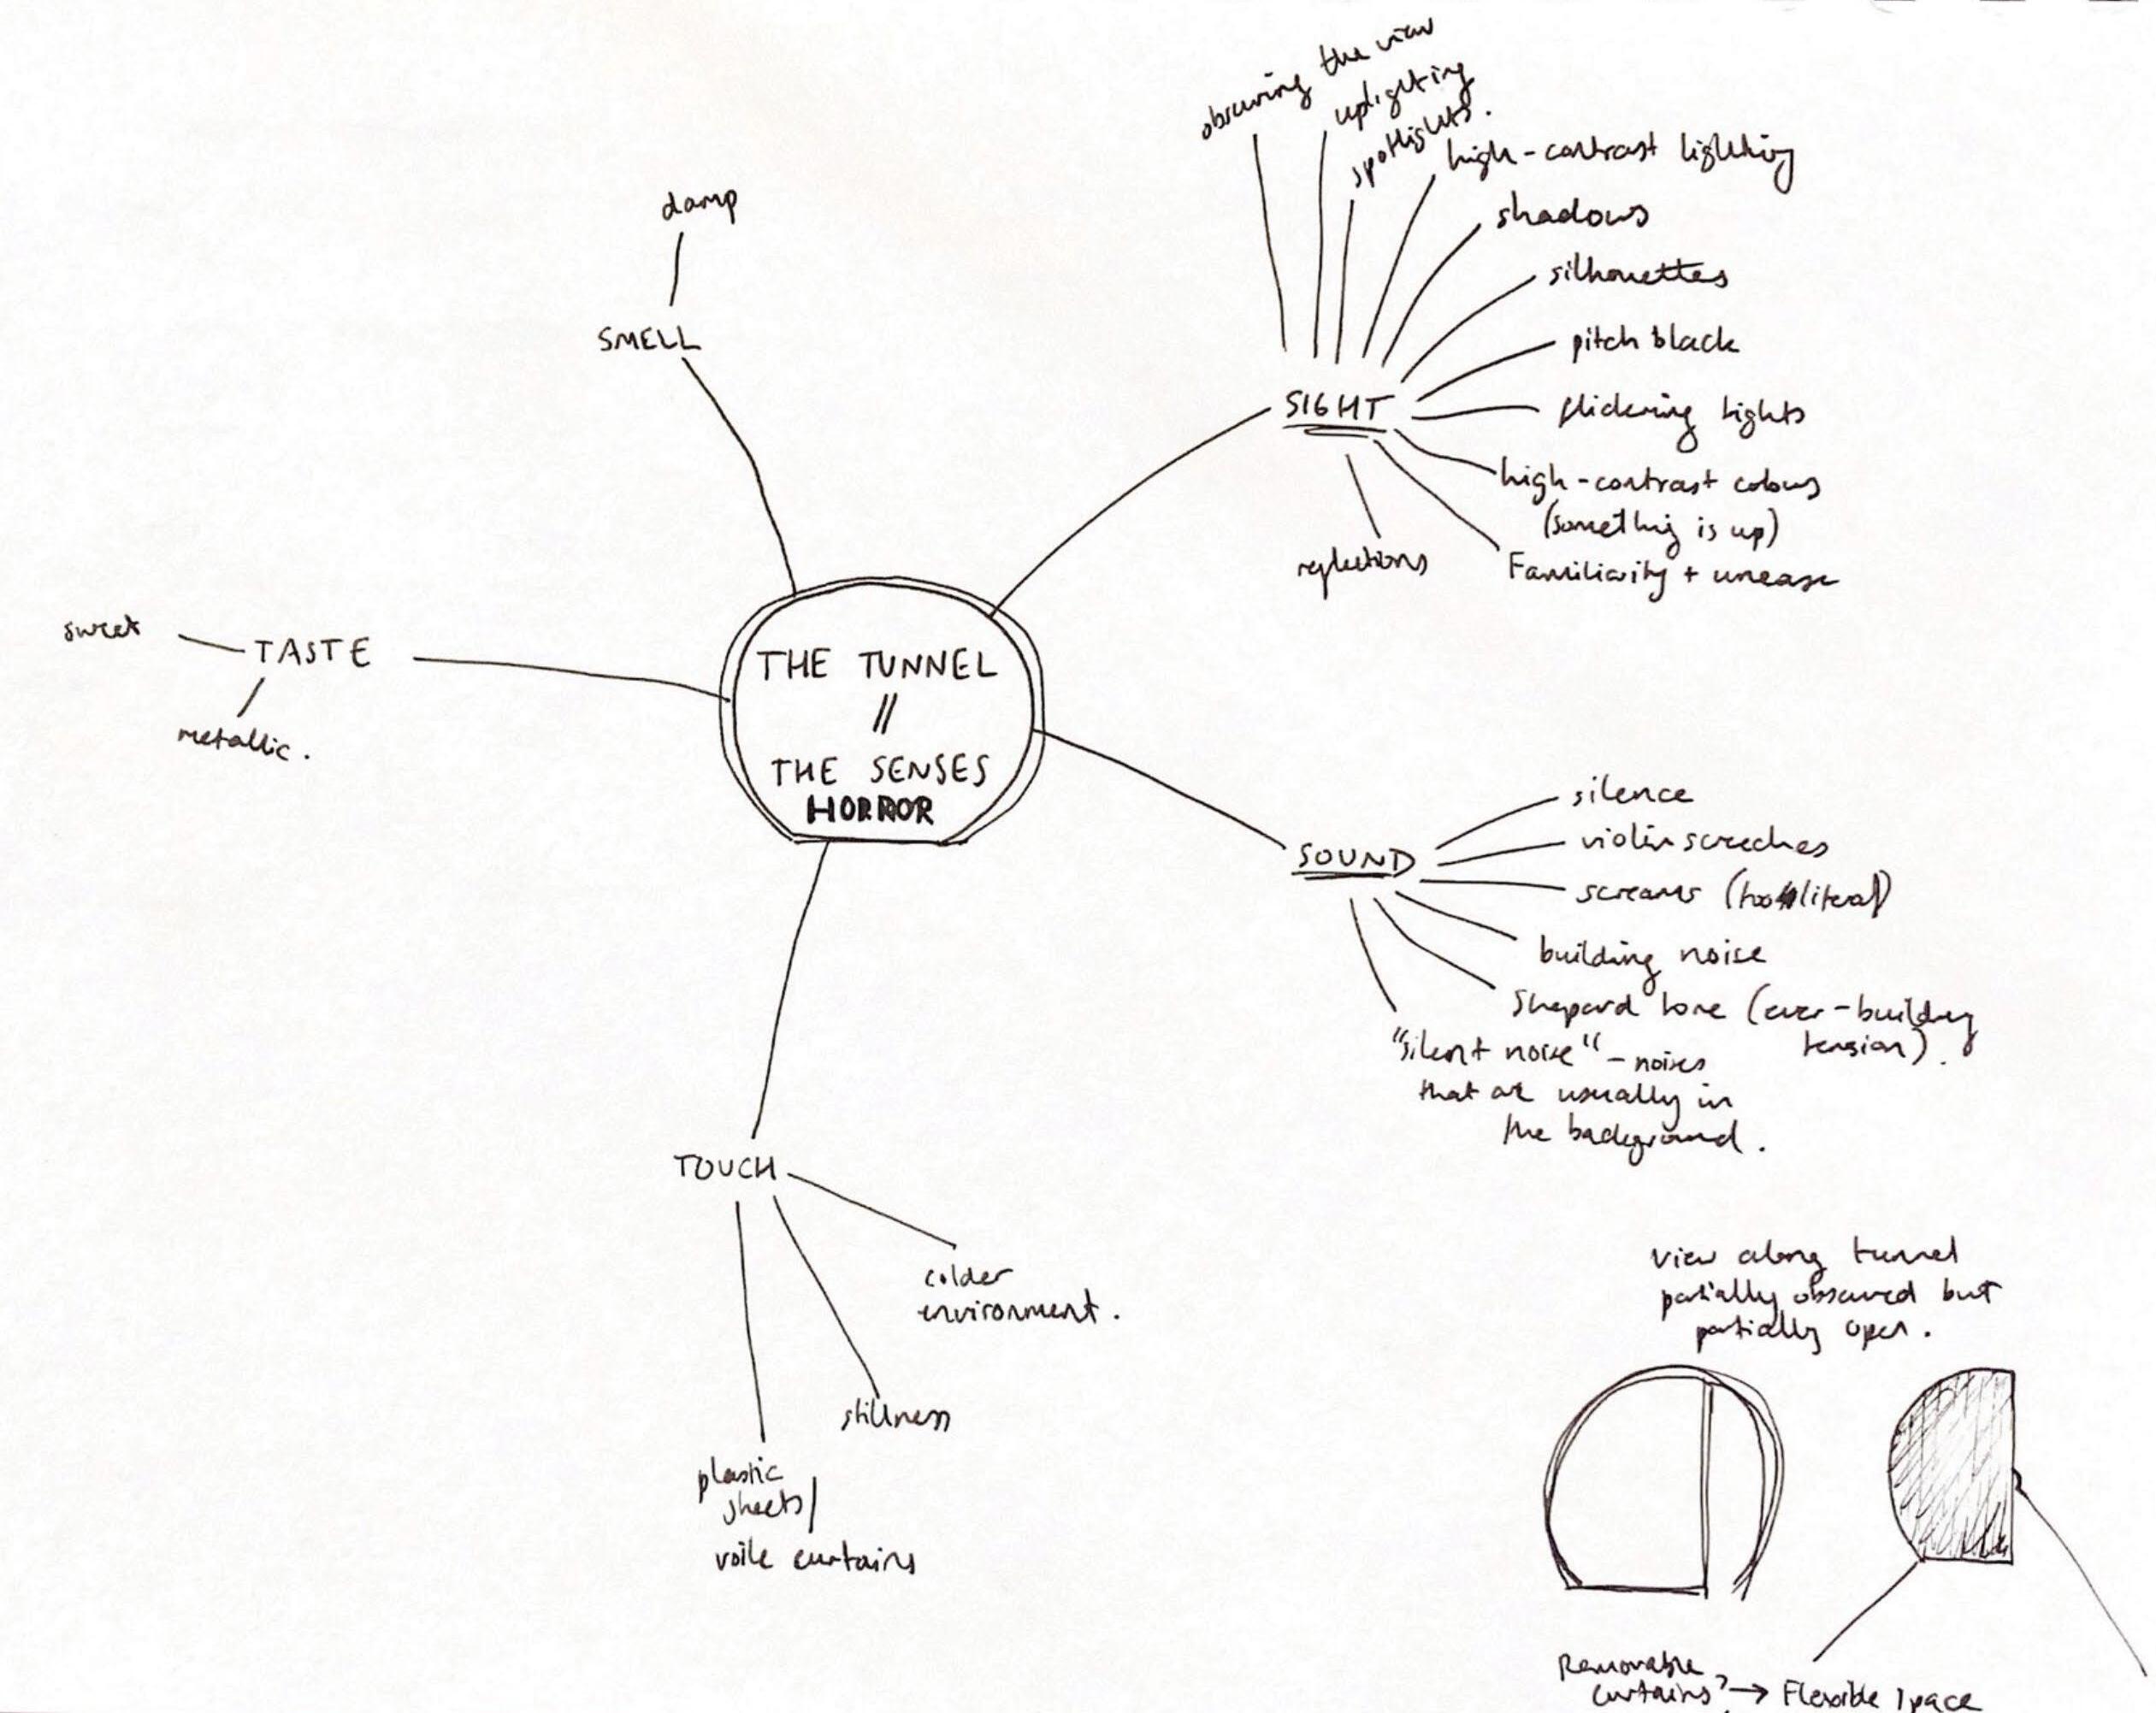
Mapping elements of the tunnel if a horror film is being shown at the cinema
I focused on sight, sound and touch to create an immersive sensory experience.
obscura 36
Brainstorming ideas for elements of the tunnel horror experience

37 20 credittunnel

obscura 38
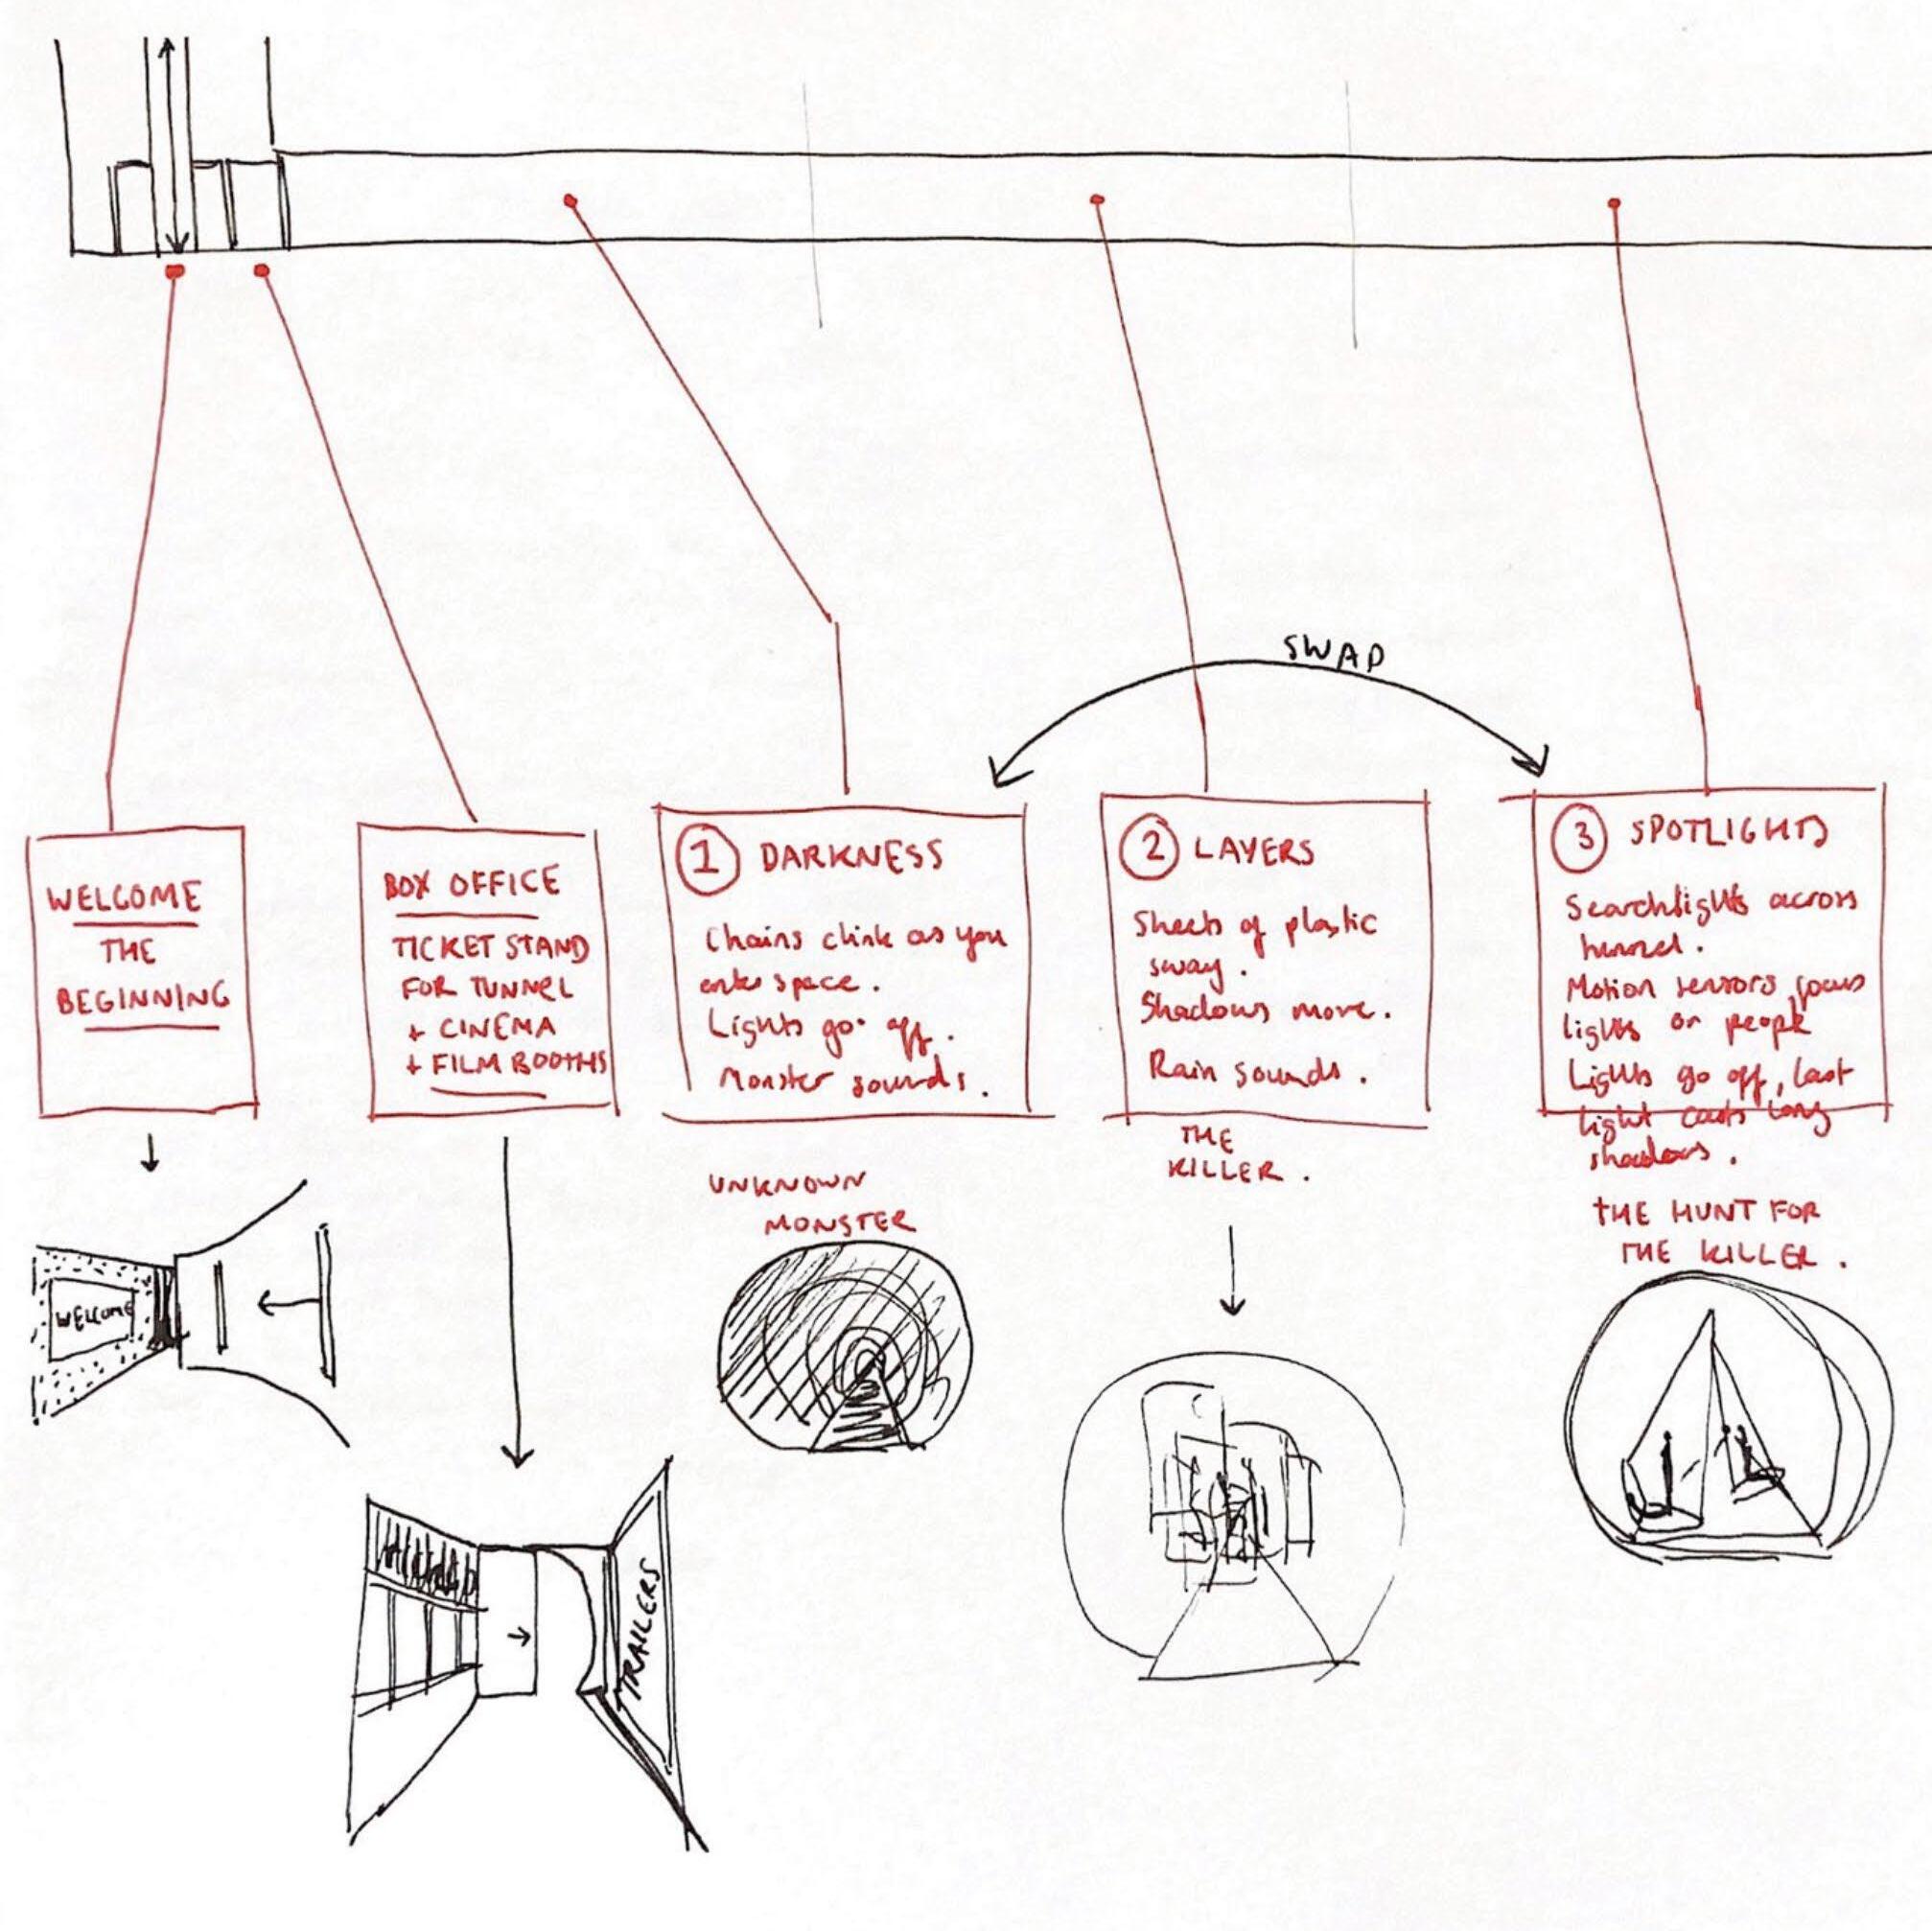
Storyboarding the tunnel experience
Sketching ideas for the first part of the tunnel horror experience


This sequence is inspired by Zodiac, in which police are attempting to track down an unknown serial killer. The lighting in the film is often high-contrast, with car headlights lighting one particular scene (pictured below).

39 20 credittunnel
Sketches of the second part of the tunnel horror experience

Inspired by Psycho, this sequence involves visitors navigating through a space full of plastic sheets, reminiscent of the shower curtain in the film.
The sound of rain fills the space, inspired by the shower scene in the film (pictured right), along with a short excerpt from the film’s memorable soundtrack.

obscura 40
Sketches for the third section of the tunnel horror experience


This section is inspired by a scene in Alien (pictured left), where one character is in a darkened room, unsure where the alien is hiding. As in the film, chains are heard quietly clanking in the tunnel as tension builds towards the monster appearing.
This section is also inspired by Stranger Things, where lights begin to flicker when the monster is nearby.

41 20 credittunnel
Storyboarding the tunnel experience from North to South Rotundas


obscura 42
Storyboarding the Film of the Tunnel

43 20 credittunnel

obscura 44
the journey: the film


 Photobooth with flickering neon light
Obscura Shifting Text Title
Long Shadows Along the Tunnel
Searchlights Fill the Tunnel
Photobooth with flickering neon light
Obscura Shifting Text Title
Long Shadows Along the Tunnel
Searchlights Fill the Tunnel
45 20 credittunnel
Stills from the final tunnel film
The film opens with a shot of the photobooth and secret entrance to the tunnel - the beginning of the tunnel journey. The titles flick between the words ‘Obscura’, ‘Rotunda’ and ‘Glasgow’.

The horror experience begins with Part One: Searchlights. Lights at the opposite end of the space fill the tunnel with long shadows. As the audience hears a car engine starting, the lights begin to move, turning into searchlights. They hear the sound of passing cars, and a radio call exclaiming that a suspected killer is on the loose. The audio begins to break up and searchlights start to follow the audience as they make their way through the tunnel.

Part One Title Page
Eyes Glance at Each Other
obscura 46
Part Two Title Page


Sheets Move Around in the Breeze
Light Filters Through Plastic Sheets

Part Three Title Page

47 20 credittunnel
Hand Appears Behind the Sheet

Stills from the final tunnel film

To get to the next section, visitors must move through the curtain between the sections of the tunnel. This exaggerates the tense atmosphere as the audience do not know what to expect next.
The horror experience continues with Part Two: Obscured. In this section, the audience has to navigate past layers of plastic sheets which are hung from the ceiling. The sound of a thunderstorm plays as fans gently blow the sheets around in the light, This creates moving shadows and plays with the fear of the unknown, making the experience scarier for visitors. The memorable soundtrack to Psycho is quietly heard in the background as the audience wonders whether “the killer” is among them.
Flicker Softly
Lights
obscura 48
Shadows at the End of the Tunnel


Eyes Appear in the Darkness

Lights Turn on as Monster Footsteps Approach
The Audience are Frightened

49 20 credittunnel
A Monster Screeches in the Dark
Stills from the final tunnel film

The final section of the experience is titled Part Three: The Killer. This begins as dim strip lights softly flicker and the audience hears the sound of chains clinking. Suddenly, the lights go out and the audience are in the dark. It is much quieter now, until the sound of a monster screeching fills the tunnel. As lights turn on from the end of the tunnel towards the audience, they hear the heavy footsteps of a monster approaching. As the frightened audience begins to calm down after the climax of the experience, the lights flicker and the chains can be heard once more. This concludes the three-part experience. The audience can now move on to the tunnel base at the South Rotunda and relax after the exciting horror experience.

Please scan the QR code to view the finished film.
https://youtu.be/C-8D_sJq1f0
 The Experience Has Come to an End
obscura 50
