APS 5 Battery Charger Manual
Content
Specifications
Description
Package Contents
Precautions
Recommendations for Use
Battery Charging
Legal Compliances and Disclaimers
Specifications
APS
Charging temperature range 0° ...+35° (+32°F +95°F)
Dimensions 77 35 52 mm (3 x 1.5 x 2.05 inches)
Weight 0.13 kg
100-240
5 SKU 79182 Power adapter input voltage
V (110 V for US) Power adapter output voltage/current 5 V 2 A; 9 V 3 A
Charging voltage/current 5 V 2 A; 9 V 3 A Rated output voltage 4.2 V Battery compatibility APS 5
Description
APS 5 charger is designed to charge APS 5 rechargeable batteries used with Pulsar thermal imaging devices and supports USB Power Delivery fast charging technology using a standard charging kit (USB Type-C cable, power adapter).
Package Contents
APS 5 charger
Power adapter
USB Type-C Cable
Operating Manual
Warranty card
Precautions
Always use this charger or APS 5 charger supplied with the device to charge APS 5 batteries. Using the unsuitable charger can cause irreparable damage to the battery and fire. Do not charge the battery immediately after brining it from cold to warm. Wait at least 30 minutes for the battery to warm up. Do not leave the battery unattended while charging. Do not use the charger if it has been modified or damaged. Do not leave the battery in a charger connected to the network after charging is complete.
Do not expose the battery and charger to high temperatures and naked flame.
Do not disassemble or deform the battery or charger. Do not drop and strike the battery and charger. The charger is not designed to be immersed in water. Keep the charger out of the reach of children.
Battery Charging
1. Insert the battery* (1) along the guide to the stop into the APS 5 charger slot (4) (see. Fig.).
2. Connect the plug of the USB Type-C cable(7) to the USB Type-C connector of the power adapter (3). Plug the power adapter into a socket 100-240 V (6) (110 V socket for US).
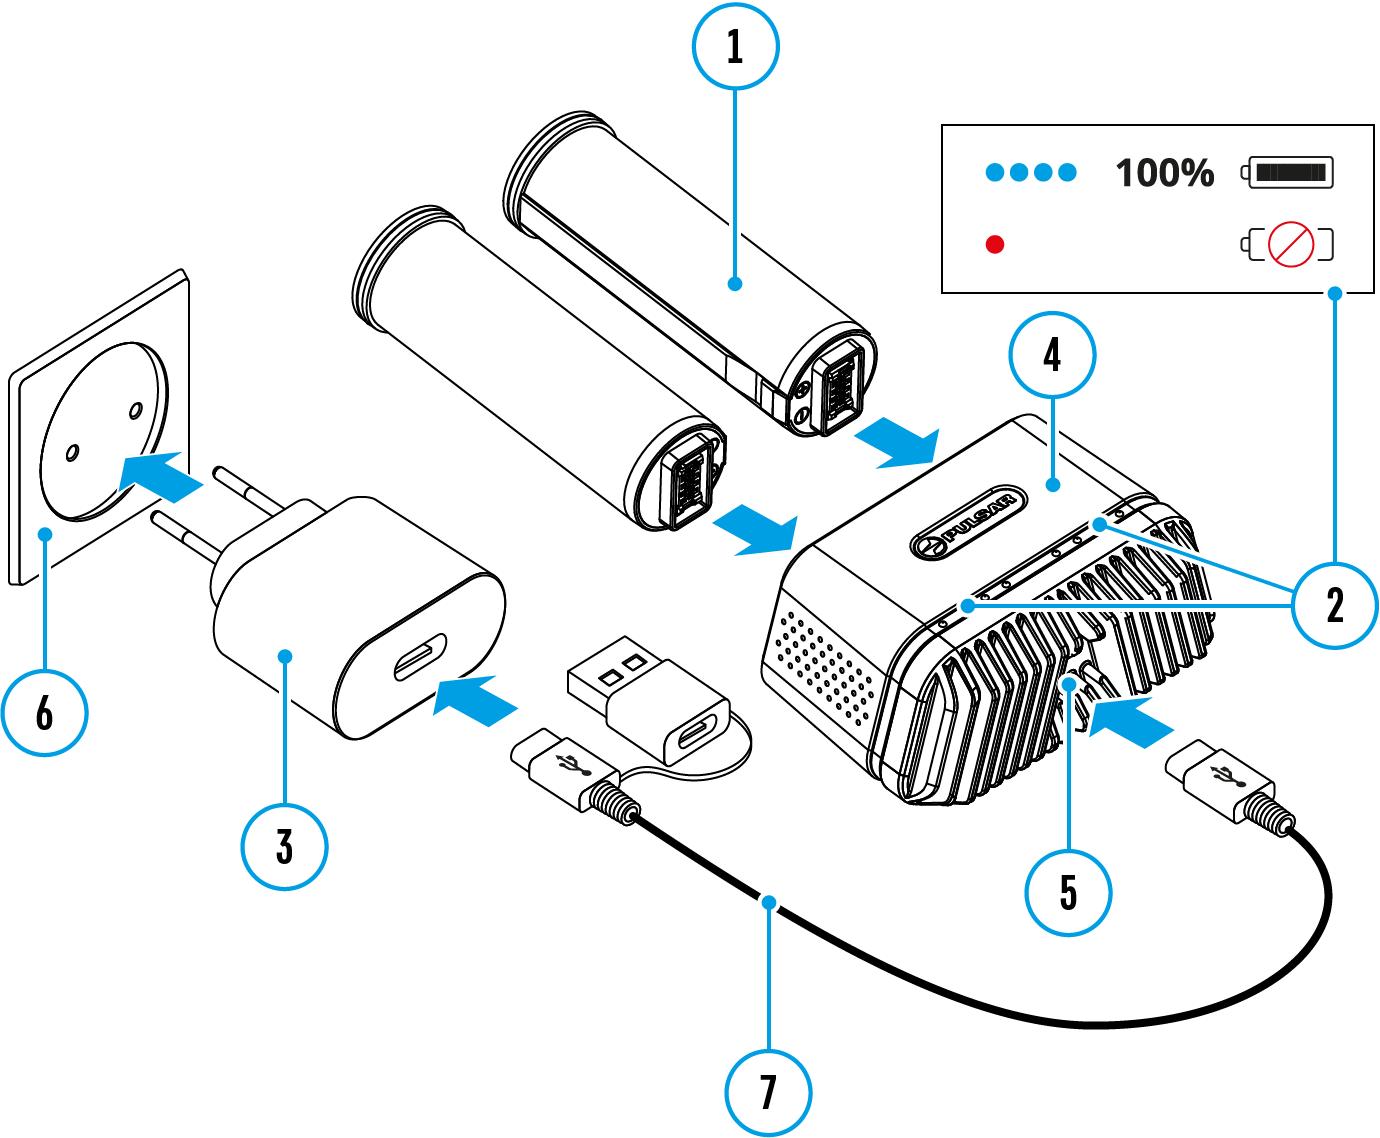
3. Connect the other end of the USB Type-C cable to the USB Type-C connector (5) of the charger(4)by removing the USB Type-A adapter.
4. LED indication (2) displays battery charging level (see Table).
5. Two batteries can be charged at the same time: the second slot is designed for it.
LED indication (2) in the battery charging mode
Battery Level
Battery charge level is from 0% to 25%
Battery charge level is from 26% to 50%
Battery charge level is from 51% to 80%
Battery charge level is from 81% to 99%
Battery is fully charged. Charging will automatically stop. The battery can be disconnected from the charger
Defective battery. Do not use the battery!
LED indication (2) in the standby mode**


Battery Level
Battery charge level is from 0% to 25%
Battery charge level is from 26% to 50%
Battery charge level is from 51% to 80%
Battery charge level is from 81% to 99%
Battery is fully charged. It can be disconnected from the charger.
Defective battery. Do not use the battery!
* Purchased separately or supplied as package contents of a device.
** Standby mode an operating mode in which batteries are inserted into the charger, but the power adapter is not connected. In this mode, the indication is on for 10 seconds.
Attention! When using a power adapter that does not support USB Power Delivery fast charging technology, the flicker frequency of LED indicators decreases by 3 times and charge time increases.
Attention! The charger heats up during fast charging. Excess heat is removed through the radiator and does not affect the device operation.
Legal Compliances and Disclaimers

The manufacturer reserves the right at any time, without mandatory notice, to make changes to the package contents, design and characteristics that do not impair the quality of the product.
For technical support please contact support@pulsar-vision.com.
Answers to frequently asked questions about the devices can also be found in the FAQ section.
