
Merger LRF Manual
Content Specifications
About the device
Description
Package Contents
Components and Controls
Features
Power supply
Precautions
Recommendations for Battery Use
Battery Charging
Battery Installation
Switching and Changing the Batteries
External Power Supply
Getting Started
Powering on and Image Settings
Button Operation
Interface
Status Bar
Quick Menu
Main Menu
Enter the Main Menu
Amplification Level
Colour Modes
Smoothing Filter
User Mode
Display Settings
Wi-Fi Settings
Microphone
Rangefinder
Calibration Mode
General Settings
Defective Pixel Repair
Defective Pixel Repair
Restore Default Pixel Map
Device Information
Functions
Video Recording and Photography
Laser Rangefinder
Discrete Digital Zoom
PiP Function
Display-Off Function
Wi-Fi Function
Installing the Device on a Tripod
USB Connection
Software
Stream Vision 2
Firmware Update
Maintenance
Technical Inspection
Technical Maintenance
Storage
Troubleshooting
Legal Compliances and Disclaimers
Specifications
You can learn more about the main parameters here.
LRF XQ35
Model
Microbolometer
Type uncooled
Resolution, pixels 384x288
Pixel Pitch, µm 17
NETD, mK < 25
Frame rate, Hz 50
Optical Characteristics
Lens, mm F35 F/1.0
Continuous digital zoom, x 3-12
Digital zoom 2x/4x
Minimum Focus Distance, m/y 5 / 5.47
Eye relief, mm/inch 12 / 0.47
Exit pupil diameter, mm 5
Field of view (HxV), degrees / m@100m 10.7 / 18.7
Diopter adjustment, D -4/+3
Interpupillary distance adjustment, mm 63-74
LRFXQ35 SKU 77483
Range of detection (deer type object), m/y 1350 / 1476
Display
Type AMOLED
Resolution, pixels 1024 768
Operational Characteristics
Power supply, V 3.7
Battery type / Capacity / Output voltage
Li-Ion Battery Pack APS3 / 3200 mAh / DC 3.7 V (removable)
Li-Ion Battery Pack / 4000 mAh / DC 3.7 V (built-in)
External power supply 5V
Operating time on Battery Pack (at t=22°C), h* 10
Degree of protection, IP code (IEC60529) IP 7
Operating temperature range, ° /° F -25 ... +50 / -13 ... 122
Dimensions, mm / inch 165x131x68 / 6.5x5.16x2.68
Weight (with battery), kg / oz 0.83 / 29.3
Video Recorder
Video / photo resolution, pixel 1024 768
Video / photo format .mp4 / .jpg
Built-in memory 16 Gb
Wi-Fi Channel**
Frequency 2.4/5 GHz
Standard IEEE 802.11 b/g/n/ac
Characteristics of the Rangefinder
Wavelength, nm 905
Max. measuring range***, m/y 1000 / 1094
Measurement accuracy, m +/-1
*Actual operating time depends on the extent of using Wi-Fi, integrated video recorder and integrated laser rangefinder.
**The reception range may vary depending on various factors: obstacles, other Wi-Fi networks.
***Depends on the characteristics of the object under observation and environmental conditions.
SKU 77484
Microbolometer
Type uncooled
Resolution, pixels 640x480
Pixel Pitch, µm 17
NETD, mK < 25
Frame rate, Hz 50
Optical Characteristics
Lens, mm F35 F/1.0
Continuous digital zoom, x 2-16
Digital zoom 2x/4x/8x
Minimum Focus Distance, m/y 5 / 5.47
Eye relief, mm/inch 15 / 0.59
Exit pupil diameter, mm 3.5
Field of view (HxV), degrees / m@100m 17.8 / 31.3
Diopter adjustment, D -5/+4
Interpupillary distance adjustment, mm 63-74
Range of detection (deer type object), m/y 1350 / 1476
Display Type AMOLED
Resolution, pixels 1024 768
Operational Characteristics
XP35
LRF
Model LRF XP35
Power supply, V 3.7
Battery type / Capacity / Output voltage
Li-Ion Battery Pack APS3 / 3200 mAh / DC 3.7 V (removable)
Li-Ion Battery Pack / 4000 mAh / DC 3.7 V (built-in)
External power supply 5V
Operating time on Battery Pack (at t=22°C), h* 9
Degree of protection, IP code (IEC60529) IP 7
Operating temperature range, ° /° F -25 ... +50 / -13 ... 122
Dimensions, mm / inch 165x131x68 / 6.5x5.16x2.68
Weight (with battery), kg / oz 0.83 / 29.3
Video Recorder
Video / photo resolution, pixel 1024 768
Video / photo format .mp4 / .jpg
Built-in memory 16 Gb
Wi-Fi Channel**
Frequency 2.4/5 GHz
Standard IEEE 802.11 b/g/n/ac
Characteristics of the Rangefinder
Wavelength, nm 905
Max. measuring range***, m/y 1000 / 1094
Measurement accuracy, m +/-1
*Actual operating time depends on the extent of using Wi-Fi, integrated video recorder and integrated laser rangefinder.
**The reception range may vary depending on various factors: obstacles,
other Wi-Fi networks.
***Depends on the characteristics of the object under observation and environmental conditions.
Model
SKU 77465
Microbolometer
Type uncooled
Resolution, pixels 640x480
Pixel Pitch, µm 17
NETD, mK < 25
Frame rate, Hz 50
Optical Characteristics
Lens, mm F50 F/1.0
Continuous digital zoom, x 2.5-20
Digital zoom 2x/4x/8x
Minimum Focus Distance, m/y 5 / 5.47
Eye relief, mm/inch 15 / 0.59
Exit pupil diameter, mm 3.5
Field of view (HxV), degrees / m@100m 12.4 / 21.8
Diopter adjustment, D -5/+4
Interpupillary distance adjustment, mm 63-74
Range of detection (deer type object), m/y 1800 / 1970
Display
Type AMOLED
Resolution, pixels 1024 768
Operational Characteristics
XP50
LRF
LRF
XP50
Power supply, V 3.7
Battery type / Capacity / Output voltage
Li-Ion Battery Pack APS3 / 3200 mAh / DC 3.7 V (removable)
Li-Ion Battery Pack / 4000 mAh / DC 3.7 V (built-in)
External power supply 5V
Operating time on Battery Pack (at t=22°C), h* 8.5
Degree of protection, IP code (IEC60529) IP 7
Operating temperature range, ° /° F -25 ... +50 / -13 ... 122
Dimensions, mm / inch 196 143 76 / 7.72x5.59x2.99
Weight (with battery), kg / oz 0.95 / 33.5
Video Recorder
Video / photo resolution, pixel 1024 768
Video / photo format .mp4 / .jpg
Built-in memory 16 Gb
Wi-Fi Channel**
Frequency 2.4/5 GHz
Standard IEEE 802.11 b/g/n/ac
Characteristics of the Rangefinder
Wavelength, nm 905
Max. measuring range***, m/y 1000 / 1094
Measurement accuracy, m +/-1
*Actual operating time depends on the extent of using Wi-Fi, integrated video recorder and integrated laser rangefinder.
**The reception range may vary depending on various factors: obstacles,
other Wi-Fi networks.
***Depends on the characteristics of the object under observation and environmental conditions.
SKU 77481
Microbolometer
Type uncooled
Resolution, pixels 1024x768
Pixel Pitch, µm 12
NETD, mK < 40
Frame rate, Hz 50
Optical Characteristics
Lens, mm F50 F/1.0
Continuous digital zoom, x 2.5-20
Digital zoom 2x/4x/8x
Minimum Focus Distance, m/y 5 / 5.47
Eye relief, mm/inch 15 / 0.59
Exit pupil diameter, mm 3.5
Field of view (HxV), degrees / m@100m 14 / 24.6
Diopter adjustment, D -5/+4
Interpupillary distance adjustment, mm 63-74
Range of detection (deer type object), m/y 2300 / 2515
Display Type AMOLED
Resolution, pixels 1024 768
Operational Characteristics
Power supply, V 3.7
LRF XL50
Model LRF XL50
Battery type / Capacity / Output voltage
Li-Ion Battery Pack APS3 / 3200 mAh / DC 3.7 V (removable)
Li-Ion Battery Pack / 4000 mAh / DC 3.7 V (built-in)
External power supply 5V
Operating time on Battery Pack (at t=22°C), h* 7
Degree of protection, IP code (IEC60529) IP 7
Operating temperature range, ° /° F -25 ... +50 / -13 ... 122
Dimensions, mm / inch 197 140 72 / 7.8x5.5x2.8
Weight (with battery), kg / oz 0.96 / 35
Video Recorder
Video / photo resolution, pixel 1024 768
Video / photo format .mp4 / .jpg
Built-in memory 64 Gb
Wi-Fi Channel**
Frequency 2.4/5 GHz
Standard IEEE 802.11 b/g/n/ac
Characteristics of the Rangefinder
Wavelength, nm 905
Max. measuring range***, m/y 1000 / 1094
Measurement accuracy, m +/-1
*Actual operating time depends on the extent of using Wi-Fi, integrated video recorder and integrated laser rangefinder.
**The reception range may vary depending on various factors: obstacles, other Wi-Fi networks.
***Depends on the characteristics of the object under observation and environmental conditions.
Description
https://www.youtube.com/embed/C3laUtLo4xk?si=a07-cFrNjlkwUc6T
https://www.youtube.com/embed/ExhRraKEfX4
https://www.youtube.com/embed/qSozyKEc1tU
Merger LRF thermal imaging binoculars are made with the external design of classic daytime binoculars and provide comfortable viewing with both eyes.
Merger LRF binoculars accommodate day and nighttime observations. Merger LRF provide exceptional image quality even in adverse weather conditions (fog, smog, rain) and beyond obstacles like branches, tall grass, dense foliage, etc. known to hinder target detection.
Merger LRF devices do not require an external light source and are not affected by bright light exposure.
These binoculars are equipped with a precise built-in laser rangefinger capable of measuring distances up to 1000 m accurately (± 1 m).
Merger LRF thermal imaging binoculars are perfectly suited for night hunting, observation, trail orientation, identifying hazards, rescue operations, etc.
To get started, see the sections:
Battery Charging
Battery Installation
Powering on and Image Setting
Laser Rangefinder
Stream Vision 2
Package Contents
Merger thermal binocular
PS3 Battery Pack
APS battery charger
Power adapter
USB Type-C cable with USB Type-A adapter
Carrying case
Neck strap
Quick-Start guide
Lens cloth
Warranty card
Tripod adapter
Components and Controls
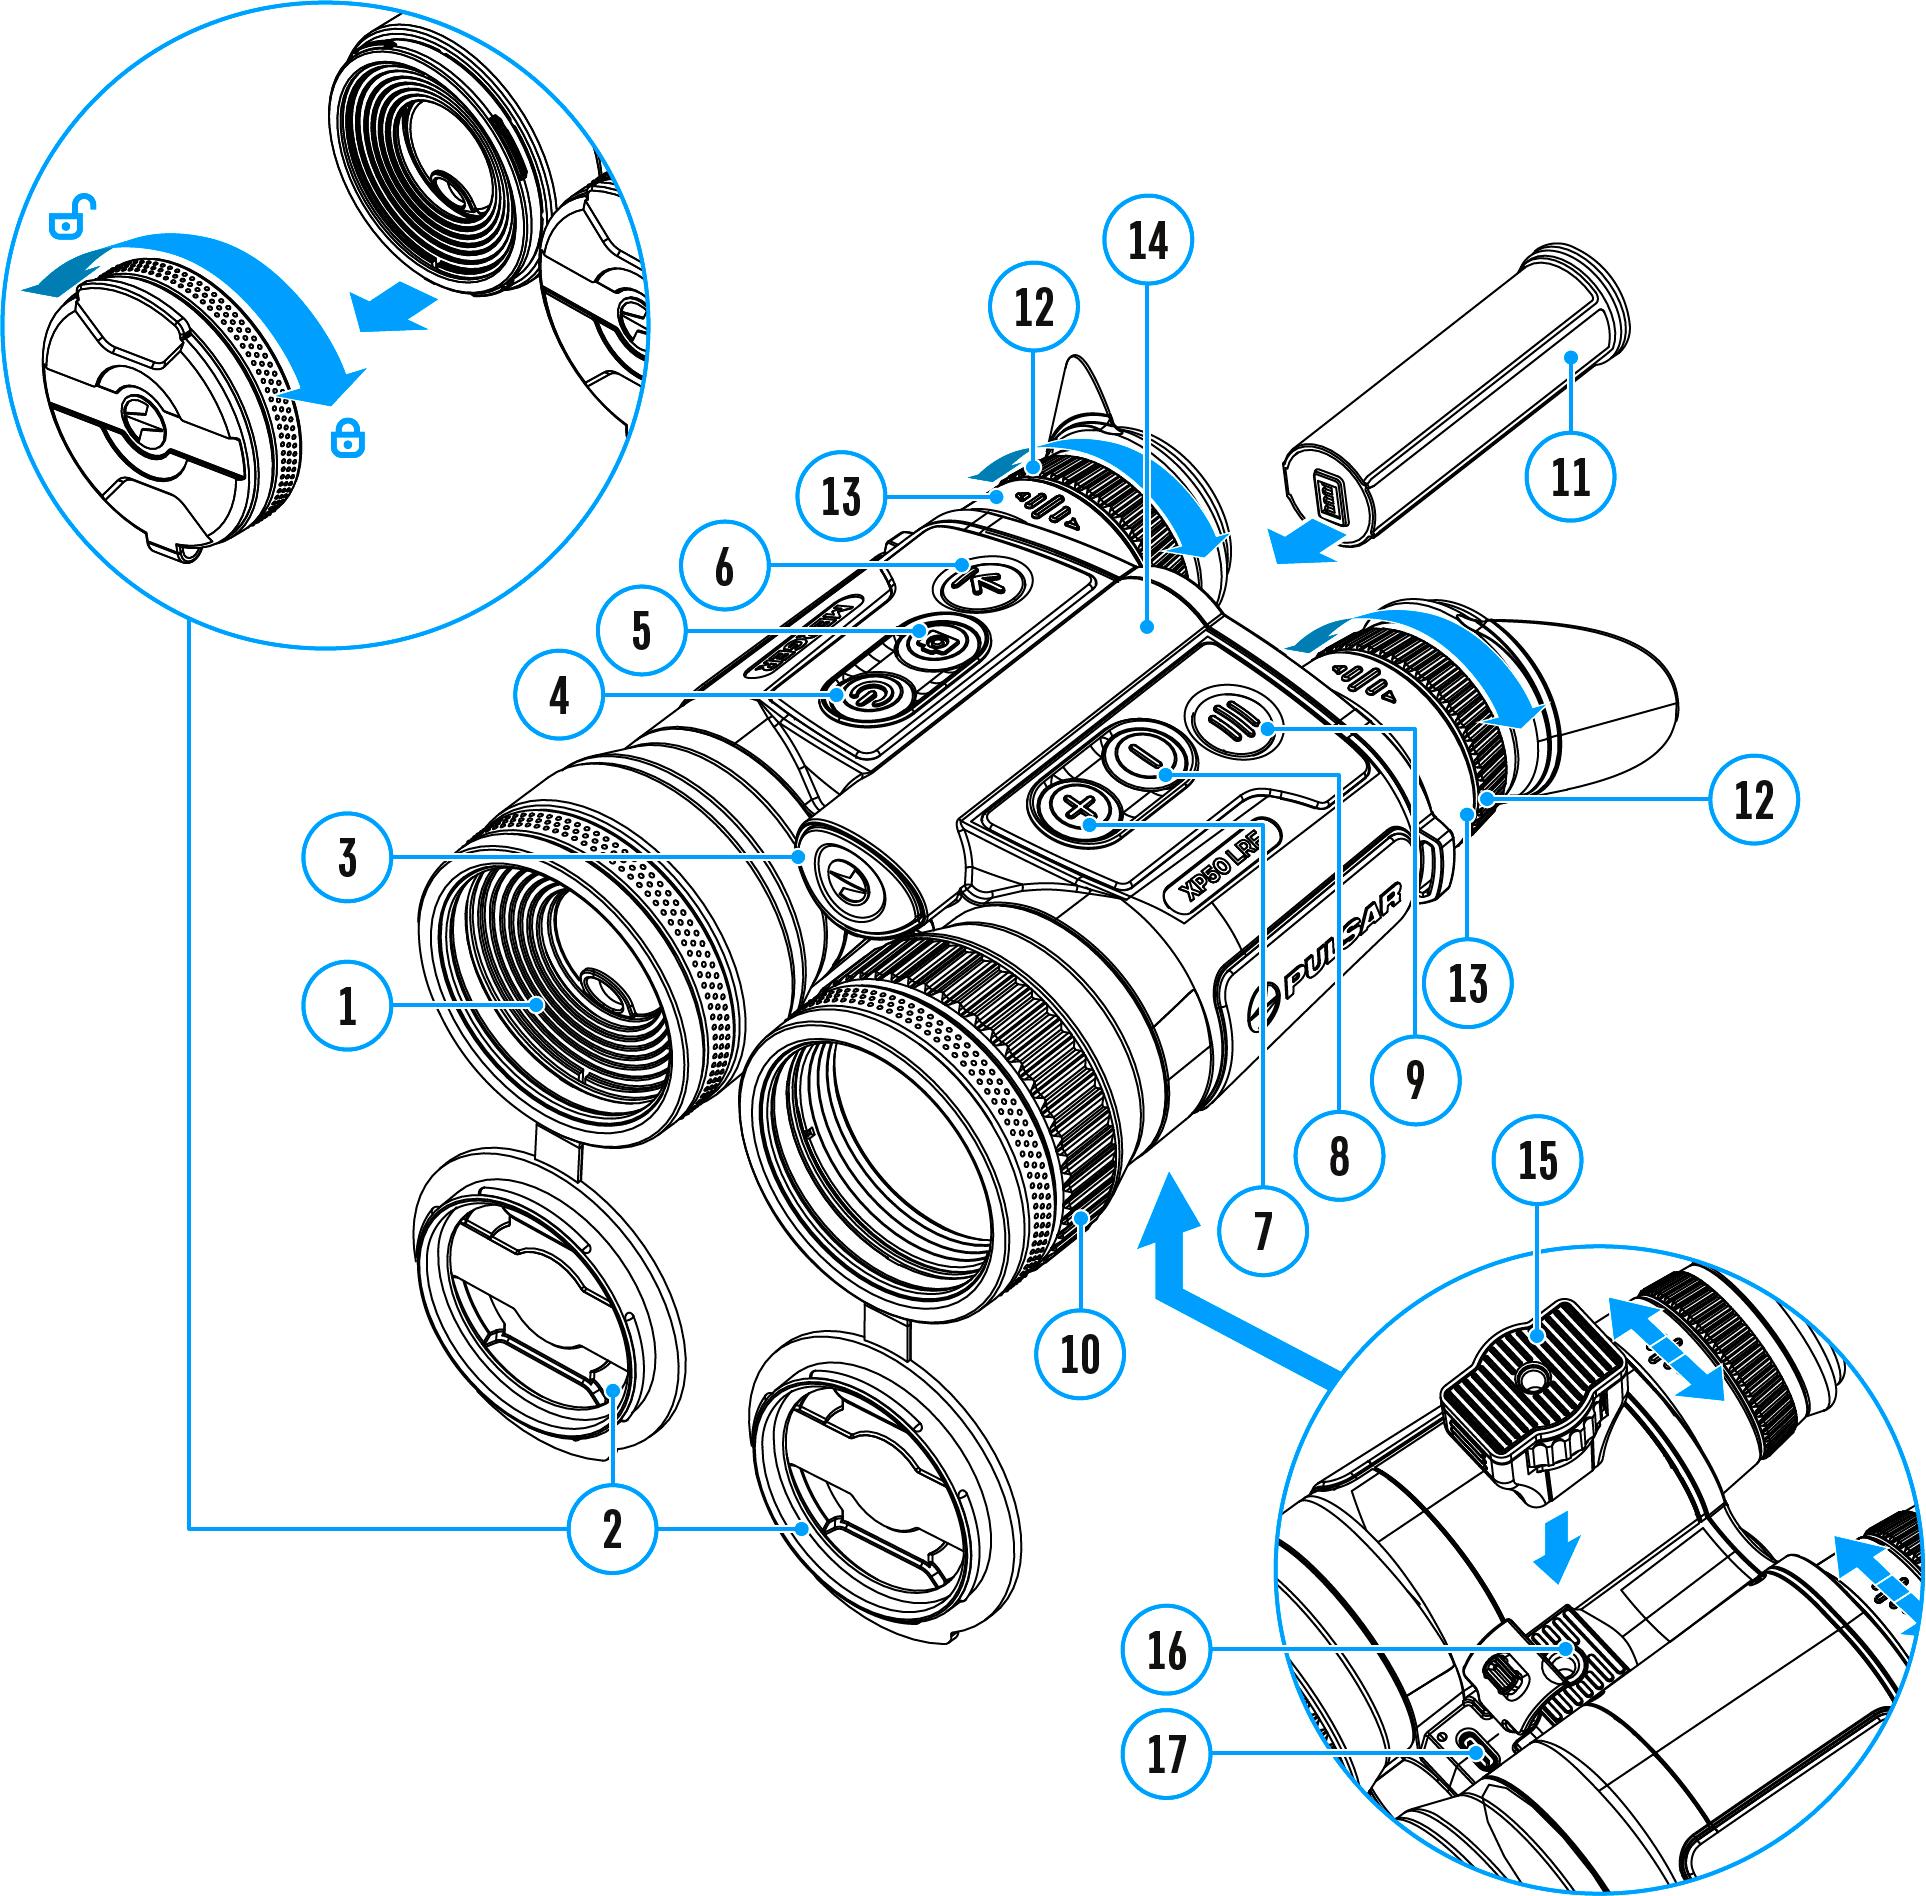
1. Laser rangefinder
2. Removable lens covers
3. Battery release button
4. Power ON/OFF/Calibration button
5. REC button
6. LRF button
7. UP/ZOOM navigation button
8. DOWN navigation button
9. MENU button
10. Lens focus ring
11. Battery APS 3
12. Eyepiece dioptre rings
13. Eyepieces
14. Battery compartment
15. Tripod adapter
16. Tripod adapter socket
17. USB Type-C port
Features
AMOLED displays with a resolution of 1024x768
Classic daytime binocular design
8-color display palette
3 calibration modes: manual, semi-automatic and automatic
Long detection distance
Smooth digital zoom 2.5-20x
3 levels of sensitivity enhancement: Normal, High, Ultra
Picture-in-Picture mode
Built-in laser rangefinder (up to 1000 m)
Display functions turn off with the proximity sensor
Display dimming function
Auto shutdown function
Defective Pixel Repair function
Device firmware update using the free Stream Vision 2 App
Wide operating temperature range -25 ° +50° (-13 °F +122 °F)
Completely waterproof IPX7
Tripod mount
Video/Audio Recording
Built-in video and sound recorder
Integration with iOS and Android devices
Wi-Fi remote control and viewing using a smartphone
Storing photos and videos in Cloud when using the Stream Vision 2 App
Battery Pack
Quick Change Li-Ion Battery Pack APS 3
Charging from USB Power Bank
Quick-Charge power delivery
Precautions
Only use the charger supplied with the Battery Pack. The use of any other charger may irreparably damage the Battery Pack or the charger and may cause fire.
Do not charge the built-in and removable batteries immediately after moving the device and batteries from a cold place to a warm place. Wait at least 30 minutes for the device and batteries to warm up. It is not recommended to charge the batteries with a charger connected to the USB port of a computer or laptop. It can damage the computer.
Do not leave the Battery Pack unattended while charging.
Never use a modified or damaged charger.
Do not leave the Battery Pack with a charger connected to the power adapter after charging is complete.
Do not expose batteries to high temperatures or to a naked flame. Do not use batteries as a power source for devices that do not support APS batteries.
Do not disassemble or bend batteries or charger.
Do not drop or strike batteries or charger.
Batteries and charger are not designed to be immersed in water. Keep the Battery Pack out of the reach of children.
Recommendations for Battery Use
For long-term storage, the built-in and removable batteries should be partially charged from 50 to 80%.
Batteries should be charged at an ambient temperature of 0 °C ... +35 °C. Otherwise, battery life will be significantly reduced. When using batteries at sub-zero ambient temperatures, the battery capacity decreases, this is normal and not a defect.
Do not use batteries at temperatures outside the range of -25 °C +50 °C it may reduce the battery life.
The battery has a short-circuit protection. Any situation that may cause short-circuiting, however, should be avoided.
Battery Charging
Merger LRF binoculars are supplied with a removable and rechargeable APS3 lithium-ion battery pack and a built-in rechargeable lithium-ion battery. The batteries should be charged before first use.

The icons in the status bar will flash when the battery is low. The batteries need to be charged.
Option 1

1. Install the APS 3 battery (11) in the battery compartment (14) of the device.
2. Connect the USB Type-C cable (21) to the USB Type-C connector (17) of the device.
3. Connect the other end of the USB cable (21) to the Power Adapter (22) by removing the USB Type-A adapter.
4. Plug the Power Adapter (22) into a 100-240 V socket.
5. Wait until the batteries are fully charged (indication in the status bar: ; 1 - built-in battery, 2 - removable battery).

Note: next to the USB Type-C connector (17)on the device body there is a light-emitting diode (24) to indicate the battery charge level when the device is switched off.
(24) LED indication


Battery status
Batteries are charging Batteries are charged
One of the batteries is defective. The device must not be used. The defective battery should be replaced. Contact Pulsar service to replace the internal battery.
There is no external battery in the device, or the device is switched on
Attention!When charging rechargeable batteries via a USB Type-C connector (17) in the device body section:
Charging priority is given to the built-in battery.
When the device is off, both batteries are charged at the same time. When using the device, the external battery is discharged first.
Built-in and removable batteries support USB Power Delivery fast charging technology when using the USB Type-C cable and power adapter supplied with the device.
Option 2

1. Insert the Battery Pack (11) along the rail into the APS charger (18) slot as far as it will go. The APS charger is supplied with your device or purchased separately.
2. Point A on the battery and point B on the charger should match.
3. Connect the USB Type-C plug of the USB cable (21) to the port (19) of the charger (18).
4. Connect the second plug of the USB cable (21) to the USB port on the power adapter (22).
5. Plug the device into a 100-240 V socket.
6. The LED indicator (20) will display battery charge status.
7. Wait until the battery is fully charged (LED indication (20): ).

8. Two batteries* can be charged at the same time: the second slot is designed for it.
(20) LED Indicator**

Battery Charge Status
Battery level is from 0% to 10%. Charger is connected to a power supply.
Battery level is from 0% to 10%. Charger is not connected to a power supply.


* Purchased separately.
Battery level is from 10% to 20%.
Battery level is from 20% to 60%.
Battery level is from 60% to 95%.
Battery completely charged. Charging will automatically stop. The battery can be disconnected from the charger.
Defective battery. Do not use the battery.
** LED indicator displays the current battery charge status for 30 seconds when the APS charger is not plugged in. When the power is being supplied, the indicator is constantly displaying the current battery charge status, the LEDs are additionally flickering to display the battery charging process.
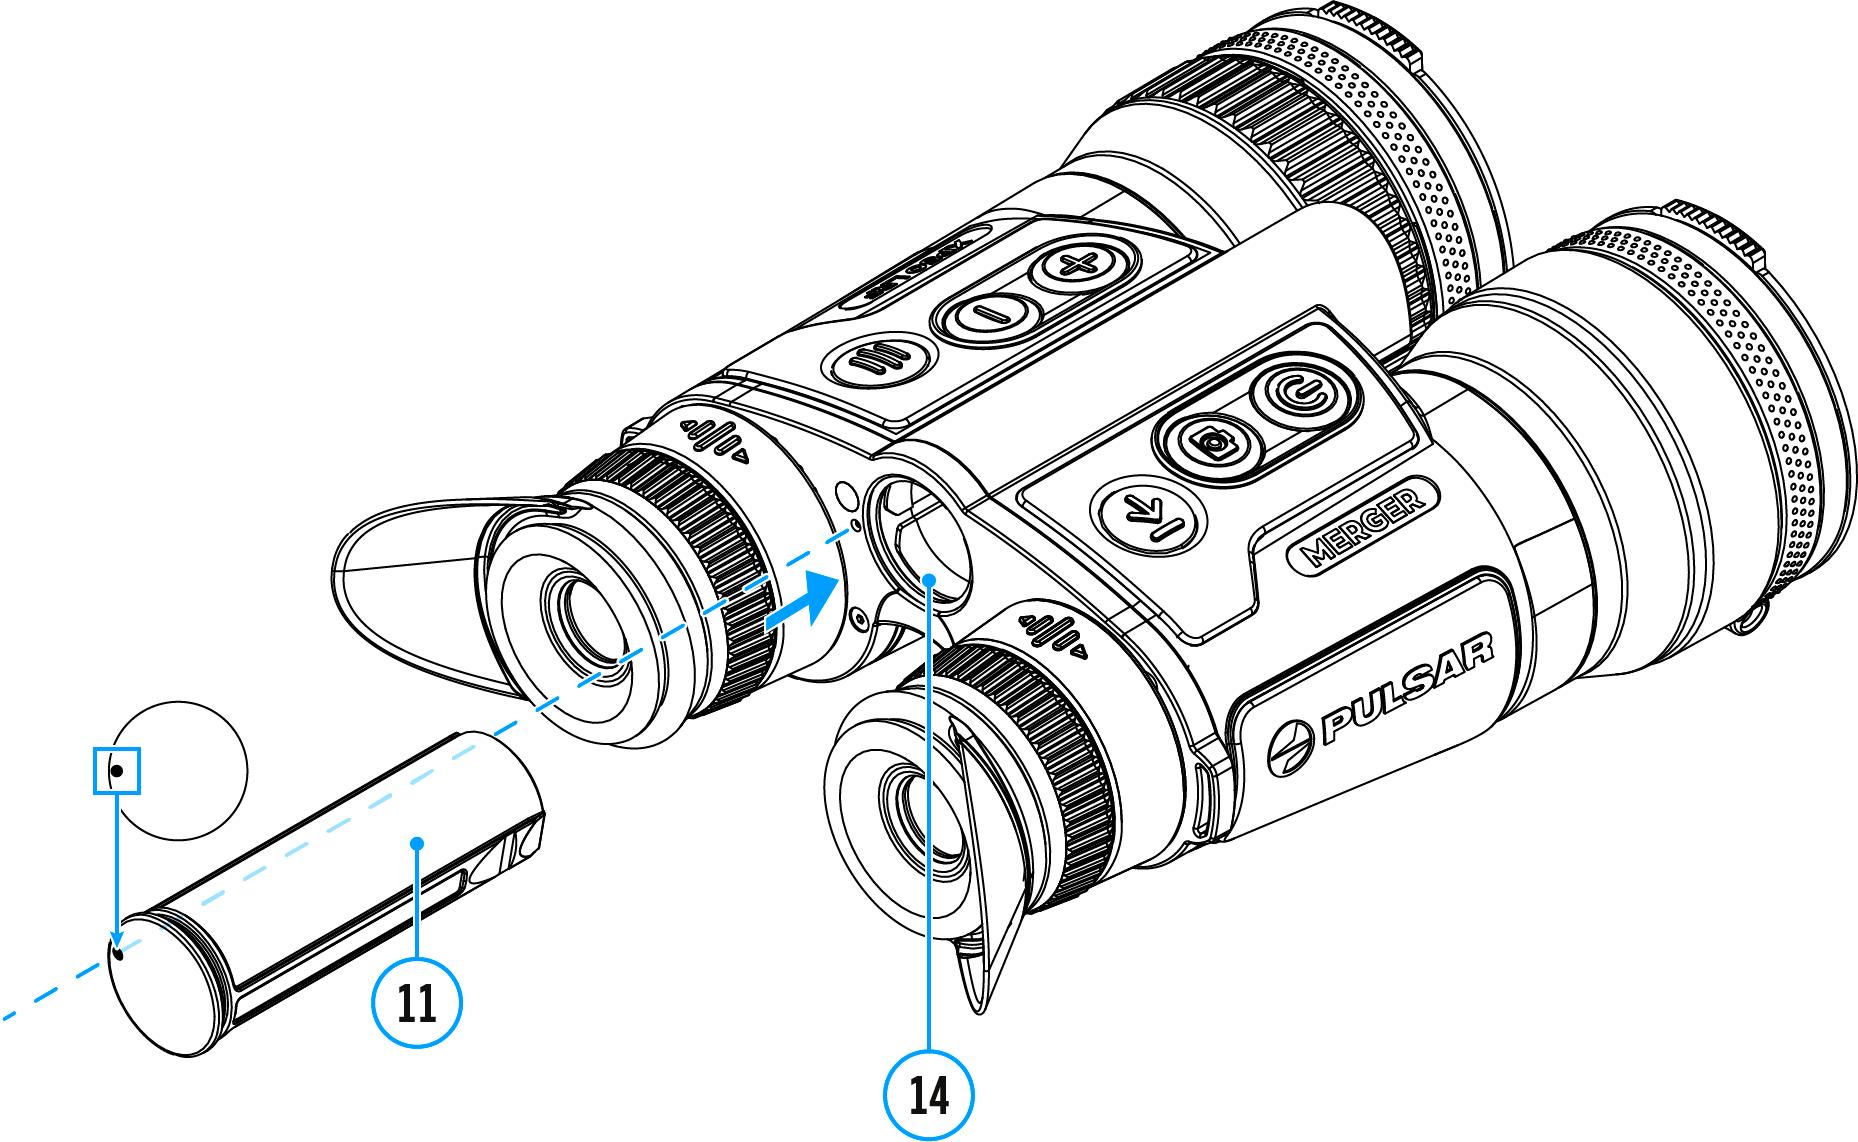
Battery Installation

Attention! Before installing the battery, make sure that there is an undamaged rubber insulating ring on the battery. The ring is designed to protect your device from moisture getting inside. Damage to the device due to a missing ring is not covered by the warranty. To replace or purchase a ring, contact your local distributor.
1. Install the battery (11) into the battery compartment (14). A pictogram in the form of a dot on the battery should be on the left.
2. You will hear a click when the battery is placed correctly.
3. To remove the battery from the device, press the Battery Release button (3).
Switching and Changing the Batteries
Merger LRFdevices are powered by 2 batteries: built-in Battery Pack and removable Battery Pack APS3.
1. If there are two batteries in the device at the same time, two battery icons are displayed in the status bar (1 - built-in battery, 2 - removable battery). The device battery is displayed in white, inactive in grey.
2. When there is no removable battery in the device, only one icon for the built-in battery displays in white in the status bar.
3. When both batteries are fully charged, the device is powered by the removable battery. If there is low removable battery level, the device will switch to the built-in battery.
4. Battery charge level is displayed in % above the icon in the status bar while charging.
5. It is possible to replace the removable battery even while the device is on.
Attention! When installing a removable battery with a sufficient charge level, the device will automatically switch to it.
External Power Supply
Show device diagram
Power can be supplied from an external source such as a 5 V power bank.
1. Connect the external power supply to the USB Type-C port (17) of the device.
2. The device switches to external power source, while built-in Battery Pack and removable Battery Pack APS3 will gradually recharge.

3. The display will show the battery icon with charge level as a percentage.
4. If the device is powered by an external power supply, but the APS3 battery is not connected, only the built-in battery will be charged.
5. When the external power supply is disconnected, the device switches to the internal battery pack without powering off.
Warning! Charging the built-in battery and the APS3 battery from the power bank at an external temperature below 0 °C (32 °F) can reduce the battery life. When using external power, connect the Power Bank to the device after it has been turned on and working for several minutes.
Powering on and Image Settings
Show device diagram
1. Open the lens covers (2).
2. Turn the device on with a short press of the ON/OFF (4) button.
3. Adjust the interpupillary distance by moving the eyepieces (13)
farther or closer to each other. It takes some effort to move the eyepieces.
4. Adjust the symbol sharpness on the displays by rotating the eyepiece dioptre rings (12). In future, it will not be necessary to rotate the eyepiece dioptre rings, regardless of the distance and other conditions.
5. To focus on the object being observed rotate the lens focusing ring (10) .
6. Select the calibration mode: manual (M), semi-automatic (SA) or automatic (A) in the main menu (enter the menu by long pressing the MENU (9) button).
7. Calibrate the image with a short press of theON/OFF (4) button (when calibration mode(SA) or (M) has been selected). Close the lens cap before manual calibration.
8. Select the required amplification level ( Normal , High , Ultra ) by briefly pressing the DOWN(8) button.
9. Adjust the brightness, display contrast, smooth digital zoom in the quick menu (activate by briefly pressing the MENU (9) button).
10. Press the LRF (6) button briefly to start the rangefinder. The rangefinder reticle will appear in the center of the image (the rangefinder mark appears in the centre of the image). Briefly press the LRF (6) button to measure the distance. Press and hold down the LRF (6) button for 2 seconds to measure the distance in scan mode. If the rangefinder is idle longer than for 4 seconds, it turns off automatically.
11. After use, press and hold down the ON/OFF (4) button to turn the device off.
Notes:
To prevent accidental decamouflage of the user, the displays automatically turn off when the observer moves the device away from the face.
When the device approaches the face, the displays will automatically turn on.
The proximity sensor can be disabled/enabled in the General settings section of the main menu.
Observation conditions: time of day, weather, different observation objects affect the image quality. Custom settings for brightness, display contrast as well as the function of adjusting the microbolometer sensitivity level will
help to achieve the desired quality in a particular situation.
Warning! Never point the lens at intensive energy sources such as laser radiation emitting devices or the sun. It can damage electronic components in the device. The warranty does not cover damage arising from failure to comply with operating instructions.
Button Operation
Operation Button

Power device on short press
Power device off long press for 3 secs
Turn display o
(if the proximity sensor is off) long press for less than 3 secs
Turn display on
(if the proximity sensor is off) short press
Calibrate the microbolometer short press
Control discrete digital zoom short press
PiP on/off long press
Switching amplification levels short press
Turn on/off the White Hot palette long press
Video Recorder Button
Start/pause/resume video recording short press
Stop video recording long press
Switch to video / photo long press
Capture Photo short press
Main Menu Button
Enter main menu long press
Navigation upwards/rightwards short press
Navigation downwards/leftwards short press
Con rm selection short press
Exit submenu without con rming selection long press
Exit menu (switch to viewing mode) long press
Quick Menu Button
Enter quick menu short press
Switch between quick menu options short press
Increase value short press
Decrease value short press
Exit quick menu long press
Rangefinder Button

Activate rangefinder short press
Measure distance short press
Start/stop SCAN mode long press
Status Bar
The status bar is at the bottom of the image and shows information on the actual operating status of the device, including:


1. Colour Mode: - White hot - Black hot
2. Amplification level (e.g., Normal)
3. Smoothing Filter (displayed when the function is on)

4. Calibration mode (a countdown timer will appear instead of the calibration icon when in automatic calibration mode with 5 seconds remaining until automatic calibration)
5. Microphone
6. Current magnification
7. Wi-Fi connection
8. Clock
9. Power supply:
Battery discharge level (when riflescope is powered by a built-in or removable battery).

External battery power indicator (if the riflescope is powered by an external power supply).
Battery indicator with current percentage of charge (when charging from an external power source).
Battery indicator shows a low battery charge

Battery indicator shows a low internal battery charge

Quick Menu
Show device diagram
The quick menu allows you to access the main device settings, such as adjusting the display brightness and contrast, and smooth digital zoom.
Enter the menu with a short press of the ENU (9) button.
To toggle between the functions below, press successively the ENU(9) button.

Brightness press briefly the UP (7)/DOWN (8) buttons to change display brightness from 0 to 20.
Contrast press briefly the UP (7)/DOWN (8) buttons to change display contrast from 0 to 20.
Smooth digital zoom press the UP (7)/DOWN (8) buttons to change digital zoom from 2.5 to 20.
Smooth digital zoom is in 0.1x increments.
To exit quick menu, press and hold down the ENU (9) button or wait 5 sec for automatic exit.
Video Recording and Photography
Show device diagram
Merger LRF thermal imaging binoculars feature video recording and photography of the image being ranged to the internal memory card.
Before using the photo and video functions, read the Dateand Time
subsections of the General Settings section.
For information on how to watch recorded photos and videos, see the Stream Vision 2 user manual: Android, iOS
Built-in recorder operates in two modes:
Photo (photography; the icon is displayed in the upper left corner of the image).

Video (video recording; the icon is displayed in the upper left corner of the image, the total remaining recording time is given taking into account the current resolution in the HH:MM format (hours:minutes).
Switching between the operating modes of the video recorder is done by long pressing the REC (5) button. Switching between the modes is cyclical ( Video > Photo > Video...).
Photo mode. Capturing an image

1. Switch to the Photomode with a long press of the REC (5) button.
2. Press the REC (5) button briefly to capture a photo. The icon flashes the photo file is being saved to the built-in SD card.
Video mode. Recording a video

1. Switch to the Video mode with a long press of the REC (5) button.
2. Press the REC (5) button briefly to start video recording.
3. When the video recording starts, the icon will disappear, instead of it the REC icon as well as the video recording timer displayed in the MM:SS (minutes:seconds) format will appear


4. Pause/continue recording by briefly pressing the REC (5) button.
5. Press and hold the REC (5) button to stop video recording.
Video files are stored in the built-in memory card:
After turning off the video recording; Upon powering the device off if recording was on; When the memory card is overfilled during recording (Memory Full message appears).
Notes:
You can enter and navigate the menu during video recording. Recorded videos and photos are saved to the built-in memory card of the device in the format img_xxx. jpg (for photos); video_xxx. mp4 (for video).
Videos are recorded in clips with a maximum duration of 5 minutes. The number of recorded files is limited by the capacity of unit s internal
memory and video compression ratio. Regularly check free memory within the built-in memory card and move the footage to other storage media to free up the memory card space. In case of a memory card error, you can use the format function in the General Settings section of the main menu.
Laser Rangefinder
Show device diagram
The binoculars are equipped with a built-in rangefinder (1), allowing you to measure distance to objects up to 1000m away.
Single Measurement Mode
1. Turn on the device, set up image according to section Powering on and Image Setting.
2. Briefly press the LRF (6)button to measure the distance. The rangefinder reticle will appear in the centre of the image. In the top right corner of the display you will see distance in meters (or yards - depending on settings).

3. If PiP mode is activated, the PiP window remains active upon activation of the rangefinder.
4. Point the rangefinding reticle at an object and press the LRF (6) button.
Note: if the rangefinder is idle longer than for 4 seconds, it turns off automatically.
Scan Mode
1. To measure distance in scanning mode, hold down the LRF (6) button for longer than two seconds. Measurement readings will be changing in real time as you point the binoculars at different objects. A SCAN message will appear in the upper right corner of the image.

2. To exit SCAN mode, press LRF (6) button again.
3. If measurement fails, dashes will appear on the display.
4. In 4 seconds of inactivity (no measurement is taken) the rangefinder turns off, the rangefinding reticle with readings disappears from the display.
Notes:
To select a rangefinding reticle, please see the Reticle Type subsection in the Rangefinder section.
To select a unit of measurement (meters or yards) go to the Units of Measure subsection of the General Settings section.

Additional Information:
Accuracy of measurement and maximum range depend on the reflection ratio of the target surface, the angle at which the emitting beam falls on the target surface and environmental conditions. Reflectivity is also affected by surface texture, color, size and shape of the target. A shiny or brightly colored surface is normally more reflective than a dark surface.
Measuring range to a small sized target is more difficult than to a large sized target.
Accuracy of measurement can also be affected by light conditions, fog, haze, rain, snow etc. Ranging performance can degrade in bright
conditions or when ranging towards the sun.
Discrete Digital Zoom
Show device diagram

The device allows you to quickly increase the basic magnification (please refer to the Magnification line in the Specificationstable) by 2, 4 or 8 times.
To operate the discrete digital zoom, press successively the UP/ZOOM (7) button.
The digital zoom will not be saved after the device is re-started.
PiP Function
Show device diagram
PiP ("Picture in Picture") allows you to see a zoomed image simultaneously with the main image in a dedicated window.

Turn on/off the PiP function with a long press of UP/ZOOM (7) button.
Change zoom ratio in the PiP window with a short press of UP/ZOOM (7) button.
The zoomed image is displayed in a dedicated window, while the image in the rest of the screen is displayed at base magnification (2.5x).
When PiP is turned on, you can operate the discrete and continuous digital zoom. The magnification will take place only in the dedicated window.
When PiP is turned off, the image is shown with the optical magnification set for the PiP function.
Display-Off Function
Show device diagram
This function darkens the screen, which aids the user s concealment. However, the device stays on.

The displays can be turned off automatically if theproximity sensoris turned on or by pressing the ON/OFF (4) button if the proximity sensor is turned off.
The proximity sensor is turned on:
1. When the device moves away from the user's face, the displays will turn off.
2. When the device approaches the user's face, the displays will turn on again.

3. While holding the ON/OFF (4) button, a countdown icon will appear on the displays and the device will turn off.
The proximity sensor is turned off:
1. When the device is on, press and hold the ON/OFF (4) button. The displays will turn off, the current time and the "Display off"icon will appear.
2. Turn the displays back on with a short press of theON/OFF (4) button.
3. When you press and hold the ON/OFF (4) button, the displays show the "Display off" icon with a countdown. Pressing & holding the button down for the duration of the countdown will power the device off completely.
Wi-Fi Function
The device has a function enabling wireless communication with external devices (smartphone or tablet) via Wi-Fi.
Turn on the wireless module in the WI-Fi Activation menu option.
Wi-Fi operation is shown in the status bar as follows:
Status bar indication


Connection status
Wi-Fi is off
Wi-Fi activated by the user, Wi-Fi in the device is being activated
Wi-Fi is on, no connection with device
Wi-Fi is on, device connected
Your device is detected by an external device as "MERGER_XXXX", where XXXX is the last four digits of device's serial number.
After entering the password (default: 12345678) on a mobile device (see Password Setup subsection of the Wi-Fi Settings section for more information on setting a password) and connection is established, the icon in the status bar will change to Image not found or type unknown .

The Wi-Fi function will turn off automatically if there is not enough battery power for Wi-Fi. The battery icons will turn red and flash. To use the Wi-Fi function again, you need to charge the batteries.
Installing the Device on a Tripod
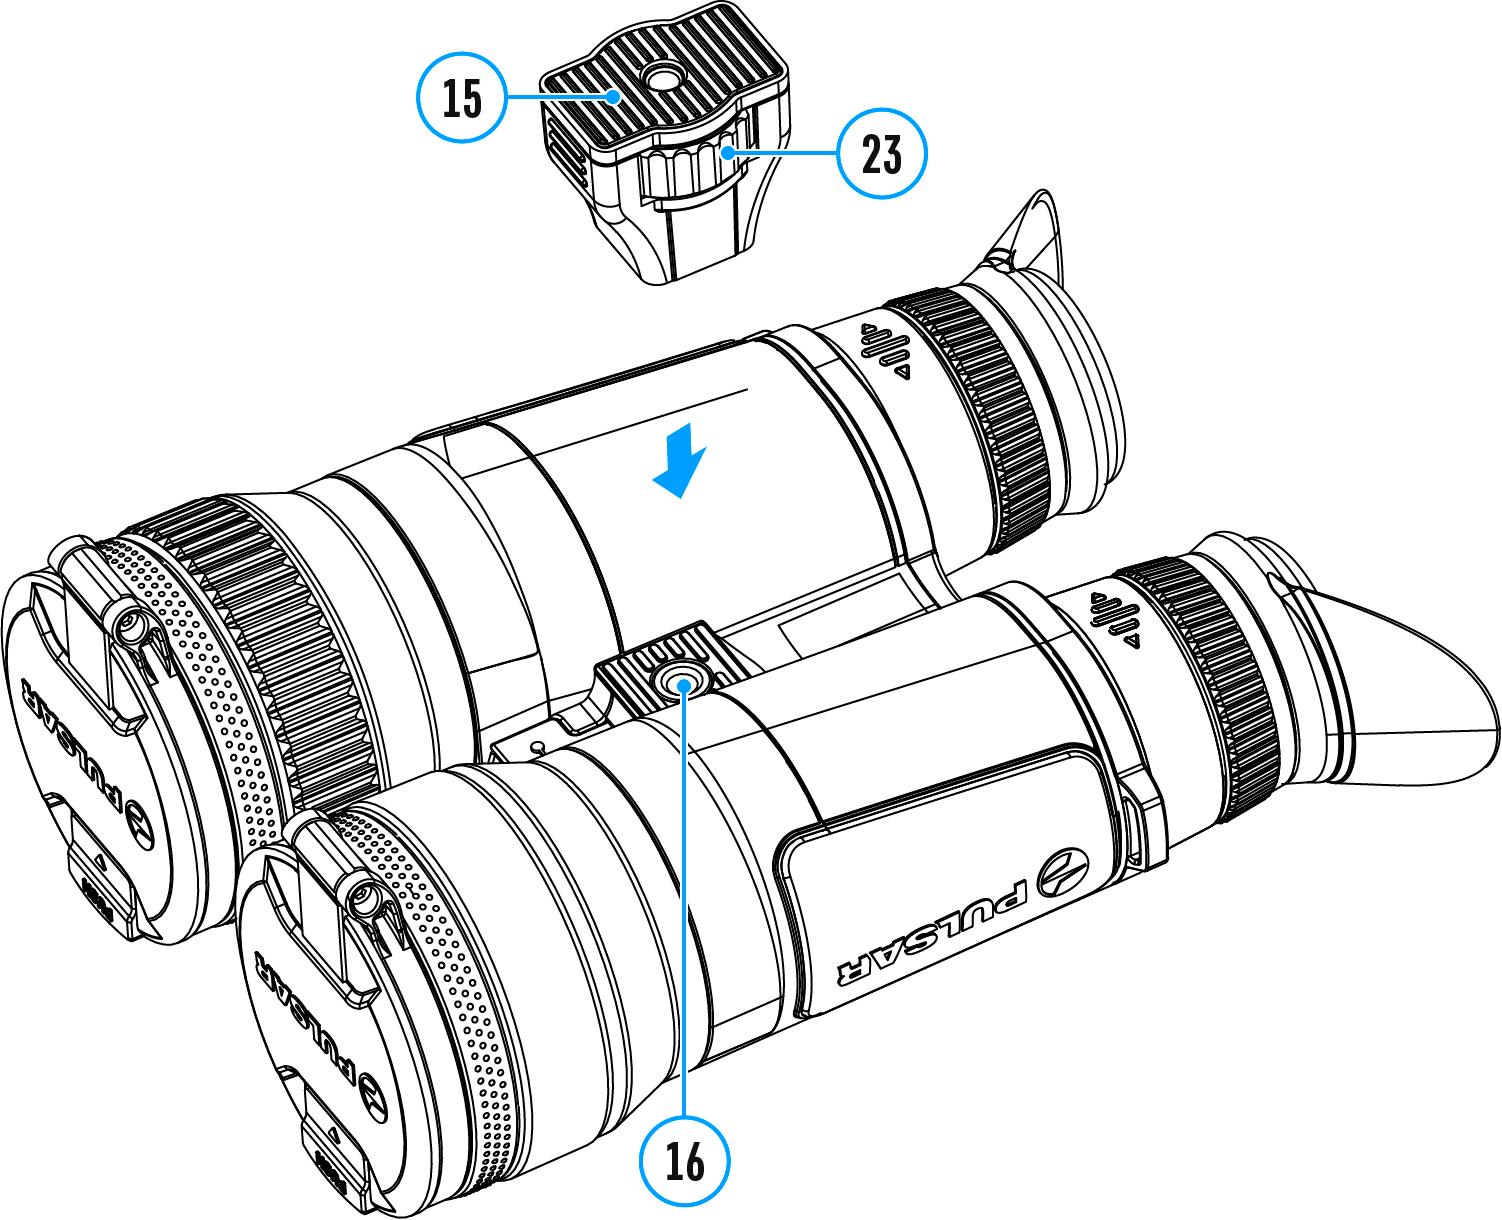
1. Attach the tripod adaptor (15) to the socket (16).
2. Screw the adapter wheel (23) clockwise until it stops.
3. Secure the adaptor with the device on a tripod.
USB Connection
Show device diagram

1. Connect one end of the USB cable to the USB Type-C (17) connector of the device, the other one to the port on your computer using a USB Type-A adapter.
2. Turn the device on with a short press of the ON/OFF (4) button (device that has been turned off cannot be detected by your computer).
3. Your device will be detected by the computer automatically; no drivers need to be installed.
4. Two connection modes will appear on the image: Power and Memory Card (external memory).
5. Select connection mode with UP (7)/DOWN (8) buttons.
6. Confirm selection with a short press of the MENU (9) button.
Power
In this mode, when a computer is used as an external power supply, the icon appears in the status bar. The device will continue operating and all functions are available. The Battery pack installed in the device is not being charged! A battery recharge feasibility depends on your computer's USB port.
Memory Card
In this mode the device is detected by the computer as a flash card. This mode is designed for work with the files saved in device's memory. The device's functions are not available in this mode; the device turns
off automatically.
If video recording was in progress when connection was made, recording stops and video is saved.
USB Disconnection
When the USB is disconnected from the device connected as the Power mode, the device continues operating from the rechargeable batteries if they are sufficiently charged.
If the device is in Memory Card mode and is disconnected from USB, the device will remain on.
Stream Vision 2

Install the Stream Vision 2 application to download files, update firmware, control the device by remote control and broadcast images from your device to a smartphone or a tablet via WiFi.
We recommend using the latest version Stream Vision 2.

You can find further guidelines on Stream Vision 2 here.
Download from Google Play
Download from App Store
Find answers to frequently asked questions about using Stream Vision 2 here. Stream Vision 2 Manual
Android iOS
Firmware Update
1. Download the free Stream Vision 2 App in Google Play or App Store.
2. Connect your Pulsar device to your mobile device (smartphone or tablet).
3. Launch Stream Vision 2 and go to section Settings .
4. Select your Pulsar device and press Check firmware update .
5. Wait for the update to download and install. Pulsar device will reboot and will be ready to operate.
Important:
if your Pulsar device is connected to a phone or mobile device, please turn on mobile data transfer (GPRS/3G/4G) to download update; if your Pulsar device is not connected to your phone or mobile device but is already listed in Settings > My devices section, you may use Wi-Fi to download update.
Find answers to frequently asked questions about using Stream Vision 2 here.
Is your firmware up to date?
Click hereto check the latest firmware for your device.
Technical Inspection
It is recommended to inspect your device before each use. Check the following:
The device should be free of any cracks or deformations. The lenses should be free of cracks, grease, dirt or debris.
The battery level of the device should be full. Electrical sockets should be free of salts, oxidation, or other debris.
All controls should be responsive.
Technical Maintenance
Maintenance should be carried out at least twice a year and should include the following steps:
Wipe the exterior surfaces of metal and plastic parts with a cotton cloth. Do not use chemically active substances, solvents, etc. as these will damage the paint.
Clean the electric terminals of the Battery Pack and device's battery slot using a grease-free organic solvent.
Check the lenses of the eyepieces, objective and rangefinder. If necessary, remove dust and sand from the optics (it is preferable to use a non-contact method). Cleaning of the exterior surfaces of the optics should be done with cleaners designed especially for this purpose.
Storage
Always store the device in its carrying case in a dry, well-ventilated space.
Remove the Battery Pack for long-term storage.
Troubleshooting
For technical support please contact support@pulsar-vision.com.
Answers to frequently asked questions about the devices can also be found in the FAQ section.
The device does not turn on
Possible cause
The batteries are completely discharged.
Solution
Charge the batteries.
Device malfunction
Solution
In case of any malfunctions during operation, try resetting the device by long pressing the ON/OFF button for 10 seconds.
The device does not operate on external power supply
Possible cause
USB cable is damaged.
Solution
Replace USB cable.
Possible cause
The external power supply is discharged.
Solution
Charge the external power supply.
The image is blurry, with vertical stripes and uneven background
Possible cause
Calibration is required.
Solution
Carry out calibration according to Calibration Modesection.
Black screen after calibration
Solution
If the image does not clear after calibration, you need to recalibrate.
When the device is turned on, the calibration frequency is at first higher, then decreases (if the automatic calibration mode is enabled)
Possible cause
After turning on the device, it takes some time for the sensor temperature to stabilize. This is normal and is not a defect.
Colored lines appeared on display or image has disappeared
Possible cause
The device was exposed to static electricity during operation.
Solution
After exposure to static electricity, the device may either reboot automatically, or require turning off and on again.
The image is too dark
Possible cause
Brightness or contrast level is too low.
Solution
Adjust the brightness or contrast level in the Quick Menu.
Poor image quality / Detection range reduced
Possible cause
Problems described may arise in adverse weather conditions (snow, rain, fog etc.).
Smartphone or tablet cannot be connected to the device
Possible cause
Password in the device was changed.
Solution
Delete network and connect again inserting the password saved in the device.
Possible cause
There are too many Wi-Fi networks in the area where the device is located which may cause signal interference.
Solution
To ensure stable Wi-Fi performance, move the device to an area with few or no Wi-Fi networks.
Solution
Switch the device's Wi-Fi band.
Possible cause
The device has a 5 GHz network enabled, but the smartphone only supports 2.4 GHz.
Solution
Switch the device's Wi-Fi band to 2.4 GHz.
More information on solving problems with connection to Stream Vision 2 by following the link.
Wi-Fi signal is missing or interrupted
Possible cause
Smartphone or tablet is out of range of a strong Wi-Fi signal. There are obstacles between the device and the smartphone or tablet (e.g., concrete walls).
Solution
Relocate smartphone or tablet into the Wi-Fi signal line of sight.
More information on solving problems with connection to Stream Vision 2 by following the link.
The image of the object being observed is missing
Possible cause
The object is behind glass, which obstructs thermal vision.
Solution
Remove the glass.
There are several light or black dots (pixels) on device s displays or microbolometer
Solution
The presence of such pixels is associated with the manufacturing technology of displays and microbolometer. It is not a defect.
When using the device at below zero temperatures the image quality is worse than at positive temperatures
Possible cause
In warm climates, objects in the background of a thermal image heat up differently because of thermal conductivity, generating a high temperature contrast and a sharper thermal image.
In cold climates, objects in the background of a thermal image will cool down to roughly the same temperature, which leads to a greatly reduced temperature contrast and a degraded image quality. This is
Rangefinder will not measure distance
Possible cause
There is an object in front of the receiver or emitter lens preventing signal transmission.
Solution
Make sure that: the lenses are not blocked by your hand or fingers; the lenses are clean.
Possible cause
The device is not being held steadily when measuring.
Solution
Keep the device steady when measuring.
Possible cause
Distance to the object exceeds 1000 m.
Solution
Pick an object at a distance not longer than 1000m.
Possible cause
Low reflection ratio (for example, tree leaves).
Solution
normal for all thermal imaging devices.
Pick an object with higher reflection ratio (see point Additional Information in section Laser Rangefinder
Large measurement error
Possible cause
Inclement weather conditions (rain, mist, snow).
Legal Compliances and Disclaimers
Attention! Merger thermal imaging binoculars require a license if exported outside your country.
Electromagnetic Compliance
This product complies with EU Standard EN 55032:2015, Class A.
Warning! Operation of this equipment in a residential environment could cause radio interference.

Caution use of controls or adjustments or performance of procedures other than those specified herein may result in hazardous radiation exposure.

Updates of the Product. The manufacturer reserves the right at any time,
without mandatory prior notice to the Customer, to make changes to the package contents (subject to the applicable laws, if any), design and characteristics that do not impair the quality of the Product.
Repair. Repair of the product is available within 5 years after purchase of the product.
Limitation of Liability.Subject to mandatory applicable laws and regulations: manufacturer will not be liable for any claims, actions, suits, proceedings, costs, expenses, damages or liabilities (if any), arising out of the use of this product. Operation and use of the product are the sole responsibility of the Customer. Manufacturer s sole undertaking is limited to providing the product(s) and related services in accordance with the terms and conditions of concluded transactions, including provisions established in warranty. The provision of products sold and services performed by Manufacturer to the Customer shall not be interpreted, construed, or regarded, either expressly or implied, as being for the benefit of or creating any obligation toward any third party (other than Distributor, Dealer, Buyer). Manufacturer s liability hereunder for damages, regardless of the form or action, shall not exceed the fees or other charges paid to Manufacturer for the product(s) and/or service(s).
MANUFACTURER WILL NOT BE LIABLE FOR LOST REVENUES OR INDIRECT, SPECIAL, INCIDENTAL, CONSEQUENTIAL, EXEMPLARY, OR PUNITIVE DAMAGES, EVEN IF THE MANUFACTURER KNEW OR SHOULD HAVE KNOWN THAT SUCH DAMAGES WERE POSSIBLE AND EVEN IF DIRECT DAMAGES DO NOT SATISFY A REMEDY.
