13 minute read
Fiat Panda 100HP
Project Fiat Panda 1.4 100HP Springing into action
PART TWO: Our 2008 Panda 100HP is due an MOT test. In preparation, we go through the mechanicals and replace a few bits to make sure it’s fighting fit. Andrew Everett gets his hands dirty for once!
Advertisement
With the worsening economic situation and the decrease in new car sales for various reasons, more and more folk are hanging onto their existing cars and spending out on repairs and maintenance. This means that garages are as busy as never before with booking times running into weeks: it was for this reason that I had to crack on with Fiat repairs myself, only getting my preferred local garage (Parkside Autos in Worksop) to find a half-day slot to replace the timing belt that you can read all about next month.
As it arrived, the Panda had various issues. Worst was the appalling noise of a dying wheel bearing – and in second place a bad vibration from the frontend that simple wheel balancing didn’t cure. In the end, a buckled wheel was discovered and moved to the back for a temporary fix. The steering felt a bit stiff and the handling slightly odd, and a previous MOT advisory for ‘misting’ of the offside front shock absorber meant that it was indeed knackered.
Editor Knowles thought the brakes were a bit ‘wooden’, and upon inspection, we found that the driver’s side (offside) rear wheel bearing was absolutely goosed. So, a long list of bits was given to series sponsors GSF – discs and pads all-round, front struts, top mounts, rear dampers and the usual filters, plugs and so on.
Strut one's stuff
However, the front struts proved elusive, and it seems that 100HP ones are Fiatonly and in the region of £400 a pair. Stuff that. Undoubtedly stiffer than a regular Panda, there had to be a way around this. I looked through various damper manufacturer catalogues, crossreferenced and found that both Monroe and GSF list the 1.3 Multijet diesel struts as the same part number. So, my local GSF in Sheffield had a pair of their Amtex equivalents in stock and on a ‘suck it and see’ basis. And yes, they are spot on. GSF part numbers AEX473319 and AEX473320 are the ones we used – and at 50 quid a side, are cheap enough. We fitted new top mounts as well – part number DTSBSH0463C.
The rest of the jobs were easy enough given the age of the car and inevitable rusty bolts – but compared to the previous Merc SLK project, it was a walk in the park. More car design like this please.
FRONT DISCS & PADS
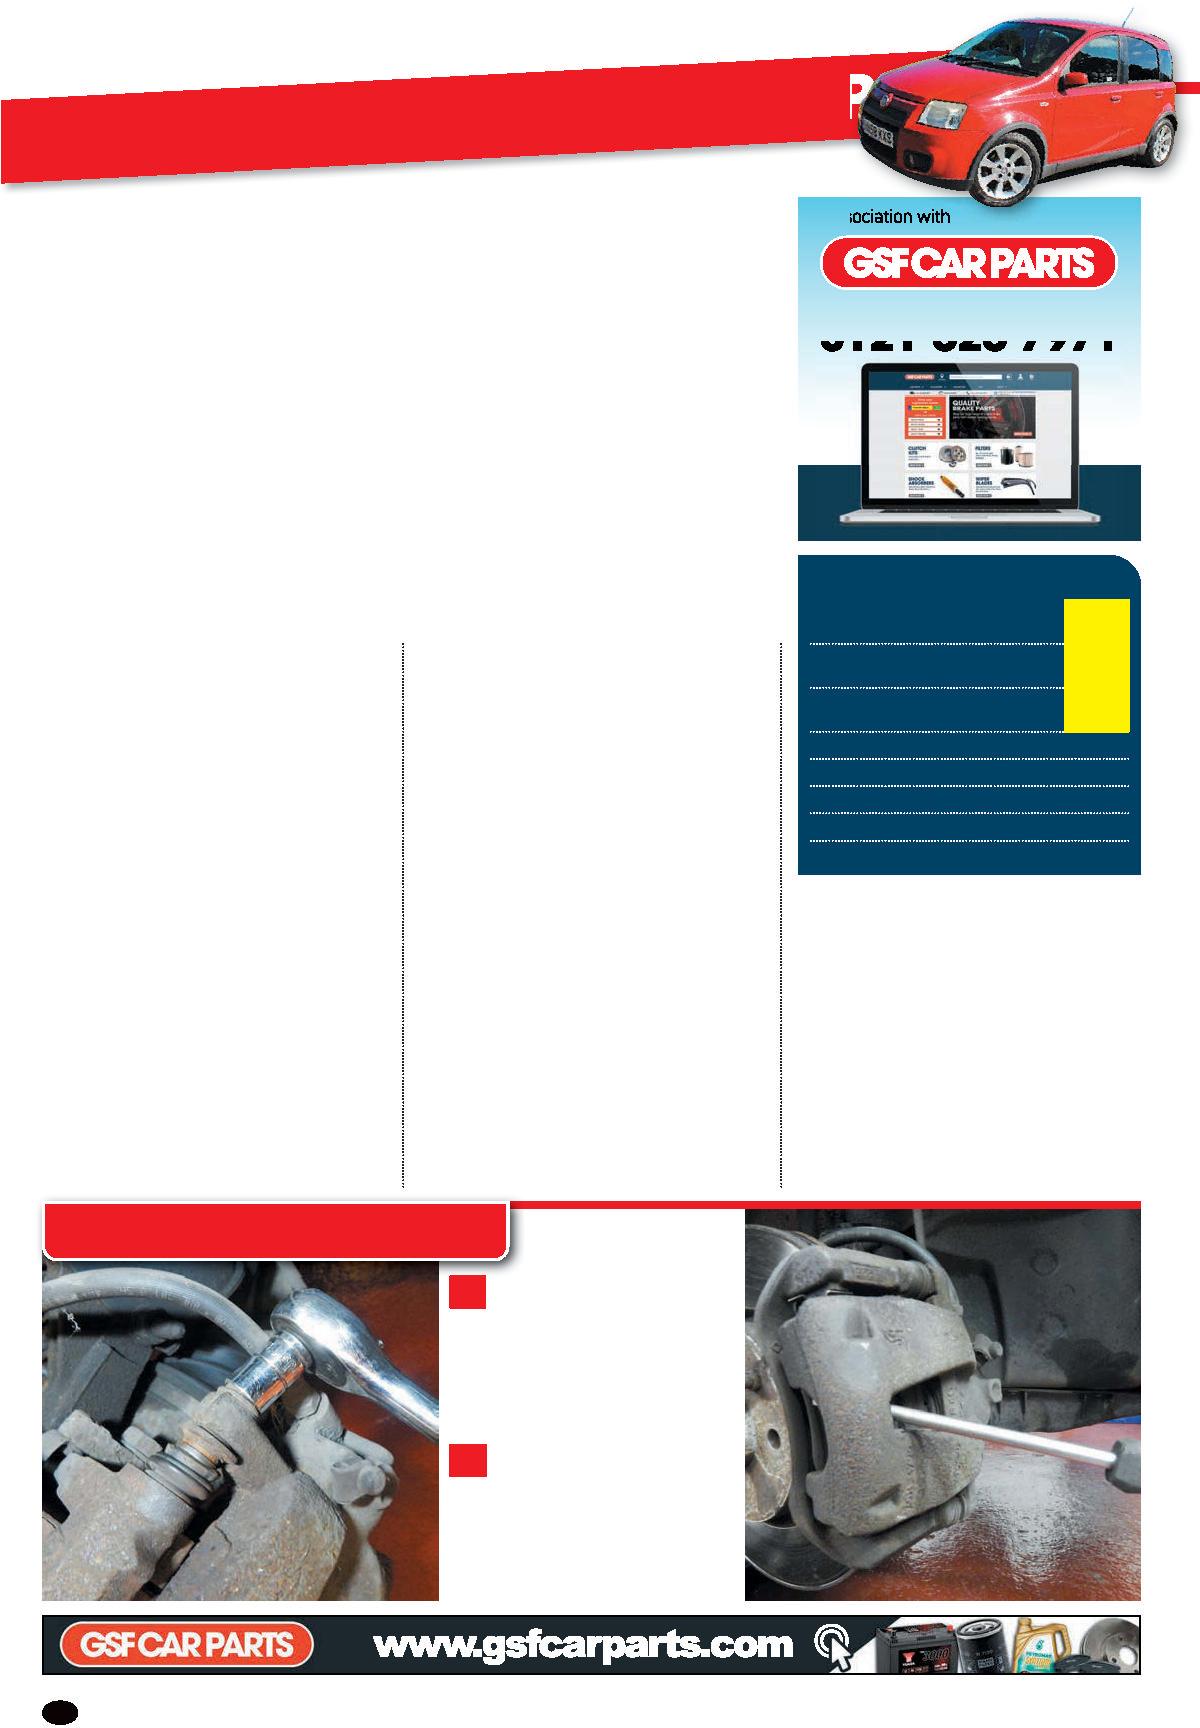
1 The front discs didn’t look that bad, but we replaced
them anyway as they are pretty cheap. Start with the 13mm bolts that secure the caliper to the support bracket slider pins. These do not need holding with a spanner. Hang the caliper up on some wire on removal.
2 Use a decent sized flat-bladed screwdriver to gradually force
the caliper across in order to push the piston back into the caliper housing. Ours moved easily, meaning that the piston wasn’t seized. On well-worn pads, keep any eye on the brake fluid level in the reservoir to avoid spillage.
in association with
BUY ONLINE OR CALL US ON 0121 626 7971
JOBS LIST
✓ RENEW
DAMPERS ✓ RENEW FRONT
DISCS & PADS ✓ RENEW REAR
WHEEL BEARING
✖ TIMING BELT AND WATER PUMP ✖ SORT BODYWORK ISSUES ✖ ENGINE SERVICE ✖ RENOVATE INTERIOR
Part 2 DEC 22 Part 2 DEC 22 Part 2 DEC 22
PLUS ANYTHING ELSE THAT CROPS UP
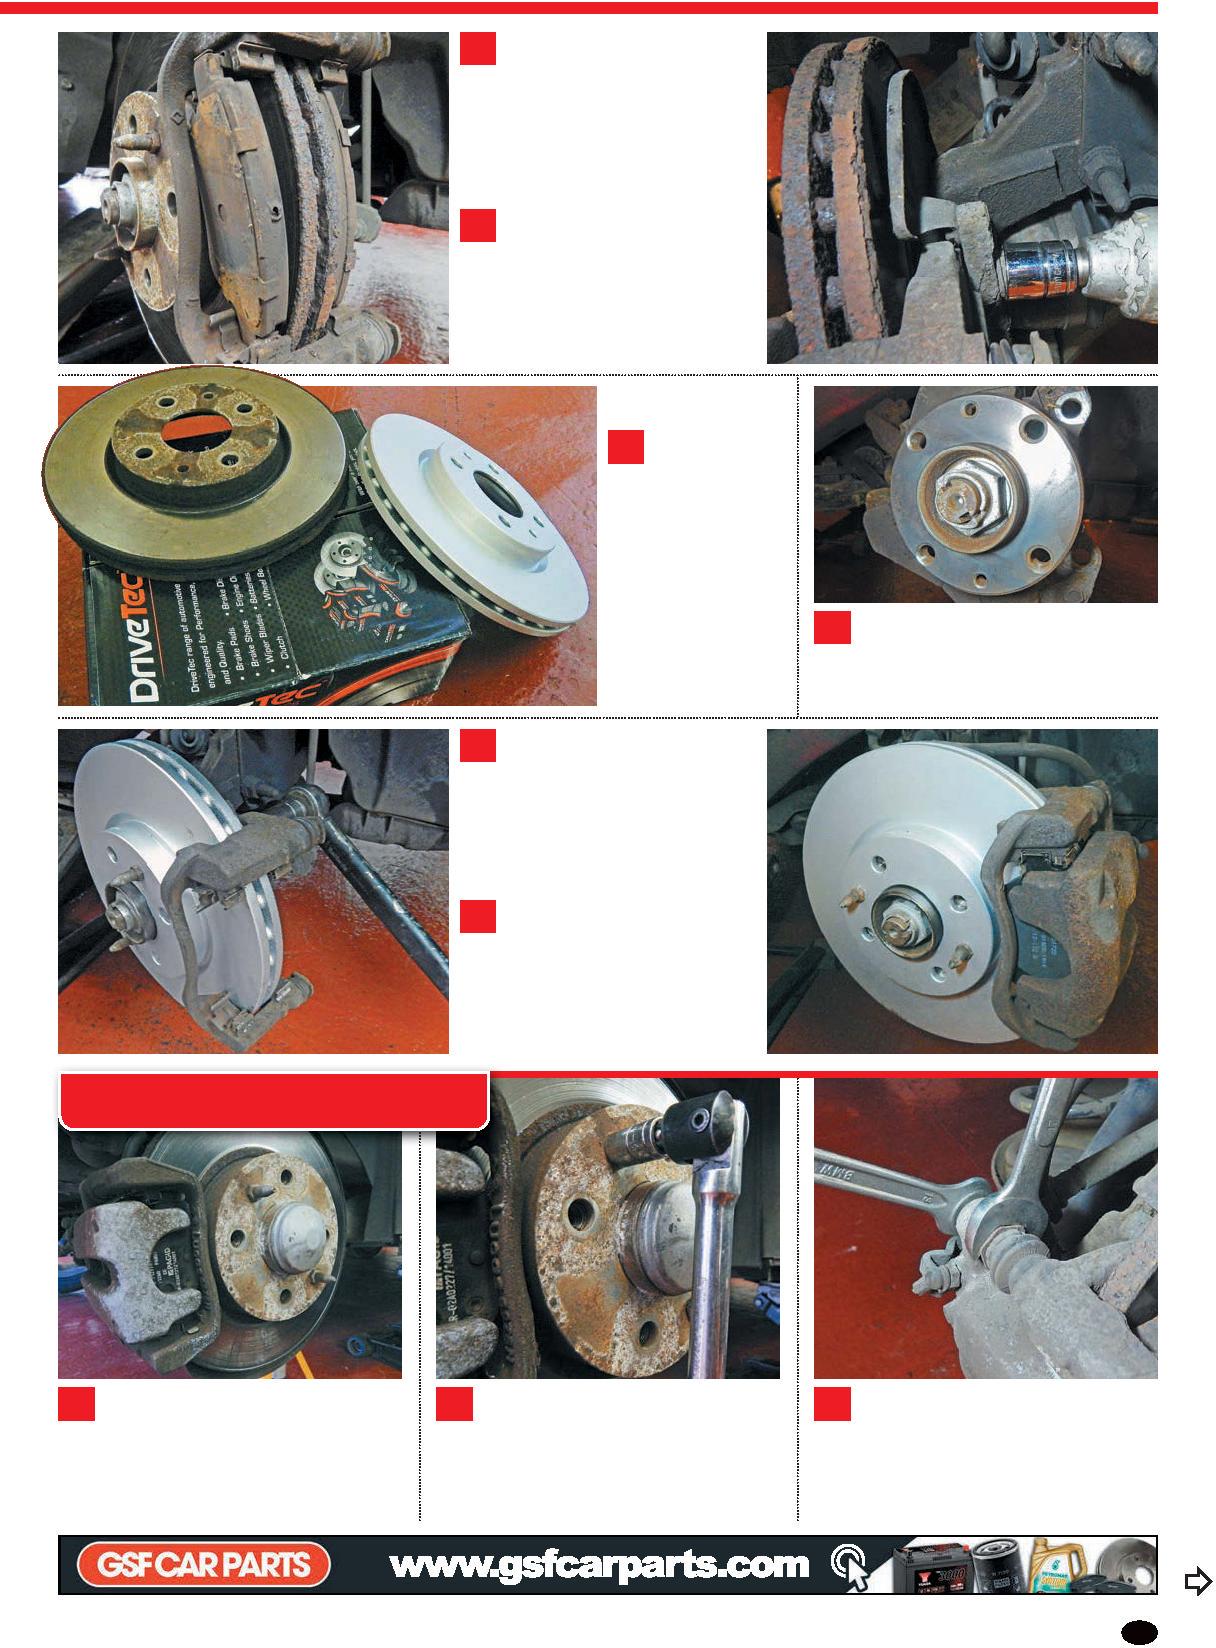
3 The disc edges were a bit rusty but the discs themselves were still
quite good and the brake pads not that worn – perhaps 60% remaining. The more friction material left means more capacity to retain brake heat and less to transfer into the caliper piston to heat the brake fluid.
4 The caliper carrier comes off now, secured to the hub by 19mm
bolts that are torqued up to 100Nm on reassembly. I tend to use a good threadlocking fluid as well as a belt and braces thing – my favourite is Würth green. Remove the two disc retaining bolts and the disc comes off as well.
5 Once again we are using
GSF’s own brand DriveTec brake parts. Unlike a lot of budget discs these are silver painted to resist the inevitable corrosion and they do last well. They don’t have an oily protective film to clean off. Just bolt them on and the pads go to work straight away.
7 Coat the hub flange with a very light smear of suitable brake
grease and fit the disc. Fiats use a pair of 12mm retaining bolts with wheel locating prongs. Just nip this up hand tight – no need to go mad. Thread-lock the caliper carrier bolts (not essential) and torque them both up.
8 You’ll have cleaned up the caliper carrier already, as well as
the stainless pad shims – don’t ignore this as the new pads might be sticky and cause an issue. Lightly smear some brake grease on the pad ‘ears’, slide them into place, fit the caliper and nip the bolts up to 27Nm.
REAR DISCS & PADS
6 Before fitting the new disc, you must clean up the disc-to-hub mating flange. Rust forms here and if the hub isn’t perfectly clean, the disc won’t sit flat. I used a wire cup brush in an angle grinder to get a perfect finish.
1 The Panda’s rear brakes were also in decent condition with OK discs, pads and a working handbrake. Disc and pad replacement is broadly similar to the fronts apart from the curse of the home mechanic – wind-back brake calipers. They can be a nuisance and you really need the correct tool. 2 Like fronts, start by removing the two disc-to-hub 12mm retaining bolts that are nipped up hand tight – 10Nm if you are really fussy. A bit of grease on the threads doesn’t hurt either. You may find as we did that one had broken off in the hub – it’s not a problem to have just one in place. 3 Unlike the front calipers where the slider pins only move in and out and do not rotate, the rear ones require holding with a 17mm spanner to prevent them from turning whilst you remove the 13mm bolts. Some new pads come with new bolts but ours didn’t – just thread-lock the old ones.
REAR DISCS & PADS CONTINUED
4 The caliper can now be removed but because we have wind-back pistons, it’s impossible to push them back with a screwdriver. The caliper is very light so it can be safely hung on the handbrake cable without straining the brake hose. The pads can now be carefully removed. 5 Shown here are the two Allen bolts that secure the caliper carrier to the rear axle. We think they were 7mm, but they were pretty rusty, and needed a Torx bit hammering in to get a good grip. They are tightened up to 60Nm on reassembly and I again used thread-lock fluid.
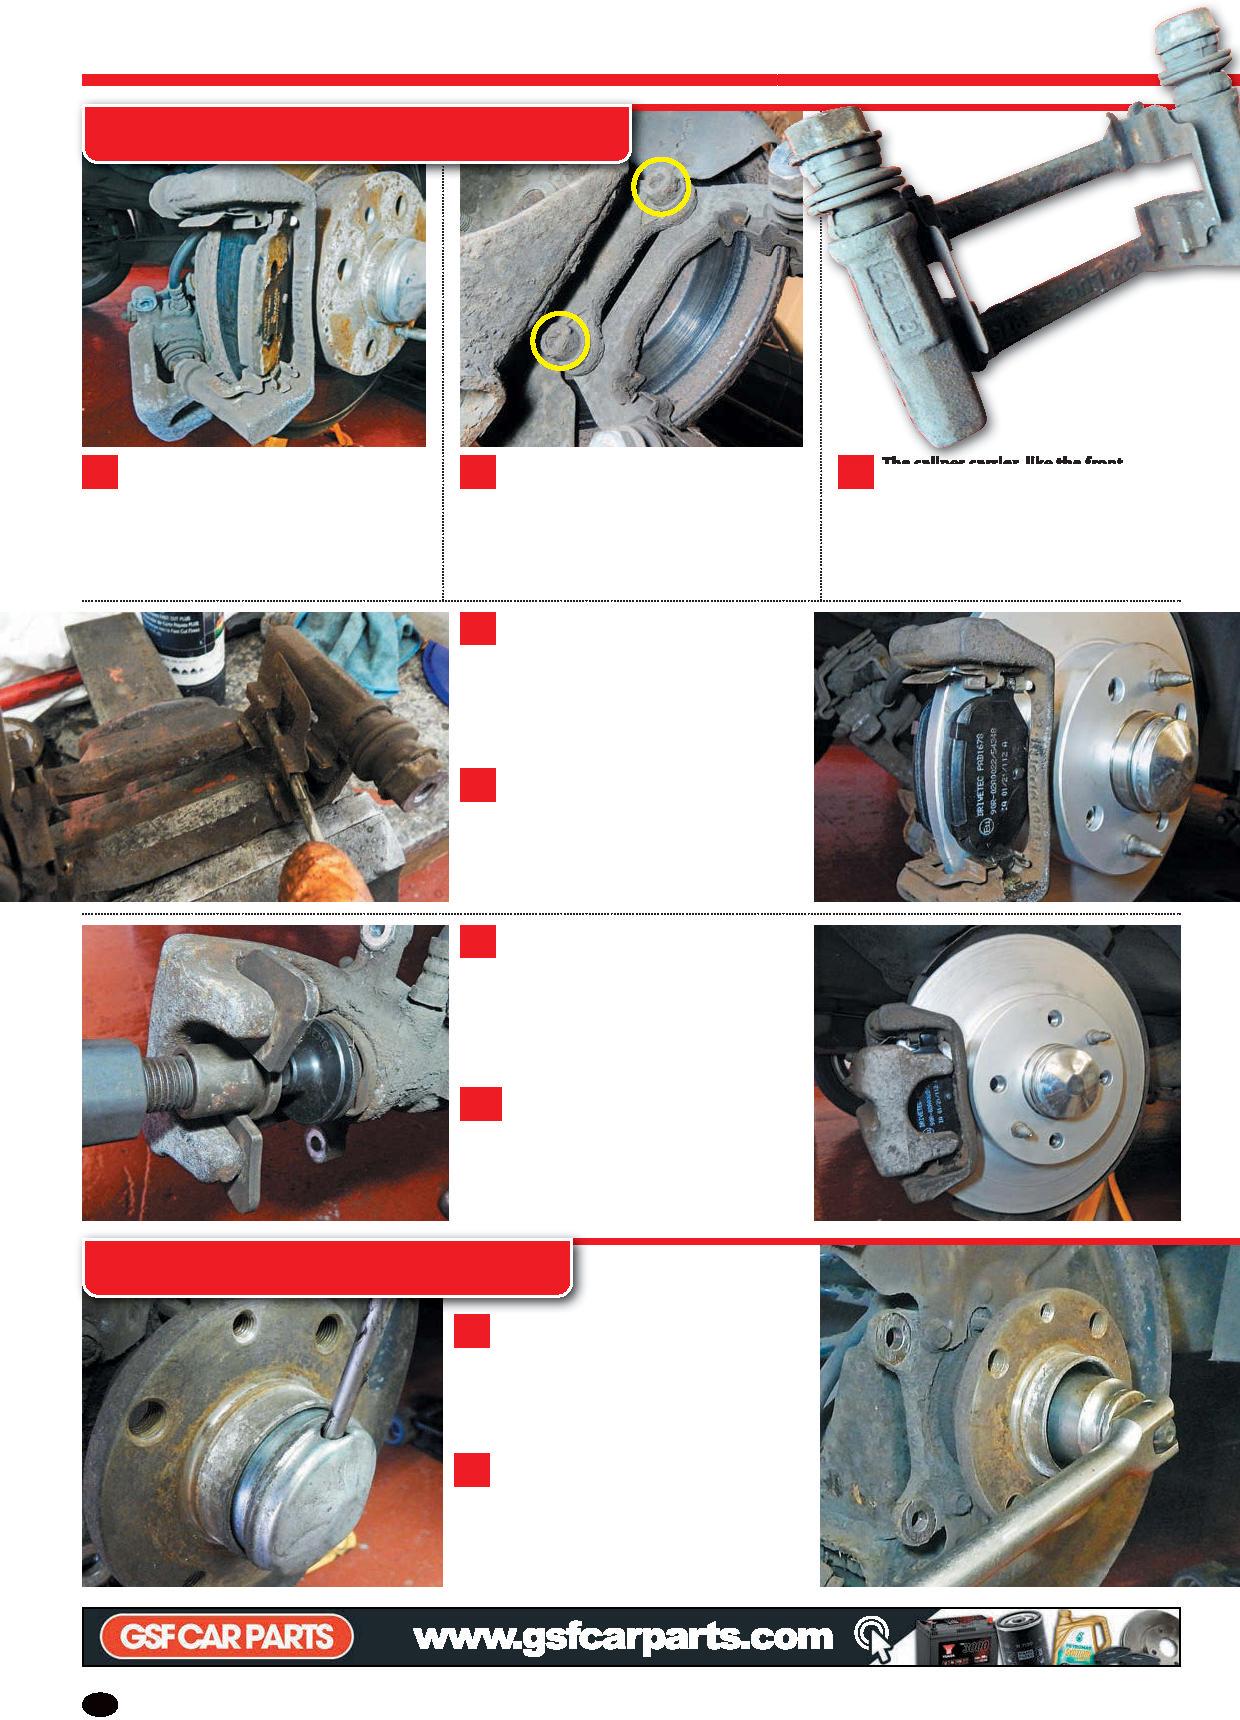
7 Whilst the front brakes use four shims in each carrier – two per brake pad –
the rear ones use two shims that go across the carrier. Use a flat-bladed screwdriver to carefully prise them out as shown here. Pull the slider pins out and grease them up if they feel like they might be sticking.
8 Like the fronts, clean up the hub very thoroughly and bolt the new disc
on followed by the caliper carrier. The pads clip into the carrier shims with a dab of brake grease – use this as opposed to copper grease as it just makes a neater job of it in our opinion. It’s cheap enough.
9 Wind-back pistons need the correct tool to do this job. Forget about doing
this job without one, you will fail. They are available for under £15 these days. Fit the tool as shown with the pegs on the disc locating into the slots on the piston and wind them clockwise. It can be tough going.
10 You may find that you go to fit the new pads and caliper that they then
won’t fit back on – well they will... the rear disc is jammed. This is because the locating pin on the rear of the brake pad isn’t locating into one of the four slots on the piston – just rotate the piston enough for the pin to engage.
REAR WHEEL BEARING
1 The offside rear bearing was so bad that we initially thought it was a front one
– at 50mph it was like a Lancaster bomber was flying overhead. Spinning all four wheels soon found the culprit. To get to this stage, remove the caliper and disc as we have outlined.
2 Remove the metal dust cap with a hammer and screwdriver – there is a new
one with the bearing kit so you can be brutal. You will need a 32mm socket and a serious breaker bar to get the bearing retaining nut off as it is tightened up to a whopping 280Nm. A ¾-inch breaker bar is best. 6 The caliper carrier, like the front one, is cast iron and they can rust spectacularly on cars that have lived in harsh climates. Our car is quite good in that regard for a 14+ year old Fiat – and this is ours on removal. It will need a good clean up though and you can see the stainless shims.
REAR SPRINGS & DAMPERS
1 Our rear dampers had been replaced before, but with a make
that we’re not over enamoured with so will remain nameless. With a trolley jack under the rear spring cup to just take some spring tension, undo and remove this 16mm damper upper retaining bolt. Easy for once.
2 Underneath the back of the car, you can then slacken and remove
this lower bolt after which the damper can be prised out with a big screwdriver from the axle beam. On reassembly, fit the new damper and bolts, jack up the axle to normal ride height and torque the bolts up to 80Nm.
3 We used GSF’s own
brand of dampers. These being Amtex which we rate quite highly and especially for the little they cost. As you might be able to see, the upper and lower ‘eyes’ are wider on the Amtex units as opposed to the ones on the old units – I’ll try and find a home for these.
4 As with the dampers, the
rear springs are super easy to remove. Just disconnect the damper at one end, force the axle down and the spring just comes out – compare this to the previous Mercedes SLK project, Fiat actually put some intelligent thought into how it can be repaired.
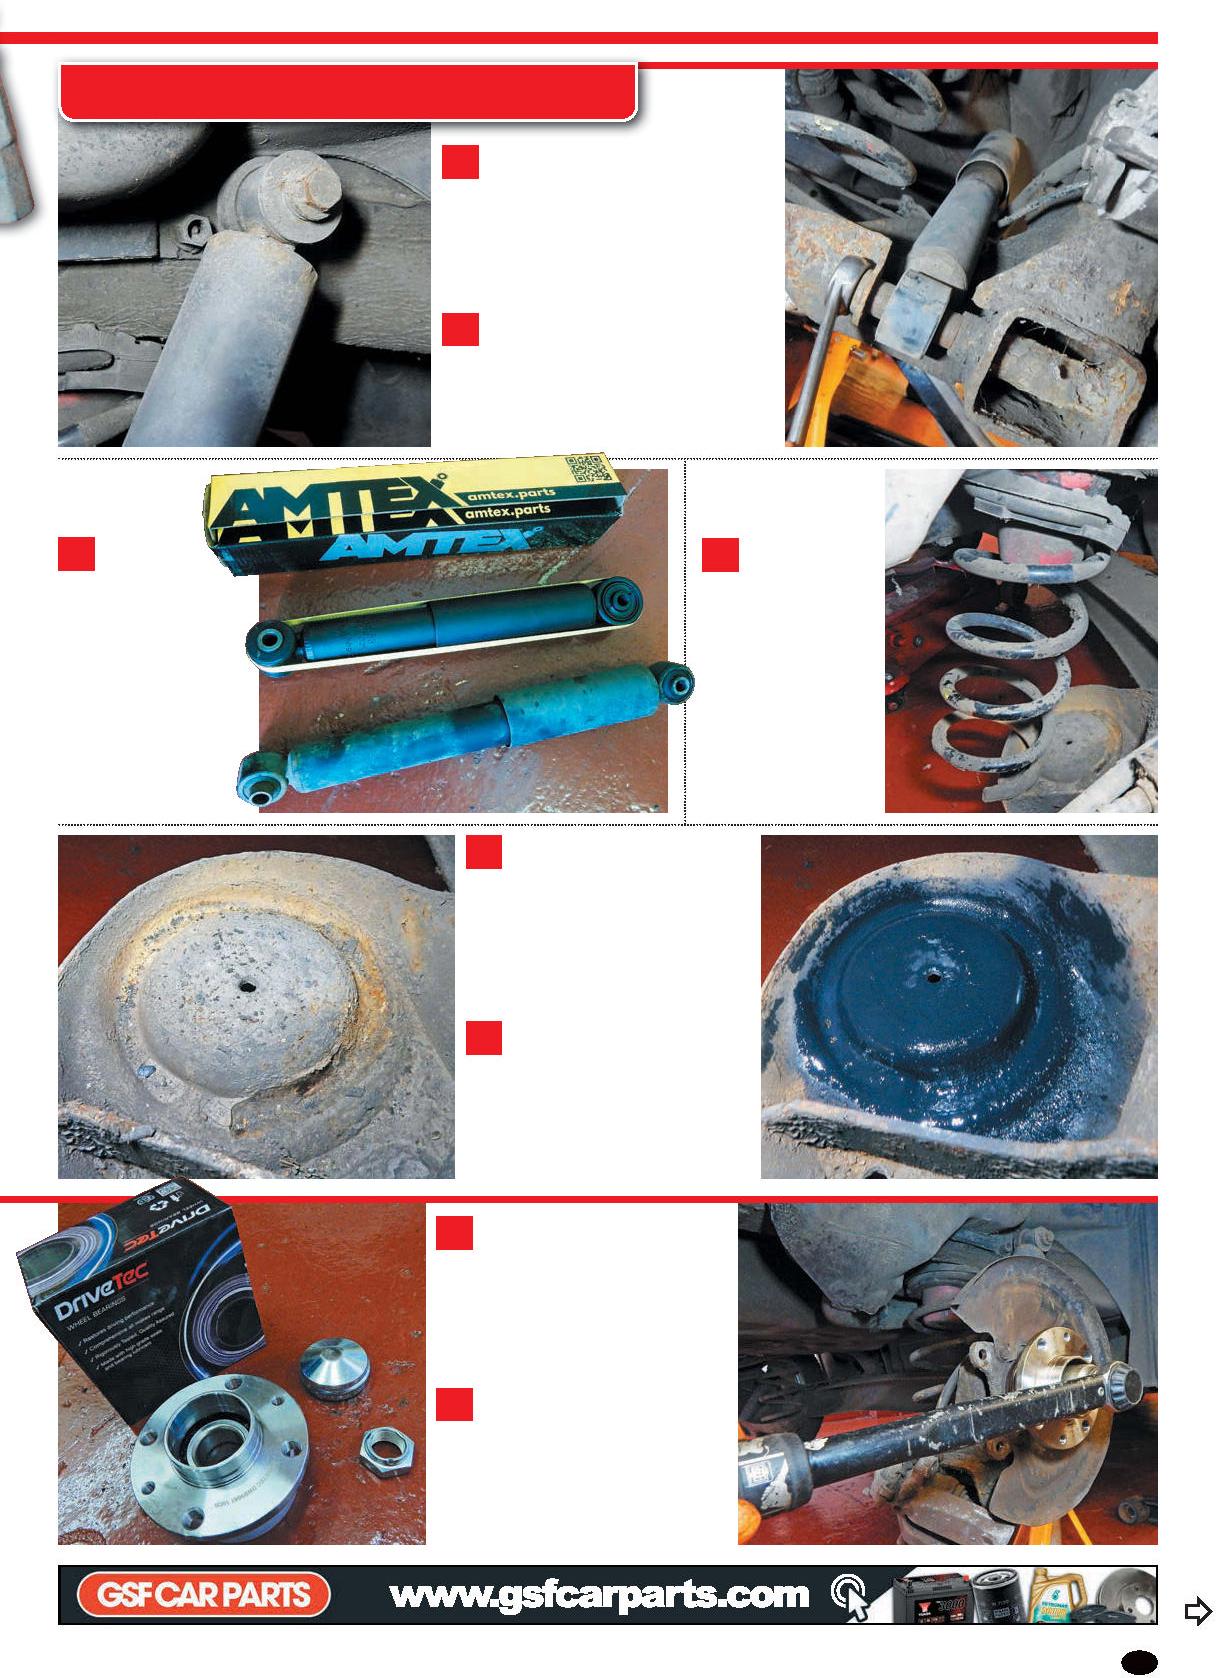
5 Panda and 500 rear axles are known to rot however, both
in the spring cups and in bad cases on the welded seams. We wanted to remove our rear springs mainly to assess the axle condition and do a bit of rust-proofing. Our spring cups looked a bit rusty but not terrible.
6 I started with a screwdriver to scrape all the mud and crap out
as well as any flaky rust. Then I used a bit of coarse emery paper before spraying some zinc primer in there (seen here) followed by black Waxoyl. You could drill an extra water drain hole in there as well if you wanted.
3 Here is the new DriveTec wheel bearing kit and like most
these days it comes as a complete ‘slide off slide on’ unit which saves time and aggro driving out old bearing races. They are so cheap to buy that it’s probably worth replacing both if combining this with a brake service.
4 Here, the new hub is on and is being torqued. If your ½-inch
torque wrench doesn’t go up to 280Nm, thread-lock the new nut and do it as much as you can – then use a breaker bar and an extension pole to tweak it a bit more – realistically, it’s a self-locking nut and it’s not coming off.
FRONT DAMPER SWAP
1 With the car on axle stands and the wheels off, you need to undo the top strut plate 19mm nut. Don’t worry, the strut won’t all come apart as the main nut is underneath. You need a cranked spanner and a 4mm Allen key The top nut is torqued up to 50Nm on reassembly. 2 Not got a cranked spanner? Me neither, so I used a 19mm socket and some serious vice grips as shown here. If the dampers are scrap, you can even use the grips on the chromed damper rods but either way, the top plate nut can put up a bit of a fight. Use a good fitting Allen key as well.
PARTS COSTS
Front dampers (each) £100.42 Front top mounts £19.07 Rear dampers (each) £49.96 Front discs (pair) £26.77 Front pads £17.00 Rear discs (pair) £22.33 Rear pads £16.34 Rear wheel bearing £35.71 TOTAL £887.60
3 Under the arch, disconnect the anti-roll bar droplink from the strut body as seen here. Ours didn’t have a flat on the pin to hold with a spanner so we cleaned up the thread, used releasing fluid and undid the 16mm nut with a suitable Allen key (4mm here) to hold the pin. Easy enough. 4 More simple design. Unclip the brake hose and ABS sensor wire from the bracket. For the latter I always bend one of the tangs to avoid straining the sensor wire. Now undo and remove the two 18mm strut to hub bolts – they can rust in, but perseverance gets them out. Torque? 75Nm.
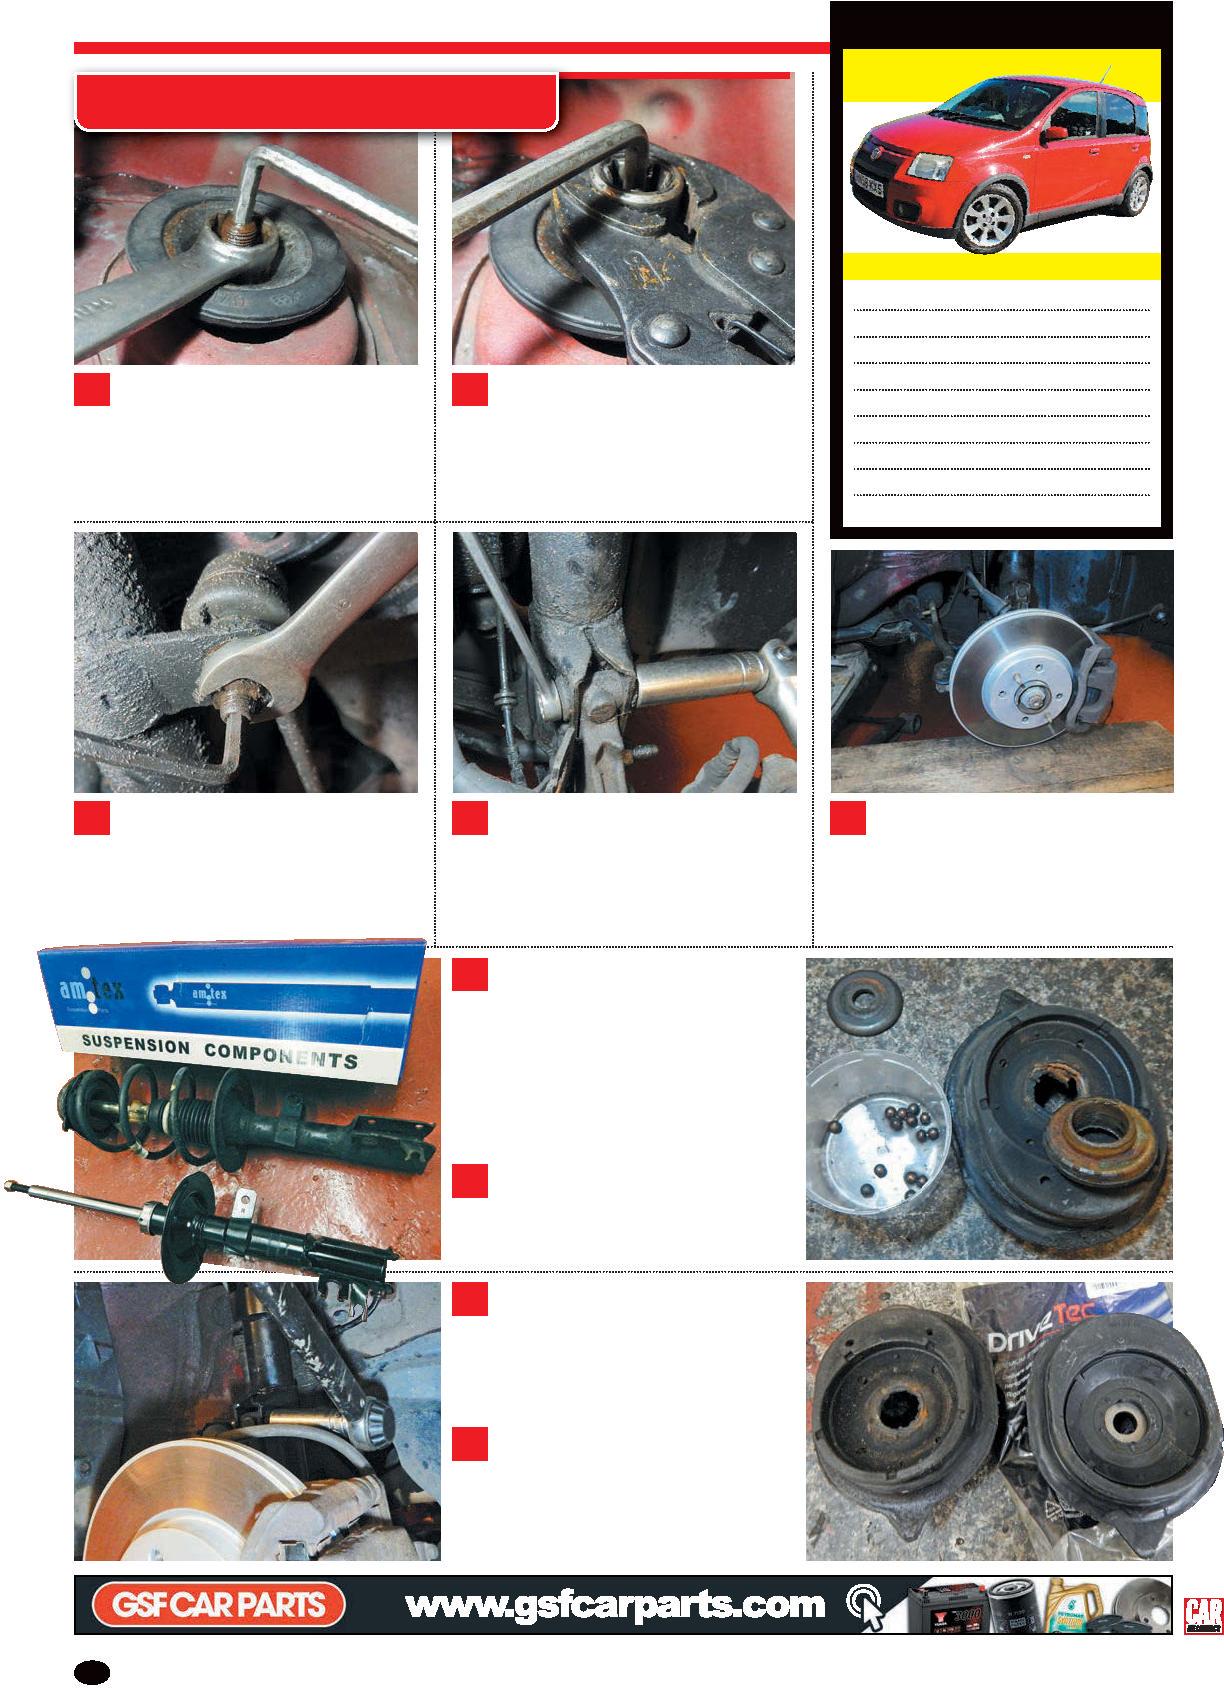
6 We used GSF’s excellent Amtex struts on the front and we just could
not find specific 100HP struts (apart from Fiat). Some cross-reference sleuthing told us that 1.3 Multijet diesel units were in fact the very same. I used spring compressors but you don’t need them. Fiat struts have so much thread for the top mount that the spring is decompressed by the time the 27mm top nut has been removed.
7 The old top mounts fell to bits when removed – notice all the ball bearings.
We could have cleaned, greased, and reassembled but they are so cheap new from GSF that it’s not worth the bother.
8 Swap the dust boot and bump stop over to the new strut (ours were still
good), fit the top retaining plate and the new top mount, and tighten the 27mm nut to 65Nm or decently hand tight if you don’t have a deep socket. Then refit the strut – the second strut took me 45 minutes in total.
9 When refitting the strut, make sure the pointy bit seen on the top mount


