ACL Playbook


 Dr. Christopher George
Patient Name:
Date of Surgery:
Date & Location of First FollowUp Visit at ValleyOrtho:
Date & Location of First


1. Pain Expectation:
2. Activity Expectation:
YOUR ACL RECONSTRUCTION PLAYBOOK
Thank you for joining our team at ValleyOrtho.

We feel you are the most valuable person in the surgery and recovery process. This Playbook is your guide to best prepare for and recover from your ACL reconstruction surgery.
Each member of your care team plays a valuable role and has been trained to assist you every step of the way.
1 Your Orthopedic Team Staff Introductions 3-4 ACL Reconstruction Anatomy & Surgery 5 From Start to Finish 6-7 Pre-operative Training Schedule Physical Therapy 8 Pain & Crutch Education 9 Crutch Walking 10 Cold Therapy Choices 11 Contact Us 11 Preparing for Your Surgery Preparing Your Home 12 Packing for the Hospital 13 Pre-Surgical Skin Prep 14 Surgery Instructions Sheet 15 FAQ’s 16-17 Surgery & Hospital Care Day of Surgery 18 At Home After Surgery Monitor Your Healing 19 Pain & Constipation 20 Activities of Daily Living 21 Initial Home Exercises 22
Recovery Process Initial Precautions 23 Expected Phases 24 PASS Program 25 Follow-up Visits 26
Your
Rehabilitation Appointment:
for Surgery & Recovery
Patient Expectations
Premier Athletic & Sport Screening (PASS) Program
We want you to feel confident about returning to your desired activity level after your surgery. To balance a speedy recovery with a safe recovery you will be evaluated with a series of assessments at very critical times in your recovery to best guide your progress:
Test Timing:
1. Before your surgery (Setting a Preoperative Baseline)
2. 3 months After your surgery
3. 6 months after your surgery.
4. When your surgeon feels you may be ready to return to full activity if you did not meet all the return to activity criteria at your 6 month assessment.
This Valley View Hospital safety measure is a free service that provides your surgeon the information needed to best direct you on your safe return to activity.


These assessments will be performed on the 3rd floor of Valley View Hospital in the Rehabilitation Services Department or at the Rehabilitation Services Clinic Willits. A scheduler from rehabilitation services will contact you to schedule your first assessment. If you do not hear from us shortly please call 970.384.7550 to the Glenwood clinic and we will be happy to help!
Assessment Descriptions: Setting a Pre-Operative Baseline
This will assess the strength of your healthy knee before surgery to set appropriate goals for the full return to activity testing. This phase will include some strength and jumping assessments.
3 Month Progress Assessment
This will assess your readiness to return to running and check the progress of your recovery. This phase will include a series of range of motion, balance strength, and jumping assessments.
6 Month & Return to Full Activity Progress Assessments
This will be a more demanding physical test. Depending on your desired activity, you will be required to run or bike to fatigue in the clinic before performing your return to full activity assessment This phase will include more jumping tasks than the 3 month assessment and will have an additional psychological readiness evaluation.
2
Meet Your Physician, Dr. Christopher George, MD

Dr. Christopher George has been providing Orthopedic care to patients in the Roaring Fork Valley since 2013. He specializes in sports medicine, hip arthroscopy, knee reconstruction, Mako certified robotic assisted anterior muscle sparing total hip replacement, and knee replacement. With minimally invasive and arthroscopic treatment options, Dr. George strives to return patients to the lifestyle and activities they desire.

Dr. George grew up in Iowa and attended college at the University of Iowa, where he was a member of the University of Iowa swimming team, elected as team captain for two seasons. He attended medical school at the University of Iowa Carver College of Medicine. He completed his Orthopedic surgery residency at the University of Illinois at Chicago where he served as chief resident in his final year. He then continued his training and specialization in Orthopedic sports medicine with the Aspen Sports Medicine Foundation.
His approach starts with conservative treatment options and only progresses to surgery when appropriate. Dr. George enjoys working with his patients to mutually develop a treatment plan to help them get back to their active lifestyles as efficiently as possible.
Outside of his time in the office, Dr. George enjoys spending time with his wife Marni and their children, Ryder and Avelyn.
Meet Your Physician Assistant, Rachel Mazza PA-C
Rachel Mazza graduated with her Master of Physician Assistant Studies from the University of Colorado in 2015, after which she worked at the Orthopedic Centers of Colorado and the UCHealth Steadman Hawkins Clinic practicing in sports medicine, joint replacement, and treating orthopedic trauma. She attended UC on the school’s Rural Track, where she focused on treating and servicing smaller communities like the Roaring Fork Valley. In orthopedics her focus is to keep people active. As a very active person herself, she tries to impart that love of the outdoors and exercise into her patients
In her spare time, Rachel enjoys reading and spends a lot of time with her dog. She also enjoys hiking, backpacking, camping, and has climbed a few fourteeners around Colorado. “I enjoy the backcountry, but I also like frontcountry camping closer to civilization,” she says. “As long as I’m outside, I’m happy.”

3
YOUR ORTHOPEDIC TEAM
Meet Your Medical Assistant
Michelle Gorton, PCT
Growing up in the Roaring Fork Valley, Michelle is happy to serve the community she has loved since she was young.
Michelle received her Associates of Science degree in 2009; then earned her Associates Degree in Applied Science in Veterinary Technology. She has worked at a local animal hospital as a veterinary nurse and practice manager since 2012. She joined the ValleyOrtho team in October 2022.


As a Coloradan, Michelle enjoys hiking or traveling for extended backpacking trips in the summer with her dogs, cross country skiing during the winter season, reading or spending time with family.
Meet Your Primary Athletic Trainer
Jackie Brey ATC
Jackie was born and raised outside of Milwaukee Wisconsin; she earned her Bachelor’s in Kinesiology from the University of Wisconsin – Eau Claire with an emphasis in Athletic Training and Sports Rehabilitation. She always had a yearning for the “West” and found her way to the Roaring Fork Valley in 2004 as the Athletic Trainer for Rifle High School. Come 2007 she transitioned to a clinical position with Aspen Orthopedic Associates. Throughout her tenure with Aspen Orthopedics she worked her way into management of the practice until she relocated to the Front Range to follow her husband’s career change in 2015. Jackie recently found her way back “home” to the Roaring Fork Valley where she now works as an Athletic Trainer in ValleyOrtho.
In her downtime she’s a BLS instructor for the American Heart Association. When away from work she enjoys golfing, hiking and camping with her husband and fur baby.
Meet Your Surgery Coordinator
Roslyn Bernstein, MA
Roslyn has worked in orthopedics since 2011 and with ValleyOrtho specifically since 2017. She graduated Colorado Mountain College’s medical assistant program and state certification. Roslyn will work with you to help schedule any surgeries, procedures, imaging or follow up appointments to best manage your care at ValleyOrtho.

Outside of the clinic she helps promote smoking cessation programs and facilitating student health fairs at Glenwood High School. She has a unique passion for roller derby and all forms of mountain adventuring that keep her busy in her off time.

4
ANATOMY & REPAIR OVERVIEW
Let’s review what the anterior cruciate ligament (ACL) is and how we can help get you back to what you love doing.
Where is the ACL?
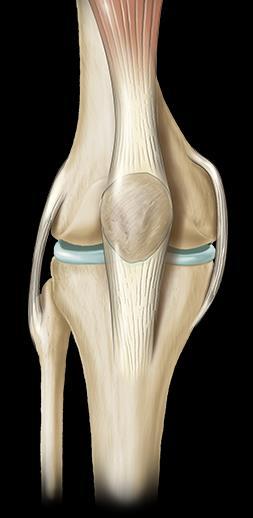
The knee is made of 3 bones: The thigh bone (femur), the shin bone (tibia) and the knee cap (patella, not pictured). The ACL is a ligament deep in the knee that attaches to the underside on the back of the femur and crosses diagonally through the knee joint to attach at the upper part of the tibia. It is represented by the red line in the picture.


What Does the ACL Do?
The Knee
The ACL helps stabilize the knee by preventing the tibia and femur from sliding or twisting on one another. It is especially important for stopping and starting motions, and when changing directions when walking or running.

Detailed Reparative Options:
Dr. George will first remove the damaged ACL and prepare 2 tunnels (T) for the new graft. Dr. George will determine what type of graft is best for you. The two primary grafts are taken and made from parts of your patellar tendon or the hamstring tendons to recreate the ACL in your knee. A third option is to use a graft from a donor (cadaver). The chosen graft will be placed into the tunnels and anchored in place with a button (B) on the outside of the bones.
Bone Patellar Bone Graft:


A small middle portion of the patellar tendon with attached bone material from the tibia and the patella is removed from the surgical knee.
Quadriceps Graft:
A small middle portion of the quadriceps tendon and attached bone from the top of the patella is removed from the surgical knee.

5
OR
T
B
T
B
Knee Bent 90°
ANATOMY & SURGERY
Patellar Tendon
T T
B
B
Knee Bent 90 Quad Tendon
ACL RECONSTRUCTION TIMELINE
AT LEAST TWO WEEKS BEFORE TO SURGERY
You will likely be referred to physical therapy before surgery to prepare your knee and begin our PASS Program. See pages 2, 9 and 25
Schedule your first physical therapy appointment for 5-7 days after your surgery
o Schedule therapy for twice a week for 6 weeks to start. See page 8 for details.

Register yourself for our surgery department at OneMedicalPassport.com
ONE WEEK BEFORE SURGERY
You will be contacted by the Pre-Anesthesia Clinic to schedule a specific date and time to complete any other medical clearance needed before surgery.
To minimize surgery and medication related constipation see page 20.
DO NOT shave around the knee beginning 4 days before surgery.
Prepare your home environment for a safe return as you will be using crutches for a few days Refer to pages 10 and 12 for more details.
Stop taking all supplements that are not prescribed medications and following medications that increase bleeding: Aspirin, Ibuprofen, Naproxen or fish oil.
THE DAY BEFORE SURGERY
The Day Surgery Department will call after 2pm the day before surgery about:
o What time you should plan to arrive at the hospital.
o When to stop eating/drinking before surgery. See page 15 for more details.
o Which medications to take the morning of surgery.
During this call, complete your “Surgery Instructions Sheet” on page 15.
Call (970)384-7166 if you do not hear from the nursing staff before 5pm.

THE NIGHT BEFORE SURGERY
Remove any nail polish from your toes.
Shower with provided cleaning sponge Refer to page 14 for details.
Enjoy dinner then brush your teeth and rinse out your mouth before bedtime.
Put clean sheets on your bed, wear a clean set of pajamas.
DO NOT smoke at this time. DO NOT resume smoking until the day after surgery.
DO NOT allow your animals to be in your bed with you.
THE MORNING OF SURGERY
Shower and repeat sponge cleansing process thoroughly. See page 14 for details.
Do not shave or use any lotions on the surgical leg.
If you usually take morning medications for your heart, blood pressure, lungs, seizures, and/or acid reflux, take them with a small sip of water without any food
6
THE DAY OF SURGERY
Arrive and register at the hospital at your assigned time
In Day Surgery, Dr. George will meet you and prepare you for surgery.
THE DAY AFTER SURGERY
Take your pain medications as needed for pain control.
Follow your crutch and brace instructions as described on page 10.
Follow your cryotherapy and exercise schedules on pages 19 & 22.
3-5 DAYS AFTER SURGERY
You will begin outpatient rehabilitation to promote optimal knee healing by regaining motion, decreasing swelling and improving muscle control.
7-10 DAYS AFTER SURGERY
You will return to Dr. George’s office to check your progress, have your stitches removed, your bandage changed and brace unlocked to 30 degrees.
WEEK 1 TO WEEK 3 (Page 24 for more details)
Your surgical knee is likely to be uncomfortable during this phase. This is normal and expected as your tissues are healing quickly.
You will use crutches to help you walk without a limp. You may put as much pressure through your knee as you are comfortable, see pages 9-10 for more crutch information. Your therapist will help you with your walking.
We expect the motion, quadriceps control and pain levels to improve steadily.
WEEK 3 TO WEEK 12 (Page 24 for more details)
You will be working hard to regain your balance and muscle control at your knee.
Even though discomfort may still be present, we expect you to stop narcotic pain medication use by week 4. Refer to page 23 for pain medication information.
You will progress your strength to start light hopping and perform your 12 week progress assessment at Valley View nearing the end of this phase.

WEEK 12 TO WEEK 20 (Page 24 for more details)
You will continue with a progressive strengthening program and begin return to running activities in this phase.
We expect that you may have muscle soreness as you increase work to improve the strength of your knee This is normal.
WEEKS 20 TO WEEK 30 (Page 24 for more details)
We do not expect you to be back to any competitive sports at this time as your knee endurance and strength improve to pre-injury levels.
You should have near full strength and everyday function of your knee.
As part of our PASS Program you will be taken through a series of return to full activity tests before your 6 month follow up visit with Dr. George.
7
ACL TIMELINE
YOUR PRE-OPERATIVE TRAINING
At ValleyOrtho, you are the most important player on our team. Our pre-operative training program is designed to help you participate in your healing like a pro.
1. Set Up Your Valley View Patient Portal


You should have received an email from us with a link to set up your patient portal account. If you cannot find the email we will be happy to send you another one, just let us know.
Benefits of the Portal
Easily contact Dr. George and his team using the Portal Messaging Center
Have access to your visit reports by clicking “My Health” on the left sided toolbar then click “Care Summaries”.

2. Schedule Your Therapy Appointments NOW
Schedule your first outpatient physical therapy appointment for 5-7 days after your surgery Therapy will be twice a week to start. Schedule for six weeks initially.
Your insurance may restrict the amount of visits you can attend per injury. You and your therapist will determine the best visit schedule for you.
We expect you to be attending physical therapy in some fashion for 4-6 months.
3. Pain Education
Pain is an expected and necessary part of the healing process.
It is normal to have pain when you wake from surgery.
o It is also normal to feel an increase in pain 12-24 hours after surgery as the stronger medications used for surgery wear off.
This early increase in pain does not mean there has been damage to the repair.
o This is your nervous system becoming more efficient at sensing the healing that is taking place in your knee.
Your nervous system will become less sensitive over time.
o Participation in physical rehabilitation with appropriate rest and medication use will help with this process. Your therapist will guide you through the pain relieving strategies that will work best for you.
4. Understanding Your Surgical Nerve Block
Dr. George uses a nerve block during surgery for long lasting pain relief after surgery.
The block allows for decreased opioid use for 48-72 hours after surgery.
It gradually loses its effects so you know when to appropriately, and gradually, increase your pain medication use as you need.
8
5. ValleyOrtho’s Premier Athletic & Sport Screening (PASS) Program

We want you to feel confident about returning to your desired activity level after your surgery. To ensure you are at your best you will be run through a series of physical tests before your surgery, your 3 month and your 6 month follow up appointments. This is a free and mandatory Valley View Hospital safety measure to provide Dr. George the information needed to best direct you on your safe return to activity. More on page 25.
6. Quick Recovery Tips
These simple healing points can take your recovery from good to great. See
Use cold therapy continuously for the first week as described on page 19.
Consistently follow the extension, and flexion schedules on page 22.
Do everything to achieve and maintain a straight knee position.
Elevate your knee in a straight position above your heart.
7. Tips for Using Your Knee Brace After Surgery
You will wear your brace in a locked straight position during standing, walking and sleeping until your first follow up appointment.
You are encouraged to unlock your brace when sitting.
Your brace will likely be unlocked from 0°-30° for standing, walking and sleeping after your first follow up visit with Dr. George (if you are without a meniscal repair).

Your brace will be unlocked or removed by Dr. George, Rachel Mazza, or your physical therapist when you demonstrate proper knee strength and control.
8. Crutch Fitting


Feel comfortable with your crutches after your surgery, below are a few fitting tips.
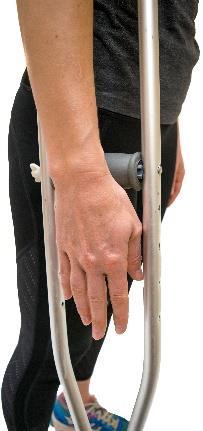

First: Fit the crutches as shown with the points out to side and just in front of your feet.
Second: Adjust the height using the pegs at the bottom to allow for 2-3 fingers between pad and armpit.
Third: Adjust the hand grips at wrist level when your arms are hanging relaxed at your side.
9
PREOPERATIVE TRAINING
9. Weight Bearing as Tolerated with Crutches
(Weight Bearing as Tolerated status may change with meniscus repair)

Use the crutches to find the perfect amount of weight for you for about 2 weeks. You may walk without crutches in the first week if you can do so without a limp, pain or swelling. Your physical therapist will help you find your best walking pattern.

If you limp or have increased pain using 1 crutch when walking, you still need to use 2 crutches when walking.


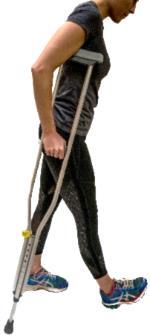


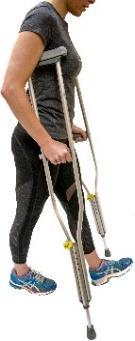
If you limp or have increased pain without using a crutch when walking, you still need to use 1 or both crutches when walking.
Double Crutch Walking Pattern
Knee Brace REQUIRED initially
(Not Pictured)
Single Crutch Walking Pattern


Knee Brace REQUIRED initially
(Not Pictured)
A single crutch is used on the opposite side of the surgical leg
Double or single crutch use with locked knee brace until cleared:


Surgical Leg Stance Phase: Lift the crutches/crutch and the surgical leg off the ground at the same time. Bring the crutches/crutch and your surgical leg’s heel forward and place them down in front of you at the same time so they are in line with each other. Put pressure through your hands (not through the armpits) to take pressure off of the surgical leg as your roll from your heel to your toes.
Surgical Leg Swing Phase: Swing the surgical leg forward in front of you (knee straight in a brace, or with a slight bend if you’ve been cleared from the brace). Then pull your toes up before you contact the floor with your surgical heel.
10
10. Choose Your Cooling Device

A medical device representative will call you to discuss your options before your surgery. Below are your cooling options to help you heal after your surgery.
**Best Choice**
Automatically cycles cold water.
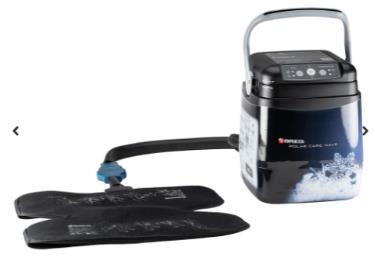
Programmable compression.


No ice required.
Costs to own is approximately $350.
You’re Trained. Now What?
Need multiple packs for front and back of knee and chilling between uses.
No compression.
Can purchase in pharmacy.
Any surgery can be daunting, but you can rest assured knowing that our team will walk you through every step on your big day. The rest of this Playbook will explain in detail your pre-surgical, surgical and recovery process from start to finish. Use this as a guide to effectively complete the ACL Reconstruction Timeline on pages 6-7
When you choose to have your ACL reconstruction surgery with ValleyOrtho and Valley View Hospital, our team is committed to helping you achieve the best surgical outcome possible so you can return to the lifestyle you love.

Contact Us
At each stage of your journey, before, during and after surgery, we’re here to provide information and answer any questions you may have. Feel free to reach us quickly during business hours by messaging “Dr. George” through your Valley View Hospital Patient Portal, or by phone at (970)384-7140. If something is urgent you don’t have to worry about when you should call; an on call provider can answer your questions day or night by calling (970)384-7140.
IMPORTANT NOTE
If you happen to become ill within 2 weeks of your surgery, even with a simple cold, please contact us right away. We may need to reschedule your surgery until you are healthy again. Also, if you get a cut, scrape, rash, or sore on the knee scheduled for operation, please let us know immediately. A skin break could require rescheduling your surgery, due to a small increased risk of infection.
11
PREOPERATIVE TRAINING
Cold Packs
Polar Care Wave
PREPARING FOR YOUR SURGERY
Give yourself a head-start on healing by following these more detailed surgery-prep tips from Dr. George
Prepare Your Body
Continue (or develop) the healthy habits needed to support your healing. Eat healthy foods like fruits, vegetables, lean meats and whole grains. Increase the amount of water you are drinking daily and get plenty of rest.
Reduce or stop all smoking, tobacco, and alcohol use.

Exercise as much as your body can tolerate to maintain your muscle strength.
Practice Daily Tasks
You will temporarily need to use crutches to move about your home. It is important to imagine how you will go about your day without being able to hold anything in your hands as you move from room to room.
Before surgery, practice how you will get in and out of the shower with a stiff surgical knee that will not want to bend comfortably.
You may also want to practice getting in and out of the passenger side of the car with a stiff surgical knee, adjusting the seat position now could save you some trouble when it’s time to go home.
Prepare Your Home for a Smooth Transition
Make these changes to improve the convenience and safety of your home environment ahead of time.
Create a clear path to the entrance of your home. Pick up throw rugs, tack down loose carpeting and remove electrical cords or other obstructions from walkways.
Install a rubber mat, or non-skid adhesive, on the bottom of the tub or shower.
Install night lights in bathrooms, bedrooms and hallways.
If you will be returning home alone, establish a rotating support system that involves more than one person to help you with everyday needs.

Plan for someone to drive you to your outpatient physical therapy appointments, the store, and other important destinations for the first 3-4 weeks.

Introduce family pets to crutches before surgery. Strongly discourage them from being underfoot when you are up and moving as they can become a tripping hazard.
It is best to sleep with the knee supported in a straight position elevated on pillows. It may be more comfortable but DO NOT support the knee in a bent position (by using a pillow behind the knee) as this will delay your recovery.
12
Prepare Your Knee
Dr. George wants your knee to be in the best condition possible before surgery so that you can get the best result after surgery.
You may be referred to physical therapy to:
o Decrease any swelling from around your injured knee.
o Regain appropriate strength to your quadriceps muscle.
o Regain appropriate motion to your injured knee.
o Normalize your walking.
o Learn about initial post-operative exercises and healing strategies for after surgery.
ValleyOrtho’s Premier Athletic & Sport Screening (PASS) Program (page 25)
o To set the best target to return you to your pre-injury activity level part of our process is to test the strength of your uninvolved knee before surgery.
Pre-arrange Your Finances to Reduce Stress
Our Patient Financial Services staff is happy to help all of our patients with their billing questions If you have questions about billing, insurance, financial assistance or charges for healthcare services, please contact Patient Financial Services at (970)3846890

Pack for Your Surgery
To stay comfortable during your hospital visit, we suggest you bring:

Your ACL Playbook.
Your cooling device if you have received it before surgery.
Slip-on shoes with heel cup and rubberized soles.
Comfortable elastic waistband pants or shorts that are easy to put on and take off over a likely swollen leg.
Eye-glasses instead of contacts.
Driver’s license or photo ID, Insurance card/Medicare Card.
Copy of your Advanced Health Care Directives.
Cash or credit card to pay for discharge medications.
A list of your daily medications, vitamins and herbal supplements, including the dosage and frequency, plus a list of medications you stopped taking in preparation for surgery.
o Your own medication will be used only when the hospital pharmacy does not stock your specific medication and interruption in the use of that medication would compromise your care. Speak with Dr. George if you feel your medications may fit these criteria.
Your Cell phone/charger, books, magazines or other portable hobbies.
A pair of crutches if you have them. These should be labeled with your name.
DO NOT wear or bring any jewelry or any other valuables. This includes removing wedding bands and all piercings.
13
PREPARING FOR SURGERY
Prep Your Skin to Discourage Bacteria
Preparing your skin before surgery can reduce the risk of infection at the surgical site by reducing bacteria on the skin. You will receive scrub brushes with anti-bacterial soap from our clinic at your pre-operative appointment.
Please use the prescribed sponges to wash carefully before your surgery, following the steps below:
1. Wet your entire body with warm, NOT hot, water.
2. Wash hair with normal shampoo/conditioner. Wash your face and body with your normal soap, then rinse.
3. Wet the sponge provided then turn off the water.
4. Use the sponge side only and clean starting from the surgical knee working outward to include the front and back of your thigh and lower leg Avoid contact with your eyes, ears, mouth and directly on genitals. This process should take 3 minutes to clean.
5. Wait 2 minutes after this application before turning the shower back on and rinsing off.
6. Rinse off all of the soap from your body with warm water.
7. Dry with a clean towel and wear clean clothes to bed.
For best results, follow these additional instructions:
Remove any nail polish from fingers and toes.
Don’t let the prescribed cleanser get into your eyes, ears, mouth or genitals.
DO NOT use moisturizers, lotions or oils on the skin after beginning the cleansing regimen we provide.
If you have persistent redness or itching, rinse the affected area, discontinue use of the wash, and call our office at (970)384-7140.
If you swallow the wash, call Poison Control right away: (800)222-1222.
SPECIAL NOTE ABOUT SHAVING:
We ask that you DO NOT shave your surgical knee for four days prior to surgery. Dr. George will inspect your surgical knee the morning of your surgery and will carefully shave the area at that time. If there are any breaks in your skin, your surgery may need to be rescheduled due to a risk of infection.


14
SURGERY INSTRUCTIONS SHEET
The Day Surgery staff will call you the day before your surgery with instructions. Complete this worksheet during that phone call.
Patient calls begin at 2pm one business day before the scheduled surgery date. This means Monday’s surgical patients are called on the Friday before. You may contact the day surgery staff at 970-384-7166 if you have not received your instructions before 5pm one business day before your surgery date.
Fill in Your Personal Instructions Below:
Date of Surgery:
Surgery Location:
Check-in Time: _____________________
*If you are late it may affect your surgery time, or result in rescheduling your surgery.*

Surgery Time:
Eating Allowed Until:
*Do not eat any food after midnight before your operation unless otherwise instructed.*
Approved Clear Liquids Allowed Until:
*Do not drink anything after midnight before your operation unless otherwise instructed.*
Approved Clear Liquids Include: Water, Sports Drinks, Sodas, and Strictly Black Coffee (DO NOT add milk/cream/sugar/honey).
Any Additional Eating and Drinking Instructions: _______________________________________________________________________________
Medication Instructions: ________________________________________________
Medications You are Told to STOP Taking Below:
15
PREPARING FOR SURGERY
FREQUENTLY ASKED QUESTIONS

Q. Can I work out after my surgery?
Early after surgery your exercise program should be modified to exclude putting a lot of weight or motion through your surgical knee. If you are in a brace, continue to wear it when you exercise. Upper body exercise is encouraged as soon as you feel able. Unless you have a partner to help you, you are limited to seated upper body machines initially because it will be difficult to carry weights in the gym on your own.
Q. How long until I can drive?
You are not able to drive while taking your narcotic pain medications. Driving after an ACL reconstruction is a safety concern. Be aware that driver’s who require crutches to walk carry more liability. The ability to drive depends on whether surgery was on your right leg or your left leg, and the type of car you have. If the surgery was on your left leg and you have an automatic transmission, you could be driving as soon as you are off narcotics and can get into/out of the car comfortably. If your surgery was on your right side, your driving could be restricted as long as four weeks until you have the motion and strength needed to operate the pedals safely and efficiently.
Q. How often will I see Dr. George following the surgery?
Your first postoperative office visit will be scheduled for 7-10 days after surgery, then 1 weeks after that first follow up appointment. After that, plan for appointments at onemonth intervals. Your physical therapist will communicate with Dr. George and his team regarding your progress.

Q. When can I Shower? Can I swim / submerge the incision?
Shower as soon as you feel able after returning home. The dressings are water resistant so they can get wet, but do not allow the shower to hit the incisions directly and do not submerge the incisions in water. Always use a clean wash cloth and do not scrub directly the incisions. Pat the incisions dry thoroughly after your shower. We want the incisions to be fully healed and free from scabs, which takes 14 days on average before you submerge. Please clear this activity with your therapist or doctor before you submerge the incision.
Q. Will I be in pain after surgery?
You will likely be in some form of discomfort after surgery. This is normal. It is your body telling you to slow down to heal. Our team will work you through this process, taking your comfort into consideration in everything that we do.
Q. Can I take off the steri-strips if they are coming off?
We encourage you to allow them to fall off. However, if they are “hanging on by a thread,” you can gently pull them off.
16
Q. When will I be able to get back to work or school?
We recommend that you take at least 1 week off from desk work or school to help manage the initial swelling and start your rehabilitation off right To return to work and school you should be a strong walker (with or without crutches), be able to maintain good pain control during a full day, and ensure swelling continue to decrease each day as you return to work and school. If your work is labor intensive, plan to take closer to 8 weeks off before returning to light duty
Q. Do you recommend any long-term restrictions?
No. Be sure to follow all post-operative instructions and you should enjoy full motion and return to activity once you heal. It is important to continue your home program for at least 1 year after your repair to get back to your pre-injury strength level.
Q How long should I expect my repair to last?
Your ACL reconstruction should reach a comparable level of strength to a natural ACL at 9-12 months after your surgery date. When your regain your full strength and motion you will be at little to no increased risk for future injury than your uninjured side is now.
Q. How long will my recovery take?
Knee motion should be nearly restored within three weeks with regular physical therapy. With continued strengthening and balance exercises, both strength and function of your knee should dramatically improve after two months. As part of our included PASS Program with a physical therapist, you will have a progress assessment at approximately 3 months after surgery to best fit your rehab program to your specific needs. With a continued strengthening program you will be ready to complete a full return to activity progress assessment with a physical therapist 6 months at the earliest to fine tune your final rehabilitation process. Dr. George will look at those test results and talk with you about your return to activity timeline at your 6 month follow up visit. A repeat assessment is likely to meet appropriate strength levels to protect your new ACL with your chosen activity. When you return to recreational activity is based on how well you can protect your knee with your muscle strength and jumping / running abilities. This timeframe can typically range from 6 months to 1 year and is dependent on how well you follow your rehabilitation program.
Q. How long do I wait before having dental procedures?

It is possible, in some situations, for bacteria from the mouth, teeth or gums to travel through the bloodstream and settle in a post-surgical site. In an attempt to prevent this occurrence representatives from the American Dental Association and the American Academy of Orthopedic Surgeons developed these guidelines:
Refrain from any dental work two weeks prior to surgery.
Refrain from dental work one month after surgery.
Ask your dentist about having antibiotics prescribed and the timeframe for premedicating prior to any dental work to ensure safety.
17
PREPARING
SURGERY
FOR
YOUR SURGICAL & FACILITY CARE
The Day of Surgery Game Plan: Checking In
At the Hospital
The Valley View Valet is a free service. The CalawayYoung Cancer Center valet is open from 7:30AM to 5PM.


You will stop at one of the hospital’s registration desks 2 hours before your surgery time.
o Registration at the Emergency Department entrance is always open.
o Upper registration on the 2nd floor near the Pharmacy is open from 7AM-3:30PM MondayThursday and from 8AM-2:30PM on Fridays.
Valley View Surgery Center at Basalt


Please use the onsite parking right outside the Mid Valley Surgical Center. You will register at the front desk 2 hours before your surgery time.
Address: 1450 E Valley Rd Suite 202, Basalt, CO 81621
Our nursing staff will begin preparing you for surgery by starting an IV and ensuring that you’re comfortable.
Dr. George will come and answer any additional questions you may have and mark the knee you are having repaired with a surgical marker.
An anesthesiologist will meet with you to talk about general anesthesia and the nerve block you will receive for comfort.
A nurse will take you into the operating room on a portable bed.
Following surgery you will spend about an hour in the post anesthesia care unit (PACU) while your vitals normalize and your pain is controlled. Your family and friends will not be allowed to visit the PACU.
You will return to the Day Surgery Department to rest and meet your family and friends.
Your Recovery in the Day Surgery Department
The duration of your stay will be based on your vitals, progress, and safety. Most patients are discharged approximately 6 hours after their surgery.
You will interact primarily with your day surgery nurse and patient care technician (PCT).
A nurse will assist you while getting in and out of bed and into the bathroom. Do not try to get out of bed by yourself. They will help guide your movements, monitor pain and dizziness, and keep you safe from falls.
A physical therapist will instruct you in your post-operative instructions that include your home exercise routine and proper crutch walking progression.
18
AT HOME AFTER YOUR SURGERY
Monitor Your Healing
Healing after an ACL reconstruction can be uncomfortable but you need to know what signs of healing need immediate professional attention. An on call provider is ready to help you at all times. Immediately call 970-384-7140 if you experience any of the following:
A fever over 101.5 degrees.
An increase in bleeding from the surgical site.
Worsening pain that is not controlled by medication or position changes.
Worsening nausea or vomiting.


Increased swelling that is not controlled by cold therapy or position changes.
Increased redness around your incisions and/or cloudy fluid draining from the incision.
Or if you get the feeling that something is just not right.
Call 911 with Shortness of breath and/or chest pain symptoms.
If you have questions about upcoming appointments or medications, please message “Dr. George” through your Valley View Hospital Patient Portal for the timeliest response.


Cold Therapy for Pain and Swelling
Cycle the cold therapy 15 minutes on, then 15 minutes off for the first week. After the first week you can choose to use cold therapy as needed to manage your pain and swelling during the day.

Apply your chosen cold therapy over a thin layer of clothing while. After the first week you should use the cold therapy on the knee in a supported, straight, and elevated position.
When using the Polar Care Wave:
o Always apply and remove the device from your knee only when the knee wrap is empty and the hose is unattached.
o Check every 2-3 hours that there is still ice in the unit so that your treatments are effective.
Set the compression settings on the Polar Care Wave to your preference. If it is too uncomfortable you do not need to use the compression feature.
When using cold packs, place them on the front and back of the knee with an ace wrap
Remove cold therapy when doing your scheduled extension and flexion exercises or to shower and dress.

19
AT HOME AFTER SURGERY
Polar
Care Wave Cold Packs
Manage Your Postoperative Pain
Your goal is to be completely transitioned from opioids to over the counter pain medications 2 - 4 weeks after surgery. Keep in mind that the goal of taking pain medication is not to be pain free after a major orthopedic surgery, but to be comfortable enough to get some sleep and participate in your physical therapy program. IMPORTANT NOTE: Please plan ahead as we need 24 hours to properly process any medication refill request and we do not refill medications over the weekend.
How to Wean Off of Narcotics:
o Step 1: Increase the amount of time between doses.
Example: Take a dose every 5-6 hours for 1-2 days. Then take a dose every 7-8 hours for 1-2 days.
o Step 2: Start to reduce the dose amount.
Example: Decrease from 2 pills to 1 pill at each dose for 1-2 days.

o Step 3: Start to transition to Tylenol
Example: During the day, replace a dose of narcotics with a dose of Tylenol for 1-2 days. Monitor for adequate pain relief.
Continue to replace narcotic doses with Tylenol until you are completely off of the prescription pain medication.
Cold therapy is also very helpful in reducing your pain in the first few weeks after surgery. Refer to page 19 for details.
Address Any Postoperative Constipation

Constipation is one of the most common postoperative complaints, as it’s a common side effect from anesthesia and narcotic pain medications. Constipation is defined as infrequent bowel movements, fewer than three a week, and is associated with the following symptoms:
Difficulty passing stool or incomplete bowel movements
Bloated or swollen abdomen
Hard or rock-like stool
Help keep your bowels regular by continuing your pre-surgical laxative protocol when you come home.
Take MiraLAX twice daily: one dose (17 grams) in the morning and again in the evening, each with an 8 oz. beverage of choice, especially while you are still taking narcotic pain medications.

Introduce foods rich in fiber (36g/day).
Increase daily water intake: drink at least 8 cups.
Include fresh/dried fruits vegetables, whole wheat/oat bran, prune juice and/or oatmeal.
20
Let Our Pros Help You Tackle New Challenges


Your outpatient therapist will help problem solve and address any challenges you may experience at home. Below are some tips to make life a little easier.
Going Up and Down Stairs: If you are using crutches, hold the handrail with one hand. Put both crutches in your other hand. Support your weight evenly between the handrail and your crutches and use “Up with the Good”, “Down with the Bad” sequence as above. Always move your crutches in conjunction with the surgical leg.

Dressing: Initially your surgical leg will be larger as it heals; it will be easier to wear loose fitting pants or shorts early on. You will likely need to sit on the edge of a chair or bed to put on your pants and socks. Slip-on shoes with heel cup and rubberized soles are recommended as bending your knee to tie your shoes may be difficult.

Transportation: You will not be able to drive yourself until you are completely off of your narcotic pain medications. Before getting into the passenger side of the car, push the car seat all the way back and recline it if possible. Back up to the car until you feel it touch the back of your legs. Reach back for the car seat and lower yourself down. Duck your head so that you don’t hit it on the door frame. Scoot back onto the seat and lift one leg at a time into the car. Use this sequence in reverse to get out of the car.

Sleeping: The best sleeping with the leg elevated on pillows in a straight knee positon. Keep your pain medication nearby as you may need it during the night.

Pain: Everyone has some pain after surgery, and you will be given prescriptions for pain medication to take home. DO NOT take ibuprofen (Advil®, Motrin®) or naproxen (Aleve®) unless explicitly directed by Dr. George Take your prescription medications as directed. The cooling system is also very helpful in reducing your pain in the first few days after surgery.

21
AT HOME AFTER SURGERY
Keep Your Recovery Moving Forward the First Week
Knee Extension Exercise: Perform this routine every hour on the hour, 8AM-10PM.
1. Remove the cold therapy from around your knee.
2. Place your heel on towel roll then place a 2 pound weight (or use hand pressure if you do not have a weight) on top of the shin just below the knee; allow leg to relax and hang into an extended position for 10 minutes.
3. Stay in the stretch position above and wrap a belt around the ball of the foot. Gently pull towards your body to stretch the calf. Hold this stretch 30 seconds then relax the belt. Repeat this 3 times.
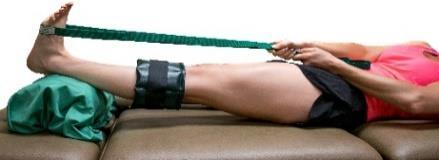
4. Then perform 10 quad sets holding for 10 seconds each repetition. Perform with both legs at the same time to confirm that the correct muscle above your knee cap is pulling your knee cap up towards you. The Goal is to flatten the back of your knee into the bed while keeping your buttocks relaxed and only use the muscle on top of the thigh.
5. Replace the cold therapy.
Knee Flexion Exercise: Perform this routine every 3rd hour on the hour, from 8AM to 10PM.


1. Remove the cold therapy from around your knee.
2. Slide your heel towards your buttocks to 90 degrees or more for a moderate and pain free stretch. Hold this position for 5 minutes.
3. After the stretch above, use your hands to pull the knee toward your chest as far as comfortable, hold for 1 minute.


4. Replace the cold therapy onto your knee.
Ankle Pumps: While sitting or lying down, slowly push your feet forward (like a gas pedal) then pull them backwards. Do this with both feet 1,000 times a day.
Walking: Limit walking to household distances for the first week to help prevent increased swelling.

NOTE: Your outpatient physical therapist will progress your exercise program as you heal. These are just the beginning!

22
YOUR RECOVERY PROCESS
Steps to Get Back in the Game
The ultimate goal of your ACL reconstruction is to get you back to your pre-injury level of activity. Participation in your rehabilitation program is essential for a successful surgical outcome. The surgery is only a small part of your journey. Working hard to regain motion and strength in your repaired knee is the key to returning to your pre-injury activities.
Do not let anyone tell you that the rehabilitation portion of your recovery is easy. It will take hard work and dedication. We are here to guide your recovery towards the best possible outcome. Protecting your healing repair, and healing in the right position in the early phase is critical for your long term success.
Follow These Precautions For the Best Results:
For the First Week:
o Do not rest the leg in a bent knee position after surgery for greater than 30 minutes at a time. Getting the knee into a completely straight position is very important for your recovery.


o Limit walking to household distances.
For Weeks 1-3:
o Increase walking amount and weight bearing through surgical leg as much as you can without experiencing increased pain or swelling in your knee.
o Progress steadily to a normal walking pattern without the use of crutches. See page 10 for walking instructions.

23
RECOVERY PROCESS
EXPECTED PHASES OF RECOVERY
There may be slower progressions if you had a meniscus repair during your surgery Your therapist and Dr. George will guide you appropriately through the process.
Phase I: Weeks 1 to 2 — Quadriceps and Swelling Control
Your surgical knee is likely to be uncomfortable during this phase. This is normal and expected due to the swelling and large amount of healing that is taking place.
Your job is to use regular cold therapy and your extension and flexion schedules as described to decrease the swelling in your knee.
Prescribed exercises and hands on therapy will increase knee motion and help decrease your pain and inflammation.
Phase II: Weeks 3 to 12 — Full Motion and Strength Building
We expect you to regain full motion and normal everyday functional use of your surgical knee in this phase.
As you work to build strength in your knee we expect you to stop narcotic pain medication use in the early weeks of this phase even though discomfort may still be present.
Exercises and training in this phase are aimed to improve strength coordination and confidence in your surgical knee to return to light jumping tasks.
Phase III: Weeks 13 to 20 — Return to Running Program
We expect that you will have minimal to no discomfort at this time at rest.


We expect to be able to slowly return to a running program and sport specific training at a low intensity level if that was part of your pre injury lifestyle
We expect you to be back to 70% of your full strength at this time but aggressively working towards your full strength goal with your exercise program.
You will slowly begin more complex plyometric training to ready yourself for return to light recreational activity under the direction of your therapist and Dr.
Phase IV: Weeks 21 to 30 — Return to Recreational Activity
You will not likely be cleared to contact sports at this time but will continue to integrate into sport specific training under the direction of your therapist and Dr.
You will be cleared to full competitive return to sport when detailed return to sport criteria is met. This is also dependent on the discretion of Dr. George regarding your recovery and chosen sport.


24
ValleyOrtho’s Premier Athletic & Sport Screening (PASS) Program:

This is an additional, free, and mandatory service to make sure we are doing our very best to keep you as safe as possible while you recover and return to your desired activity level. Your baseline and progress assessments will be performed in the Rehabilitation Services Department located on the 3rd floor of Valley View Hospital or in the Valley View Willits Care Center
Setting a Pre-Operative Baseline
We will be assessing the strength of your healthy knee to set appropriate goals for the full return to activity testing at 6 months. This testing will include the items 3-10 from the list of tests below.
12 Week Progress Assessment
This will be scheduled before your 12 week follow up visit with Dr. George and includes:


1. Range of Motion Measurements


2. Balance Test: Stork Test
3. Single Leg: Leg Press Strength Test


4. Single Leg: Hamstring Strength Test
5. Single Leg: Quadriceps Strength Test
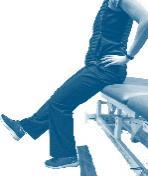

6. Timed Single Leg Squat Test
7. Single Leg Hop Test
Return to Full Activity Progress Assessment
This will be scheduled before your 6 month follow up visit with Dr. George. Depending on your activity you will be required to run or bike to fatigue in the clinic before performing your return to sport test. Based on your desired activity level this test will additionally include a combination of the following tests:
8. Timed Single Leg Side Hop test
9. Single Leg Crossover Hop Test
10. ACL Return to Sport After Injury Scale
11. Agility T-Test

25
RECOVERY PROCESS
Set Up and Keep Your Follow-Up Visits with ValleyOrtho
Dr. George and your outpatient therapist will be in constant communication regarding your progress. It is important to attend your ongoing care appointments to be certain that your ACL reconstruction is progressing properly. By conducting regular physical exams and reviewing your program, Dr. George can identify any problems that may be developing even before you know it.
Schedule follow-up appointments at these intervals
Post-Surgery
7-10 days after surgery date.
2 weeks after surgery date.
Monthly follow ups until discharge after second follow up appointment.
Ongoing Care

One year.
At ValleyOrtho, we appreciate your confidence, and we will do our best to keep earning it.
We are honored that you have chosen ValleyOrtho to help you regain your active lifestyle. We will be the first to wish you happy hiking, biking, skiing, climbing, gardening, and fishing with your repaired knee. In short, we would like nothing more than to help you get off the bench and back onto the playing field of your life.


ThankYOU!
26


 Dr. Christopher George


