
2 minute read
2.0 Preflight: Untrapped File

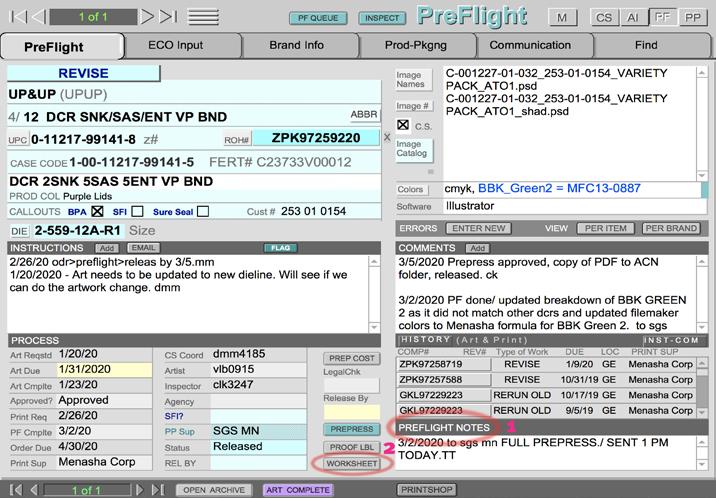
In Filemaker, Click PF button (1) (see fig. A) Click PF QUEUE button (2), and Job with the soonest Release Date will be shown first. (see fig. A) To view all jobs in PF Queue, click on ‘hamburger menu’ (3); jobs listed in order by Release Date (see fig. A) NOTE: A corrugate job may take precedent, even though it has a later Release Date, because corrugate jobs have a 7 day interim where printcards must be created by platemaker and approved by Package Engineer and Preflight. See Corrugate Procedure for detail.
fig. A – FileMaker Preflight panel
Advertisement
Locate and Open the Artwork File on the Server
• Go to: groups$ (G Drive) > Art > Customers > [cust name] > [prod category] > [job folder] > file.ai • Open file and Relink images to Hi-Res versions: groups$ (G Drive) > Art > Art Images --or-- Art > Images
PREFLIGHT READY
Images in PREFLIGHT READY are usually supplied by the customer, are customer-specific, and can only be used for that customer’s projects. Or, the image originally was a Presto image that the customer edited for their own use. Inspect the Artwork Using the PreFlight Inspection Checklist (see Exhibit A at end of document) • Check against the seed die, and review all graphic content • The top 5 Critical items that need to be Correct to prevent destruction of printed pieces:
UPC and Digimarc code • Dist By & COO info • Legal (content & font size) • Part Number • Die Number
You will be checking (in order of appearance on the Inspection Checklist): - Job Folder Naming - Use Panel Statements - Images and Shadows - Database Record Info - Headings & Copy - File Clean Up - Seed die /Bleed - Legal on all panels: Check - ID, Color Bars, Color Seps against Brand Info/FM Bible
If Errors are found during Preflight:
• Edit the file if it is a quick correction, or return job to Artist to make corrections • Update FM record with comments about corrections made or needed • If Preflight makes edits: Save your work to retain the corrections made, and continue to next step
IMPORTANT - SGS Shirt-tail: As a guide, add a 3 inch x 10 inch box to the bottom of the file’s artboard for SGS’s ‘shirt-tail’ to contain their printing info slug (added by SGS Prepress). Extend the artboard past the box, then delete the box. If this isn’t done, then the comparison feature of the SGS Remote Approval website won’t work when it comes time to Prepress Proof after the trapping is complete. (file comparison is a feature of the Kodak Insite Creative software used by SGS) • Save the Illustrator .ai file and make a LR pdf
Review Links
• In links panel, click on each linked image; verify correct color mode (CMYK) and resolution (300 ppi) • If links were found in the Art > Images PREFLIGHT READY folder: - File the images on the server: a. Lo-Res .eps into: groups$ (G Drive) > Art > Images b. Hi-Res layered .psd and flattened .eps into: groups$ (G Drive) > Art >Art Images - Include the linked Hi-Res images in the zip file when job is uploaded, see Step 13


