1 minute read
4.0 Submitting Illustrator Files to SGS for Trapping - File Transfer


12. Prepare Artwork for Upload
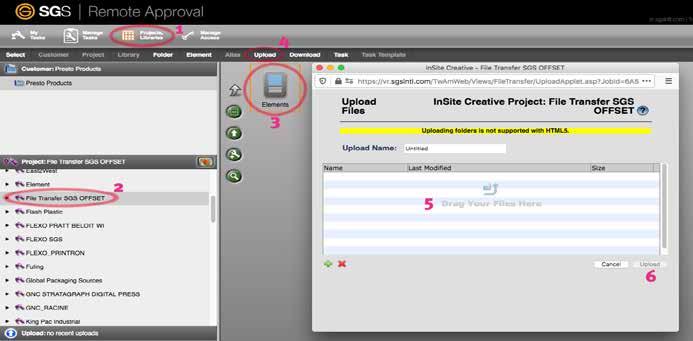
• Create a .zip file containing: _OL.ai file, new customer images, UPC code, _OL LR pdf and worksheet • Upload .zip file to: SGS Remote Approval > Projects, Libraries (1) > File Transfer SGS OFFSET (2) > Elements (3) >
Advertisement
Upload (4) to get the Upload Files window (see fig. D) • Drop the .zip file on the window shown in fig. D (5); Click Upload button (6)
fig. D – SGS Remote Approval: File Transfer
• Separately, Upload the _OL.ai file to: SGS Remote Approval > Work in Process (1).> Elements (2) > Upload (3) (see fig. E) • Drop the _OL.ai file on the window shown in fig. E (4); Click Upload button (5)
fig. E – SGS Remote Approval: Work In Process folder

13. Review Uploaded File to Approve Ready For Trapping
• After upload: In Elements (1) > double click on the _OL.ai file (2) (see fig. F) to open the file in Smart Review (see fig.G)
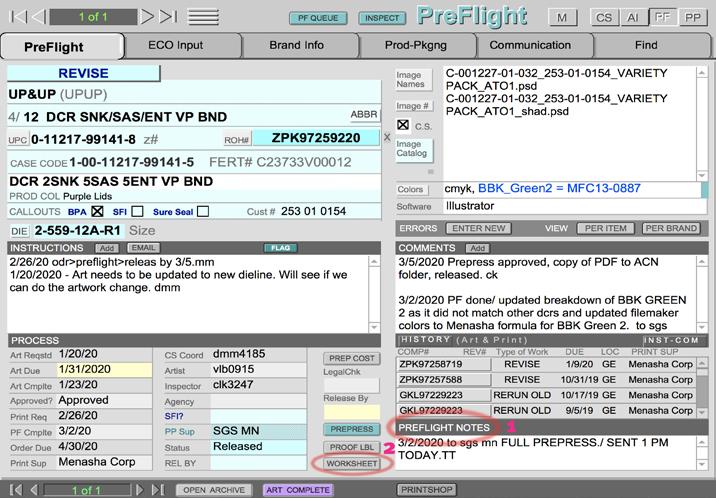
fig. F – File uploaded and in Elements folder • Inspect file integrity. Drop down ‘No Task’ (1), and select SGS STL (this hasn’t yet been changed to read SGS MN).
Below the image click on the Green icon to signify Approved (2). This automatically sends notification to SGS
PrePress that file is ready for trapping. (see fig. G)


fig. H – Comments and Prepress button to update record

14. RUSH JOBS
• If the job being sent to SGS is a RUSH job: - send an email to Sherry Zimmerman, Project Coordinator and copy Jeff Mack, Sales Representative indicating job # that has been uploaded and stating that it’s status is RUSH (this should have already been stated in the worksheet too).
15. Prepress Proofer/File Releasing
• Preflight is complete. Tracking job progress next transfers to the Prepress Proofer/File Releasing.