
9 minute read
Growing seed potatoes


BY JULIAN ACKLEY POTATO SEED GROWER
Advertisement
In the past five years the potato industry has weathered many setbacks and has forced many growers to either leave the industry or restructure their business.
For those wishing to continue to utilise their equity in potato equipment, many are looking more closely at seed potato production. The new initiative of Ausfarm Connect is leading the way to potentially creating export opportunities for increased seed potato production in Western Australia (WA). For those of you thinking about giving it a go, this article intends to give you the basics in the hope it will prevent simple but costly mistakes in your first seed potato crop. WA Seed Scheme
The WA Seed Scheme is unique across the world as it includes two variants, both the Certified Seed Scheme and the Registered Seed Scheme. For most intensive purposes they are essentially identical in terms of allowable disease levels and almost every other rule. The only exception of the Registered Seed Scheme is that it allows certification approved swamps to omit from rotational requirements. However, without an approved swamp you will still be required to rotate your growing areas identically to the certified scheme. If the intention is to export overseas then it may create less confusion if your crop is under the certified scheme; for exporting to the eastern states of Australia then certified or registered seed are equally suitable. Seed labels
Before you can start growing seed you will need to obtain suitable seed stocks, which will include a label that provides the traceability of the seed line.
3 IF your seed crop is flowering and you have not yet submitted a application, then it is too late and you should make other plans for your crop.
3 OF the four labels available in WA, you will need either Black Label Certified or Blue Label Registered if you wish to multiply the seed another generation.
PHOTOS © JULIAN ACKLEY
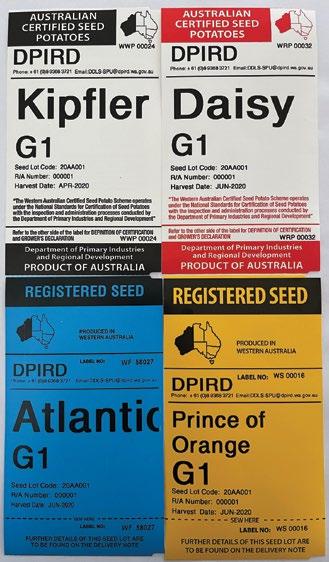
In WA there are four different labels, two for Certified and two for Registered. To be able to grow a seed line you will require either a Certified Black (printed on white) label or a Registered Blue label. Both of these labels signify that the seed has passed inspection or testing to the highest level and is suitable for multiplication as seed. Certified Red (printed on white) or the Registered Yellow label are intended only to be grown out for consumption. These tickets are usually issued at the seed growers request, but in exceedingly rare cases these labels may be issued if critical faults (such as virus) are more than 0.1 per cent but less than 1 per cent. You cannot grow a seed crop from Certified Red or Registered Yellow labelled tubers. Generations
A generation of a seed line refers to how many times it has been multiplied in a field setting. Within the Certified Scheme, generations 0 to 4 are suitable to be grown as seed, generation 5 (G5) is only suitable to be grown for consumption. When talking generations, the seed grower will often refer to the generation of the crop growing as the generation that was planted, however the buyer or market grower will refer to the generation of the harvested seed they are buying. As an example, the seed grower will plant a patch of G2 seed, the plants and patch are constantly referred to as G2, however the harvested tubers of that crop to be sold are in fact G3. When that G3 is be multiplied again, it’s resulting tubers will be G4. So, if your market requires G5 seed product, then you will need to purchase G4 seed to achieve that.
Obtaining your seed
Professional seed growers will purchase G0 or Mini Tuber Unit (MTU) seedstock from certified laboratories. In Australia, Toolangi Elite in Victoria and Solan Nurseries in South Australia are the main suppliers. G0 MTU stock is grown from tissue samples in the laboratory and then eventually the small plants are moved to controlled greenhouses where the crop is grown out. This process takes 12–18 months of planning and as such all MTU Stock is only grown to order and there is rarely any excess stock. Orders must be placed at least 18 months in advance of expected delivery. In addition, it is not possible to directly order any varieties that have a royalty on them. In order to obtain a variety with Plant Breeders Rights you will need a contract with the Australian representative of said variety. A simpler way to get started is to simply purchase a higher generation seed stock from a professional seed grower closer to your client’s requirements and do the final bulk out. Growing low generation seed is exceedingly expensive, and it is incredibly unlikely you will be able to purchase G1, G2 or even G3 seed without some kind of prior contract. However, when you get your seed, make sure you don’t lose the labels, as you cannot grow the seed again without them, and you may be required to produce the labels before certification is granted.


WWW.SOLAN.COM.AU PHOTOS ©
3 TOP: Solan is the only mini producer with a nursery facility structured in this way in Australia therefore these images are unique to Solan’s production system only and not representative of other mini suppliers to the Australian industry. 3 LEFT: Generation 0 AKA Mini Tubers are grown from a tissue sample in a laboratory and bulked out in a greenhouse.
currently growing them on your property, your property is not currently eligible to grow seed potatoes. The second thing you need to consider is the isolation gaps. For G0, G1 and G2 sown seed you must have a 50m isolation buffer from any other potato crop; for G3 and G4 that distance is 20m. This means that if you’ve planted your 100-acre pivot G0, G1 and G2 sown seed you must have a 50m isolation buffer from any other potato crop. with processing potatoes and you want to just certify a small 2-acre plot within that pivot, it will not be possible unless the entire pivot is certified. There is also differing requirements in isolation depending on the generation of seed planted nearby; these requirements can be found in the Certified or Registered Seed Scheme rules. There are also different isolation requirements when growing certified and registered seed within the same field. The final decision when choosing your Choosing your planting location site to plant seed is the rotational If you’ve managed to obtain suitable seedstock you’ll now need to decide on a location to plant your seed crop. First of all, certified seed potatoes cannot be grown on any property where there are potatoes planted from non-certified or requirement for planting G0, G1 and G2 seed. It is a requirement that the selected site has not grown solanaceous crops for a minimum of five years. For G3, and G4 planted crops it is a minimum of three years. registered seed. This means if you’ve kept some seed from a non-seed crop and are
Submitting your application for a seed plot
At this stage you’ve got some seed, it has a Black Certified or Blue Registered label, and you’ve found a suitable patch to plant your seed crop. In preparation you will need to obtain form 401 Seed Potato Application from the DPIRD website. It is recommended you familiarise yourself with this application before you start planting your seed crop, as it will ensure you have all the appropriate information in advance. Form 401 should be sent directly to DPIRD inspectors within seven days of planting. You may also be required to supply the seed label with the application, so ensure you have that on hand.
Additionally, a clear map of all plots is required containing the plot number, variety and generation. A simple way to achieve a good map is to print out an overhead view of your farm from google earth and draw your plan over the top of the paddock, and include information like where the gates are, where to drive and where the plot tags are located.
3 YOUR crops will need to be graded to below 2 per cent total defect before the final tuber inspection is done.

The first inspection
First inspection occurs before row closure, when you can still clearly see the base of plants four rows over. This would roughly be four weeks after planting. Ensure you have all your plots clearly labelled as inspectors will be looking for virus infected plants, volunteers, adequate isolations, weeds and excessive virus vectors such as aphids, thrips or psyllids. Generation 2 crops will have leaf samples collected for virus testing in the industry survey and additional leaves will be collected across your property to be tested for Spindle Tuber Viroid surveillance.
Second inspections
The second inspection typically takes place four weeks after the first inspection. It is important to ensure you have had your second inspection before burning off your crop, as doing so could cause your crop to fail certification. If you have fast growing varieties this should be discussed with the inspector at the first inspection. The second inspection is typically done around full flowering or just after and will look more closely for foreign varieties, virus infected plants and excessive vector insects.
Harvest and grading
Now that your crop has passed both inspections, you can burn it off to suit the tuber sizes required by your customer. Once you know the quantity of seed you will have, you will need to fill in a Preliminary Seed Works Summary Sheet and submit this to DPIRD so they can issue you the required labels. Your crop must still pass a tuber inspection, which is carried out by an authorised tuber inspector or DPIRD.
Typically, this will occur after you have graded the crop and reduced significant tuber defects to below 2 per cent total. A chart of defects and their associated levels can be found within the Certified Seed Scheme rules.
In summary
Growing seed potatoes can initially be a minefield of rules and regulations, the main thing is to be prepared before you think about obtaining your seed. 1. Ensure you purchase the right generation with the right label type up front. 2. Make sure you are not growing any potatoes from uncertified farm saved seed on the property. 3. Double check you are leaving the right isolation gaps and get your applications in as soon as you have planted. 4. Do your own inspections before your scheduled inspection and rogue out anything that doesn’t look right. Make sure you are managing your virus vectors ahead of them arriving and keep track of the paper trail. It’s very easy to fail certification from very simple mistakes, so make sure you understand all the requirements before you start working up the paddock.
MORE INFORMATION For more information on the West Australian Seed Scheme please refer to the Certified Seed Scheme rules found online at www.agric.wa.gov.au/plant-biosecurity/


