
6 minute read
Giving and receiving assistance

from 2011_mini_cooper

Giving and receiving assistance Giving and receiving assistance
Roadside Assistance
Advertisement
Roadside Assistance is available by phone 24 hours a day in many countries. You can receive assistance there in the event of an emergency. Phone numbers for Roadside Assistance are listed in the Contact brochure.
First aid pouch*
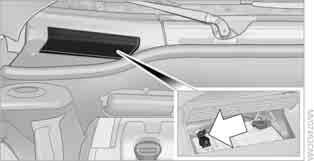
Some of the articles contained in the first aid pouch have a limited service life. Therefore, check the expiration dates of the contents regularly and replace any items in good time, if necessary.
By way of example, the illustration shows the cargo area in the MINI. The first aid pouch is located on the rear cargo well by the left side trim panel.
Warning triangle*
MINI

On the inside of the liftgate. Press the tab to take it out.
MINI Convertible
The warning triangle is located at the bottom of the luggage compartment floor.
Jump-starting
If the car's own battery is flat, your MINI's engine can be started by connecting two jumper cables to another vehicle's battery. You can also use the same method to help start another vehicle. Only use jumper cables with fully-insulated clamp handles. Do not touch any electrically live parts when the engine is running, or a fatal accident may occur. Carefully adhere to the following sequence, both to prevent damage to one or both vehicles, and to guard against possible personal injuries.<
1. Check whether the battery of the other vehicle has a voltage of 12volts and approximately the same capacitance in Ah. This information can be found on the battery. 2. Switch off the engine of the support vehicle. 3. Switch off any consumers in both vehicles. There must not be any contact between the bodies of the two vehicles; otherwise, there is a danger of shorting.<
Connecting jumper cables
Connect the jumper cables in the correct order, so that no sparks which could cause injury occur.< 1. Open the battery cover in the engine compartment to access the positive terminal of your MINI.
2. Release the tabs on the left and right sides of the positive terminal cover*, arrows 1, and lift the cover to open, arrow 2.
3. Attach one terminal clamp of the plus/+ jumper cable to the positive terminal of the battery or to a starting-aid terminal of the vehicle providing assistance. 4. Attach the second terminal clamp of the plus/+ jumper cable to the positive terminal of the battery or a starting-aid terminal of the vehicle to be started. 5. Attach one terminal clamp of the minus/– jumper cable to the negative terminal of the battery or to an engine or body ground of the assisting vehicle. Body ground in MINI:
6. Attach the second terminal clamp of the minus/– jumper cable to the negative terminal of the battery or to the engine or body ground of the vehicle to be started.


Starting the engine
1. Start the engine of the donor vehicle and allow it to run for a few minutes at slightly increased idle speed. 2. Start the engine of the other vehicle in the usual manner.
If the first start attempt is not successful, wait a few minutes before another attempt in order to allow the discharged battery to recharge. 3. Let the engines run for a few minutes. 4. Disconnect the jumper cables by reversing the above connecting sequence. If necessary, have the battery checked and recharged. Never use spray fluids to start the engine.<
Observe the applicable laws and regulations for tow-starting and towing vehicles.< Do not transport any passengers other than the driver in a vehicle that is being towed.<
Using a tow fitting
The screw-in tow fitting must always be carried in the car. It can be screwed in at the front or rear of the MINI. It is stored in the onboard vehicle tool kit in the cargo area underneath the cover on the righthand side, page 137. Use only the tow fitting provided with the vehicle and screw it all the way in. Use the tow fitting for towing on paved roads only. Avoid lateral loading of the tow fitting, e.g. do not lift the vehicle by the tow fitting. Otherwise, the tow fitting and the vehicle could be damaged.<
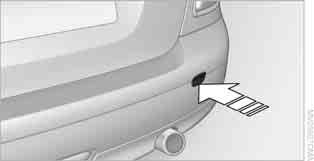
Access to screw thread
Push out the cover of the towing eye out of the recess in the bumper.
Front Being towed

Make sure that the ignition is switched on, refer to page 44; otherwise, the low beams, tail lamps, turn signals, and windshield wipers may be unavailable. Do not tow the vehicle with just the rear axle raised, as this would allow the steering to turn. < There is no power assist while the engine is off. Thus, braking and steering will require increased effort. Switch on the hazard warning flashers, depending on local regulations.
Manual transmission
Gearshift lever in neutral position.
Automatic transmission
Tow vehicles with automatic transmission only with a tow truck or with the front wheels lifted; otherwise, the transmission can be damaged.<
Towing with a tow bar
The towing vehicle must not be lighter than the towed vehicle; otherwise, it may be impossible to maintain control.< The tow fittings used should be on the same side on both vehicles. Should it prove impossible to avoid mounting the tow bar at an angle, please observe the following: > Clearance and maneuvering capability will be sharply limited during cornering. > The tow bar will generate lateral forces if it is attached offset.
Attach the tow bar to the tow fittings only, as attaching it to other parts of the vehicle could result in damage.<
Towing with a tow rope
When starting off in the towing vehicle, make sure that the tow rope is taut. To avoid jerking and the associated stresses on vehicle components when towing, always use nylon ropes or nylon straps. Attach the tow rope to the tow fittings only, as attaching it to other parts of the vehicle could result in damage.<
Towing with a tow truck

Have the MINI or MINI Convertible transported by a tow truck with a so-called lift sling or on a flatbed. Do not lift the vehicle by a tow fitting or body and chassis parts; otherwise, damage may result.<
Tow-starting
Avoid tow-starting the vehicle whenever possible; instead, jump-start the engine, page 148. Vehicles with a catalytic converter should only be tow-started when the engine is cold, vehicles with an automatic transmission cannot be towstarted at all. 1. Switch on hazard warning flashers, comply with local regulations. 2. Switch on the ignition, page 44. 3. Shift into 3rd gear. 4. Have the vehicle tow-started with the clutch completely depressed and then slowly release the clutch. After the engine starts, immediately depress the clutch completely again. 5. Stop at a suitable location, remove the tow bar or rope and switch off the hazard warning flashers. 6. Have the vehicle checked.


