


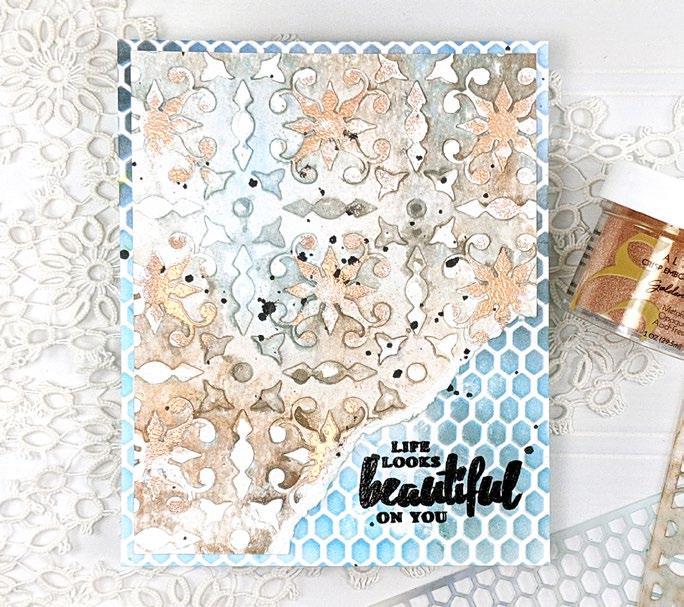
CREATE & INSPIRE 81 Fun Stamping, Die Cutting, Coloring, and Ink-Blending Tricks to Try! One-Of-A-Kind Techniques and Tips for Easier Projects! Take Your Crafting to the Next Level! 7 Captivating Card Ideas for YOU!


CONTENTS 03 05 07 09 04 06 08 Use Lovely Ephemera Packs to Make Quick and Easy Cards Easy Masking and Tone-OnTone Stamping Technique Quick and Easy Stamp Coloring with Stencils Fun Coloring With Stencils and Water-Based Markers One-Layer Stenciled Card Using Two Beautiful Inks! How to Create Flowers in a Glass Vase Easy Yet Stunning 10-Minute Card Idea for Busy Crafters
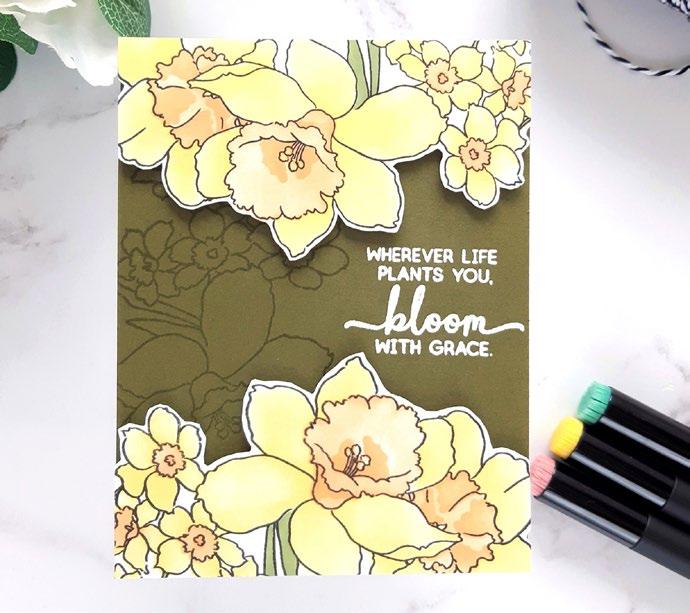
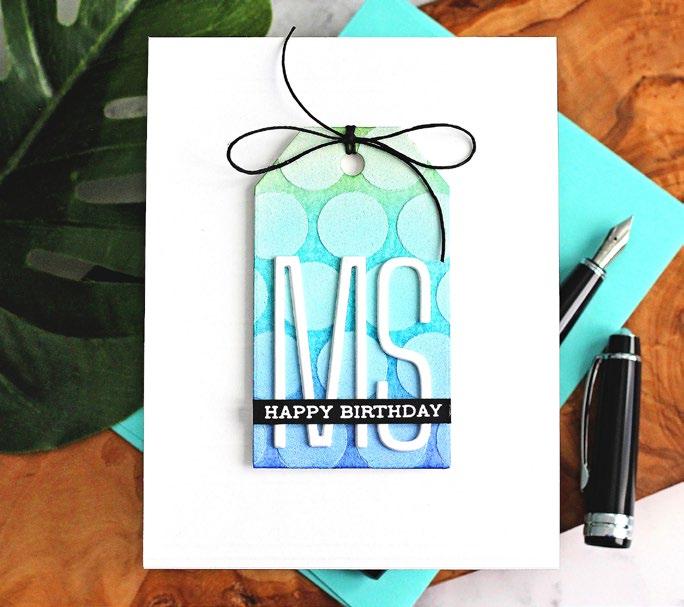
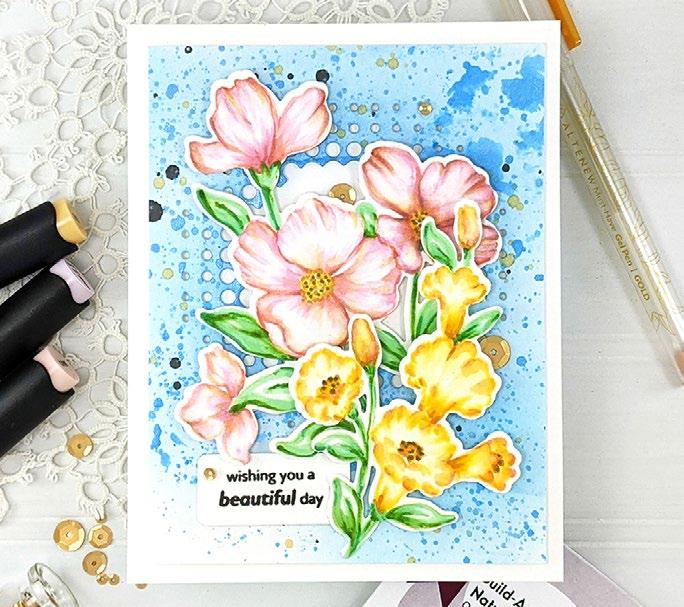
TWO BEAUTIFUL INKS!
BY ERUM TASNEEM
INSTRUCTIONS
1. Create a 4 ¼” x 5 ½” card base from Classic Crest Solar White Cardstock.
2. On the 4 1/4” x 5 1/2” panel of Classic Crest Solar White Cardstock, use a stamp positioner, like the Stampwheel, to stamp the image in Sunray Crisp Dye Ink.
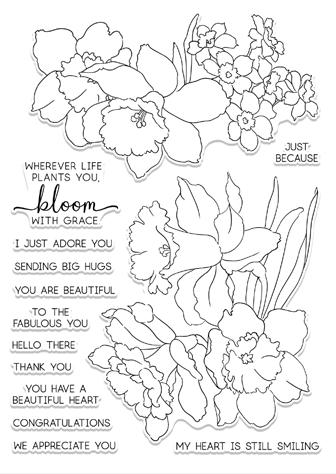
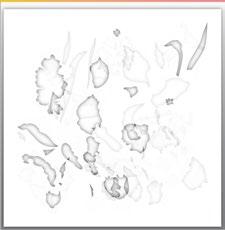
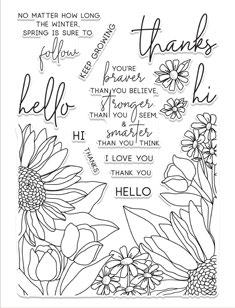
3. Follow the guide on the stamp insert to color the image using the Build-A-Garden: Daffodil Delight Simple Coloring and Layering Stencil.
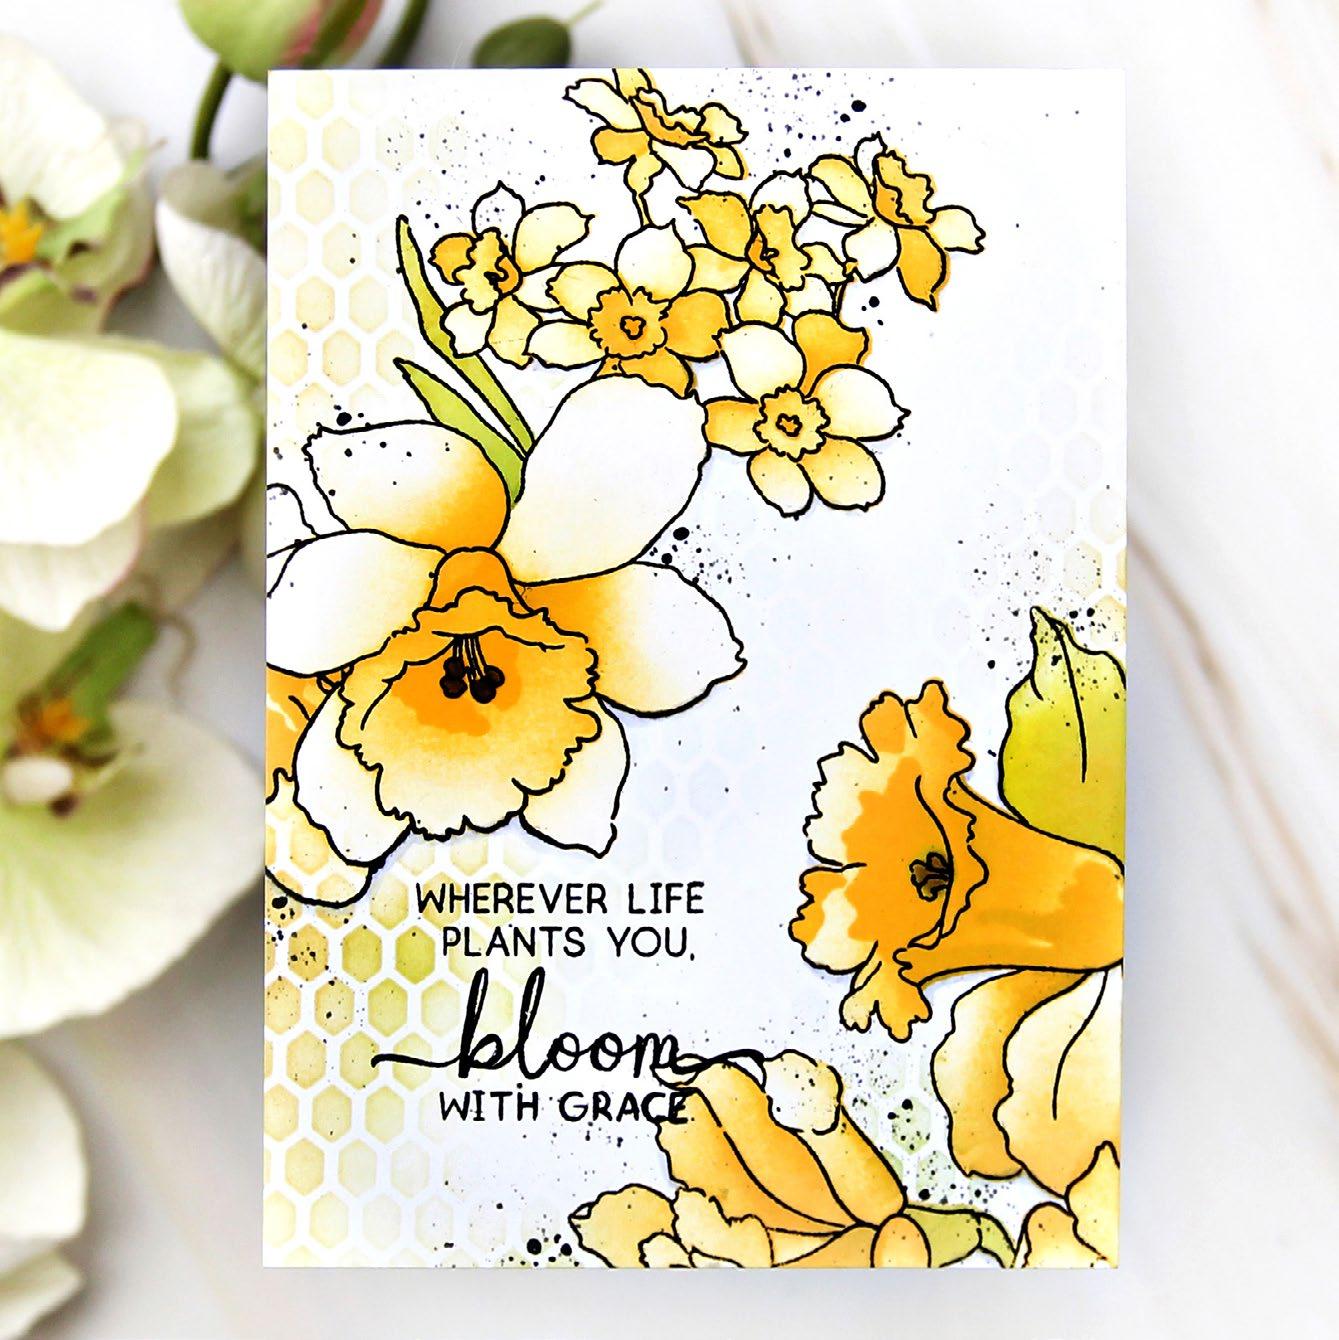
4. Start ink-blending with the topmost image with stencil 4. Apply ink with a gentle hand using a Mini Blending Brush, adding pressure only where the petals connect to achieve lighter petals on the big flower on the top left. Vary the ink intensity on the smaller flowers to create variations in petal inking.
5. Through stencil 5, apply yellow ink with a little more hand pressure in the center portion of the flower, making it darker than the open petals.
6. Place stencil 4 again and layer a darker concentration of the same yellow ink for added depth.
SUPPLIES
Stamp and Die Set
Build-A-Garden: Daffodil Delight
Build-A-Garden: Daffodil Delight
Add-on Die Set
Stencil
Fine Tulle Stencil
Cardstock
Classic Crest Solar White Cardstock Ink
Crisp Dye Ink: Limeade, Sunray
Obsidian Pigment Ink
Other Mini Blending Brush Set
7. For the leafy bits, use Limeade Crisp Dye Ink. Apply it heavily at the base and reduce pressure as you move toward the tip.
8. Place the stamp back in the stamp positioner and restamp over your colored image again in Obsidian Pigment Ink. This is to make the outline crisp and bold.
9. Stamp another image on the other side using Sunray Crisp Dye Ink.
10. Color the second image. Using stencil 1, apply yellow ink with pressure, reducing it as you reach the edge.
11. Then, use stencil 3, and apply yellow ink with a gentle hand.
12. Apply both Limeade and Sunray inks for the leaves to get an autumnal feel and color.
13. Re-stamp the second image as needed.
14. Place the Fine Tulle Stencil and selectively apply either or both of the yellow inks around the bunches of flowers. Make sure to use masking if you don’t want to stencil over your flowers.
15. Add fine black splatters for added texture.
16. Stamp the sentiment in Obsidian Ink to complete the card.

SEE MORE ON OUR BLOG ONE-LAYER
STENCILED CARD USING
03
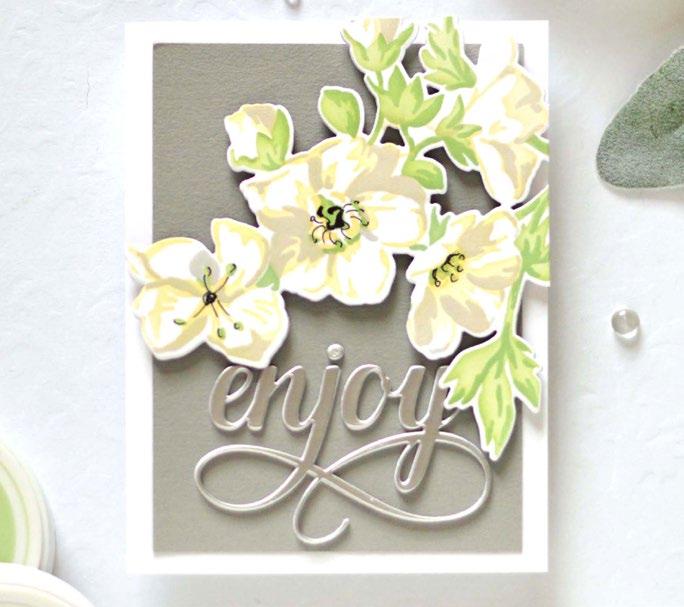
USE LOVELY EPHEMERA PACKS TO MAKE QUICK AND EASY CARDS
BY LAURIE WILLISON
INSTRUCTIONS
1. Create a 4 ¼” x 5 ½” card base from Classic Crest Solar White Cardstock.
2. Using the Wildflower Collection Paper & Ephemera Bundle, select coordinating elements for your card.
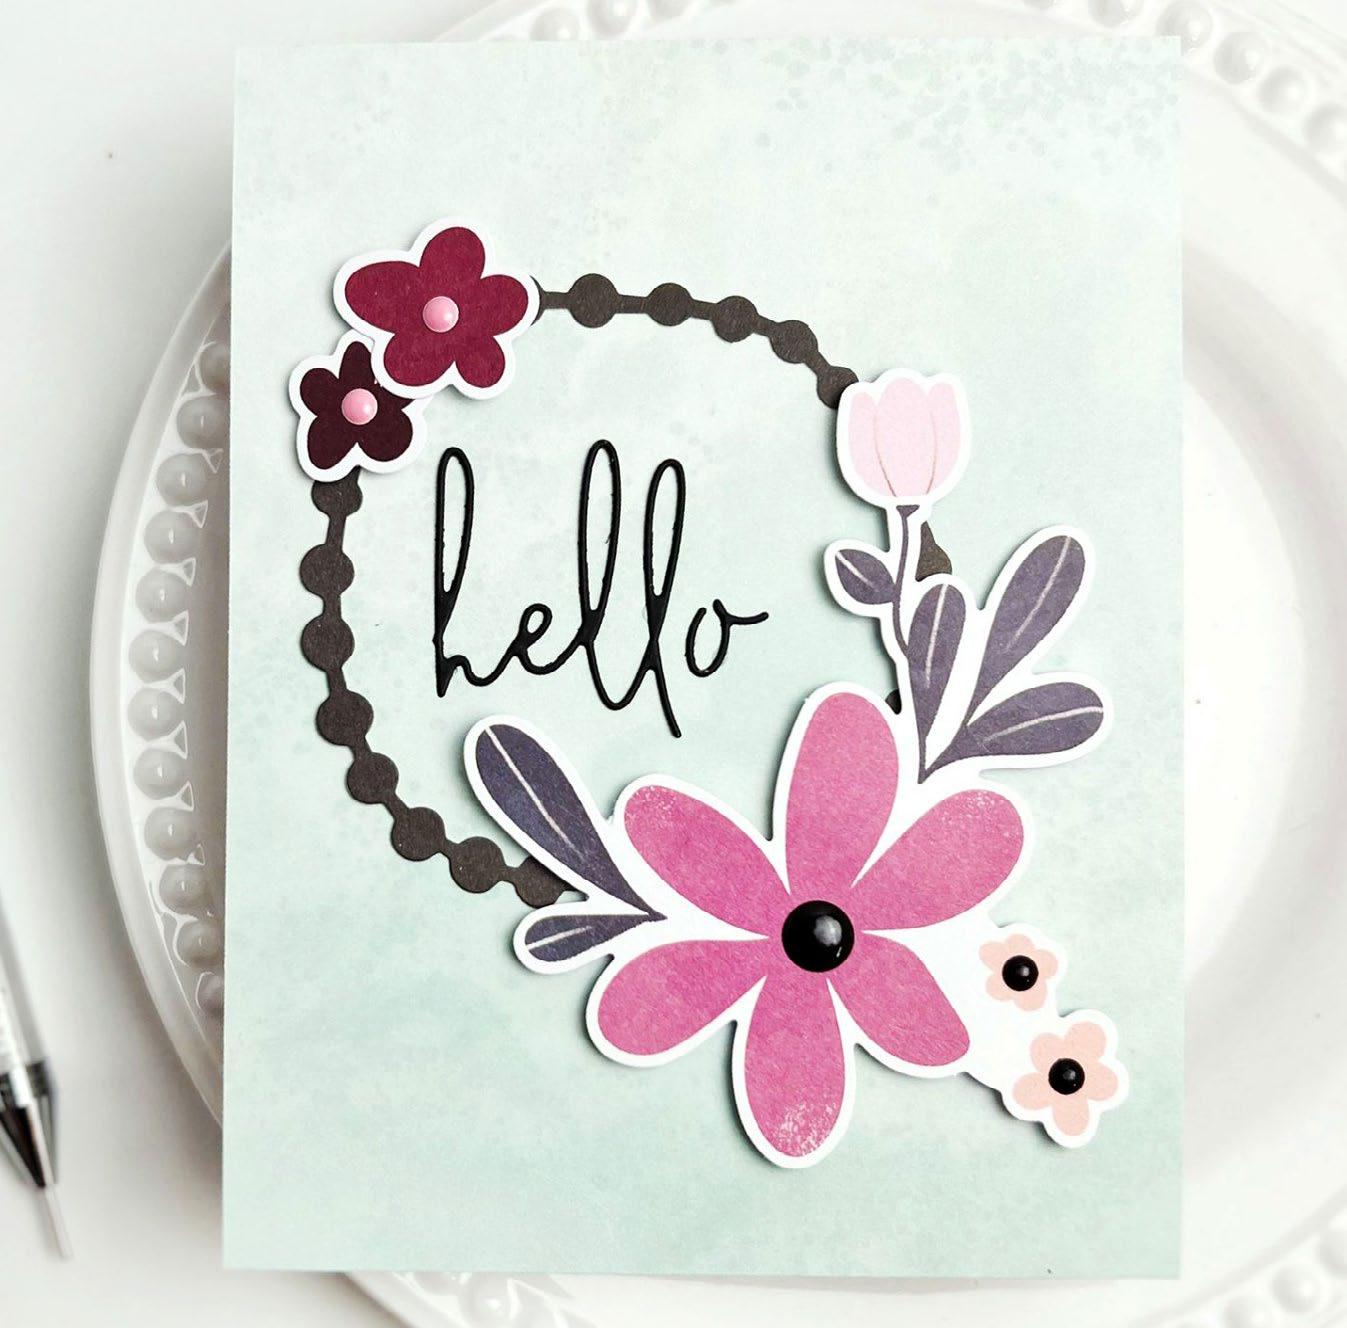
3. Lay out the chosen items on the card to ensure the simple layout works well.
4. Once satisfied with the arrangement, apply adhesive to the back of each element and attach them to the card base.
5. Use the Seasonal Blooms Dies to add the “hello” sentiment to the card.
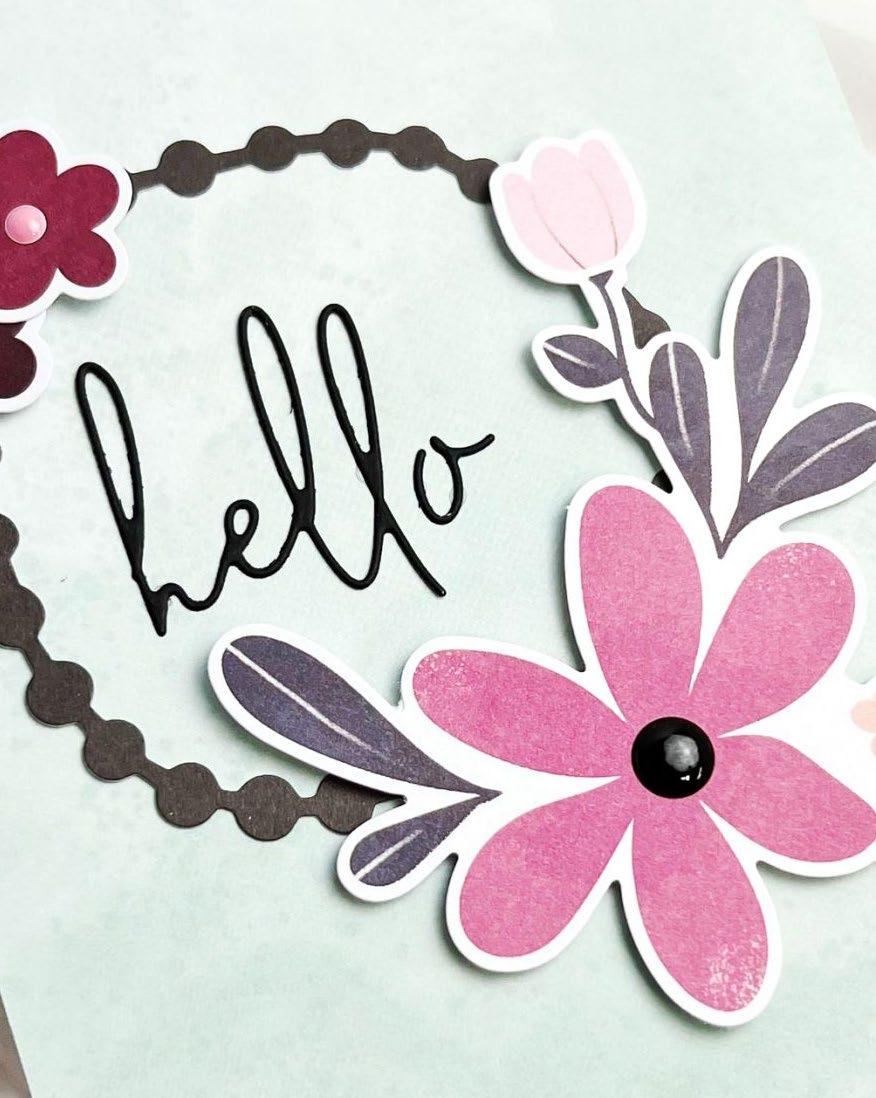
6. Add enamel dots from the Tea Party Set and the Black and White Set.
7. If desired, incorporate more details from the Altenew Ephemera Packs to further enhance the card.
SUPPLIES
Dies
Craft Your Life Project Kit: Seasonal Blooms Die Set
Paper Pack
Wildflower Collection Paper & Ephemera Bundle
Cardstock
Classic Crest Solar White Cardstock
Other
Tea Party Enamel Dots
Essential Black & White Enamel Dots
8. Complete the card by adding another sentiment from the Seasonal Blooms set.
SEE MORE ON OUR BLOG
04
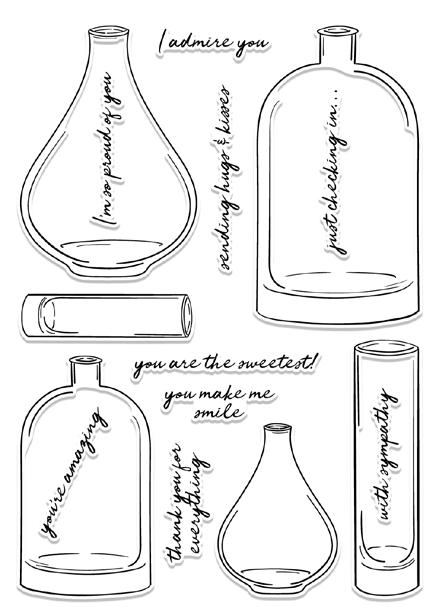
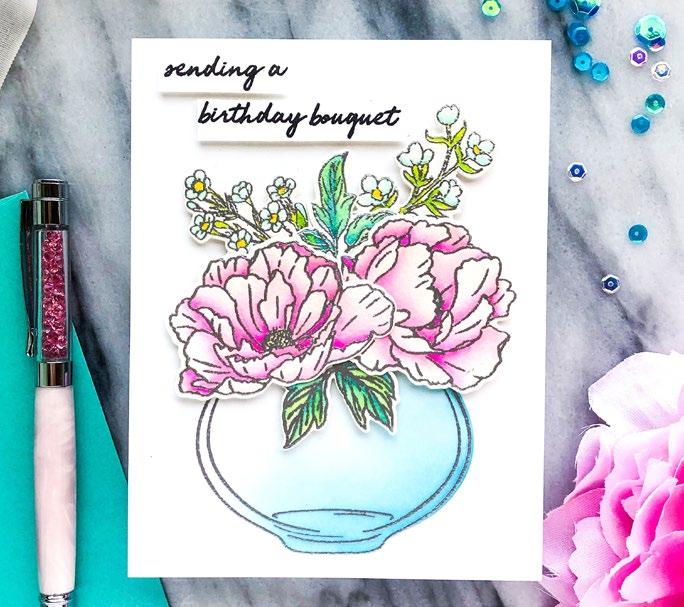
HOW TO CREATE FLOWERS IN A GLASS VASE (WITH REAL GLASS LOOK!)
BY JENNY COLACICCO
INSTRUCTIONS
1. Create two 4 ¼” x 5 ½” card bases from Classic Crest Solar White Cardstock.
2. Stamp a vase from the Versatile Vases 2 set using Permanent Black Ink.
3. Use the Versatile Vases 2 Mask Stencil Set to mask the outline of the vase, leaving only the inside edges of the vase visible.
4. Stamp the floral design from the BuildA-Garden: Nature’s Magic Stamp Set inside the edges of the vase using Permanent Black Ink.
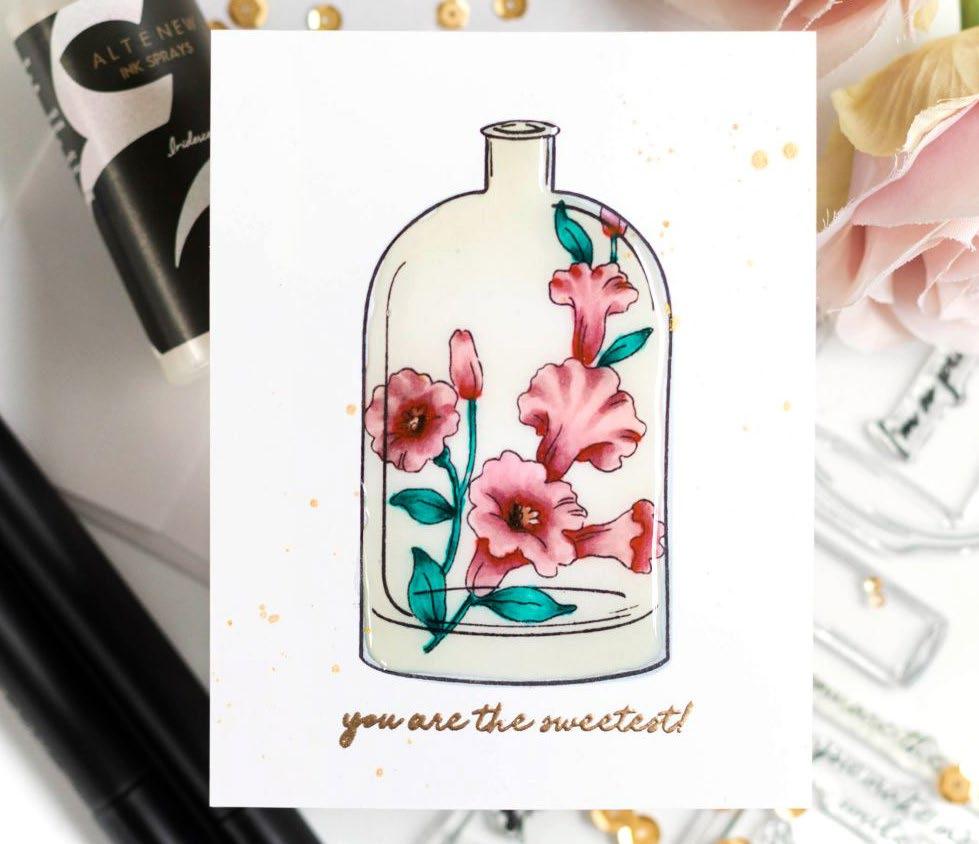
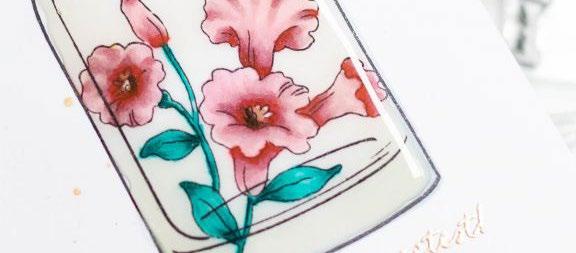
5. Color the stamped florals using Artist Markers (Set D - Rock Garden).
6. Place the masking stencil back on the vase to protect the florals.
SUPPLIES
Stamp, Dies, and Stencil
Build-A-Garden: Nature’s Magic
Versatile Vases 2
Inks
Permanent Black Ink
Polar Bear Crisp Dye Ink
Coloring Medium
Artist Alcohol Markers Set D - Rock Garden
Cardstock
Classic Crest Solar White Cardstock
Other
Iridescent Shimmer Ink Spray
Crystal Glaze
7. Blend pale Polar Bear Crisp Dye Ink from the sides of the vase to give it some definition.
8. Enhance the glassy look by adding some Iridescent Shimmer Ink Spray.
9. Heat emboss a sentiment from the Versatile Vases 2 bundle underneath the vase using Rose Gold Crisp Embossing Powder for an elegant touch.
10. Apply a glossy accent, like a crystal glaze, all over the vase to achieve a ‘faux glass’ look.
11. Allow the glaze to dry overnight for a real glass-like appearance.
12. Finally, spray some Antique Gold Metallic Ink Spray for a final touch of elegance and shine.
SEE MORE ON OUR BLOG
05
EASY MASKING AND TONE-ONTONE STAMPING TECHNIQUE
BY SVITLANA SHAYEVICH
INSTRUCTIONS
1. Create a 4 ¼” x 5 ½” card base from Classic Crest Solar White Cardstock.
2. Start by white embossing a flower from the Paint-A-Flower: Wood Anemone Outline Stamp Set in the middle of a yellow card panel.
3. To build a continuous cluster of flowers, use masking for the flowers on both sides of the middle one. Stamp each flower on both sides using Clear Embossing Ink and apply Pure White Embossing Powder.
4. Before heat setting the powder, brush off the powder from the overlapped areas to create the effect of “overlapped” images.
SUPPLIES
Stamp and Dies
Paint-A-Flower: Wood Anemone Outline
Stamp Set
One Go Birthday Greetings Stamp and Die Set
5. Heat set the embossed flowers to secure the design.
6. Use Woodless Coloring Pencils to add color to the heat-embossed flower elements. Apply pigment to the flowers and then use a slightly wet brush to wash out the colors.
Ink
Embossing Ink
Coloring Mediums
Woodless Coloring Pencils
Cardstock
Classic Crest Solar White Cardstock
Jet Black Cardstock
Other
Pure White Embossing Powder
Instant Dimension Foam Tape
Antique Gold Metallic Ink Spray
Artists’ Watercolor Brushes Bundle
7. After finishing the coloring, add Antique Gold Metallic Ink Spray onto the panel for a shimmering effect.
8. Tear the top and bottom edges of the yellow card panel to add some texture and interest.
9. Wrap an orange twine around the panel and tie a bow to accentuate it.
10. Use foam tape to mount the decorated yellow panel onto a white card base, providing an added dimension to the card.
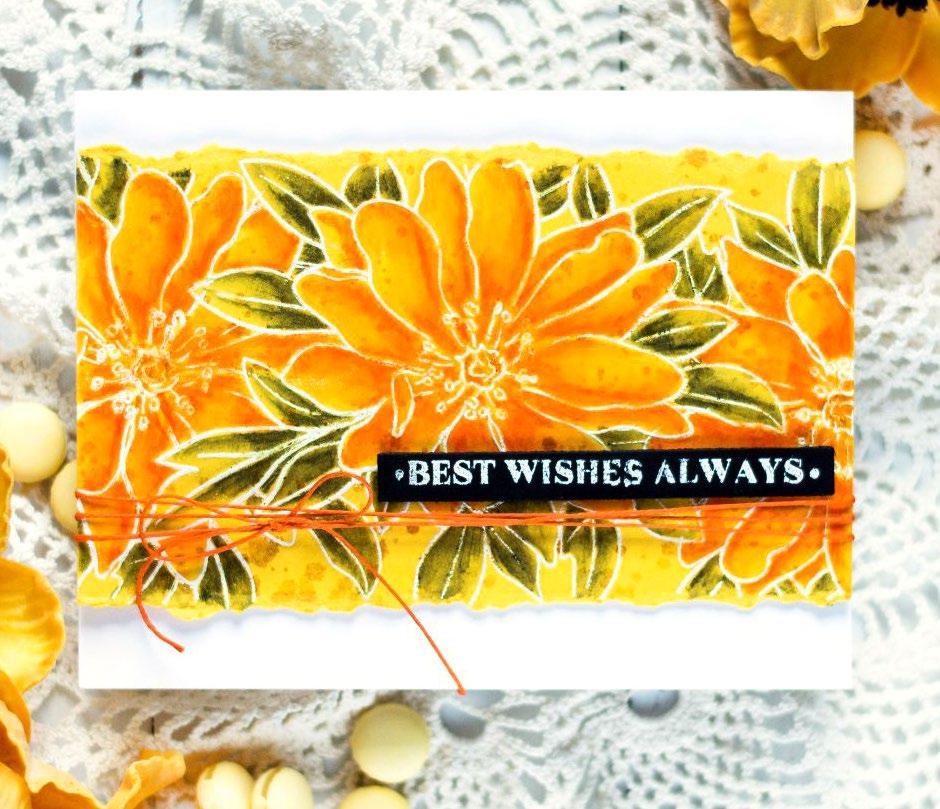
11. Use the One-Go Birthday Greetings Stamp and Die Bundle to make a strip of sentiments to choose from.
12. White emboss the sentiments from the bundle onto Jet Black Cardstock and choose one to put on the card.
SEE MORE ON OUR BLOG
06
QUICK AND EASY STAMP COLORING WITH STENCILS
BY MICHELLE SHORT
INSTRUCTIONS
1. Create a 4 ¼” x 5 ½” card base from Classic Crest Solar White Cardstock.
2. Start by stamping the beautiful Build-A-Garden: Daffodil Delight image onto a white card base using Permanent Black Ink.
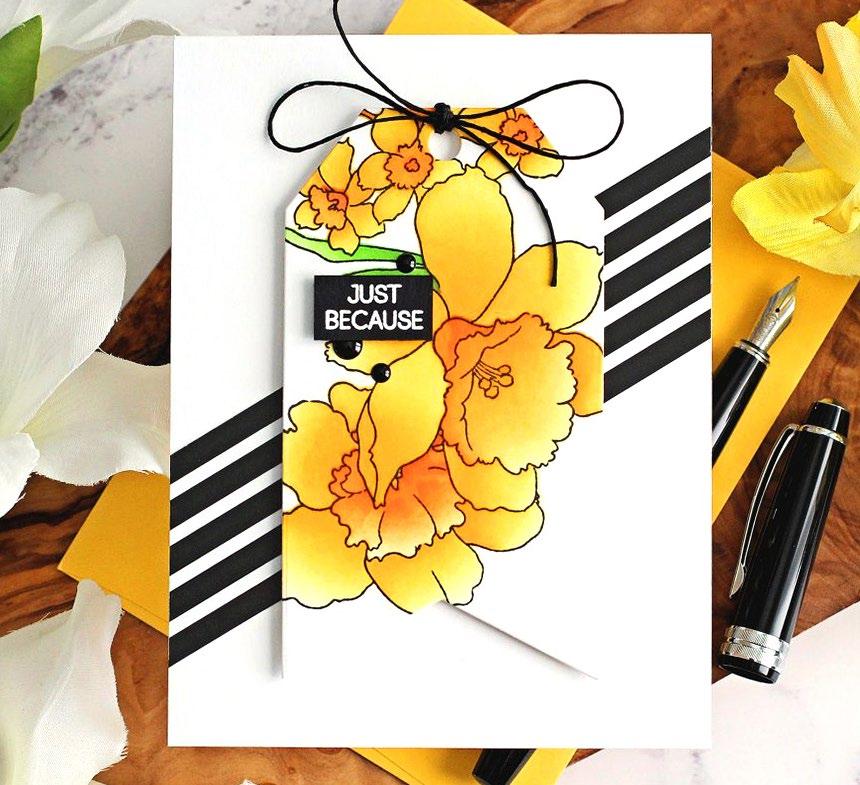
3. Take the Simple Coloring and Layering Stencils from the same set and place them one by one over the image, securing them with Satin Masking Tape.
4. Use a Small Ink Blending Tool and a Mini Blending Brush (included with the Build-A-Garden set) to add ink blending to the image with Golden Sunset Crisp Dye Inks.
5. Focus on the darkest colors in the center of the flowers to create dimension. Add a small amount of Grass Field Crisp Dye Ink for the leaf/ stem.
SUPPLIES
Stamp and Dies
Build-A-Garden: Daffodil Delight
Terrific Tag Die Set
Inks
Permanent Black Ink
Crisp Dye Inks: Grass Field, Golden Sunset
Embossing Ink
Cardstock and Paper
Classic Crest Solar White Cardstock
Jet Black Cardstock
Essential Black & White 6x6 Paper Pack
Other
Instant Dimension Foam Tape
Pure White Crisp Embossing Powder
Mini Blending Brush Set
Glue Tape
Satin Masking Tape
Crafter’s Essential Micro-Tip Tweezers
Essential Black & White Enamel Dots
6. Die cut the stamped image using a Terrific Tag Die to create the focal point.
7. Take the sentiment from BuildA-Garden: Daffodil Delight and stamp it onto black cardstock using Embossing Ink.
8. Apply Pure White Crisp Embossing Powder and heat set.
9. Cut the sentiment into a strip and attach it to the tag using foam tape.
10. Cut a sheet from the Essential Black & White 6 x 6 Paper Pad to create five black stripes.
11. Adhere the stripes to an A2 white card base using Glue Tape and trim the edges with a paper guillotine.
12. Tie black twine through the top of the tag.
13. Attach the tag to the card base using foam tape.
14. Add black enamel dots to finish off the card.
SEE MORE ON OUR BLOG
07
CARD IDEA FOR BUSY CRAFTERS
BY AGA MALYSZEK
INSTRUCTIONS
1. Create a 4 ¼” x 5 ½” card base from Classic Crest Solar White Cardstock.
2. Die cut two copies of the Antique Blossoms Die out of Forest Glades Cardstock.
3. Trim and adhere the die-cuts to the card base.
4. Add black ink splatters to the background for more interest.
5. Die cut Fancy Enjoy Die out of Jet Black Cardstock.
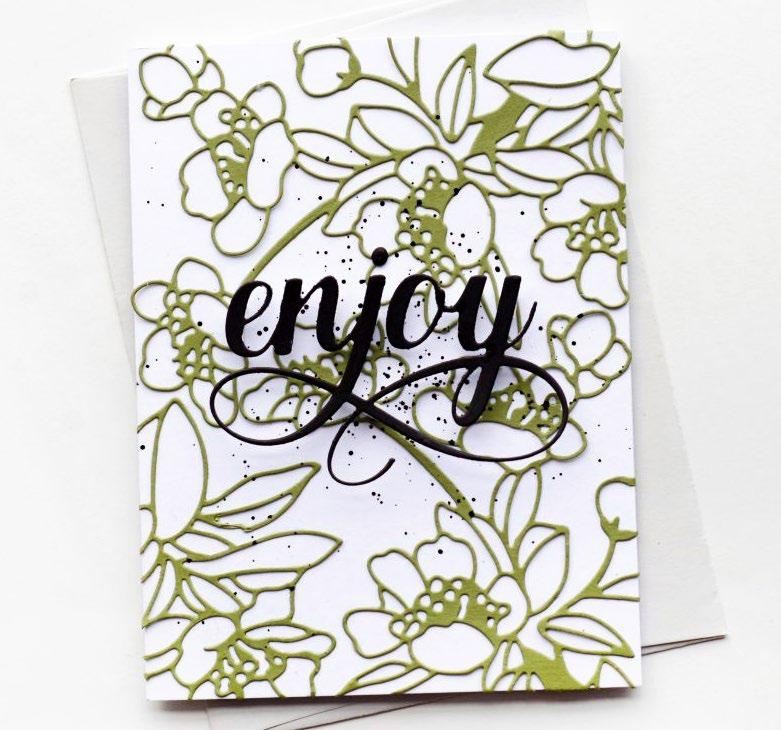

6. Adhere the sentiment to the card with foam tape for some dimension.
SUPPLIES
Dies
Antique Blossoms Die
Fancy Enjoy Die
Cardstock
Classic Crest Solar White Cardstock
Forest Glades Cardstock
Jet Black Cardstock
Other
Jet Black Ink Spray
Instant Dimension Foam Tape
SEE MORE ON OUR BLOG EASY YET STUNNING 10-MINUTE
08
FUN COLORING WITH STENCILS AND WATER-BASED MARKERS
BY JENNY COLACICCO
INSTRUCTIONS
1. Create a 4 ¼” x 5 ½” card base from the Altenew Watercolor Paper Set.
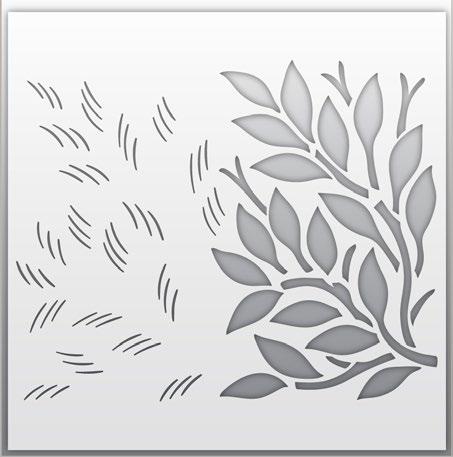
2. Prepare the coloring materials, including the Hawaiian Shores Brush & Fine Tip Pens and the Foliage Stencil.
3. Place the stencil over the card base at an angle, and secure it in place with Satin Masking Tape.
4. Begin with the lightest marker color (Firefly) and use the brush tip end of the pen to outline each of the leaves in the stencil.
5. Use a size 2 Detailed Watercolor Brush (damp, not soaking) to pull the color from the outlines into the middle of each leaf.
6. Repeat this process for each leaf and branch, using the Honey Drizzle marker for the branches.
7. Once the initial outlining is done, use the second green shade from the same market set (Just Green) to add more color to the base of each leaf.
SUPPLIES
Stamps
Say It with Love Stamp Set
Stencil
Foliage Stencil
Ink
Embossing Ink
Coloring Medium
Hawaiian Shores Dual Tip Pens
Cardstock and Paper
Classic Crest Solar White Cardstock
Watercolor Paper Set (A2 loose sheets)
Other
Satin Masking Tape
Satin Gold Sequins
Crafter’s Essential Micro-Tip Tweezers
Instant Dimension Foam Tape
Fine Watercolor Brushes
8. Apply a few strokes of the Just Green marker freehand, then use the damp brush to pull the color out and blend it with the previous layers.
9. To create stems and join the leaves to the branches, add a touch of the third darkest green color (Evergreen) to the base of each leaf and blend it out.
10. Place the Foliage Stencil over the leaves again, this time with the detailed area of the stencil.
11. Use the fine tip of the Firefly pen to add lines and finer details to enhance the foliage’s appearance.
12. For an artsy look, add splatters by scribbling the pen onto a craft mat, picking up the color with a wet brush, and splattering it onto the card.
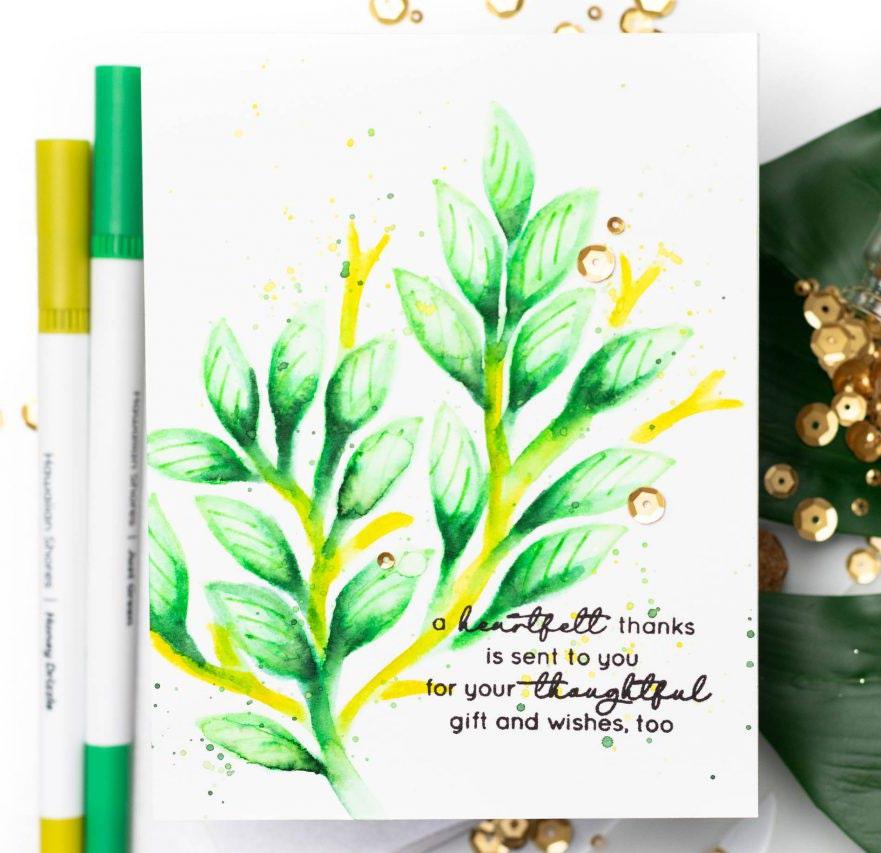
13. Once the watercolor is dry, stamp a sentiment from the Say It with Love Stamp Set using Obsidian Pigment Ink.
14. Add a touch of subtle sparkle with Satin Gold Sequins as embellishments.
SEE MORE ON OUR BLOG
09
FEATURED PRODUCTS

BUILD-A-GARDEN: DAFFODIL DELIGHT
BUILD-A-GARDEN: NATURE’S MAGIC
CRAFT YOUR LIFE PROJECT KIT: SEASONAL

ONE GO BIRTHDAY GREETINGS


PAINT-A-FLOWER: WOOD
SAY IT WITH LOVE

Note: Gray SKU represents coordinating die set.

ALT7211BN RETAIL $35.00 ALT7211-DIE RETAIL $22.99
ALT7102BN RETAIL $$35.00
ALT6243 RETAIL $59.99
BLOOMS
ALT7229 RETAIL $15.99 ALT7230 RETAIL $14.99
ANEMONE ALT7219 RETAIL $15.99
ALT4215 RETAIL $23.99
VASES 2 ALT4764 RETAIL $23.99 ALT4765 RETAIL $21.00 ANTIQUE BLOSSOMS DIE ALT7015 RETAIL $19.99
ENJOY DIE ALT7135 RETAIL $9.99 TERRIFIC TAG DIE SET ALT4221 RETAIL $29.99 FINE TULLE STENCIL ALT6132 RETAIL $6.99 FOLIAGE STENCIL ALT3461 RETAIL $6.99
VERSATILE
FANCY
MORE DESIGN INSPIRATION


STAY CONNECTED Download our FREE mobile app! altenew.com blog.altenew.com facebook.com/altenew instagram.com/altenewllc pinterest.com/altenew youtube.com/altenew tiktok.com/@altenew support@altenew.com (800) 593-1089
