


CREATE & INSPIRE EDITION 82 7 Easy Techniques for Breathtaking Designs! Get More Use Out of Your Crafty Products With These Tips!


CONTENTS 03 05 07 09 04 06 08 A Beautiful Floral Stencil Card With Impressionist Art Style How to Do the Eclipse Technique for Your Cards How to Color Glitter Cardstock With Alcohol Inks How to Stretch Your Hot Foil Plates Using Stencils for Quick and Bold Backgrounds How to Use Alcohol Markers on Colored Cardstock Merry Winter Card With Holiday Typography
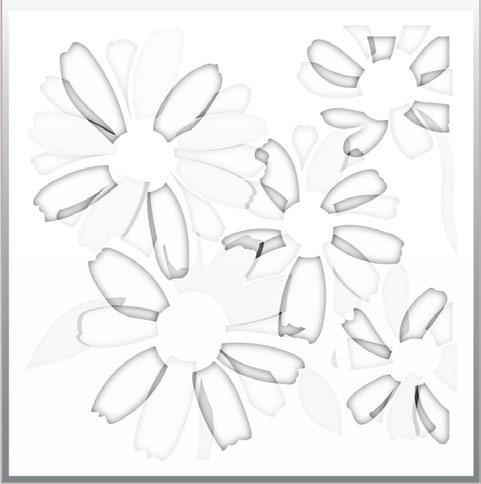
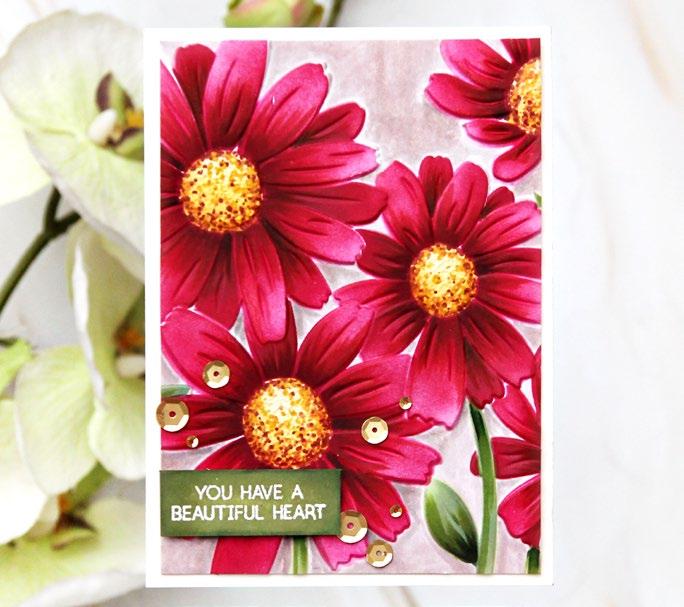
BOLD BACKGROUNDS
BY LAURIE WILLISON
INSTRUCTIONS
1. Create a 4 ¼” x 5 ½” card base from Classic Crest Solar White Cardstock.
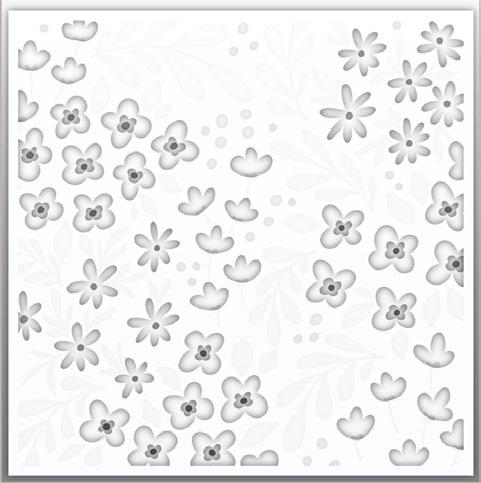
2. On a panel, place the Daisies Stencil Set. Choose Sunray and Chamomile Inks to add color to the stencil layers.
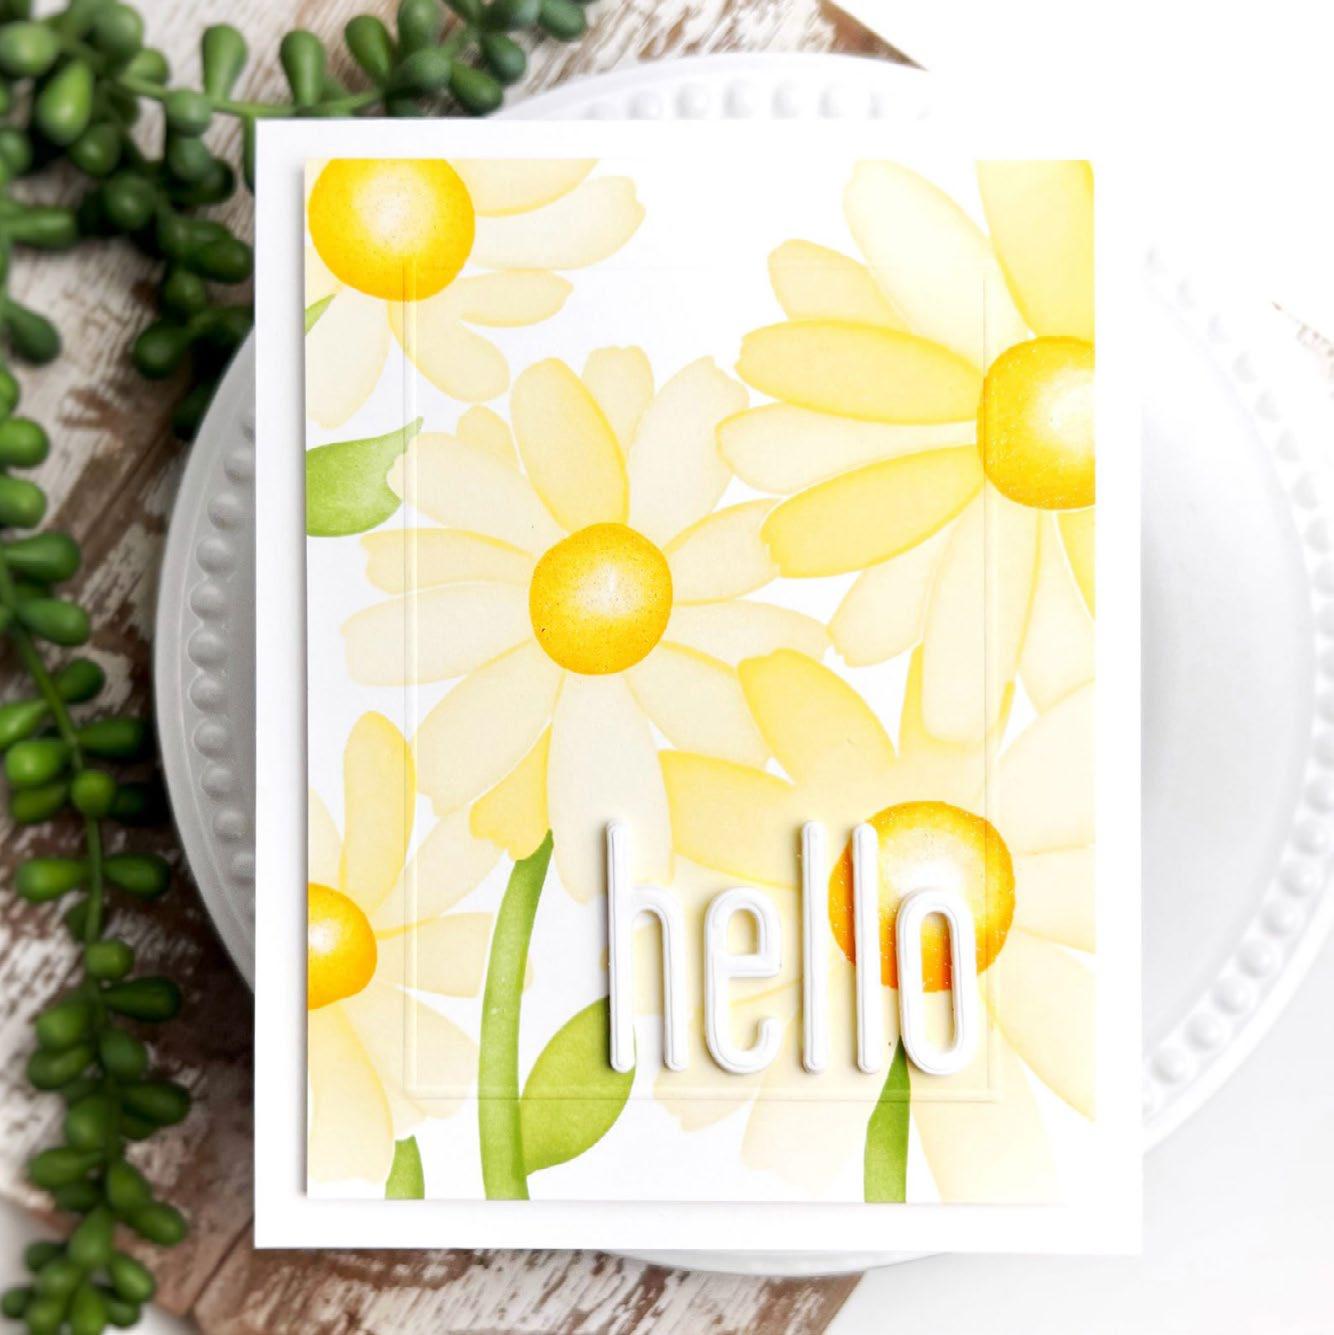
3. Add shading or details, if desired, using alcohol markers.
4. Decide whether to keep the daisies as a one-layer card or add dimension with the coordinating 3D embossing folder.
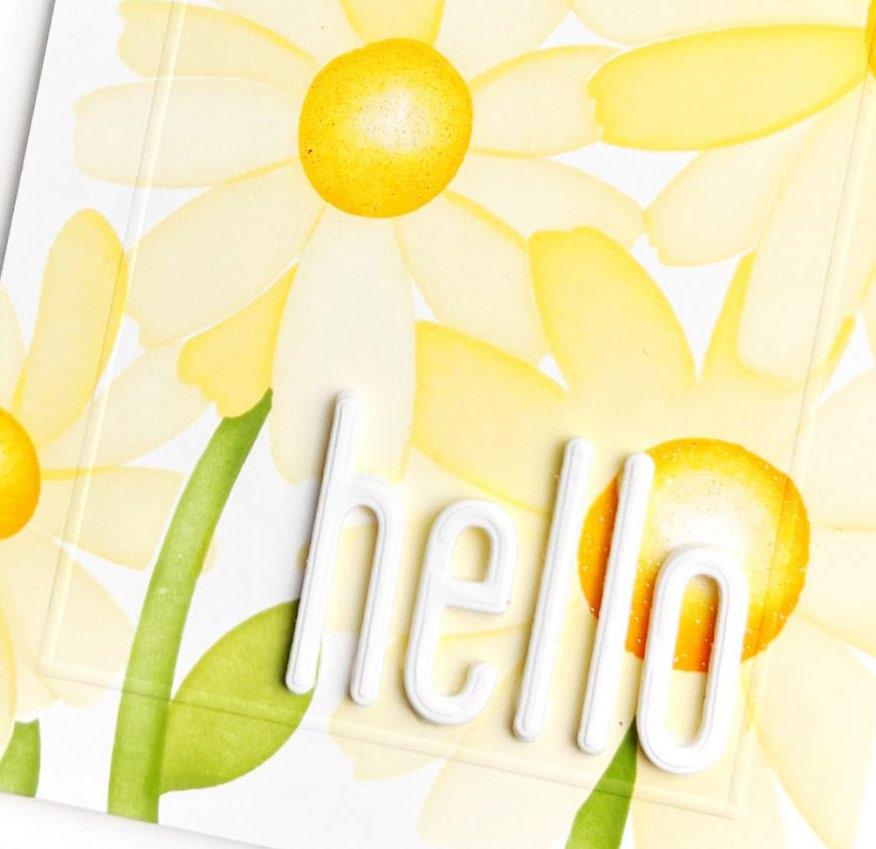
5. Trim the card front by 1/2” for a smaller panel.
6. Score a 1/2” frame inside the card front for texture.
7. Attach the card panel to the card base using foam tape.
SUPPLIES
Stencil and 3D Embossing Folder Set
Daisies Stencil Set & Embossing
Folder
Dies
Tall Alpha Lowercase Die Set

Cardstock
Classic Crest Solar White Cardstock
8. Die cut the sentiment from white cardstock using the Tall Alpha Lowercase Die Set.
9. Die cut another sentiment copy from fun foam.
10. Adhere both sentiment layers together using the 2-in-1 Precision Glue Pen.
Ink
Crisp Dye Ink: Sunray, Chamomile
Other 2-in-1 Precision Glue Pen
SEE MORE ON OUR BLOG USING STENCILS FOR QUICK AND
03
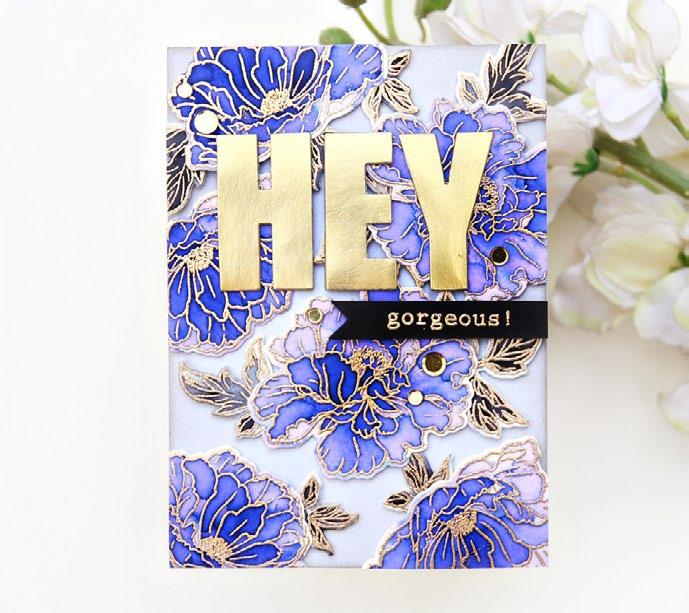
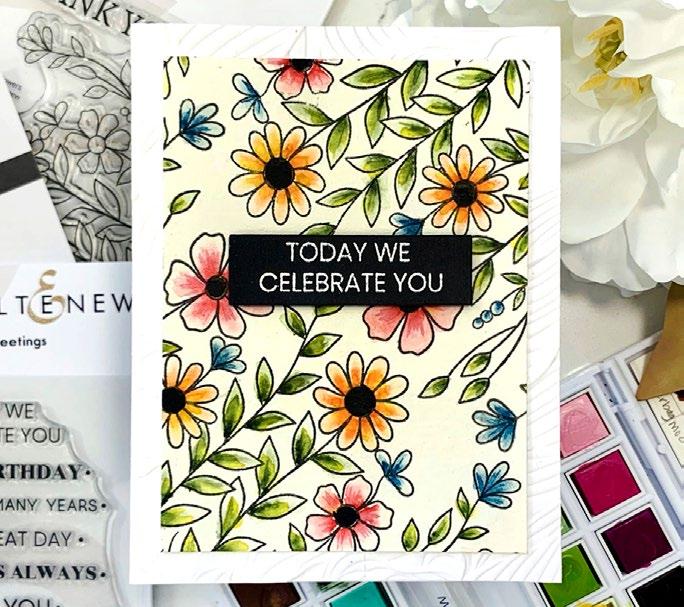
WITH IMPRESSIONIST ART STYLE
BY JENNY COLACICCO
INSTRUCTIONS
1. Create a 4 ¼” x 5 ½” card base from Classic Crest Solar White Cardstock.
2. Begin by selecting the largest bloom on the Impressionist Bouquet Layering Stencil Set.
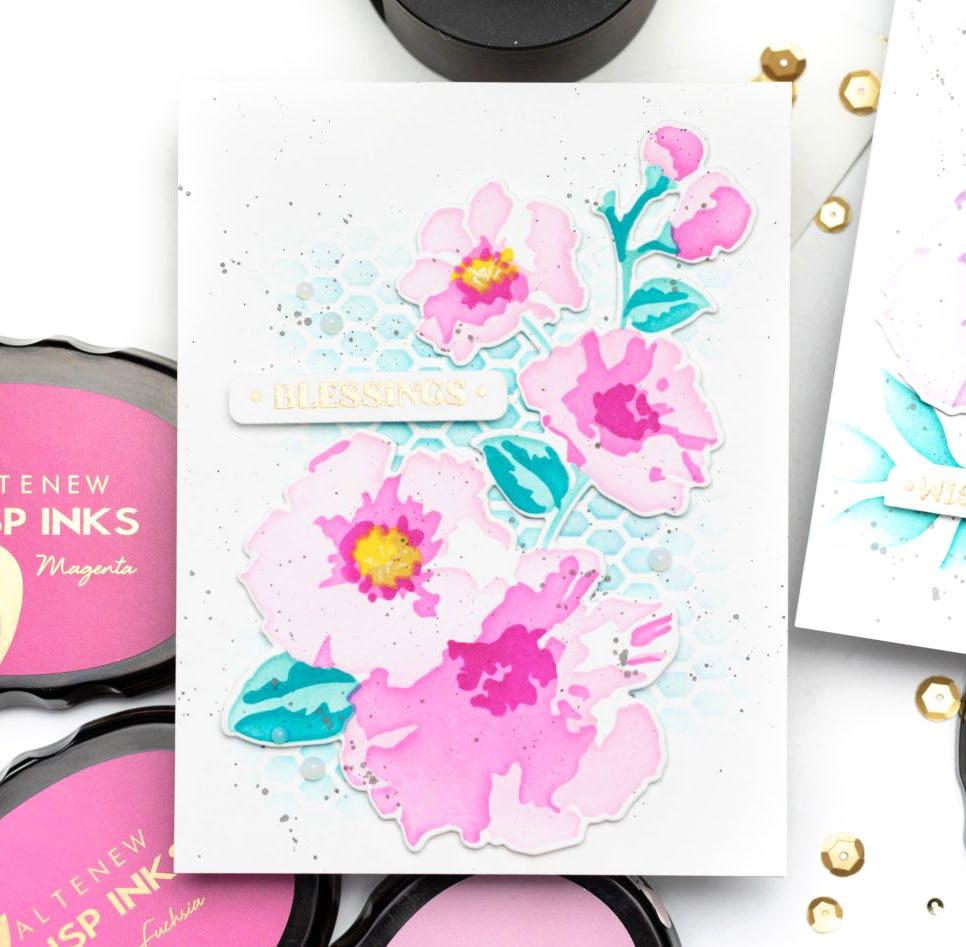
3. To ensure proper alignment during the inking process, create a half panel of Solar White Cardstock and cut out the shape of the bloom.
4. Place the die-cut shape back into the negative space of the cardstock and secure it on your Crafter’s Mat using Glue Tape on the back. This will prevent any movement during stenciling.
5. Overlay each layer of the stencil in sequence, following both the guide on the back of the stencil set packaging and the outlines etched into the stencil itself.
6. For the floral layers, use Crisp Dye Inks in the following colors: Baby Pink, Fuchsia, Magenta for the petals; Teal Cave and Aqualicious for the leaves; Honey Drizzle and Hazelnut for the floral centers.
SUPPLIES
Stencil Set
Impressionist Bouquet Layering Stencil Set (3 in 1)
Fine Tulle Stencil
Stamp and Die Set
One-Go Birthday Stamp & Die Set
Inks
Crisp Dye Ink: Baby Pink, Fuchsia, Magenta, Teal Cave, Aqualicious Honey Drizzle, Hazelnut
Cardstock
Classic Crest Solar White Cardstock
Other
Instant Dimension Foam Tape
Jet Black Ink Spray
Rose Gold Crisp Embossing Powder
Crafter’s Essential Stamping Mat
Glue Tape
7. On the card base, use the Fine Tulle Stencil as the card’s background. Apply Aqualicious ink through the stencil, creating a swirling pattern that fades out towards the edges.
8. Once the background is stenciled, overlay the Impressionist Bouquet diecuts on the background.
9. Stamp and heat emboss a sentiment using the One-Go Birthday Stamp & Die Set.
10. Heat emboss the sentiment using Rose Gold Crisp Embossing Powder
11. Attach the bouquet with Instant Dimension Foam Tape to add depth and dimension.
12. Use a paintbrush and Jet Black Ink Spray to add a few splatters.
13. For a final touch, embellish with a few clear drops strategically placed for a subtle yet charming effect.
SEE MORE ON OUR BLOG
A BEAUTIFUL FLORAL STENCIL CARD
04
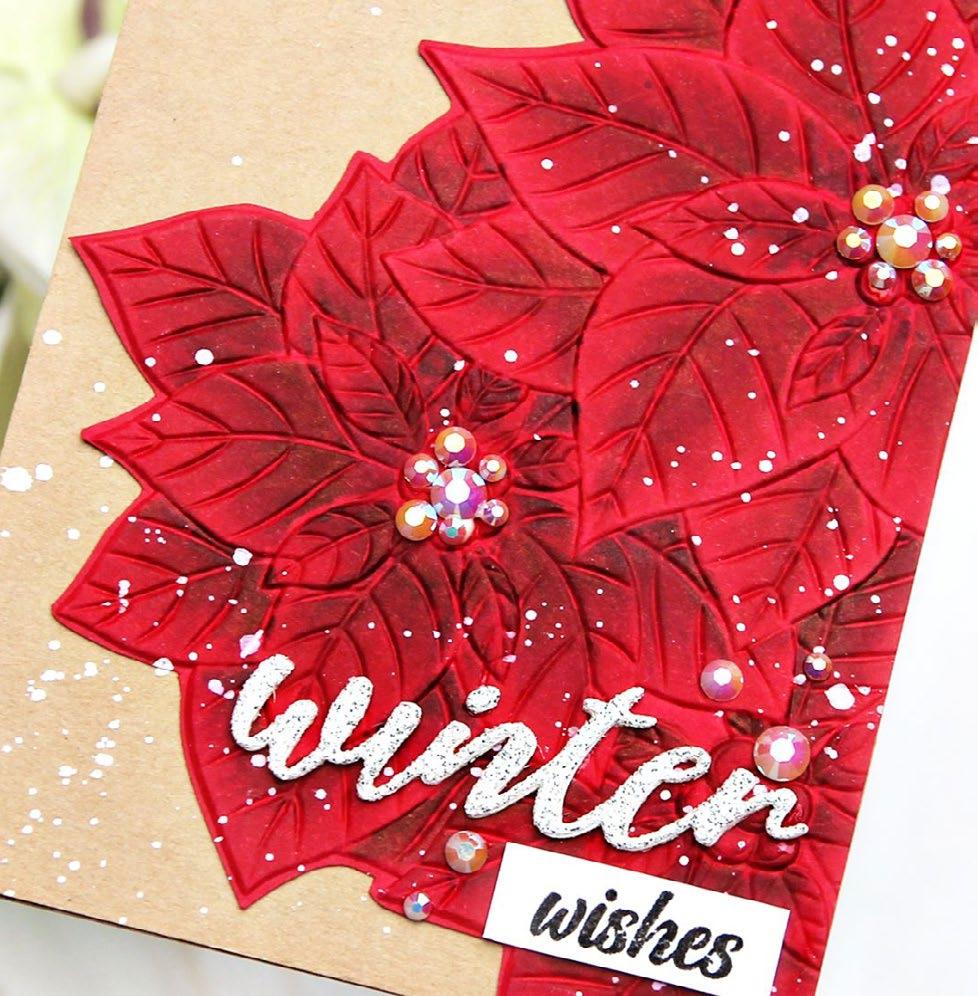
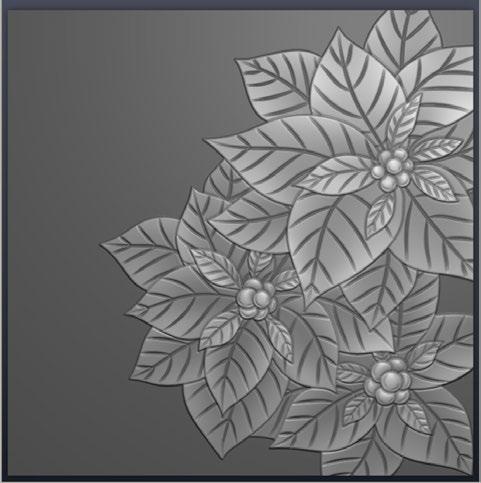
HOW TO USE ALCOHOL MARKERS ON COLORED CARDSTOCK
BY ERUM TASNEEM
INSTRUCTIONS
1. Emboss a red cardstock panel using the Poinsettia Cluster 3D Embossing Folder.
2. Color the poinsettias using the shades Grapevine, Vineyard Berry, Velvet, Ruby Red, Heart Beat, and Coral Bliss.
3. If any of the dimensions were lost during coloring, place the cut piece back in the embossing folder and emboss it again to restore the texture and depth.
4. Use scissors to carefully cut around the embossed flowers.
5. Adhere the embossed and colored piece onto a Kraft cardstock base measuring 4 ¼” x 5 ½” and trim off the excess overhang.
SUPPLIES
Embossing Folder
Poinsettia Cluster 3D Embossing Folder
Stamp and Die Set
Winter Typography Stamp & Die Set
6. Apply white splatters onto the card using Pure White Ink Spray.
7. Die cut the word “Winter” from the Winter Typography Die Set out of Dazzling Diamond Glitter Cardstock.

Ink
Obsidian Pigment Ink
Coloring Medium
Artist Alcohol Markers Red Sunset Set
Artist Alcohol Markers Red Cosmos Set
Island Garden Artist Alcohol Markers Set
Cardstock
Glitter Cardstock Set- Dazzling Diamond
Kraft Cardstock
Other
Pure White Ink Spray
Gems
8. Mask and stamp the word “wishes” in Obsidian Pigment Ink from the Winter Typography Stamp Set.
9. Adhere gems to flower centers.
SEE MORE ON OUR BLOG
05
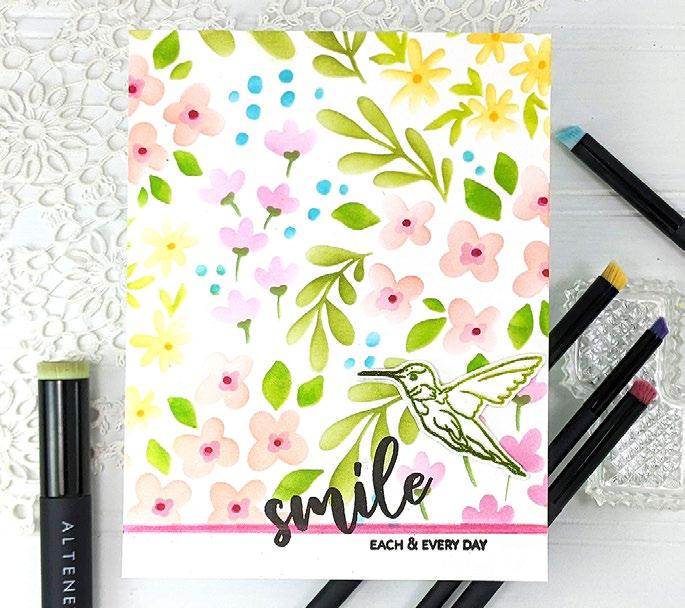
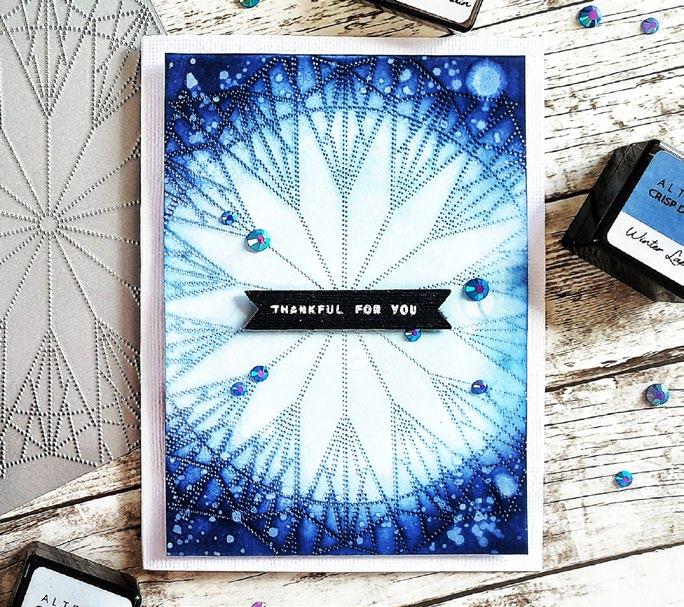
HOW TO DO THE ECLIPSE TECHNIQUE FOR YOUR CARDS
BY TERRI KOSZLER
INSTRUCTIONS
1. Create a 4 ¼” x 5 ½” card base from Classic Crest Solar White Cardstock.
2. Begin by stenciling the pattern from Blooming Flower Bed Stencil Set on a panel, similar to the process used for the first card.
3. Use Raw Amber, Green Opal, Red Jasper, and Rhodolite Crisp Dye Ink colors.
4. Cut the stenciled panel to measure 2.75″ by 5.5″.
5. Use the Caps Bold Alphabet Dies to spell out the word “Hugs” on the stenciled panel.
6. Run the panel through a die cutting machine, capturing all the letter pieces as they are cut out.
SUPPLIES
Stencil Set
Blooming Flower Bed Stencil Set (3 in 1)
Die Set
Sweet Sentiments Die Set
Caps Bold Alphabet Die Set Inks
Crisp Dye Ink: Raw Amber, Green Opal, Red Jasper, Rhodolite Cardstock
Classic Crest Solar White Cardstock
Gold Foil & Gold Mirror Paper Bundle
Other
Instant Dimension Foam Tape
7. Cut the letters “Hugs” two more times from white cardstock.
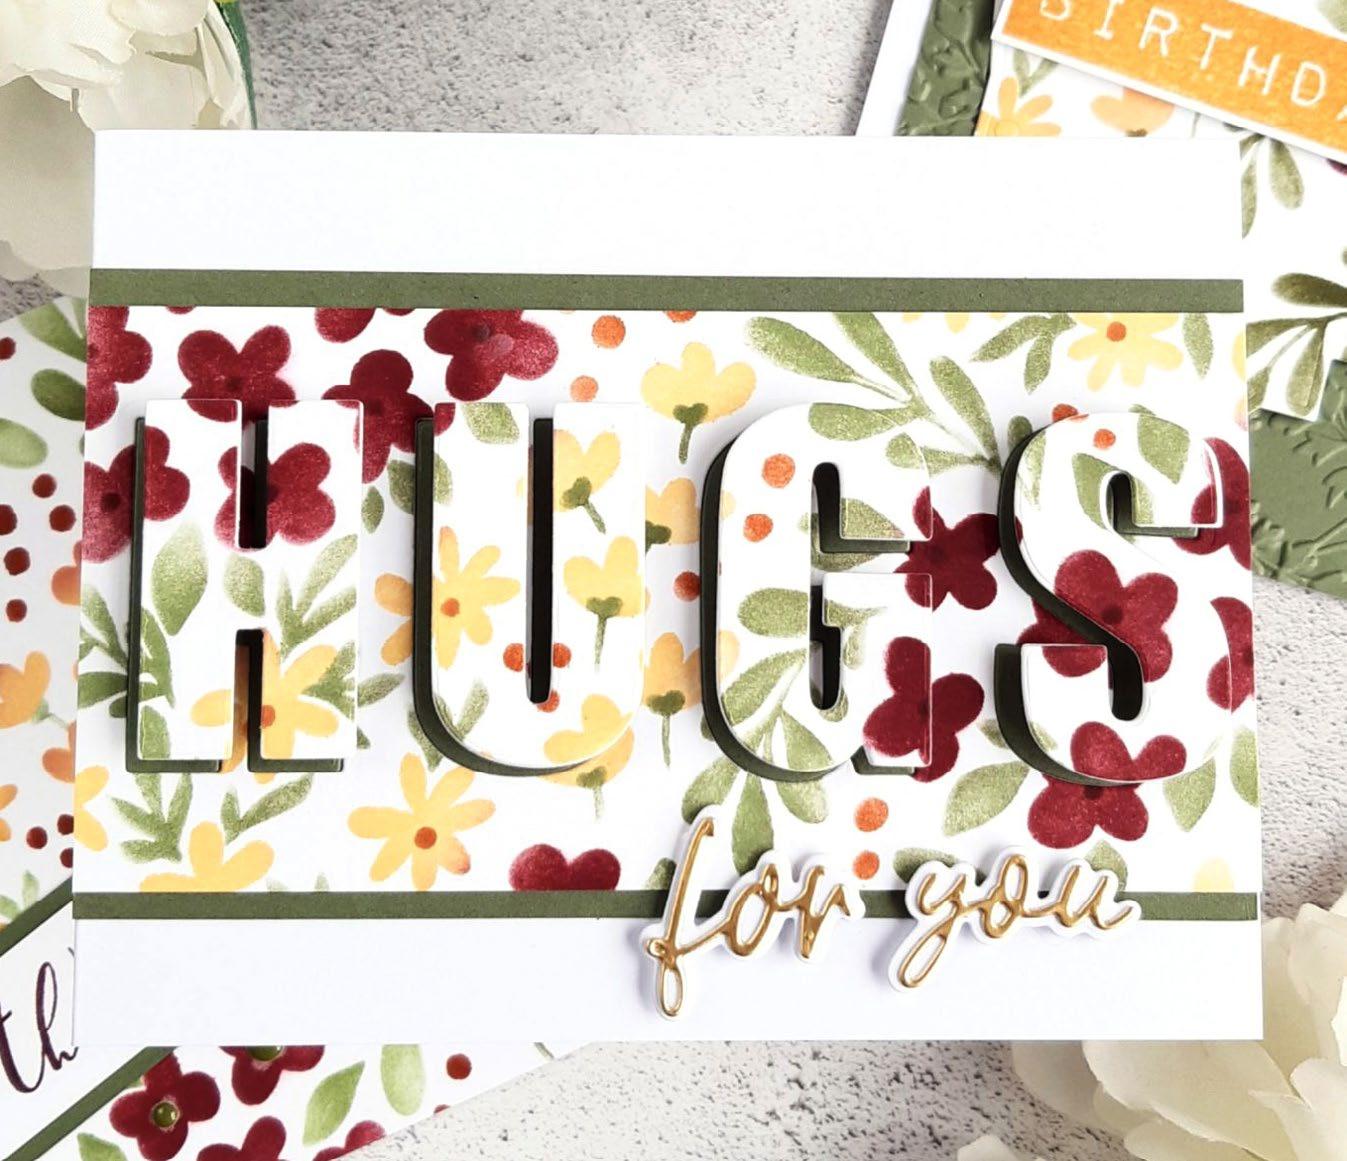
8. Layer and adhere the multiple white cardstock letters together to create thick faux veneer-style letters.
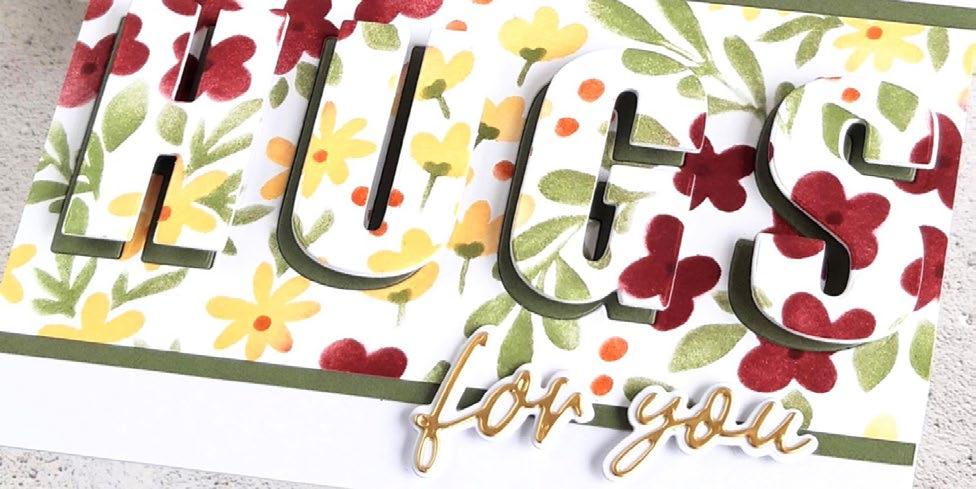
9. Raise and place the assembled letters back onto the stenciled panel, completing the eclipse technique.
10. Attach the stenciled background to a piece of Forest Glades Cardstock, and secure it to an A2 notecard.
11. Position the letters on the card using foam tape.
12. For the sub-sentiment, use the Sweet Sentiments Die Set.
SEE MORE ON OUR BLOG
06
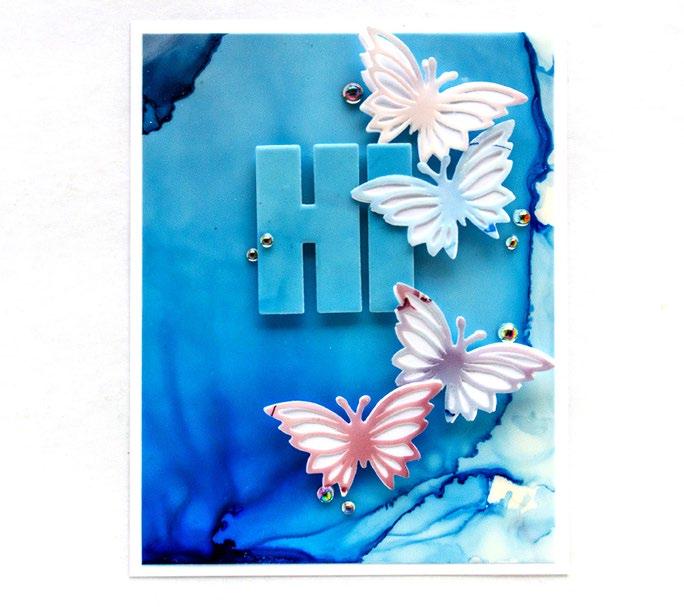
HOW TO COLOR GLITTER CARDSTOCK WITH ALCOHOL INKS
 BY LYDIA EVANS
INSTRUCTIONS
1. Create a 4 ¼” x 5 ½” card base from Classic Crest Solar White Cardstock.
2. Begin with a piece of Dazzling Diamond Glitter Cardstock.
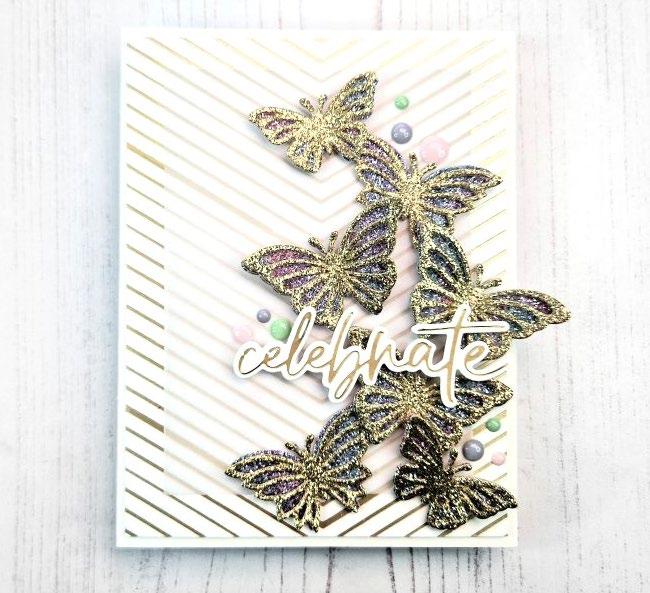
3. Use Wisteria, Dew Drops, and Pink Diamond Alcohol Inks to alter the color of the cardstock. Feel free to choose your preferred colors.
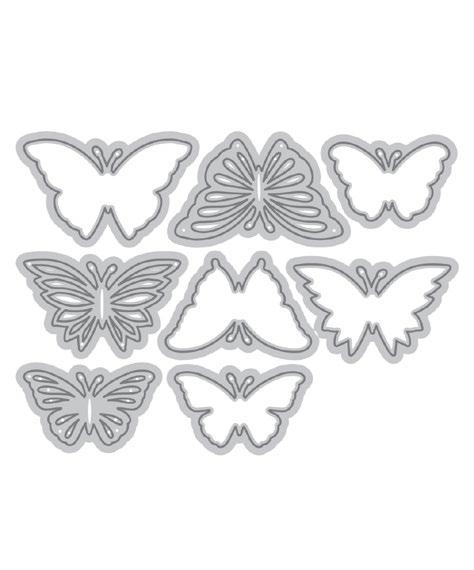
4. Allow the cardstock to dry partially before proceeding to cut out solid butterfly layers using the Mix & Match Mariposa Die Set.
5. Use Brushed Gold Glitter Cardstock for the detailed butterfly layers. Assemble the layers together with strong adhesive.
SUPPLIES
Dies and Hot Foil Plates
Mix & Match Mariposa Die Set
Sweet Sentiments Hot Foil Plate & Die Set
Alcohol Inks
Alcohol Inks: Wisteria, Dew Drops, Pink
Diamond
Cardstock and Paper
Classic Crest Solar White Cardstock
Glitter Cardstock Set - Dazzling Diamond
Glitter Cardstock Set - Gilded
Vellum Translucent Paper (25 sheets/set)
Other
Instant Dimension Foam Tape
Ultra Sticky Double Sided Tape (¼ x 50m)
Brass Hot Foil Roll
6. Create the background using the Chevron Background Hot Foil Plate, and apply Brass Hot Foil for foiling.
7. Use the “Celebrate” sentiment from the Sweet Sentiments Hot Foil Plate and foil it using the Brass Hot Foil.
8. Add a piece of vellum over the foiled background to slightly soften it before attaching the butterfly elements and sentiment.
9. To introduce more interest and color, use enamel dots as finishing touches.
SEE MORE ON OUR BLOG
07
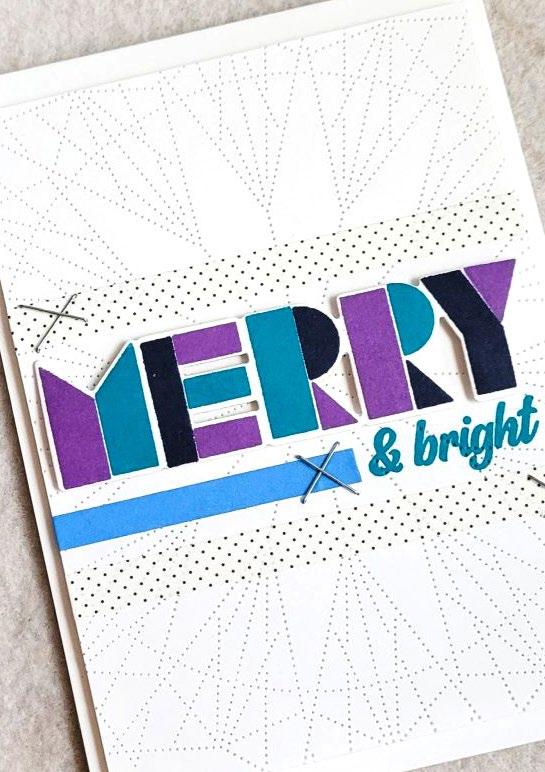
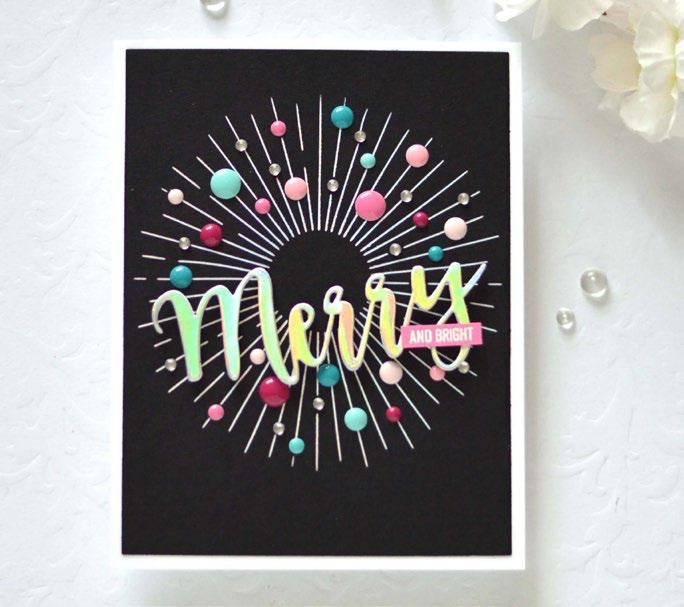
WINTER CARD WITH HOLIDAY TYPOGRAPHY
 BY TENIA NELSON
INSTRUCTIONS
1. Create a 4 ¼” x 5 ½” card base from Classic Crest Solar White Cardstock.
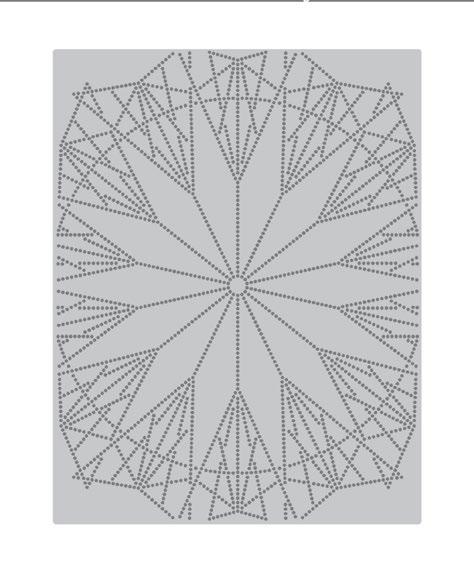
2. Emboss a card panel using Dotted Lines Debossing Cover Die.
3. On the image panel, stamp “& bright” sentiment from the Winter Typography Complete Bundle.
4. Attach Delicate Polka Dots Washi Tape, Lapis Lazuli Slim Washi Tape, and add staples.
5. Stamp the “Merry” sentiment using Deep Iris, Arctic Mountain, and Teal Cave Inks.
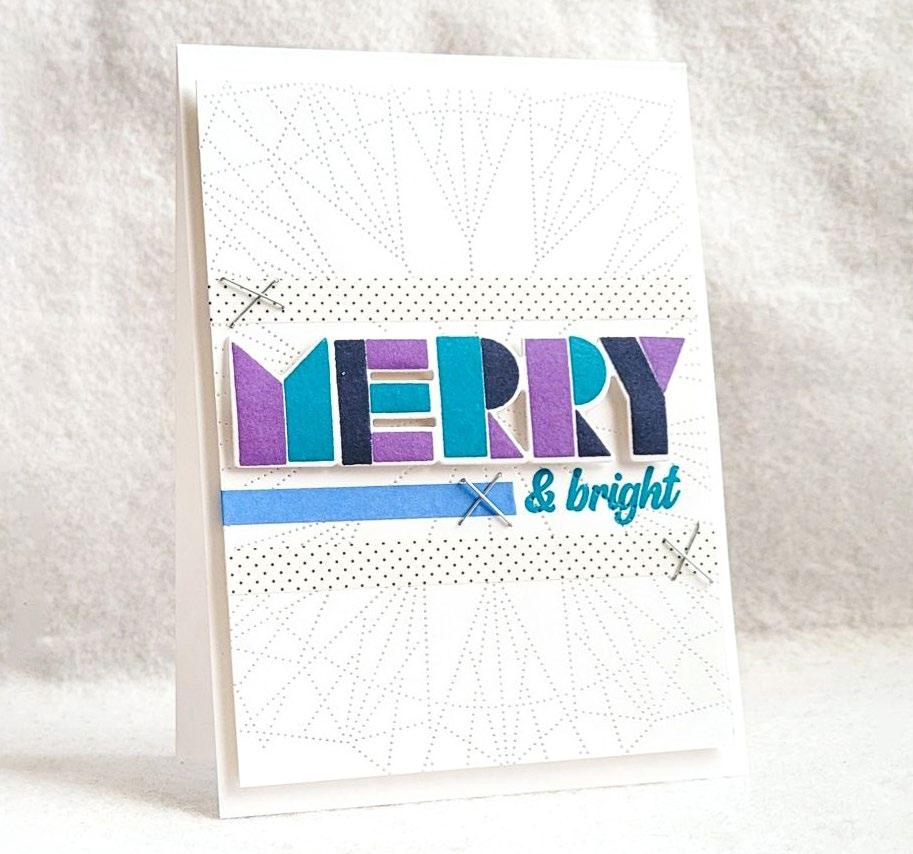
6. Die cut the “Merry” sentiment and adhere to the image panel using foam tape.
7. Adhere the image panel onto the card base.
SUPPLIES
Stamps and Dies
Winter Typography Complete Bundle
Dotted Lines Debossing Cover Die Inks
Crisp Dye Ink: Deep Iris, Arctic Mountain, Teal Cave
Cardstock
Classic Crest Solar White Cardstock
Other
Delicate Polka Dots Washi Tape
Lapis Lazuli Slim Washi Tape
Instant Dimension Foam Tape
SEE MORE ON OUR BLOG MERRY
08
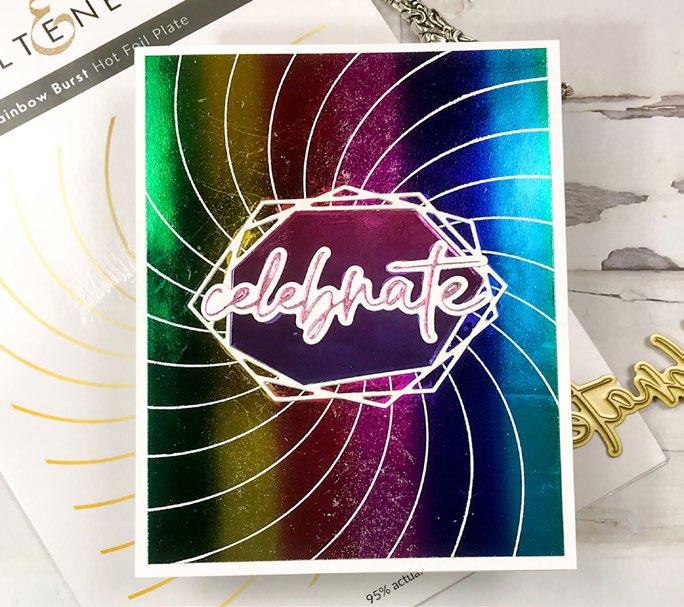
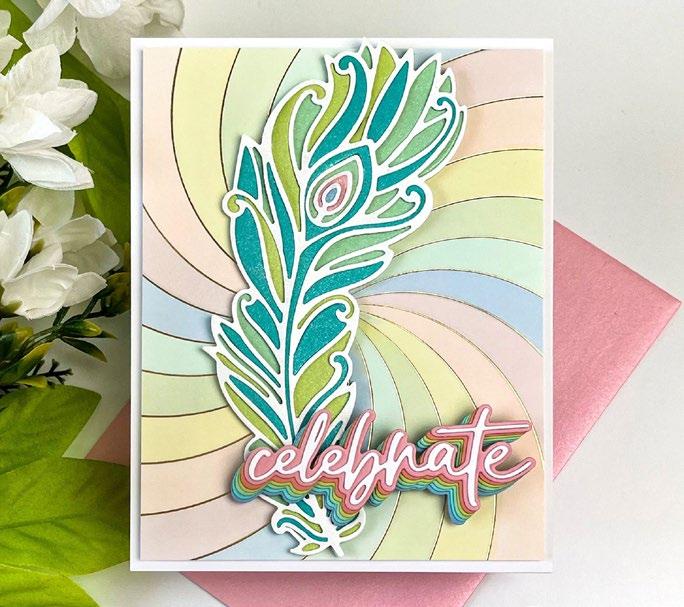
BY THERESE CALVIRD
INSTRUCTIONS
1. Create a 4 ¼” x 5 ½” card base from Classic Crest Solar White Cardstock.
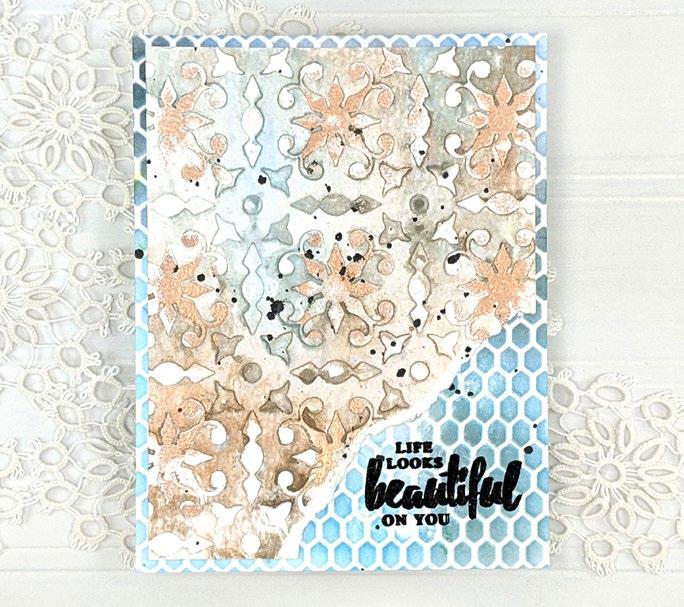
2. Use the Magic Burst Hot Foil Plate to either serve as a focal point or an exquisite background for your card.
3. Foil it into the background, and blend gradient ink colors over the top. Use Chamomile, Sunray, and Blush Crisp Dye Inks.
4. On another card panel, stamp the images from Dazzling Dahlias Stamp Set with embossing ink. Then, use Antique Gold Embossing Powder and heat set.
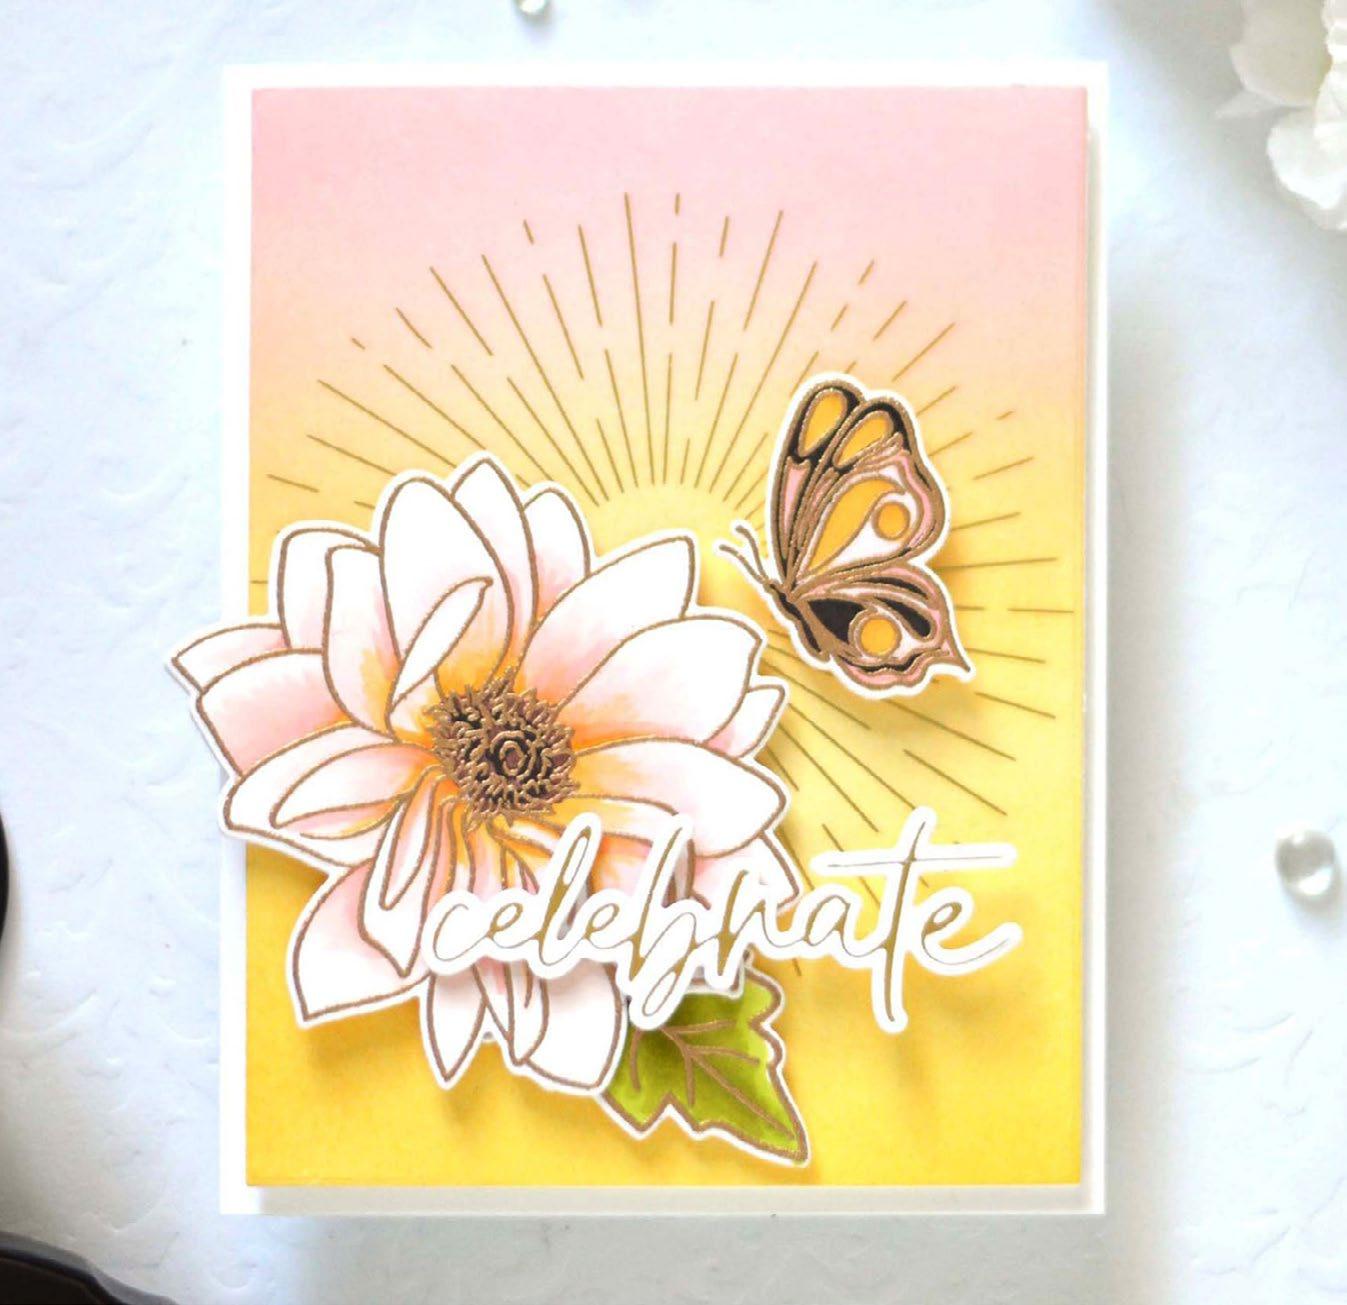

5. Color the flowers, butterfly, and leaves with alcohol markers. Cut with the coordinating die.
SUPPLIES
Stamps, Dies, & Hot Foil Plates
Dazzling Dahlias Stamp & Die Set
Sweet Sentiments Hot Foil Plate & Die Set
Magic Burst Hot Foil Plate
Inks
Crisp Dye Ink: Chamomile, Sunray, Blush
Embossing Ink
Coloring Medium
Artist Alcohol Markers Bundle (84 Colors)
Cardstock and Paper
Classic Crest Solar White Cardstock
Other
Ink Blending Brush - Large
Instant Dimension Foam Tape
Antique Gold Crisp Embossing Powder
Glue Tape & 3 Refills Set
6. Foil the sentiment, “Celebrate” from the Sweet Sentiments Hot Foil Plate & Die.
7. Adhere all the die-cut elements on the ink-blended panel with foam tape and glue tape.
8. Attach your panel to the card base with glue tape.
HOW TO STRETCH YOUR HOT FOIL PLATES SEE MORE ON OUR BLOG
09
DAZZLING DAHLIAS

FEATURED PRODUCTS


 ONE-GO BIRTHDAY
WINTER TYPOGRAPHY
CAPS BOLD ALPHABET
DOTTED LINES DEBOSSING COVER
MIX & MATCH MARIPOSA
SWEET SENTIMENTS
TALL ALPHA LOWERCASE
MAGIC BURST
POINSETTIA CLUSTER
BLOOMING FLOWER BED
DAISIES STENCIL
ONE-GO BIRTHDAY
WINTER TYPOGRAPHY
CAPS BOLD ALPHABET
DOTTED LINES DEBOSSING COVER
MIX & MATCH MARIPOSA
SWEET SENTIMENTS
TALL ALPHA LOWERCASE
MAGIC BURST
POINSETTIA CLUSTER
BLOOMING FLOWER BED
DAISIES STENCIL
MORE DESIGN INSPIRATION


STAY CONNECTED Download our FREE mobile app! altenew.com blog.altenew.com facebook.com/altenew instagram.com/altenewllc pinterest.com/altenew youtube.com/altenew tiktok.com/@altenew support@altenew.com (800) 593-1089
