
8 minute read
Build Your Own PVC Schooling Standards


Build Your Own PVC Schooling Standards By Dadre McCreary
Schooling standards are available commercially and can be purchased for about $300 a pair, plus shipping, per pair from the official jump supplier for the US Equestrian Team. Or, you can build 6 sets of your own schooling standards for about the same price.
These PVC standards are inexpensive, and easy to make using your horse girl “know how.” They are also practical and lightweight for riding instructors who offer jumping lessons. They are also easy to move around to create oxers when placed behind a wing standard. All of the materials and supplies you’ll need are available at your local home improvement store.
This is a relatively inexpensive and easy process; it shouldn’t cost more than $50 for one set of schooling standards. This project can be accomplished in a few hours, depending on your skillz. The skillz I’m referring to are “standard horse girl skills” of wielding an electric saw and drill. If you can mend a fence, you can build these standards. If you can’t mend a fence, then this project probably isn’t for you.
For this project, you will need to gather the following materials. If you are not a savvy home improvement store shopper, I recommend taking this list to the store. Ask the sales associate to help you gather the items you will need. Don’t be afraid to ask them questions, I have found that they are always willing to help and offer advice.
Materials Required:
(1) 4˝ × 4 “x 8΄ vinyl fence post (2) 1.5˝ × 5.5˝ × 8΄ vinyl fence rails (16) 1/4˝ – 20 × 2˝ stainless steel, Phillips drive, pan head, machine screws with nuts (32) 1/4˝ stainless steel washers Tools Required: • Chop saw (or a curricular saw with two saw horses or a work bench) • Electric drill • (3) Drill Bits in the following sizes: • ⅛˝ bit • ⅜˝ bit • ½˝ bit • Clamp • Yardstick • Measuring tape • Speed square • Pencil • Phillips head screw driver • ¼˝ socket and wrench • Eye and ear protection • 1 disposable respirator (this can be reused, do not discard after use)
NOTE: Acquiring these tools can be pricey, however, are all of these items are useful around a horse farm and as such are worth the investment. I recommend Harbor Freight if you intend to buy the aforementioned tools, especially if you don’t think you will use them frequently. Make sure to look online for a 20% off coupon.
I use my power tools for many different projects and as such, I prefer Ryobi, 18 volt cordless battery driven power tools available from the Home Depot. If you are buying tools for this project only, I suggest buying electric tools with power cords verses battery driven tools. Electric tools with power cords are way less expensive than battery driven.
For those budget conscious horse girls, consider buying used power tools from Facebook Marketplace. I am not a spokesperson for either retail store or Facebook. TIP: I recommend reading the following instructions once or twice to make sure you understand the process.
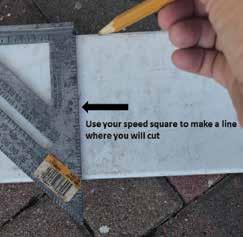
Now that you have collected the materials and tools, let’s get started. 1. Measure 4΄ on your 4˝ × 4˝ × 8΄ vinyl post using a pencil. Use the speed square to draw a line with your pencil where you will cut your vinyl post in half. See photos 1 & 2. 2. Put on your eye and ear protection,
as well as your respirator. You do not want to breath in fumes or PVC shavings or dust into your lungs! Use your chop saw (or circular saw) to cut the 4˝ × 4˝ × 8΄ vinyl post in half so that you are left with (2), 4΄ long pieces. These are the upright support posts for your standards. Measure (6), 16˝ sections on both of your 1.5˝ × 5.5˝ × 8΄ vinyl fence rails. Use the speed square to draw lines with your pencil every 16˝ where you will make your cuts on the vinyl rails. See photos 3 & 4. Put on your eye and ear protection, as well as your respirator. Next, cut each fence rail into (6) 16˝ pre-measured sections that you marked in step 3. These will become the “feet” of your standard on the support post. TIP: You will have (12) 16˝ sections, for this project you will only need (8) sections to make (2) standards, save the other (4) sections to make another standard at a later date. Place one of the 4˝ × 4˝ × 4΄ posts that you cut in step 1, on its side and measure 2˝ from the side in the following 3 places: top of the 4˝ × 4˝ × 4΄ post, about 1΄ down from the first measure point and another 1΄ down from that measure point. Do this on both sides of your support posts. See photo 5. TIP: It does not have to be exact…a guestimate will do. Use your yardstick to connect the dots vertically and draw a line with a pencil! Do this on the opposite side of your post as well. See photo 6. ➢
1

3


5 2

4

6
American Riding Instructors Association
28801 Trenton Ct., Bonita Springs, FL 34134-3337 Phone (239) 948-3232 • Fax (239) 948-5053 e-mail aria@riding-instructor.com www.riding-instructor.com
Membership Benefits
• Riding Instructor magazine • Monthly ARIA E-News • Insurance Discounts! • Free classified ads in the E-News! • Membership card to carry in your wallet • ARIA color logo decal for your car window Application for ARIA Membership
Name
Address
Telephone
Amount enclosed $
(Visa/MC/AmEx/Discover accepted) Membership is available to individuals only. $35 for one full year from the date of application or $75 for three full years!
Lifetime Membership $1000
7


8
7. Now there are lines through the vertical center of your post two opposite sides.
Next, use your measuring tape and measure every 6˝ and mark with your pencil. (or you can mark every 3˝ if you want flexibility to set your jumps at 3˝ intervals such as 2΄, 2΄-3˝, 2΄-6˝ etc…) These are the marks where the jump cup holes will be drilled. 8. Take the speed square and make cross marks at these intersecting points using your pencil! Do this on both sides of your post. 9. Place your ⅛˝ drill bit in the drill and drill “pilot” holes on each cross hair Do this on both sides of your post. 10.Exchange the ⅛˝ drill bit for the 1/2˝ drill bit. Drill into the “pilot” holes with the 1/2˝ drill bit to enlarge the holes to accommodate a jump cup pin.
Do this on the opposite side of your post as well. 11. Next, take your 16˝ section of fence rail and drill 2 pilot holes using your ⅛˝ drill bit, into the rail at one end. I recommend 1.5˝ from the end, and 1˝ down from the side. Take care not to drill into the internal supports of the 16˝ section of rail. See photos 7 & 8. 12.Next, mount the jump’s feet to the support post. Take the 4˝ × 4˝ × 4΄ support post and lay it on its side. Take (1), 16˝ fence rail section, with the pre-drilled holes and place it perpendicular to the bottom of the 4˝ × 4˝ × 4΄ post, thus creating the first of the four feet of the base on the support post. Use your speed square to square it up on the bottom and
9

on the side to make it flush. Use your clamp to affix the 16˝ section of rail to the 4˝ × 4˝ × 4΄ support post. 13. Use your ⅜˝ drill bit to drill through the pilot holes you made in step 11, into the 4˝ × 4˝ × 4΄ support post. Do not remove the clamp! See photo 9. 14.Take one of the ¼˝ × 2˝ machine screws and place a washer on it. Then poke the machine screw through the top hole on the post. This will hold the first of the four “feet” to the post. Then, place a washer inside the 4˝ × 4˝ × 4΄ post and on to the machine screw. Screw on the nut until it is “finger tight.”
TIP: Remember, “righty tighty, lefty loosie”! 15. Place the socket wrench inside the 4˝ × 4˝ × 4΄ post, over the nut. It will fit snugly. Use the socket to hold the nut while you use the Phillips head screwdriver to screw the machine screw in tightly.
TIP: When the vinyl starts to “Pucker” it is tight enough.
10
16.Repeat this process 3 more times for each of the standard’s feet in a pinwheel design, and Voila’! You have a jump standard. 17. Repeat steps 5–16 to build the second standard to finish your set! See photo 10.
Now all you need are jump cups and poles! You can purchase jump cups at any online retailer.
You may be tempted to buy 4˝ PVC pipes, but I don’t recommend it. They don’t wear well in the weather and become brittle and can crack and splinter. Wood rails are worth the investment. Check out the Spring issue of Riding Instructor Magazine for the next installment on jump building to learn how to create your own 4˝ × 4˝ × 10΄ (or 12΄, your choice) wood octagonal poles!
About the author: Dadre McCreary is a certified ARIA Level II Huntseat riding instructor, as well as an aficionado of all things equine! She was the proprietor of2 successful schooling horse shows in the great state of Florida and an avid do-it-yourselferenthusiast!


