

MANUAL DATA CLEANING FOR FAIR
BIODIVERSITY DATA STEWARDSHIP
Prepared by Dr Phon Chooi Khim Forest Research Institute Malaysia
Suhaila Azhar
Centre for Research in Biotechnology for Agriculture, Universiti Malaya
Edited by Dr Nurzatil Sharleeza Mat Jalaluddin
Faculty of Science / Centre for Research in Biotechnology for Agriculture, Universiti Malaya

THE MANUAL OF DATA CLEANING FOR FAIR BIODIVERSITY DATA STEWARDSHIP
This manual is developed by the subject matter experts under the FAIR Data Stewardship Guidelines for Reproducibility in Biodiversity Research (Phase I) project. This manual is prepared to guide the data cleaning process towards achieving the FAIR principle.
© Academy of Sciences Malaysia 2024
All Rights Reserved.
Copyright in photographs as specified below.
Front cover: Taractrocera archias (Phon, C.-K.), Back cover: Scenery (Premium image by Wirestock.com on Freepik.com)
No part of this publication may be reproduced, stored in a retrieval system or transmitted in any form or by any means, electronic, mechanical, photocopying, recording or otherwise without prior permission in writing from the Academy of Sciences Malaysia.
Academy of Sciences Malaysia
Level 20, West Wing, MATRADE Tower
Jalan Sultan Haji Ahmad Shah off Jalan Tuanku Abdul Halim
50480 Kuala Lumpur, Malaysia
EXECUTIVE SUMMARY
Data cleaning is needed to rectify typo errors and other types of errors, and to standardise data entries such as the style of collector’s name, collection date format, localities, and geographical coordinates in Microsoft Excel, for example, before exporting the database into Microsoft Access. This manual describes the data cleaning process for biodiversity specimen data using Microsoft Excel. Users are advised to keep the original copy of the data, work on a duplicated file and stop adding new entry until the database is exported into Microsoft Access successfully. This manual serves as a guide, and it is not a standard method that needs to be followed strictly. Users have the flexibility to decide which data cleaning methods that they are familiar with and confident to use to avoid from introducing mistakes into the database. In this manual, Forest Research Institute Malaysia’s (FRIM) database of butterflies’ collection is used to demonstrate the data cleaning process.
CHAPTER 1
CLEANING UP DATA ENTRY IN ALL FIELDS
The goal of cleaning up data entries in all fields is to standardise all information and to correct typo errors on the recorded information before exporting it into Microsoft Access. Before the data cleaning process begins, it is important to identify fields that require a simple cleaning process or a slightly complicated process. This process can be achieved by using the “Insert Table” tab or “Filter” in the Data tab. The latter method is quite straightforward, and therefore, this manual will demonstrate using the “Insert Table” method.
1.1 IDENTIFY FIELD
1. Highlight data from the headers to the last row of your data.
2. Once the selected table has been highlighted, go to tab “Insert” (Step 1) and click on “Table” (Step 2) (Refer to Figure 1.1).

3. Click on “My table has headers” (Step 3) and then click “OK” (Step 4) (Refer to Figure 1.2).

Figure 1.1 Microsoft Excel ribbon
Figure 1.2 Creating dropdown menus in a table
4. The dropdown menus appear in the headers, as captured in Figure 1.3.

1.3 Dropdown menus created using the highlighted data
1.2 SIMPLE CLEANING PROCESS
Fields that require a simple cleaning process can be those fields that contain repetitive data, for example, Country, State, Sex, Taxonomy Order, Family, and others. In this manual, we will use “Country” and “State” fields to demonstrate the simple cleaning process.
1. Click on the dropdown menu in the “Country” field (Step 1) (Refer to Figure 1.4).


Figure
Figure 1.4 Selection of the “Country” field
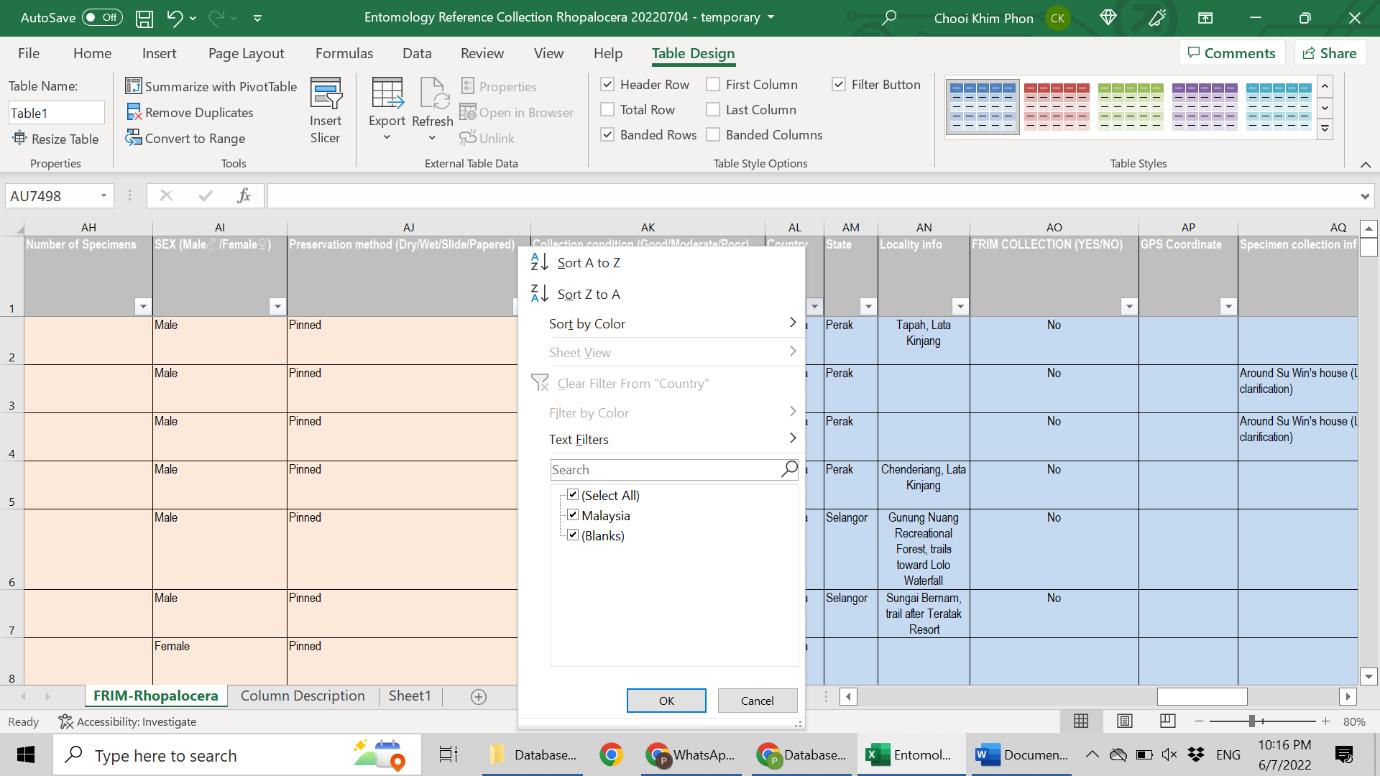
Figure 1.5 Data keyed in in the “Country” field
3. If the (Blanks) should be filled in as (Malaysia), you can first untick (Malaysia), then fill in the blank cells with (Malaysia). This can be done by Copy and Paste (Malaysia) into the blank cells. After that, it is recommended to double-check by clicking on the dropdown menu in the “Country” field again (Refer to Figure 1.6).
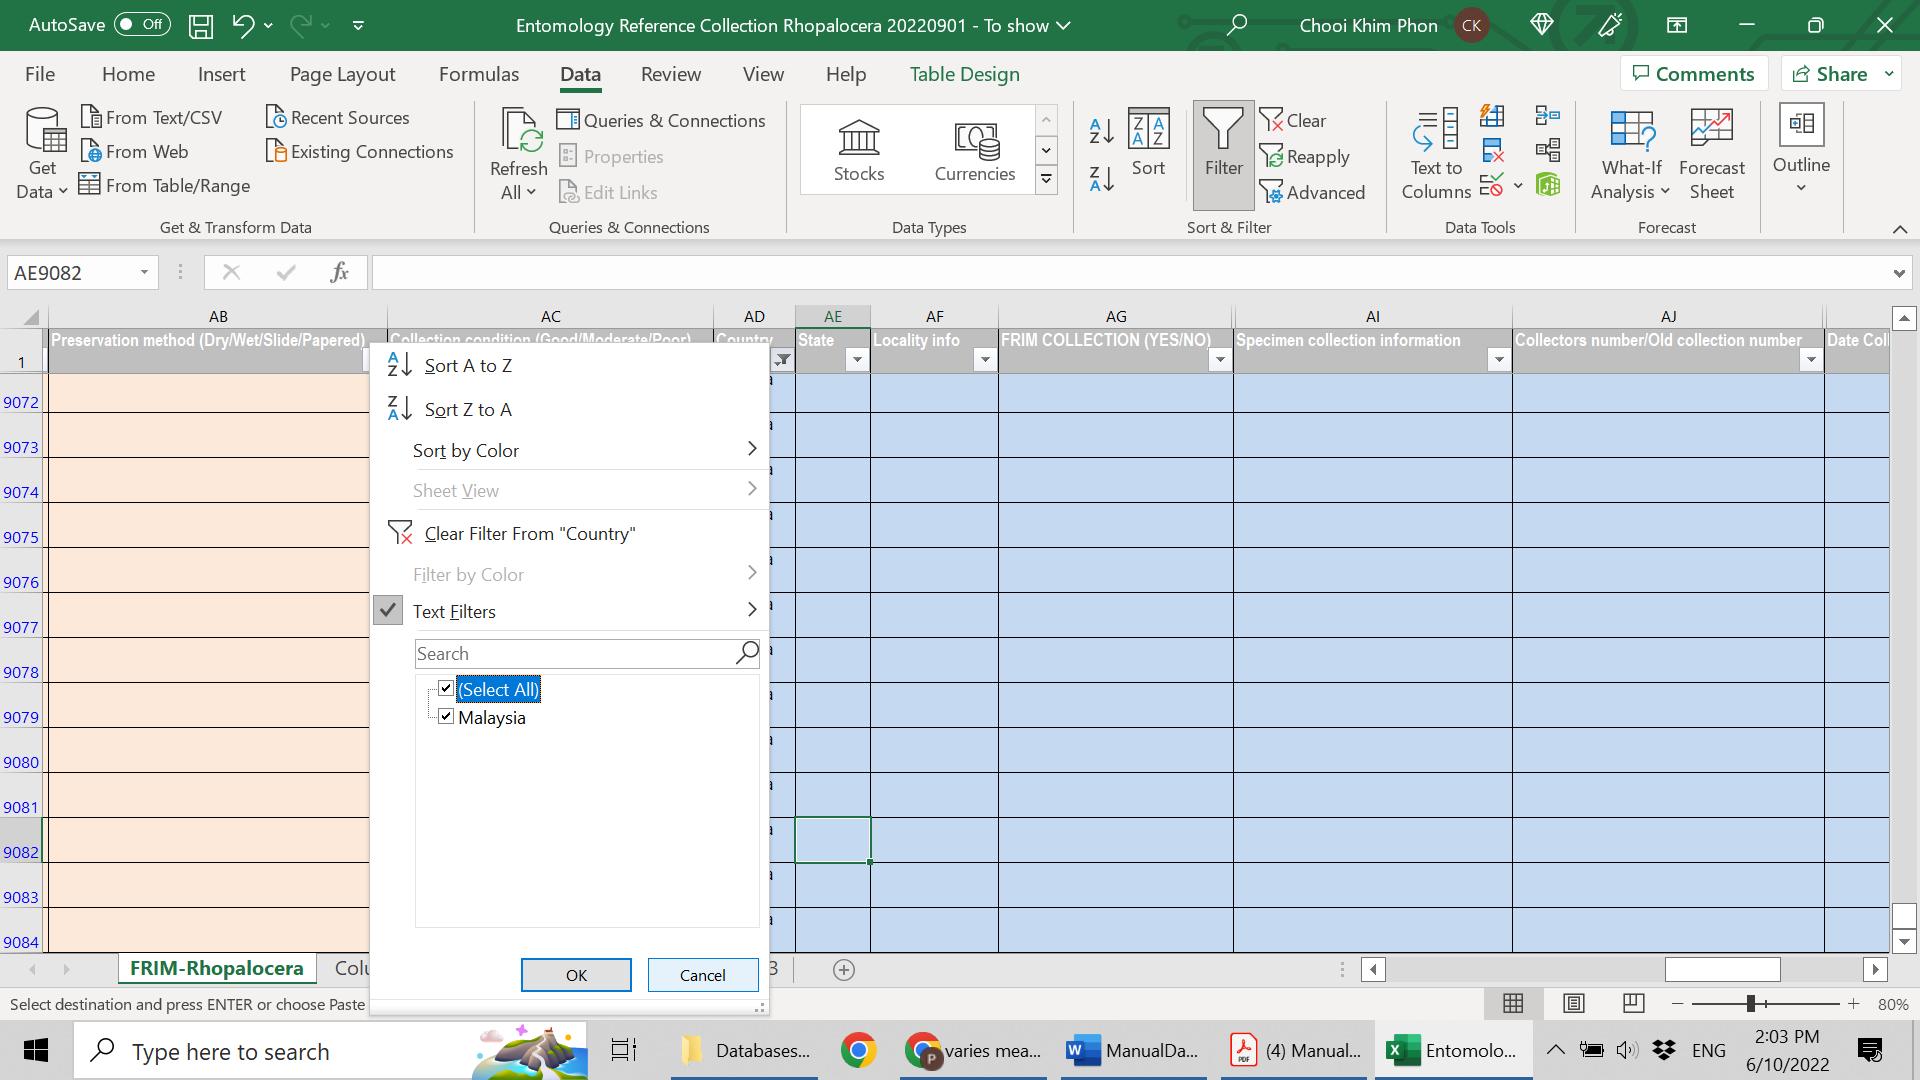
4. Another example using the “State” field is shown below. Click on the dropdown menu in the “State” field (Step 1) (Refer to Figure 1.7).


Figure 1.7 Selection of the “State” field
STEP 1
6. Go to “Find and Select” (Step 2) on “Home” Tab. Click on “Replace” (Step 3) (Refer to Figure 1.9).
STEP 2

STEP 3


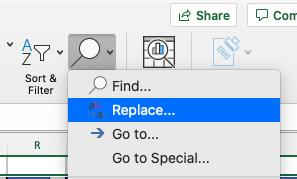
7. Find what: type in wrong spelling/wrong style (e.g., “Johore”) (Step 4) (Refer to Figure 1.10). Replace with by correcting the spelling/correct style (e.g., “Johor”) (Step 5). Then click “Replace All” (Step 6).
STEP 4

STEP 6
STEP 5
Figure 1.9. Microsoft Excel ribbon
Figure 1.10. Replacing the term “Johore” with “Johor”
8. Check the results again by clicking on the dropdown menu (Refer to Figure 1.11).

1.3 SLIGHTLY COMPLICATED PROCESS
The fields that need a slightly more complicated process can be those fields that have many different data that are likely to have typo errors or unstandardised style, for example, locality, collector name, date, and others. We demonstrate this slightly complicated process using the “Collector” field as below.
1. Copy and paste the “Collector” into a new column and paste it as values. Rename the field with a new name, in this case, “Collector_Temp” (Refer to Figure 1.12).


Figure 1.12 The original and new columns
The original column
A new column created
2. Select the whole set of data. Click tab “Insert” (Step 1), then “PivotTable” (Step 2) (Refer to Figure 1.13).
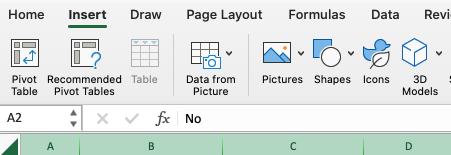
3. Choose “New Worksheet” (Step 3) and click “OK” (Step 4) (Refer to Figure 1.14).

1.14 The PivotTable from table or range feature
4. The PivotTable appears in Sheet 2 (or a new sheet) (Refer to Figure 1.15).
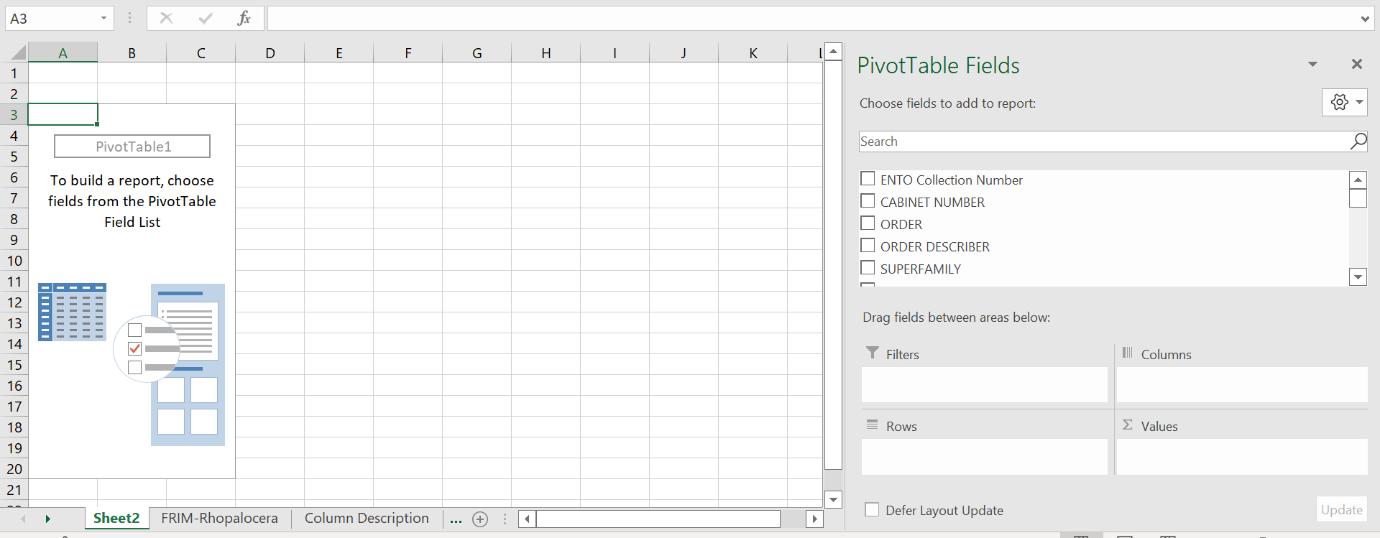

Figure 1.13 Microsoft Excel ribbon
Figure
Figure 1.15 The PivotTable in a new sheet
New Sheet
5. In the PivotTable Fields, click the “Collector_Temp”. Look for those unstandardised styles/ spelling errors. For example, there are three different styles of the same name. Pick one standard style (For example, Nafaruding and C.N.) (Refer to Figure 1.16).


1.16 Different styles of data entry
6. Go to the original datasheet and repeat steps 4, 5 and 6 in the earlier section (Refer to Figure 1.10) for “Find” and “Replace” features. In the “Find what:” cell, type in the wrong spelling or wrong style (For example, Nafaruding C.N and Nafaruding C.N.) (Step 1).
Then, type in “Replace with:” with the correct spelling or correct style (e.g., Nafaruding, C.N.) (Step 2). Then click “Replace All” (Step 3) (Refer to Figure 1.17)
Figure
3


Figure 1.17 Replacing the term “Nafaruding C.N” with “Nafaruding, C.N.”
7. Repeat for other fields by clicking the different fields in PivotTable Fields (Refer to Figure 1.18).


Figure 1.18 The PivotTable Fields
8. When the clean-up process is completed for the whole dataset, remember to remove those added columns. STEP 1 STEP 2


CHAPTER 2
SPLITTING AND COMBINING INFORMATION
The goal of splitting or combining information or data in the database is to facilitate the cleaning process. In this chapter, we will show how splitting and combining information can be done.
2.1 HOW TO SPLIT INFORMATION IN A CELL INTO A FEW COLUMNS
Sometimes, there is a need to split data entry in a cell into a few columns to facilitate the cleaning process. This usually happens for fields such as “Date”, “Locality” and others. For this manual, we demonstrate the steps using the “Locality info” field.
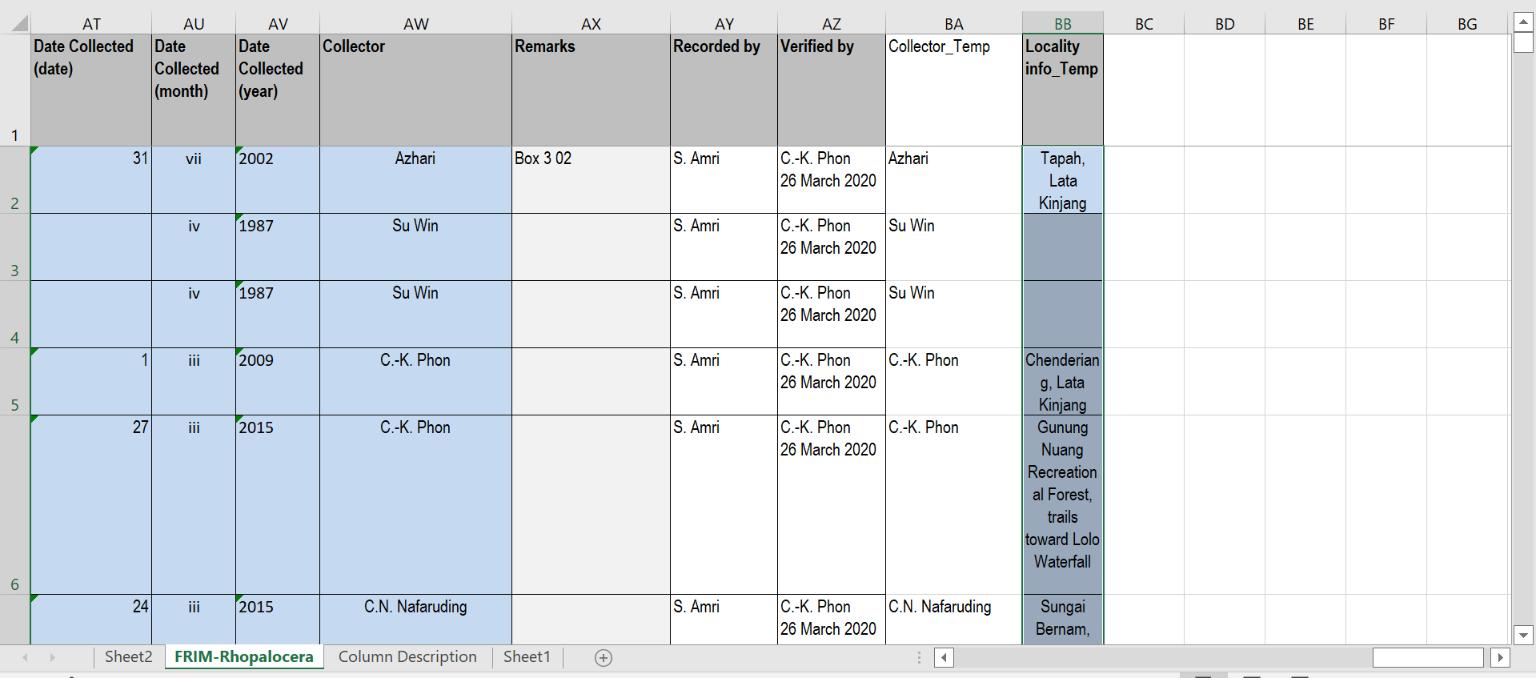
1. Copy and paste the “Locality info” into a new column and paste it as values. Rename the field with a new name, in this example, we use “Locality info_Temp” (Step 1) (Refer to Figure 2.1).

New column created STEP 1

Figure 2.1 Creating a new column “Locality info_Temp”
2. Select the column you want to split the information (Step 1) (Refer to Figure 2.1). Then go to tab “Data” (Step 2) and click on “Text to Columns” (Step 3) (Refer to Figure 2.2).

Figure 2.2 Initial steps showing how to split information
3. Select “Delimited” (Step 4), then click “Next” (Step 5) (Refer to Figure 2.3).

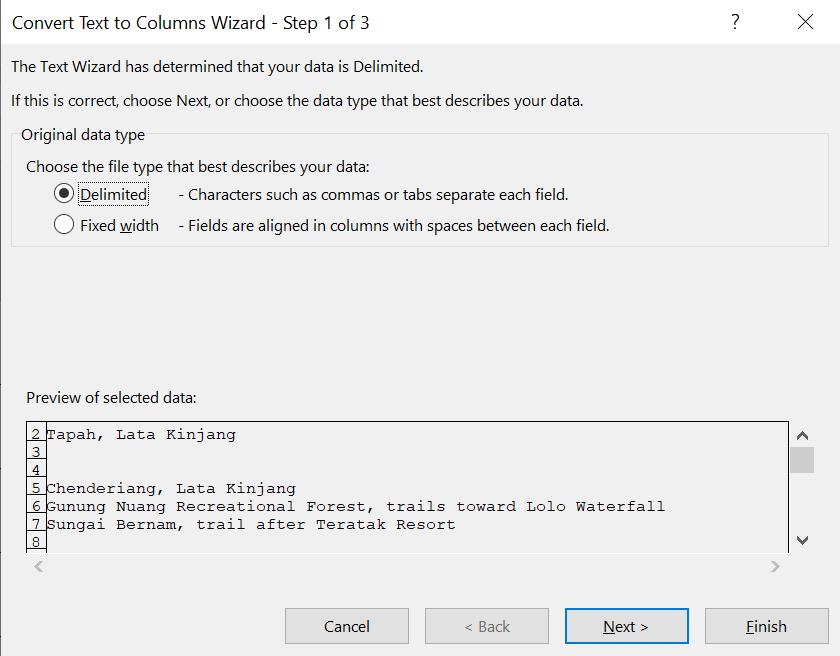

2.3 Converting text to columns wizard – Step 1 of 3
Figure
4. Select either “Tab”, “Comma”, or “Space” on the “Delimeters” tab (Step 6) depending on your data entry (Refer to Figure 2.4). Then click “Next” (Step 7). You can always check the results on Data preview.

Figure 2.4 Converting text to columns wizard Step 2 of 3
5. Select the destination which cell you want to put the outputs (Step 8) (Refer to Figure 2.5). You can use the columns next to the “Locality info_Temp” field. Then click “Finish” (Step 9). STEP 6 STEP 7


Figure 2.5 Converting text to columns wizard – Step 3 of 3 and the results
6. Start the cleaning procedures as described previously (See Chapter 1.2 and 1.3).
2.2 HOW TO COMBINE DATA IN A FEW CELLS INTO ONE CELL
1. After cleaning, you might want to combine again the cells into one cell.
2. This can be achieved by using formula such as =BC2&","&BD2&","&BE2 OR =CONCAT(BC2, ", ", BD2, ",", BE2).

