

MANUAL SPECIMEN DIGITISATION FOR FAIR
BIODIVERSITY DATA STEWARDSHIP
Prepared by ChM Ts Dr Ong Song Quan Institute for Tropical Biology and Conservation, Universiti Malaysia Sabah
Suhaila Azhar
Centre for Research in Biotechnology for Agriculture, Universiti Malaya
Edited by Dr Nurzatil Sharleeza Mat Jalaluddin
Faculty of Science / Centre for Research in Biotechnology for Agriculture, Universiti Malaya

THE MANUAL OF SPECIMEN DIGITISATION FOR FAIR BIODIVERSITY DATA STEWARDSHIP
This manual is developed by the subject matter experts under the FAIR Data Stewardship Guidelines for Reproducibility in Biodiversity Research (Phase I) project. This manual is prepared to guide the specimen digitisation process towards achieving the FAIR principle. © Academy of Sciences Malaysia 2024 All Rights Reserved.
Copyright in photographs as specified below.
Front cover: Cyrestis nivea (Phon, C.-K.), Back cover: Scenery (Premium image by Wirestock.com on Freepik.com)
No part of this publication may be reproduced, stored in a retrieval system or transmitted in any form or by any means, electronic, mechanical, photocopying, recording or otherwise without prior permission in writing from the Academy of Sciences Malaysia.
Academy of Sciences Malaysia
Level 20, West Wing, MATRADE Tower
Jalan Sultan Haji Ahmad Shah off Jalan Tuanku Abdul Halim
50480 Kuala Lumpur, Malaysia
Perpustakaan Negara Malaysia
Cataloguing-In-Publication Data
MANUAL - SPECIMEN DIGITISATION FOR FAIR BIODIVERSITY DATA STEWARDSHIP
e ISBN 978-629-7712-01-7
EXECUTIVE SUMMARY
Specimen digitisation is important for accurate digital record keeping of biodiversity specimens for future reference. This user manual guides users through every aspect of the digitisation process for Natural Museum specimens. Content in this manual first begins with a general workflow describing the three phases of digitisation, namely, pre-production, production, and post-production. Pre-production emphasises the importance of selecting the highest priority specimens for digitisation, according to species, such as rare specimens or holotypes or the best-documented taxa, as well as planning for the digitisation schedule and manpower requirement. Pre-production also requires the user to prepare an ImageData spreadsheet documenting all the metadata of the image and set up a digitisation station to acquire the specimen and any associated labels or information. Once everything has been checked in preproduction, users can progress to the production phase, where the light and colour calibration procedure and ISO /shutter speed/aperture guidelines are established. Finally, in the post-processing section, this manual discusses what to do with file naming and storage and briefly explains the use of optical character recognition (OCR) to convert the physical text on labels or paper into digital data to make the user's job easier when digitising. This manual also provides some tips for troubleshooting potential problems that the user may encounter during the digitisation process.
LIST OF FIGURES
LIST OF TABLES
CHAPTER 1
PREPARATION FOR SPECIMEN DIGITISATION
To initiate specimen digitisation, it is important for the user to plan the workflow (Refer to Figure 1.1) and check all the requirement checklists (Refer to Table 1.1).
START
Pre-production phase:
1. Specimen selection
2. ImageData spreadsheet
3. Timeline/manpower planning
4. Digitisation station set-up
Production phase:
1. Camera mode
2. Light calibration
3. Colour calibration
4. Connecting camera to the computer
Post-production phase
1. File transfer and storage
2. Documentation of metadata to ImageData spreadsheet
3. Transcription tool - optical character recognition (OCR)
Advanced level:
1. Digital make-up or image quality improvement
2. Stacking
3. 3D model
Figure 1.1 The overall workflow for specimen digitisation
Table 1.1 Specimen digitisation pre-production checklist
NUM
1 SPECIMEN SELECTION
The specimen that will be digitised is ready at the holding site
2 SPECIMEN CONDITION
The specimen is free from dusk, parasites, or unwanted objects on its surface
3 IMAGEDATA SPREADSHEET
The ImageData spreadsheet is ready for databasing
4 TIMELINE AND WORKFORCE
The timeline and workforce are planned and arranged for digitisation
5 DIGITISATION STATION
The equipment and camera setting for the digitisation station is set up
CHAPTER 2
2.1 SPECIMEN SELECTION
1. Determine the groups of specimens to be digitised and the location of the cabinet that stores the specimens.
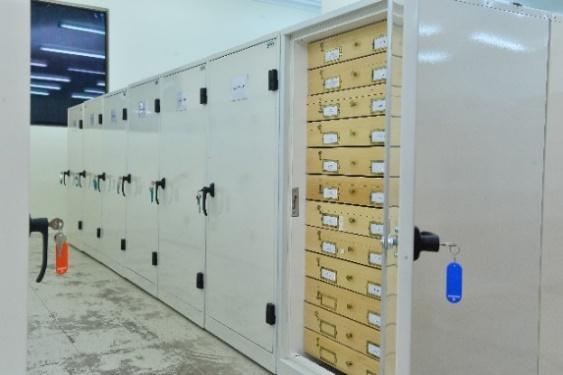
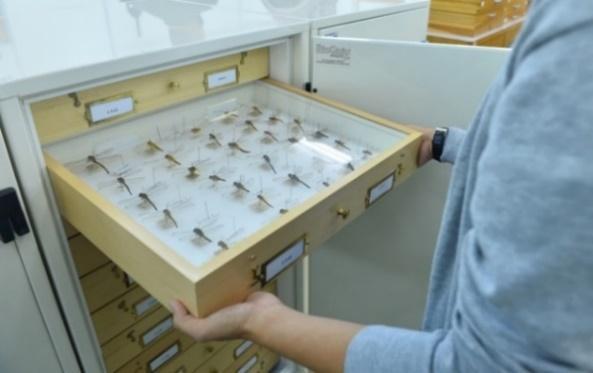
2. Prepare a polystyrene board or tray to collect the specimens according to the planning per day, for example, 50 specimens per day and take them to the target cabinet.


Figure 2.1 An example of specimen selection
Figure 2.2 The selected specimen is placed on polystyrene board or tray
2.2 SPECIMEN CONDITION
1. Please ensure the specimens are free from dusk, parasites, or unwanted objects on their surface.

2.3 Example of the specimen with dust
2. After fetching the specimen for digitisation, place the specimen in a photography tray. The user must provide several equipment or materials for setting up the photography tray (Figure 2.4). There are several steps for preparing a photography tray, as illustrated in Figure 2.5.

Figure
EV Form/ Manila Card
Polystyrene Needle
Label


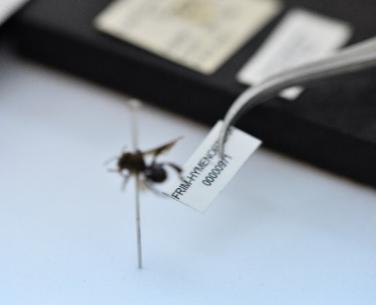

Figure 2.5 Steps for preparing a photography tray (1) Place the ruler and Evform or Manila card on a suitably sized polystyrene board. (2) Remove all physical labels from the specimen needle (if attached). (3) Place it on the right side of the specimen. For other specimens, such as microscope slides, herbaria, and others, the physical labels must remain on the package, and more than one image is needed to digitise the specimen. (4) Place the specimen in the centre of the polystyrene board and adjust the height of the pin deepness in the polystyrene board
2.3 IMAGE DATA SPREADSHEET PREPARATION
The Image Submission Protocol of the Barcode of Life Data Systems (BOLD) consists of ten variables as metadata that can be queried and databased in the management system. Table 2.1 shows an example of an Image Data spreadsheet that needs to be prepared. The spreadsheet has the variables (especially mandatory variables at the point of the data catalogue) that will be used for documenting the metadata of an image.
Table 2.1 The Image Data spreadsheet for documenting the metadata of an image Image File* View metadata* Caption Measurement Measurement type Sample ID* License Holder License* License Contact Photographer*
2 Dorsal Adult stage
4 Azrie *Mandatory at the point of data catalogue
2.4 DIGITISATION STATION SET-UP
The basic equipment needed to set up the digitising station is a camera with a tripod, a computer, and a photo studio box. The equipment can be placed on a stable table (A) or on the floor (B), depending on the type or size of specimen and the environmental conditions.
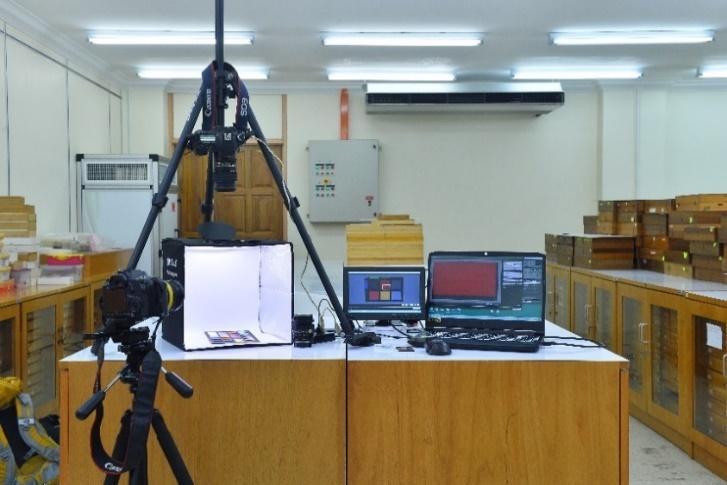
Digitisation station for small specimens
Digitisation station for large specimens
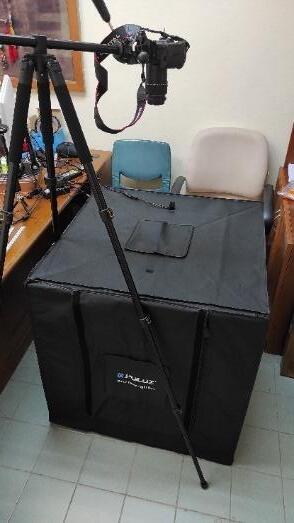
Figure 2.6 An example of digitisation station
CHAPTER 3
PRODUCTION SPECIMEN DIGITISATION
1. Camera mode - Use the fully manual setting (M) with autofocus (except in macro mode, which requires a manual setting of the minimum focal length)

2. Connect the camera to the computer - Connect the camera to the computer using a cable (as in Figure 3.2) or wirelessly (Bluetooth or Wi-Fi for certain/current models). Turn on the remote camera software (Canon Utilities, Nikon Pro Control or others.)
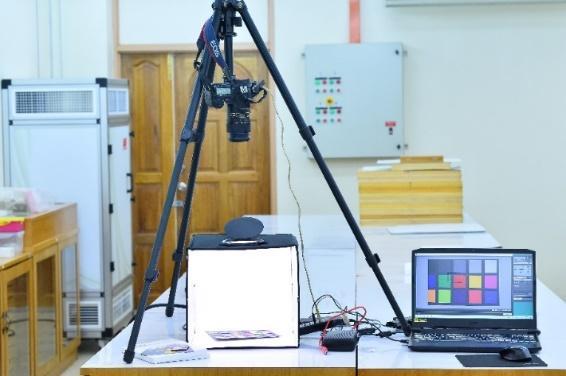
Figure 3.1 The manual setting position
Figure 3.2 The arrangement of the digitisation setup
Manual Setting
Camera Cable
3. Light calibration - The exposure triangle (Refer to Figure 3.3) is a basic concept for calibrating the light intensity or exposure of an image. Referring to the baseline of the setting in the illustration, the result of the light intensity measurement on the camera display should be between 0 and +1.


4. Colour calibration - use a colour chart and set the white balance of the camera into "Kelvin" mode with a range between 4000 to 5000K and adjust the value colour on the screen of the computer (for inter-rater reliability, this may require at least two observers to rate the colour similarity).


Figure 3.3 Illustration of the exposure triangle and light intensity measurement
Figure 3.4 An example of the colour calibrator and the colour calibration position in
5. Place the specimen in the photo light box and check on the computer that the image capture includes all labels and rulers.


6. Use the remote-control software to enlarge the image to check sharpness. Make sure that the sample meets the image quality (refer to Table 3.1) before you press the shutter button. However, you can also take several pictures and later select the best picture for documentation.
Table 3.1 Image Quality Assessment
Aspects Criteria
Composition Does the placement of specimens and labels follow the guidelines?
Brightness Is the image’s brightness satisfying?
Colour Does the image’s colour look similar to the real specimen?
Sharpness Is the image’s sharpness, especially the key morphology, sharp enough to identify?
Yes No
he position of specimen in the photo light box and the example of image capture
CHAPTER 4 POST-PRODUCTION SPECIMEN DIGITISATION
4.1 FILE NAMING AND TRANSFERRING TO STORAGE
The tool built into the camera or remote-control software allows the user to customise the prefix of the file by referring to the function of the folder. Save the file as a JPEG and name the file after the UID or pattern ID (according to the data management or registration step) or any sequence generated by the software or camera.
Prepare at least 1TB of hard disc space with backup software for storage. Once the image files have been named or annotated and transferred to the hard drive, staff should duplicate or multiply the data to the institution's storage system (for example, Google, Azure, AWS, Oracle, and others) and another storage system (such as additional hard drive or cloud storage).

Figure 4.1 The software image capture
4.2 COMPLETE THE METADATA OF THE IMAGE
Document the metadata of the captured image into the ImageData Spreadsheet, as illustrated in Figure 4.2.

Figure 4.2 The image metadata in the ImageData spreadsheet
4.3
OPTICAL CHARACTER RECOGNITION
(OCR)
Metadata can be documented by using optical character recognition (OCR). Optical character recognition (OCR) is a type of text recognition on images. In general, OCR can extract and digitise the text on the image. The application mainly recommends automating the process of entering the information from the physical labels into the file name or annotation of the file. OCR methods can be done with Google Chrome with Google Lens enabled


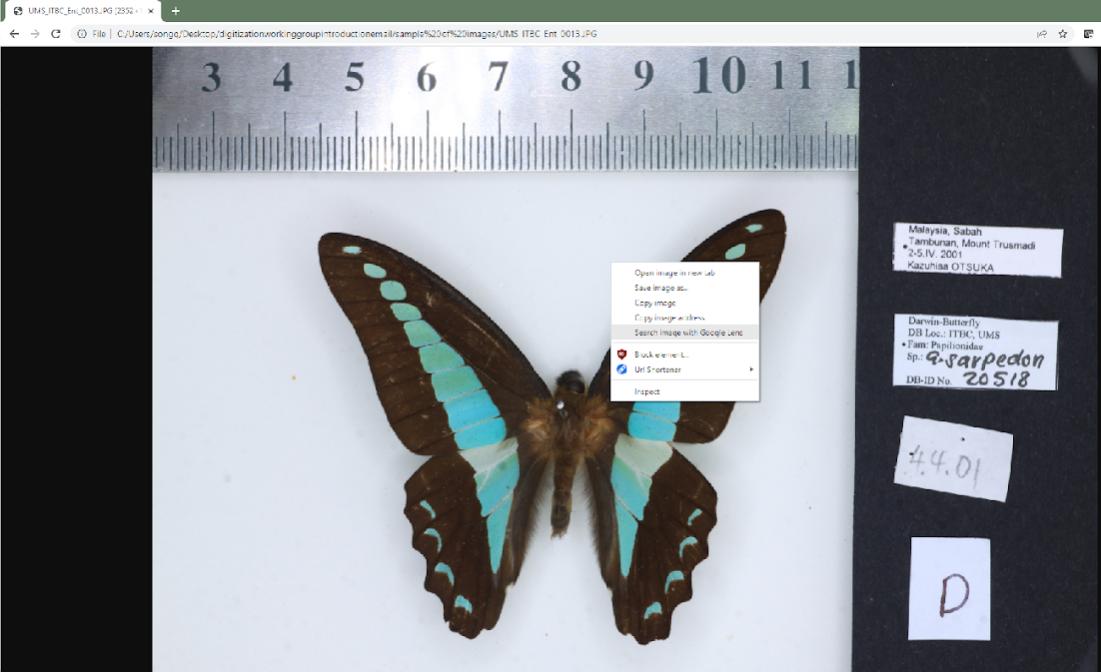
( STEP 1. Open the image in Google Chrome in a new tab.
STEP 2. Right-click on the image and select "Google Lens".
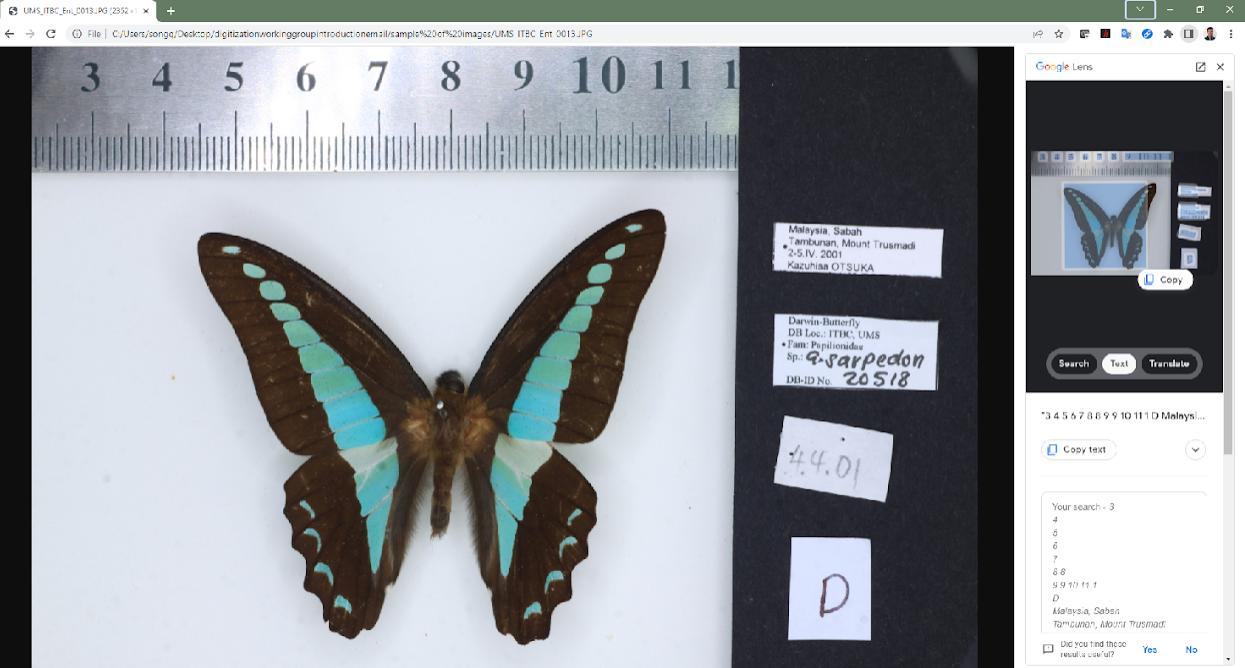
STEP 3. A tab will appear on the righthand side where you select text to copy the digitised text or information into the ImageData table.
Figure 4.3 Steps for OCR method
CHAPTER 5
TROUBLESHOOTING
In this chapter, we list possible problems that can be anticipated by users when digitising specimens and potential solutions to the problems, as summarised in Table 5.1.
Table 5.1 Potential problems when digitising specimens and proposed solutions to the problems
PROBLEMS
1. Camera cannot connect to the computer
2. DSLR camera cannot be switched on
3. Camera LCD not working or blank
SOLUTION
● Connect the cable properly to the computer.
● Check the type of cable you are connecting to the computer. The cable should be the original cable from the manufacturer.
● Check the software and make sure it is installed and updatedor uninstall and reinstall it.
● Check the camera model covered by the software.
● Fully charge the camera's battery.
● Insert the battery properly into the compartment.
● Remove the lens and the SD card from the camera. Wait for a few minutes before putting them back in.
● Clean the battery compartment with a cotton swab moistened in vinegar if you see corroded residue. Then, dry it with a clean cotton swab before inserting the batteries.
● When connecting to the remote-control software, check the screen of your computer when the software is open.
● Make sure you have removed the lens cover before taking photos.
● Press the FINDER or LCD button to turn the LCD on and off.
● If your camera has a DISPLAY / DISP button, press it several times.
● Check that the power saving mode settings have turned off the LCD.
● Check that the brightness of the camera is not too low.
4. Camera storage error
● Remove the camera battery and the SD card and wait a few minutes before inserting them again.
5. Image has black or white spots
● If you use remote control software, for example, EOS Utility, the file is saved on the computer in the directory you can find in the software (you can change the setting or directory in the software)
● Check the directory and make sure it is not an external hard drive.
● If you are using an internal hard drive, check the computer's disc space.
● If you are saving to an SD or CF card, remove the SD card, clean it and put it back in the camera.
● Unlock your SD card by sliding the lock switch on the side upwards if it is write-protected.
● Connect the camera's memory card to the computer and transfer all photos and videos. Format the memory card, insert it into the camera and use it.
● Make sure the lens cap on your DSLR is on.
● Avoid changing the lens frequently.
● Do not change the lens in a dusty environment.
● Clean the camera sensor with a blower or send it to the manufacturer for professional cleaning.
● Remove the stain with the help of photo editing software e.g. Photoshop
6. DSLR cannot save photos or video
7. Do not have the feature of Optical Character Recognition (OCR) in Google Chrome
● Remove the card and reinsert it into the slot.
● Transfer the photos and videos from the SD card to your computer.
● Troubleshoot a damaged SD card on your computer.
● Format the card in the camera to use it again.
● If the problem persists, get a new SD card.
● Make sure you are using “right-click” and see the “Google Lens tag”.
● Make sure you have the latest version of Chrome installed and updated.
● Uninstall and reinstall Google Chrome
