5 minute read
Steps for Silo Repair
BY BRIAN HANDSHOE
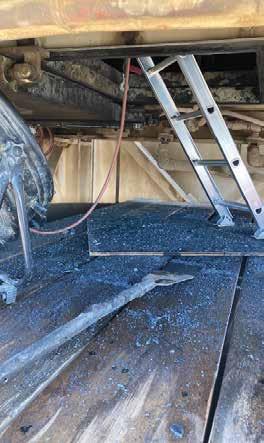
MMaking repairs to a worn asphalt plant silo is never fun or easy. For Dan Bowman with Tullis Inc., Redding, California, however, it was going to be an even bigger challenge. Bowman’s primary challenge came from the weigh hopper hanging directly beneath the worn silo cone, making access to the cone difficult and dangerous.
Silo repairs present a challenge starting with the choice of liner material. Do you use plate steel cut and rolled into the standard “pie” shaped kit? What about ceramics? For Bowman, the solution came in the form of the Kenco Engineering’s Modular Silo Liner Kit system from Kenco
Engineering, Roseville, California.
A primary factor for Tullis’ choice was that Kenco’s unique Modular
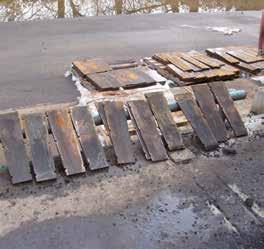
Silo Liner Kit is designed to be easier to install than OEM style liner kits. Custom designed for each installation, Kenco’s kits are comprised of trapezoidal wear plates cut from ½-inch thick, AR500 plate. These wear plates are less than 24 inches long and weigh less than 25 pounds each. This size and weight combination allows for covering the maximum amount of surface area while remaining small enough and light enough to easily handle. Each plate has recesses cut into the perimeter allowing simple plug welding for installation.
STEP 1. BUILD A BASE
To start his project, Bowman began by building a platform on top of the weigh hopper. This platform formed a base from which to work in the silo. The small distance between the weigh hopper and the opening for the silo would have made working with long, pie-shaped liner pieces next to impossible. The smaller Kenco kit liners, however, fit easily in this reduced work space. This photo is courtesy of Tullis Inc.
STEP 2. SEPARATE YOUR MATERIALS
For simple round silos emptying from a round opening, the Kenco Modular Silo Liner kit consists of multiple rows of liners where each row consists of identical liners with each liner individually numbered. Bowman and his workers separated the liners according to their number and loaded them into a man basket, which they used to lift the liners up to the work platform. They built scaffolding in the silo as work progressed further up from the bottom. This photo is courtesy of Knife River Corporation.
STEP 1.
STEP 2.
CRUSH RAP COSTS
with the HONEY BADGER
From replaceable abrasion-resistant steel wear liners to a 1/2" steel pulverizing hopper, this machine is ready for wear and tear. And by reducing material handling and minimizing moisture, the Honey Badger increases production and saves on fuel costs. Average return on investment is 1/8 the cost of other crushing operations. Fully-equipped with max power, reliable operation, and easy maintenance, the Honey Badger is ready to crush your costs!

Reduced RAP moisture = lower fuel consumptions
Reduce or eliminate crushing costs
Typical 6 month ROI
(300,000 ton/season plant)
Minimize material handling
STATIONARY PORTABLE
STEP 3. WELD A BASE RING
Installing the very first row took a little longer than expected because Bowman and his team first welded a base ring to the bottom of the silo to serve as the base support for the first row. This base ring, while taking quite a bit of time to build, ensured the first row could be properly positioned. This photo is courtesy of Tullis Inc.
STEP 4. TACK WELD
Once properly positioned, this first row was tack welded into place. At this point, the first row serves as the perfect base for all subsequent rows, which are simply stacked in place according to their row number and then tacked in place as well. This photo is courtesy of Tullis Inc.

STEP 5. BUILD AS YOU GO
Another benefit of Kenco’s modular design is that it is not an “all or none” type of arrangement. Producers can install kits row by row over time. As an example, Bowman installed three rows of liner plates last season and plans on adding two more rows along with a cylinder band this year. All in all, Bowman was happy with the way the Kenco kit made a bad job much easier to handle.
Another asphalt producer who is happy with the performance of the Kenco Modular Silo Liner Kit is Pat Budlong with Knife River Corporation, Tangent, Oregon. At this point in his career, Budlong has been involved with installing more than 24 Kenco Modular Silo Liner kits. Budlong’s primary motivations for using Kenco’s kits include ease of installation due to the custom design as well as the long wear life the liners provide.
When discussing ease of installation, the Kenco kits go in fast. According to Budlong, the complete project, start to finish, will take about three days. That includes about one day to complete the Confined Space process, make the silo safe and install the scaffolding used to weld in the liners. Day two usually takes about 10-12 hours and is when the Kenco kit is welded into place including a full weld along the top edge to prevent material getting behind the liners to “hydraulic” them away from the wall. Day three will be for finishing up what is left and disassembly of the scaffolding. Budlong contends that when relining a silo in the air, the Kenco Modular Silo Liner kit is “faster to install and wears great.”
When looking at wear life, the Kenco Modular Silo Liner kit is also a long-term solution to a maintenance headache. Made from ½-inch-thick AR-500 plate, the Kenco kits have been found to outlast pie-shaped liner kits by more than 3-1. When compared to ceramic kits, Kenco’s system can be installed in a fraction of the time due to the reduced number of components, no need for adhesive and no need for weld washers. Kenco steel liners are not susceptible to breakage.
Budlong jokingly explained that he feels bad for Kenco’s Regional Sales Representative, Paul Weber. “I feel bad so often having to tell Paul that I don’t need anything—nothing is worn out.”
STEP 3.


STEP 4.
STEP 5.
A few days of hard work result in a newly lined interior, ready for next season’s production. Photo courtesy of Kenco Engineering


