
13 minute read
Civil 3D
from AUGIWORLD
by AUGI, Inc.
Civil3D Annosensations – Unique Ways to Leverage Labeling Functionality for Better Plan-Production
“Why is this leader not pointing to anything?” exclaims the Project Manager to the frustrated designer that has spent countless hours validating the design, only to discover the plan-production effort was not the smooth-sail envisioned. “And this label is contradicting what’s been presented on the previous sheet. And over here, the text is upside down!”
Love it or hate it, labelling plans will be around until the entire design delivery mechanism moves away from plans as we know it (looking at you AR guy, moonwalking around the room to the beat of Thriller while orchestrating the model with sign language). Until that hits mainstream – today it is labels. There could be thousands of them in a plan set. How do we better ensure every one of them is the way they should be and in a quicker timeframe? Thankfully, the tools available are getting better at providing designers the means and methods for such. This article aims at some unique use cases utilizing Civil 3D functionality within this realm.
OVERVIEW
good reason. These annotation objects are entirely independent of (or unlinked from) the object for which they are supposed to reference. This is often the cause of the issues illustrated in the first paragraph - contradictory labels sheet to sheet, the notorious “floating” leader head pointing to a patch of white space and overall excessive time spent reproducing the same thing.
Enter the Civil 3D label – the superior alternative that, instead, reads information that is attached to the root object itself and is married unequivocally to it unless, heaven forbid, the explode command do it part. Understanding that many already utilize Civil 3D labels in some capacity. Let us focus on some unique gymnastics they can perform, with the ultimate goal of adhering to the “data at the center” ideal.
PROPERTY SETS – THE UNDERUTILIZED KINGPIN OF PRODUCTIVITY
Even with the abundance of Civil 3D objects available, there is still some primitive linework hanging out inside drawings that need to be labeled (lines, polylines, 3dpolys, etc.). Hold that finger! Do not reach for a multileader just yet. The same Civil 3D functionality for labeling can be applied to these objects via property sets. And
I assure you, it is as easy as Alabama’s win over Notre Dame in the college football playoff this year.
Property sets allow for a wealth of additional information to be attached to any object in Cadland, and for this example, we will (1) add a property definition (or field) arbitrarily called “Label Text” to all polylines in the drawing and (2) create a single line label style called “Read Property Set Data”. That is the one-and-done setup, and it is a matter of utilizing typical selection tools/commands to enter text directly into the polylines’ properties and labeling all with the single label style that reads that property.
Note that property sets live within the drawing itself and carry with the source drawing on XREF into another drawing. This enables the placement of labels in different drawings, at different locations along the same object – all reading the same information. It is a flexible alternative to displaying labels through an XREF if necessary. Moreover, there can be multiple properties assigned to the same object in the source drawing, so that labels read differently from one drawing to another if desired.
Drawing Set Up
1. Define a new property set and apply it (or
“make it available”) to the object types wished - polylines in this case. This simply allows for the property to exist in Properties-Extended Data tab of object types.
2. Create a manual property within that property set definition (far right tab). Set the type to text and enter “???” as the default. This will make it apparent when a label is placed on an object with no text entered in its associated property.

3. Set system variable AECPSDAUTOATTACH to 0 or 1. We will set it to 1 so that with every new polyline created, it automatically makes the field available within the object’s extended data tab of properties. Else, the property field needs to be manually added to every new object in that tab.
4. Create a single Line Label Segment Style. This one is arbitrarily called “ReadPSData”. Insert the property set syntax made available in the property set tab of the style dialog. This tab only appears if there is property sets within the drawing. To label curves (within a polyline or another object) this style needs to be replicated under curve labels.
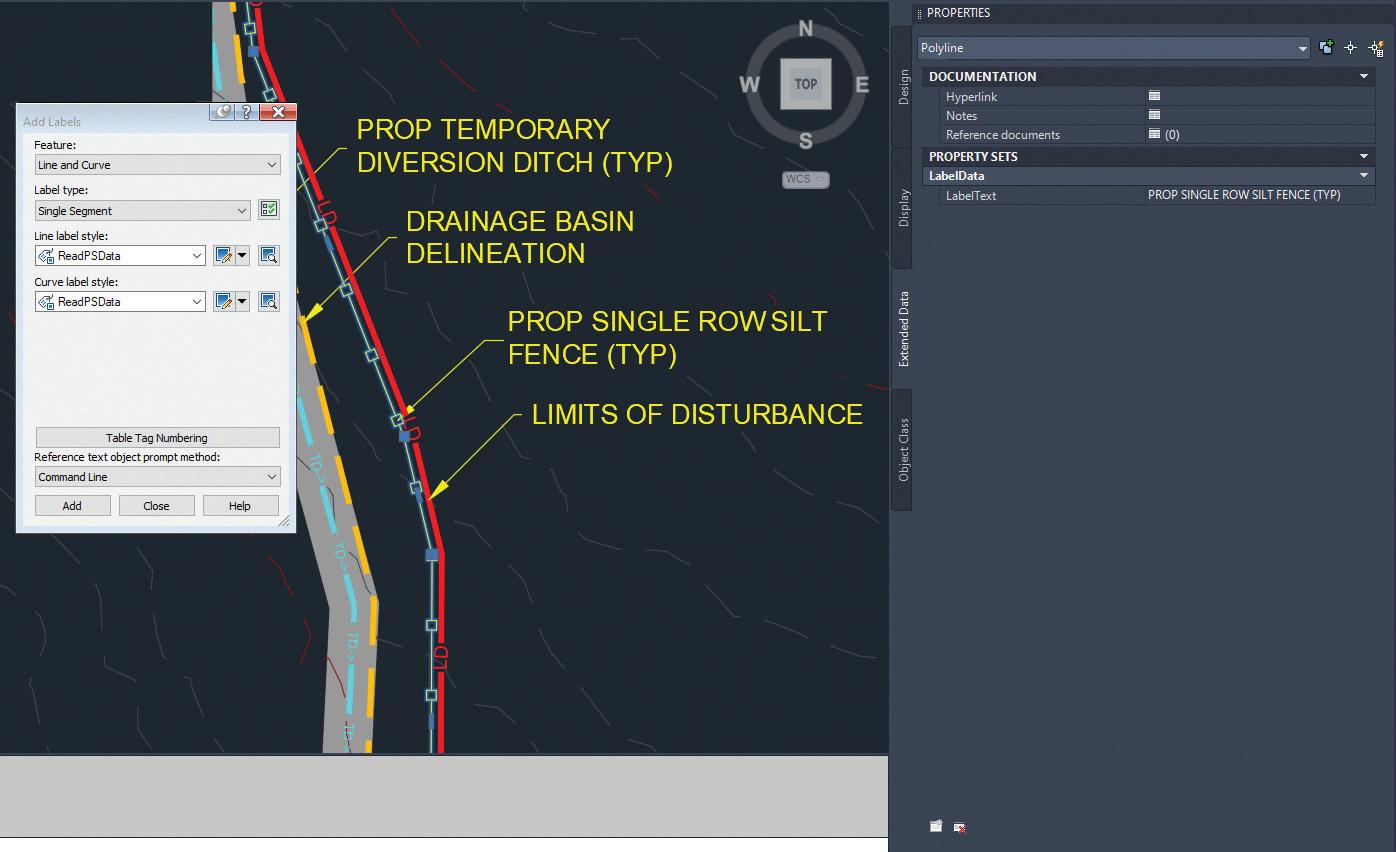
Figure 2. Line and Curve Label Style
Labeling Workflow
1. Fill the fields within the polylines’ Properties-
Extended Data tab with the text to display in that object’s label. The weapon here is to utilize typical mass-selection commands – Select
Similar, Isolate Layer, and the “select similar on steroids” – QSELECT. For example, if I wanted every polyline on layer C-EROS-SILT to read
“Proposed single-row silt fence. Refer to detail 2 on C3.08” I’d select all on that layer, and simply type that string into the Layer Text property.
2. The magic part – simply place labels. The figure below shows the label text field within the extended data of a polyline. A line and curve label is placed on that polyline reading that string of text. Of course, the label’s text is dynamic – so change any field and upon
REGEN, the label will update.
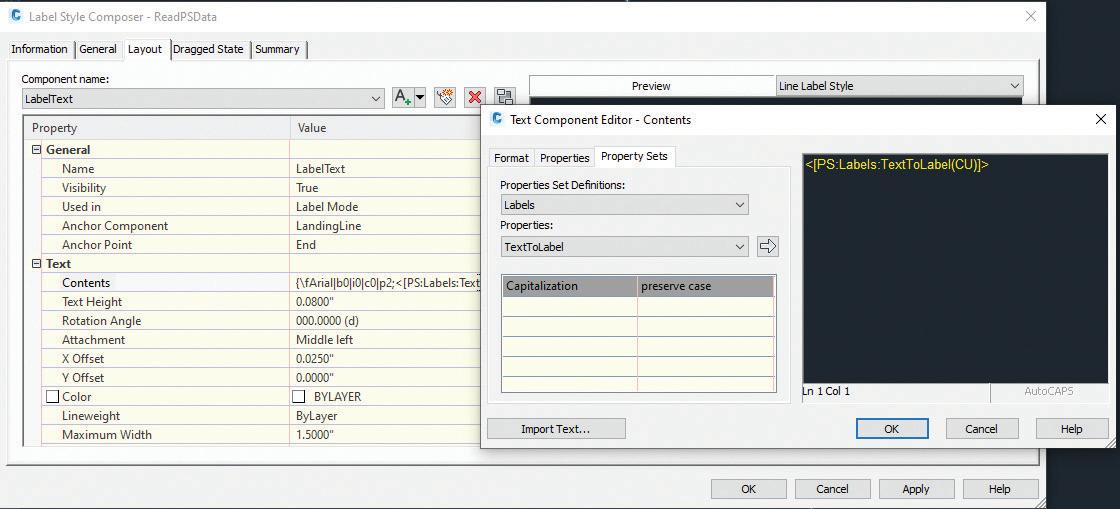
Figure 3. Labelling
CODE SET STYLE LABELLING
There is one tedious element missing from the mostly automated capabilities of cross section production – dimensions. Luckily, with some creative rigging of Civil 3D link label styles assigned within the corridor code set style, it’s possible to have Civil 3D produce and package the dimensions apart of the corridor section itself.

Figure 4. Section with dimensions embedded
A single link label style can house all annotation of the link. In the figure above, a single style displays the dimension, offset/elevation, and grade. Granted it does take some effort creating the style itself, it is a one and done procedure with the style available for use onward.
Within the label style are 7 components that amount to what represents the dimension because each component needs to have its own restricted “freedom” to stretch. For the sake of conciseness, this is an overview of the main properties of each:
• The dimension text - anchored from the feature at “Section View Top- Middle”.
• Two vertical lines – the first line anchored at the feature start (the link start) and the “Section
View Top – at Start”. The other vertical line is just the opposite.
• Two horizontal lines – the first line anchored from the dimension to “Section View Top –
Start” and dimension to “Section View Top –
End” respectively. • Arrow blocks anchored to the end of both horizontal lines and rotated appropriately.

Figure 5. Link Label Style displaying link dimension
The Y offset of each components section view anchor is then set to a value where the horizontal lines are orthogonal to the section axis and the dimension text is placed in desired proximity to them. Note the
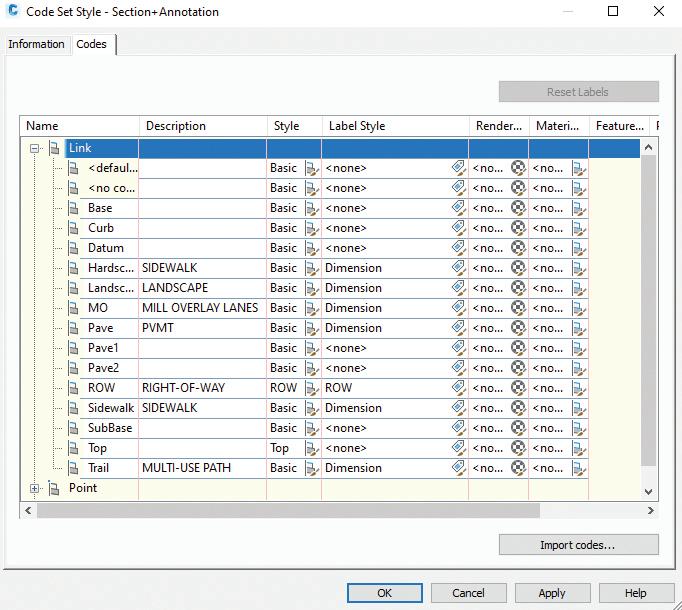
possibilities of what can be shown within the label style. The figure above leverages the text within each code’s description as well. There is also a “ROW” label style assigned to its associated code that displays a vertical boundary line block with associated text. Only links needed for the annotation are assigned the label style within the code set.
There is a dose of reality that also comes with this. This solution provides maximum congruency at the cost of flexibility. It is not possible to drag/move labels within the section corridor object. Likely there is some sections that may have small-width links that force the labels to overlap. In those cases, you may be forced to create a new label style for alternate offsets of text components, or perhaps override the code set style in that particular section to one without annotations – annotating manually there. Of course, there are more flexible ways to label utilizing section view offset and grade labels, but those will require their own special maintenance with label weeding factors, etc. (and cannot display corridor link widths/dimensions).
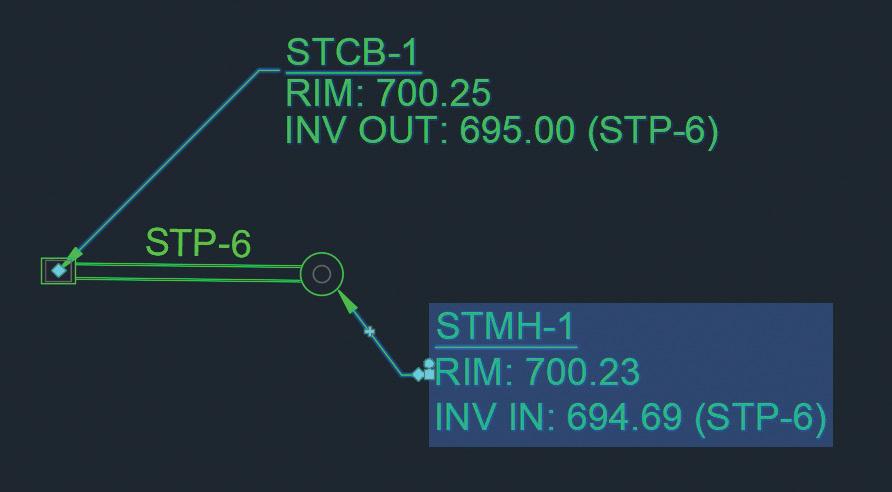
Often, it is necessary to label every entity of a particular type (perhaps storm structures) with a leader regardless of circumstance. It can be very taxing to drag every label away from its default location to trigger the leader components in the dragged state. A simple solution like the one presented in code set styles: Create a leader block and insert that block as a definition of the style within the layout tab – perhaps a leader block that is identical to the settings you prefer in the dragged state tab. On initial label placement, congruent leaders in angle and leader lengths will be shown. On move of a label, the leader style is identical. Be sure to set the dragged state components to “Stacked Text” to replace the static leader block with the dynamic dragged state leader when label is moved.
SPOT/GRADE LABELLING BREAKLINES
Spot or elevation labeling the surface object itself requires a level of placement precision that introduces user error, particularly on areas of steep grade or where the surface is triangulating around curves. Misplace a spot label just a fraction on a curb or wall and that equates to large error in the elevation readout. Similarly, placing surface slope/ grade labels requires extreme placement precision, particularly for cross-slopes.
Instead, consider labeling the breaklines that make up the surface definition itself. This guarantees accurate spot and grade labels, even if the surface itself has minor inaccuracies. This will also boost CAD performance because there is no need to have the surface on to label.
General Line and Curve Label Styles read feature lines, polylines, lines, arcs, and 3dPolys. And while any of these objects are valid breaklines and can be inserted as part of the surface definition, we are labeling feature lines for this example.
Create the spot and grade label styles
For spot grades that display elevation of a feature line PI or elevation point, two styles are needed – one that reads the segment start z

elevation and one for the end z elevation. If only one existed, either the start or the end of the feature line would not be labeled. Line and curve labels read the objects underlying line and arc segments. The critical property here is the labels anchor point on the object. Ensure its congruent with the text property the label is reading so the label is forced to the correct location. The figure below utilizes the “Default” dragged state leaders illustrated previously.
For grade/slope labels, simply add General Segment Grade to a single style and assign insertion point to middle. Now the drawing is set up to pepper-label the feature lines utilizing those label styles.
EXPRESSIONS
Labels can read numerical object data, calculate, and display the result by way of expressions that live at the bottom of any given label type in Toolspace-Settings. A common expression leveraged to pipe label text is the Manning’s equation for velocity and flow. Expressions can also calculate label components’ rotation, as is used for the grade arrow’s orientation in the grade label previous. Note that expressions use radians for angular input, so below translates to “If the grade is positive on that segment, rotate the arrow opposite to point it downhill (pi = 3.14 rad = 180°). Else, it is correct and leave it be.
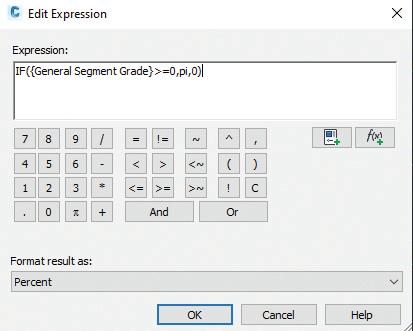
Figure 9A. Rotation Expression Figure 9B. Grade label style arrow rotation

ODDS AND ENDS OF LABEL STYLES
A few handy tidbits on general functionality, behavior, and performance of Civil 3D Label Styles:
• Labels shrink to valid information. For example -if two property set fields exist within a label style but the associated object does not have any data present for the second field, the label will shrink to fit the only thing it finds. This makes for a great diet of concise styles within a drawing.
• Plan readability tells Civil 3D at what degree it should invert the text when the view is twisted.

Labels for road names placed on centerlines is one example. If they read upside down, adjust plan readability in the label style.
• AutoCAD’s Display Manager can aid
performance and clarity by controlling visibility of object types per view type (plan, model, profile, section). This one is often overlooked in-lieu of the layer manager and Civil 3D object style visibility control. Unlike Civil 3D object styles, label styles’ visibility per view type cannot be controlled within the style. For view types (3D model view particularly) that do not need labels visible (or any other object type), simply uncheck that object under model in DM.
MAP 3D LABELS
This article, void of a Map 3D mention, would be a disservice. Map 3D’s full functionality lives inside the Civil 3D application and while the two do not necessarily talk to each other much at the playground, they do coexist peacefully and can complement each other in the same space – with a couple nuances. The Map 3D functionality exists with the Planning and Analysis workspace – or by commonly calling the MAPWSPACE palette.
One aspect where Map 3D shines: Its ability to label areas, or closed boundaries dynamically. It is particularly helpful when the plan just needs some context outside of the surveyed bounds or the project area. Perhaps there is a need to label numerous adjacent property owners/deed info/etc. Sure, parcel objects could be used but that requires manual entry of each text property to be shown in the label. If GIS data is available (shapefiles, sqlite, etc. often provided by public municipalities), it’s a drag-and-drop operation with the data into model space, then configuring the Map 3D label style to read GIS attributes. It may be beneficial to create a map template for large scale areas of frequent work, harnessing all the linked data styled and annotated to a standard.
The other brilliant functionality unique to Map 3D labels is dynamic visibility/positioning. Given a viewport in a layout, every Map 3D label will attempt to show in its entirety within the bounds of its reference. If it cannot do that, it simply does not show.
A couple caveats to mention: (1) On plot, Map 3D does not read AutoCAD plot styles. It prints as the screen displays. Keep that in mind when styling colors and applying line widths to those objects within the Map 3D style. (2) This functionality reads database information. Edits to geometry using Map 3D tools edit the source data that may be read into other drawings and projects. There is a “Save as AutoCAD Drawing” within MAPWSPACE Task Pane - Maps that will copy the map objects on screen to static AutoCAD objects should that be needed.

Figure 11. Map3D Template Drawing. Source GIS Data Credit – Mecklenburg County, North Carolina
CONCLUSION
I hope this sheds light on some new and exciting ways to up your plan-production game. The underlying premise of “data at the center” or “at the source” being the main important point. Annotations that read object data in lieu of housing it within become more a simple byproduct of the model itself, aiding the foundation for the next generation of design deliverables. I would love to hear your ideas and field any questions you might have via the contact info below.
Onward!
Matthew Grigsby is the Design Technology Manager for LandDesign in Charlotte, NC - an Autodesk Certified Professional, professional engineer and avid developer/ student of .NET. Previously he spent 8 years as a designer and technical lead within the private mixeduse, multifamily, retail, and industrial design-space. Matthew can be reached for comments or questions at www.linkedin.com/in/ mdgrigsby


