9 minute read
AutoCAD
from AUGIWORLD
by AUGI, Inc.
Setting Up System Variables for Success in AutoCAD
Have you ever started working in a drawing and some commands appear to have stopped working or function in a different way than before? As a design systems admin I help solve problems for users while working on design projects. Many times, the answer comes down to a system variable that has changed.
This could have happened by starting a different command, new workflow, or loading an app or lisp file into your project. System variables can be the key to success when understanding and controlling the behavior of these modifiers.
OVERVIEW
System variables in AutoCAD are values that control command settings, interface behavior, and user options. Some system variables are stored within the drawing file while others are stored in the Windows registry. In this article you will learn how to redefine important system variables to maximize your efficiency using AutoCAD. After gaining an understanding we will review the System Variable Monitor and System Variable Editor to help us manage and maintain a standard approach to your software workflow.
ACCESSING THE SYSTEM VARIABLE LIST
There are a couple ways to access the system variable list. At the command prompt type SETVAR and select enter twice. In the text window you will see all the system variables within your session of AutoCAD as shown in Figure 1. Select F2 if the text window does not appear.

Figure 1: SETVAR dialog box

Figure 2: Express Tools The second and most preferred way is on the express tools tab of the ribbon under the tools panel, select System variables as shown in Figure 2.
A dialog box will appear (Figure 3) giving you a list of system variables where you can go through and change values as well as read up on the actions taken by making changes.
1. Within this window you can type the variable you are looking for. 2. The second area is where you can see if the variable can be change, is read only, and where it is saved in. 3. The third area is where you can gain information about the different settings and how they affect your drawing environment.
REVIEWING SYSTEM VARIABLES
Although we cannot cover all the system variables in AutoCAD, we will focus on those you can change and that can alter the way you work. We will navigate alphabetically through a list of 20.

APERTURE
Aperture controls how closely the crosshairs must be to an object before the snap marker appears. You can set this value between 1 and 50 pixels. The default value as shown below is 10.
ATTIPEDIT
This variable controls how attributes are selected within the attribute dialog box. You can also access embedded attributes by holding down the ctrl key then selecting the attribute. This will launch the attipedit command.
EXPERT
The Expert variable will suppress the operation in question is performed as though you entered y at the prompt. Note: Setting EXPERT can affect scripts, menu macros, AutoLISP, and the command functions. The following settings are taken directly from the knowledgebase article.
0. Issues all prompts normally. 1. Suppresses “About to regen, proceed?” and
“Really want to turn the current layer off?” 2. Suppresses the preceding prompts and “Block already defined. Redefine it?” (-BLOCK) and “A drawing with this name already exists. Overwrite it?” (SAVE or WBLOCK). 3. Suppresses the preceding prompts and those issued by the LINETYPE Command prompt (-LINETYPE) if you try to load a linetype that’s already loaded or create a new linetype in a file that already defines that linetype. 4. Suppresses the preceding prompts and those issued by UCS Save and VPORTS Save if the name you supply already exists. 5. Suppresses the prompt, “That name is already in
Use, redefine it?” issued by the -DIMSTYLE Save option when you supply the name of an existing dimension style.
DIMMASOC
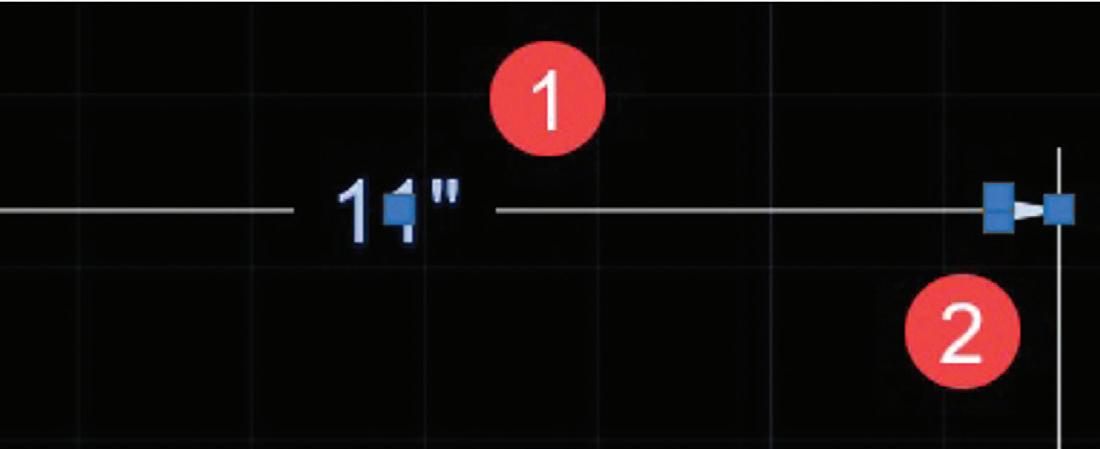
This variable controls how dimension objects are created. The default value is set to 2 which creates an associate dimension object which are connected to the geometry object. If you set this variable to 0, your dimensions will be exploded and entered as single entities within your drawing as shown in steps 1 and 2 in Figure 5.
SELECTIONANNODISPLAY
This variable controls the visibility of annotative objects that are not controlled by the current scale. Turning it off (setting to 0) will eliminate the ghosting effect you can have on drawings as shown in Figure 6.
ROLLOVERTIPS
If the ROLLOVERTIPS system variable is set to 1 and you hover your cursor over an object in the drawing area, then a tooltip will appear which will show a small list of the object properties. Make this variable 0 to increase speed when working with large drawings.
Figure 4: Control Key Figure 5: Dimensions Exploded


Figure 6: Ghosting Text

Figure 8: The Statusbar
REMEMBERFOLDERS
This will remember the folders of the last place you were in while inserting a block. A simple on off switch will control this system variables.
STATUSBAR
Controls the visibility of the status bar in the lower right of your drawing area as shown in Figure 8. Setting the value to 0 will turn off the status bar.
PEDITACCEPT
The default value of PEDITACCEPT system variable is set to 0 which allows Polyline Edit command to return a prompt as shown in Figure 9.
If the value of this system variable is changed to 1 then the default value “Y” will be accepted, and this prompt will be suppressed.
SELECTIONPREVIEW
By default, the value of SELECTIONPREVIEW system variable is set to 3, which allows a preview of the object under selection when you hover your cursor over the object in the drawing. You can change this value to 0 to avoid any object selection preview thereby improving the performance of AutoCAD.
PALETTEOPAQUE
This system variable controls the transparency of palettes, to improve performance keep the transparency off or set the value of PALETTEOPAQUE system variable to 1. The default value of this system variable is 0.
HPLAYER
Controls the default layer which hatch patterns are placed on. This can be controlled via the Hatchedit (HE) dialog box as well as shown in Figure 10.
CURSORSIZE
Determines the size of the crosshairs as a percentage of the screen size. Valid settings range from 1 to 100 percent. When set to 100, the crosshairs are full-screen, and the ends of the crosshairs are never visible. When less than 100, the ends of the crosshairs may be visible when the cursor is moved to one edge of the screen.
HIGHLIGHT
This system variable controls whether the selected object will be highlighted or not. The default value of HIGHLIGHT system variable is 1 which allows objects to remain highlighted when selected. You can change this system variable to 0 to stop highlighting objects when selected.
FILEDIA
This system variable controls whether dialog boxes are suppressed in AutoCAD. Setting this variable to 0 will cause all the commands to be shown on the command line and not via a dialog box (Figure 11). Always, remember to look at the command line as this variable can change with apps and lisp files used in AutoCAD.

Figure 9: PEDIT command (Y) Figure 10: Default Hatch Layer


Figure 11: No Dialog Boxes

Figure 12: Layout 1 and 2 Tabs
MIRRTEXT
This system variable controls how mirror reflects a text object. Setting this variable to 0 will force the text to retain its current direction and not be mirrored along with the objects selected.
XFADCTRL
Controls the amount of fading within a reference being edited in place. This setting affects only the objects that are not being edited in the reference. Valid values are from 0 to 90.
LAYOUTTAB
Toggles the visibility of the Model and Layout tabs. When this is set to 0; Model and layout tabs are hidden. Setting to 1 will display Model and layout tabs as shown in Figure 12
STARTMODE
Start mode will determine whether you want the start tab to show up or not when you launch AutoCAD. Some more experienced users turn this off but don’t do so right away. There is a lot of great information on the start tab including recent files and learning content. See Figure 13 for a list of great information that can be provided from the start tab.
1. Recent Drawing files. 2. Autodesk Docs – Direct connection to BIM360 3. Learning Material 4. My Insights 5. Online Help Menus 6. Announcements (Have you tried series). 7. Send feedback to Autodesk
SYSTEM VARIABLE MONITOR
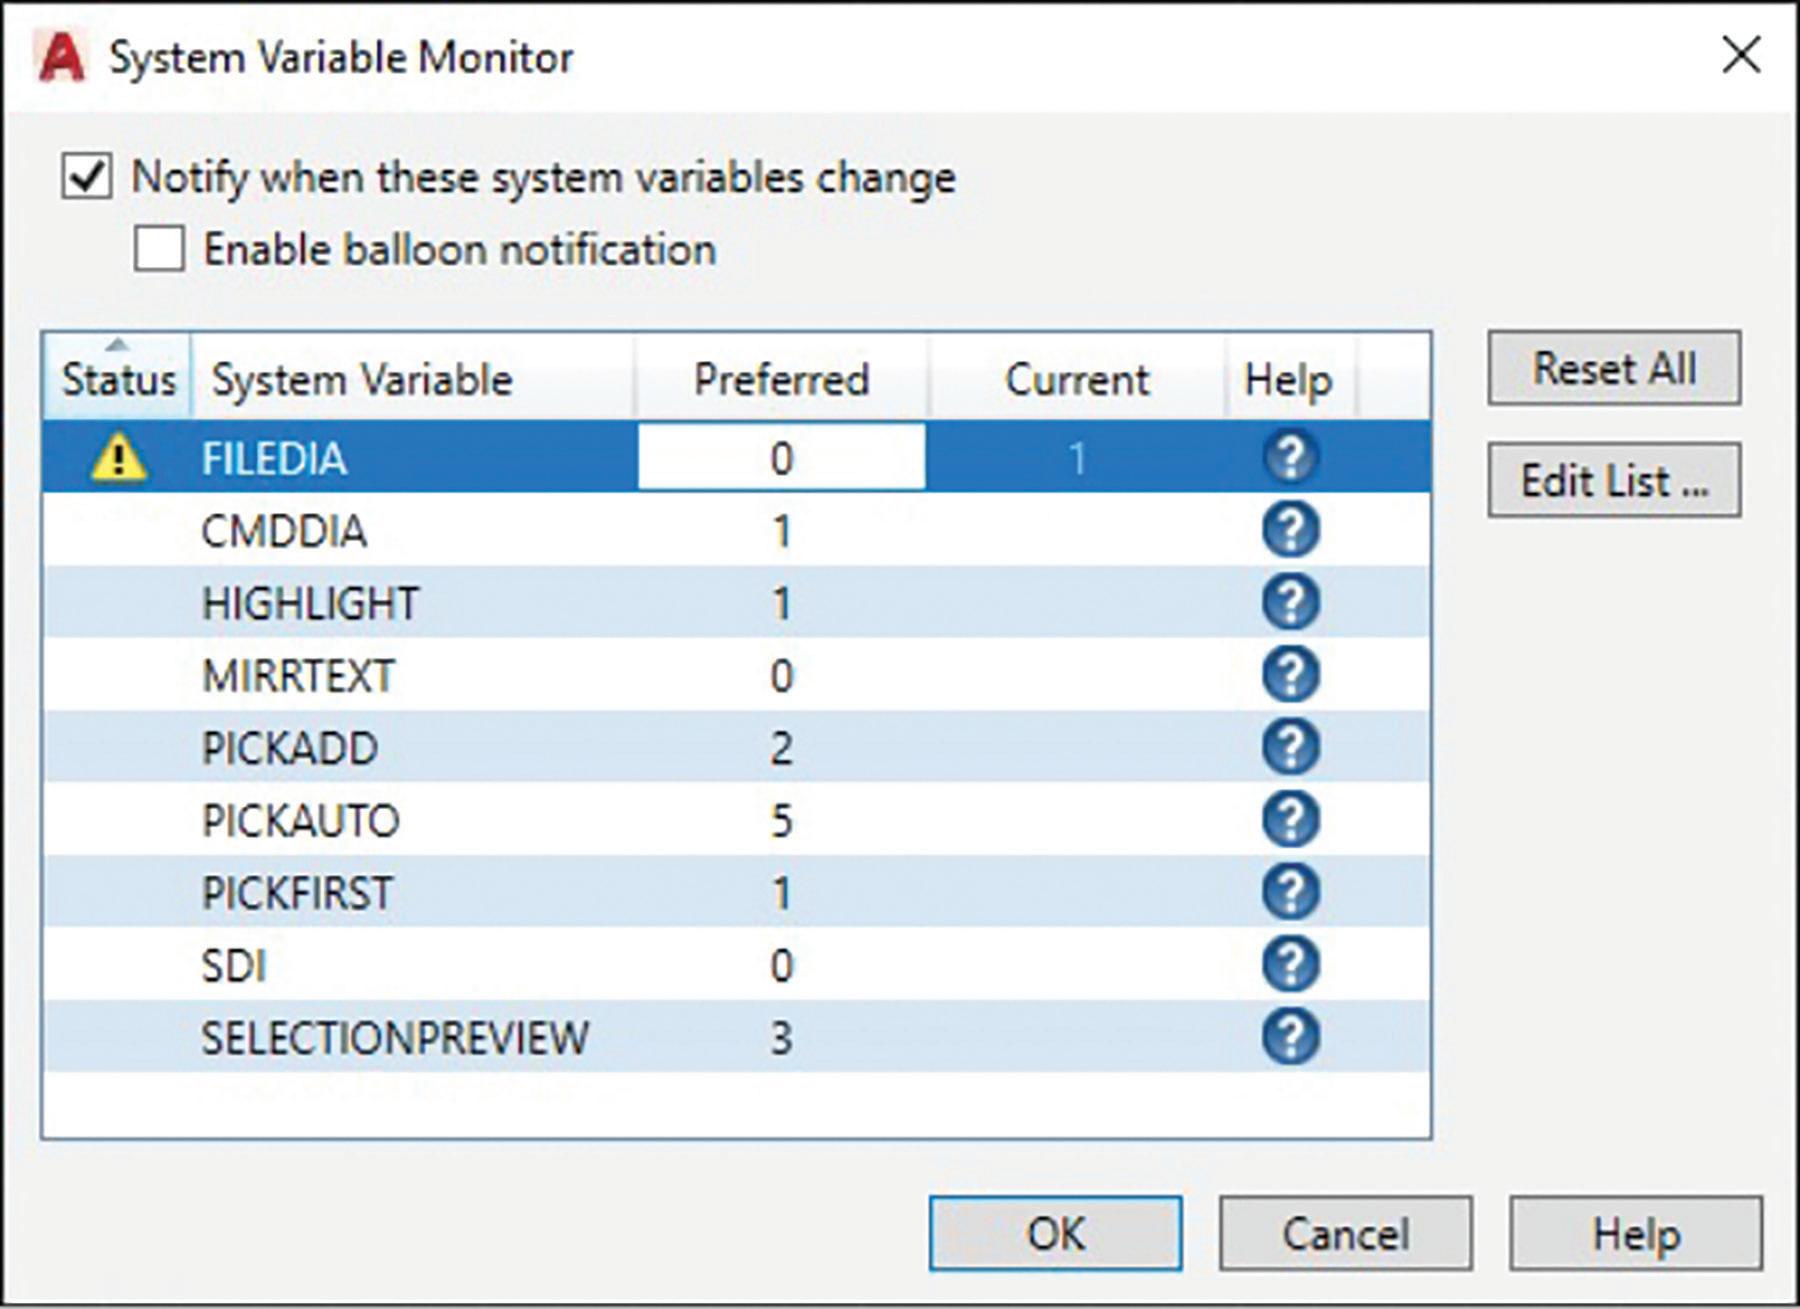
The System Variable Monitor is designed to contain a list of AutoCAD system variables and provide access to view and change the default values as needed. You can access the system variable monitor by typing SYSVARMONITOR at the command prompt or right clicking on the status bar as shown in Figure 14 and select Configure System Variable Monitor.
Click on the “Edit List” button within the main window and


Figure 14: System Variable Monitor Status Bar

Figure 15: System Variable Monitor Dialog Box

a new dialog will open (Figure 15). Scroll through the available system variables in the left windowpane or begin typing a variable name in the search field.
Select the variable then click on the right arrow to move them to the monitored system variables in the right pane. You can also remove variables by reversing this step. When done click on “OK”
CONCLUSION
If you want to learn more about system variables and how they can affect your drawings, then look for my class at Autodesk University 2022 named “System Variables Explained” in New Orleans. In this class we will review over 50 system variables that can directly affect the way you work in a negative or positive way. At the time of writing this article the voting will be underway and we will not know if the class was selected or not. Either way we will continue to investigate system variables in AutoCAD and how they can affect your workflow.
Sam Lucido is a Design Systems Administrator for CHA Consulting, Inc. He has over 25 years of experience in engineering design projects, user support, CAD standards and customization. Sam is professionally certified in AutoCAD, Civil 3D, and an Autodesk Expert Elite Member. Sam has been a top-rated Autodesk University Speaker for the past 7 years and created many articles on AutoCAD and Civil 3D through the Autodesk Knowledge Network. He uses his vast knowledge about AutoCAD and Civil 3D to help provide support to engineering and design teams at CHA Consulting, Inc. You can find him at CADProTips.com and he can also be reached at sam. lucido@cadprotips.com


