1 minute read
Accounts
To track the transactions and balances for key reports like the Balance Sheet and Profit and Loss, QuickBooks online uses a list of accounts, or Chart of Accounts. The setup process will create a generic Chart of Accounts which can be customised.
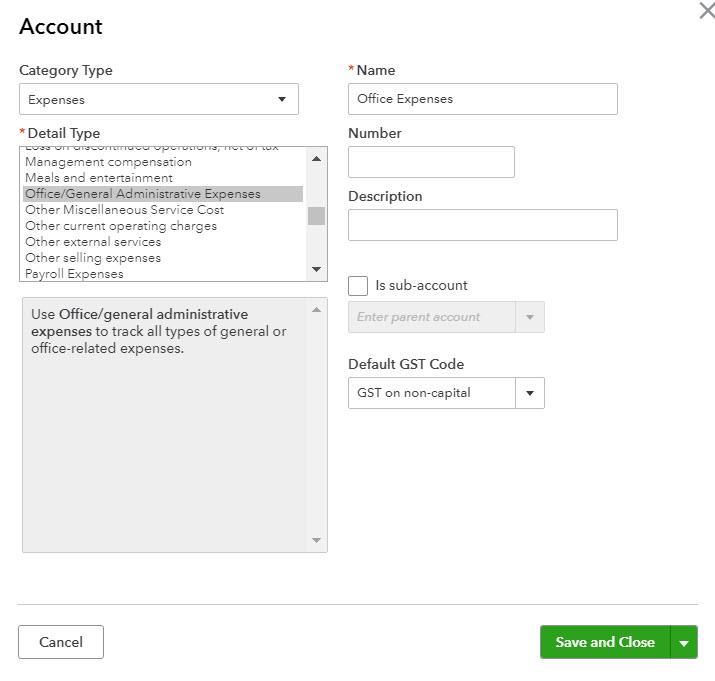
Manually add an Account Locate the Chart of Accounts, select the Gear Icon > Your Company > Chart of Accounts. Select New from the top right hand corner. This opens a new screen where the account can be configured.
Advertisement

Category Type - specifies the account type.
Note: Cash and cash equivalents is used for setting up Bank Accounts. Credit Cards are set up as Category Type - Credit Card. Typically, Expenses are coded as ‘non-capital’ and Asset purchases are coded ‘capital’. Out of Scope refers to accounts and transactions that are not reportable on a BAS. e.g. Owner’s Drawings. In other accounting systems ‘GST’ or ‘GST free’ are commonly used.
Detail Type - provides more detail on the Category type selected. It is a compulsory field although it does not affect any financial reporting. Select the detail type closest to the account being set up. Name - this is the name of the Account being set up. It is what is seen in the Chart of Accounts List. Number – An optional account number. Description - allows greater detail of the name to be added and is optional. Is sub-account - place a tick in the sub-account selection field to make the account being set up a sub-account of another account.
Default GST Code - select the appropriate GST coding for the account being set up. To update the Chart of Accounts you would click Save and Close.
Note: An alternative way to navigate to the Chart of Account is via the Accounting tab from the left hand navigation bar.


