48 minute read
Munis Instructions
MUNIS COMMON SEARCH TOOLS
Ranges and/or logical search characters can be used in your search The following is a list of characters and an example of their use. Not all these characters can be used in all fields. For example, you cannot use the wildcard character (*) in a date field.
Advertisement
NOTE: MUNIS is case-sensitive so a name entered as John Doe in MUNIS would not be found if the user put JOHN DOE in the name field when doing a search.
SYMBOL DESCRIPTION * Wildcard Use this with any combination of letters or numbers before or after the symbol EXAMPLE OF USE Office* returns any names that begin with Office (Office Max, Office Depot) *Office* returns any names that contain the word Office (Staples Office Supply, ION Office Equipment, Office Max)
> Greater Than >1/16/07 returns all dates greater than the specified date. >= Greater Than or Equal To >=1/16/07 returns the specified date and all dates greater than the date specified
< Less Than
<= Less Than or Equal To
<> or != Not Equal To
<$10,000 00 returns all amounts less than the amount specified. <=1/16/07 returns the specified date and all dates less than or equal to the date specified <>135 or !=135 used in Dept/Loc returns all departments except 135 : or .. Range 500:599 returns all amounts including the beginning and ending amounts | Pipe symbol Used as “and” Finds the named data items, regardless of the range For example, 1/1/06|1/10/06|1/31/06 returns only the three dates
Vendor Search
A Department can look up vendors either through the Munis Vendor Inquiry program or Munis Vendor Central
Vendor Inquiry
Departments may access Munis Vendor Inquiry program through Financials>Purchasing>Purchase Order Inquiry and Reports>Vendor Inquiry or Departmental Functions>Vendor Inquiry The following is the Main screen of Vendor Inquiry:
Departments may search for vendors using any of the following fields or combination of fields in Vendor Inquiry: • Vendor – Assigned number, which is used to record all vendor activities in the Munis system • Alpha – Vendor alpha sort value, which has a maximum of 21 characters • Status – Pre-defined by Munis. The following are vendor statuses in Munis: • Active – Indicates a current vendor that may use for either PO or P-card purchases • Bidder – The City currently does not use • Inactive – Provides a warning during invoice entry that the vendor is inactive but does not prevent the usage of the vendor The City currently does not use • One Time Pay – Indicates a vendor number used one time to pay multiple recipients Vendors cannot be updated to this status; they must be created as One Time Pay vendors These vendors may only be used by Accounts Payable and the P-card Program • Stop – Prevents the use of this vendor during requisition and invoice entry P-card only vendor status is Stop and can only be used in the Munis P-card Statement program • Temporary - Signifies that this vendor is only to be used for a short period of time. The City only uses this status for Utility Billing refunds • Self Service – Indicates a potential vendor has added its information using Vendor Self Service The Purchasing Division reviews the vendor information for completeness, works with the vendor to obtain any missing information, and then changes the status to Active • Entity – The City uses only “1” • Type – Defined by the City. The following are current vendor types in Munis: • EDUC – Education Institution • EMPL – Employee Reimbursement

VENDOR SEARCH
• GOVT – Government Entity • MEMB – Membership Organization • NPRO – Non-Profit Vendor • PURC – Product Vendors • REFN – Refund to Customer • SERV – Service Vendor • Reason - The City creates the reason codes The following are the current reason codes: • BNF – Benefits / Insurance • EMP – Employee Vendor • FINA – Banks / Payment Processing • GOVT – Government Entity • MEMB – Membership • PAYR – Payroll • PCAR – P-Card Only • REFU – Refund to Customer • SOFT – Software • UTIL – Utilities Entity • VSS – Vendor Self Service • YEC – Year End Close Adjustments • Company Name – up to 50 characters • DBA – Doing Business As name for the vendor • Address – Searches can be by street or P O Box, City, Zip Code, or Country • Email – Email address • www – Website address • FID – Federal Tax ID
Vendor Central
Departments can access Munis Vendor Central program through Financials>Accounts Payable>Vendor Processing>Vendor Central The following is the initial search screen:
A main difference between Vendor Inquiry and Vendor Central is you must use wildcards or enter the exact information to search for a vendor in the Vendor Inquiry program While in the Vendor Central program, you can type in part of the information without wildcards and it brings up all vendors with matching information Also, in Vendor Central, capitalization (CAPS) does not affect the search results For example:


VENDOR SEARCH

To change between the above tile view to the grid view below, select the icon circled above

The Advance Search allows you to search by the following other fields. You can also save your searches.

Purchase Order (PO) Serach
A Department can search for a PO either through the Munis Purchase Order Inquiry program or Munis Purchase Order Central program
Purchase Order Inquiry
Departments may access Munis Purchase Order Inquiry program through Financials>Purchasing> Purchase Order Inquiry and Reports>Purchase Order Inquiry or Departmental Functions>Purchase Order Inquiry To search for a PO or group of POs, complete the following steps: 1 Select Search from the menu bar 2 Complete any of the following fields or combination of fields:
3 Select Accept from the menu bar 4 If the search generates multiple POs, use the Browse function from the menu bar to view all POs, and select the PO you want by double clicking on it or use the arrows on the bottom ribbon to move between
POs

Purchase Order Central
Departments can access Munis Vendor Central program through Financials>Purchasing> Purchase Order Inquiry and Reports>Purchase Order Central The following is the initial search screen:
One of the main differences between Purchase Order Inquiry and Purchase Order Central is you must use wildcards or enter the exact information to search in the Purchase Order Inquiry program While in the Purchase Order Central program, you can type in part of the information without wildcards and it will display POs with matching information Also, in Purchase Order Central, capitalization (CAPS) does not affect the search results

Departments may find the advance search is a better tool than the initial search. The advance search searches by any of the following combinations of fields. You can also save your searches.
PURCHASE ORDER (PO) SEARCH


To change between the above tile view to the grid view below, select the icon circled above

General Ledger (GL) Account Search
Departments may look up GL account information either through the Munis Account Inquiry program or Munis Account Central program
Account Inquiry Program
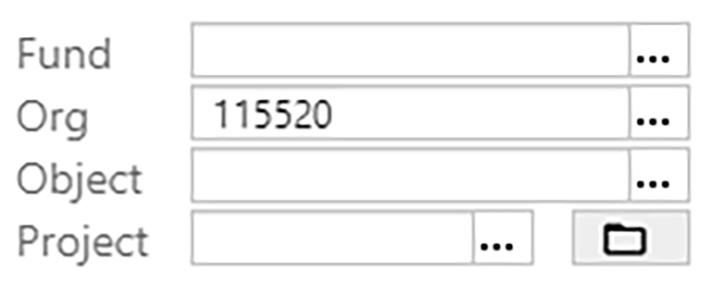
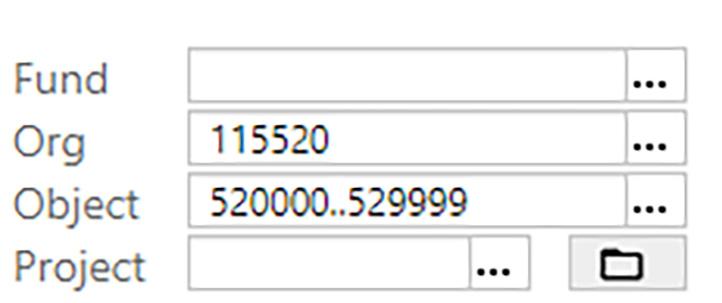
Departments may access Account Inquiry through Financials>General Ledger Menu>Inquires and Reports> Account Inquiry Departments may search desired general ledger information by: 1 Select Search from the menu bar 2 Select an Org, Object, etc , or use Munis Common Search Tools • Seach by 1 Org Code:
• Seach by 2 Org codes, 1 Obj code:
• Search by 1 Org, Range of Obj codes:
• Search by Budget Rollup Code:
3 Select Accept from the menu bar to start the search 4 Select Browse from the menu bar to view the accounts in a list


Customize the Browse Screen
• Sort the list - select a column name to sort
GENERAL LEDGER (GL) ACCOUNT SEARCH
• Select/de-select columns • Right-click on any column name to open the menu • Scroll through the list and check or uncheck columns as desired Then close the box by clicking anywhere on the screen outside of the box
• Rearrange the columns by selecting and holding the column that you want to move and drag it where you want it • Change the split of the view on the screen - hover over the dividing line until you see the up and down arrow, then drag the dividing bar between the upper and lower parts of the screen down


GENERAL LEDGER (GL) ACCOUNT SEARCH
Drilling Down to the Detail
To view the details behind an account, select the yellow folder next to the amount you want to view
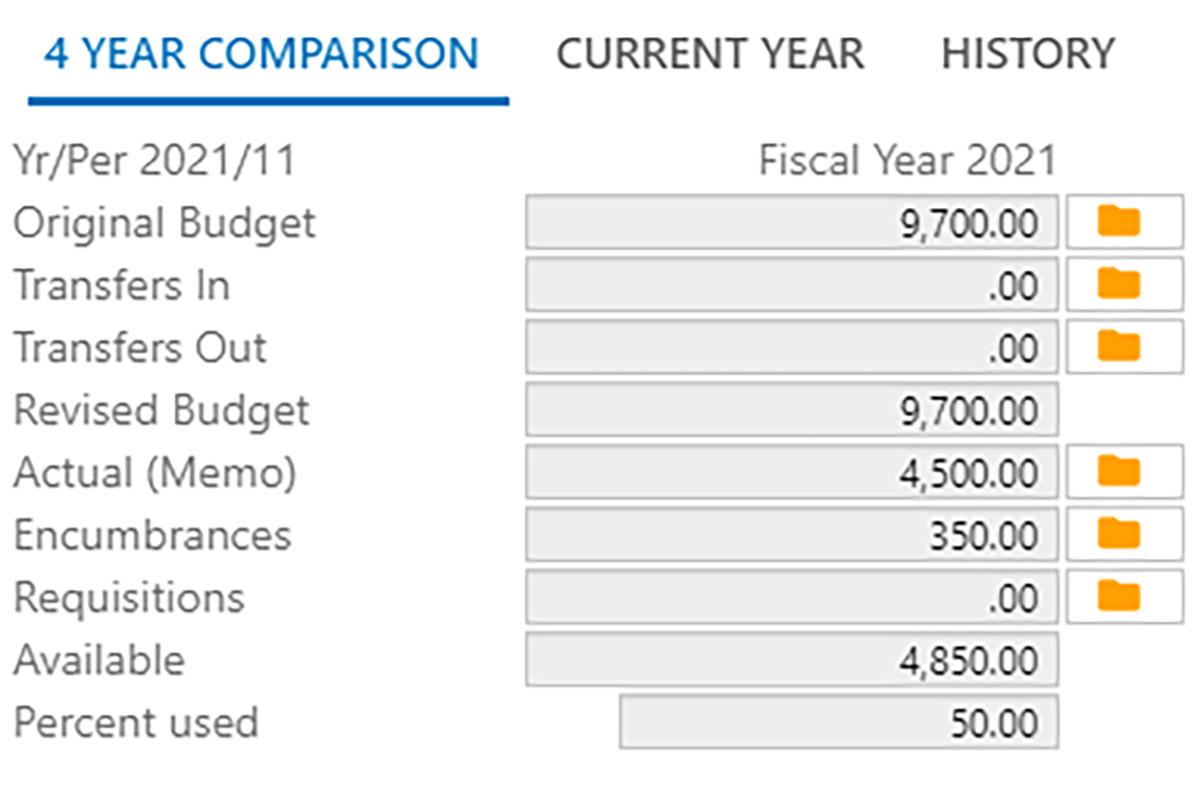
Actuals (amount paid out) POs created, vendor not paid Reqs not yet converted to POs Available budget
Detail, Months, and Totals Functions
Detail - Select this to see data for a specific date range or other options.
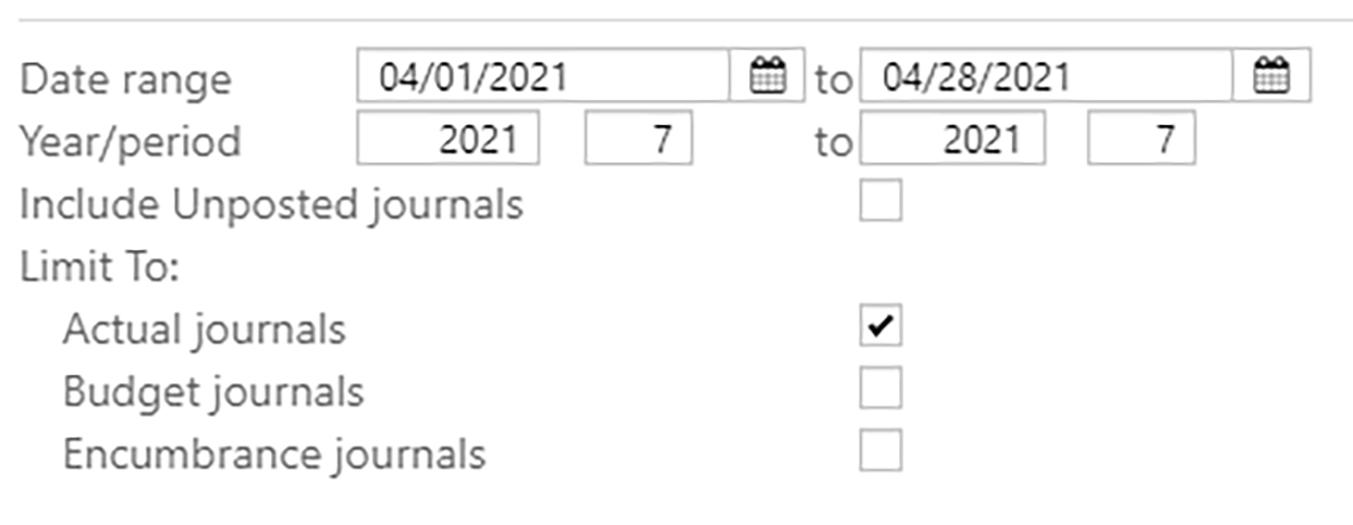
Months - Select this to see data by month
Totals - Select this to total all selected accounts from the search Within this function you can then open a yellow folder and all transactions from all accounts are included in the detail


GENERAL LEDGER (GL) ACCOUNT SEARCH
Source Codes
• API - Check or EFT payment Double select on the line to get more detail • GEN - Journal Entry Highlight the line, then select Journal for more detail • GNI - Another type of Journal Entry Highlight the line, then select Journal for more detail • POE - Purchase Order Encumbrance Double select on line to get more detail • POL - Purchase Order Liquidation Highlight the line, then select Journal for more detail
Account Central
Departments can access Munis Account Central Program through Financials>General Ledger Menu>Inquires and Reports>Account Central. The following is the first search screen:

The Advanced Search allows you to search by the following fields. You can also save your searches.
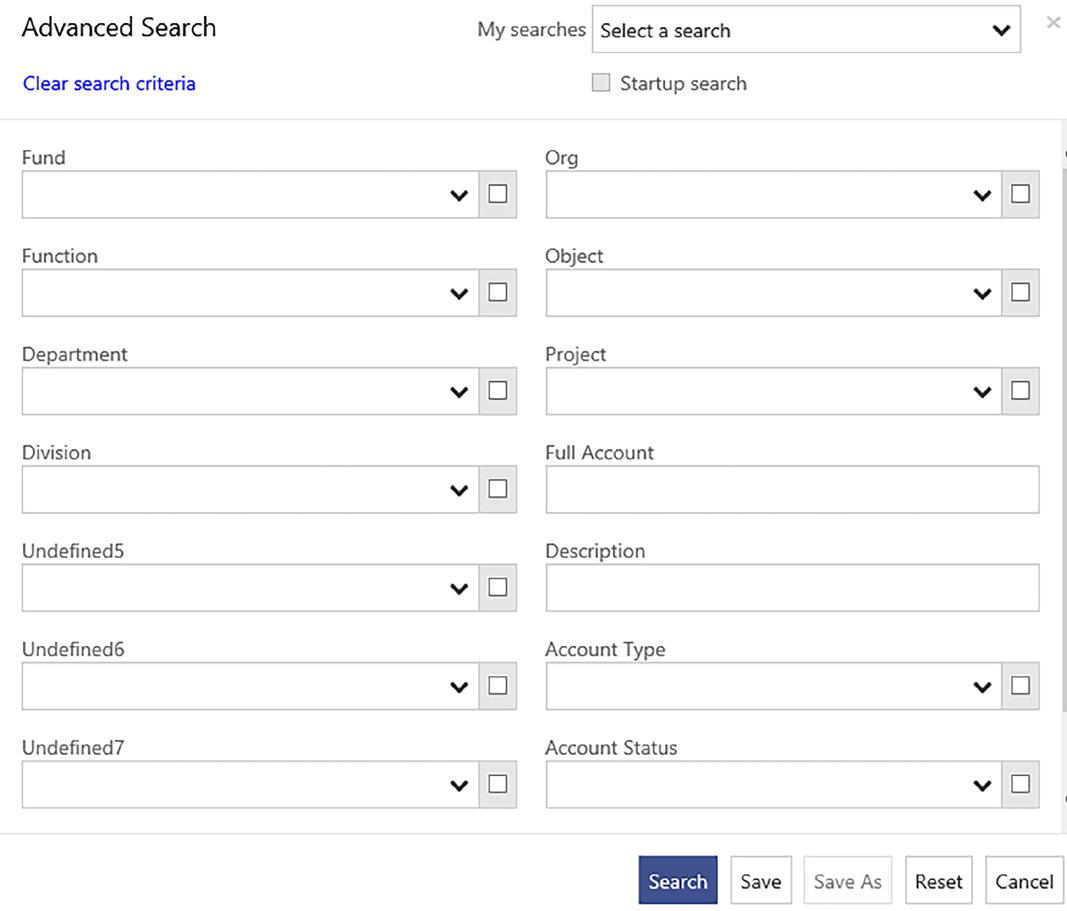
The Search Results appear in tile or grid format The following is the tile format:

GENERAL LEDGER (GL) ACCOUNT SEARCH
To change between the previous tile view to the grid view below, select the icon circled above
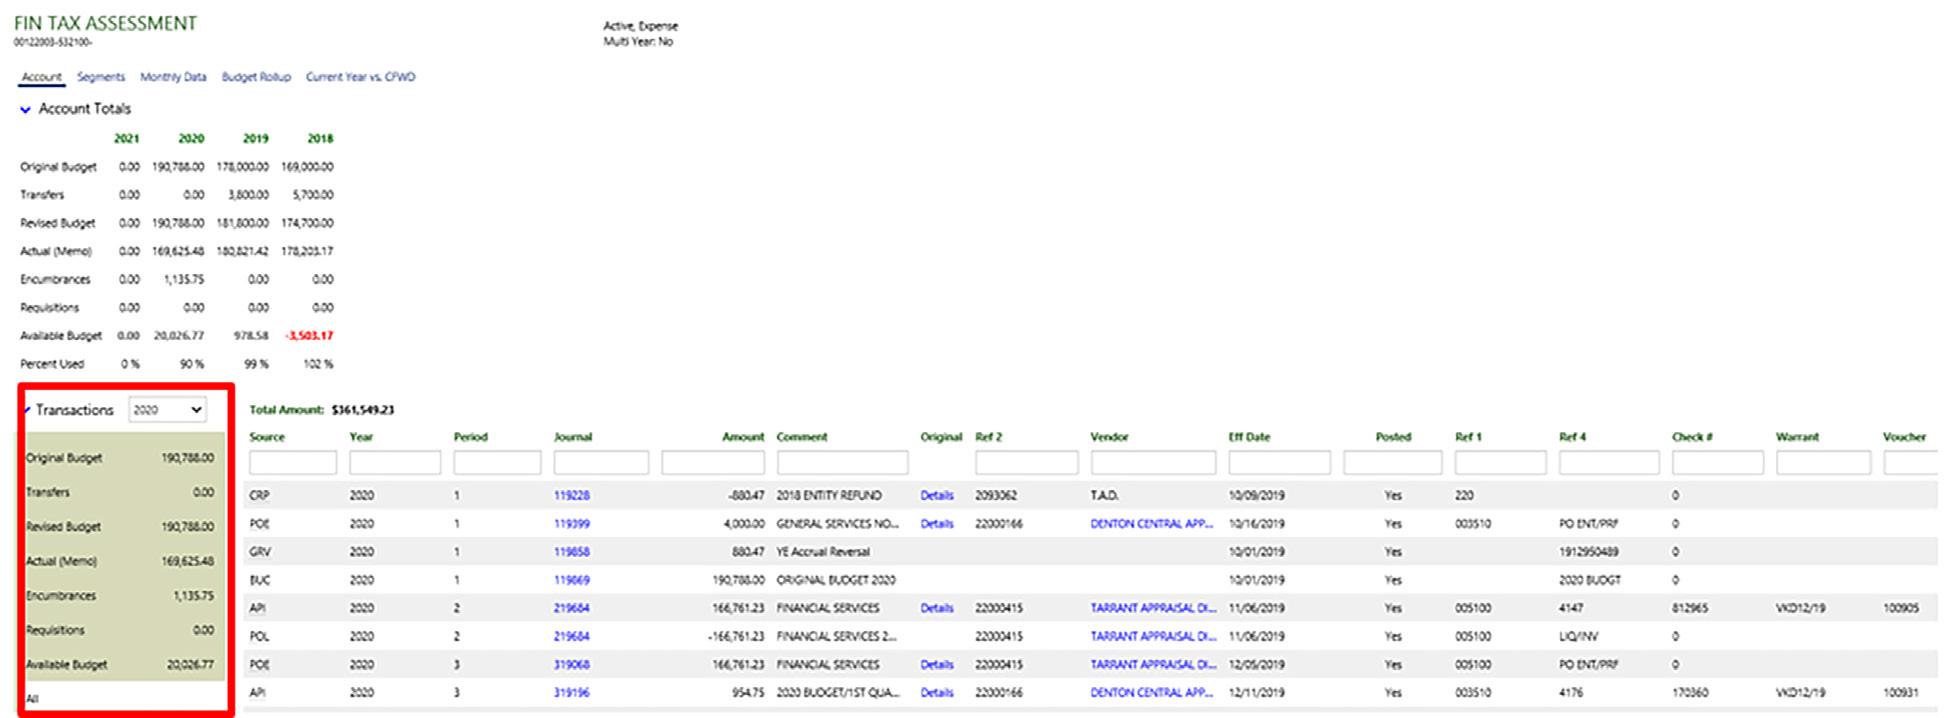
Select the tile/description you would like to drill down further on Once selected there are 5 tabs across the top (Account, Segments, Monthly Data, Budget Rollup, and Current Year vs CFWD)

Account Tab
Departments can see transaction information on the account tab To see different Munis transactions, select the desired type of transactions (Original Budget, Transfers, Revised Budget, Actual, Encumbrances, Requisitions, Available Budget, or All). You can change the year to see prior years detail. You can also filter any column by typing in the box under the column title
Segments
The Segments tab shows the account’s segment groups

GENERAL LEDGER (GL) ACCOUNT SEARCH
Monthly Data
The Monthly Data tab shows the transactional information in a graph To see different Munis transaction types, select the desired type of transactions (Actuals, Encumbrances, Budget Transfers, or Budget)

Budget Rollup
The Budget Rollup tab shows the budget rollup code that the account is currently included in

Current Year vs. CFWD
The Current Year vs CFWD tab lists the current year and carry forward (CFWD) amounts, if applicable

Year-to-Date (YTD) Budget Report
Departments may create budget reports in summary or in detail through the Munis General Ledger YTD Budget Report program by accessing the program through Financials>General Ledger Menu>Inquires and Reports>YTD Budget Report 1 Select Search from the menu bar 2 Select an Org, Object etc , or use Munis Common Search Tools Search by one Org code: Search by Org codes in a range:


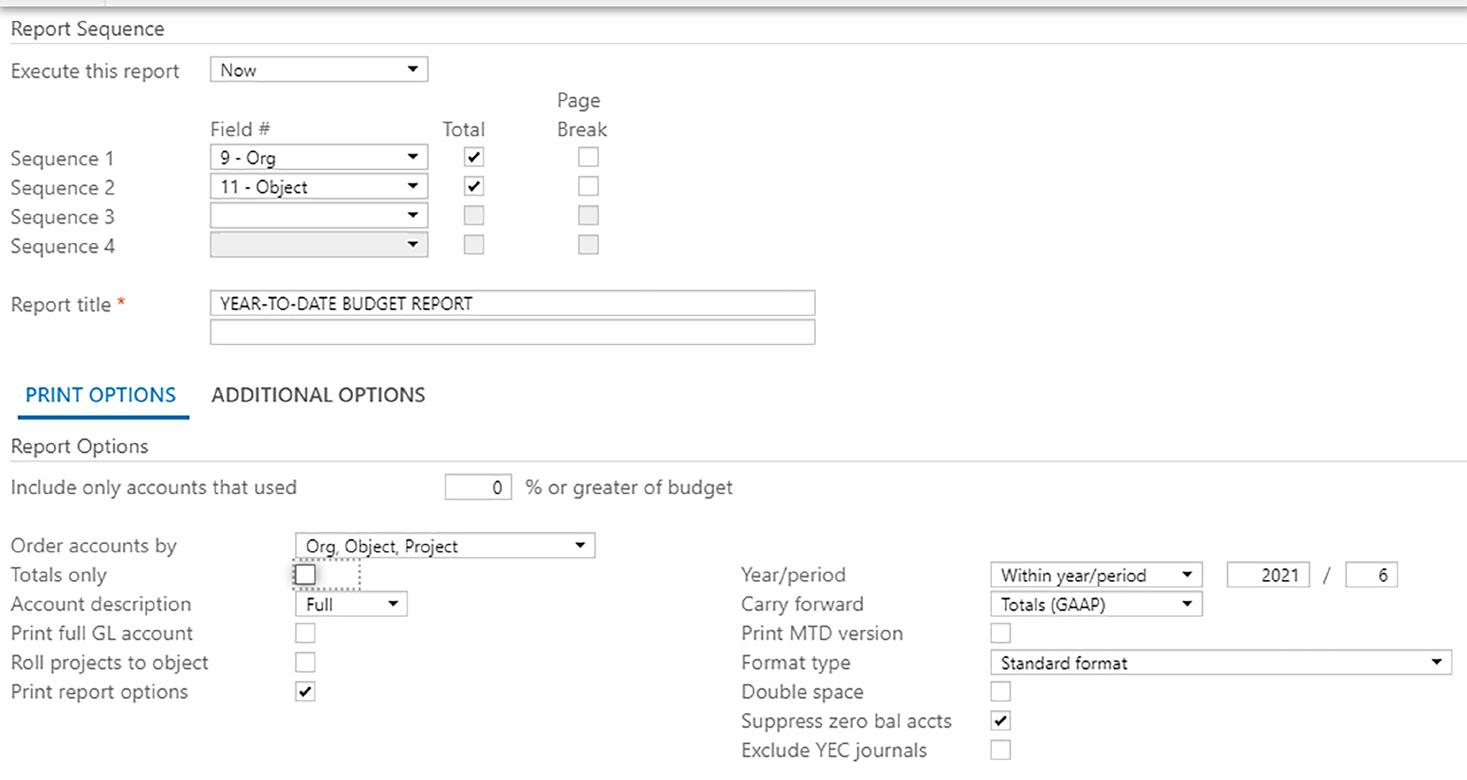
3 Select Accept from the menu bar to initiate the search 4 Select Report Options from the menu bar for report settings 5 This is an example of report settings for a report with Totals only (no detail) You may work with the settings for different report looks. Selections only need to be made on the first tab called Print Options.

YEAR-TO-DATE (YTD) BUDGET REPORT
6 This is an example of report setting for a report with detail You may work with the settings for different report looks Totals only is not checked, and the Additional Options tab must be updated
Be sure to update the Print journal detail on this tab!
7 Select Accept to initiate the report 8 Journal Entry Sort option – Select (3) Invoice, then OK
9 Select Back from the menu bar 10 Select PDF or Excel to generate the report:


Requisitions
Creating a Requisition
Departments may access Munis Requisition Entry program through Financials>Purchasing>Purchase Order Processing>Requisition Entry or Departmental Functions>Requisition Entry and then complete the following steps to process a requisition: 1 Select Add from the menu bar The screen should look like the following:
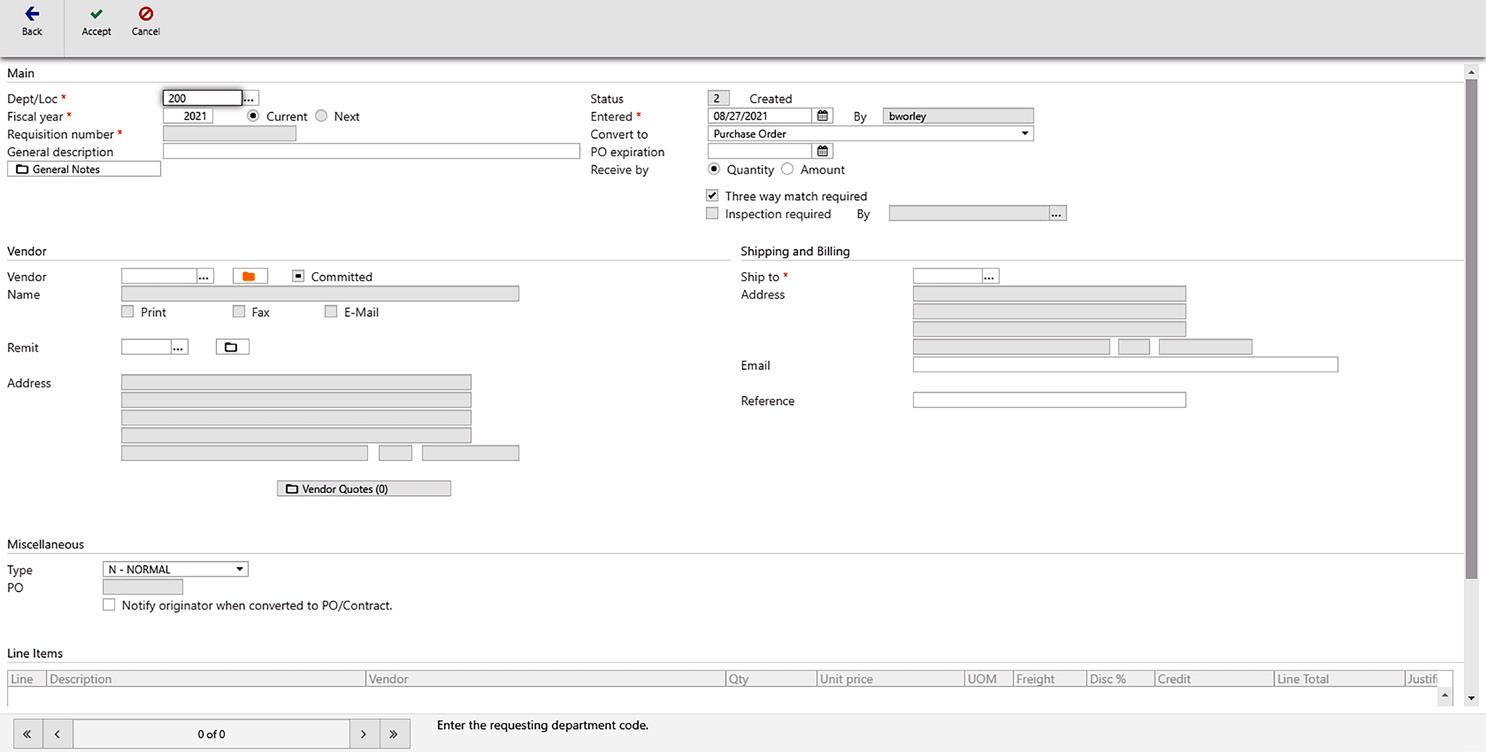
2 Complete all applicable sections on the first screen.
Main Information Section
Dept/Loc If you need to change the auto populated department, enter or select a different department The auto populated department is based on the user’s assigned department in Munis Users have access only to departments that the Munis Administrator has assigned
Fiscal year The fiscal year should auto populate. If the year is not correct, please contact the Purchasing Division before proceeding
Requisition number Auto populates to the next number for the department The format of the requisition number is DDYYXXXX (DD = first 2 digits of the department numbers, YY = Budget Year, and XXXX= sequential number assigned by Munis starting with 0001)
General Description Field Enter a brief description of the overall requisition This description does not appear on the printed PO It is for internal use
Entered Date Auto populates and should not be changed
Convert to Auto populates and should not be changed
PO expiration Do not enter. It will auto populate to the last day of the fiscal year when the requisition is processed.
REQUISITIONS
Received by Determines the method by which a purchase order created from the requisition is received If Quantity is selected, the Department receives by quantity and the invoice can only be processed for the number of units received at the unit price on the requisition If Amount is selected, the department receives by the dollar amount that the Department is authorizing Accounts Payable to pay Departments cannot change this selection through a PO Change Order
General Notes These allow internal communication about the requisition By selecting the checkbox Print on PO, the note will print on the PO at the bottom
Vendor Information Section
Vendor - Enter Vendor number (see Munis Instructions - Vendor Search) Munis auto populates the vendor information based on the individual vendor set-up Verify the Remit address is correct for this purchase as some vendors have multiple remit addresses Accounts Payable processes the payment based on the selected remit address from the requisition
Shipping and Billing Section
Verify that the Ship to address is correct for this purchase or select a different location
Miscellaneous Section
Type – Currently the City only uses two types
N – Normal - Purchase order for specific goods or services. (majority of requisitions)
B – Blanket - A purchase order that is intended to be used over a long period of time PO – Auto populates once the requisition is converted to a PO
3 After completion of all sections on first screen, Select Accept. Second screen should look like:
If Quantity was selected under Receive by:
If Amount was selected under Receive by:
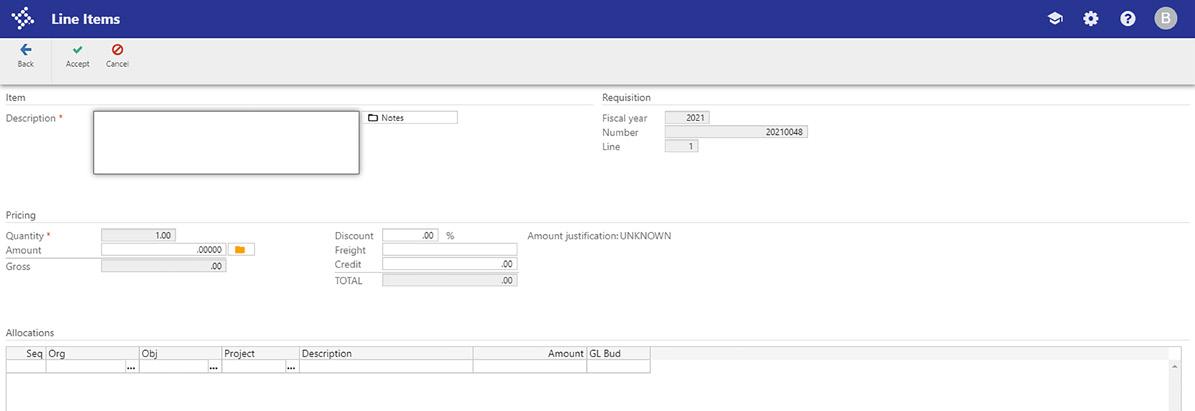
4 Complete all applicable sections on the second screen
Description Detail description of the line item This description prints on the PO

REQUISITIONS
Notes These allow internal communication about the line By selecting the checkbox “Print on PO”, the note will print on the PO at the bottom
Quantity If using Quantity under Receive by section on first page, enter the number of units being ordered. If Amount was selected under Receive by section on first page, it is greyed out with a quantity of 1.
Unit Price Only when Quantity is selected under Receive by section on first page. The Department receives by quantity and Accounts Payable only processes the invoice for the number of units received at the unit price on the requisition
UOM Only when Quantity is selected under Receive by section on first page. It should default to Each, do not change
Amount Only when Amount is selected under Receive by section on first page. The Department receives by dollar amount that the Department is authorizing Accounts Payable to pay
Discount The City does not use
Freight Enter the amount of delivery If this option is used and there is a partial receiving of products/services from the PO, Munis will recognize the freight proportionally to the percentage of the receiving to the overall PO This may not be the best option in most situations
Credit The City does not use
Org, Object, Project Enter the general ledger account number
5 Select Accept from the menu bar 6 If the Department receives an Over Budget Message, the Department determines if a budget transfer is required and complete the budget transfer process before completing the requisition 7 If the Department needs to add more lines to the requisition, select Add from the menu bar 8 Repeat steps 4 through 7 until all lines have been added 9 Select Back from the menu bar 10 Attach applicable documents per the Bidding Parameter section of the Playbook by selecting the down arrow next to attach Select Open TCM
11 A Tyler Content Manager (TCM) window opens Select the Plus sign “+” on the ribbon

REQUISITIONS
12 Select the Up Arrow on the ribbon
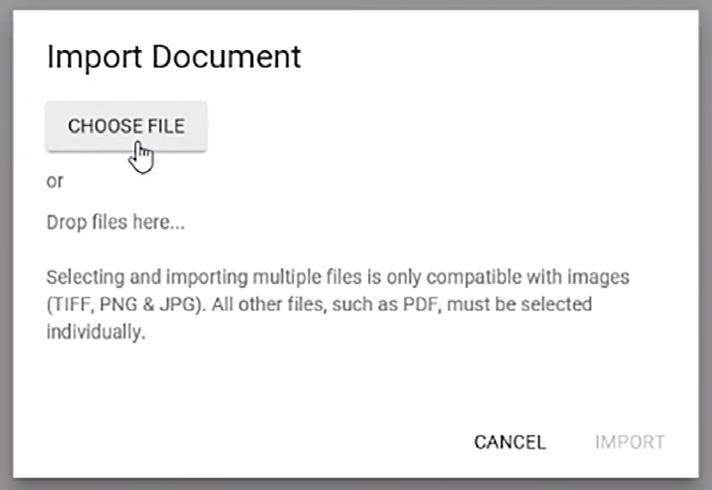
13 Either drag the document to the Import Document box or Select Choose File and select desired file.
14 Select Import 15 Select Save in the upper left corner You must save after each document
16 If additional documents need to be uploaded, repeat steps 14 through 18 17 Close the TCM window 18 Select Release from the menu bar to release the requisition into the approval workflow. Approving a Requisition
A requisition flows through a workflow process to obtain approvals. The workflow depends on the total value of the requisition, and the assigned Department approval levels as determined by the Director. Munis notifies an assigned Approver either through email and/or the dashboard, depending on the Munis user’s notification delivery selection, when a requisition is ready for his/her approval The Approver is responsible to review the requisition for compliance with the City’s purchasing policies and procedures (Playbook), including attached documents, and appropriateness of the requisition The Approver may access the requisition using one of the following ways: 1 From the Tyler Menu, select Departmental Functions> Workflow Assistant. 2 Directly from the Approval Tile 3 From the Tyler Menu, select Departmental Functions> Requisition Approvals If the Approver determines the requisition is complete and appropriate, the Approver selects Approve, adds optional comment if desired, and selects Accept The requisition moves to the next Approver or if the last Approver, Munis sends the Purchasing Liaison (PL) a notification that the requisition is approved.
If the Approver determines the requisition is not complete or appropriate, the Approver selects Reject, adds required comment, and selects Accept The requisition moves back to the originator for correction Note: Using the Hold status will not stop the requisition from auto forwarding after the set number of days programmed in the workflow setup. Handling a Rejected Requisition
If a requisition is rejected by an Approver, the PL receives notification of the rejection. Complete the following steps to correct any issues: 1 Login into to Munis Requisition Program
REQUISITIONS
2 Select Search 3 Enter Status as 1 (Rejected) and the fiscal year or the requisition number.

4 Select Accept Note: To view the rejection comments the Approver entered in Munis, select Approvers on the bottom ribbon and it appears on the top of the next screen Select back from the menu bar to return to the Requisition screen
5 After selecting the applicable rejected requisition, select Activate from the menu bar to return the requisition to an Allocated status, which allows you to correct 6 Status changes to Allocated 7 Select Update from the menu bar on the screen requiring changes and make the required changes 8 Once the PL addresses the required changes, select Release from the menu bar to release it into the workflow.
Converting a Requisition to a Purchase Order (PO)
To convert an approved requisition to a PO, Departments access the Munis Requisition Conversion program through Financials>Purchasing>Purchase Order Processing>Requisition Conversion and then complete the following steps: 1 Select Search 2 Enter the applicable search information
3 Select Accept The program lists all requisitions for the PL 4 Select Select from the menu bar 5 Select Approve under Code next to the requisition to convert


REQUISITIONS
6 To view the requisition, select View Requisition from the menu bar 7 Select Back from the menu bar 8 Select Accept from the menu bar 9 Select Process from the menu bar The requisition disappears from the list
Printing the PO
To print the PO after the requistion conversion, Departments access the Print Purchase Orders program through Financials>Purchasing>Purchase Order Processing>Print Purchase Orders and then complete the following steps: 1 Select Export PO(s)

2 Select Define from the menu bar. 3 Select Print and change the Included PO Numbers to the desired PO
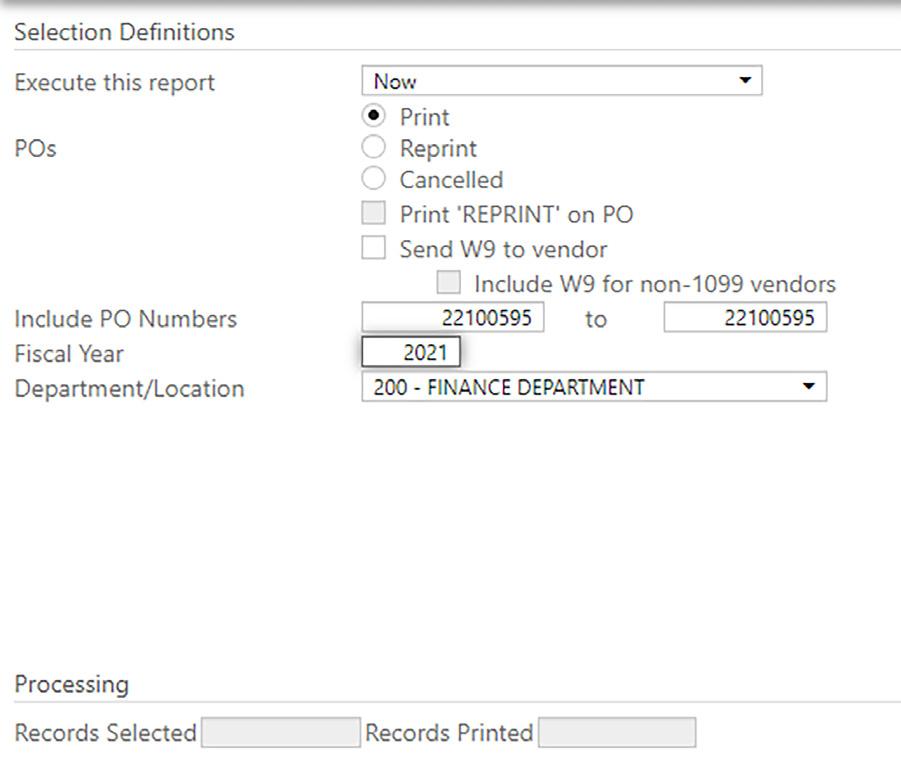
4 Select Accept from the menu bar 5 Select Select from the menu bar (number of records found appears on the bottom ribbon) 6 Select Ready Forms
7 Select the down arrow and then select Process Purchase Order
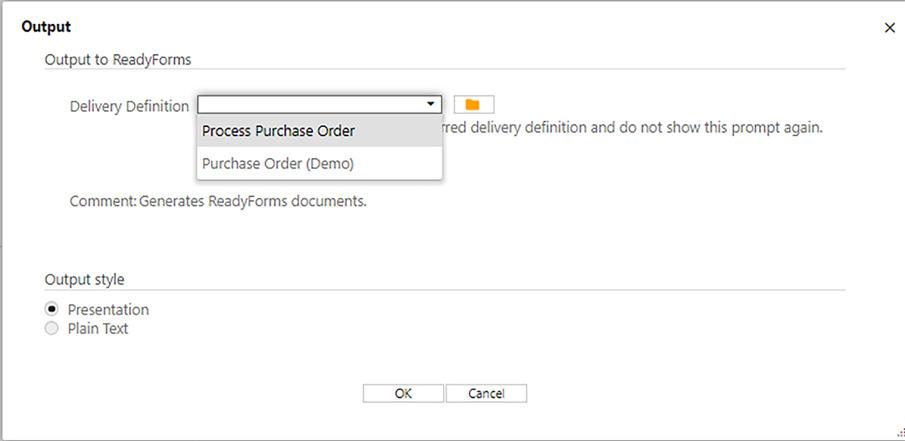
Purchase Order Change Orders
Creating a Change Order
Departments may access Munis Purchase Order Change Orders program through Financials> Purchasing>Purchase Order Processing>Purchase Order Change Orders and then complete the following steps to process a Purchase Order (PO) Change Order: 1 Select Search from the menu bar 2 Enter the PO number that needs a change order 3 Select Accept from the menu bar 4 Select General Notes and add any applicable notes
5 Select Add from the menu bar 6 Enter the reason for the change order and any other relative information 7 Select Accept from the menu bar 8 Select Back from the menu bar to move back to the PO Change Order screen 9 Select on the Line Items from the menu bar 10 To move between line items, use the arrows on the bottom ribbon

Adding an Additional Line
a Select Add b Complete the following areas: i Description (under Journal Information section) - the reason for the change order ii Quantity iii Description (under Item section) – line item description, which shows on printed PO iv Unit Price v UOM (Unit of Measurement) – Each vi Requested by vii Org, object, and project code c Select Accept
Modifying an Existing PO Line
a Navigate to the line to be modified. b Select Update c Complete the following areas, if applicable: i Description (under Journal Information section) - the reason for the change order ii Quantity (under New section) iii Unit Price (under New section) iv Description (under Detail section) – line item description, which shows on printed PO v Requested by (under Detail section) vi Org, object, and project code d Select Accept e Repeat steps until all lines that need to be modified are completed.
PURCHASE ORDER CHANGE ORDER
Creating a Change Order (Continued)
11 Select Back to move back to the PO Change Order screen from line items 12 Select the down arrow next to Attach 13 Select Open TCM
14 A Tyler Content Manager (TCM) window opens Select the Plus sign “+” on the ribbon
15 Select the Up Arrow on the ribbon
16 Either drag the document to the Import Document box or Select Choose File and select desired file.
17 Select Import 18 Select Save in the upper left corner You must save after each document
19 If additional documents need to be uploaded, repeat steps 14 through 18 20 Close the TCM window 21 After all change order information has been entered, select Release This releases the Change Order into the workflow process to the assigned Approvers. Approving a Change Order


PO Change Orders flow through a workflow process to obtain approval. The workflow depends on the total PO value after the Change Order, and the assigned Department approval levels as determined by the Director
Munis notifies the Approver either through email and/or the dashboard, depending on the Munis user’s notification delivery selection, when a PO Change Order is ready for the Approver The Approver is responsible for reviewing the Change Order for compliance with the City’s purchasing policies and procedures (Playbook), including attached documents, and appropriateness of the Change Order The Approver may access the Change Order using one of the following ways: a From the Tyler Menu, select Departmental Functions>Workflow Assistant. b Directly from the Approval Tile
PURCHASE ORDER CHANGE ORDER
If the Approver determines the Change Order is complete and appropriate, the Approver selects Approve, adds optional comment if desired, and selects Accept The Change Order moves to the next Approver or if the last Approver, Munis sends the Purchasing Liaison (PL) a notification that the Change Order is approved.
If the Approver determines that the Change Order is not complete or appropriate, the Approver selects Reject, adds required comment, and selects Accept The Change Order moves back to the originator for correction
Note: Using the Hold status does not stop the Change Order from auto forwarding after the set number of days that is determined in the workflow setup. Handling a Rejected Change Order
If a Change Order is rejected by a workflow approver, the PL receives notification of the rejection. Complete the following steps to correct any issues: 1 Login into to Munis Purchase Order Change Orders Program 2 Select Search 3 Check the box for Change Order and select Rejected under Status

4 Select Accept 5 After selecting the applicable rejected Change Order, select Reactivate from the menu bar to return the
Change Order to Created status to make changes 6 Select Yes to the following question
7 Under Journal Description, enter the reason for Change Order


PURCHASE ORDER CHANGE ORDER
8 Select Accept The Change Order Status will be at created status

9 Select Update on the screen that changes need to occur and make the required changes
Note: To view the rejection comments from the Approver, select Approvers and then All POM Approvers on the workflow ribbon, the reason appears at the top of the next screen. Select Return on the ribbon to return to the Charge Order screen
10 Once the required changes are complete, select Release to release it into the workflow. Printing a Change Order
Once the PO Change Order is approved, the PL prints the purchase order by going to the Print Purchase Orders program through Financials>Purchasing>Purchase Order Processing>Print Purchase Orders and completing the following steps: 1 Select Export PO(s)

2 Select Define from the menu bar. 3 Select Reprint and change the Include PO Numbers to the desired PO

PURCHASE ORDER CHANGE ORDER
4 Select Accept from the menu bar 5 Select “Select” from the menu bar (number of records found appears on the bottom ribbon) 6 Select Ready Forms from the menu bar
7 Select the down arrow and then select Process Purchase Order
8 Select OK Munis sends the PL and the Vendor an email with the PO attached

PURCHASE ORDER CHANGE ORDER

Receiving on PO’s
Departments may access the Purchase Order Receiving program through Financials>Purchasing> Purchase Order Processing>Purchase Order Receiving and then complete the following steps to receive services/products on a PO: 1 Enter applicable PO number in the search box (See Munis Instructions – Purchase Order Search)
2 Click on the Purchase Order Number
“Received by” Types (Amount vs Quantity) a If 100% of the PO was received at the same time no matter the “Receive By” type, place checkmarks next to Full shipment and Close PO and if applicable, enter the Packing Slip number b If the “Received by” on the Requisition was Amount and receiving a partial amount of the total PO, enter the dollar amount for each line in the Amount Receiving column and if applicable, enter the Packing Slip number
If there are multiple lines and some of the lines were fully received, place checkmarks next to those lines and enter the dollar amount for lines that are partially received in the Amount Receiving column
c If the “Received by” on the Requisition was Quantity and receiving a partial amount of the total PO, enter the quantity received for each line in the Quantity Receiving column and if applicable, enter the Packing Slip number
If there are multiple lines and some of the lines were fully received, place checkmarks next to those lines and enter the quantity received for lines that are partially received in the Quantity Receiving column
3 Place a checkmark on the Close PO when this is the last receiving and the Department wants the PO closed out
4 Select Save


RECEIVING ON PO’S
5 Select Attachments to attach any applicable documents
6 Select PO Receivable
7 A Tyler Content Manager (TCM) window will open Select the Plus sign “+”
8 Select the Up Arrow on the toolbar


9 Either drag document to Import Document box or select Choose File and select the desired file.

10 Select Import 11 Select the Save icon in the upper left corner You must save after each document
12 If additional documents need to be uploaded, repeat steps 8 through 12 13 Close the TCM window
Accounts Payable Discrepeancies
When a Purchasing Liaison (PL) receives a notification from Munis that an APD is waiting for resolution, the PL researches and determines the appropriate resolution Then complete the following steps to complete the APD: 1 Select Update

2 Tab through Assigned to and Department status (3 tabs) 3 Enter the resolution or if the Department is waiting on a resolution enter what the Department is waiting on under the Notes section Note: Tab through any Program-Generated discrepancy lines
4 If approving a Unit Price Variance or Quantity Variance, check the Override box
5 Select Accept from the menu bar 6 Select Approve or Reject at the bottom of the screen


P-Card Statement
Reconciling a P-card Statement
The assigned P-card Holder/Purchasing Liaison (PH/PL) reconciles and releases the P-card statements to the Statement Approver no later than the 15th of the month Complete the following steps to reconcile a P-card Statement:
1 Log on to Munis 2 Open the Purchase Card Statement program using one of the following ways: a From the Tyler Menu, select Financials>Accounts Payable>Invoice Processing>Purchase Cards>Purchase Card Statements; b Select Purchase Card Statements from your favorites if you have saved it to your favorites; or c Directly from your Notification Tile (If you use this process, please skip down to step #7). 3 To search for a P-card Statement, select Search from the menu bar 4 Under Status, Select New
5 Select Accept from the menu bar This brings up any P-card Statements assigned to you in the New status 6 If you have multiple P-card Statements assigned to you, use the Browse function from the menu bar to view all statements in the New status, and select the desired statement by double clicking on it 7 To view, code and upload the receipt for each transaction, do one of the following: a Double-click on the transaction in the list under the Transactions section; or
b Select Transactions from the menu bar
8 On the Transactions screen, select Update from the menu bar 9 Update the following, as applicable: a Card Holder for Transaction – for most, you should not need to change this The PL documents the traveler’s name for Travel Cards b Vendor – Auto-populates if the Federal Tax ID (FID) exists in the Vendor Database in Munis If the FID does not exist in Munis, vendor 999993 appears with the name of the business from the JP Morgan import Vendor 999993 is the default P-card one-time vendor i If the vendor name begins with “SQ*”, please leave the vendor as 999993 ii It appears most refunds do not include the FID in the JP Morgan import and therefore, default to vendor 999993 Change it to the correct vendor number by searching through the menu or searching the vendor number in Vendor Inquiry or Vendor Central

P-CARD STATEMENT
iii If the vendor is a one-time registration or travel vendor, please leave the vendor as 999993 iv For all other vendors that come through as 999993, the PH/PL shall contact the P-card Administrator to determine if a new vendor needs to be added to the system If the PA determines and adds a new vendor, the PH/PL shall update the vendor number with the number provided by the PA Note: Walmart and Sam’s Club use the same FID and therefore, auto populates with the Company Name of Walmart/Sams Club c Charge Description - Update field, using all CAPS, to accurately describe the purchase and reason for the purchase, if applicable. The field allows you to enter 100 characters, but only the first 50 characters flows into the AP invoice process, and only the first 30 characters appears in the comment section of the General Ledger Account Detail The better the description, the easier to see what the purchase was for, which helps department personnel in researching issues and preparing for the next year’s budget d Commodity code – Leave blank e Contract – Leave blank f Invoice Number – If applicable, enter the invoice number exactly as it appears on the invoice, including leading zeros, dashes, periods, etc g Org Obj Project – Update to the applicable account number, as it defaults to 00122003-599999
Leave the column titled “A” with N i If the amount needs to be split between multiple accounts, you may use the percentage or amount column to allocate ii If you do not have access to the Org Obj Project you need to code the transaction to, please reach out to the P-card Administrator iii If the account coding is not changed, the PA rejects the entire P-card Statement and sends it back to the PH/PL for correction and it requires review and approval again by the assigned Statement Approver h Notes - Optional, but a good way to communicate to the Statement Approver and P-card
Administrator any information to better understand the transaction The folder turns orange when a note has been added i Select the Notes folder

ii Type the desired information iii Select Stamp Top or Stamp Bottom iv Select Save v Select Back to return to the transaction screen 10 After updating the above fields, select Accept from the menu bar. 11 If you get a warning similar to the following, it means that the Org.Obj.Project field has not been updated or the Org Obj Project selected is in a budget rollup code that is over budget

a If the Org Obj Project was not updated, update to the correct Org Obj Project b If the Org Obj Project is correct but is over budget, a budget transfer needs to be processed
Work with the applicable person in the Department to process a budget transfer After the budget transfer has been processed in Munis, update the Org Obj Project
P-CARD STATEMENT
12 Select the down arrow next to Attach from the ribbon and then select Open TCM to upload the detail receipt and any other supporting documents
a Receipt / Invoice i Verify the receipt agrees to the amount charged on the P-card Statement ii Verify the receipt is readable, itemized (no total only receipts) and has no sales tax (only exception is for travel) iii Verify no capital asset or CIP purchases on P-card, must use a P O iv Verify no travel upgrades For air fare, staff is to choose the most economical way to travel Travel upgrades for personal comfort, preference or convenience shall be at the traveler’s expense v Verify no fuel purchases for the use of personal vehicle The City reimburses the use of a personal vehicle through mileage A Cardholder may use a P-card for fuel for a City vehicle vi Verify an itemized receipt for room service charges on a hotel bill is attached and the room charges and room service charges are coded correctly to lodging and meals b Additional documentation - If the purchase is over $3,000, verify that either the required documentation is attached or there is information under the Notes section documenting how the bidding requirements were met Bidding requirements are the same when using a P-card as they are with a P O c If applicable, verify an APPROVED P-card Exception Request form is attached for all exceptions to the City’s P-card / Playbook polices and procedures See the P-card Exception Process under the Purchase Card Program section of the Playbook 13 A Tyler Content Manager (TCM) window opens Select the Plus sign “+” on the upper left corner
14 Select the Up Arrow on the toolbar

15 Either drag the document to the Import Document box or select Choose File and select desired file.

P-CARD STATEMENT
16 Select Import 17 Select the Save icon in the upper left corner You must save after each document
18 If additional documents need to be uploaded, repeat steps 13 through 17 for each document 19 Close the TCM window 20 Repeat Steps 8 through 19 for each transaction by using the arrows at the bottom of the screen to move between transactions on the transaction screen
21 After all transactions are coded and receipts uploaded, select Back from the menu bar 22 Select Release from the menu bar. This releases the Statement into the workflow process to the assigned
Approver. You know the Statement was released into the workflow process when the status changes from New to Released 23 If the following warning message appears, select Yes, if you have attached the required documentation to each transaction This means you attached the support documents correctly to the transactions and not to the Statement

Approving a P-card Statement
The P-card Statement Approver is to complete the approval process by the 20th of each month Complete the following steps to Approve or Reject the P-card Statement: 1 Log on to Munis 2 Open the Purchase Card Statement program using one of the following ways: a From the Tyler Menu, select Financials>Accounts Payable>Invoice Processing> Purchase Cards>Purchase Card Statements; b Select Purchase Card Statements from your favorites if you have saved it to your favorite; or c Directly from your Approval Tile (If you use this process, please skip down to step #7). 3 To search for a P-card Statement, select Search from the menu bar 4 Under Status, select Released
5 Select Accept from the menu bar This brings up any P-card Statements assigned to you in the Released status, waiting for approval 6 If you have multiple P-card Statements assigned to you, use the Browse function from the menu bar to view all statements in the Released status and select the desired statement by double clicking on it

P-CARD STATEMENT
7 To review each transaction, do one of the following: a Double-click on the transaction in the list under the Transactions section; or
b Select Transactions from the menu bar 8 From the Transaction screen, review the following: a Charge Description – Review for appropriate description, which should accurately describe the purchase and reason for the purchase, if applicable. The field allows 100 characters, but only the first 50 characters flows into the AP invoice process, and only the first 30 characters appears in the comment section of the General Ledger Account Detail The better the description, the easier to see what the purchase was for, which helps department personnel in researching issues and preparing for the next year’s budget b Org Obj Project – Review for the appropriate account coding c Notes – Optional, but a good way for the PH/PL to communicate to the Statement Approver and P-card Administrator any information to better understand the transaction The folder turns orange when a note has been added If the folder is greyed out, there is no note
9 If something is incorrect, the Approver may either reject the Statement, which sends it back to the PH/PL to correct, or if it is a minor change, the Approver has the ability to correct it by selecting the Update icon on the menu bar and making the required change 10 Select the down arrow next to Attach from the menu bar and then select Open TCM to view the attached documents
11 Review all documentation. When there are multiple document files, you can move between documents by selecting the documents on the left-hand side of the screen a Verify the transaction is appropriate and for an allowable purchase b Verify the receipt agrees to the amount charged on the P-card Statement c Verify the receipt is readable, itemized (no total only receipts) and has no sales tax (only exception is for travel) d Verify there is sufficient documentation of how the bidding requirements were met, if applicable. e Verify the purchase follows both State and City policies and procedures f If applicable, verify an APPROVED P-card Exception Request form is attached for all exceptions to the City’s P-card / Purchase Playbook procedures See P-card Exception Process under the Purchase Card Program section of the Playbook 12 After determining the appropriate documents are attached and agrees to the charges on the P-card
Statement, you can close the TCM window and move back to the Transactions screen 13 Repeat Steps 8 through 12 for each transaction by using the arrows at the bottom of the screen to move between transactions


P-CARD STATEMENT
14 After all transactions have been reviewed, select Back from the menu bar 15 Select Approve from the ribbon at the bottom of the screen This releases the statement into the workflow process for final review by the PA.
Processing a Rejected P-card Statement
If at any time, an Approver determines the P-card Statement should be rejected and sent back to the PH/PL, the Approver selects the Reject button on the bottom of the Statement screen and adds the reason why If more explanation is required than the Munis allows, the Approver should send an email to the PH/PL 1 If a statement is rejected by an Approver, the PH/PL receives notification of the rejection via email or desktop notification depending on Munis user’s notification selection. Complete the following steps to correct any issues: a Login into to Munis P-card Statement Program (see Reconciling a P-card Statement under Munis Instructions - P-card Statement in the Playbook) b From the Statement screen, search for Statements with the status of Rejected c After selecting the applicable rejected statement, select the Reactivate option on the menu bar to return the Statement to New status to make changes
Note: To view the rejection comments the approver entered in Munis, click on Approvers on the bottom ribbon and it appears on the top of the next screen Select Back on the menu bar to return to the Statement screen
2 The following are possible ways to correct some common issues: a Attach the missing, readable, or correct documentation b Work with the vendor to credit back the sales tax and attach documentation showing the vendor credited the P-card c Reimburse the City for sales tax paid, missing receipts, or upgrade travel purchased Attach the receipt from the City cashier documenting the correction d Obtain and attach the APPROVED P-card Exception Request form See the P-card Exception Process under the Purchase Card Program section of the Playbook 3 Once the PH/PL corrects the outstanding issues, select Release The Statement Approver reviews and approves it again If all Statement issues are corrected, the PA approves and converts the Statement to invoices and Accounts Payable processes the invoices through the Accounts Payable program

Central Budget Entry
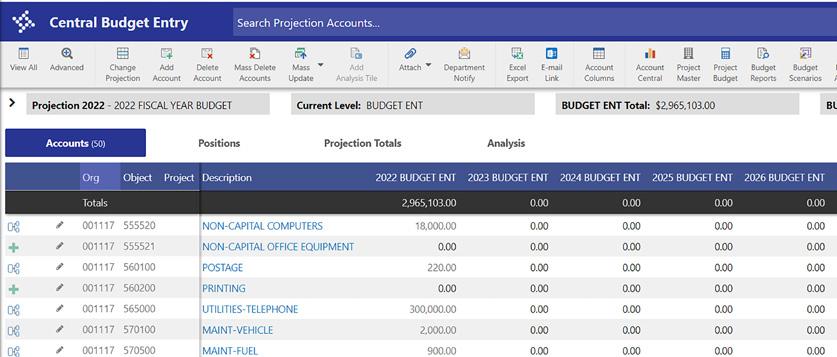
1 In the Tyler Menu, type in Central Budget Entry in the search bar and select the link
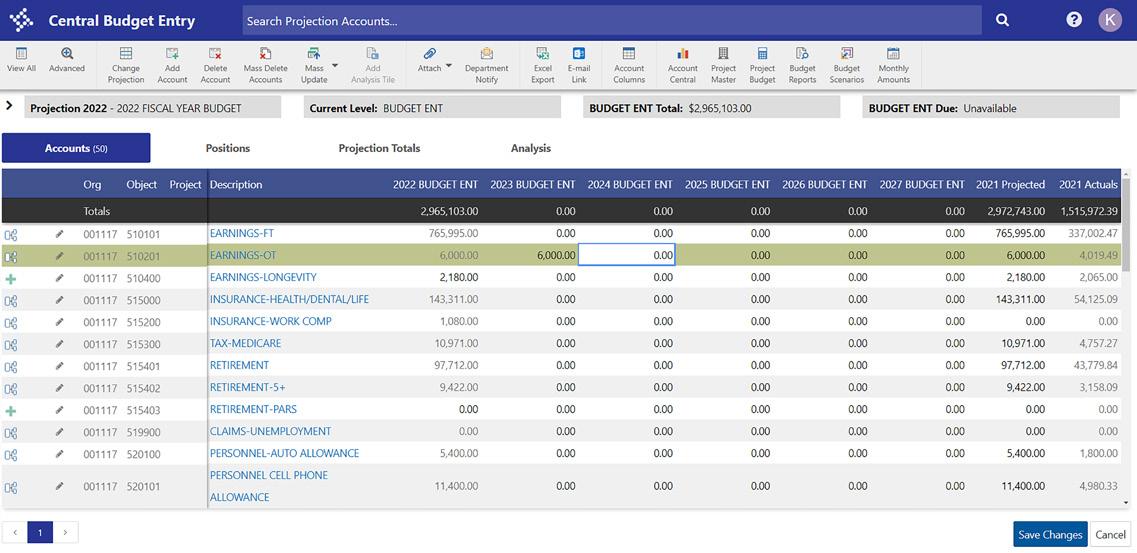
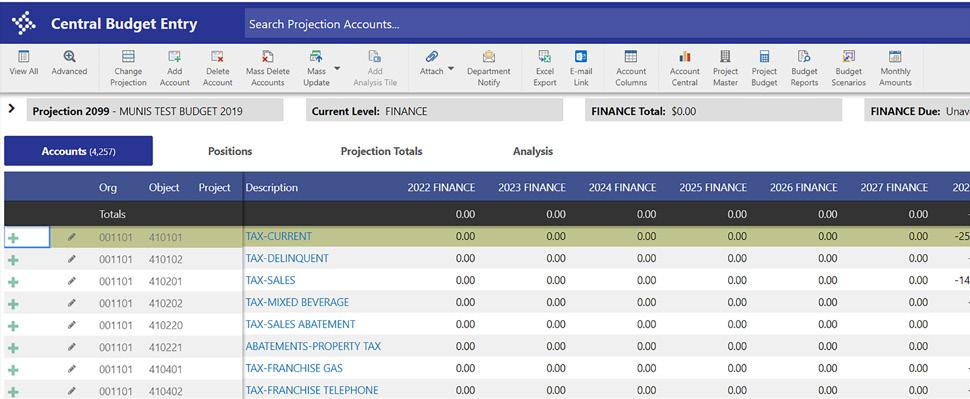
2 The Central Budget Entry screen will appear
3 Filter your view to see the ORG you want to work with by selecting Advanced on the menu bar


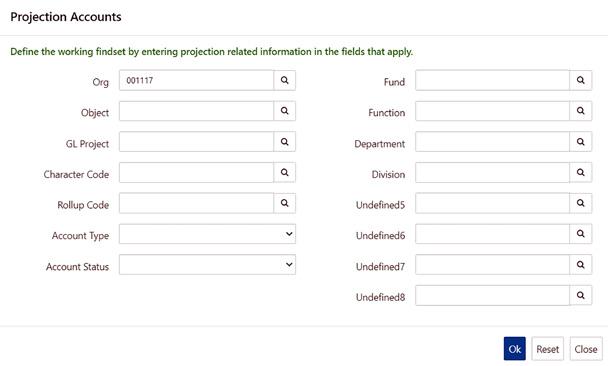
4 Search for the ORG by clicking on the magnifying glass or entering the ORG number directly At this screen, you can also continue to filter as needed. When finished select OK.
5 Your screen should now show you just your selected ORG Note: You also have some other options on this screen you can adjust before you start entering your budget For instance, adjusting your account columns is a good idea so it mirrors what you are required to enter For the current budget entry, you will want to see current budgeting year, the following five years, and the current year projected at minimum To adjust this, go to Account Columns

CENTRAL BUDGET ENTRY
6 To adjust Account Column, select Account Columns from the menu bar A new screen will appear Insert a check mark, in the box, next to each item you want to see on your main screen Select ok when you are finished. Your screen will now show you future years, as well as the year you are budgeting for.


Note: If you click the arrow next to the projection This will expand the top and show you your Target Number for this ORG You cannot exceed your target number in Munis If you are entering a line item that will push your total over the ceiling, it will kick it back and tell you in red that you cannot exceed your ceiling This means you will need to lower your number somewhere else or lower the amount you are entering At all times, you must stay at or below your target number Note: For budget entering purposes, you will not enter anything starting with a 51**** object code EXCEPT Overtime and Contract Labor Everything else starting with a 51**** is imported into your budget from HR based on your current, approved, employees In addition, you WILL NOT enter any allowances (auto, cell, etc ) HR will generate these when they import salary projections
Object codes that currently have detail will show the detail tree You will also see that their budget dollars are greyed out for the upcoming budget year The total will only get updated when you update each detailed line item for that object
Note: Object codes that do not currently have detail will show the plus sign 1 To modify object codes that currently have detail, click on the detail tree
2 A new screen will appear that shows the current detail


CENTRAL BUDGET ENTRY
3 To view or update current detail, select the stack in the far right corner Note: This is also how you update the month the item will be budgeted in
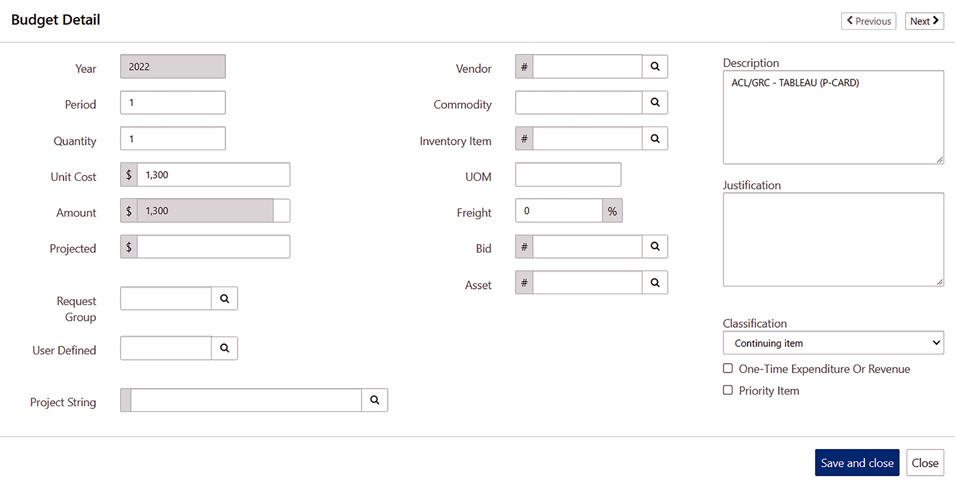
4 A new screen will appear
5 On this screen, you can adjust the following at minimum: • Period: This is the month you are budgeting this item in Keep in mind, this is the month you would spend the money for this item, or the month that the vendor invoices for this item and accounts payable sends payment That might not be the same month that the PO is generated (Note: Period 1 is October, Period 2 is November, etc ) • Quantity: How many of these are we budgeting for • Unit Cost: This is the cost for one • Amount: The amount will generate based on the quantity and unit cost • Projected: This is what you are projecting the amount to be for the current fiscal year you are in. • Description: Detailed information about this budget item • Justification: The why to support your budget for this line item. • Classification Note: There are other fields that you can fill in as well, but they are not required. These fields just provide more information to anyone, including you, when you go back and look at the detail about this item 6 Enter all the information and then select save and close Munis will take you back to the original screen for that object 7 To add additional budget dollars and detail to this object code, select the Add Detail button from the menu bar See the section Adding a Budget with Detail for an Object Code that Currently DOES NOT
HAVE DETAIL
8 Once you have completed adding detail for this object, select return This will take you back to the previous screen



CENTRAL BUDGET ENTRY Detail by Month for an Object Code that currently DOES NOT HAVE DETAIL
Object codes that do not have detail will show the plus sign You will also see that their budget dollars are 0 00 or black text for the upcoming budget year
Note: All object codes that have a budget dollar must include detail The budget detail is necessary because this is the only way to budget it in the correct month 1 To add detail to object codes that do not currently have detail, click on the plus sign
Note: A new screen will appear that has no detail to begin with 2 To begin, select add detail
3 Select add detail under the Operating/Capital category
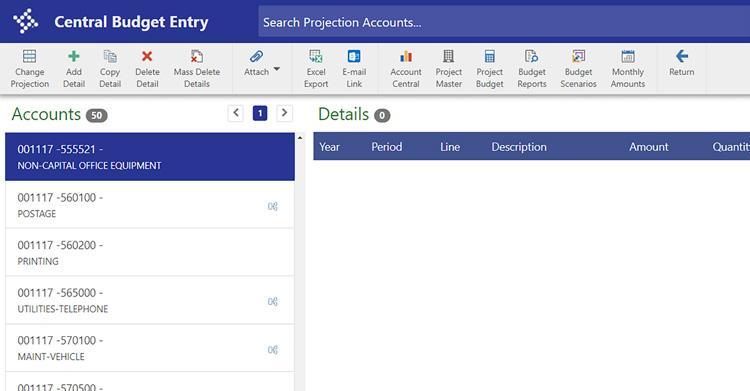

4 On this screen, you can adjust the following at minimum: • Period: This is the month you are budgeting this item in Keep in mind, this is the month you would spend the money for this item, or the month that the vendor invoices for this item and accounts payable sends payment That might not be the same month that the PO is generated (Note: Period 1 is October, Period 2 is November, etc ) • Quantity: How many of these are we budgeting for • Unit Cost: This is the cost for one • Amount: The amount will generate based on the quantity and unit cost • Projected: This is what you are projecting the amount to be for the current fiscal year you are in. • Description: Detailed information about this budget item • Justification: The why to support your budget for this line item. • Classification Note: There are other fields that you can fill in as well, but they are not required. These fields just provide more information to anyone, including you, when you go back and look at the detail about this item

CENTRAL BUDGET ENTRY
5 Enter all the information and then select save and close It will take you back to the original screen You can now see the detail you just added It has also added a detail tree to the object code that was not previously there
6 Repeat these steps until you have added all the detail necessary for this object code 7 When you have completed this object code, select Return on the menu bar


Adding a Projected Totals for Future Years
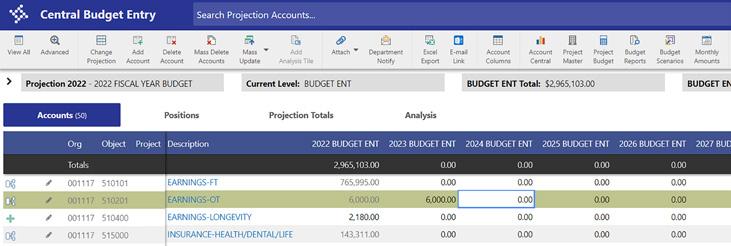
1 To add projected totals for future years, double click on the number under each year
2 Enter the total for the year
3 Once you enter the total, hit the tab button to go to the next year


CENTRAL BUDGET ENTRY
4 Repeat the process until the remaining years are complete Note: You will continue this process for each object code in the org 5 Once you have completed your updates, select save changes at the bottom of the screen
