www.digitalsurf.com
ISSUE IN THIS
NEW MOUNTAINS® 9.3
WHAT’S COMING?
5 reasons to update to Mountains 10.2
Accelerating surface analysis automation... and much more
APPLICATION
APPLICATION
Force spectroscopy:
Revealing key topographic parameters in surface bacterial adhesion
Strengthening polylactic acid polymers by calcification

HOW TO
FEATURE SPOTLIGHT

Welcome to the fascinating world of fiber analysis
Turbo-charge your analysis processes with no-code automation
SURFACE METROLOGY
SURFACE METROLOGY Q&A
Q&A
What’s new in surface texture standardization?
What cut-off value should I use?
NEWS & SOCIAL
Visitors to the upcoming Control trade fair in Stuttgart (April 23-26) will get an exclusive peek at the new version of industry’s most trusted surface analysis software.
EVENTS & SOCIAL Trade show review
Events highlights
What’s hot online
What’s hot online
Watch a WEBINAR
A much-awaited feature for critical dimension metrology and line edge roughness (LER) for AFM and SEM measurements of semiconductors makes its debut, as do many other new features for users of all categories of microscopic and spectroscopic techniques.
… Turn to page 2

Did you know there is a whole catalogue of free webinars waiting just for you on our website?
Head on over to our Webinar Library & become a Mountains® software expert in no time!
Check it out:
www.digitalsurf.com/learning/webinars/
Surface imaging, analysis & metrology news from Digital Surf Join us! CRITICAL
METROLOGY, POINT
ASSEMBLY,
MOUNTAINS®
SURF ACE
DIMENSION
CLOUD
IMPROVED 3D...
10.2 IS HERE!
…
NEWSLETTER // DIGITAL SURF // SPRING 2024 Newsletter SPRING 2024
5 REASONS TO UPDATE TO MOUNTAINS® 10.2
The new Mountains® 10.2 version release is just around the corner, with a preview scheduled at the Control trade show for quality assurance in Stuttgart to be held next April 23-26. The Digital Surf team is excited to showcase a number of new features, in particular dedicated to users working with topographic data. In the context of smarter manufacturing, many new tools contained in this version will contribute to improving automated practices in production environments. Read on to find out more.

1. POINT CLOUD STITCHING
In industrial metrology or inspection, point clouds offer a way to accurately create digital representation of surfaces, for example to check a manufactured part against an existing model.
Version 10.2 builds on previous releases to add a new Assemble Point Cloud feature.
Multiple point clouds, measured from different angles can now be stitched into a single point cloud. Overlaps are automatically detected and managed by the software.
Stitched point clouds can then be converted to Shells (freeform surfaces) for metrological analysis.
▶ SEE IT IN VIDEO: bit.ly/assemble-point-clouds
2. NEW POWER SPECTRUM DENSITY TOOL
Power spectral density (PSD) provides a representation of the amplitude of a surface’s roughness as a function of its spatial frequency.

It is used notably in optics and multi-scale analysis.
In Mountains ® 10.2, in addition to the Average spectrum tool previously available, users now have access to a new Power Spectrum Density feature. This allows log-log graph display with line fitting on the linear part, in order to calculate A and B parameters, according to ISO 10110-8.
3. CRITICAL DIMENSION METROLOGY
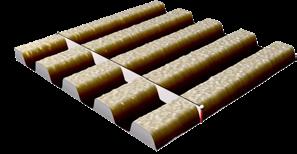
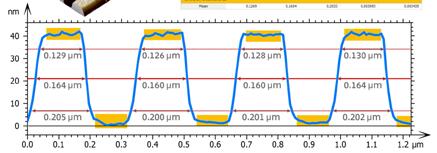
Another exciting addition to Mountains® analysis software comes in the form of the new Critical Dimensions & Trenches optional module.
Customers analyzing critical dimensions in semiconductor fabrication processes with atomic force microscopy (AFM), scanning electron microscopy (SEM) or optical profilometry can now:
▶ Detect peaks or trenches quickly and easily
▶ Calculate parameters relative to critical dimension analysis: height, top/middle/bottom CD, sidewall angle, pitch, width/pitch ratio etc.
SURFACE NEWSLETTER // SPRING 2024 2 WHAT’S NEW?
Above. Multiple point clouds can now be stitched into a single point cloud converted to Shells for metrological analysis

▶ Display surface geometry and values for each profile or for each pattern
▶ Statistically evaluate each detected pattern.
On SEM image data, users can calculate line edge roughness (LER) and line width roughness (LWR) parameters on the edges of detected bands, including in automated processes.
4. NEW OPTIONS & IMPROVED 3D RENDERING OF CUBES
Voxel cubes of mono-channel and multi-channel data acquired using various techniques (FIB-SEM, confocal Raman etc.) have had a make-over in new version 10.2. Users can now:
▶ Extract shells from voxel cubes: extract a Shell (freeform surface), detected at a particular density threshold, from a voxel cube measured by X-ray computed tomography (XCT)
▶ Improvements for volume electron microscopy: extract a sub-area when loading image stacks, segment data according to intensity and benefit from improved 3D rendering of cubes.
▶ Improved 3D rendering of multi-channel EDS cubes (mixed, combined, dominant).
LEARN MORE & UPDATE
5. MANY OTHER HELPFUL IMPROVEMENTS
▶ More options in template mode
▶ More control over parameter configuration
▶ Improvements to Contour study
▶ Better Particle Analysis
▶ Better W-axis (spectral axis) management
▶ Peak fitting: new settings
▶ Enhanced nanoindentation analysis


Check www.digitalsurf.com for full details of the v10.2 release (available May 2024). Access to the new version is included for users with an active Mountains® Software Maintenance Plan. To find out more about your Maintenance options, please contact sales@digitalsurf.com
SURFACE NEWSLETTER // SPRING 2024 3 WHAT’S NEW?
Above. New Critical Dimensions study for analysis of semiconductor fabrication processes.
Above. Improved 3D rendering of cubes: volumetric (left) and iso surface (right).
REVEALING KEY TOPOGRAPHIC PARAMETERS IN SURFACE BACTERIAL ADHESION

In the realm of dental implantology, understanding bacterial adhesion mechanisms is essential to avoid peri-implantitis (a destructive inflammatory lesion of soft and hard tissues surrounding oral implants), and ensure implant longevity. Recent research led by Steve Papa and fellow researchers at the Jean Monnet University in Saint-Étienne, France, revealed the intricate relationship between surface topography and bacterial adhesion, with a particular focus on Porphyromonas gingivalis, a bacterium closely associated with dental implant failure.
GOING BEYOND TRADITIONAL ROUGHNESS MEASUREMENTS
The study utilized femtosecond laser irradiation to create multiscale micro/nano-topographies, known as laser-induced periodic surface structures (LIPSS), on mirror-polished titanium samples.
These textured surfaces were meticulously analyzed using MountainsMap® software, offering unprecedented insight into surface properties. Instead of solely relying on traditional roughness measurements like Sa, the study explored a comprehensive range of parameters, including kurtosis (Sku), density of furrows and mean furrow depth.
MountainsMap® software was the central element in this research, providing a comprehensive
platform for surface analysis. By exploiting the software’s capabilities, the researchers were able to go beyond conventional roughness measurements and gained a nuanced understanding of surface-bacteria dynamics.
The correlation analysis was carried out between each surface parameter and bacterial adhesion, allowing the precise identification of key topographic parameters in bacterial adhesion.
Sku & FURROW ANALYSIS
The software’s versatility allowed analysis of measurements at various scales, such as microto nano-topographies, providing a global view of surface characteristics.
The study underlined the limitations of conventional roughness parameters in capturing the

SURFACE NEWSLETTER // SPRING 2024 4 APPLICATION 4
Above center. Graphical representation of the correlation betweenP.gingivalisadhesion and density of furrows or mean furrows depth with the Spearman’s rank-order correlation and associatedp-value. Left & right. Qualitative rendering of the furrows.
complexity of surface-bacteria interactions. Instead, parameters like Sku and the aspect ratio between density of furrows and mean furrow depth were significant indicators of bacterial adhesion.
Surfaces with lower furrow density and greater mean furrow depth were found to promote higher bacterial adhesion, showcasing the critical role of surface complexity in microbial colonization.
Furthermore, the research highlighted the potential for bacterial adhesion anticipation through surface evaluation, offering promising prospects for the field of ultrafast laser surface texturing. A more global and precise description of surface topographies would be instrumental in designing future biomaterials such as dental implants.
By revealing the intricacies of laser-textured surfaces with a great accuracy, MountainsMap® software is helping to pave the way to the development of nextgeneration dental implants with improved biocompatibility and longevity.
CONCLUSION
This research represents a significant advancement in understanding the multifaceted dynamics of bacterial adhesion on implant surfaces.
MountainsMap® software’s powerful and versatile tools enabled researchers to unlock new insights into surface/bacteria interactions, ultimately driving innovation in implantology as well as improving patient outcomes.


Above. 3D representation of laser-induced periodic surface structures.
A. Representative fluorescence images of calcein-stained P. gingivalis after 48 h of contact on partially textured samples. B & C. 2D & 3D representation of surface topographies generated with MountainsMap® software.
INSTRUMENTS & SOFTWARE USED
Focus variation microscope, scanning electron microscope & MountainsMap® software.
READ MORE
Key topographic parameters driving surface adhesion of Porphyromonas gingivalis
S. Papa, M. Maalouf, P. Claudel, X. Sedao, Y. Di Maio, H. Hamzeh-Cognasse, M. Thomas, A. Guignandon, V. Dumas. Sci Rep 13, Article no. 15893 (2023) doi.org/10.1038/s41598-023-42387-5
Work funded by public grant from the French National Research Agency (ANR) under the “France 2030” investment plan, ref. EUR MANUTECH SLEIGHT - ANR-17-EURE-0026
SURFACE NEWSLETTER // SPRING 2024 5 APPLICATION 55
Above. Colorized SEM image ofP.gingivalison laser-induced periodic surface structures.
TURBO-CHARGE YOUR ANALYSIS PROCESSES WITH NO-CODE AUTOMATION

In industrial and research environments, automation has become synonymous with progress, reshaping traditional workflows and optimizing processes. However, traditional automation methods often require coding skills, limiting their use to users with high technical expertise. Enter Mountains® software no-code automation tools, designed to help non-technical users extract valuable insights from large and/or intricate datasets. Isabelle Cauwet, support and applications specialist, delves into how these tools can boost your productivity.
If you’re reading this article, it’s perhaps because you have dozens, if not hundreds of measurements at your disposal, or you’re thinking about how to control a production process. You need to analyze and, if possible, draw conclusions from this sizeable dataset. No worries, Mountains® analysis software is here to make your life easier. After all, we designed it with you in mind! Here are a few recommendations on how to go about this.
#1 - BUILD YOUR ANALYSIS WORKFLOW
One of Mountains® greatest strengths is that it offers you the flexibility to design your own workflow. With the workflow, you’ll be able to clearly identify and modify the analysis steps you apply and get immediate visual feedback. Of course, at this stage, you can take full advantage of the Undo/Redo feature!
We also offer example workflows to guide you in your initial steps as well as a wealth of other information including an extensive Reference guide
During this phase, once you’ve fine-tuned each part of your process (e.g., defined specific settings in the Leveling operator, chosen a particle detection method or selected the parameters you need to display), you can save your settings. This allows you to automatically reapply them to other measurements (or other batches of measurements), saving you valuable time.
#2 TEST IT WORKS
Once your workflow is ready, Mountains® allows you to perform a few quick tests to make sure it works on all your measurements.
Testing it on measurements close to tolerance limits can be a good starting point. In Mountains®, you can easily substitute the measurement to which the workflow is applied with any other measurement. You can then adjust and check again by substituting with further datasets. Next, you can try out the workflow on a representative subset of your data. The best tool for this is the Mountains® SmartFlow: just save your workflow as a SmartFlow, then load a batch of measurements. The workflow will be applied to all your measurements and the results will be displayed in a single document, which you can simply browse through to check. If adjustments

6 6 HOW TO SURFACE NEWSLETTER // SPRING 2024
Above. The Mountains® SmartFlow feature (previously known as Minidocs) allows you to save and reapply any analysis sequence to other datasets quickly and easily.

are necessary, all you need to do is change the settings and re-save your SmartFlow.
#3 POLISH LAYOUT AND PROTECT YOUR DOCUMENT
Once your workflow is ready, you may wish to fine-tune document layout to improve clarity. You can add text, links, images, define a page background and provide information about your measurements (name, date, etc.) or about the workflow (summary, history). When your document is just the way you want it, you can save it and protect it from modifications with a password.
#4 LAUNCH ANALYSIS ON HUNDREDS OF MEASUREMENTS
Your document can now be used directly as a template for automation, with no need to create a macro or write code. All you need to do is apply it to the directory containing your measurements. In the blink of an eye, you’ll obtain a new document for each measurement, in Mountains® (MNT) or PDF format. You can also generate images or certain curves, or export in text format for future use.
#5 VISUALIZE A SUMMARY AND STATISTICS ON YOUR RESULTS
The numerical results calculated in each document are compiled into a single file that you can open as a spreadsheet. Mountains® can even generate statistical summaries, monitor statistical population drift and compare populations with each other.
AUTOMATION IN A PRODUCTION ENVIRONMENT
Users performing quality checks in continuous production environments can also choose to design a template that the software will automatically apply to any new dataset which is injected into a particular directory or folder. When new data is saved by your measuring instrument, Mountains® creates a new document and/or exports numerical results. Results can be automatically added to a text file and statistical studies (control charts, box plots etc.) updated immediately.
Other, integrated solutions are of course available (but that’s a story we’ll save for next time!)

SURFACE NEWSLETTER // SPRING 2024 7 HOW TO
OUT MOUNTAINS
AUTOMATION TOOLS
TRY
®
Get a free 30-day trial and expert advice from our team - www.digitalsurf.com/free-trial
Above. From raw data to dynamic statistical documents, Mountains® software contains all the tools you need to fully automate your processes, without the need to for complex code or scripts.
Left. In continuous production environments, every time a new measurement is performed, results and statistical studies are automatically
updated.
WHAT’S NEW IN SURFACE TEXTURE STANDARDIZATION?

ISO standards play a crucial role in surface metrology by establishing internationally recognized norms for measurement techniques, terminology, and specifications.
Digital Surf’s senior surface metrology expert François Blateyron, new convener of working group WG16, shares insights on current projects and looks ahead to future advancements in the field of surface texture.
A STRONG INVOLVEMENT IN STANDARDIZATION
For many years now, Digital Surf has been providing Mountains® software to major instrument manufacturers. These large companies delegate their analysis software to us, and they naturally expect Mountains® to be compliant, accurate and efficient. It’s a big responsibility. And that’s why, for over 20 years, we have been actively present in standardization committees in France, Europe and at ISO.
Initially, our participation was a way to better understand future standards, connect with experts and ensure that our implementations were correct. But we quickly became contributors ourselves to the development of standards, sharing our experience in the development of correct and optimized algorithms.
Being able to understand the implementation of parameters, filters or form fitting algorithms gives
us a unique insight on standards and we can provide feedback to help draft better definitions and explanations.
As an active member of working groups WG15 (filtration) and WG16 (surface texture) groups within technical committee TC213, we contribute to better standards for the future of metrology. We also contribute to the dissemination of knowledge and best practices, among our users and partners, through the Mountains® reference guide and the free online Surface Metrology Guide.
A NEW CONVENER
During the last ISO TC213 meeting, in March 2024, hosted by the National Physical Laboratory (NPL) in Teddington near London, I had the privilege and the pleasure of assuming for the first time the role of convener of working group WG16. Hélène Cros of the UNM (Union de Normalisation de la Mécanique), was present as the group’s new secretary.

SURFACE NEWSLETTER // SPRING 2024 8
SURFACE METROLOGY Q&A
Above. The first meeting of ISO TC213 WG16 led by François Blateyron, in March 2024 at Teddington (UK).
Since its creation in 2003, and until September 2023, WG16 has had only one convener, John Westberg, from Sweden. John did a great job leading the group through the development of two major series of standards: ISO 25178, the first standard on areal surface texture and ISO 21920, the new profile standard.
The group’s work will continue with the help of dedicated experts: academics, manufacturers and users. Numerous documents are currently in development or in revision, driven by project leaders who are specialists in their domain. The main challenge for the group convener is to ensure that these contributions are consistent and compatible with existing documents.
CURRENT WORK

These documents will be published in late 2024 and 2025. Same thing for the classification document (part 6) on which revision has also started.
FUTURE WORK
Within WG16, I recently led the revision of ISO 25178-2, published in 2021, which corrected a few mistakes from the 2012 edition, clarified several concepts and definitions and added a few new parameters. I’m now working on the revision of ISO 25178-3 on specification operators, with the aim of modernizing the document which is currently too close to the old profile standards from the 1990s. Areal surface texture specification requires new ideas and cannot be just an extension of existing practices from profile surface texture. On the verification side, metrologists need to understand and interpret areal specifications, and be given clear guidance to verify them using areal optical profilers.
Another group of documents currently under revision are those on surface texture instruments. Parts 601 to 607 have been updated to implement the latest concepts described in part 600.
ASSOCIATED RESOURCES
Besides the regular revision of existing documents, several topics need to be addressed in the future. The ISO 16610 series, developed within WG15, is missing several filters for surfaces, such as morphological filters.
Another important topic for the future is the drafting of the basis of surface metrology on triangle meshes (called Shells in Mountains®). This new type of surface analysis will see significant growth in the future, pushed by applications in additive manufacturing and advances in instrumentation capable of measuring 3D surfaces. Filters, form fitting and parameters must be adapted to triangle meshes using new mathematics and new algorithms.
The next meetings of ISO TC213 will be hosted in September 2024 at the European Spalliation Source, in Lund, Sweden.
▶ What are the differences between ISO 4287 and ISO 21920?
www.youtube.com/watch?v=Oox81vg-xxQ
▶ Revision of ISO 25178: guide.digitalsurf.com/en/guide-iso-25178-revision.html
▶ What is the GPS matrix?
guide.digitalsurf.com/en/guide-gps-matrix.html
▶ Surface texture on freeform surfaces: guide.digitalsurf.com/en/guide-freeform.html
SURFACE NEWSLETTER // SPRING 2024 9 SURFACE METROLOGY Q&A
Bushy House in Teddington, London, built in the 18th century and occupied by the National Physical Laboratory (NPL) since 1902.
TRADE SHOW REVIEW
RAMANFEST
Our team of experts were in Paris November 9-10, 2023 to attend RamanFest, an international conference on advanced applied Raman spectroscopy. Renata and Nicolas were pleased to meet the world-leading Raman community to share, learn and discuss how Raman spectroscopy is being applied to today’s problems and pioneering tomorrow’s capabilities.
MRS FALL MEETING
Digital Surf was thrilled to be exhibiting at the Materials Research Society (MRS) Fall Meeting late November. As for several years now, our sales & applications team were present in Boston, USA to meet scientists from all over the world to discuss the latest materials research news and innovations.
Among the 5,200 attendees, Arnaud, Anne, Nicolas and Mathieu were on hand to welcome customers and partners to the Digital Surf booth and provide them with live demos of Mountains® software, including its latest features.

PITTCON
Mountains® software is used for a wide range of applications and we were excited to show some of its features at the Pittcon Conference late February. For our second participation as exhibitors, Arnaud & Nicolas flew to San Diego, California to take part and witness the latest in laboratory instrumentation.
This great international event was also the opportunity to demonstrate the ever-increasing capabilities of Mountains® software in the analysis of spectroscopy and microscopy data.

EU MEETING ON INFRARED NANOSPECTRO-IMAGING
Back closer to home, we were pleased to attend the first European meeting on InfraRed Nanospectro-Imaging. Held in France at ParisSaclay University from March 12 to 15, this event gathered the European IR nanospectroscopy community and was a good opportunity for scientific exchange combined with informal discussion. As part of the event, Nicolas gave a presentation of Mountains® software dedicated features for nanoIR data analysis.
SPRING 3D VIEW CONTEST

With a new version of Mountains® software being released this Spring, we are organizing a contest for Mountains® users!
Share the most beautiful 3D views of your data to get entered into a draw to win a cool wireless headset.
Check out the contest guidelines and rules here: bit.ly/3dview-contest
The competition runs from April 15 to May 31.
SURFACE NEWSLETTER // SPRING 2024 1010 EVENTS HIGHLIGHTS
Above. The Digital Surf team at RamanFest 2023.
Above. MRS Fall Meeting 2023
WHAT’S HOT ONLINE

LOVED ON LINKEDIN
A new webinar just hit our webinar library, this time around on the topic of areal analysis. You can watch this one along with all the others in our freshly updated library: bit.ly/4aymLTh
Check out refreshed library: bit.ly/DS-webinars

SEEN ON YOUTUBE
Christophe recently talked about why we are so passionate at Digital Surf about working on developing and improving tools for metrologists and microscopists. Turn your English subtitles on, video in French: bit.ly/3PI8OtU
Have you been to our YouTube channel ?

We have lots of quick helpful videos, as well as tutorials on Mountains® software basic and advanced features, check them out: bit.ly/2U2I2za

Surface Newsletter
Know a friend or colleague who would be interested in receiving the Surface Newsletter?
Let us know : contact@digitalsurf.com
The newsletter is available for download on our website www.digitalsurf.com
SURFACE NEWSLETTER // SPRING 2024 11 11 11
SOCIAL
Useful LINKS
HQ, R&D Center
16 rue Lavoisier
25000 Besançon - France
Tel: +33 38150 4800
www.digitalsurf.com
TRY MOUNTAINS® SOFTWARE
Take Mountains® for a test drive
Visit www.digitalsurf.com/free-trial
CONTACT US FOR AN UPDATE
Contact sales@digitalsurf.com for information about updating from previous versions to the latest Mountains® version
WATCH A MOUNTAINS® TUTORIAL
Get the most out of Mountains® software by watching one of our video tutorials www.digitalsurf.com/tutorials
LEARN SURFACE METROLOGY
Dive into our free online surface metrology guide and learn about characterizing surface texture in 2D and 3D www.digitalsurf.com/guide
CATCH UP WITH US
Forum de microscopie à sondes locales
April 22-26, 2024 | Lyon, France
36th Control International trade fair for quality assurance
April 23-26, 2024 | Stuttgart, Germany
24th International Conference on Metrology and Properties of Surfaces (Met&Props)
May 27-29, 2024 | Marrakech, Morocco

Editor : Christophe Mignot Content editor : Clare Jamet Contributors : Laure Aubry, François Blateyron, Eugenia Capitaine, Isabelle Cauwet, Steve Papa.
© 1996-2024 Digital Surf, all rights reserved
contact@digitalsurf.com Surface Newsletter, April 2024
Copyright
DAYS TRIAL 30 TRY IT FOR FREE


