
4 minute read
Getting Ready to Use Office 2010

from Microsoft Office 365
by EckoTango

■ Microprocessing power For just data and voice: Intel Pentium 500 MHz or higher; For video: 1 GHz or higher; For online meetings 1.8 GHz or higher
■ Memory 512 MB RAM ■ Hard-disk space 1.5 MB ■ Video card memory 64 MB RAM ■ Audio Microphone and speakers, or headset with microphone ■ Video Video camera or webcam
Advertisement
■ Bandwidth For data only: 56 kbps (kilobyte per second); For data, voice, video, and online meetings: 350 kbps
Tip If you work with team members all over the world—no problem. The early version of the Office 365 Beta was available for users in Canada, France, Germany, Hong Kong, Ireland, Italy, Japan, Mexico, Puerto Rico, Singapore, Spain, United Kingdom, and the United States, but as the program goes to wider release, support for additional countries will be added.
Office 365 offers you different ways to work with the Microsoft Office 2010 applications, depending on what you need to do with the various programs. As part of Microsoft Office 2010, you can access and work with Office Web Apps: ■ Word Web App ■ Excel Web App ■ PowerPoint Web App ■ OneNote Web App Additionally, Outlook Web App enables you to receive and send email, set up meetings, assign tasks, and perform the most common tasks you use in your desktop version of Outlook 2010.
Office Web Apps are available to you as part of Office 365 no matter which version you are using. These Web Apps are great for creating, editing, sharing, and reviewing
content. What’s more, you can work collaboratively on documents with Word Web App, partner on presentations with PowerPoint Web App, and co-edit in the same worksheet with Excel Web App. You’ll find out more about the capabilities of the Web apps—and get the play-by-play on how to accomplish different tasks—in Chapter 8.
Tip Office 365 Enterprise users also receive access to the latest version of Microsoft Office 2010 Professional Plus, which they can use on a pay-asyou-go basis. When Enterprise users click to use an Office application, Office 365 checks to ensure the user has been assigned a license for the software. The administrator of the Office 365 account handles this task and ensures that users have the necessary licenses. The cost for the license is included in the Office 365 package the organization selects.
Running Office 365 Desktop Setup
You can set up your desktop Office 2010 applications to work seamlessly with Office 365 by clicking Downloads in the Resources area on the right side of the Office 365 Home page, which takes you to the Downloads page. Click the Set Up button in the Set Up And Configure Your Office Desktop Apps area. Click Run (shown in Figure 2-10) to install and run the utility.
FIGURE 2-10 The Office 365 Desktop Setup utility connects Office Web Apps to your Office 2010 desktop applications.
After you run the Office 365 Desktop Setup utility, you’ll be able to open and work with files from Office 365 in your Office 2010 applications. You’ll also be able to sign in to
your Office 365 account by using your Microsoft Online Services ID directly in your Office 2010 programs. So it’s a convenience issue, but it also enables you to smooth out any wrinkles your desktop applications might encounter when you go to save or access files you’ve saved in Office 365. In the Microsoft Office 365 Desktop Setup dialog box, click Continue to set up your applications and download any necessary program updates. (See Figure 2-11.) Click Continue. You will be asked to review and access the Office 365 user agreement, and then the utility begins searching for and downloading any available updates.

FIGURE 2-11 The Office 365 Desktop Setup utility configures the applications and downloads any available updates for your programs.
You can get more information about what’s being downloaded by clicking the Show More Details link toward the right end of the status bar. The program items being updated are listed in the center column of the dialog box, and the link wording changes to Hide Details. (See Figure 2-12.) When the process is finished, click the Restart Now button to close all applications and reboot your computer so that the changes can take effect.
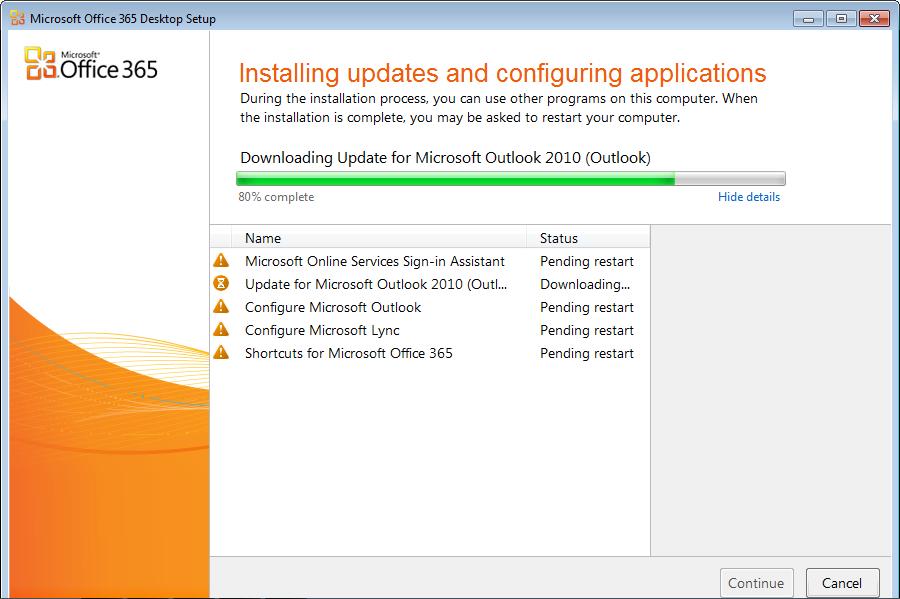
FIGURE 2-12 You can view the changes being made by clicking Show More Details and reviewing the list of updates in the center of the dialog box.
Setting Up Outlook 2010
When all is said and done, your computer restarts and pops back up with one more configuration screen, most likely telling you that a little manual work is required on your part. You need to create an email account in your desktop version of Outlook so that the Office 2010 Outlook Web App can interact seamlessly with your desktop version of the program. The process is simple: 1. Open Outlook 2010. 2. Click on the File tab, and click Add Account. 3. Outlook might add your information automatically in the Auto Account Setup page. Change the entries if necessary, and click Next.
Tip Check with your administrator if you are unsure about the settings you need to enter here.
4. Outlook searches for your Exchange Online settings and prompts you to enter your email address and your use name. 5. Click Finish to complete the process.


