3 minute read
Checking System Status

from Microsoft Office 365
by EckoTango

6. Enter a title that gives the technician an idea of the problem you’re having. 7. Click in the Description area, and describe the problem fully. 8. In the Error Message area, provide any error messages you receive. 9. Click the arrow to the right of Have You Reproduced This Problem On More Than One Computer?, click either Have Not Tried, No, or Yes to let the technician know whether the problem exists on only one system or throughout your site. 10. Click Next.
It’s often helpful for tech support personnel to see what you see when they are evaluating a problem you’re having. You can capture a screen shot of any error message or problem you see on-screen and send the image to the technician. To capture the image, you can simply press Prt Sc while the problem is displayed on the screen and then paste the picture into your favorite image editor (such as Windows Paint); then save the file. Attach the file to your service request in the Attach File page by clicking the Attach A File link. Navigate to the file you want to attach, click Open, and when prompted, click Yes to affirm that you do want to attach the file. The file appears in the center of the File Attachments page. You can remove the attachment if you’d like by clicking the Remove link that appears to the right of the attached file.
Advertisement
Tip Of course, you aren’t just limited to capturing a screen shot of the problem—you can use Problem Steps Recorder in Windows 7 to record the steps that reproduce the problem and then upload the file along with your service request.
Finally, send your service request to Microsoft by clicking the Submit button. Office 365 displays a Confirmation window, providing a summary of your request and providing a reference number. Click Finish to return to the Service Requests page.
When you depend on a web-based service to provide connectivity to your team members and access to your programs and files, making sure the service is up and running correctly is a major concern. Recognizing this, Office 365 keeps you clued in about challenges and updates in the Office 365 system. If you’re having trouble accessing a service, for example, your first step in solving the problem is to check the status of the overall system to make sure there aren’t service glitches somewhere along the way.
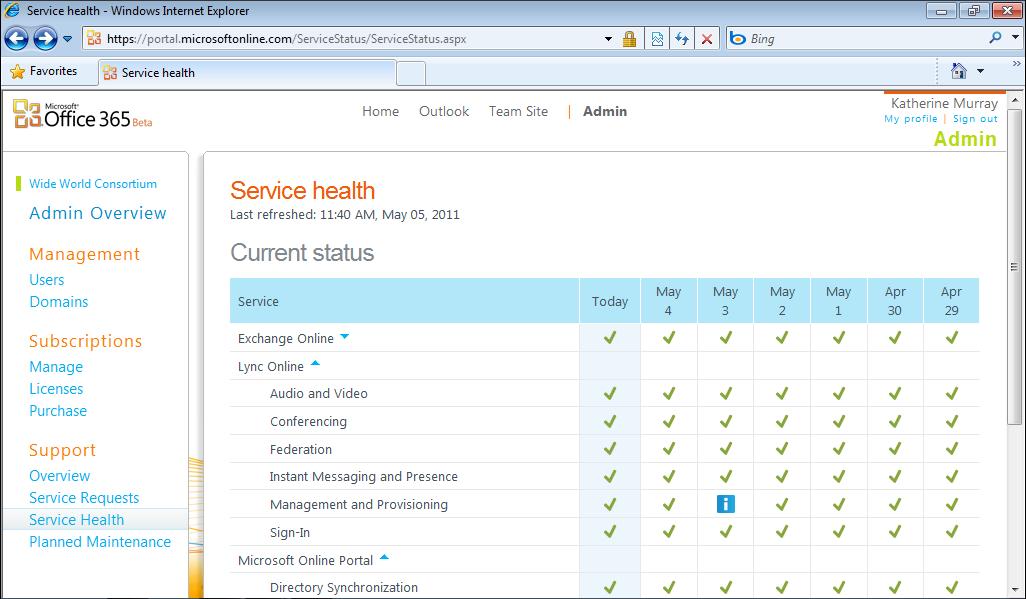
To check the system status of Office 365, follow these steps: 1. Click Admin to display the Admin Overview screen. 2. In the Support area on the left side of your screen, click Service Health. The Service Health screen shows you the status of all the different services running in Office 365. (See Figure 3-23.) 3. Scroll down the list to check the status of all services.
4. Click the blue-and-white information icon to display the details about a particular service interruption.
FIGURE 3-23 Check the system status of Office 365 to make sure that all services are up and running properly.
If you want to find out when the software will be going through planned maintenance upgrades, click Planned Maintenance on the left side of the screen. You’ll be able to see when the next maintenance activities are scheduled, read details about the activity, and see the date and time the event is scheduled. This information will help you avoid scheduling site events that might be affected by the changes. For example, you might want to avoid scheduling an online meeting using Lync at the precise time the Lync service is set to undergo program maintenance.


