Dogan Ibrahim
A Beginner's Guide to AI and Edge Computing
●
Dogan Ibrahim
● This is an Elektor Publication. Elektor is the media brand of Elektor International Media B.V. PO Box 11, NL-6114-ZG Susteren, The Netherlands Phone: +31 46 4389444
● All rights reserved. No part of this book may be reproduced in any material form, including photocopying, or storing in any medium by electronic means and whether or not transiently or incidentally to some other use of this publication, without the written permission of the copyright holder except in accordance with the provisions of the Copyright Designs and Patents Act 1988 or under the terms of a licence issued by the Copyright Licencing Agency Ltd., 90 Tottenham Court Road, London, England W1P 9HE. Applications for the copyright holder's permission to reproduce any part of the publication should be addressed to the publishers.
● Declaration
The authors and publisher have used their best efforts in ensuring the correctness of the information contained in this book. They do not assume, and hereby disclaim, any liability to any party for any loss or damage caused by errors or omissions in this book, whether such errors or omissions result from negligence, accident or any other cause.
● ISBN 978-3-89576-638-1 Print
ISBN 978-3-89576-639-8 eBook
● © Copyright 2024 Elektor International Media www.elektor.com
Prepress Production: D-Vision, Julian van den Berg
Printers: Ipskamp, Enschede, The Netherlands
Elektor is the world's leading source of essential technical information and electronics products for pro engineers, electronics designers, and the companies seeking to engage them. Each day, our international team develops and delivers high-quality content - via a variety of media channels (including magazines, video, digital media, and social media) in several languages - relating to electronics design and DIY electronics. www.elektormagazine.com
Preface
Artificial Intelligence (AI) is now part of our lives. Most microcontroller based systems are expected to include some form of AI in their future designs. In the past, AI was implemented using rather expensive and fast parallel computer structures and this technology was not available to general users. With companies developing low-cost AI powered hardware into their products, it is now becoming a reality to purchase AI accelerator hardware at comparatively very low costs. One such hardware accelerator is the Hailo module. The good news is that recently this module has been compatible with the Raspberry Pi 5 as it requires the PCIe hardware support.
The Raspberry Pi AI Kit is a cleverly designed hardware as it bundles an M.2 based Hailo8L accelerator with the Raspberry Pi M.2 HAT+ to offer high speed inferencing on the Raspberry Pi 5.
Using the Raspberry Pi AI Kit you can build complex AI based vision applications, running in real time with low power requirements. Examples include object detection, pose estimation, instance segmentation, home automation, security, robotics, and many more neural network based applications.
The AI Kit offers 13 tera operations per second (TOPS) neural network based inference accelerator built around the Hailo08L chip. The Raspberry Pi 5 automatically detects the installed Hailo module and makes the NPU available for AI based applications.
The AI Kit hardware fully integrated with the Raspberry Pi 5 board and it is supplied with the following parts:
• Hailo AI module containing the Hailo-8L chip
• Raspberry Pi 5 M.2 HAT+ interface to connect the AI module to your Raspberry Pi 5
• Mounting kit
• GPIO header
The basic features of the AI Kit are:
• 13 TOPS neural network inference accelerator
• Fully integrated with the Raspberry Pi camera system
• Compatible with the Raspberry Pi HAT+ specification
• Thermal pad to spread heat across components
• Easy fitting to the Raspberry Pi 5
This book is an introduction to the Raspberry Pi AI Kit, and it is aimed to provide some help to readers who are new to the kit and who want to run some simple AI based visual models on their Raspberry Pi 5 computers. The book is not meant to cover the detailed process of model creation and compilation, which is done on an Ubuntu computer having a large disk
space and 32 GB memory. These are covered in detail with examples at the web sites of Hailo.
Learning to use the AI software takes a bit of learning, but it is expected that this may change as the time goes on and as the Hailo software is more integrated into the Raspberry Pi 5 operating system.
Two fully tested and working projects are given in the book. The first project explains how a person can be detected and how an LED can be activated after the detection, and how the detection can be acknowledged by pressing an external button. The second project illustrates how a person can be detected, and how this information can be passed to a smart phone over a WiFi link, and how the detection can be acknowledged by sending a message from the smart phone to Raspberry Pi 5.
The AI Kit software is new and it is currently under development and changes. The book presents the currently available software features of the kit.
The author hopes that the book becomes useful to those readers seeking to understand how to install and use the AI Kit.
Dr. Dogan Ibrahim London, 2024
Chapter 1 • The Raspberry Pi 5
1.1 Overview
Raspberry Pi 5 is the latest credit card size computer from the Raspberry Pi Foundation. In this Chapter we will look at the specifications of this new computer and compare it with the Raspberry Pi 4.
1.2 The Raspberry Pi 5 hardware
Raspberry Pi 4 was released in June 2019. There has been long wait for a newer model and finally Raspberry Pi 5 is here and will be on sale from the end of October 2023.
Raspberry Pi 5 is claimed to be two or three times the processing power of Raspberry Pi 4 which is already a very popular single board computer. Raspberry Pi 5 will initially be available in 4GB and 8GB memory capacities, although smaller memory devices will be announced later. Although the Raspberry Pi 5 is same size and shape as the Model 4B, it has a number of interesting new features such as PCIe connector, power button, built-in real-time clock, and some others that we will investigate in this Chapter.
Raspberry Pi 5 is based on 2.4GHz Cortex-A76 Arm processor with a new Southgate bridge for handling the peripheral interface. A new VideoCore VII GPU is provided with 800MHz speed. Dual camera interface is another nice feature of the Raspberry Pi 5. Another major improvement is the microSD card slot with support for high-speed SDR104 mode. In our testing, the SD card speeds were twice as fast as the last generation. This is thanks to the new RP1 southbridge developed by Raspberry Pi.
Table 1.1 shows a comparison of Raspberry Pi 4 and 5. Notice that both devices have dual 2 x 4Kp60 HDMI display interfaces although Pi 5 supports HDR output. The new Raspberry Pi 5 rocks DDR4X RAM instead of the DDR4 RAM used before. This enables the RPi 5 to have improved clock speeds with less power consumption, which is a step in the right direction. The RPi 5 can perform close to 30,000 MB writes and reads per second as compared to the Raspberry Pi 4, which can only do 4,000 to 6,000. 2 x 20 pin GPIO interface is the same in both devices. Raspberry Pi 5 additionally supports 2 camera interfaces, PCIe bus connector, UART interface, RTC clock power connector, and fan power connector. Wi-Fi and Bluetooth are supported by both devices. The on-board power switch on Pi 5 is a useful addition and was requested by many users. Pi 5 is powered from 5V 4A USB-C type power supply where Pi 4 is powered from a 3A power supply. Pi 5 is slightly more expensive than Pi 4.
SoC
Raspberry Pi 4 Raspberry Pi 5
BCM2711 SoC
Cortex-A72 CPU at 1.8 GHz
BCM2712 Soc
Cortex-A76 CPU at 2.4 GHz
CPU 4 core 4 core
Instruction set ARMv8-A
ARMv8-2
Display 500 MHz VideoCore Vi GPU 800 MHz VideoCore VII GPU
L2 Cache 1 MB (shared) 2 MB
L3 Cache None 2 MB (shared)
RAM 1,2,4 GB LPDDR4 4,8 GB LPDDR4X
SD Card microSD microSD (high speed SDR104 compatible)
GPIO 2 x 20 pin
2 x 20 pin
USB ports 2 x USB2 2 x USB3 2 x USB2 2 x USB3
Networking
Gigabit Ethernet port Gigabit Ethernet port
Connectors 2-lane MIPI display port
2-lane MIPI CSI camera port
4-pole stereo audio and composite video port
Wi-Fi/Bluetooth
Power button
Power
802.11ac, Bluetooth 5/BLE
None
5V 3A USB-C
2 x MIPI camera
2 x 4-lane MIPI camera/display
2xPCIe 2.0 interface
UART port
RTC clock power port
Fan power port
802.11ac,Bluetooth 5/BLE
Yes
5V 4A USB-C
Size 85 x 56mm 85 x 56mm
Table 1.1 Comparison of Raspberry Pi 5 and raspberry Pi 4
There are 2 micro HDMI based monitor ports on both devices, with both having the same specifications.
The Ethernet port and USB ports are swapped. As a result of this the Raspberry Pi 4 case is not compatible with the Pi 5 case and a new case is required.
The camera and display connectors on Raspberry Pi 5 are 15-pin and smaller instead of the original 22-pin connector used on Pi 4. A ribbon cable with 22-pin on one side and 15-pin on the other side is required to connect an existing Raspberry Pi 4 camera to Raspberry Pi 5. Raspberry Pi 5 has two connectors, allowing two cameras or DSI displays (or a mix of either) to be connected. The PCIe connector is for fast external PCIe compatible peripherals, such as SSDs.
Chapter 1 • The Raspberry Pi 5
The new power button on Raspberry Pi 5 could be very useful. When the device is On, pressing the button brings the shutdown (logout) menu. A safe shutdown will occur with another press of the power button.
Figure 1.1 shows the front view of the Raspberry Pi 5 with the components labelled for reference.
While the Raspberry Pi 4 and 5 share a similar form factor (e.g., same size: 85mm x 56mm), the Pi 5 has many subtle differences that can be seen at first glance. For example, the USB and Ethernet ports are in reverse order. A Raspberry Pi 5 looks more like a Pi 3B+ from this angle (see Figure 1.2).
1.3 Active cooler
The Raspberry Pi 5 gets very hot and it is recommended to use an active cooler to lower the CPU temperature. Although the idle CPU temperature is around 50 degrees Celsius, it can go higher than 85 degrees under a stress test. An active cooler is available for Raspberry Pi 5. Holes and power points are provided on the board to install and power the active cooler.
Figure 1.3 shows the Raspberry Pi 5 with the recommended official active cooler installed.
Figure 1.1 Raspberry Pi 5
Figure 1.2 RPI 4 (left) and RPI 5 (right)
The specifications of this active cooler are:
Input voltage: 5 V DC supplied via four-pin fan header on Raspberry Pi 5 board
Fan speed control: Pulse width modulation control with tachometer
Maximum airflow: 1.09 CFM
Material: anodised aluminium
The active cooler cools down the SoC, RAM, and the Southgate chipset. Without any cooling, the Raspberry Pi 5 idle temperature is about 65ºC. With the cooler, when the temperature is 60ºC the blower's fan turns on. At 67.5ºC the fan speed is increased, and at 75ºC the fan speed increases to its maximum. When the temperature drops, the fan speed also drops automatically. You can mount a HAT above the Active Cooler using a set of 16mm GPIO extenders. Inevitably there is some disruption to the air flow which will cause the Raspberry Pi to run hotter, but the Active Cooler is still able to handle extended stress tests without significant temperature rises.
1.4 Raspberry Pi 5 Operating System
Raspberry Pi 5 OS is based upon Debian 12 with the codename Bookworm. This OS, released in July 2023, comes with a new Python interpreter (Python 3.11). A new change is that a Python package cannot be installed using the pip commands. Also, Bookworm operating system uses the Wayland rather than X11 as the display system. For many years, or most Unix desktop environments, including the Raspberry Pi Desktop, have been based on the X11 window system which has several limitations.
Another major software change in Bookworm is that the RPi.GPIO (created by Ben Croston) was not available at the time of writing this book. As a result of this, all of the GPIO based Python programs in the book have been developed using the gpiozero. Most third-party
Figure 1.3 Raspberry Pi 5 with active cooler
HATs are based on the RPi.GPIO and these will not work until their software is changed by their manufacturers. It is hoped that the manufacturers will change their software by the time Raspberry Pi 5 becomes officially widely available.
ALSA was the original audio interface on Raspberry Pi computers. PulseAudio then has replaced the ALSA interface which was still sitting on top of the low-level ALSA interface. This made it easier to manage things like Bluetooth audio devices, allowed audio from multiple applications to be mixed together, and allowed audio to easily be switched between outputs while playing. In Bookworm, PulseAudio has been replaced with the newer PipeWire audio system. This new system manages audio applications, remember the ones used at powerdown, and automatically connects them at reboot time. From a user point of view, both the PulseAudio and PipeWire look identical.
1.5 Benchmarks
Figure 1.4 and Figure 1.5 show the overall benchmark scores of the Raspberry Pi 5 and Raspberry Pi 4 with both having 8 GB of memory, which clearly indicate that the Raspberry Pi 5 is two to three times faster than its predecessor in all types of tests. In these tests, same SD card, same power supply, and same cooling environments were used.
1.4 Geekbench 5 benchmark scores for the Raspberry Pi 5 (Geekbench)
Figure 1.5 Geekbench 5 benchmark scores for the Raspberry Pi 4 (Geekbench)
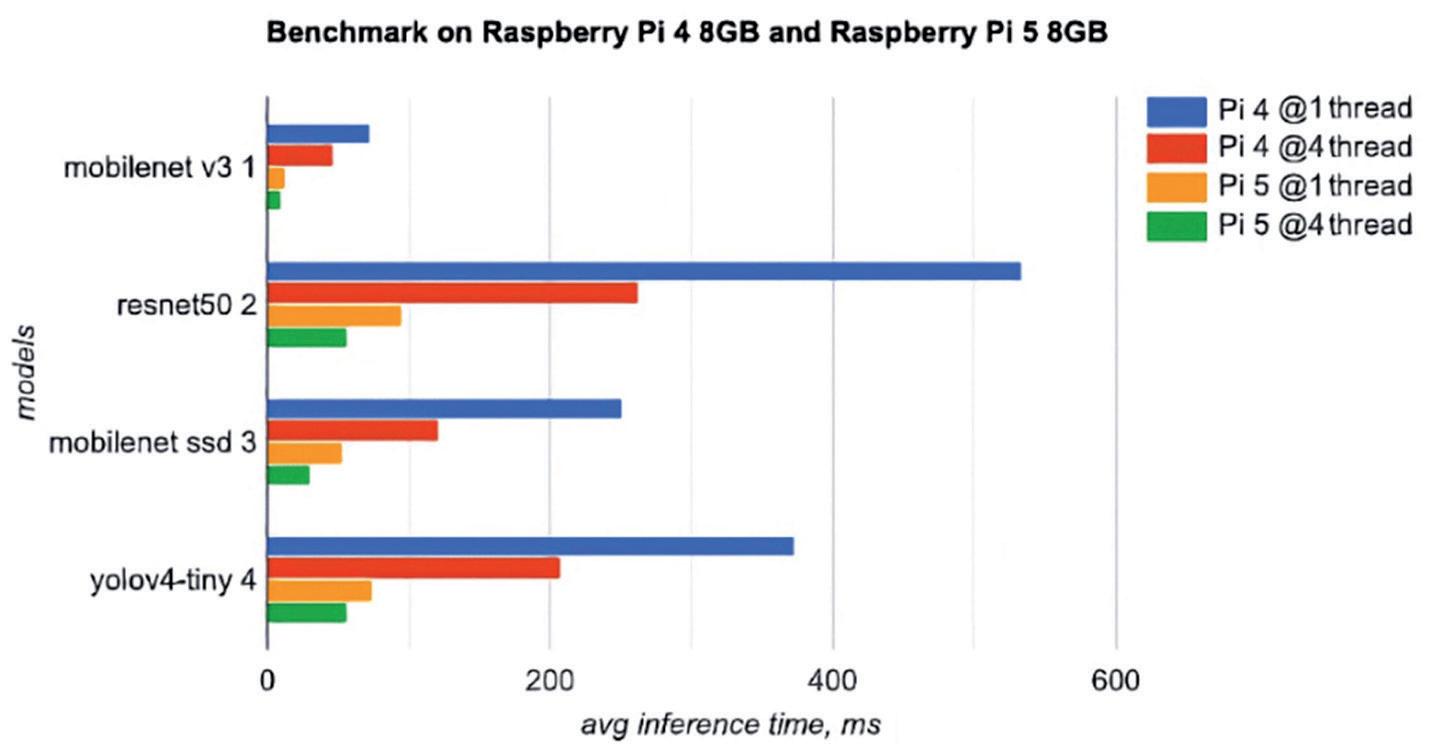
The ncnn framework (neural network models) tests from Seeed Studio show in Figure 1.6 the power of the Raspberry Pi 5 compared to Raspberry Pi 4. Note here that smaller numbers are better.
Figure
Figure 1.6 Some ncnn framework tests from Seeed Studio
Chapter 2 • Installing the Raspberry Pi 5 Operating System and Console Commands
2.1 Overview
Raspberry Pi 5 operating system Bookworm is available either on a pre-installed micro SD card, or you can download the operating system image on a blank micro SD card. In this Chapter you will learn to install the operating system using both methods. Additionally, some commonly used console commands are described briefly in this chapter.
2.2
Using a pre-installed SD card
The pre-installed Raspberry Pi 5 operating system is available in various size micro SD cards. In this section the author used the pre-installed 32GB micro SD card supplied by Elektor. Additionally, the author used a 7-inch HDMI compatible monitor, a Raspberry Pi official keyboard, and a mouse. The author's hardware setup between the Raspberry Pi 5 and various devices is shown in Figure 2.1.
The steps are as follows:
• Insert the pre-installed micro SD card into your Raspberry Pi 5
• Connect all the devices as in Figure 2.1
• Connect the Raspberry Pi 5 adapter to mains
• You should see the Raspberry Pi 5 booting the first time and asking you various questions to setup the device, such as the username, password, WiFi name and password, any updates if necessary, etc. etc. In this book the username is set to pi.
Figure 2.1 Author's hardware setup
• The Raspberry Pi will boot in Desktop mode and will display the default screen. You can press Cntrl+Alt+F1 at any time to change to the Console mode
2.3 Larger font in Console mode
It is probably hard to see the characters on a 7-inch monitor in Console mode. You can follow the steps below to increase the font size (skip this section if you have a large monitor):
• Make sure you are in the Console mode
• Enter the following command:
pi@raspberrypi: ~ $ sudo dpkg-reconfigure console-setup
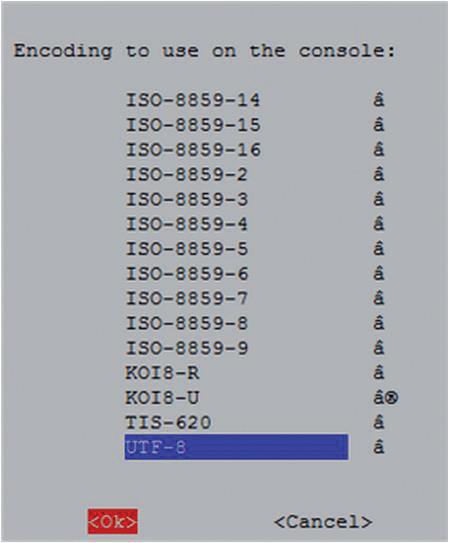
• Select UTF-8 in the Package Configuration screen (Figure 2.2)
• Select Guess optimal character set (Figure 2.3)
Figure 2.2 Select UTF-8
Figure 2.3 Select Guess optimal character set
Chapter 2 • Installing the Raspberry Pi 5 Operating System and Console Commands
• Select Terminus (Figure 2.4)
Figure 2.4 Select Terminus
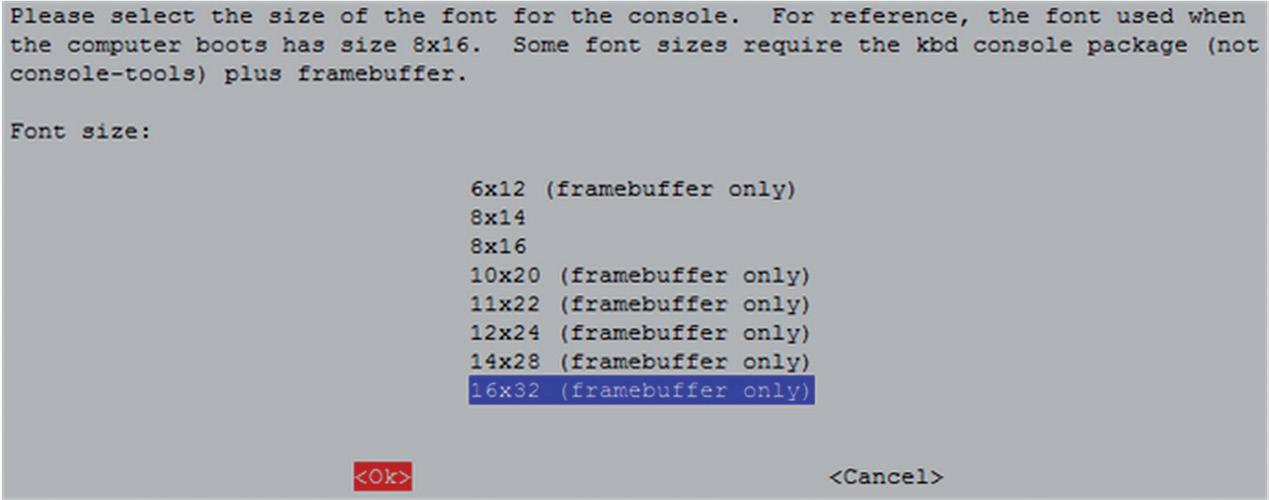
• Select font 16x32 (Figure 2.5)
Figure 2.5 Select font 16x32
2.4 Accessing your Raspberry Pi 5 Console from your PC – the Putty program
In many applications you may want to access your Raspberry Pi 5 from your PC. This requires enabling the SSH on your Raspberry Pi and then using a terminal emulation software on your PC. The steps to enable the SSH are as follows:
• Make sure you are in Console mode
• Type: sudo raspi-config
• Move down to Interface Options
• Highlight SSH and press Enter (Figure 2.6)
• Click Yes to enable SSH
• Click OK
• Move down and click Finish
You will now have to install a terminal emulation software on your PC. The one used by the author is the popular Putty. Download Putty from the following web site: https://www.putty.org
• Putty is a standalone program and there is no need to install it. Simply double click to run it. You should see the Putty startup screen as in Figure 2.7.
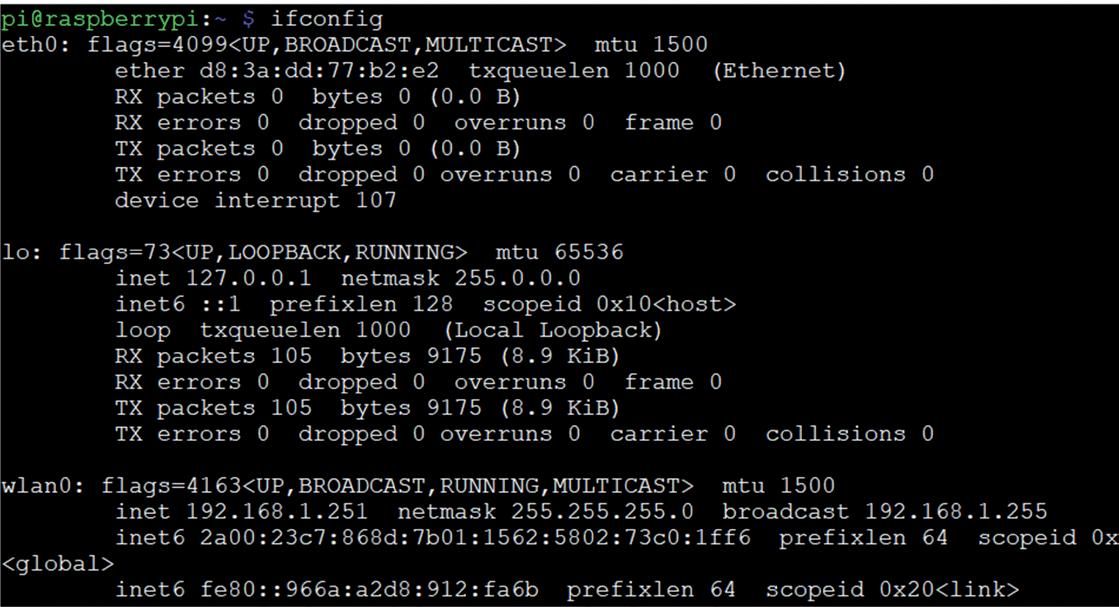
• Make sure that the Connection type is SSH and enter the IP address of your Raspberry Pi 5. You can obtain the IP address by entering the command ifconfig in Console mode (see Figure 2.8). In this example the IP address was: 192.168.1.251 (see under wlan0:)
Figure 2.6 Highlight SSH
Figure 2.7 Putty startup screen
Figure 2.8 Command ifconfig
• Click Open in Putty after entering the IP address and selecting SSH
• First time you run Putty you may get a security message. Click Yes to accept this security alert.
• You will then be prompted to enter the Raspberry Pi 5 username and password. You can now enter all Console based commands through your PC.
• To change your password, enter the following command:
pi@raspberrypi: ~ $ passwd
• To restart the Raspberry Pi 5 enter the following command:
pi@raspberrypi: ~ $ sudo reboot
• To shut down the Raspberry Pi 5 enter the following command. Never shutdown by pulling the power cable as this may result in the corruption or loss of files:
pi@raspberrypi: ~ $ sudo shutdown –h now
2.4.1 Configuring the Putty
By default, the Putty screen background is black with white foreground characters. The author prefers to have white background with black foreground characters, with the character size set to 12 points bold. You should save your settings so that they are available next time you want to use the Putty. The steps to configure the Putty with these settings are given below:
• Restart Putty
• Select SSH and enter the Raspberry Pi IP address
• Click Colours under Window
• Set the Default Foreground and Default Bold Foreground colours to black (Red:0, Green:0, Blue:0)
• Set the Default Background and Default Bold Background to white (Red:255, Green:255, Blue:255)
• Set the Cursor Text and Cursor Colour to black (Red:0, Green:0, Blue:0)
• Select Appearance under Window and click Change in Font settings. Set the font to Bold 12.
• Select Session and give a name to the session (e.g. MyZero) and click Save.
• Click Open to open the Putty session with the saved configuration
• Next time you re-start the Putty, select the saved session and click Load followed by Open to start a session with the saved configuration
2.5 Accessing the Desktop GUI from your PC
If you are using your Raspberry Pi 5 with local keyboard, mouse, and display you can skip this section. If on the other hand you want to access your Raspberry Pi 5 remotely over the network, you will find that SSH services cannot be used. The easiest and simplest way to access your Pi 5 remotely from a computer is by using the VNC (Virtual Network Connection) client and server. The VNC server runs on your Pi 5 and the VNC client (or VNC Viewer) runs on your computer. It is recommended to use the tightvncserver on your Raspberry Pi 5. The steps are:
• Enter the following command:
pi$raspberrypi:~ $ sudo apt-get install tightvncserver
• Run the tightvncserver:
pi$raspberrypi:~ $ tightvncserver
You will be prompted to create a password for remotely accessing the Raspberry Pi desktop. You can also set-up an optional read-only password. The password should be entered every time you want to access the Pi 5 remotely. Enter a password and remember your password.
• Start the VNC server after reboot by the following command:
pi$raspberrypi:~ $ vncserver :1
Chapter 2 • Installing the Raspberry Pi 5 Operating System and Console Commands
You can optionally specify screen pixel size and colour depth in bits as follows:
pi$raspberrypi:~ $ vncserver :1 –geometry 1920x1080 –depth 24
• You must now setup a VNC viewer on your laptop (or desktop) PC. There are many VNC viewers available, but the recommended one is the TightVNC for the PC, which can be downloaded from the following link:
https://www.tightvnc.com/download.php
• Download and install the TightVNC software on your PC. You will have to choose a password during the installation.
• Start the TightVNC Viewer on your PC and enter the Raspberry Pi 5 IP address followed by :1. Click Connect to connect to your Raspberry Pi 5 (Figure 2.9)
Figure 2.9 Connect to TightVNC Viewer
• Enter the password you have chosen earlier. You should now see the Raspberry Pi 5 Desktop image displayed on your PC screen (Figure 2.10, the image displayed on your PC may be different)
• The VNC Viewer is now running on your Raspberry Pi 5 and you have access to its Desktop GUI from your PC.
2.6 Assigning static IP address to your Raspberry Pi 5
When you try to access your Raspberry Pi 5 remotely over your local network, it is possible that the IP address given by your Wi-Fi router can change from time to time. This is annoying as you may have to find out the new IP address allocated to your Raspberry Pi 5 every time you want to use your Pi 5. Without a knowledge of the IP address you cannot login using the SSH or the VNC.
In this section, you will learn how to fix your IP address so that it does not change between reboots. The steps are as follows:
• Login to your Raspberry Pi 5 via the Putty
• Check whether DHCP is active on your Raspberry Pi (it should normally be active):
pi@raspberrypi:~ $ sudo service dhcpcd status
If DHCP is not active, activate it by entering the following commands:
pi@raspberrypi:~ $ sudo service dhcpcd start
pi@raspberrypi:~ $ sudo systemctl enable dhcpcd
• Find the IP address currently allocated to you by entering command ifconfig or hostname – I (Figure 2.11). In this example, the IP address was: 192.168.1.251. We can use this IP address as our fixed address since no other device on the network is currently using it.
Figure 2.10 Raspberry Pi 5 Desktop
Figure 2.11 Find the IP address using command hostname -I
• Find the IP address of your router by entering the command ip r (Figure 2.12). In this example the IP address was: 192.168.1.254
Figure 2.12 Find the IP address of your router
• Find the IP address of your DNS by entering the following command (Figure 2.13). This is usually same as your router address:
pi@raspberrypi:~ $ grep "nameserver" /etc/resolv.conf
Figure 2.13 Find the DNS address
• Edit file /etc/dhcpcd.conf by entering the command:
pi@raspberrypi:~ $ nano /etc/dhcpcd.conf
• Add the following lines to the bottom of the file (these will be different for your router). If these lines already exist, remove the comment character # at the beginning of the lines and change the lines as follows (you may notice that eth0 for Ethernet is listed):
interface wlan0
static_routers=192.168.1.254
static domain_name_servers=192.168.1.254
static ip_address=192.168.1.251/24
• Save the file by entering CNTRL + X followed by Y and reboot your Raspberry Pi 5
• In this example, the Raspberry Pi 5 should reboot with the static IP address: 192.168.1.251
2.7 Enabling Bluetooth
In this section, you will learn how to enable the Bluetooth on your Raspberry Pi 5 so that it can communicate with other Bluetooth devices. The steps are given below:


