booksbooks


A Fast-Lane Ride From Concept to Project
+ UDP/TCP + WiFi + Flask Cloud + TFT + I2C + LCD + Arduino + Sensor HAT + Node-RED + Alexa + IoT + MQTT + Bluetooth + Motors + Python +


Dogan Ibrahim

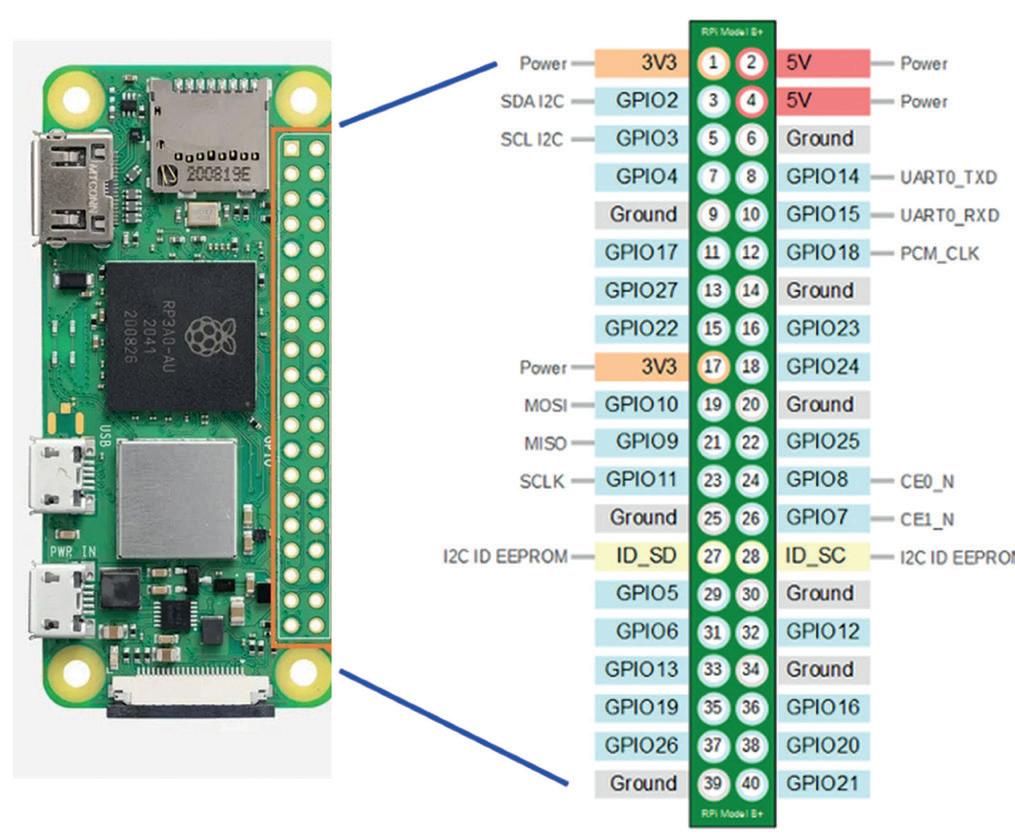
5 V Power 5 V Power Ground GPIO 14 | (UART TX) GPIO 15 | (UART TX) GPIO 18* | Chip Enable-CE0 (SPI 1) | BCK (I2S) Ground GPIO 23 GPIO 24 Ground GPIO 25 GPIO 8 | Chip Enable-CE0 (SPI 0) GPIO 7 | Chip Enable-CE1 (SPI 0) GPIO 1 | EEPROM Serial Clock (I2C) Ground GPIO 12* Ground GPIO 16 | Chip Enable-CE2 (SPI 1) GPIO 20 | MISO (SPI 1) | DIN (I2S) GPIO 21 | SCLK (SPI 1) | DOUT (I2S) 3.3 V Power Serial Data (I2C) | GPIO 2 Serial Clock (I2C) | GPIO 3 GPIO 4 Ground Chip Enable-CE1 (SPI 1) | GPIO 17 GPIO 27 GPIO 22 3.3 V Power MOSI (SPI 0) | GPIO 10 MISO (SPI 0) | GPIO 9 SCLK (SPI 0) | GPIO 11 Ground EEPROM Serial DATA (I2C) | GPIO 0 GPIO 5 GPIO 6 GPIO 13* MISO (SPI 1) | LRCK (I2S) | GPIO 19* GPIO 26 Ground * PWM
The Raspberry Pi Zero 2 W GO! Book
The Raspberry Pi Zero 2 W GO! Book
A Fast-Lane Ride From Concept to Project
● Dogan Ibrahim
● This is an Elektor Publication. Elektor is the media brand of Elektor International Media B.V.
PO Box 11, NL-6114-ZG Susteren, The Netherlands
Phone: +31 46 4389444
● All rights reserved. No part of this book may be reproduced in any material form, including photocopying, or storing in any medium by electronic means and whether or not transiently or incidentally to some other use of this publication, without the written permission of the copyright holder except in accordance with the provisions of the Copyright Designs and Patents Act 1988 or under the terms of a licence issued by the Copyright Licencing Agency Ltd., 90 Tottenham Court Road, London, England W1P 9HE. Applications for the copyright holder's permission to reproduce any part of the publication should be addressed to the publishers.
● Declaration
The author, editor, and publisher have used their best efforts in ensuring the correctness of the information contained in this book. They do not assume, and hereby disclaim, any liability to any party for any loss or damage caused by errors or omissions in this book, whether such errors or omissions result from negligence, accident or any other cause. All the programs given in the book are Copyright of the Author and Elektor International Media. These programs may only be used for educational purposes. Written permission from the Author or Elektor must be obtained before any of these programs can be used for commercial purposes.
● British Library Cataloguing in Publication Data
A catalogue record for this book is available from the British Library
● ISBN 978-3-89576-549-0 Print
ISBN 978-3-89576-550-6 eBook
● © Copyright 2023: Elektor International Media B.V.
Editor: Jan Buiting, MA
Prepress Production: D-Vision, Julian van den Berg
Elektor is the world's leading source of essential technical information and electronics products for pro engineers, electronics designers, and the companies seeking to engage them. Each day, our international team develops and delivers high-quality content - via a variety of media channels (including magazines, video, digital media, and social media) in several languages - relating to electronics design and DIY electronics. www.elektormagazine.com
● 4
Contents ● 5 Contents Preface ........................................................... 11 Chapter 1 • The Raspberry Pi Zero 2 W .................................. 12 1.1 Overview .................................................... 12 1.2 The Zero 2 W development board ................................... 12 1.2.1 Zero 2 W current consumption, and GPIO voltages and currents ............ 15 1.3 Installing the operating system ..................................... 15 1.4 Powering-up the Zero 2 W ........................................ 18 1.5 Remote access 18 1.5.1 Configuring Putty ............................................. 20 1.5.2 Remote access of the Desktop 20 1.6 Assigning static IP address to your Zero 2 W ........................... 22 Chapter 2 • Using a Text Editor in Command Mode ......................... 24 2.1 The "nano" text editor ........................................... 24 Chapter 3 • Creating and Running a Python Program ....................... 28 3.1 Overview .................................................... 28 3.2 Method 1 — Interactively from command prompt 28 3.3 Method 2 — Create a Python file in command mode ...................... 29 3.4 Method 3 — Create a Python file in GUI mode ........................... 29 3.5 Which method? ................................................ 31 3.6 The Thonny screen ............................................. 31 3.6.1 Using the debugger ............................................ 31 Chapter 4 • Software-Only Python Programs using the Zero 2 W .............. 33 4.1 Overview 33 4.2 Example 1 — Average of two numbers read from the keyboard ............... 33 4.3 Example 2 — Average of 10 numbers read from the keyboard 33 4.4 Example 3 — Surface area of a cylinder ............................... 34 4.5 Example 4 — ºC to ºF conversion 35 4.6 Example 5 — Surface area and volume of a cylinder; user function ............ 35 4.7 Example 6 — Table of squares of numbers 36 4.8 Example 7 — Table of trigonometric sine .............................. 36
The Raspberry Pi Zero 2 W GO! Book ● 6 4.9 Example 8 — Table of trigonometric sine, cosine, and tangent ............... 37 4.10 Example 9 — Trigonometric function of a required angle................... 37 4.11 Example 10 — Series and parallel resistors ............................ 38 4.12 Example 11 — Words in reverse order 39 4.13 Example 12 — Calculator ........................................ 40 4.14 Example 13 — File processing: writing 41 4.15 Example 14 — File processing: reading .............................. 41 4.16 Example 15 — Squares and cubes of numbers 42 4.17 Example 16 — Multiplication timetable ............................... 42 4.18 Example 17 — Odd or even 43 4.19 Example 18 — Binary, octal, and hexadecimal .......................... 43 4.20 Example 19 — Add two matrices 44 4.21 Example 20 — Shapes .......................................... 44 4.22 Example 21 — Solution of a quadratic equation ......................... 46 4.23 Example 22 — Matrix multiplication ................................. 47 4.24 Example 23 — Factorial of a number ................................ 47 4.25 Example 24 — Compound interest .................................. 48 4.26 Example 25 — Guess the number .................................. 49 4.27 Example 26 — Numerical integration 49 4.28 Example 27 — Practise arithmetic .................................. 51 4.29 Plotting in Python 52 4.29.1 Graph of a quadratic function .................................... 53 4.29.2 Drawing multiple graphs 54 Chapter 5 • Simple Projects for the Raspberry Pi Zero 2 W .................. 58 5.1 Overview 58 5.2 Project 1: External flashing LED .................................... 58 5.3 Project 2: Flashing the SOS signal 62 5.4 Project 3: Binary counting with 8 LEDs ................................ 64 5.5 Project 4: Christmas Lights (randomly flashing 8 LEDs) 68 5.6 Project 5: Rotating LEDs with pushbutton switch control ................... 71 5.7 Project 6 – Morse Code exerciser with buzzer . . . . . . . . . . . . . . . . . . . . . . . . . . . 75 5.8 Project 7: Electronic dice ......................................... 81
Contents ● 7 5.9 Project 8: LED brightness control ................................... 86 5.10 Project 9: Lucky day of the week ................................... 91 5.11 Project 10: Using an I2C LCD: Seconds counter ......................... 94 5.12 Project 11: Analog temperature sensor thermometer 99 5.13 Project 12: Analog temperature sensor thermometer with LCD output ........ 104 5.14 Project 13: Reaction timer 107 5.15 Project 14: Vehicle parking aid ................................... 109 5.16 Project 15: Real-Time graph of the temperature and humidity 115 5.17 The Sense HAT interface ........................................ 119 5.17.1 Programming the Sense HAT 120 5.17.2 Project 16: Displaying text on Sense HAT .......................... 121 5.17.13 Project 17: Test your math skills: multiplication 123 5.17.14 Project 18: Learning the times tables ............................ 124 5.17.15 Project 19: Display temperature, humidity, and pressure ............... 126 5.17.16 Project 20: ON-OFF temperature controller ........................ 127 Chapter 6 • Communication over Wi-Fi ................................. 133 6.1 Overview ................................................... 133 6.2 UDP and TCP ................................................. 133 6.2.1 UDP communication .......................................... 133 6.2.2 TCP communication ........................................... 134 6.3 Project 21: Sending a text message to a smartphone using TCP/IP 135 6.4 Project 22: Two-way communication with the smartphone using TCP/IP ........ 138 6.5 Project 23: Communicating with a PC using TCP/IP 140 6.6 Project 24: Controlling an LED connected to the Zero 2 W from the smartphone, using TCP/IP .................................................... 143 6.7 Project 25: Sending a text message to a smartphone using UDP 145 6.8 Project 26: Controlling an LED connected to the Raspberry Pi Zero 2 W from the smartphone, using UDP ............................................ 148 6.9 Using Flask to create a Web Server to control Raspberry Pi Zero 2 W GPIO ports from the Internet 151 6.10 Project 27: Web Server — Controlling an LED connected to the Raspberry Pi Zero 2 W, using Flask ............................................. 154 6.11 Communicating with the Raspberry Pi Pico W over Wi-Fi .................. 158
The Raspberry Pi Zero 2 W GO! Book ● 8 6.12 Project 28 – Raspberry Pi Zero 2 W and Raspberry Pi Pico W communication –controlling a relay over Wi-Fi ........................................ 161 6.13 Project 29 — Storing ambient temperature and atmospheric pressure data in the Cloud 165 6.14 Useful network commands ...................................... 171 6.14.1 Ping 171 6.14.2 hostname................................................. 172 6.14.3 ifconfig 172 6.14.4 route .................................................... 173 6.14.5 netstat 173 6.14.6 host .................................................... 174 6.15 Setting-up Wi-Fi on your Raspberry Pi Zero 2 W 174 6.15.1 During the installation of the Raspberry Pi operating system ............. 174 6.15.2 Modifying the Wi-Fi details on the SD card 174 6.15.3 Setting via the Task Bar ....................................... 175 6.15.4 Using the raspi-config tool ..................................... 175 6.15.5 Manual setup .............................................. 176 6.16 Finding the IP address of your Zero 2 W ............................. 176 6.16.1 Using a smartphone app ...................................... 176 6.16.2 Using a PC program ......................................... 178 6.16.3 Using nmap 179 6.17 Project 30 – Fetching and displaying the real-time weather data on the screen .. 179 6.18 Using TFT displays with the Raspberry Pi Zero 2 W 182 6.18.1 TFT display used ............................................ 183 6.18.2 Connecting a TFT display to the Raspberry Pi Zero 2 W 184 6.18.3 ST7735 TFT display driver library ................................ 184 6.18.4 Example display — writing text 185 6.18.5 Example display — displaying various shapes ........................ 186 6.18.6 Project 31 — Displaying the local weather data on TFT 188 CHAPTER 7 • Using Node-Red with the Raspberry Pi Zero 2 W ............... 191 7.1 Overview ................................................... 191 7.2 Installing and running Node-RED on the Raspberry Pi Zero 2 W ............. 191
Contents ● 9 7.3 Node-RED interface to external world................................ 193 7.4 Project 32: Hello World! ......................................... 193 7.5 Core nodes 196 7.5.1 Input nodes ................................................ 196 7.5.2 Output nodes 197 7.5.3 Function nodes .............................................. 197 7.5.4 Social nodes 198 7.5.5 Storage nodes .............................................. 198 7.5.6 Analysis nodes 198 7.5.7 Advanced nodes ............................................. 199 7.5.8 Raspberry Pi nodes 199 7.6 Project 33: Dice number......................................... 199 7.7 Project 34: Double dice numbers 200 7.8 Project 35: LED control ......................................... 202 7.9 Project 36: Flashing an LED ...................................... 204 7.10 Project 37: Pushbutton switch input ................................ 206 7.11 Using the ALEXA in Node-RED projects with the Raspberry Pi Zero 2 W ....... 207 7.11.1 Project 38: Controlling an LED using Alexa .......................... 208 7.11.2 Project 39: Controlling an LED and a buzzer using Alexa ................ 211 7.11.3 Project 40: Controlling an LED and a buzzer using Alexa – using a trigger node 213 Chapter 8 • Using MQTT with The Raspberry Pi Zero 2 W ................... 215 8.1 Overview 215 8.2 How MQTT works .............................................. 215 8.3 The Mosquitto Broker 217 8.4 Using MQTT in home automation and IoT projects ....................... 218 8.5 Project 41: Controlling an LED using MQTT 220 8.6 Project 42: Controlling an LED using ESP8266 NodeMCU with MQTT –LED connected to Raspberry Pi Zero 2 W ................................ 221 Chapter 9 • Communication over Bluetooth ............................. 229 9.1 Overview ................................................... 229 9.2 Project 43: Exchanging text with a smartphone......................... 229 9.3 Project 44: Bluetooth control of LED from a smartphone .................. 236
The Raspberry Pi Zero 2 W GO! Book ● 10 9.4 Arduino Uno: Raspberry Pi Zero 2 W Bluetooth communication .............. 239 9.4.1 Project 45: Communicating with an Arduino Uno over Bluetooth............ 239 9.5 Project 46: Play audio (like music) on a Bluetooth speaker via Zero 2 W 245 Appendix......................................................... 247 Bill of Materials 247 Index ........................................................... 248
Preface
The Raspberry Pi Zero 2 W is the latest member of the Raspberry Pi family of credit card sized computers that can be used in many applications including IoT, digital audio and video media centers, as a desktop computer, in industrial controllers, robotics, and in countless domestic, commercial, and industrial applications. In addition to many features found in "bigger" family members, the Raspberry Pi Zero 2 W also offers Wi-Fi and Bluetooth capability which makes it highly desirable in remote and Internet-based control and monitoring applications. The Raspberry Pi Zero 2 W replaces the older Raspberry Pi Zero W, provides 5 times more computing power, and in addition features Bluetooth capability. As a bonus feature, the Raspberry Pi Zero 2 W comes with a colored pinheader connector, making it easy to link hardware to its GPIO pins.
The book kicks off with the installation of the latest Raspberry Pi operating system on an SD card, followed by the configuration and practical use of the GPIOs. Next, the core of the book explains the use of the Raspberry Pi Zero 2 W running the Python programming language, always in simple terms and backed by many tested and working example projects. On part of the reader, familiarity with the Python programming language and some experience with one of the Raspberry Pi computers will prove helpful. Although previous electronics experience is not required, some knowledge of basic electronics is beneficial, especially when venturing out to modify the projects for your own applications.
The book includes many simple, software-only examples to widen your knowledge of Python. Besides these, over 30 tested and working hardware-based projects are given in the book, covering the use of Wi-Fi, communication with smartphones and with a Raspberry Pi Pico W computer. Additionally, there are Bluetooth projects including elementary communication with smartphones and with the popular Arduino Uno.
All the projects given in the book have been fully tested and are working. The following sub-headings are used in the projects where applicable:
• Project title
• Project description
• Aim of the project
• Block diagram
• Circuit diagram
• Program description using PDL
• Program listing with full documentation
All programs discussed in this book are contained in an archive file you can download free of charge from the Elektor website. Head to: www.elektor.com/books and enter the book title in the Search box. You can easily download and use these programs without any modifications. Alternatively, feel free to modify the programs to suit your own applications.
I hope you find the book helpful and enjoy reading it.
Prof Dogan Ibrahim London, January 2023
● 11
Chapter 1 • The Raspberry Pi Zero 2 W
1.1 Overview
The Raspberry Pi Zero 2 W is an immensely popular member of the Raspberry Pi family of development boards for embedded microcontroller applications. In this chapter, you"ll discover the hardware details of this development board and also learn how to install the latest operating system on an SD card for use with the Raspberry Pi Zero 2 W. From now on, this development board will be referred to as the Zero 2 W for short.
1.2 The Zero 2 W development board
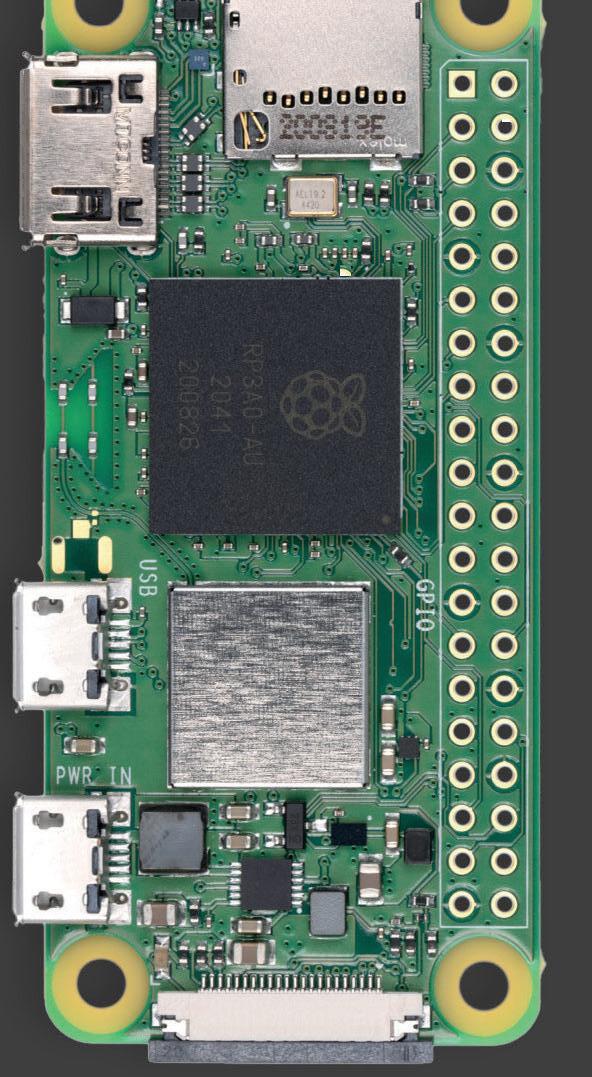
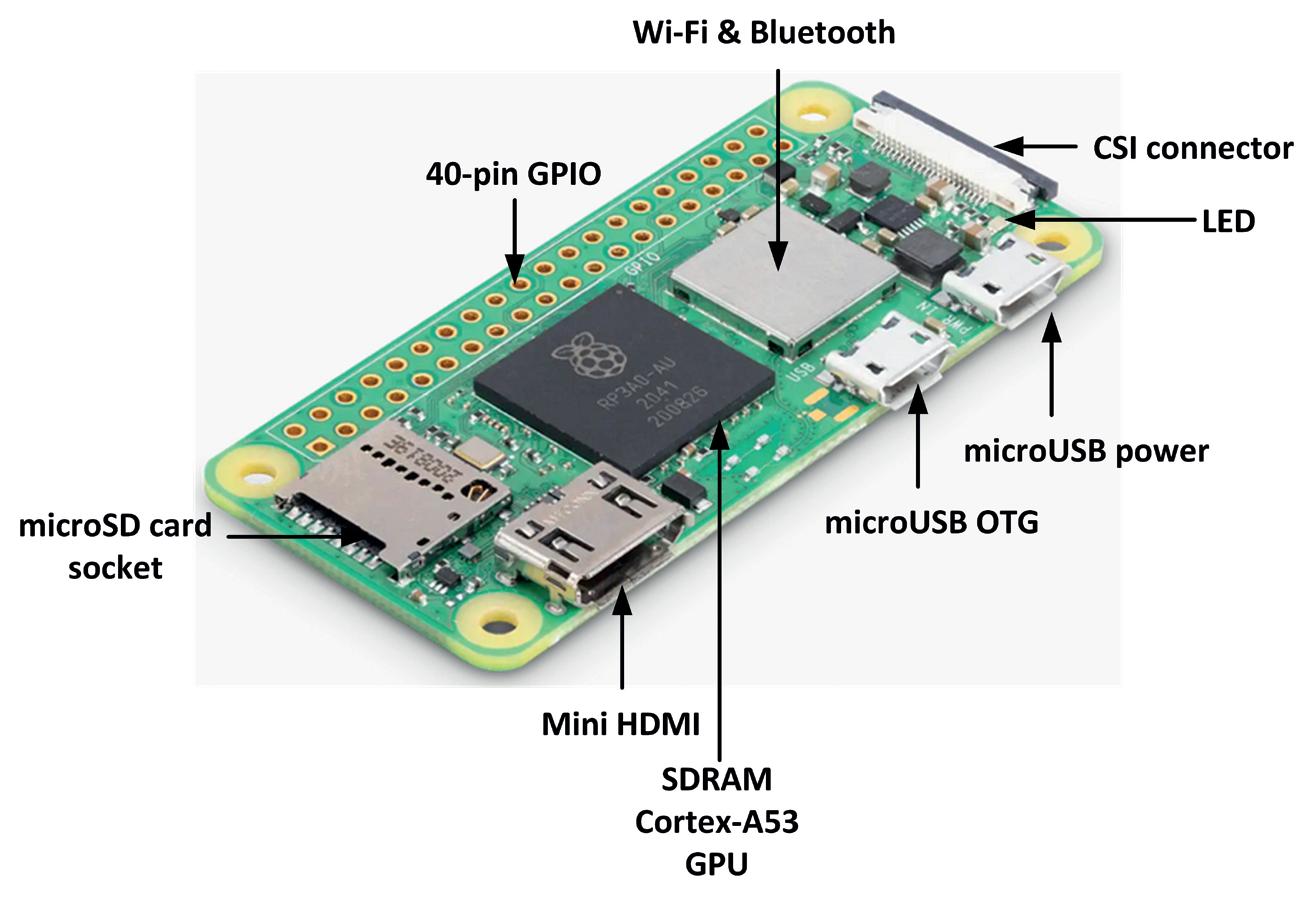
The Zero 2 W (Figure 1.1) is essentially an upgraded replacement to the popular Raspberry Pi Zero W. It features an RP3A0 system-in-package (SiP), which is a quad-core 64-bit Arm Cortex-A53 CPU clocked at 1 GHz. A Broadcom BCM2710A1 die is incorporated with 512 MB of SDRAM (LPDDR2). The processor provides 40% more single-threaded performance and 5 times more multi-threaded performance than the standard Raspberry Pi Zero.
The basic features of the Zero 2 W may be summarized as follows.
• 64-bit Arm Cortex-A53 processor @ 1 GHz
• Broadcom BCM2710A1 SiP
• 512 MB SDRAM
• 2.4-GHz IEEE 802.11b/g/n wireless LAN
• Bluetooth 4.2 BLE
• On-board antenna
• microSD card slot
• Mini HDMI and Composite video ports
The Raspberry Pi Zero 2 W GO! Book ● 12
Figure 1.1: Raspberry Pi Zero 2 W.
• CSI-2 camera connector
• 1× MicroUSB OTG
• 1× MicroUSB power input
• H.264 MPEG-4 decode (1080p30)
• OpenGL ES 1.1, 2.0 graphics
• HAT compatible 40-pin I/O header
• 5 VDC, 2.5 A input power
• Size 30 mm × 65mm × 13mm
• Weight: 39.97 grams
• Temperature range: –20º to +70º (operation)
• Stated production lifetime: until 2028
The major advantage of the Zero 2 W is that the board incorporates both Wi-Fi and Bluetooth interface modules along with Bluetooth Low Energy (BLE). The board shares the same form factor as the original Raspberry Pi Zero and therefore fits inside existing Raspberry Pi Zero cases. The board is powered externally with 5 V, 2.5 A via a MicroUSB socket.
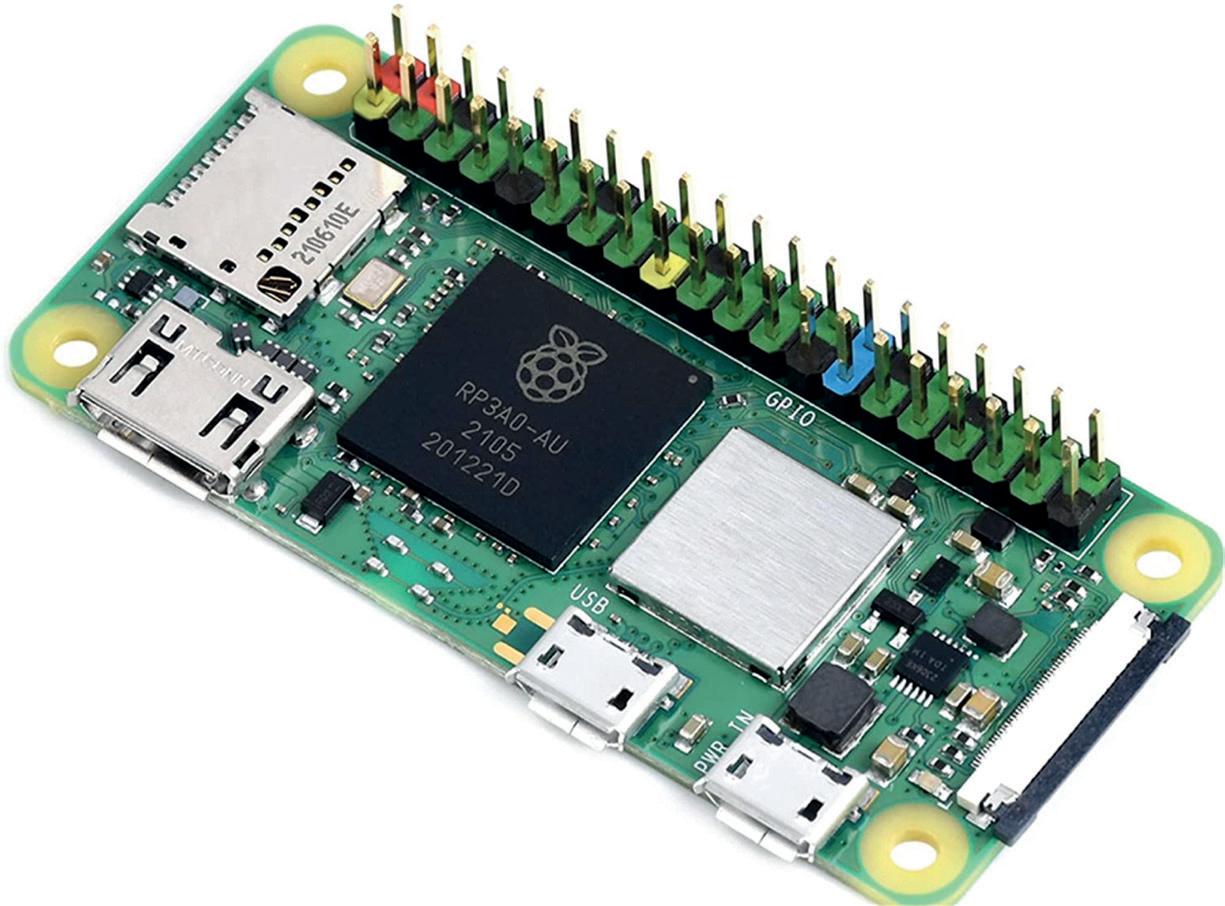
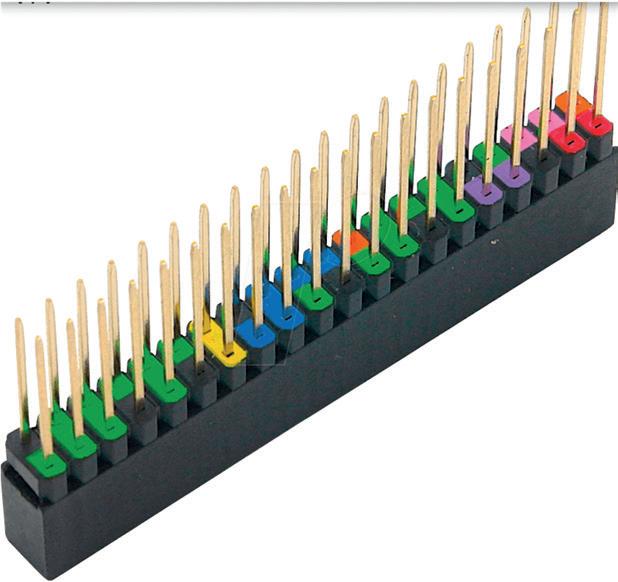
The Zero 2 W board is available with pre-soldered male color-coded header (ZERO 2 WHC) for ease of identifying the pins. This is shown in Figure 1.2. Thick internal copper layers are used to conduct heat away from the processor and consequently achieve higher performance without heating the processor.
Chapter 1 • The Raspberry Pi Zero 2 W ● 13
Figure 1.2: Color-coded pinheader.
Table 1.1 shows a comparison of the Zero 2 W with other Raspberry Pi Zero development boards. Notice that the Zero 2 W is a 64-bit device and about 5 times faster than the original Zero W.
The Raspberry Pi Zero 2 W GO! Book
ZERO ZERO W ZERO 2 W ZERO 2WH ZERO 2 WHC
Processor BCM2835 BCM2710A1
CPU 32-bit Single core Arm11 64-bit Quad core Arm Cortex-A53
Memory 512 MB SDRAM
GPU OpenGL ES 1.1, 2.0
WIFI 2.4 GHz IEEE 802.11b/g/n
Bluetooth Bluetooth 4.1 BLE Bluetooth 4.2 BLE
USB
Camera CSI-2 connector
GPIO 40-pin
Pre-soldered header Black Colored Table 1.1: Raspberry Pi Zero W and Zero 2 W comparison.
• Red = 5 V
• Orange = 3.3 V
• Black = GND
• Pink = I2C
• Purple = UART
• BLUE = SPI
• Yellow = DNC (reversed I2C)
• Green = GPIO
14
●
Figure 1.3 shows the pin configuration of the Zero 2 W board. In this book, the use of a Zero 2 WHC with color-coded header is assumed. The following colors are used on the header (Figure 1.4):
Figure 1.3: Pin configuration.
1.2.1 Zero 2 W current consumption, and GPIO voltages and currents
The Zero 2 W has 4 cores running at 1 GHz. In idle mode, the Zero 2 W's temperature is about 36.5 degrees Celsius and about 63.4 degrees Celsius when under heavy computing loads. Adding a heatsink helps to reduce the chip temperature. Additional cooling from a heatsink can reduce the temperature considerably.
The Zero 2 W operates at +3.3 V and the GPIO pins are not +5 V tolerant. It is therefore important not to connect any peripherals to Zero 2 W that operate at supply voltages exceeding +3.3 V. A voltage between +1.8 V and +3.3 V is read as logic High by the processor. A voltage lower than +1.8 V is read as logic Low.
The Zero 2 W draws about 280 mA when idle and 580 mA when under a heavy computing load. The current limit of a GPIO pin is about 17 mA and more than 51 mA should not be drawn from all GIO pins at any time.
The GPIO pins can be configured as inputs or outputs. By default, they are configured as inputs on power-up, except GPIO 14 and GPIO 15.
1.3 Installing the operating system
The Raspberry Pi OS (called Raspbian previously) is an officially supported operating system for Raspberry Pi systems. It is a 32-bit Linux based OS that has been configured and optimized to run on Raspberry Pi systems.
The Raspberry Pi operating system is normally stored on an SD card although it is also possible to store it on other media such as an SSD drive. The Raspberry Pi operating system is complimentary and can be downloaded to a PC and then transferred to an SD card that can be used to boot the Raspberry Pi development boards.
The steps to download and transfer the operating system to an SD card are given below. Please note that these are the steps that apply if you are using a Windows PC.
Chapter 1 • The Raspberry Pi Zero 2 W ● 15
Figure 1.4: Colored header.
• Go to the Raspberry Pi operating system website (Figure 1.5):
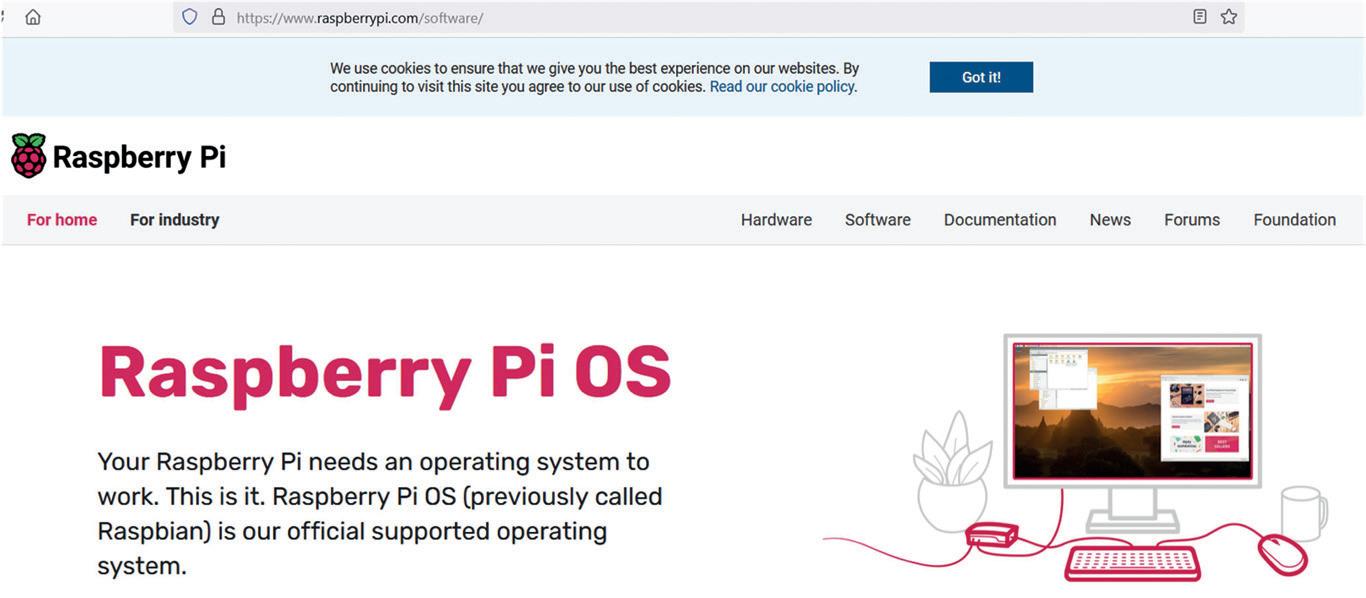
https://www.raspberrypi.com/software/
• Scroll down and click Download for Windows.
• You should see a file with the name imager_1.7.3.exe downloaded to your PC (this was the filename at the time of authoring this book. Your filename may be different).
• Insert the micro SD card into the card holder of your PC (you may have to use an adapter).
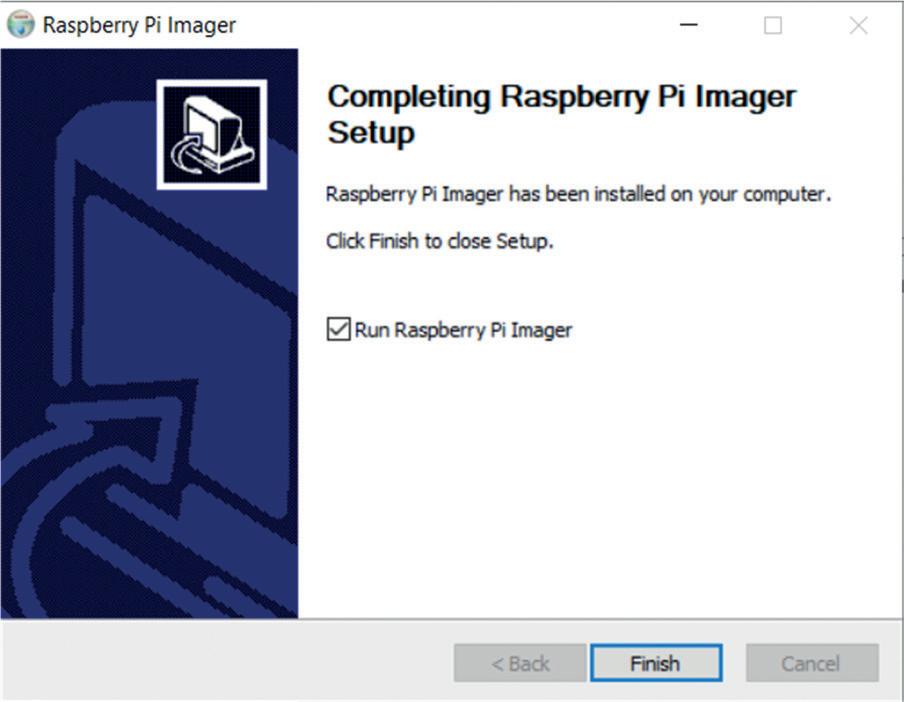
• Double-click on the file to install it on your PC.
• Click Finish to run the Raspberry Pi Imager (Figure 1.6).
The Raspberry Pi Zero 2 W GO! Book
16
●
Figure 1.5: Raspberry Pi OS website.
Figure 1.6: Run the Raspberry Pi Imager.
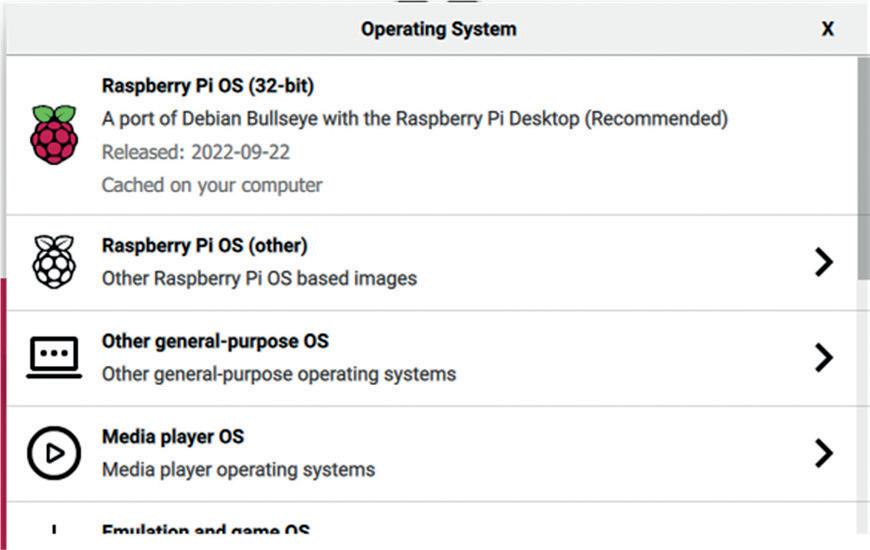
• Click CHOOSE OS and click to choose the Raspberry Pi OS (32-bit) as shown in Figure 1.7.
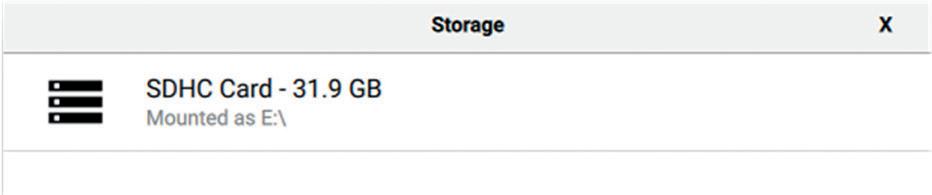
• Click CHOOSE STORAGE and select the SD card (Figure 1.8) as the storage medium. A 32-GB micro SD card was used for the examples in this book.
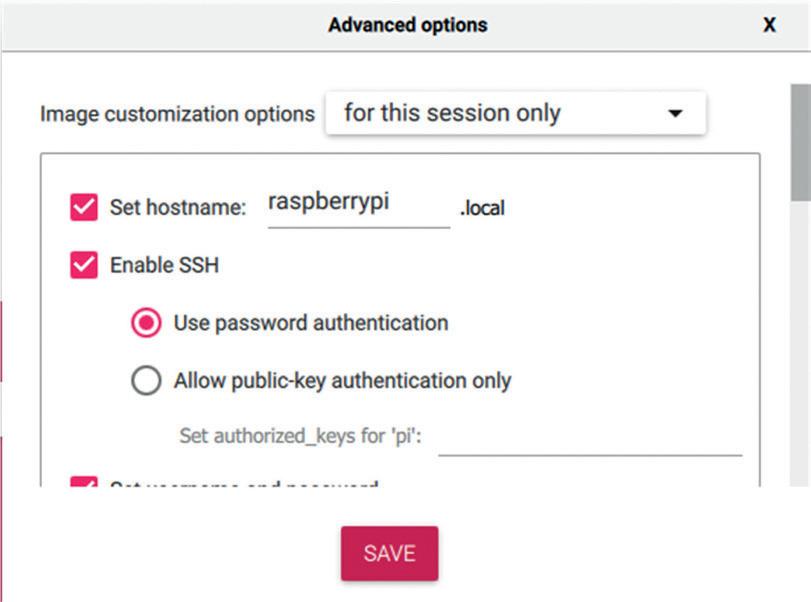
• Click the Settings icon (gear-shaped) at the bottom right of the screen and set the following (Figure 1.9):
Set hostname: raspberrypi
Enable SSH
Select password authentication
Set Wi-Fi username and password
Click configure wireless LAN and set the SSID and password Set the wireless LAN country: GB Set local settings if desired
• Click Save to save the settings.
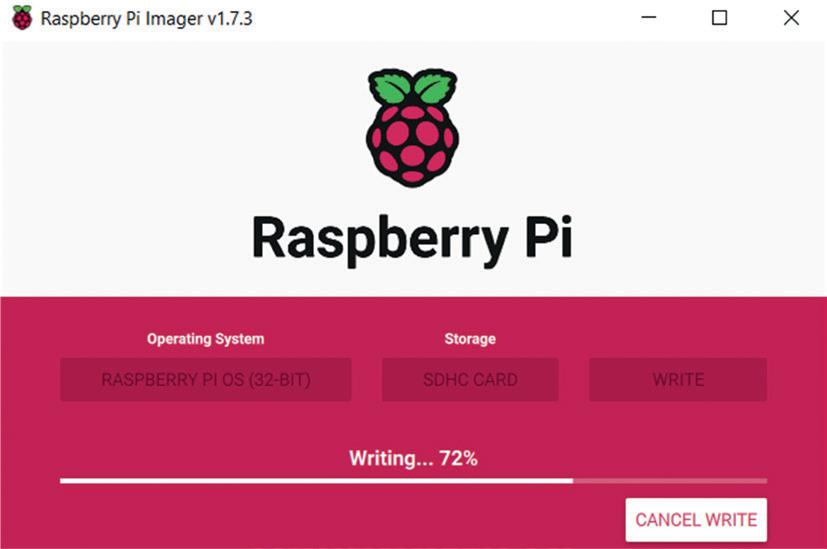
• Click Write to write the operating system on the micro SD card. Wait until the write and verify operations are finished (Figure 1.10).
Chapter 1 • The Raspberry Pi Zero 2 W ● 17
Figure 1.7: Choose the Raspberry Pi OS.
Figure 1.8: Select the SD card.
1.4 Powering-up the Zero 2 W
Insert the SD card into your Zero 2 W. Plug in a monitor and a keyboard if you have these. Plug in the MicroUSB power cable. Your Zero 2 W should boot. If you do not have a monitor and a keyboard you can access your Zero 2 W remotely as described in the next section.
1.5 Remote access
It is much easier to access the Raspberry Pi remotely over the Internet, for example using a PC rather than connecting a keyboard, mouse, and monitor to it. You can use the Putty program to access your Zero 2 W remotely from your PC. Before connecting to your Zero 2 W you have to know its IP address. This can be obtained from your Wi-Fi router, or by using an app on your smartphone. There are many freely available apps for both Android and iOS operating systems (e.g., Who's on my Wi-Fi for Android) that will scan the Wi-Fi network and display the IP addresses of the devices connected to the Wi-Fi router.
Copy Putty to your PC from the following website:
https://www.putty.org/
The Raspberry Pi Zero 2 W GO! Book ● 18
Figure 1.9: Settings options.
Figure 1.10: Copying the operating system to the micro SD card.
• Remove the micro SD card from the PC.
Chapter 1 • The Raspberry Pi Zero 2 W
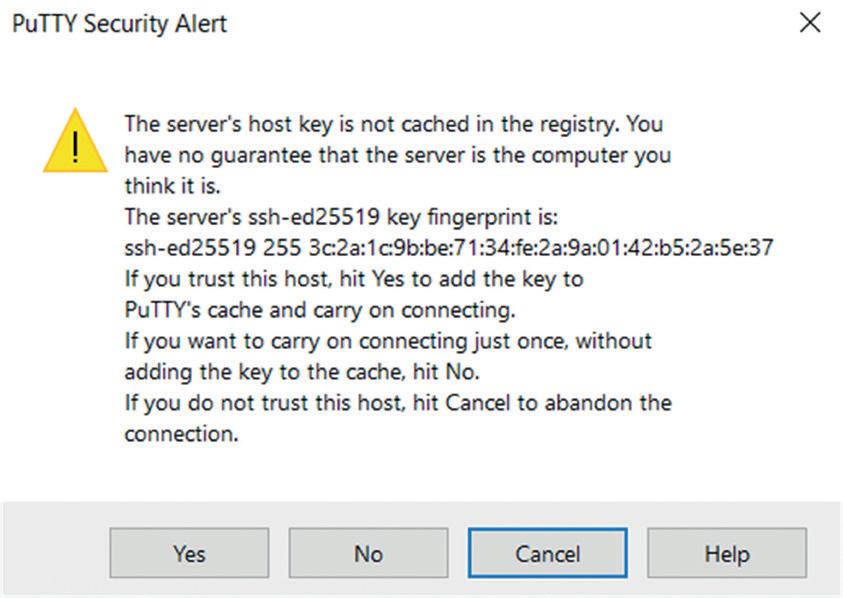
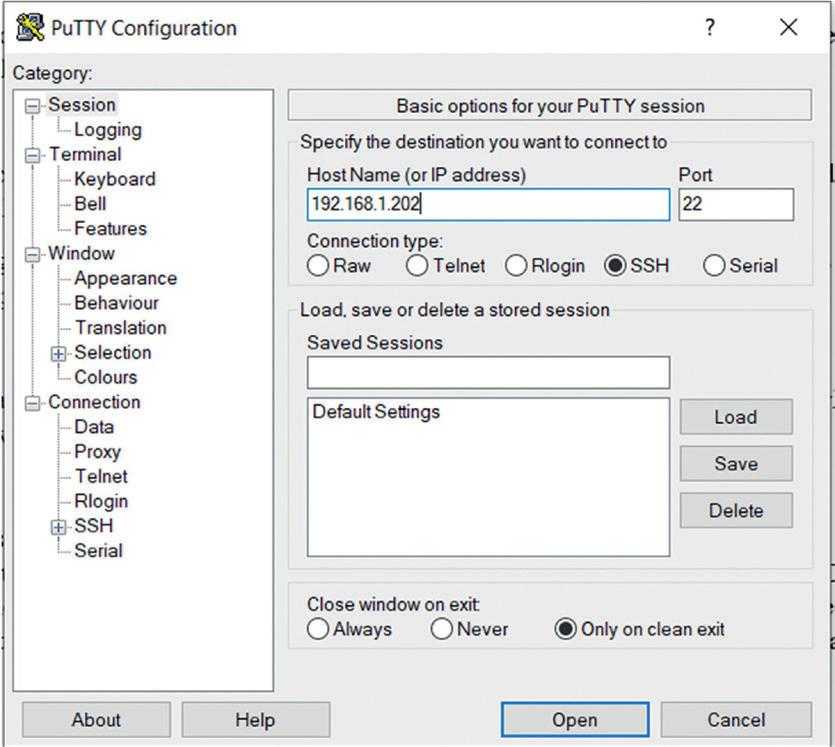
Putty is a standalone program and there is no need to install it. Simply double-click to run it and the Putty startup screen will be displayed. Click SSH and enter the Raspberry Pi IP address, then click Open (see Figure 1.11). The message shown in Figure 1.12 will be displayed the first time you access the Raspberry Pi. Click Yes to accept this security alert.
You will be prompted to enter the username and password. After a successful login, you should see the command mode as follows:
pi@raspberrypi:~ $
You should now enable VNC so that your Zero 2 W can be accessed graphically over the Internet using your PC. This can be done by entering the following command at the terminal session:
pi$raspberrypi:~ $ sudo raspi-config
Chapter 1 • The Raspberry Pi Zero 2 W ● 19
Figure 1.11: Putty startup screen.
Figure 1.12 Click Yes to accept.
Go to the configuration menu and select Interface Options. Go down to P3 VNC and enable VNC. Click <Finish> to exit the menu.
1.5.1 Configuring Putty
By default, the Putty screen background is black with white foreground characters. The author prefers to have white background with black foreground characters, with the character size set to 12 points bold. You should save your settings so that they are available next time you want to use the Putty. The steps to configure the Putty with these settings are given below.
• Restart Putty.
• Select SSH and enter the Raspberry Pi IP address.
• Click Colors under Window.
• Set the Default Foreground and Default Bold Foreground colors to black (Red:0, Green:0, Blue:0).
• Set the Default Background and Default Bold Background to white (Red:255, Green:255, Blue:255).
• Set the Cursor Text and Cursor Color to black (Red:0, Green:0, Blue:0).
• Select Appearance under Window and click Change in Font settings. Set the font to Bold 12.
• Select Session and give a name to the session (e.g., MyZero) and click Save.
• Click Open to open the Putty session with the saved configuration.
• Next time you restart Putty, select the saved session, and click Load followed by Open to start a session with the saved configuration.
1.5.2 Remote access of the Desktop
If you are using your Zero 2 W with a local keyboard, mouse, and display you can skip this section. If, on the other hand, you want to access your Desktop remotely over the network, you will find that SSH services cannot be used. The easiest and simplest way to access your Desktop remotely from a computer is by installing the VNC (Virtual Network Connection) client and server. The VNC server runs on your Pi and the VNC client runs on your computer. It is recommended to use the tightvncserver on your Zero 2 W. The steps are:
• Enter the following command:
pi$raspberrypi:~ $ sudo apt-get install tightvncserver
The Raspberry Pi Zero 2 W GO! Book ● 20
• Run the tightvncserver:
pi$raspberrypi:~ $ tightvncserver
You will be prompted to create a password for remotely accessing the Raspberry Pi desktop. You can also set up an optional read-only password. The password should be entered every time you want to access the Desktop. Enter a password and remember it.
• Start the VNC server after reboot by the following command:
pi$raspberrypi:~ $ vncserver :1
You can optionally specify the screen pixel size and color depth in bits as follows:
pi$raspberrypi:~ $ vncserver :1 –geometry 1920x1080 –depth 24
• You should now set up a VNC viewer on your laptop (or desktop) PC. There are many VNC clients available but the recommended one which is compatible with TightVNC is the TightVNC for the PC which can be downloaded from the following link:
https://www.tightvnc.com/download.php
• Download and install the TightVNC software for your PC. You will have to choose a password during the installation.
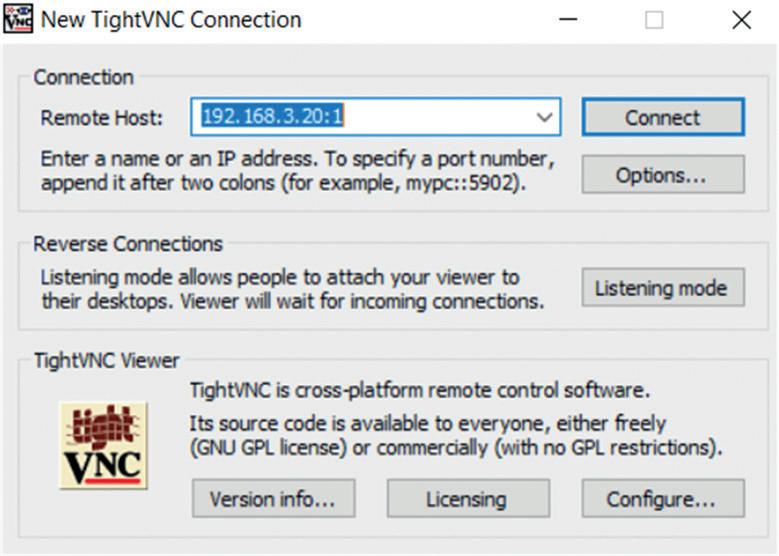
• Start the TightVNC Viewer on your PC and enter the Raspberry Pi IP address followed by :1. Click Connect to connect to your Raspberry Pi (Figure 1.13).
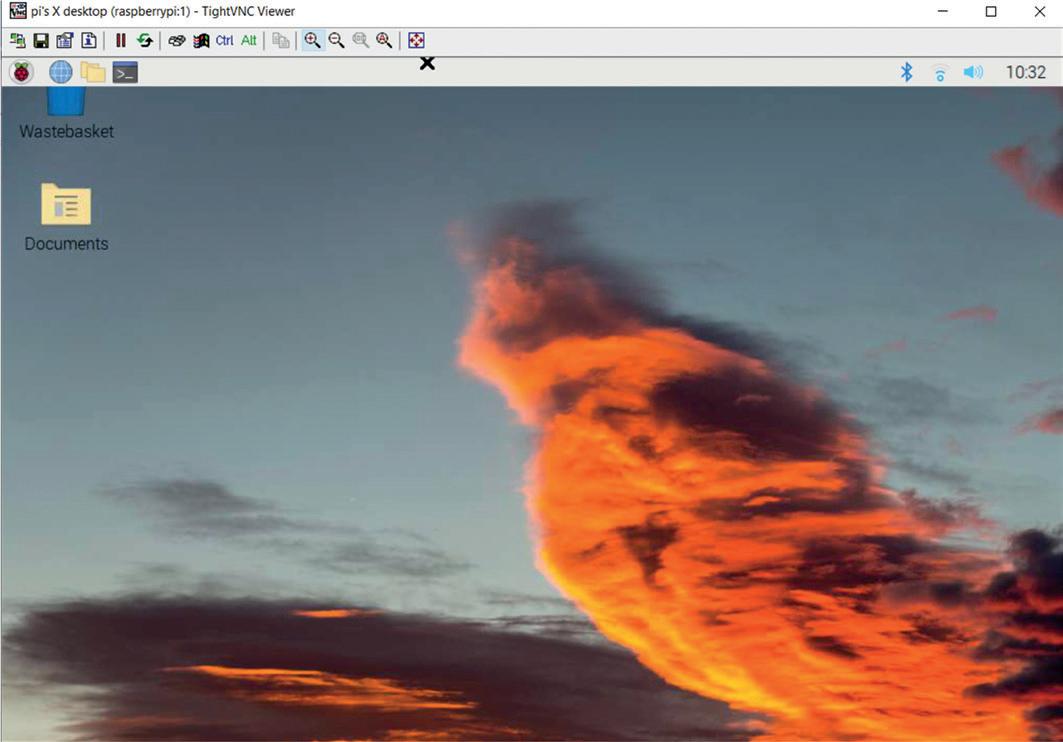
• Enter the password you have chosen earlier. You should now see the Raspberry Pi Desktop displayed on your PC screen (Figure 1.14).
Chapter 1 • The Raspberry Pi Zero 2 W ● 21
Figure 1.13: Connect to TightVNC Viewer.
• The VNC server is now running on your Raspberry Pi Zero 2 W and you have access to the Desktop.
1.6 Assigning static IP address to your Zero 2 W
When you try to access your Raspberry Pi remotely over your local network, it is possible that the IP address given by your Wi-Fi router changes from time to time. This is annoying as you have to find out the new IP address allocated to your Raspberry Pi. Without a knowledge of the IP address, you cannot login using the SSH or the VNC.
In this section, you will learn how to fix your IP address so that it does not change between reboots. The steps are as follows:
• Log in to your Raspberry Pi via SSH.
• Check whether DHCP is active on your Raspberry Pi (it should normally be active):
pi@raspberrypi:~ $ sudo service dhcpcd status
If DHCP is not active, activate it by entering the following commands:
pi@raspberrypi:~ $ sudo service dhcpcd start
pi@raspberrypi:~ $ sudo systemctl enable dhcpcd
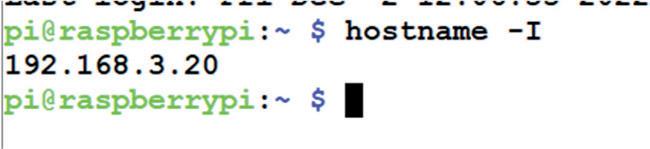
• Find the IP address currently allocated to you by entering command ifconfig or hostname – I (Figure 1.15). In this example the IP address was: 192.168.3.20. You can use this IP address as your fixed address since no other device on the network is currently using it.
The Raspberry Pi Zero 2 W GO! Book ● 22
Figure 1.14: Raspberry Pi Desktop.
• Find the IP address of your router by entering the command ip r (Figure 1.16). In this example, the IP address was: 192.168.3.1.
• Find the IP address of your DNS by entering the following command (Figure 1.17). This is usually same as your router address:
pi@raspberrypi:~ $ grep "nameserver" /etc/resolv.conf Figure 1.17: Finding the
• Edit file /etc/dhcpcd.conf by entering the command:
pi@raspberrypi:~ $ nano /etc/dhcpcd.conf
• Add the following lines to the bottom of the file (these will be different for your router). If these lines already exist, remove the comment character # at the beginning of the lines and change the lines as follows (you may notice that eth0 for Ethernet is listed):
interface wlan0
static_routers=192.168.3.1
static domain_name_servers=192.168.3.1
static ip_address=192.168.3.20/24
• Save the file by entering CNTRL + X followed by Y and reboot your Raspberry Pi.
• In this example, the Raspberry Pi should reboot with the static IP address: 192.168.3.20.
Chapter 1 • The Raspberry Pi Zero 2 W ● 23
Figure 1.15: Finding the IP address allocated to you.
Figure 1.16 Finding the IP address of your router.
DNS address.
Chapter 2 • Using a Text Editor in Command Mode
A text editor is used to create or modify the contents of a text file. There are many text editors around for the Linux operating system. Some popular ones go by the names of nano, vim, and vi. In this chapter, you will learn to use "nano" which is the most commonly used text editor in Linux. In later chapters, you will see that the nano text editor can be used to create your Python programs.
2.1 The "nano" text editor
Start the nano text editor by entering the word nano, followed by the filename you wish to create or modify. An example is given below where a new file called first.txt is created:
pi@raspberrypi ~ $ nano first.txt
You should see the editor screen as in Figure 2.1. The name of the file to be edited is written at the top middle part of the screen. The message New File at the bottom of the screen shows that this is a newly created file. The shortcuts at the bottom of the screen are there to perform various editing functions. These shortcuts are accessed by pressing the Ctrl key together with another key. Some of the useful shortcuts are given below.
Ctrl+W: Search for a word
Ctrl+V: Move to next page
Ctrl+Y: Move to previous page
Ctrl+K: Cut the current row of txt
Ctrl+R: Read file
Ctrl+U: Paste the text you previously cut
Ctrl+J: Justify
Ctrl+\: Search and replace text
Ctrl+C: Display current column and row position
Ctrl+G: Get detailed help on using the nano
Ctrl+-: Go to specified line and column position
Ctrl+O: Save (write out) the file currently open
Ctrl+X: Exit nano
The Raspberry Pi Zero 2 W GO! Book ● 24
Now, type the following text into the file:
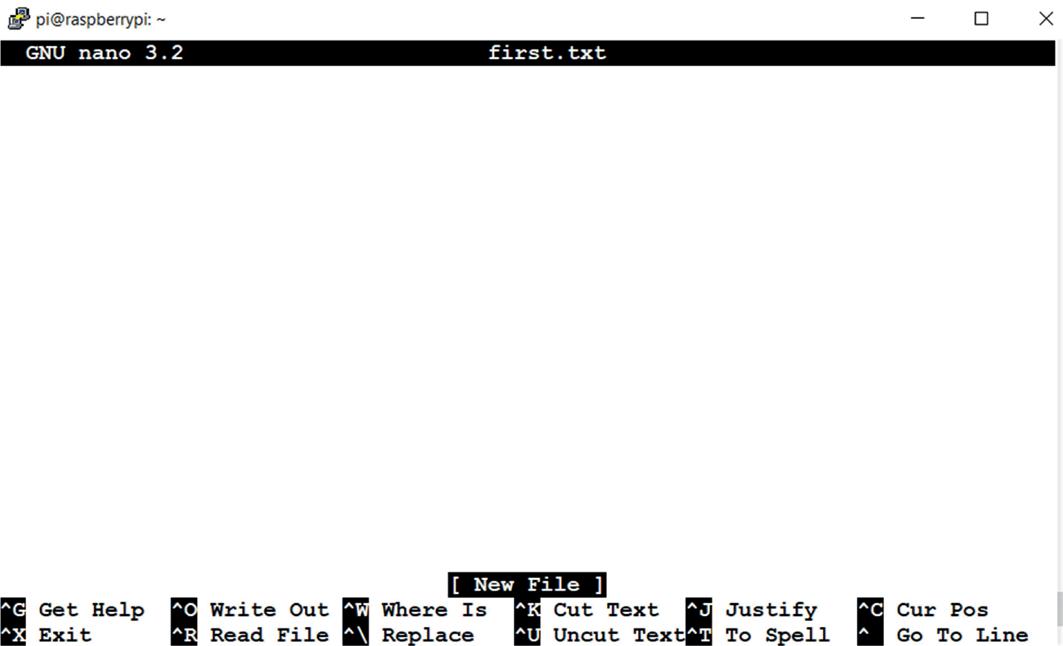
nano is a simple and yet powerful text editor. This simple text example demonstrates how to use nano. This is the last line of the example.
The use of nano is now demonstrated with the following steps:
Step 1: Go the beginning of the file by moving the cursor.
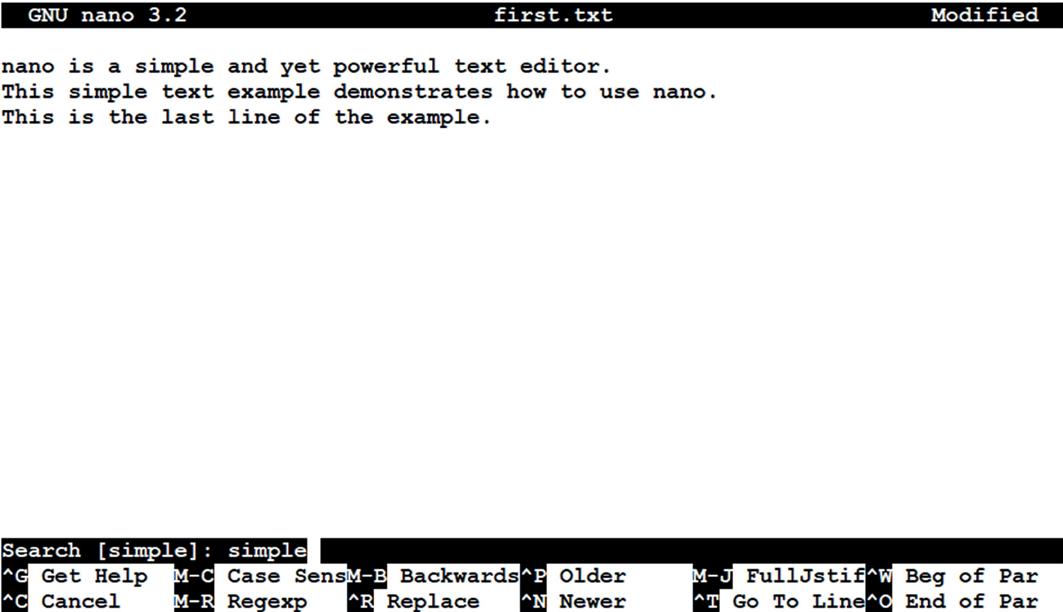
Step 2: Look for word simple by pressing Ctrl+W and then typing simple in the window opened at the bottom left hand corner of the screen. Press the Enter key. The cursor will be positioned on the word simple (see Figure 2.2).
Step 3: Cut the first line by placing the cursor anywhere on the line and then pressing Ctrl+K. The first line will disappear.
Chapter 2 • Using a Text Editor in Command Mode ● 25
Figure 2.1: The nano text editor startup screen.
Figure 2.2 Searching for the word "simple".
Step 4: Paste the line cut after the first line. Place the cursor on the second line and press Ctrl+U (see Figure 2.3).
Figure
the text line you cut previously.

Step 5: Place cursor at the beginning of the word simple on the first row. Enter Ctrl+C. The row and column positions of this word will be displayed at the bottom of the screen.
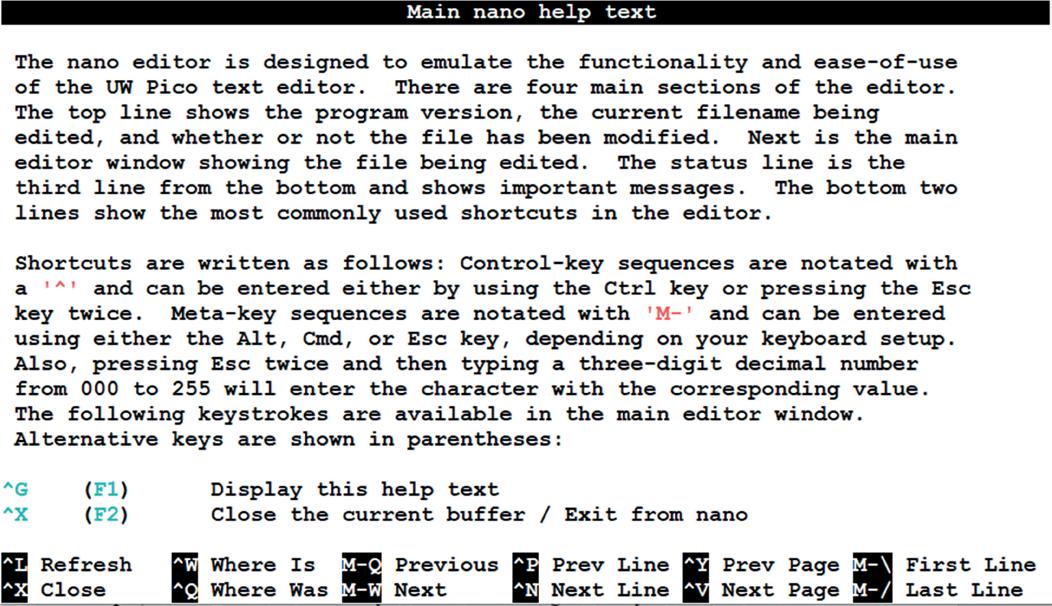
Step 6: Press Ctrl+G to display help page as in Figure 2.4. Notice that the display is many pages long and you can jump to the next pages by pressing Ctrl+Y or to the previous pages by pressing Ctrl+V. Press Ctrl+X to exit the help page.
Step 7: Press Ctrl+- and enter line and column numbers as 2 and 5, followed by the Enter key, to move cursor to line 2, column 5.
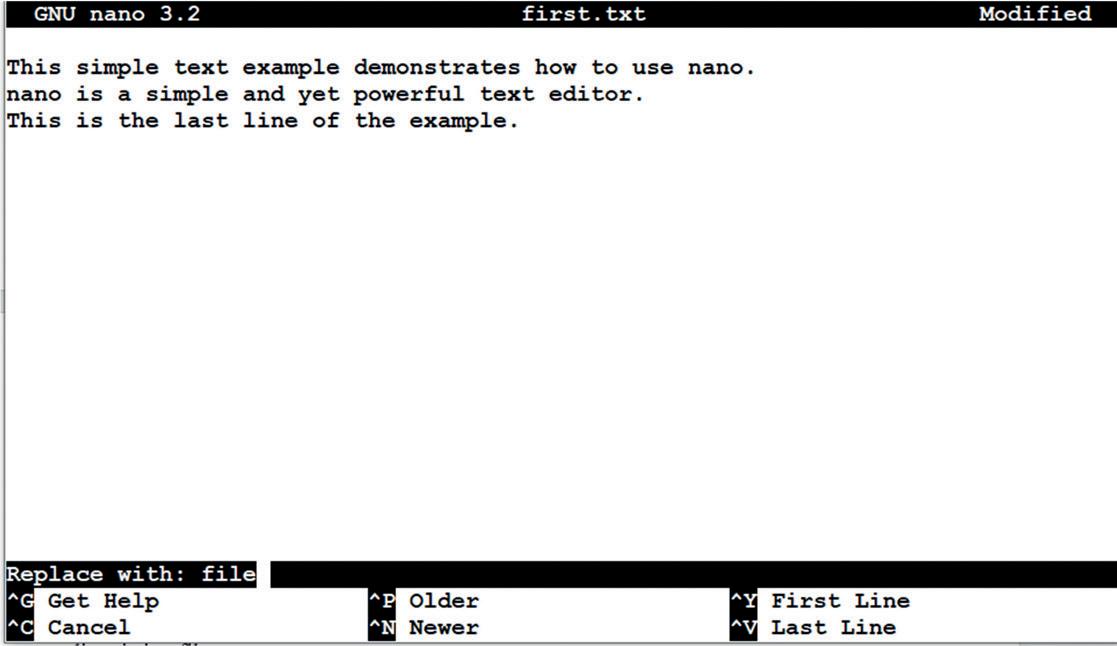
Step 8: Replace word example with word file. Press Ctrl+\ and type the first word as example (see Figure 2.5). Press Enter and then type the replacement word as file. Press Enter and accept the change by typing y.
The Raspberry Pi Zero 2 W GO! Book ● 26
2.3: Pasting
Figure 2.4: Displaying the help page.
Step 9: Save the changes. Press Ctrl+X to exit the file. Type Y to accept the saving, then enter the filename to be written to, or simply press Enter to write to the existing file (first. txt in this example). The file will be saved in your current working directory.
Step 10: Display the contents of the file:
pi@raspberrypi ~ $ cat first.txt
This simple text file demonstrates how to use nano. Nano is a simple and yet powerful text editor. This is the last line of the example.
pi@raspberrypi ~ $
In summary, nano is a simple and yet powerful text editor allowing us to create new text files or edit existing files.
Chapter 2 • Using a Text Editor in Command Mode ● 27
Figure 2.5: Replacing text.
The Raspberry Pi Zero 2 W GO! Book
● 248 Index A Advanced nodes 199 ALEXA 207 ambient temperature 165 Analysis nodes 198 API Keys 167 Arduino Uno 239 atmospheric pressure data 165 Average of 10 numbers 33 Average of two numbers 33 B BCM2710A1 12 BCM notation 84 bidirectional logic level converter 94 Binary counting 64 Binary, octal, and hexadecimal 43 Bluemix 166 Bluetooth 229 bluetoothct 231 BMP280 165 Broker 215 C Calculator 40 Channel Settings 167 CHOOSE OS 17 CHOOSE STORAGE 17 Christmas Lights 68 Cloud 165 Cloudino 166 Compound interest 48 Configuring Putty 20 Core nodes 196 Cursor Color 20 Cursor Text 20 D Data Import/Export 167 debugger 31 Default Background 20 Default Foreground 20 DHT11 115 display driver library 184 E echo 112 Electronic dice 81 Enabling Bluetooth 230 F Factorial 47 File processing 41 Flask 151 Function nodes 197 G GUI mode 29 H HC-06 Bluetooth module 239 home automation 218 host 174 hostname 172 I ifconfig 172 Input nodes 196 integration 49 Interface Options 20 IoT 218 IP address 176 L LED brightness 86 local weather 188 M matplotlib 52, 117 matrices 44 Matrix multiplication 47 MCP3002 99 Morse Code exerciser 75 Mosquitto Broker 217 MQTT 215 Multi-Level Wildcards 216 multiple graphs 54
Index ● 249 N nano 24 netstat 173 nmap 179 Node-RED 191 numpy 117 O Odd or even 43 Output nodes 197 P Play audio 245 Plotting in Python 52 Private View 167 Public View 167 Publisher 215 Putty 18 Q quadratic equation 46 R Raspberry Pi Pico W 158 Raspbian 15 raspi-config tool 175 Reaction timer 107 Real-Time graph 115 Rotating LEDs 71 route 173 RP3A0 12 running Node-RED 191 S Seconds counter 94 Sense HAT 119 Shapes 44 Single Level Wildcards 216 Social nodes 198 SOCK_STREAM 136 SOS signal 62 SparkFun 166 SPI 103 Squares and cubes of numbers 42 SSH 19 ST7735 184 static IP address 22 Storage nodes 198 Subscriber 215 Surface area of a cylinder 34 T Table of squares 36 Table of trigonometric sine 36 TCP 133 temperature controller 127 TFT displays 182 ThingSpeak 166 Thonny screen 31 TightVNC for the PC 21 tightvncserver 20 TightVNC Viewer 21 timetable 42 trig 112 Trigonometric function 37 TXS0102 94 U UDP 133 UDP Sender/Receiver 146 ultrasonic transmitter/receiver 109 Using MQTT 215 V vehicle parking 109 vi 24 vim 24 VNC 19 W weather data 179 Weather Map 180 Web Server 151, 154 Wi-Fi 133 Z ZERO 2 WHC 13