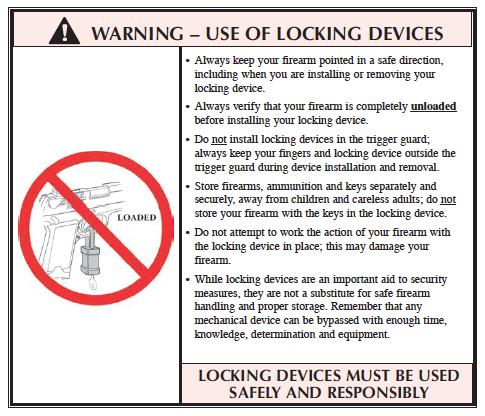
LOCKING DEVICE INSTALLATION
INSTRUCTIONS
Use the Correct Lock: While the basic locking device is substantially similar for most firearms, due to the different shapes some firearms utilize different locking devices. It is very important to acquire the correct locking device!
To Install the Factory-Supplied Locking Device:
1. Keep the muzzle pointed in a safe direction and your fingers outside the trigger guard at all times!
2. Be sure the firearm and its magazine are completely unloaded and contain no cartridges or cartridge cases! Remove the magazine from your firearm.
3.Open the action completely. Use the safety button to lock the action open during installation of the locking device.
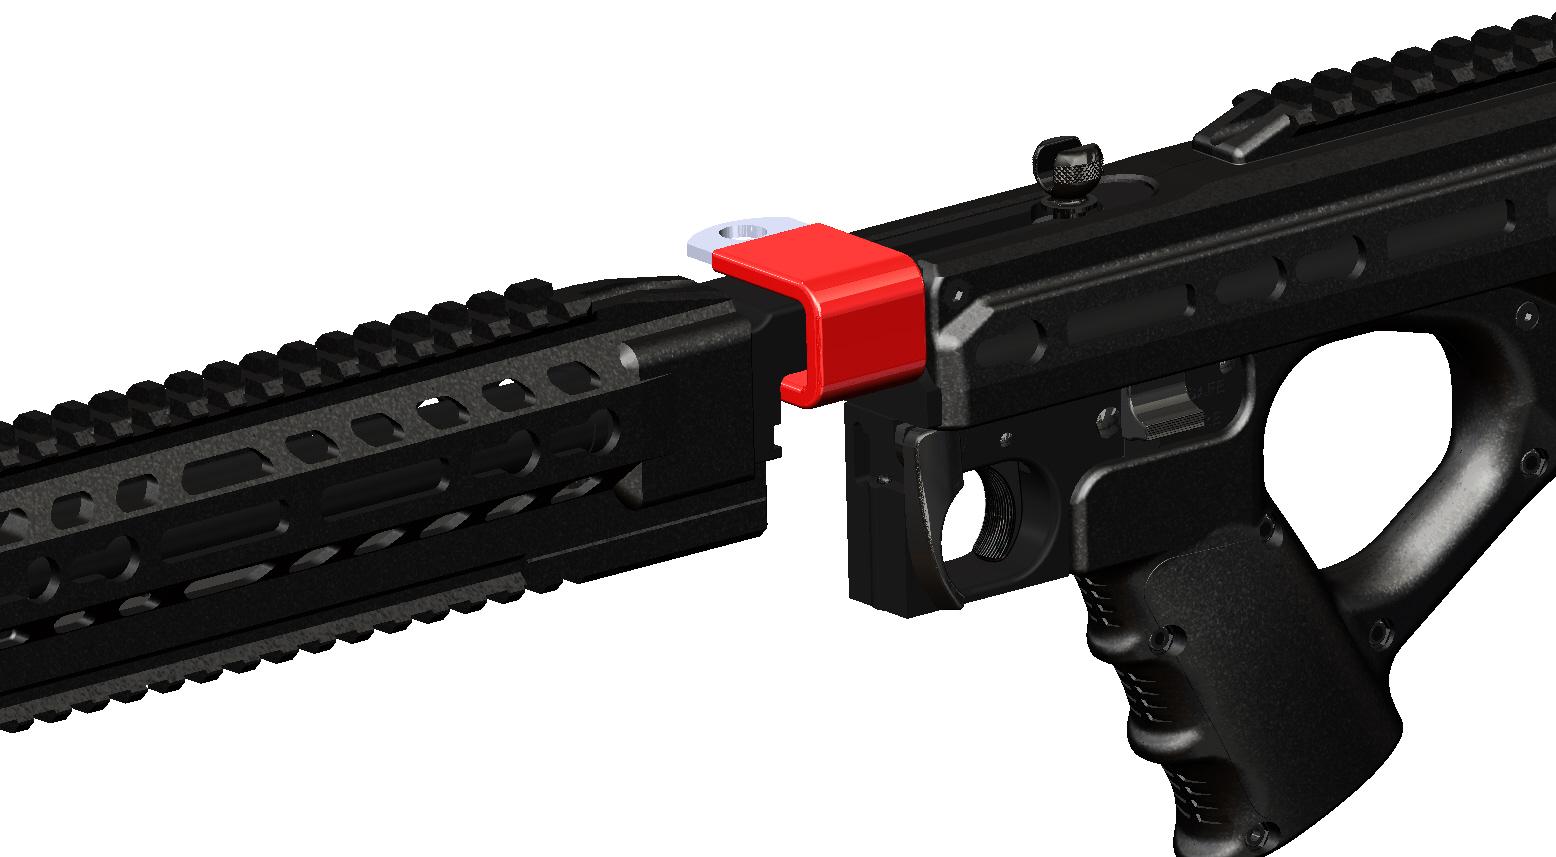
4.Apply the lock bracket(supplied) as shown in Fig. A, below.
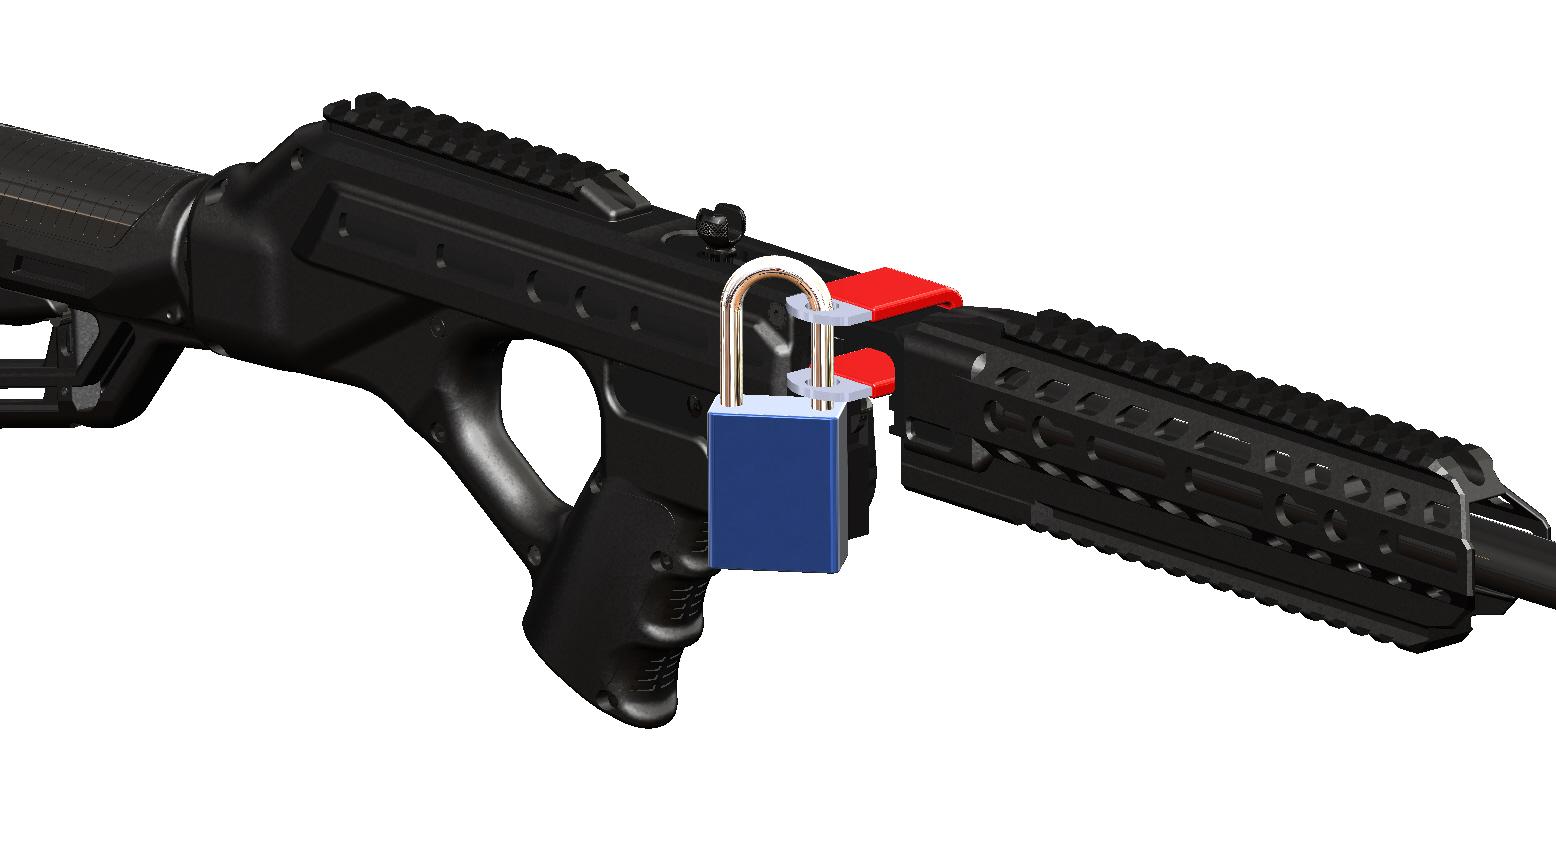
5.Apply the lock by placing the shackle of the lock into the lock bracket hole as shown below in Fig. B.
6.Close the lock by pressing the shackle into the body of the lock (the part that receives the key) as tightly together as possible. The lock has bumpers and the shackle is coated with a non-marring material that will not harm the metal finish of your firearm; be careful not to dent or scratch the gun parts.
7.Once the lock is securely closed, remove the key and pull firmly on the lock to test the connection and be sure it is locked. Do not leave or store your firearm with the key in the lock! Store your locked unloaded firearm and the key in secure, separate locations, away from ammunition, children, or unauthorized adults.
A
FIGURES B
FIGURES
FIREARMS SAFETY-YOUR RESPONSIBILITY
SAFETY MUST BE THE FIRST AND CONSTANT CONSIDERATION OF EVERY PERSON WHO HANDLES FIREARMS AND AMMUNITION.
This Instruction Manual is designed to assist you in learning how to use and care for your G4S properly. Please contact us if you have any questions about it. Only when you are certain you fully understand the Manual and can properly carry out its instructions should you practice loading, etc. with live ammunition. If you have any doubts about your ability to handle or use a particular type of gun safely, then you should seek supervised instruction. Such personalized instruction is often available from gun dealers, gun clubs or police departments. If none of these sources can help you, write to the National Rifle Association, 11250 Waples Mill Road, Fairfax, VA 22030-7400. They will assist you. The person possessing a gun has a full-time job. You cannot guess; you cannot forget. You must know how to use your firearm safely. Do not use any firearm without having a complete understanding of its particular characteristics and safe use. Remember: There is no such thing as a foolproof gun.
TABLE OF CONTENTS
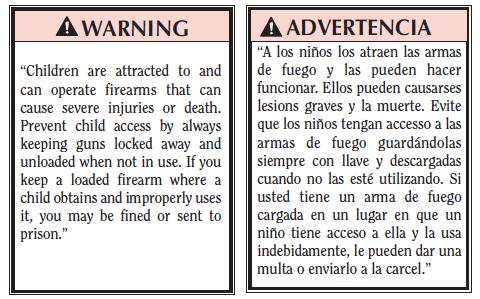
State-By-State Warnings
FIREARMS ARE DANGEROUS WEAPONS –READ THE INSTRUCTIONS AND WARNINGS IN THIS MANUAL THOROUGHLY AND CAREFULLY BEFORE USING.
GENERAL INFORMATION AND MECHANICAL CHARACTERISTICS
The G4S are auto-loading, recoil operated rifles. Retracting the bolt handle cocks the internal hammer and compresses the recoil spring. When the bolt is manually released, it moves forward (driven by the recoil spring), strips a cartridge from the magazine, if a loaded magazine is in place, and chambers the cartridge. The bolt is held against the chambered cartridge by their coil spring. When the trigger is pulled, the hammer is released and strikes the firing pin. The firing pin indents the cartridge case rim and ignites the priming compound inside the rim. This ignites the powder in the cartridge case and a great volume of gas is instantly generated, which acts on the interior of the cartridge case in all directions.
Because the bullet offers the least resistance, it moves out of the cartridge case and exits the muzzle. The bolt then moves rearward automatically, extracting and ejecting the fired cartridge case, and at the same time cocking the hammer and compressing the recoil spring, etc., as described above. Once the trigger is released, the rifle is ready to fire again.
Each time the trigger is pulled and released, the same cycle is repeated until there are no more cartridges in the magazine or in the chamber.
The rifle will fire if there is a cartridge in the chamber and the trigger is pulled, whether or not there is a magazine in place! Removing the magazine does not unload the rifle. Never assume the rifle is unloaded. Visually inspect the chamber and the magazine each time the rifle is handled to be certain there are no cartridges in either.
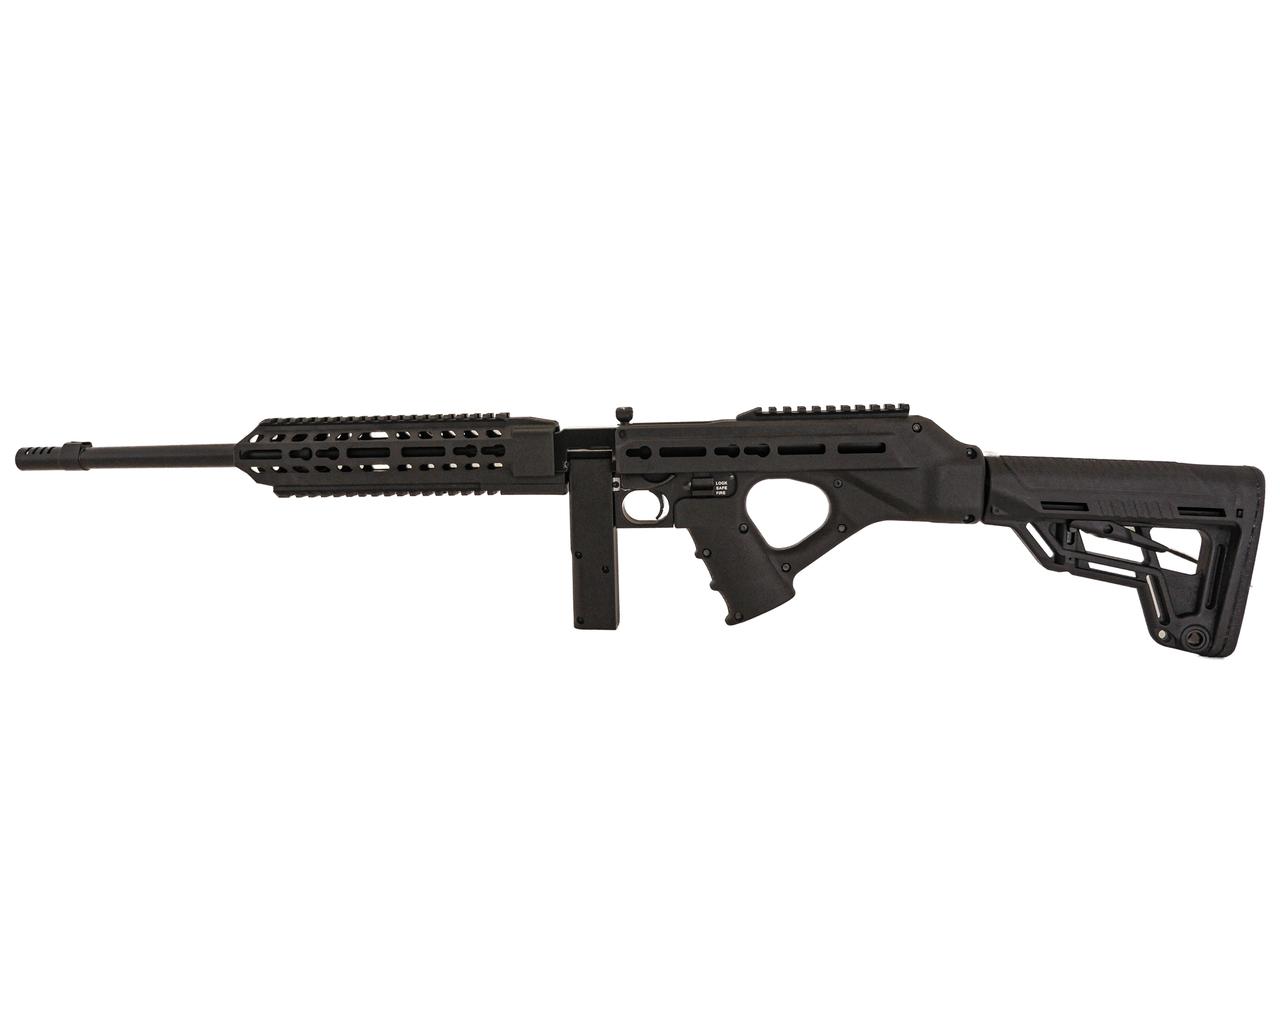
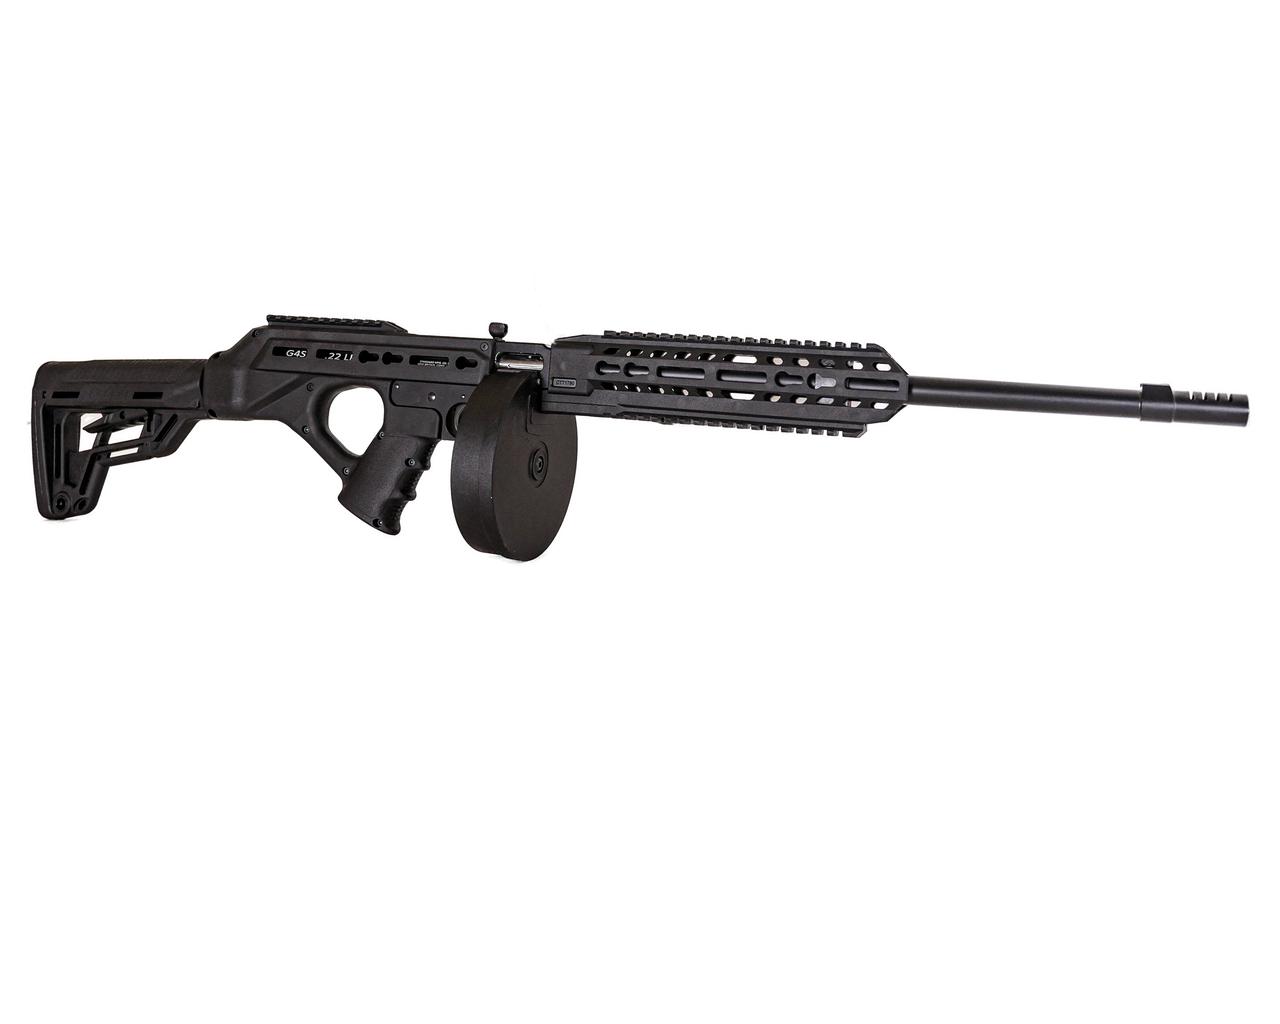
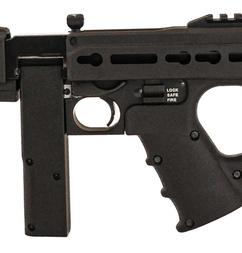
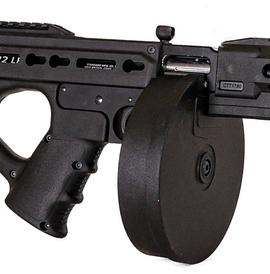
It features a polymer stock, rear hand grip, and polymer handguard. It may use a 10 round straight stick magazine or a 50 round drum magazine. It is chambered for .22 Long Rifle cartridges. Only use Standard Manufacturing Company LLC magazines with your G4S.
All models have the same basic operation mechanism and include the following features with which the gun user should be thoroughly familiar.
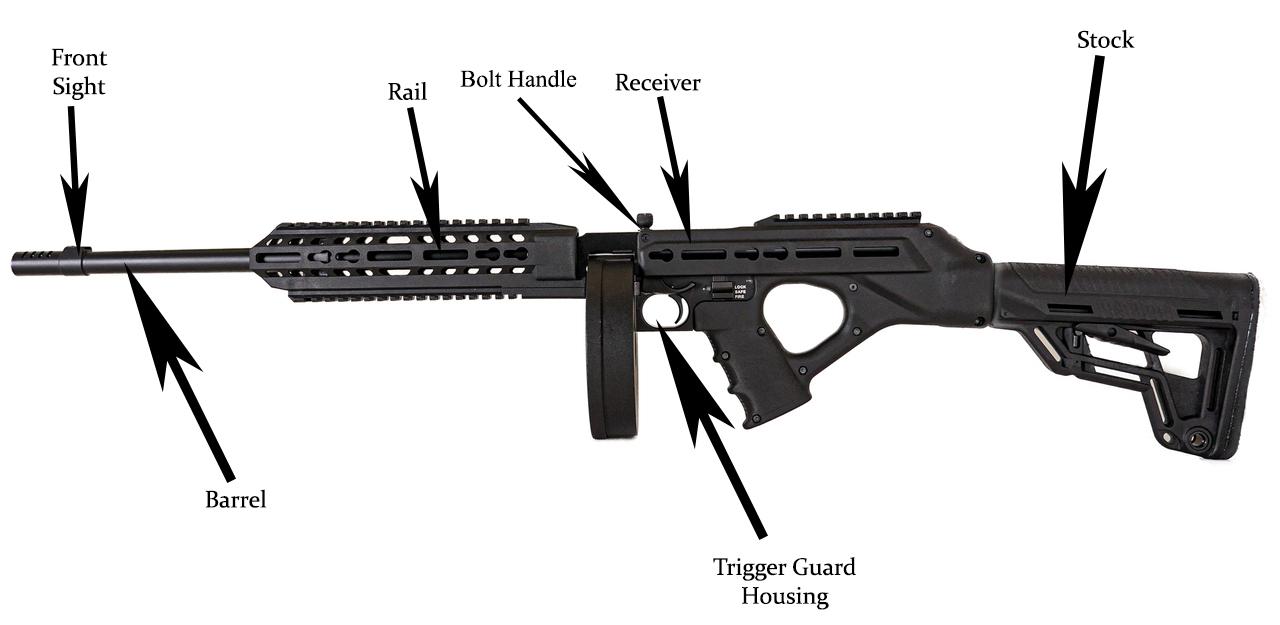
NOMENCLATURE
Figure 1. In these illustrations the frequently used operating components are identified. Note that the safety button is located on the left side of the trigger guard.
OPERATION OF SAFETY
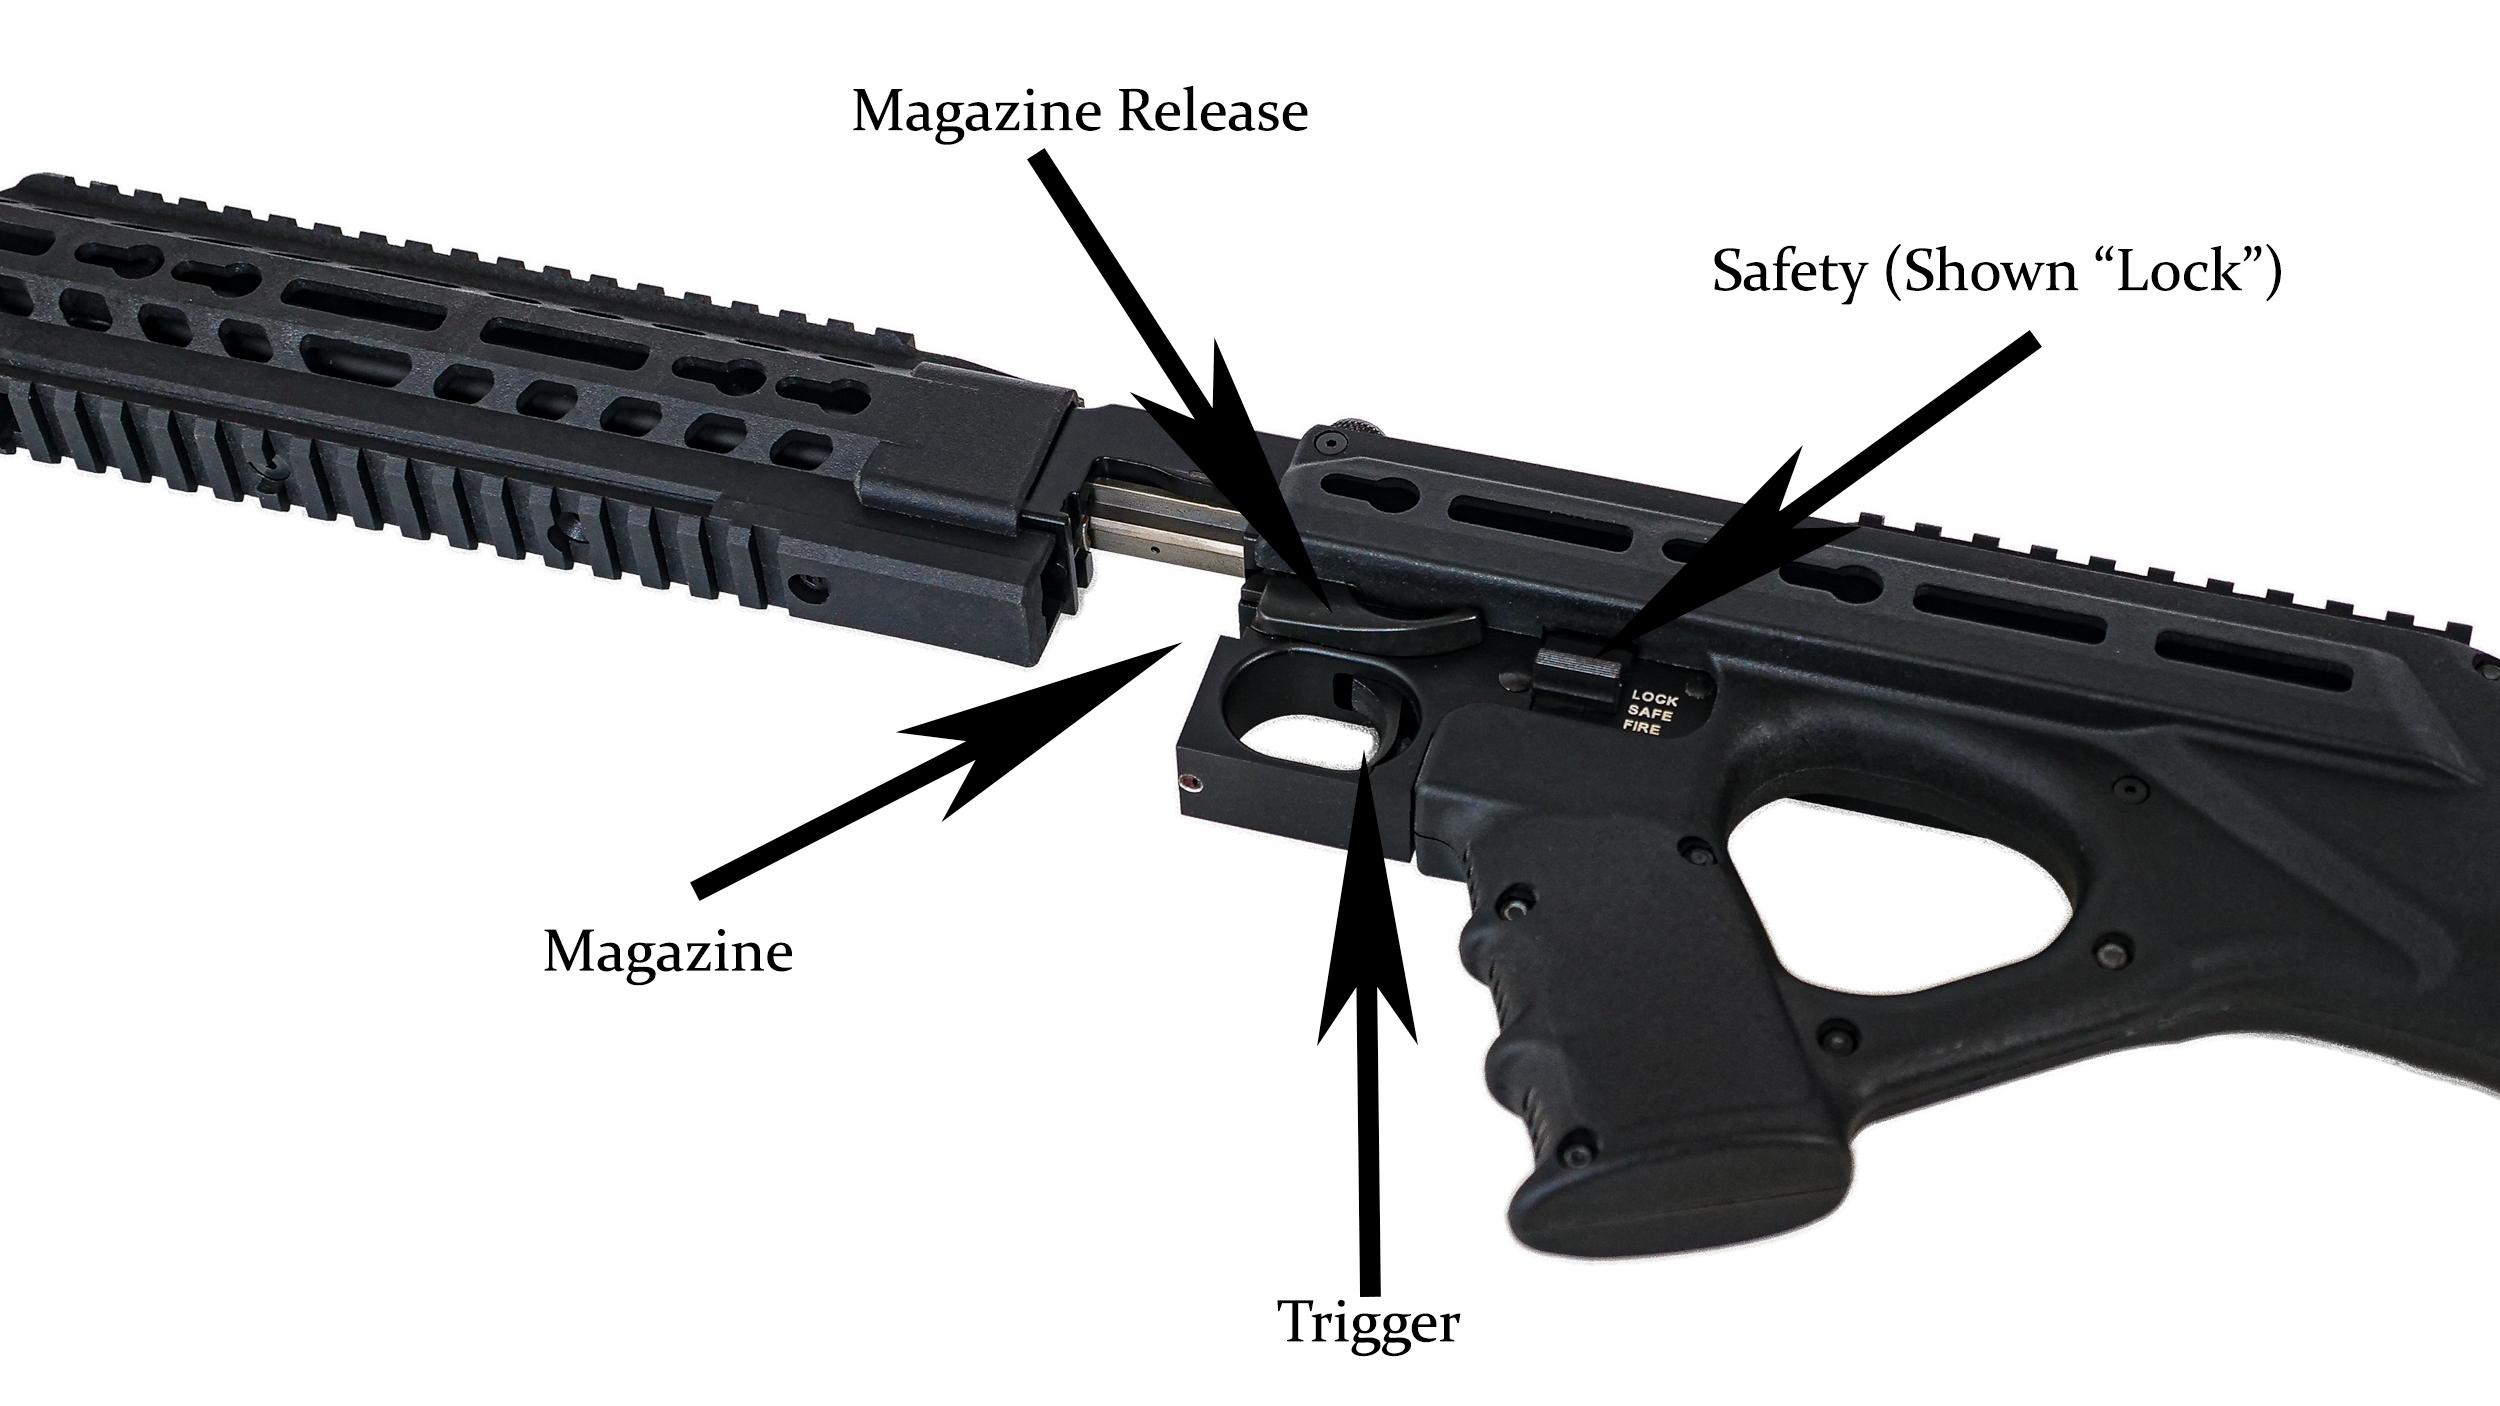
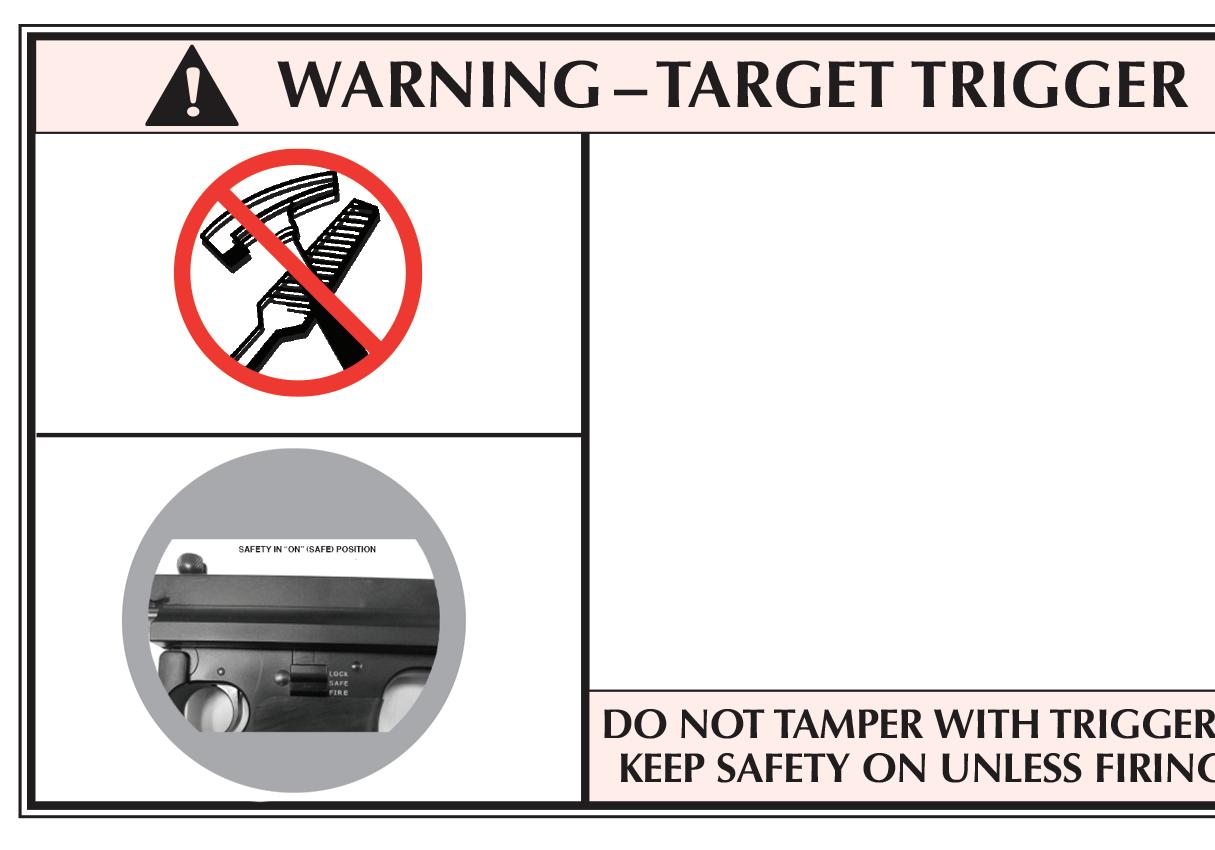
The G4S rifles have a up & down sliding safety button which is located on the left side above the middle handgrip. (See Figure 1, p. 10.) The safety can be operated only when the hammer is cocked.
The safety is “on” when it is pushed up to the “Lock” or “Safe” position on the left side of the trigger guard assembly, as shown in Figure 1. In this position the sear is blocked, and the gun cannot be fired from a normal pull on the trigger. The bolt must be retracted almost to end the stop to move the safety button up to “Safe” or “Lock” positions.
The safety should always be in the “lock” or “safe” position except when the shooter is actually firing the gun. The safety should be moved to the “safe” position whenever the shooter ceases firing, even temporarily.
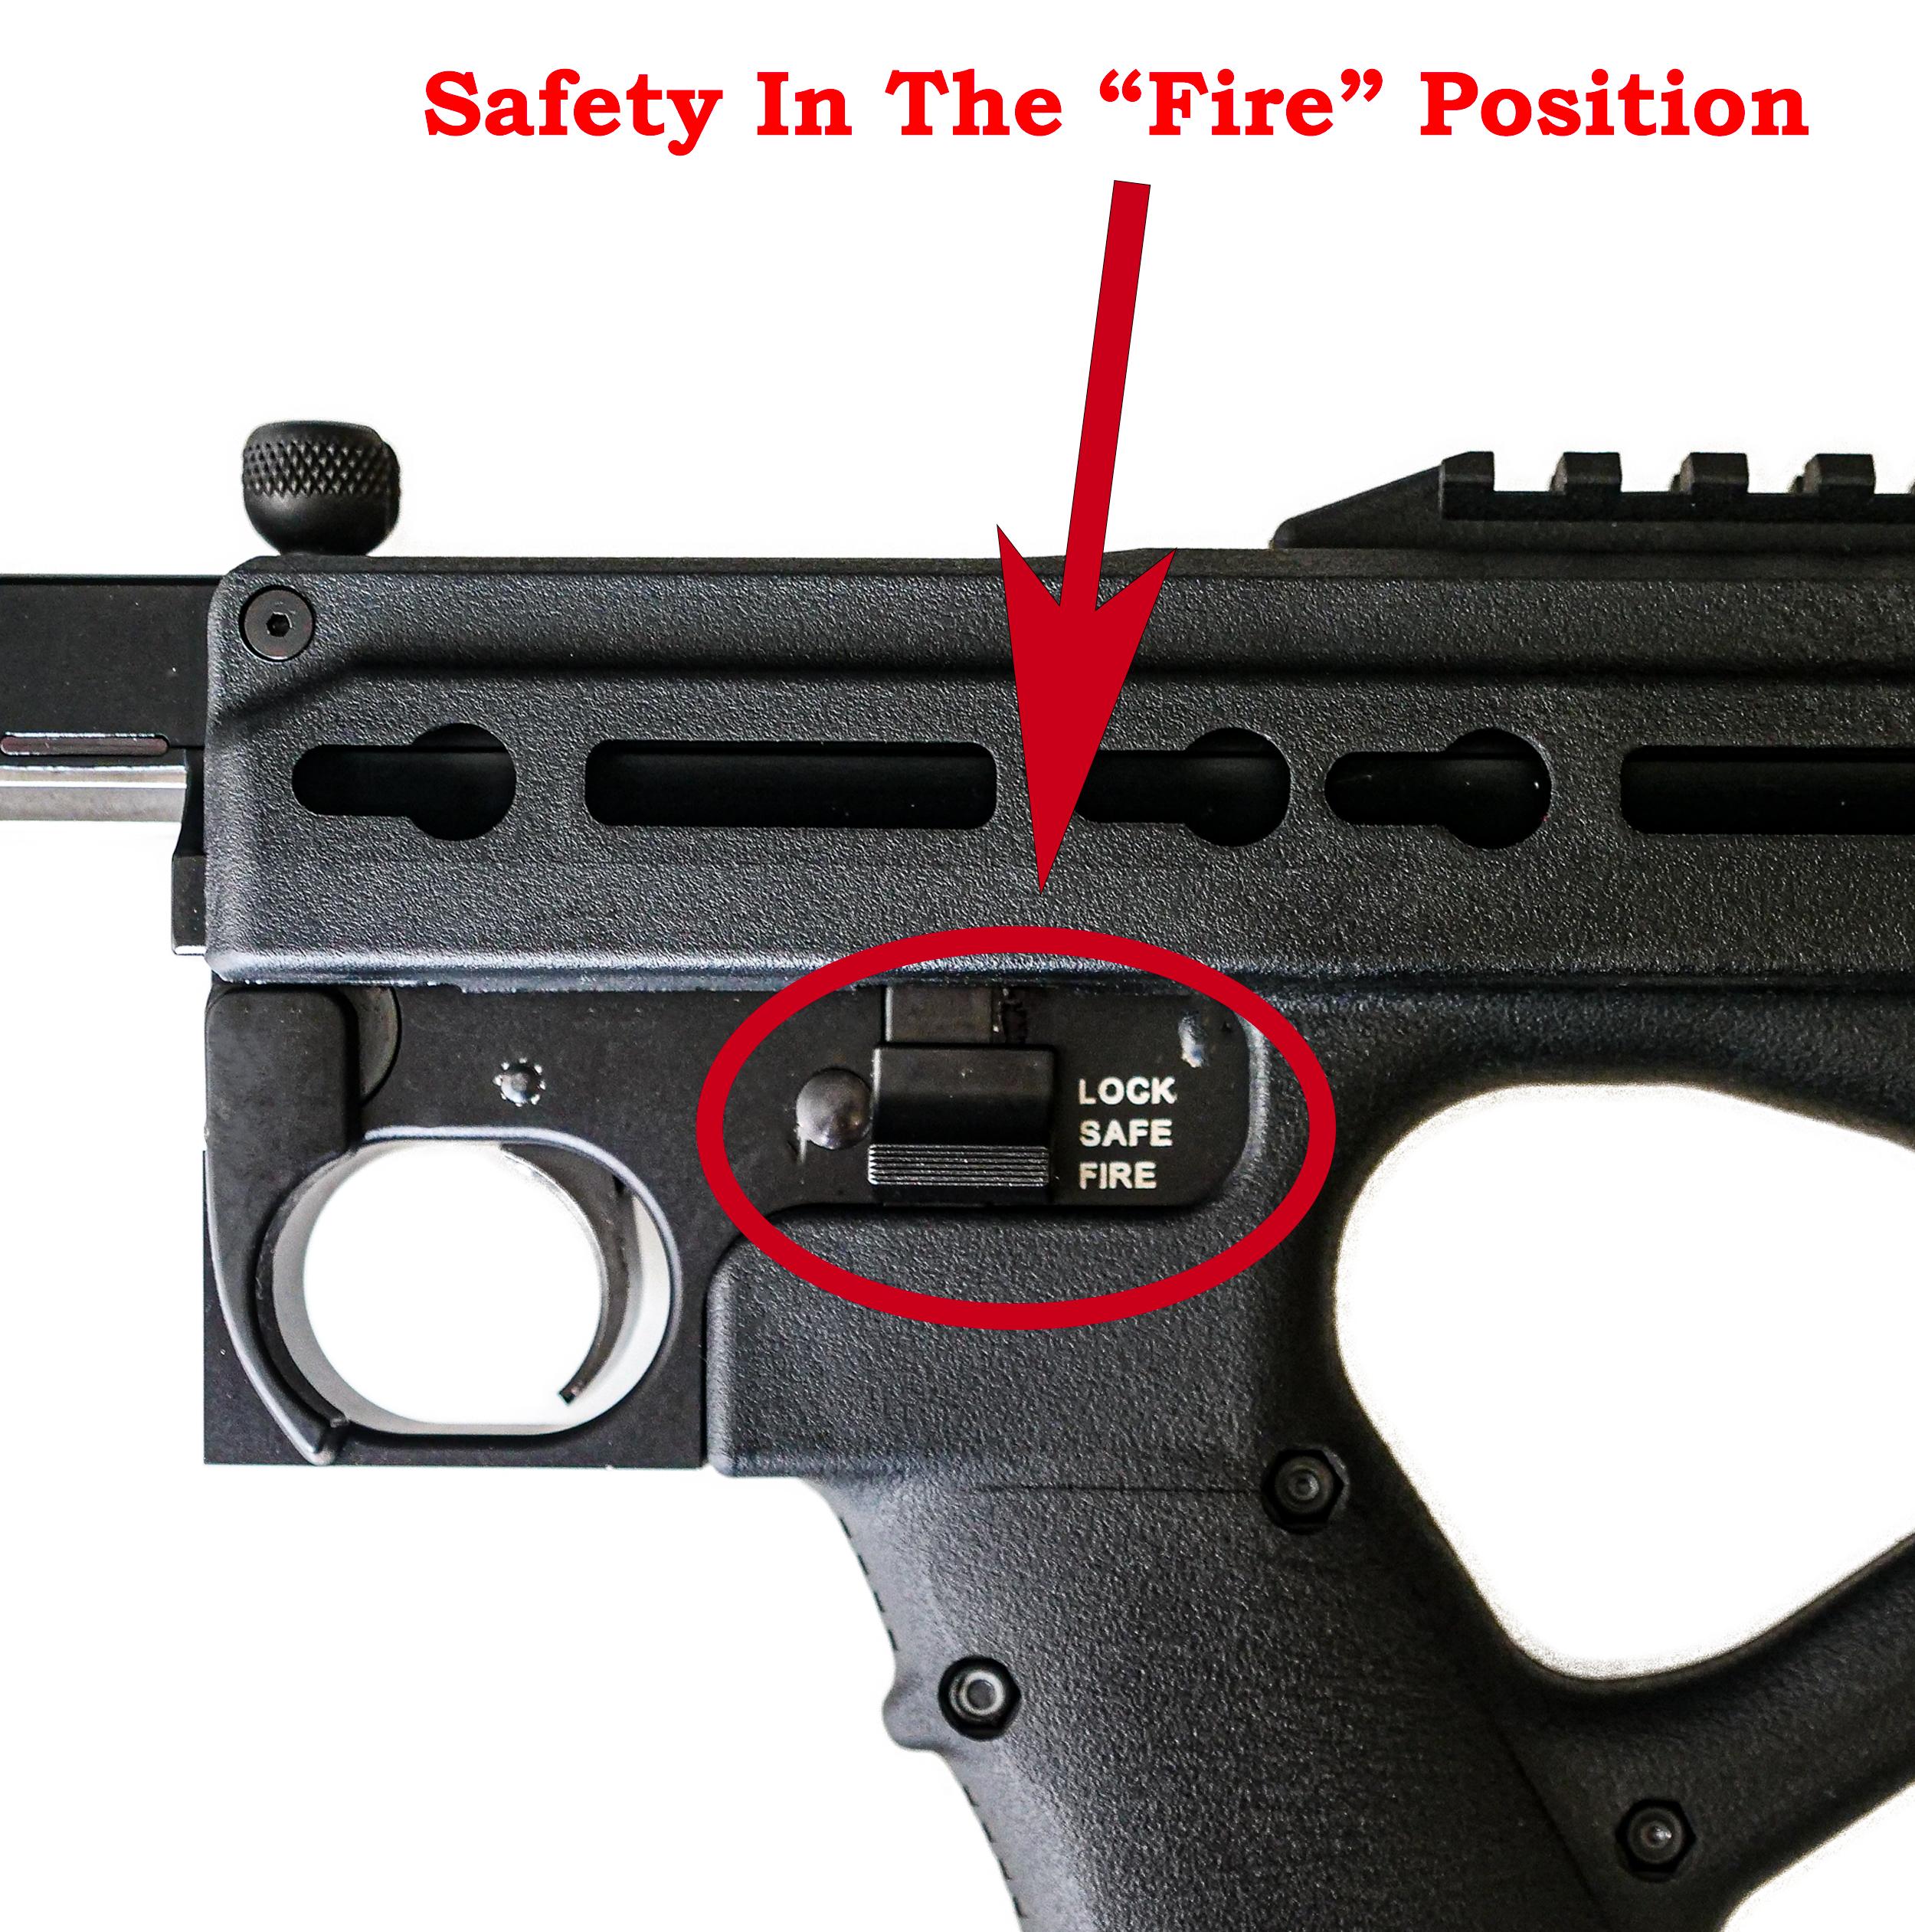
If the safety is on “fire” and the trigger is pulled, the rifle will fire.
Figure 2. The left side of the trigger guard section of the rifle. In this illustration the safety is shown in the “lock” position. It should be in the “fire” position only when you are actually firing at a target.
The safety is held in any position by a plunger that is under spring tension. When the safety is moved to either position, a distinct “click” should be heard. Frequently check the position of the safety to be certain the safety has not been inadvertently moved. If the safety seems to move too easily, or if the click is not heard when the safety is moved, stop using the rifle and email general@stdgun.com stating the problem. You will be guided through our RMA process to return the rifle.
The G4S in .22 Long Rifle (figs 1 and 2) is an air-cooled, blowback operated, magazine-fed firearm. It is designed to be fired from the shoulder of the gunner similarly to a rifle. The hand of the gunner is protected on the under side of the barrel by a polymerhandguard; a rear grip is also provided. Two magazines having capacities of 10 and 50 rounds respectively may be used (figs. 1 and 2).
Firearm
Weight of submachine gun (approx.)……4 1/2 pounds
Length of submachine gun (approx.)……35 inches
Weight of 10-round magazine……………..3 ounces
Weight of 50-round magazine……………..1 pound
Number of grooves in barrel…………………6
Rifling, RH one turn in…………………………..16 inches
Cautions
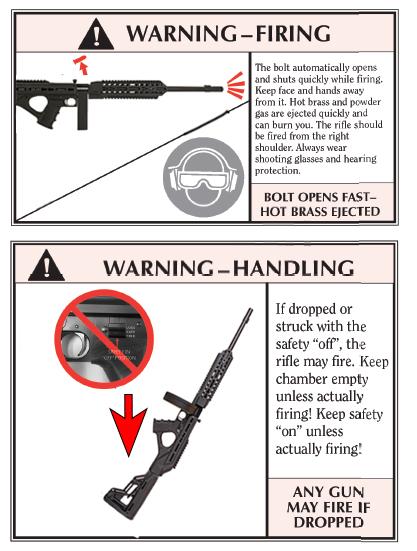
•Always keep muzzle pointed in a safe direction as an accidental discharge may result in death. Keep bolt in open position with safety button in “safe” or “lock” position.
•The G4S in .22 long rifle is not considered safe when a loaded magazine is in place and the bolt is forward in the receiver. When the gun is dropped on the butt from a height of 18 inches or more, the inertia of the bolt is sufficient to close the bolt far enough to pick up a round and fire it, or it may disengage the sear from the hammer if the bolt is already closed and fire the cartridge.
THE BOLT LOCK
The bolt handle is located in the top of the receiver (see Figure 1, p. 10). The bolt handle is the manually operated means of retaining the bolt in the rearward (open) position. When the bolt is locked open, the rifle is in an inoperative safe condition for inspection of the chamber, cleaning, etc.
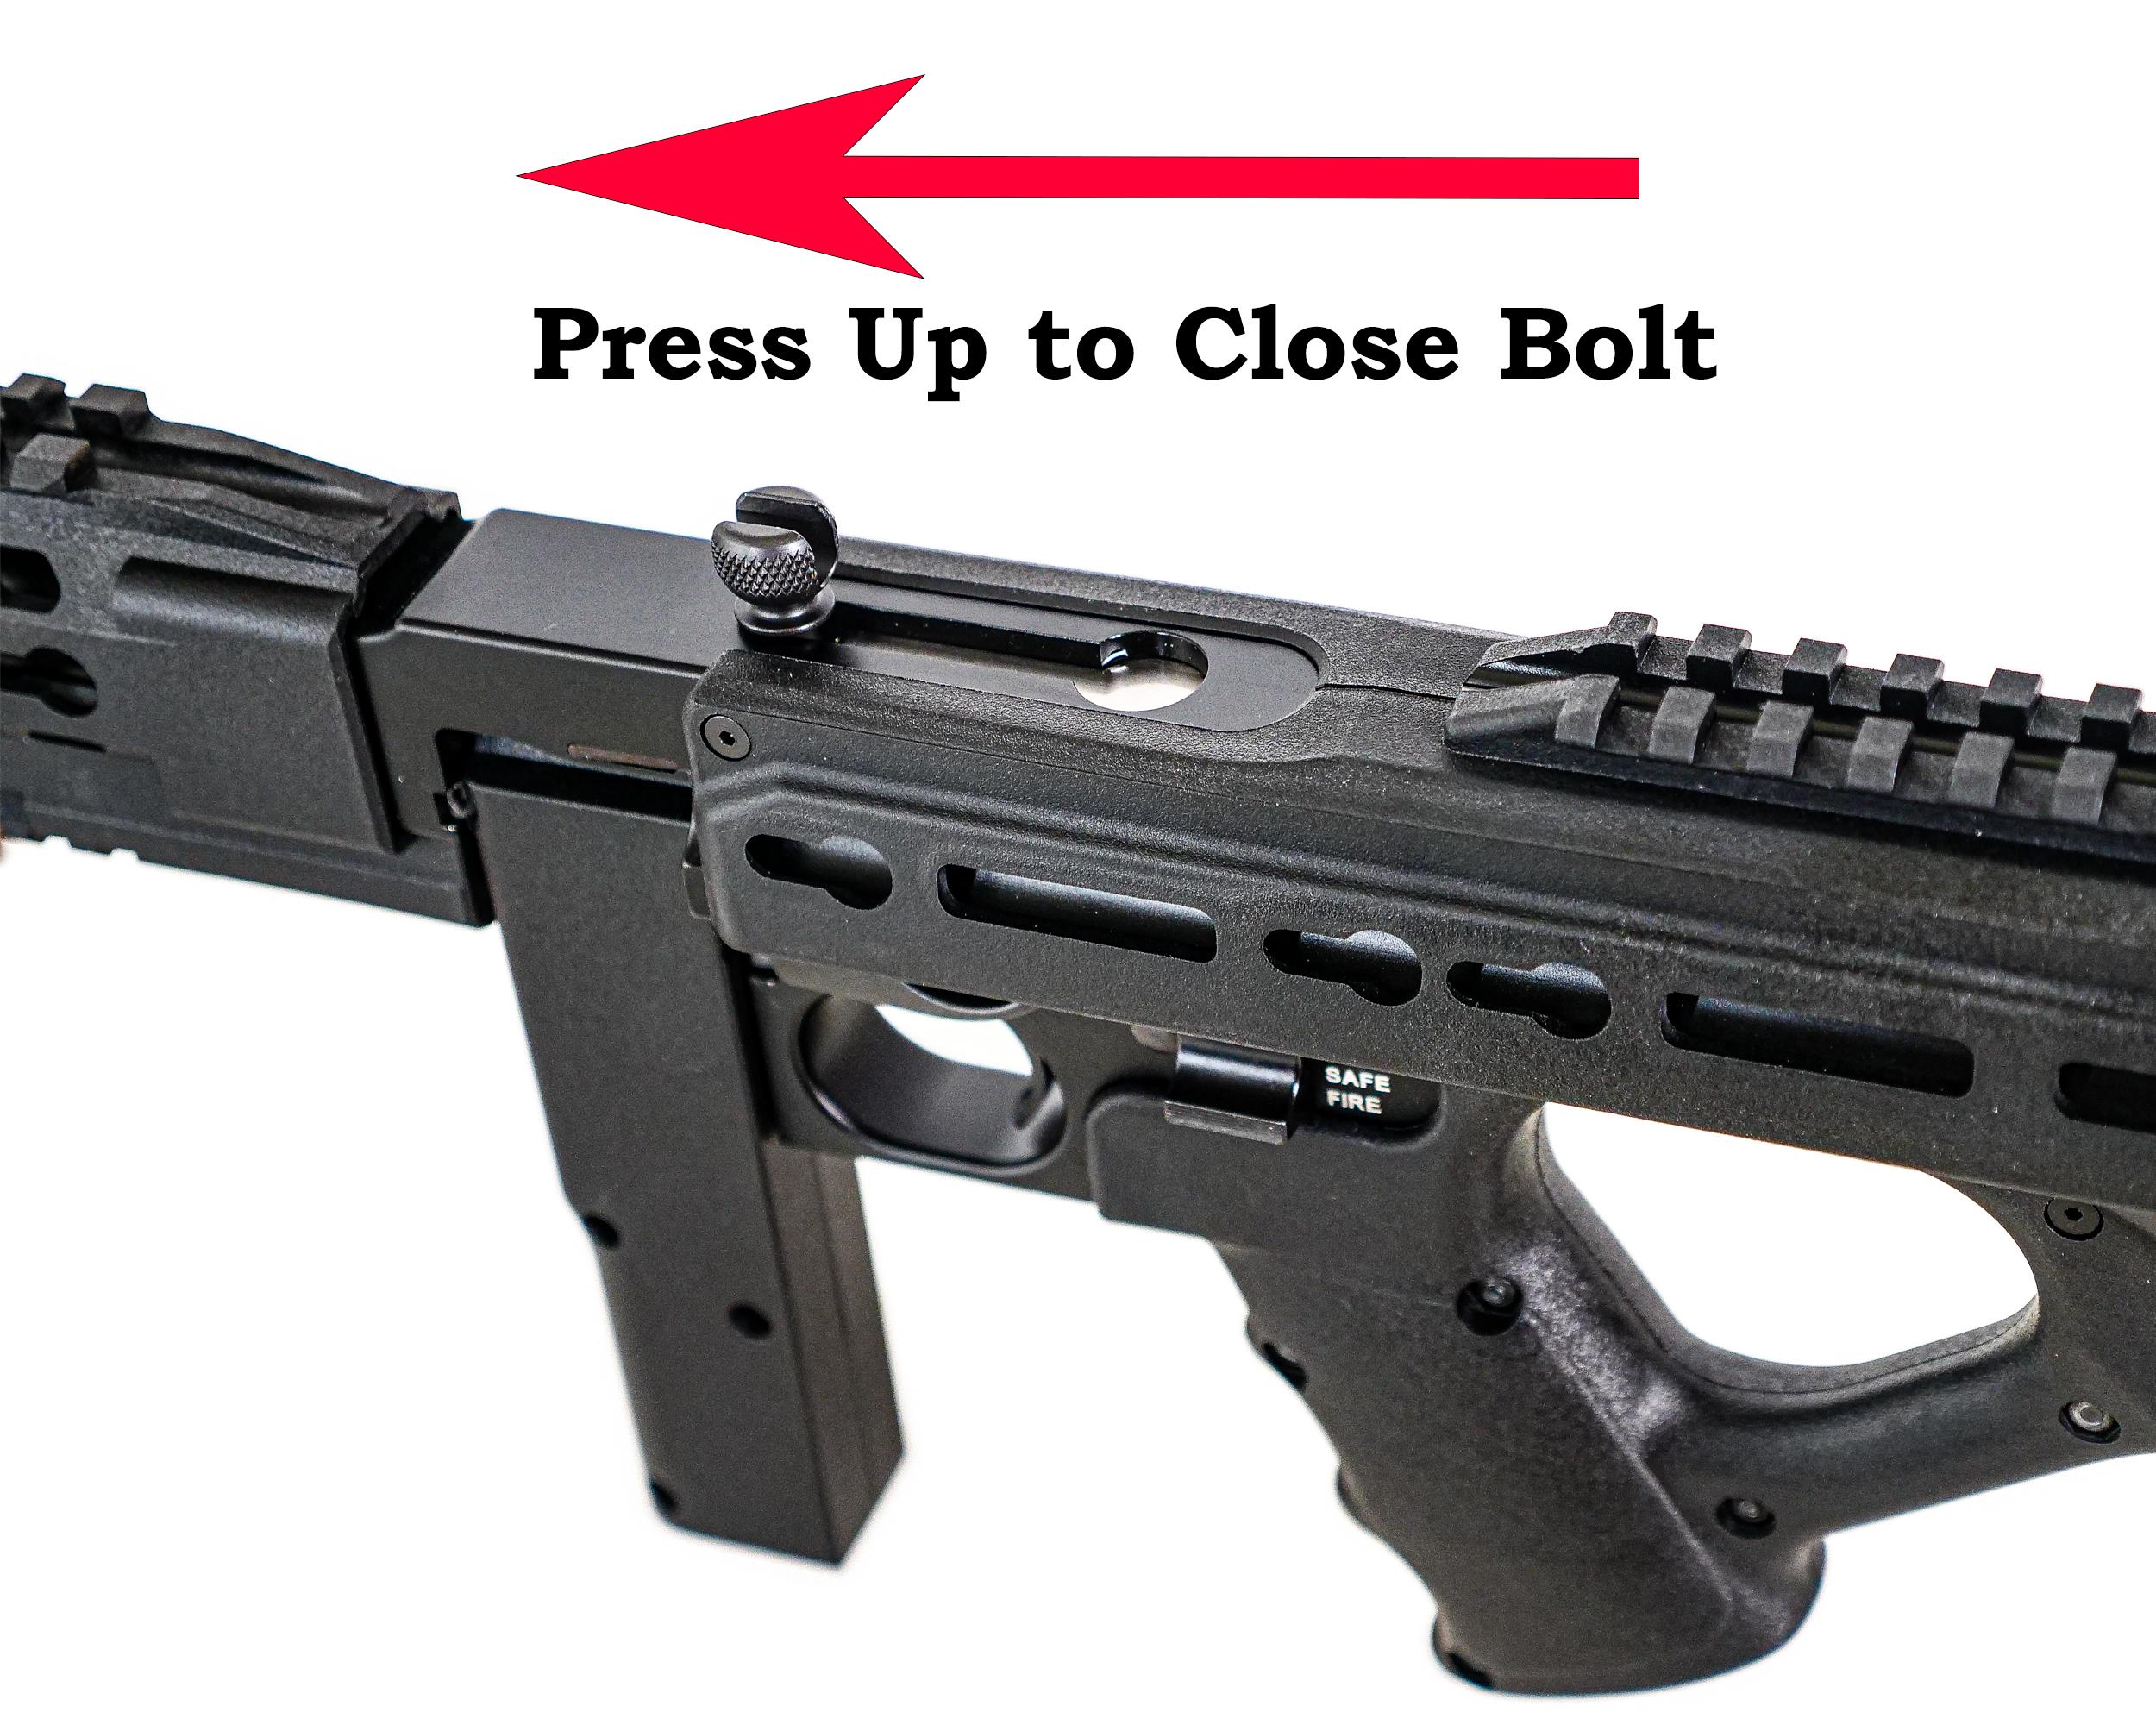
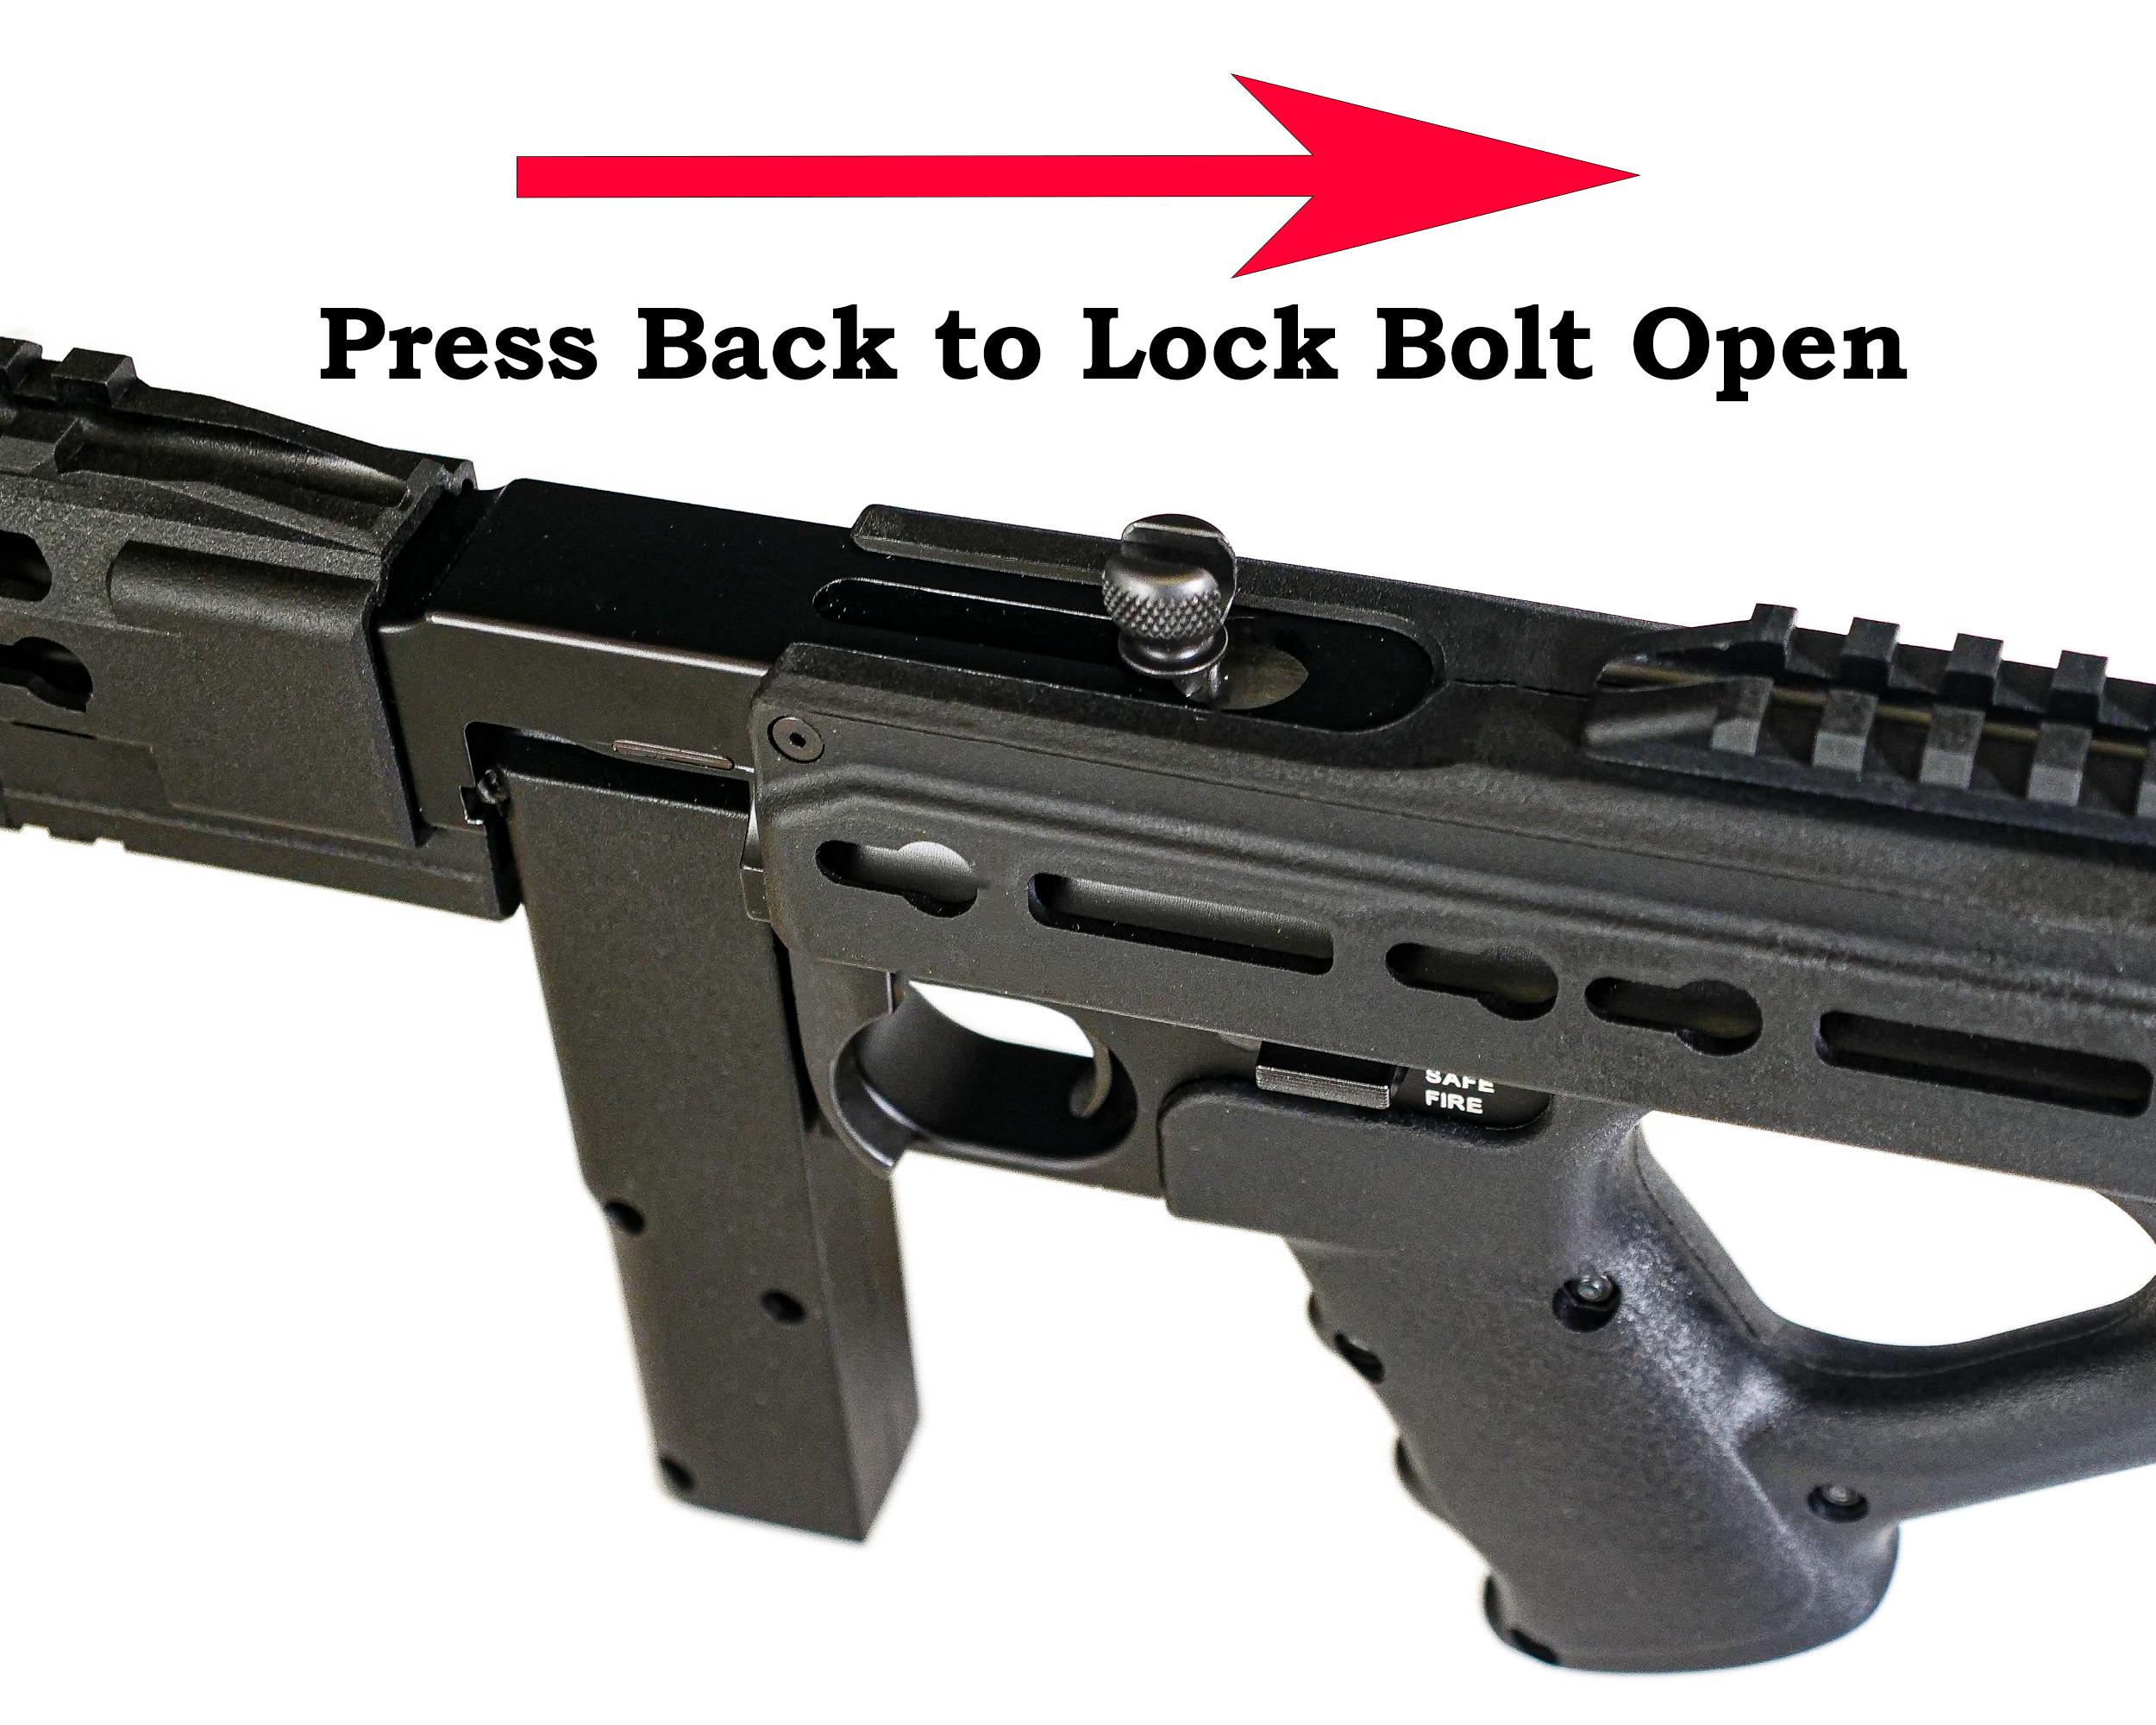
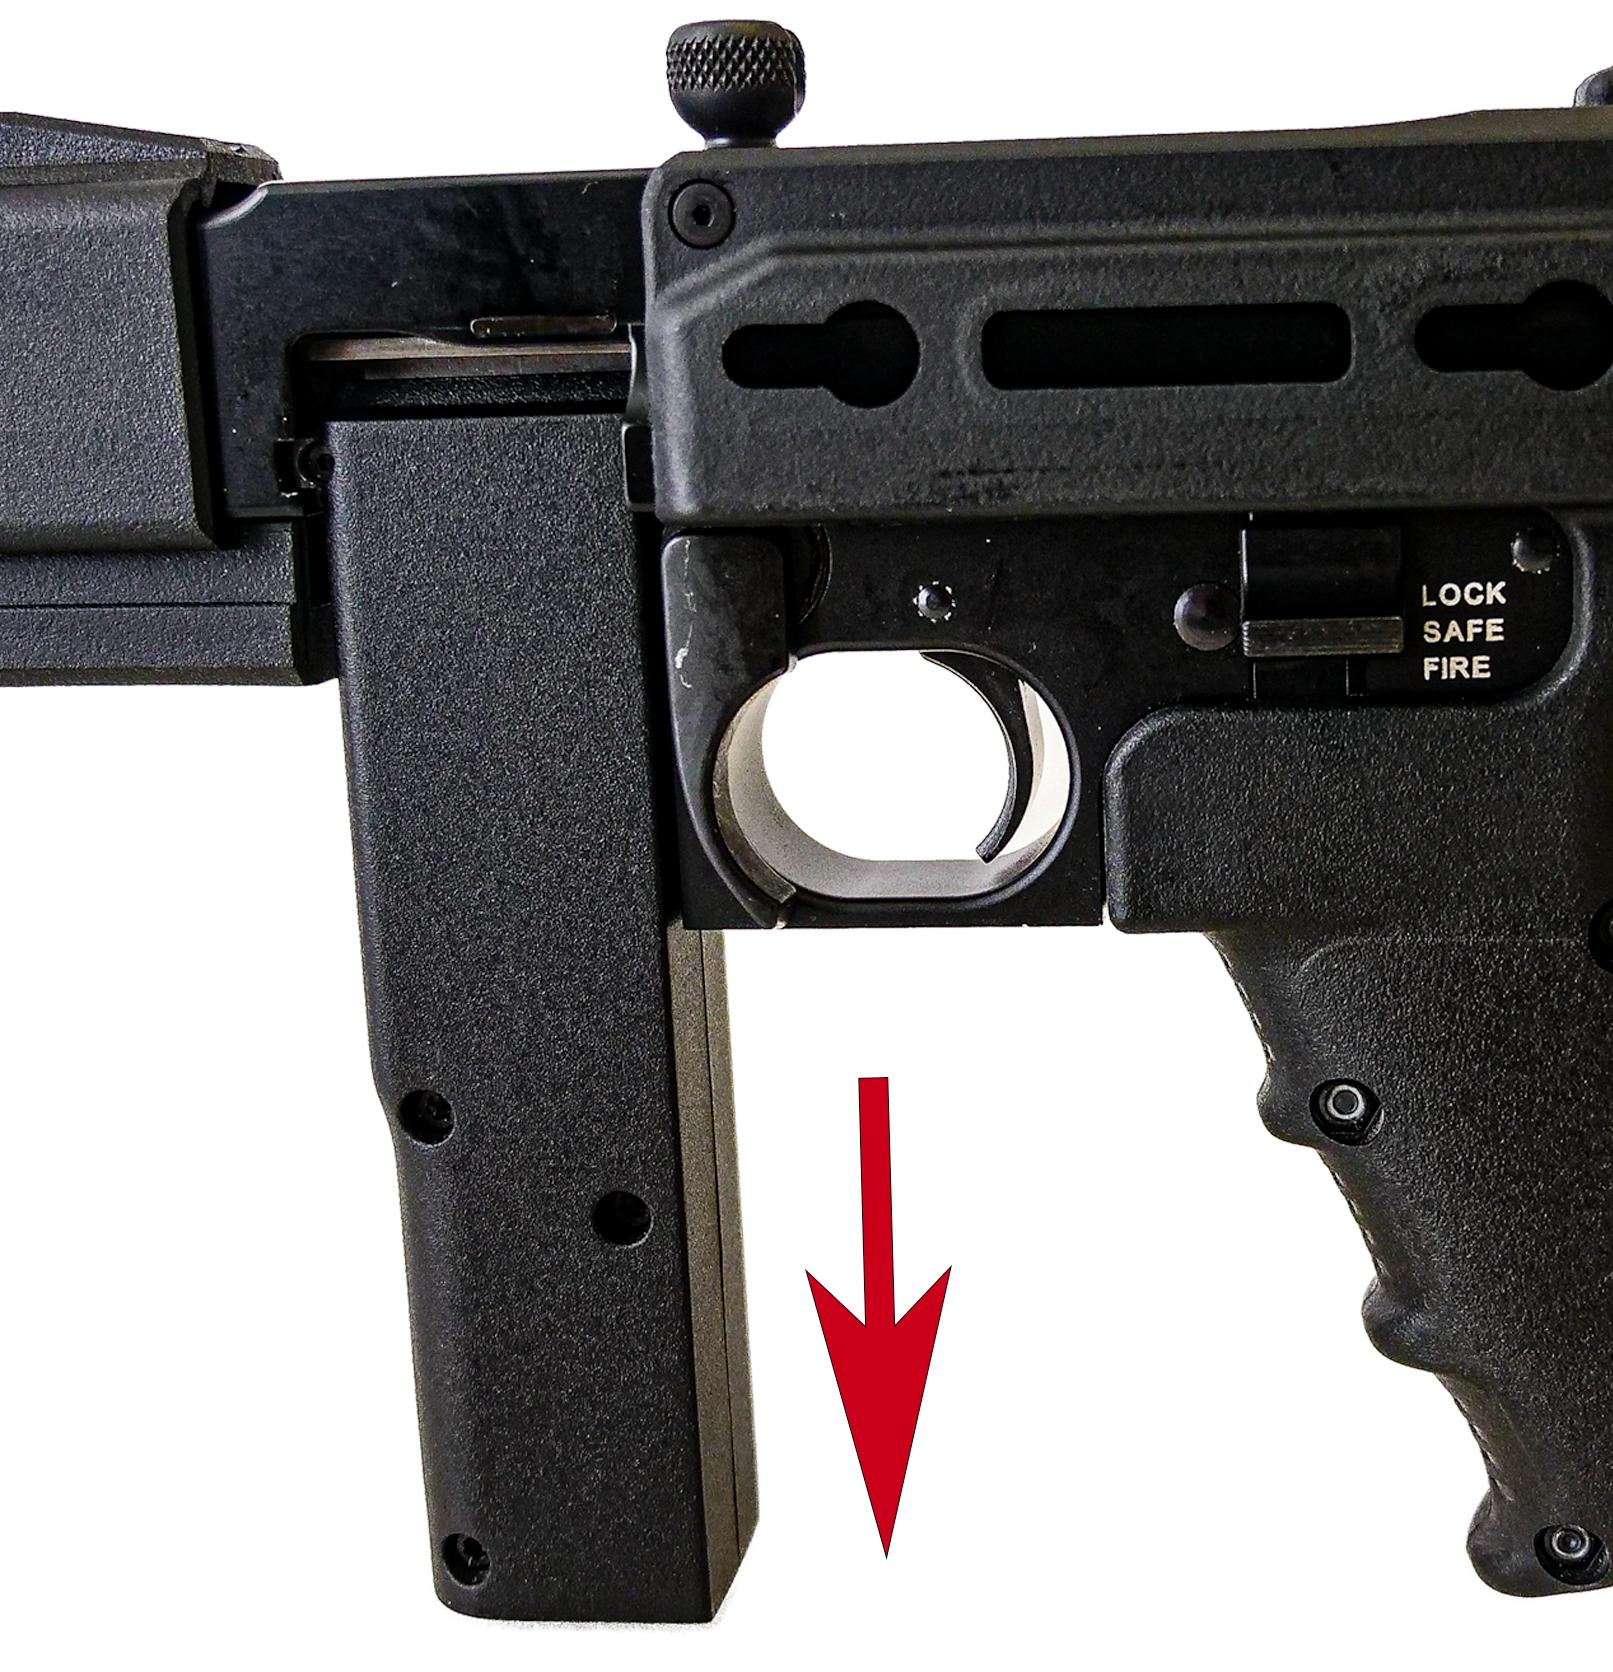
To lock the bolt open: Retract the bolt handle towards its extreme rearward position and, while retracting, press up on the safety button until it slides up to the “lock” position.
To release the bolt: Retract the bolt handle to its extreme rearward position and then release the bolt and it will move fully forward, or press down on the safety button.
NOTE: Simply retracting the bolt will not engage the lock. The safety button must be deliberately pressed up while the bolt is held to the rear. Only when the safety button slides up into “lock” position and the bolt is locked open and the chamber is emptied is the firearm deemed safe.
AMMUNITION
The G4S rifles are chambered for, and designed to properly function with, only the 22 caliber Long Rifle rimfire cartridge, standard, high velocity, or hyper-velocity, manufactured to U.S. industry standards.
Do not use 22 short, 22 long, 22 shot, or 22 cartridges loaded with blunt-nosed, sharp-shouldered, or “explosive” bullets. They will not function reliably and may jam the mechanism or discharge before being fully chambered. Use only ammunition that functions correctly in your rifle. See “Warning – Malfunctions,”p. 22.
AMMUNITION (CARTRIDGES) NOTICE
WE SPECIFICALLY DISCLAIM RESPONSIBILITY FOR ANY DAMAGE OR INJURY WHATSOEVER OCCURRING IN CONNECTION WITH, OR AS A RESULT OF, THE USE IN ANY FIREARMS OF FAULTY, OR NON-STANDARD, OR “REMANUFACTURED” OR HAND-LOADED(RELOADED) AMMUNITION, OR OF CARTRIDGES OTHER THAN THOSE FOR WHICH THE FIREARM WAS ORIGINALLY CHAMBERED.
SPECIAL SAFETY NOTE
The special model you have selected is specifically designed for rapid fire precision target shooting. As such, it demands that you take extra safety precautions.
You should practice “dry-firing” an empty rifle (with it pointing in a safe direction) to learn the “feel” of the trigger before ever loading it with ammunition.
Do not alter any factory setting! You can create an unsafe condition and the rifle may fire unexpectedly.
You should be especially careful to keep the safety on at all times except when actually firing and keep your finger off the trigger unless you are squeezing it to fire, in order to minimize the possibility of accidental discharge.
MAGAzINE
Loading the 10 Round Stick Magazine:
Align the rim of the cartridge above the wide opening of the magazine throat of the stick magazine. Press down a cartridge on the magazine follower and slide rearward until it is retained by the mouth of the magazine. Repeat the operation until the magazine is loaded. The cartridges should feed easily into the magazine.
Loading the 50 Round Drum Magazine:
To load the magazine, press the rim of the cartridge against the magazine rotor at the widest section of the magazine throat until the cartridge enters far enough to be pushed to the rear end of the magazine.. Each succeeding cartridge is pressed against the body of the top cartridge and slid to the rear of the magazine until the maximum of fifty (50) 22 LR cartridges are in the magazine.
TO LOAD AND FIRE (WITH MAGAzINE)
Practice this important aspect of gun handling (with an unloaded rifle) until you can perform each of the steps – described below – with skill and confidence. But before you do anything with the rifle, please first read completely through this manual.
1. Keep the muzzle pointed in a safe direction. (See Rule 2, p. 42.)
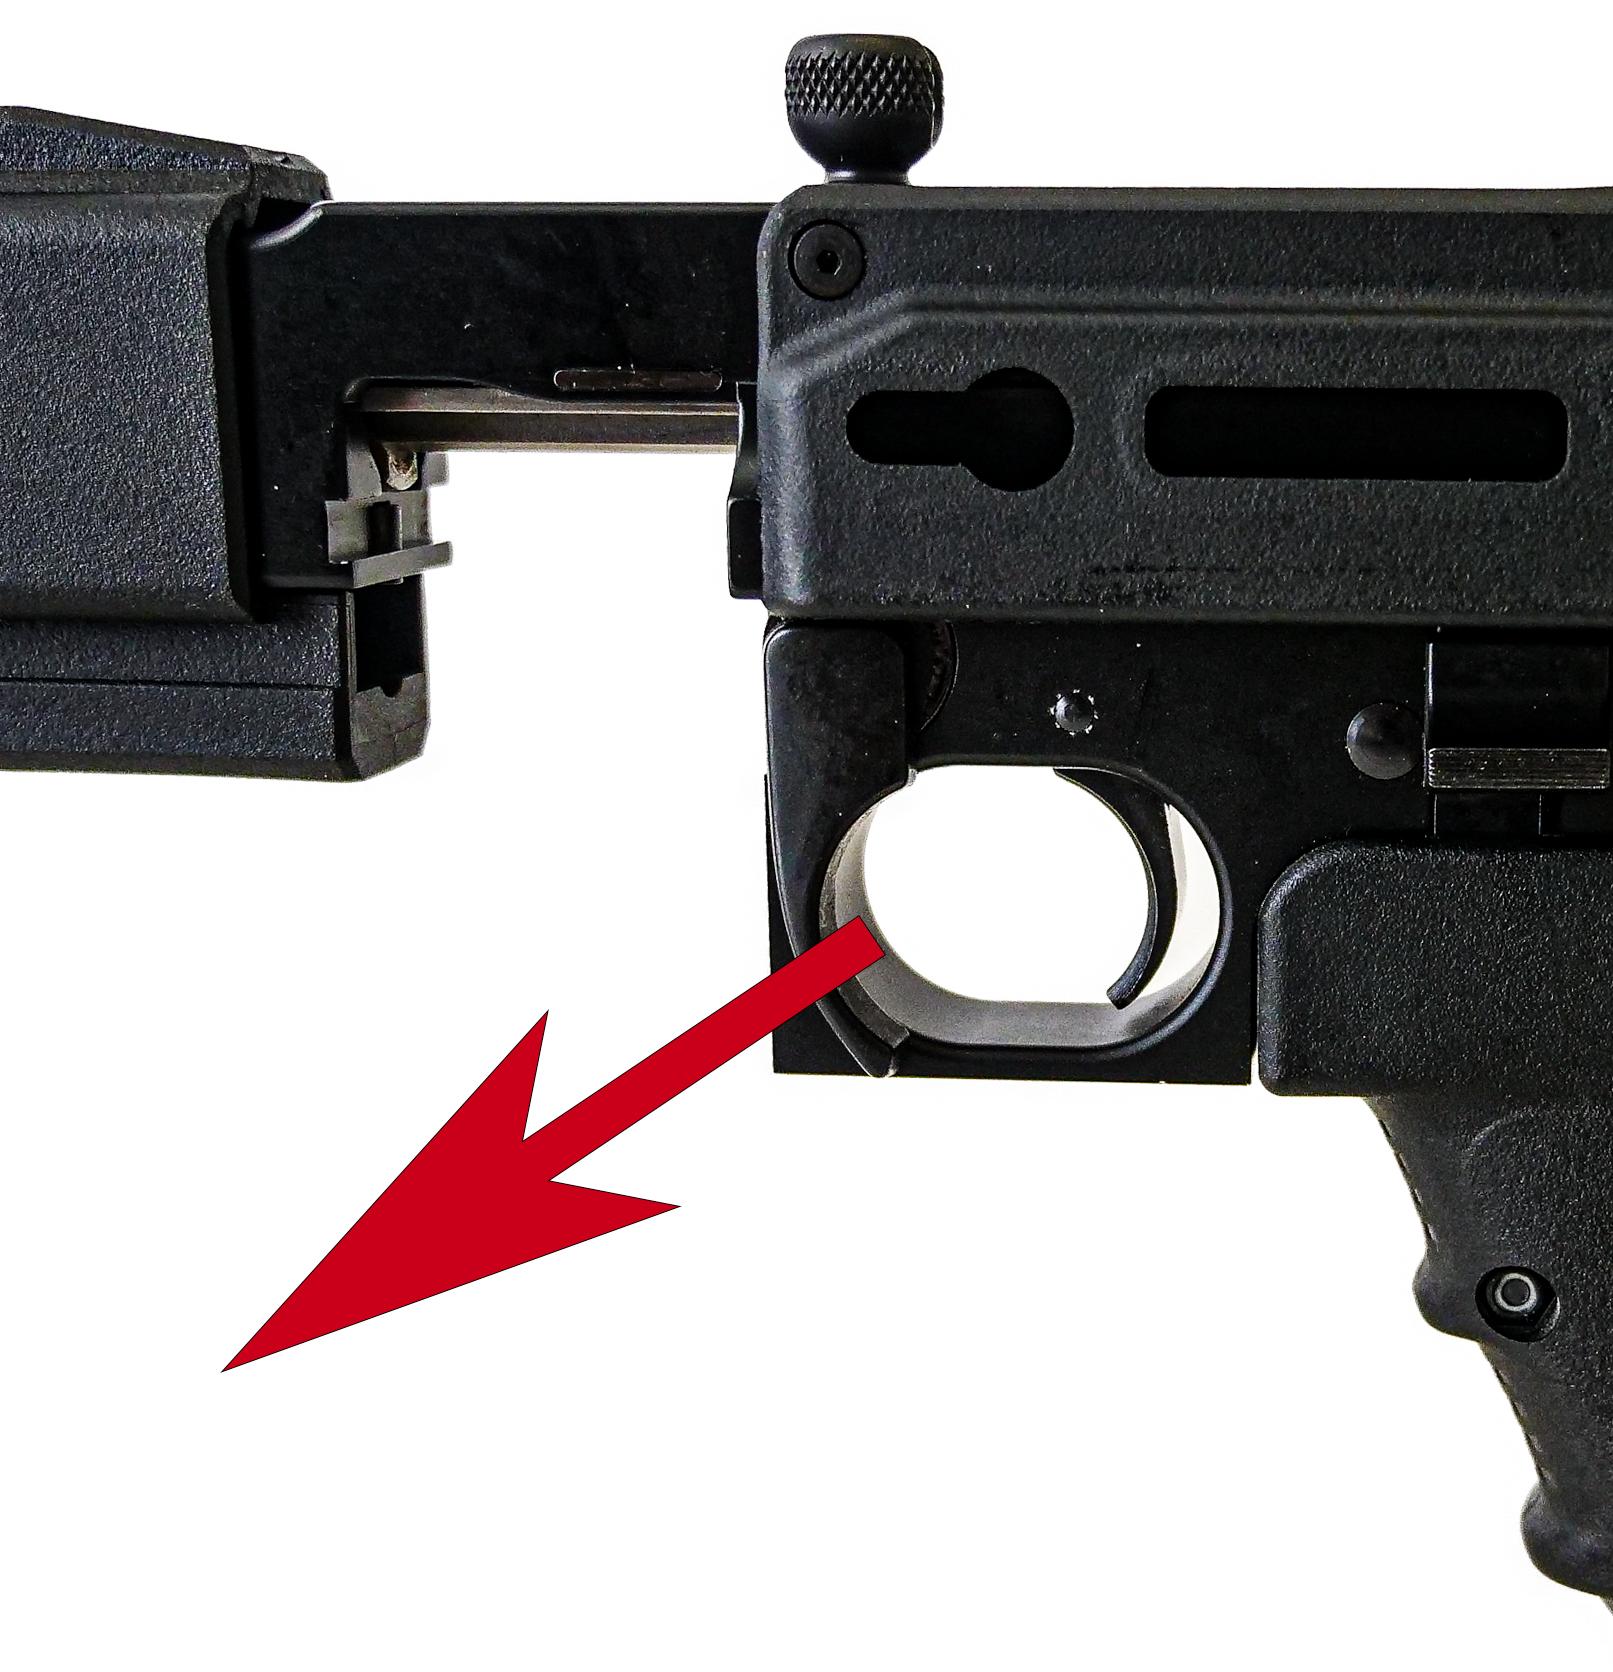
2.Pull the bolt handle rearward and lock it with the safety button. Move the bolt handle rearward while pushing the safety button up to the “LOCK” position to cock the weapon and hold the bolt open. (See p. 12.) Check the chamber to be certain it is empty. Engage the safety. (See Figure 1, p. 10.)
Figure 3. The safety should be in “lock” position when the magazine is being removed or inserted. Move the magazine release forward (Figure 3A) and draw the magazine out by grasping it between your thumb and forefinger and draw it out of the gun (Figure 3B) by sliding towards safety button side of the gun.
3.With the bolt open and muzzle pointed in a safe direction, rotate the gun to access the left side and turn the magazine release lever counter clockwise to the open position. You may now slide a loaded magazine into the receiver from the left side or you may remove the empty magazine.
4.Load the magazine with the appropriate number of cartridges (see “Loading The Magazine” section, p. 15).
5.Insert magazine into the firearm, with bullet end of the cartridges toward the muzzle. (Magazine cannot be seated if reversed.) Align the block and bar on the magazine with their respective notches on the receiver. Slide laterally to the right into receiver. Rotate magazine release lever clockwise to lock into place. Always keep gun pointed in a safe direction during these procedures. After the magazine has been inserted and locked into position, check the safety button is still in “LOCK” position.
6. Don’t touch the trigger. With the gun pointed in a safe direction you may close the bolt and feed the first cartridge in either of the 2 manners following:
• Grab the bolt handle and pull the bolt toward the rear of the gun. When bolt reaches its rear limit let go and allow the return spring to close the bolt and feed the cartridge. As the bolt is being pulled back, the safety button will be moved down into the ‘SAFE’ position.
• An alternate way to feed the cartridge is by lowering the safety button. With the gun pointed in a safe direction and the bolt locked open; use your thumb to push the safety button one step down to the ‘SAFE’ position. The bolt will slide forward and feed the first cartridge.
• The gun is now loaded with the safety in ‘SAFE’ position. Do not ‘ride’ the bolt handle as it moves forward. Do not apply force to the bolt handle to chamber a cartridge. If a cartridge does not readily chamber, eject it from the rifle, lock the bolt open.
7. The rifle is now fully loaded. If the rifle is not to be fired immediately, the safety should remain “SAFE”. (See Figure 1, p. 10.) When the safety is moved to the “FIRE” position, the rifle will fire each time the trigger is pulled until all the cartridges in the magazine, and the one in the chamber, have been fired. Push the safety button down to ‘FIRE’. Squeeze the trigger to fire one round. It is necessary to squeeze the trigger each time a single round is to be fired. Firing will automatically reload and re-cock the rifle. Note that every time the trigger is pulled, if a cartridge is in the chamber, the rifle will fire – be careful!
8. Immediately following the firing of a shot, and if a subsequent shot is not to be fired at once, put the safety on “SAFE” while the rifle is still pointing in a safe direction down range.
9. Unloading the G4S If bolt is kept from closing due to jam or the bolt is closed and the hammer fell on a misfire: keep muzzle pointed in a safe direction. Hold gun so that one hand may operate the bolt handle and the other hand may operate the safety button. Pull the bolt handle back close to the rear position so that the safety button will slide up to lock and engage the bolt. It is best to be pushing the safety button up while sliding the bolt back with the other hand. When the safety button is to its top ‘LOCK’ position the bolt is locked open. While keeping the firearm pointed in a safe direction, you may inspect the action, remove bent casings, or misfired cartridges. Use a small screwdriver or tool, do not insert fingers into the action.
To close the bolt on an empty chamber, proceed as follows. First rotate the magazine catch counterclockwise and remove the magazine. Lower the safety button or pull slightly back on the bolt handle and release.
10.The bolt does not remain open after the last shot has been fired, nor does the bolt automatically lock open when the magazine is empty. When firing is completed, manually retract the bolt, lock it open, and visually check the chamber to be sure it is empty. If the bolt is shut, the shooter should always assume that there is a cartridge in the chamber. Don’t rely on your memory to know if a gun or magazine is loaded. Visually inspect the magazine and the chamber. Retract the bolt handle and lock open.
TO LOAD AND FIRE (WITHOUT MAGA z INE)
The rifle can be used as a single shot rifle in the absence of a magazine or for safety or training purposes. To do so, follow step 1, p. 16. Then load a cartridge into the chamber, and follow steps 6 and 7, p. 16, disregarding the magazine. Engage the safety between shots.
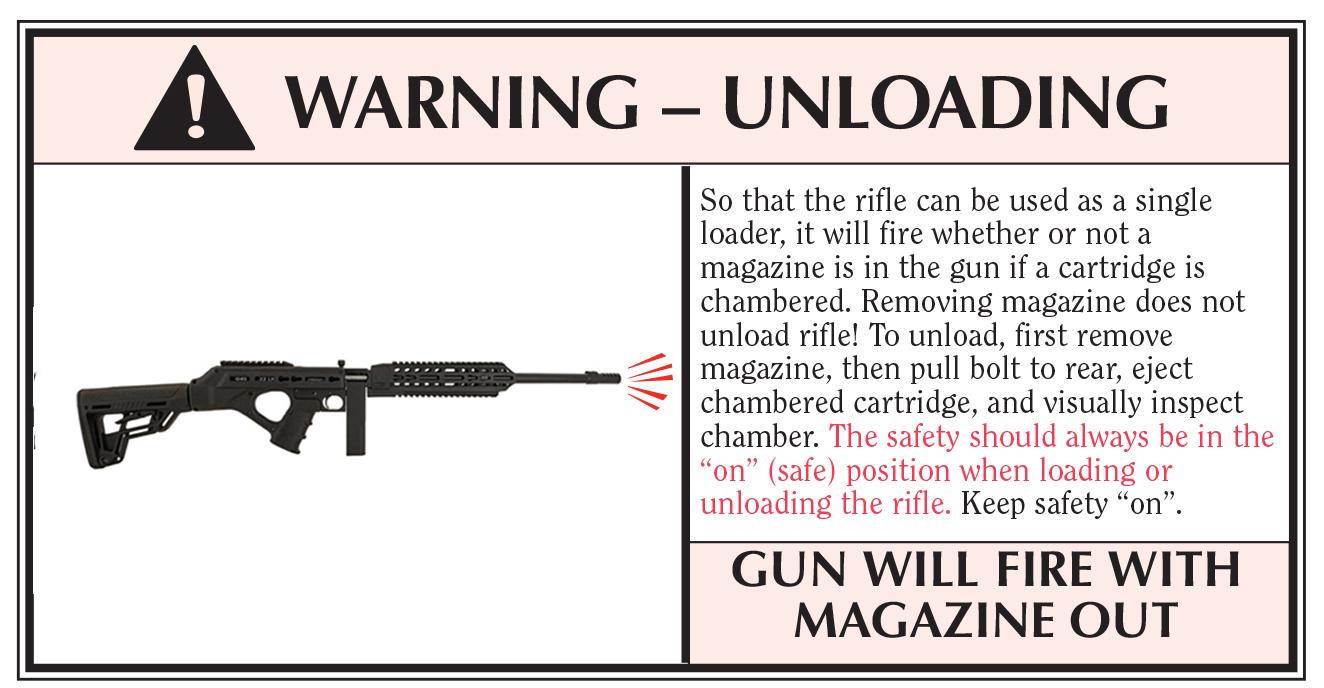
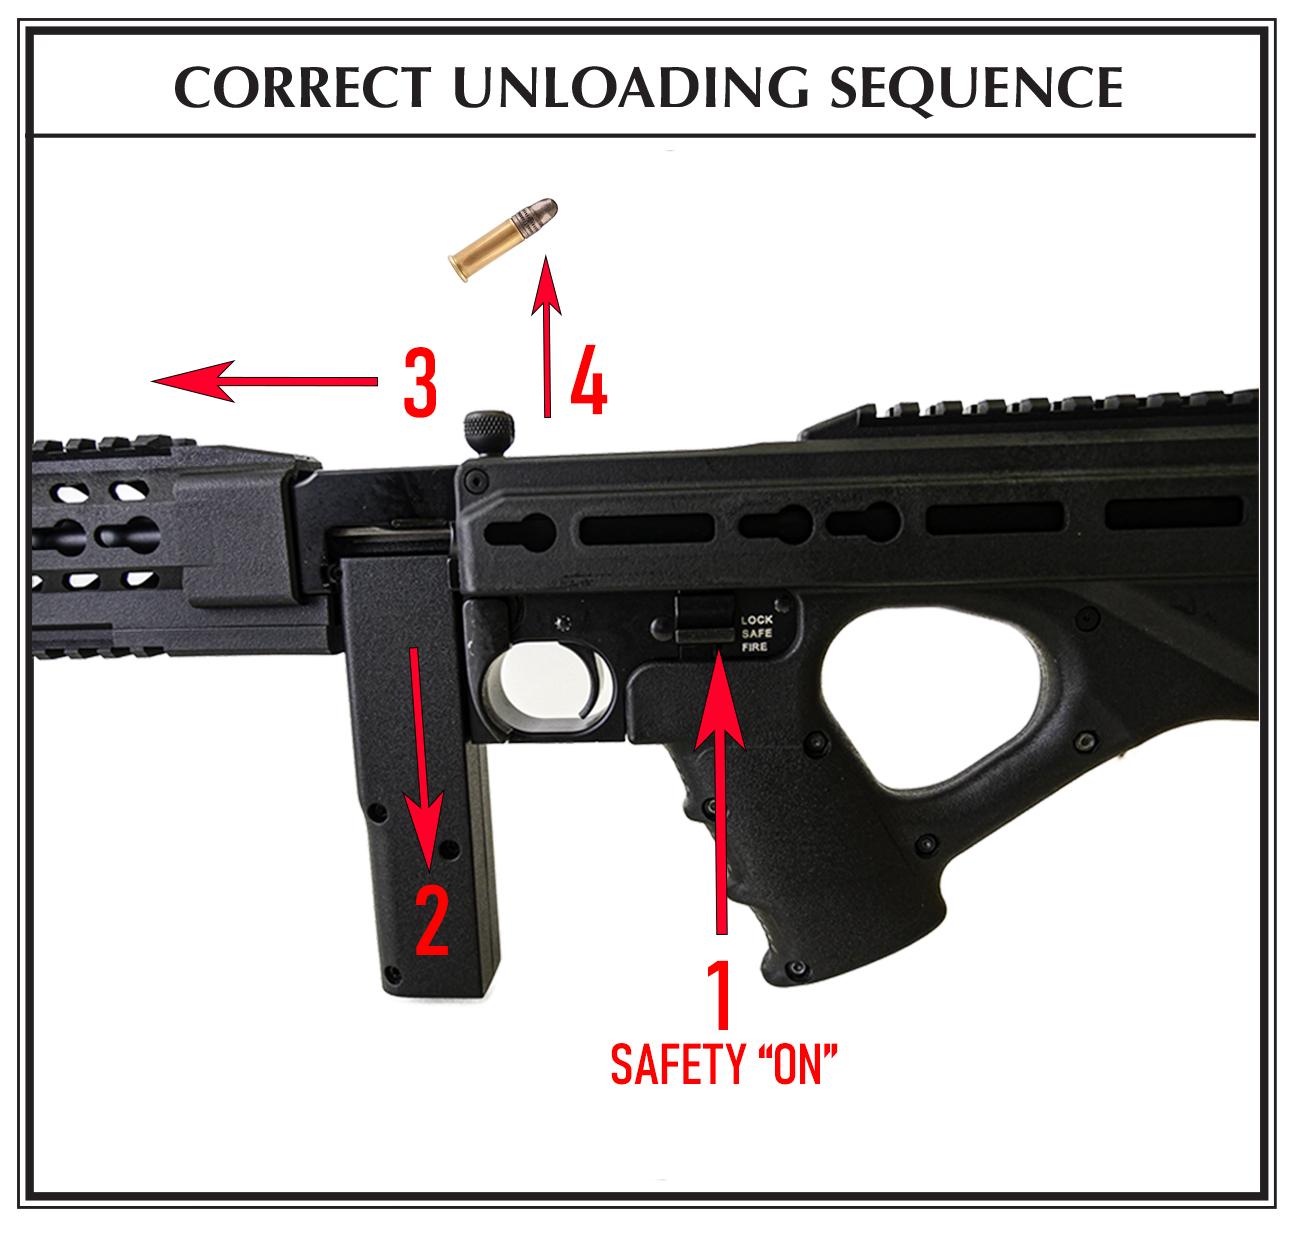
TO UNLOAD
(Rifle Must Be Kept Pointed In A Safe Direction) UNLOADTHE RIFLE IMMEDIATELY WHENYOU ARE FINISHED SHOOTING!
NOTE: This sequence must be followed exactly as spelled out. Failure to do so can result in the rifle’s chamber becoming unintentionally loaded with a cartridge!
1. Keep the muzzle pointed in a safe direction at all times and keep fingers outside the trigger guard. If the rifle is cocked, move the safety to the “SAFE”position.
2. Remove the magazine. Remember that even though the magazine has been removed, a cartridge remaining in the chamber can still be fired!
3. Retract the bolt to its open position and lock it there. This should eject any cartridge in the chamber, but...
4. Always visually double check the chamber to be certain it is empty. Empty if a cartridge is left in the chamber.
5. The only “safe” rifle is one in which the bolt is open and the chamber and magazine are empty.
6. Cartridges can be removed from the magazine by simply pushing them lightly downward and forward with the thumb, forefinger, or the rubber eraser end of a pencil against the rim of the top cartridge. Do not use a loaded cartridge as a ‘tool’ to strip cartridges from the magazine.
7. If desired, the bolt can be left in the open position, being held there by the safety button. If it is desired to close the bolt, again look to be certain the chamber is empty. Retract the bolt to its rear most position, release the bolt lock and let the bolt snap forward. Keep your fingers out of the receiver!
8. With the muzzle pointed in a safe direction, push the safety to the “FIRE”position and pull the trigger to decock it. The rifle can be “dry fired” for practice as long as it is empty and pointed in a safe direction.
9. A magazine may not be removed or installed unless the bolt is locked open.
TO EXTRACT AND EJECT A CHAMBERED CARTRIDGE
When the rifle is fired, the same gas pressure which drives the bullet forward also acts through the cartridge case to push the bolt to the rear. That action causes extraction and ejection of the fired cartridge case. But, when the bolt is operated by hand, there can be a failure to extract the cartridge from the chamber, or a failure to eject the cartridge clear of the rifle. These failures usually are the result of the bolt not being pulled rearward vigorously, coupled with an accumulation of bullet lubricant in the chamber. From the foregoing it is clear that the gun user must:
1. Always visually check the chamber after opening the bolt to eject a chambered cartridge. If the bolt is not vigorously retracted when being operated by hand, the extracted cartridge can be ‘ejected’ into the magazine area, instead of outside the rifle.
2. Thoroughly clean the chamber and the extractor as often as necessary to prevent the accumulation of grease and dirt.
3. If an empty magazine is in the rifle when the bolt is being hand retracted to extract a cartridge, the cartridge may drop on top of the magazine. Then when the bolt goes forward, the cartridge will be chambered again! Always be careful and visually ensure that no cartridges remain in the gun.
TO CLEAR A MALFUNCTION (“JAM”)
Any autoloading firearm may occasionally malfunction. If it does:
1. Be certain the muzzle is pointed in a safe direction and the safety is “SAFE.”
2. If possible, first remove the magazine. It may be necessary to manually remove a jammed cartridge which has only partially been stripped from the magazine. If so, use extreme care. Lock the bolt open with the safety button before attempting to clear the jam. Drawing the bolt fully to the rear may bring the jammed cartridge along. Keep your face away from the ejection port during this operation. When attempting to clear a jam, use only wood ‘tools’ so that a cartridge will not be ignited if you strike a primer, and so that the chamber and magazine will not be damaged. A 3/16” wood dowel rod with a point on one end is useful.
3. Visually check to make sure all cartridges have been removed from the rifle. Safely dispose of any cartridges involved in a malfunction incident. Do not use damaged ammunition in any firearm.
When a stoppage occurs during firing, perform the immediate action described below to remedy the stoppage.
FAILURE OF SEMI-AUTOMATIC TO FIRE
If the loaded gun fails to fire when the trigger is squeezed, proceed immediately as follows:
1. Wait 5 seconds before opening chamber.
2. Retract or cock the bolt by a sharp, quick pull on the bolt handle to eject round. While extracting the round, observe the ejection port. If the round in the barrel is not being extracted from the chamber you will have to find the safety button to lock the bolt open near the end of the rearward movement. Manually remove misfire or jammed casing. Make sure next cartridge is in the correct position in magazine and gun is pointed in a safe direction before allowing the bolt to close.
3. If the round is being extracted by the bolt, continue back smoothly until the cartridge ejects from the bolt. If the bad cartridge ejects, and the next cartridge appears to be in the ready position, you may release the bolt handle to close and load the next round. Inspect the chamber to see that is clear before releasing bolt handle.
4. If the chamber contains an unexpended round, set the gun at ‘LOCK’, with the bolt locked open and remove the magazine.
5. Turn the gun over on its side shake it to allow the round to fall out. If the round does not fall out, remove it by pushing the cleaning rod through the bore from the muzzle end, making certain that the gun points in a safe direction. Attach the magazine and resume firing.
TO MINIMIzE MALFUNCTIONS (“JAMS”)
Most malfunctions are caused by improper or damaged magazines, incorrect ammunition, or poor maintenance.
1. If it appears that the gun and magazine are not at fault and that the jam was caused by the type of cartridge being used, then try another type.
2. If changing to another type or brand of cartridges does not at once eliminate malfunctioning, then the following steps should be taken:
a. Make certain the gun and the magazine are unloaded and that the safety is “on.” Remember, the magazine should be removed first, then check the chamber and be certain it and the magazine-well are clear of cartridges.
b. Thoroughly clean the magazine (See “Magazine Inspection and Care,” pp. 24& 25) and bolt mechanism, paying particular attention to removing accumulated grease. Use a bristle brush and solvent to remove grease and fouling from the bolt face, the extractor, the chamber, and the feed ramp. (See the “Care and Cleaning” section of this manual for detailed cleaning instructions.)
c. Check to see that the magazine rotor spring tension is adequate.
d. Check the magazine throat to be certain they are free of nicks and burrs and are not deformed.
e. Remove excess oil and solvent from all cleaned components, load the magazine, and try the firearm again. As always, proceed slowly. Be certain bystanders are not close and that you are wearing eye and hearing protection and that your face is a safe distance from the rifle so that any discharge resulting from a jammed cartridge will not injure anyone. If the above procedures do not result in a smooth and reliably functioning firearm, don’t use the gun. The rifle can be returned directly to Standard Manufacturing Company, LLC.
3. Proper care of the semi-automatic before, during, and after firing will usually eliminate most stoppages. Stoppages or other malfunctions which cannot be remedied by the application of immediate action should be dealt with in accordance with instructions described in the following paragraphs.
4. Failure to Fire
• Causes. Failure to fire is generally caused by:
a. Defective ammunition
b. Defective firing pin
c. Bolt not fully closed
• Remedies
a. If the rim of the cartridge has been dented and deformed the round is defective and must be discarded. If it is not indented or only slightly indented, the firing pin may be worn or broken, or the bolt may not have been fully home. Check for dirt or any other obstruction on the bolt and in receiver which prevents the bolt from closing fully. Check for a ruptured
case in the chamber. Remove the obstruction. If the recoil spring is too weak to drive the bolt fully home, it should be replaced.
b. Replace the firing pin if it is worn or broken.
5.Failure to Feed
• Causes. Failure to feed may be caused by:
a. Defective magazine
b. Insufficient recoil of bolt to pick up a new round.
• Remedies
a. If the magazine does not feed cartridges into the gun because of defective spring, follower, or lips, it should be replaced.
b. Insufficient recoil may be due to obstruction in the receiver. Inspect the frame and eliminate the obstruction
6.Failure to extract
• Causes. Failure to extract is generally caused by:
a. Extremely dirty chamber.
b. Extremely dirty ammunition.
c. Faulty extractor
d. Cartridge case chambered in a hot barrel.
e. Broken extractor
• Action
a. When failure to extract occurs, the bolt may be found fully closed with a spent case in the chamber. Generally, most failures to extract can be remedied by pulling the bolt handle smartly to the rear. If this does not remove the case, use a cleaning rod.
b. Sometimes the empty case will be left in the chamber, the extractor ripping through the base of the cartridge. When this occurs, the bolt generally will attempt to feed a fresh cartridge into the chamber. It will be necessary to remove this round before the spent case can be removed.
c. Where a dirty chamber or dirty ammunition is indicated, clean the chamber and discard or clean very dirty ammunition. Faulty assembly or broken extractor will cause recurring failures to extract. Replace missing or broken parts.