


This manual provides instructions on the operation and maintenance of rifles made by Standard Mfg You must read, understand and follow the instructions and safety warnings in this manual. The safety of yourself and those around you, depends on the knowledge you have of your rifle, and your knowledge of the safety guidelines common to all firearms.
The safety information in this manual is denoted by the safety alert symbol:

The level of risk is indicated by the following signal words

Indicates a hazardous situation, w hich, if not avoided, w ill result in death or serious injury.

Indicates a hazardous situation, w hich, if not avoided, could result in death or serious injury.

Indicates a hazardous situation, w hich, if not avoided, could result in minor or moderate injury.
Indicates a situation that could result in damage to the equipment or other property.
A well crafted gun is only as good as the hands that hold it. Shooting accidents are often caused by careless oversights These oversights can result in the loss of life, limb or property. Proper use and performance of your firearm depends on correct assembly and maintenance, which is why it is critical you read and understand the information in this
manual. Use the following safety guidelines in every situation.
You must follow all of the safety guidelines to ensure the safe use of your firearm. Failure to follow these basic firearm safety guidelines may result in an unintended discharge w hich could cause serious injury or death.
READ ALL INSTRUCTIONS
Treat every firearm as if it’s loaded.
A dropped firearm may discharge. Do not drop your firearm.
Always keep your firearm pointed in a safe direction. Never point a firearm at anyone whether the firearm is loaded or not. Be careful when you’re loading or unloading your firearm.
BOOK BEFORE USING THE FIREARM
Firearms must be unloaded when not in use. Load your firearm only when you are in the field or target range and ready to fire. Never let a loaded firearm out of your sight. Completely unload your firearm as soon as you are finished shooting, before storing, traveling, standing it against anything, laying it down, entering a vehicle, entering a building or bringing it into your home. Do not take anyone’s word that a firearm is unloaded, always verify for yourself. Never pass your firearm to another person until you visually check that it is unloaded. Keep your firearm unloaded and safely stored when not in use.
Never rely on your firearm mechanical features alone. Only your safe handling of your firearm, will ensure the safe use of your firearm. A mechanical safety is not a substitute for common sense. It is merely a supplement to your safe handling of a firearm. Never touch the trigger or trigger guard until you are ready to fire. Be sure that no other objects touch the trigger. Never climb a tree or cross obstacles such as streams, creeks, or fences with a loaded firearm.
Verify the barrel is clear of obstructions before loading and firing. Completely unload the firearm and check the barrel for any obstructions or debris. Never let water, snow, mud or other materials enter the barrel Excess lubricants or grease can dangerously increase pressure and may cause barrel to burst when firing. If barrel is obstructed, remove ammunition and clean barrel immediately.
Every firearm is designed to use a certain gauge or caliber of ammunition. Never use the wrong ammunition, or non-standard, or “handloaded” ammunition which has not been subjected to internal ballistic pressure testing Always read and follow the instructions on the ammunition box.
Be sure of your target and the surrounding area. Never fire unless you know exactly where your shot is going, and what it will strike. Make sure the shot has a safe back stop, such as a hillside or sand Bullets can ricochet on surfaces such as water. Do not fire into the sky.
Safely store and secure your firearm and ammunition separately. Store your firearm and ammunition so that they are not accessible to children or unauthorized persons Evaluate your personal situation to be sure children and unauthorized persons cannot access your firearm.
You are responsible for your firearm at all times. You must protect yourself and others against injury or death from misuse of a firearm.
Never lock a loaded firearm and never load a locked firearm.
Always wear appropriate eye and ear protection while shooting and cleaning a firearm. Be sure others in the vicinity have protection as well.
Never use drugs or alcohol before or during use of firearm. Never use your firearm if you are taking
any medication which impairs, even slightly, your mental or physical ability.

Obey all laws regarding the storage, security, transportation and carrying of firearms. You must be familiar with all local, state, and federal laws regarding the safe use, storage and/or transportation of your firearm. Your local police department can answer any questions you may have regarding the legal use, storing and/or transporting of your firearm
Discharging firearms in poorly ventilated areas, cleaning the firearm, and the handling of ammunition may result in exposure to lead and other substances known to cause birth defects, reproductive harm, cancer, and other physical injury. Wash hands thoroughly after exposure. Read the warnings and labels on all ammunition and cleaning products carefully
Understand all operational aspects of the firearm before handling. Every firearm is different. Familiarize yourself with all mechanical features of your firearm If you do not understand any part of this manual or you are unsure about the operation of your firearm, contact Standard Mfg. Co. at 1-860-225-3657 before proceeding.
If your firearm fails to fire when the trigger is pulled, handle with care. Keep the firearm pointed in a safe direction. Keeping your face away from the breach, put the safety on. Unload your firearm and dispose of the ammunition safely.
Never alter or modify your firearm. Never disassemble your firearm beyond what is outlined in this manual. Improper manipulation of any internal components and/or improper disassembly or reassembly may be dangerous, and may lead to serious injury or death. Do not try to change your firearm’s trigger pull, alterations might cause accidental firing. Only a qualified gunsmith should service, repair, or modify your firearm in any way.
Be sure all accessories are compatible with your firearm. Accessories must not interfere with the safe operation of your firearm.
Never allow your firearm to be used by an individual who does not understand its safe operation or has not read these firearm safety guidelines.
The safe use of your firearm is your personal responsibility. Failure to follow all of these basic safety guidelines may result in severe injury or death to you or others.
You, the owner, are the most important safety device when it comes to the use of your Standard Manufacturing firearm.
Under no circumstances will Standard Mfg. be responsible for any injury, death or property damage that results from:
• A disregard of the safety guidelines and warnings;
• The criminal or negligent use of the firearm;
• Improper or careless handling of the firearm;
• Improper or negligent modifications or repairs to the firearm;
• The use of non-standard, defective, improper or reloaded ammunition.
This manual must accompany this firearm and be transferred w ith it upon change of ow nership or w hen presented to another person.
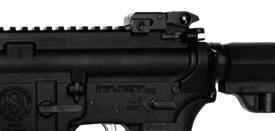
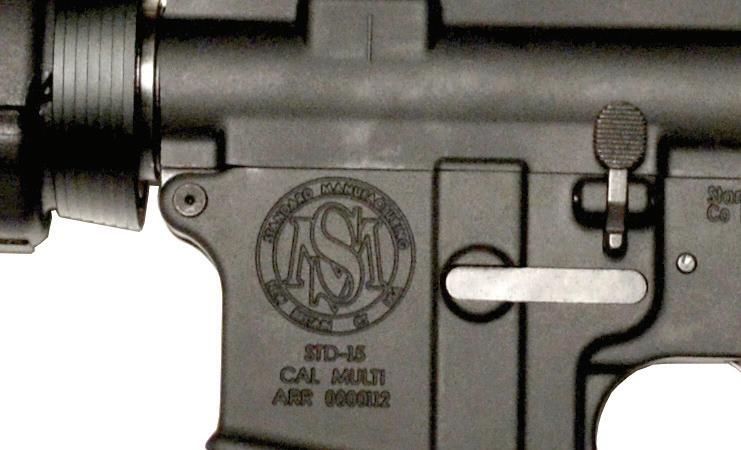
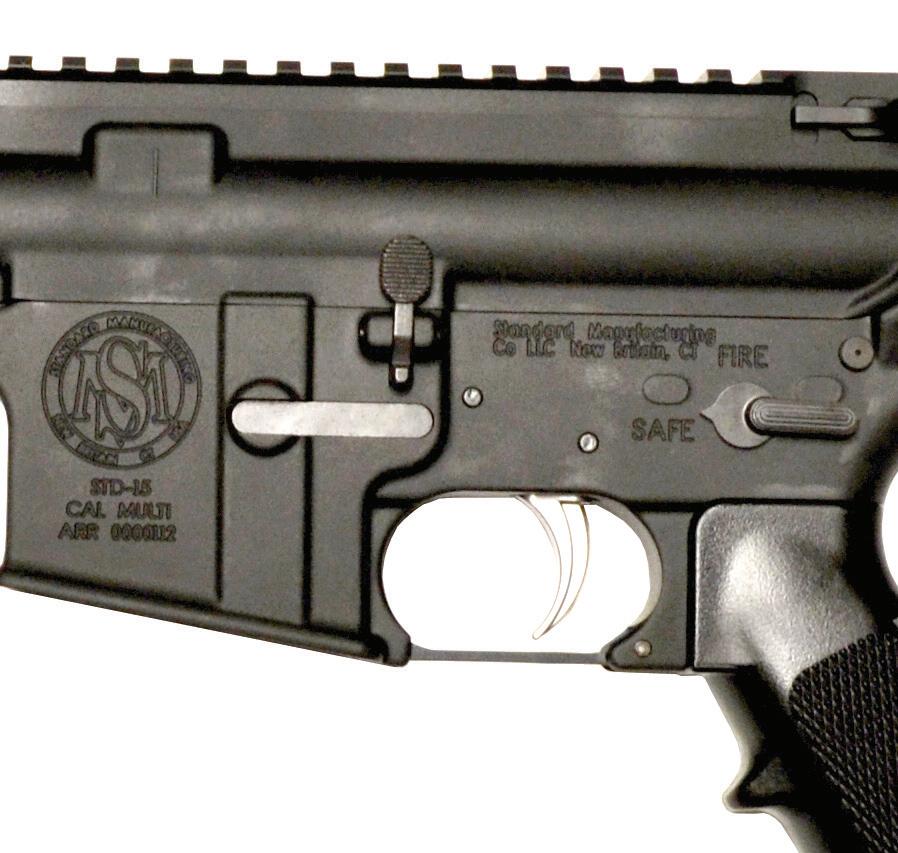
The model number (A) and serial number (B) are located on the left side of the firearm. See figure 1.
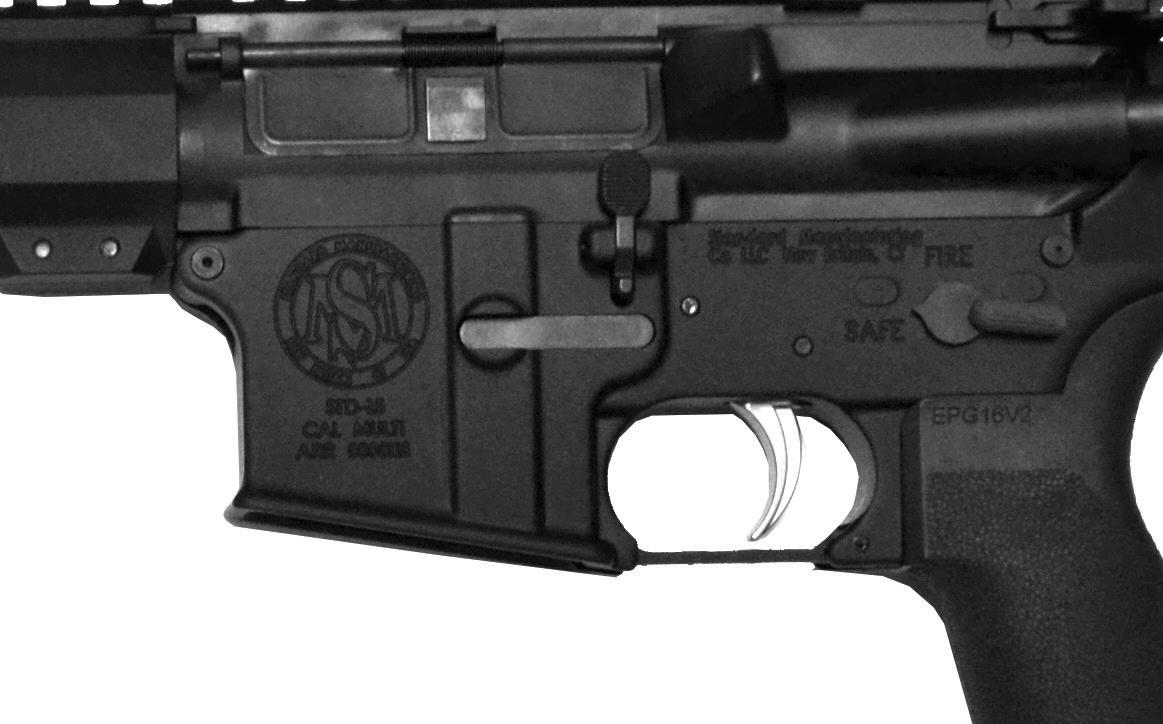
Figure 1
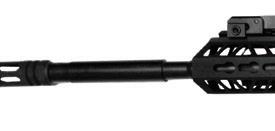


A - Flash Suppressor
B - Front Sight
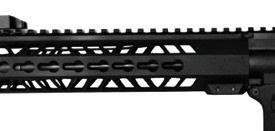
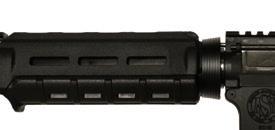
C - Hand Guard
D - Upper Receiver
E - Handle
F - Rear Sight

G - Charging Handle
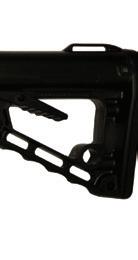
H - Stock
I - Safety Lever
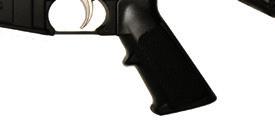
J - Grip
K - Trigger
L - Trigger Guard
M - Magazine
N - Lower Receiver
O - Bolt Catch
P - Bolt Assist
Q - Dust Cover
R - Magazine Release Button
Risk of serious injury or death.
A loaded firearm may discharge unintentionally.
Point the firearm in a safe direction w hile inspecting for ammunition.
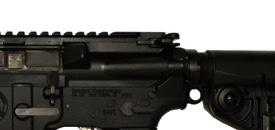
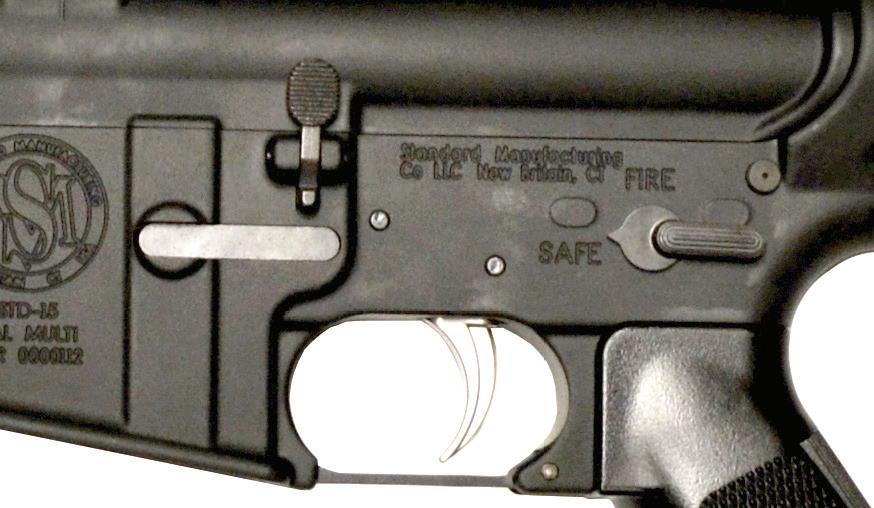
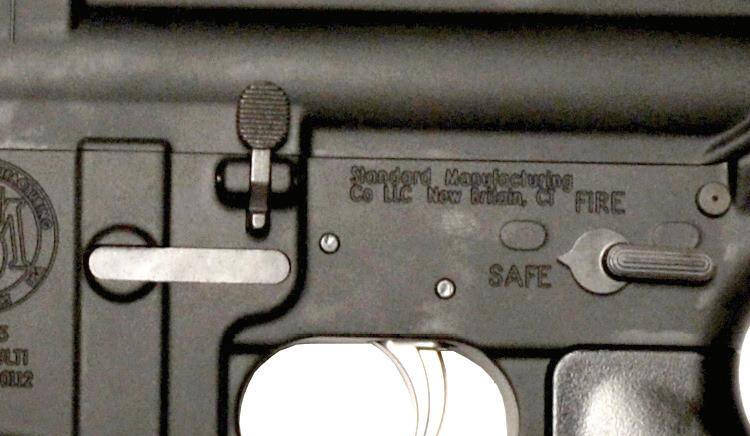
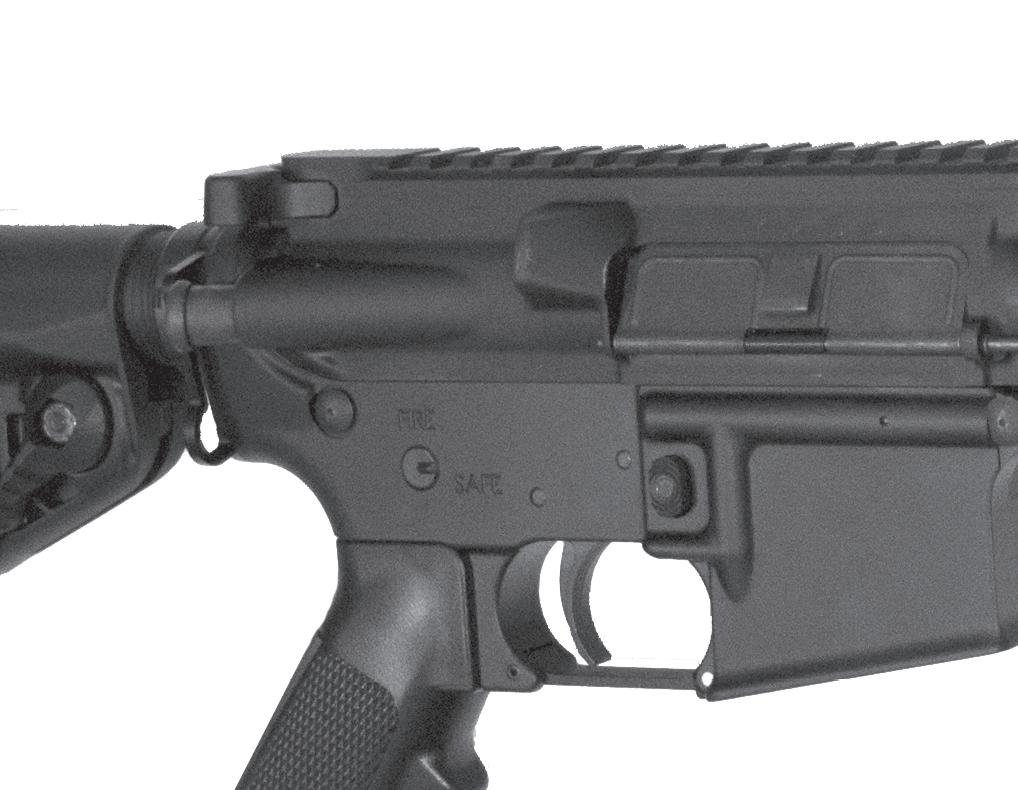
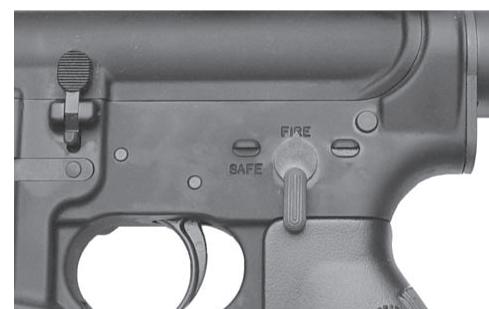
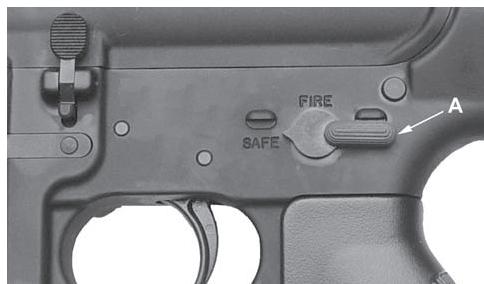
1. Place the safety selector lever (A) on SAFE. See figure 2.
2
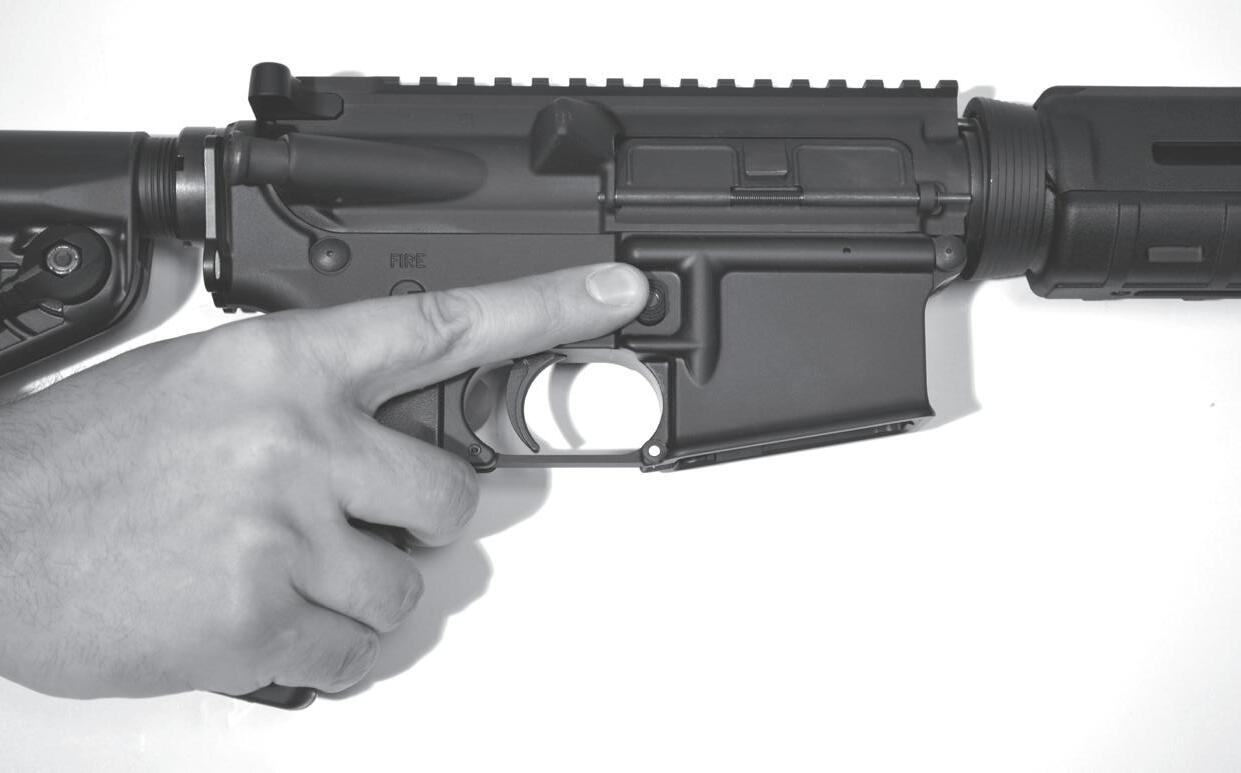
2. Grasp the firearm while keeping your finger off the trigger. Press the magazine release button (B) and pull the magazine down to remove. See figure 3.
3
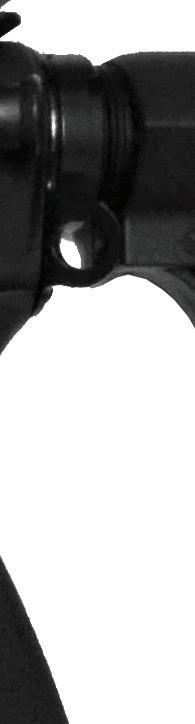
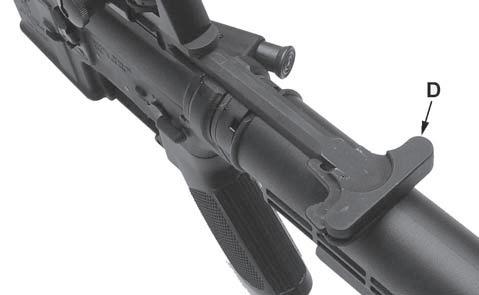
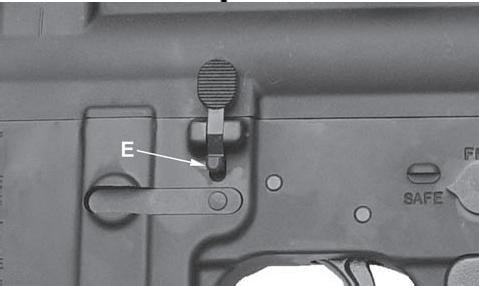
3. Unlock and pull the charging handle (D) all the way out and press in on the lower portion of the bolt catch (E). Release charging handle. This locks the bolt in the open position. See figure 4 and 5.
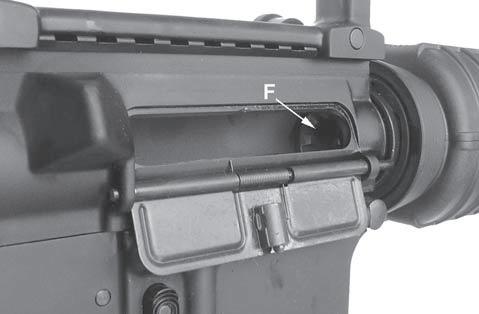
4. Look into the receiver through the ejection port and verify that there are no cartridges in the chamber (F). See figure 6.
5. Follow this inspection procedure before storage, cleaning, transporting and before handing to another person or when handed to you.


Risk of serious injury or death.
Failure to use the proper gauge or caliber of ammunition will cause your firearm to fail when firing.
Alw ays use ammunition specifically designed for use in your firearm.
You are responsible for using ammunition specifically designed for and that meets industry standards for use in your firearm.
Using ammunition not specifically designed for your firearm can cause the pressure to exceed the capability of your firearm, and could damage and/or rupture your firearm.
Never mix ammunition.
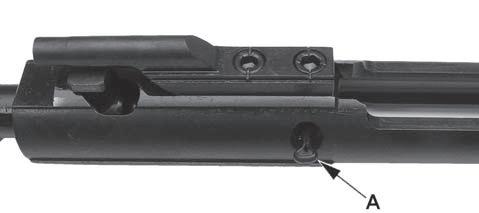
Locate the caliber mark (A) on the firearm. See figure 7. This designates the ammunition caliber that must be used in your firearm.
7
Always inspect your ammunition before using it. Never use damaged or corroded ammunition which could lead to a burst cartridge causing damage to the firearm and possible personal injury or death.
Always use ammunition that is commercially manufactured with internal ballistic pressures which are in strict accordance with the specifications of the Sporting Arms and Ammunitions Manufacturers’ Institute (SAAMI) For verification, contact your ammunition supplier.
Your firearm has been designed for ammunition of a specific caliber and type. The firearm and ammunition work together as a system. You must use the correct ammunition for your firearm.
Risk of serious injury or death.
Use of “handloaded”, reloaded or non-standard ammunition may cause your firearm to fail to fire, jam, or to dangerously increase pressure and cause barrel to burst w hen firing.
Use only quality commercially manufactured ammunition.
Risk of serious injury or death.
A loaded firearm may discharge unintentionally if dropped.
Handle the loaded firearm w ith care.
Clean your firearm before the first use. Your firearm has been treated at the factory to prevent corrosion. The chamber, bore, and exterior surfaces must be cleaned to remove excess oil.
You must read and understand this manual before loading.
Load your firearm only when you are in the field or target range, when you are sure of the target and ready to fire.
1. Inspect the firearm for ammunition if you have not done so. See Inspect For Ammunition in this manual.
2. Verify that the safety lever is in the SAFE position.
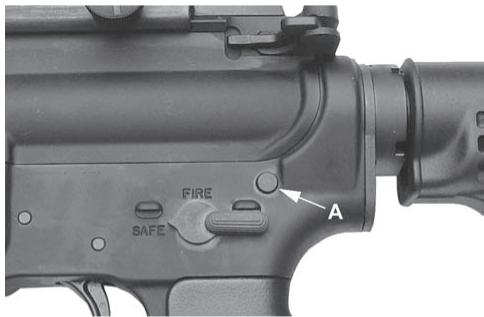
3. Press the upper portion of the bolt catch (A) and the bolt should spring forwar d. Be sure the bolt is fully forward and locked. See figure 8. Figure 8
Risk of serious injury or death.
Using damaged, incorrect, non-standard, or “handloaded” ammunition may result in firearm failure or misfire.
Use only quality undamaged ammunition in your firearm.
4. Inspect each cartridge for signs of damage. Do not load damaged ammunition. Load the magazine with the proper caliber of undamaged ammunition.
5. Push the magazine up into the magazine well until the magazine release button engages and holds the magazine. Use your hand and tap on the bottom of the magazine to be sure it is seated.
Risk of serious injury or death.
After performing step 6, the firearm is loaded and w ill fire if the safety selector is set to FIRE and the trigger is pulled.
Keep the firearm pointed in a safe direction at all times.
Never insert a round into the chamber through the ejection port.
Load the chamber by feeding a round from the magazine only.
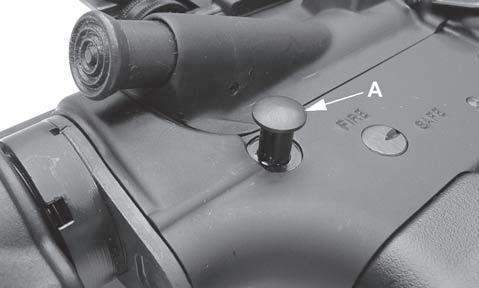
6. To load a round into the chamber, pull the charging handle (B) fully rearward and release. Tap the forward assist (E) with your hand to be sure the bolt is fully forward and locked. A round from the magazine is now loaded into the chamber. See figure 10.

You must follow all of the safety guidelines to ensure the safe use of your firearm. Failure to follow these basic firearm safety guidelines may result in an unintended discharge w hich could cause serious injury or death.
Always point the barrel in a safe direction.
Be alert and follow safety instructions.
Be aware of others. Persons in the vicinity of your shooting may unintentionally walk into your line of fire.
The proper eye and ear protection must be worn by the shooter and bystanders in the area.
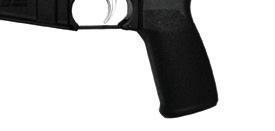
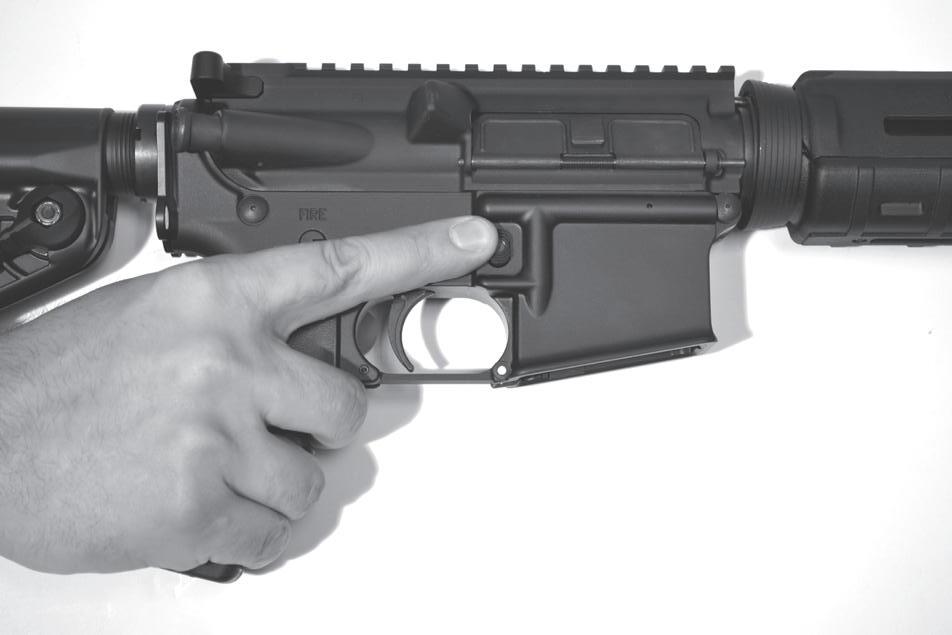
1. Grasp the firearm with one hand on the hand guard and the other on the grip. Keep fingers away from the trigger and trigger guard. See figure 11.
11
2. Place the buttstock firmly against your shoulder.
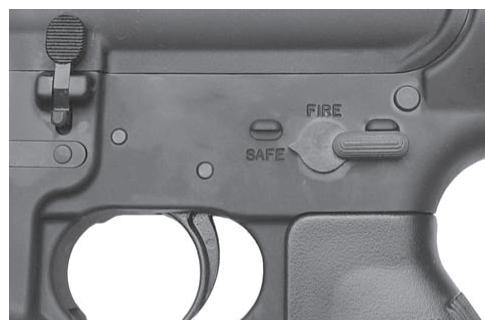
3. Mover the safety lever to FIRE. See figure 12.
4. Aim at the target and gently pull the trigger with your index finger to fire. Release the trigger and the chamber will reload immediately. You may continue to fire by pulling the trigger and fully releasing until the magazine is empty.
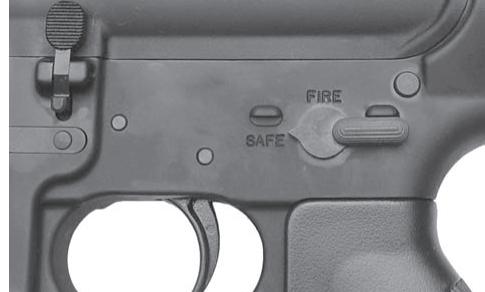
5. When you stop firing, remove your finger from the trigger and place the safety lever in the SAFE position. See figure 13.
6. Remove and reload magazine if you plan to continue shooting.
The firearm may have a round in the chamber even though the magazine has been removed. Keep the firearm pointed in a safe direction while the magazine is reloaded.
7. Unload the firearm using the Inspect For Ammunition procedure in the manual.
Risk of serious injury or death.
If your firearm is not operating properly, stop firing immediately.
Point the firearm in a safe direction and unload the firearm.
Safely store the firearm and take it to a qualified gunsmith for inspection.
If a cartridge jams or hangs up while moving from the magazine into the chamber, do not attempt to force the cartridge into the chamber.
If your firearm misfires or jams:
1. Remove your finger from the trigger area, point the firearm in a safe direction and wait 10-15 seconds.
2. Place the safety selector lever (A) on SAFE.
See figure 14
14
3. Press the magazine release button (B) and pull the magazine (C) down to remove. See figure 15.

4. Unlock and pull the charging handle (D) all the way out and press in on the lower portion of the bolt catch (E). Release charging handle. This locks the bolt in the open position. See figure 16 and 17.
5. Look into the receiver and verify that there are no cartridges in the chamber (F). See figure 18.
6. If a cartridge cannot be removed, safely store the firearm and take it to a qualified gunsmith for inspection
1. Place the safety selector lever (A) on SAFE. See figure 19
2. Press the magazine release button (B) and pull the magazine (C) down to remove. See figure 20.
3. Unlock and pull the charging handle (D) all the way out and press in on the lower portion of the bolt catch (E). Release charging handle. This locks the bolt in the open position. See figure 21 and 22.
4. Look into the receiver and verify that there are no cartridges in the chamber (F). See figure 23.
Risk of serious injury or death.
Alw ays point the firearm in a safe direction.
Risk of serious injury or death.
Verify that the firearm is not loaded before any disassembly or cleaning is begun.

Risk of serious injury or death.
Do not disassemble the firearm any further than instructed in this manual.
Do not modify or alter any part of the firearm.
Wear the appropriate protective clothing w hile disassembling and assembling the firearm.
Disassembling the firearm and the handling of ammunition and cleaning products may result in exposure to lead and other substances known to cause birth defects, reproductive harm, cancer, and other physical injury. Wash hands thoroughly after exposure. Read the warnings and labels on all ammunition and cleaning products carefully.
1. Verify that the firearm is not loaded. See Unloading in this manual.
2. Verify that bolt is in the forward position.
3. Push in on the takedown pin (A) from the left side of the firearm. See figure 24.
4. Pull the takedown pin (A) out as far as it will go. The pin will not be removed from the firearm. See figure 25.
5. Pivot the lower receiver away from the upper receiver.
7. Clean charging handle and bolt carrier components with a quality gun cleaning solution. Lubricate components with a quality gun lubricant.
Risk of serious injury or death.
Do not disassemble the firearm any further than instructed in this manual.
Do not modify or alter any part of the firearm.
Replacement parts must be installed by a qualified gunsmith.
1. Remove bolt carrier assembly from firearm See Remove Bolt section previously in this manual.
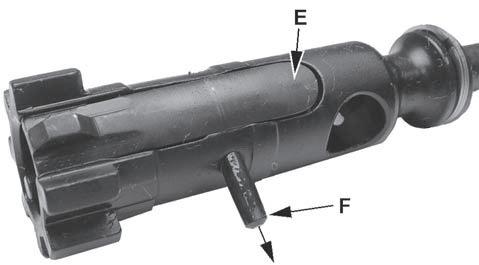
2. Remove the firing pin retaining pin. Do not distort the ends of the retaining pin.
3. Push the bolt assembly (B) into the bolt carrier to the locked position as illustrated in figure 30.
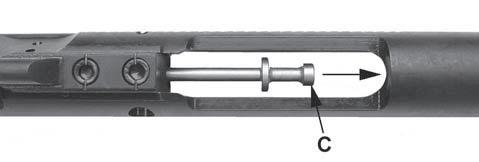
4. Remove the firing pin (C) through the rear of the bolt carrier assembly. See figure 31.
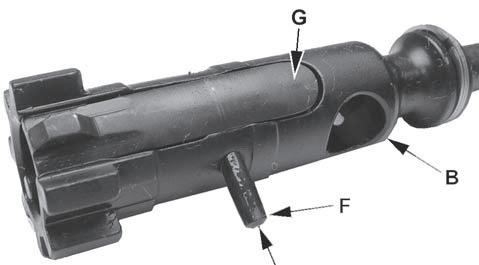
5. Turn bolt cam pin (D) 90° and remove from bolt carrier assembly. See figure 32.
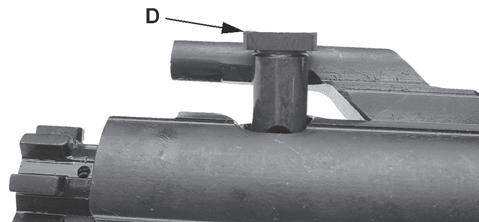
32
6. Remove bolt assembly (B) from bolt carrier assembly. See figure 33.
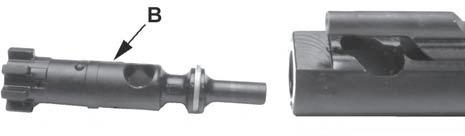
33
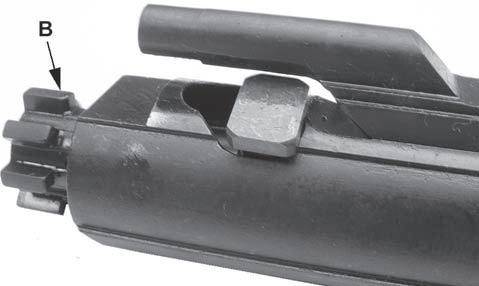
7. Push in on the rear (E) of the extractor. If the extractor does not spring back, remove the extractor from the bolt for cleaning. Push extractor pin (F) out to remove extractor. See figure 34.
34
8 Remove extractor pin (F) and extractor (G) from bolt (B). Do not remove insert (I) from extractor spring (H). See figure 35.

35
9. Clean bolt and bolt carrier components with a quality gun cleaning solution. Lubricate components with a quality gun lubricant.
Risk of serious injury or death.
Do not disassemble the firearm any further than instructed in this manual.
Do not modify or alter any part of the firearm.
Replacement parts must be installed by a qualified gunsmith.
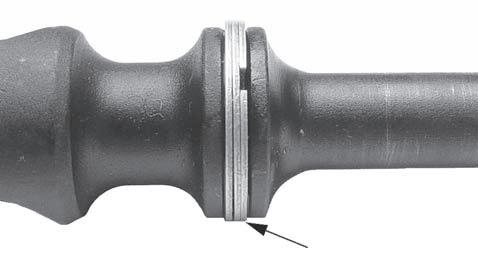
1. Stagger the gaps in the three gas rings 120° apart around the bolt. Do not align the gaps. See figure 36.
2. Install extractor (G) with insert and spring into bolt (B) and install extractor pin (F). Extractor pin must not extend outside the bolt on either side See figure 37.
37
3. Install bolt assembly into bolt carrier. Insert cam pin (D) and turn 90°. The hole in pin will align with the hole through the bolt. See figure 38.
38
4. Insert the firing pin (C) through the rear of the bolt carrier assembly. See figure 39.
39
5. Pull the bolt out and install the firing pin retaining pin (A). See figure 40.
REMOVE
1. Verify that the firearm is not loaded. See Unloading in this manual.
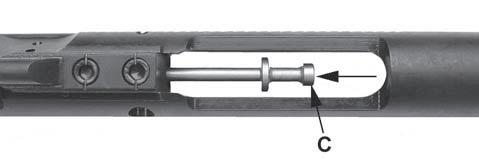
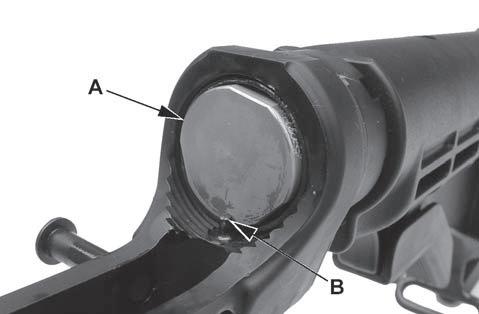
2. Hold the buffer in and press down on retainer to release buffer. See figure 41.
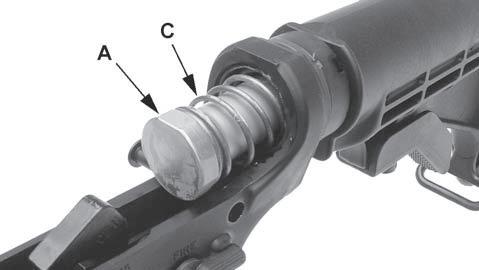
3. Remove the buffer (A) and spring (C). See figure 42.
Risk of serious injury or death.
Do not disassemble the firearm any further than instructed in this manual.
Do not modify or alter any part of the firearm. Replacement parts must be installed by a qualified gunsmith.
4. Clean buffer and spring components with a quality gun cleaning solution. Lubricate components with a quality gun lubricant.
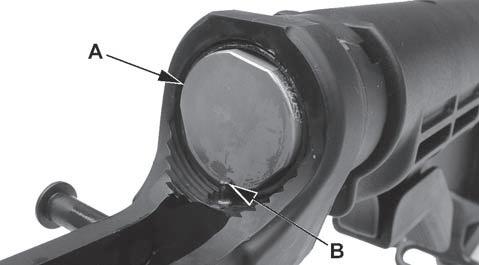
1. Insert the action spring onto the buffer and into receiver. Press down on retainer (B) and push buffer (A) past retainer, then release retainer. See figure 43.
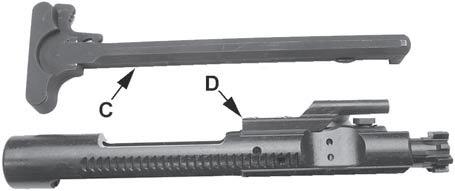
1. Engage and partially insert charging handle Install bolt carrier so that slot in carrier engages tab on charging handle. Push carrier and charging handle into receiver.
2. Verify the safety selector is on SAFE. See figure 45.
2. Pivot the lower receiver to the upper receiver and push the takedown pin (A) in. See figure 46.
1. Verify that the firearm is not loaded. See Unloading in this manual.
Risk of injury.
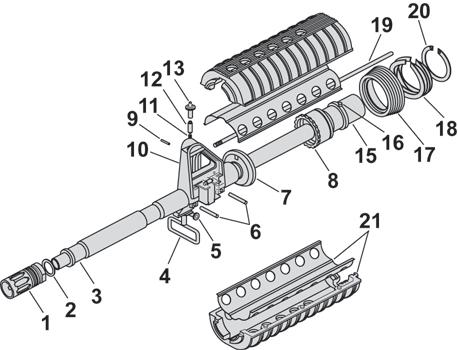
Tw o people are required to remove and install the handguards.
2. Stand the firearm on the stock.
3. While one person pulls down on the delta ring (A), the second person can remove the handguards. See figure 47.
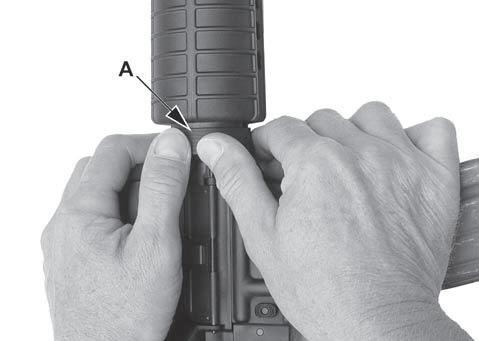
4. To install handguards, one person pulls down on the delta ring (A), the second person can install the handguards. See figure 47.
Risk of serious injury or death.
Alw ays point the firearm in a safe direction.
Risk of serious injury or death.
Verify that the firearm is not loaded before any disassembly or cleaning.
Risk of firearm damage.
Some cleaning solutions and solvents may damage your firearm.
Use a cleaning solution that is designed for use on firearms.
Risk of firearm damage.
Do not allow cleaning rods to scratch the inside of the barrel or chamber.
Commercial firearm cleaning kits are available from your firearms distributor Follow the instructions included with the cleaning kit.
Clean the firearm before the first use to remove excess oil
Remove the magazine and verify that the firearm is not loaded and safety is on SAFE.
Clean the barrel with a cotton patch attached to a cleaning rod. Moisten the patch with cleaning solution. Repeat with clean patches until patch stays clean. Apply cleaning solvent to a bronze bore brush to help loosen particles inside the barrel. After
cleaning, run a dry patch through the barrel and then follow with a lightly oiled patch.
Remove the magazine and verify that the firearm is not loaded and safety is on SAFE.
Clean the chamber with solvent and a chamber cleaning brush. Move the brush through the chamber several times to scrub the inside of the chamber. Use a clean patch to wipe the chamber after cleaning Repeat with clean patches until patch stays clean. After cleaning, run a dry patch through the chamber. Do not oil the chamber.
Remove the magazine and verify that the firearm is not loaded and safety is on SAFE.
Wipe all metal surfaces with a clean cloth and then follow up with a lightly oiled cloth.
Always point the barrel in a safe direction.
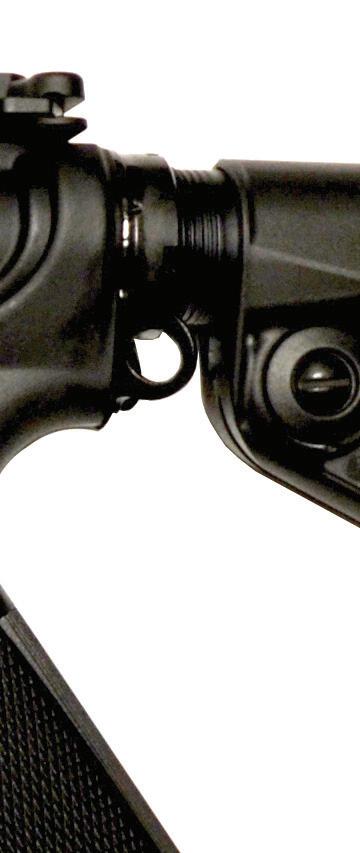
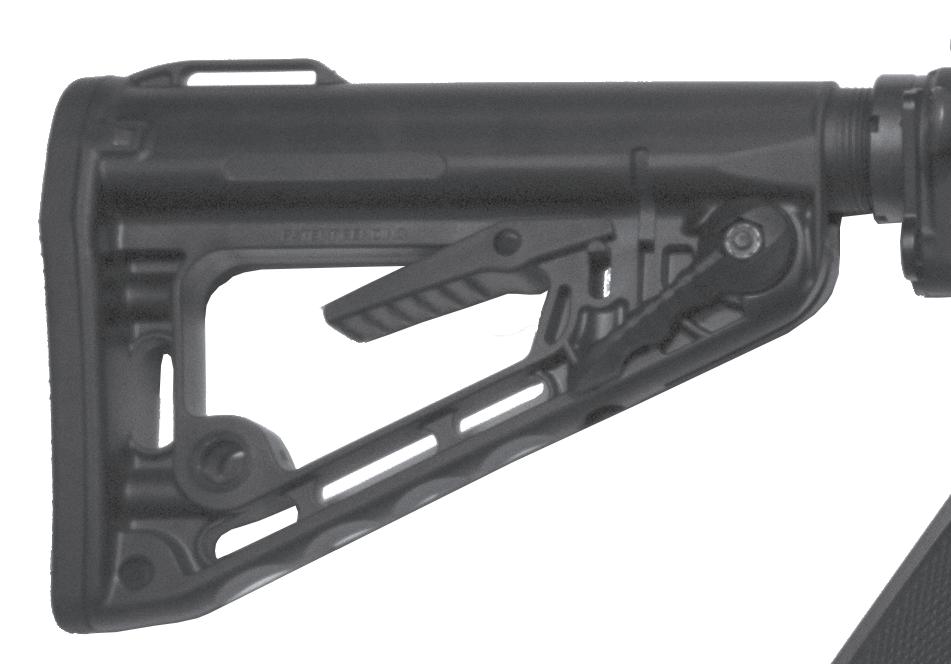
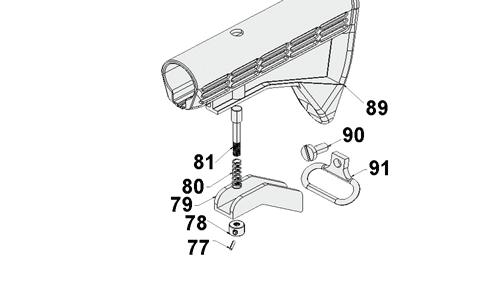
To extend or retract the buttstock, pull lever (A) and move buttstock to the desired position. See figure 52.
The sights have been zeroed at the factory. If adjustments are necessary, use the following procedure.
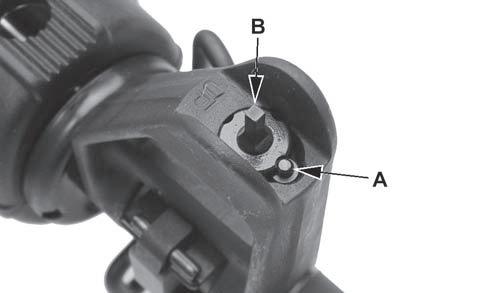
The front sight post is threaded to allow up or down movement when zeroing the rear sight Press in on the detent pin (A) and turn the sight post (B) in ¼ turn increments up or down as necessary. Turn the sight post (B) clockwise to lower or counterclockwise to raise. Verify that detent pin (A) pops up to engage the sight post See figure 54.
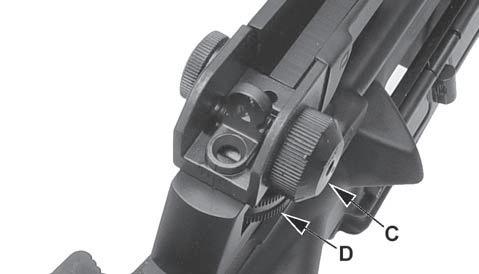
Note: An optional dual aperture rear sight is described in the procedure below.
Use the larger sight for normal and short range firing and the smaller sight for long range firing.
Use the side adjustment knob (C) See figure 55.
Barrel – The tube through which the bullet travels when the firearm is fired.
Bolt – A sliding bar that pushes the cartridge into place and extracts the empty cartridge after firing.
Buttstock – The part of the stock located behind the breech mechanism in a firearm.
Bolt Catch – The lever that, when depressed, releases the bolt carrier assembly to the forward position.
Caliber – The diameter of the bolt, designated in hundredths or thousandths of an inch (.357) or in millimeters (9mm).
Charging Handle – This cocks the firearm when preparing to fire or clean.
Handguard – This is a protective shield that covers the gas tube and the barrel keeping your hand away from the hot barrel.
Firing Pin – A part of the firing mechanism used in a firearm.
Flash Suppressor – This reduces the amount of flash from the muzzle when the weapon is fired.
Magazine – A metal receptacle for a number of cartridges, inserted into certain types of automatic weapons and when empty removed and replaced full receptacle in order to continue firing.
Rifle – A weapon that can be fired from the shoulder.
Safety Selector Lever – This feature changes the trigger between the safe mode and the firing modes.
Sight – A device used to assist aim by guiding the eye
Trigger – A small projecting tongue in a firearm that, when pressed by the finger, actuates the mechanism that discharges the weapon.
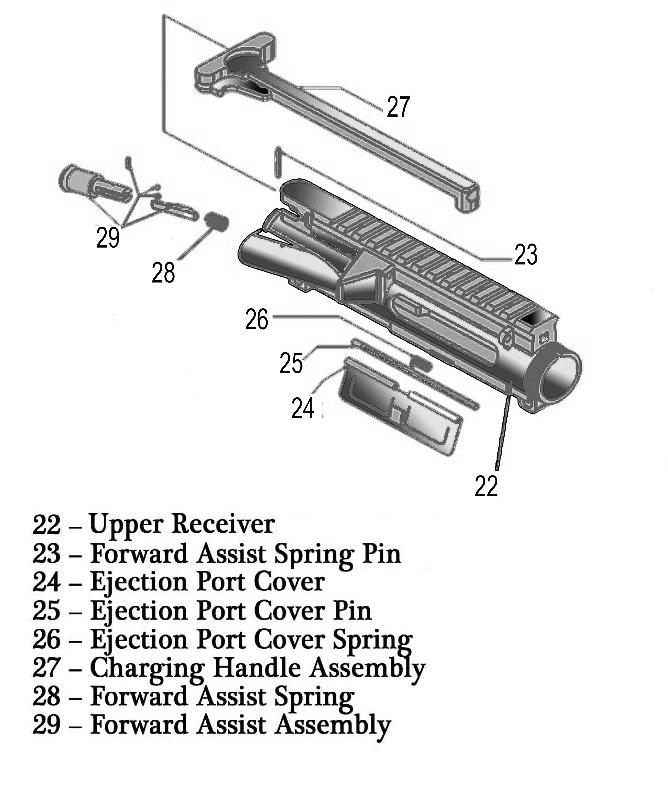
Upper Receiver – The part of the receiver containing the barrel, sights, bolt, and associated parts.


This warranty is granted by Standard Mfg. . This 1 year warranty is effective from the date of purchase and applies to the original owner of a Standard Mfg. firearm. Standard Mfg. firearms are warrantied to be free from defects in material and workmanship. Any such defects of which Standard Mfg. receives written notice by the original owner, will be remedied by Standard Mfg. without charge within a reasonable time after such notification and delivery of the product as provided below. If your Standard Mfg. firearm should ever require service or repair please perform the following to ensure fast and reliable service:
1) Include a copy of a bill of sale in the owner’s name or a copy of ATF Form 4473 indicating date of purchase.
2) Include a written copy of the model and serial number of the firearm and a description of the difficulty experienced and service desired.
3) Include your name, desired return address, and a number where we can reach you.
4) Also include a written list of any accessories in your shipment –Standard Mfg. will not be responsible for any item that was not listed and confirmed by Standard Mfg..
5) Be sure the firearm is completely unloaded and the shipping container is free of ammunition. It is against postal and commercial regulations to ship ammunition.
6) Securely package your Standard Mfg. firearm and ship (transportation charges pre-paid) to:
Standard Mfg. Service Department
100 Burritt Street New Britain, CT 06053
It is recommended that shipments be shipped UPS Ground, insurance is not necessary as we carry insurance that covers firearms in transit. Transportation and insurance charges for return to owner will be paid by Standard Mfg. if the claim is covered by the warranty. Under no circumstances shall Standard Mfg. be responsible for incidental or consequential damages with respect to economic loss or injury or property damage, whether as a result of breach of express or implied warranty, negligence or otherwise. Some States do not allow the exclusion or limitation of incidental or consequential damages, so the above limitation or exclusion may not apply to you.
Standard Mfg. will not be responsible for defects resulting from careless handling, unauthorized or unsafe adjustments or modifications, non-standard, defective, or improper ammunition, corrosion, neglect, fire damage, water damage, theft, abuse, ordinary wear and tear, or unreasonable use.
NOTE : Handguns and long guns are classified as FIREARMS or DANGEROUS WEAPONS. Guns that are surrendered by Stag Arms LLC with the express understanding that it assumes no responsibility for resale handling under local laws and regulations.
NOTE : Under current regulation the following configuration may not be sold in states that prohibit it: telescoping stock, threaded muzzle, high-capacity magazine, bayonet lug, flash suppressor.
NOTE : Lead Exposure: Discharging firearms in poorly ventilated areas, cleaning firearms, or handling ammunition may result in exposure to lead, a substance known to cause birth defects, reproductive harm, and other serious physical injury Have adequate ventilation at all times. Wash your hands thoroughly after exposure to lead.