

Business Online Banking User Guide
Business Online Banking User Guide
Welcome to Business Online Banking
Thank you for choosing First National Bank Alaska for your business banking needs. With Business Online Banking, you can securely manage your business finances, check account balances, transfer funds, issue stop payments, pay bills and so much more-anytime from anywhere.
If you choose to act as a System Administrator for your online banking services, you will have the ability to set up users and manage permissions, organize and update account information and control account access for enhanced security. This guide provides step-by-step instructions on how to log in, set up users, manage permissions and take advantage of many other secure Business Online Banking features.
Set Up and Get Started
Log In
If you are a System Administrator for your organization, the bank will provide you with a User ID and a temporary password. You will also receive a token if your organization requires them. System Administrators provide all other users their login credentials.
1. Visit FNBAlaska.com, select Business from the Account Login dropdown.
2. Enter your User ID and click Click to Log In .
3. Enter your password in the Password field and click Log In .
Activate a Token
Depending on your security settings you may be required to activate a token when you first log in.
1. Visit FNBAlaska.com, select Business from the Account Login dropdown.
2. Enter your User ID and click Click to Log In .
3. Enter your temporary password and click Log In .
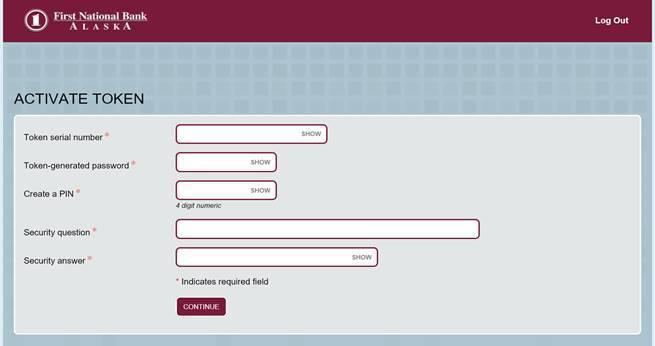
4. Complete the Activate Token screen.
a. Enter the Token Serial Number reflected on the back of the token.
b. Press the gray button on the token.
c. Enter the password displayed in the One Time Password field.
d. Enter a 4-digit PIN of your choosing. You will need this PIN each time you log in.
e. Provide a Secret Question and Answer.
f. Click Continue Your token is now activated and ready to use.

Log In with a Token
After your token is activated, follow these steps to log in to Business Online Banking.
1. Visit FNBAlaska.com, select Business from the Account Login dropdown.
2. Enter your User ID and click Log In
3. Press the gray button on your token and enter the code followed by your 4-digit PIN in the Password field. Click Log In .
4. Press the gray button on the token again and confirm the number displayed matches the Site Authentication Value reflected on the screen.
a. IF THESE NUMBERS DO NOT MATCH, DO NOT CONTINUE. Start over or contact your System Administrator for assistance.
b. If the numbers match, click OK
Establish Security Information
If you are a System Administrator, establish your security information so the bank can identify you when you call for assistance. If you do not provide this information, we will not be able to assist you over the phone.
1. Click the Administration tab.
2. Click the Change Employee radio button and then click Submit
3. Click on your name.
4. You will see the Transaction Exports row with six dropdowns and corresponding text fields.
a. In the first dropdown, select Free Form Question . In the field to the right, type a security question.
b. In the second dropdown, select Free Form Answer and provide the answer to your security question in the field to the right.


c. Complete the next four rows by selecting different security questions of your choice from the list.
NOTE | Complete all six fields. Without this information, the bank may not be able to assist you if you call the bank for online banking support.
5. In the Contact Methods panel, enter your email address, business phone, business phone extension, and mobile phone. If the information is already present, ensure it is correct.
NOTE | Ensure the Contact Methods information stays current. Incorrect or outdated information could delay important notifications from the bank.
6. Click the Save icon from the menu bar.
Dashboard Basics
The dashboard provides a summary of account information and access to all features of Business Online Banking. Depending on user access and enrollment services, the dashboard displays account balances, allows for quick transfers and transfer reviews, and enables access to Positive Pay, Bill Pay, ONEpay, and Deposit Advantage services.
Accounts
The Accounts tab on the menu bar is used to review account information. Click on an account to display the Details, Documents and download tab for the account.
The account details screen displays summary balance information on the selected account including previous day transactions, current balance, holds, pending transactions, and more. The details screen also provides a list of recent transactions.
SEARCH TRANSACTIONS
1. From the Accounts menu, select the desired account.
2. Enter the search criteria into the Search Transactions panel and click Search .
DOWNLOAD TRANSACTIONS
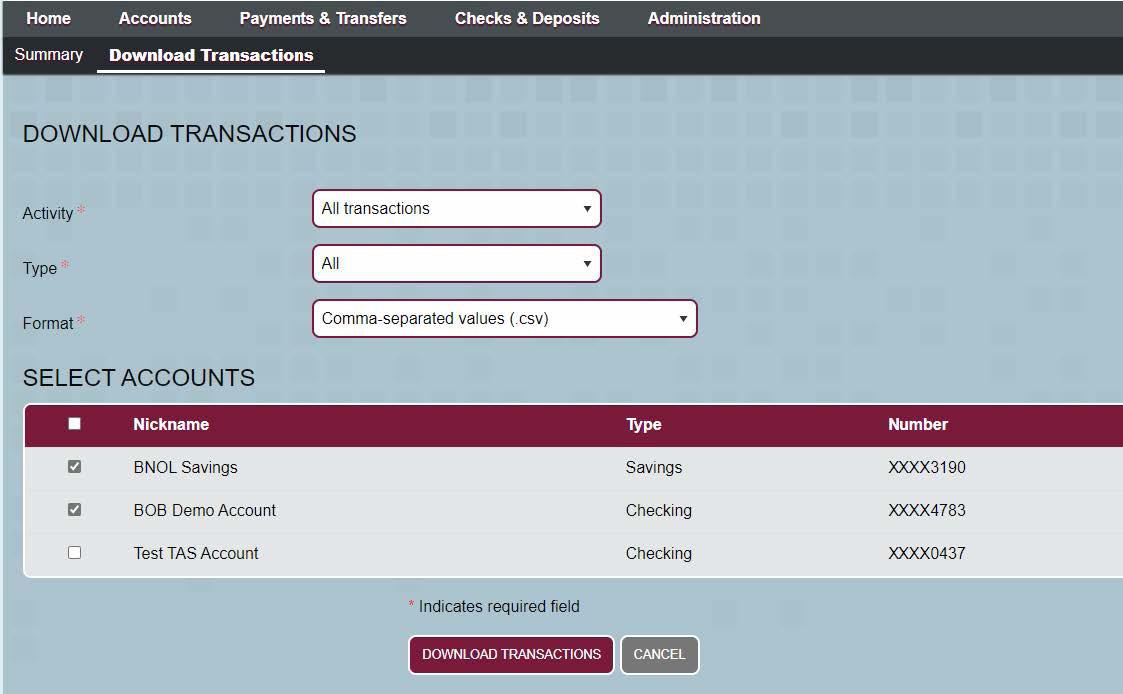
1. From the Accounts menu, click Download Transactions
2. Use the dropdown boxes to specify the range of transactions to download as well as the file type of the downloaded file.
3. Select the accounts to display by clicking the checkboxes next to them. Click Download Transactions

VIEW E-DOCUMENTS
With e-Documents, you can view, download, and print account statements and notices directly from Business Online Banking. Talk with your local banker or Treasury Management expert for enrollment assistance. Once your business is enrolled, the bank will grant access to all System Administrators, who can then set permissions for other users. Document types will appear under the Electronic Documents panel of the New Employee and Change Employee windows. To view electronic documents:
1. From the Accounts menu, select the desired account.
2. Click the Documents tab. If you do not have permission to view documents for this account, the Documents tab will not be visible.
3. Select the relevant type from the Document Type dropdown. You may also filter the documents by a specific date range.
4. Click on the document you want to view.
Security
CHANGE CREDENTIALS
1. Click Profile from the upper-right hand corner of the home screen.
2. Complete the Change Password or Change PIN screen.
3. Click Submit
RESET FORGOTTEN PASSWORD OR PIN
Forgot your password or PIN? You can have a temporary password or PIN sent to the email address on file. If you don’t have an email address on file, contact your System Administrator.
1. From the Password Login screen, click the Forgot Password/PIN hyperlink.
2. On the next screen, enter your User ID and click Submit .
3. A temporary password or PIN will be sent to the email address on file. Return to the Password Login screen and enter the temporary code.
NOTE | A temporary password or PIN will expire 15 minutes after it is requested.
4. Complete the Change Password or Change PIN screen and click Submit .
CHANGE CHALLENGE QUESTIONS AND ANSWERS
1. Click Change Security Data from the Profile tab.
2. Under Change Challenge Questions and Answers, select the questions you want to change and update the corresponding answers.
3. Click Submit . The next time you log in from a new computer you will be prompted to answer the security questions.
LOG OFF
1. Click Log Off in the top right corner of the screen to exit Business Online Banking securely.
Administration Users
ADD NEW USER
Only administrators or supervisors may create a new user profile. The bank adds all System Administrator profiles.
1. Click Profile & Permissions from the Administration tab
2. Click the New Employee radio button and click Submit.
NOTE | If you want to copy the same permissions as another user, select the New Employee Using Existing Employee radio button instead. Click Submit and then choose the name of the user whose settings you wish to copy.

3. Complete the Codes panel, identifying the user’s Name and Security Level:
• EMPLOYEE Permits user to view account balance information and initiate account-to-account transfers.
• SUPERVISOR Permits user to view account balance information, initiate account-to-account transfers, and approve transfers started by others in the same Employee Group.
• ADMINISTRATOR Permits user to view account balance information, initiate account-to-account transfers, and approve transfers started by others.
4. Choose one of the security questions below the Transaction Exports option and provide the answer in the field to the right. This field must be completed for the user to have access to Bill Pay.
5. Complete the Security panel:
a. Username: Enter a User ID between six and twenty characters.

b. Click the Change Password link. Enter a temporary password for the user in both password fields and click Submit to return to the New Employee window. Passwords must have a minimum of eight characters.
NOTE | Passwords should not contain the word “password” or the username.
c. PIN: Leave this field blank.
6. If the user requires a token, complete the Multifactor Authentication panel. Select Pending Enablement in the Token Status field and Go3 in the Token Type field.
7. Select whether or not the user has access to FNBizApp™, the bank’s Business mobile banking app, by selecting the appropriate Mobiliti Business option.
8. Complete the Role Assignment panel by selecting the role that matches the level set for the user. Ensure the Role and the Security Level fields match .
To give the user access to Positive Pay, click the Add Role link and select the appropriate Positive Pay role:
• POSITIVE PAY EXCEPTION AND ISSUE ITEM REVIEW : Allows the user to approve or return exception items and review issued items.
• POSITIVE PAY FULL ACCESS : Allows the user to perform all available Positive Pay actions.
• POSITIVE PAY IMPORT AND ITEM MAINTENANCE : Allows the user to import issued item files, change import exceptions, and add, delete, or change issued items.
9. Complete the Accounts panel by checking the boxes next to each account the user will have access to.
10. Complete the Administration Options panel (Supervisors and Administrators only):
• EMPLOYEE : Permits the user to review, add, change, or delete users.
• INTERNAL TRANSFER TEMPLATE : Permits the user to add, change, or delete internal fund transfer templates.
11. Complete the Approval Options panel:
a. If a fund transfer initiated by this user requires approval from another Supervisor or Administrator, select Yes from the Review Internal Transfers dropdown. If set to No, fund transfers initiated by this user will be completed without further review or approval.
b. Approve Transfers (only for Supervisors and Administrators): Set this field to Yes if the user will be allowed to approve fund transfers initiated by others.
12. Complete the Fund transfer section as follows:
a. INQUIRE TRANSFERS : If you want this user to view fund transfers initiated, select YES. Users with a security level of Employee may only view their own fund transfers. Users with a higher security level can view all fund transfers when set to Yes
b. INITIATE TRANSFERS : If you want this user to initiate fund transfers, select Yes .
c. BILL PAYMENT : If you want this user to have access to Bill Payment, select Yes
13. Complete the Stop Payments panel by selecting whether the user has permission to review (Inquiry) or create (New) stop payments.
14. If the user will have Bill Payment services, complete the Interface Specifications section as follows. Set the Interface to Corporate CheckFree and leave the User Code and Password fields blank.
15. If the user will have ONEpay service, complete the Interface Specifications section as follows. Set the Interface to ONEpay. Under User Code, enter the Access ID the employee will use to log in. Leave the Password field blank.
16. If the user will have access to Escrow accounts, complete the Interface Specifications panel. Select Escrow from the Interface dropdown and enter escrow in the User Code and Password fields.
17. Complete the Electronic Documents panel by selecting which types of statements and notices the user can view. Users will only be able to view e-Documents for the accounts they have access to, and only if the accounts are enrolled in e-Statements or e-notices.
18. Click Save. The Accounts Added panel appears listing the accounts the user will be allowed to access online. Click Finish to save the changes.
NOTE | If the user needs access to Treasury Management services, such as ONEpay, ACH Fraud Prevention, or Lockbox Remittance Manager, call Technical Support at (907) 777-3640 or 1 (800) 856-4362 after you have created the profile to establish access for these services.
DELETE USER
Users who no longer require access to Business Online Banking should be removed from the system. A System Administrator can only be removed by the bank. Contact the bank to remove a System Administrator’s access.
1. Click Profile & Permissions from the Administration tab. Select the Delete Employee radio button and click Submit .
2. Click on the name of the user to delete.
3. Confirm the correct name is reflected, and click the Delete (X) icon at the top of the screen.
4. Click OK on the confirmation screen.
REPLACE AND DELETE TOKEN
When a user needs to replace a token for any reason (damaged, battery life, lost):
1. Order a replacement token from a Treasury Management Representative or any branch.

2. Upon receipt of the token, a Senior Administrator can contact the bank’s Fulfillment & Support Unit (Technical Support) at 777-3640 between 8:00 am and 6:00 pm Monday - Friday to enable token.
3. When logging in, ensure you have your user name and password and token.
NOTE | If a token is no longer required for a user, contact the bank’s Fulfillment & Support Unit (Technical Support) at 777-3640 between 8:00 and 6:00 Monday - Friday
CHANGE USER’S PIN OR PASSWORD
1. From the Administration tab, select the Change Employee radio button and click Submit
2. Click the name of the user.
3. Click Change Password from the Security panel. Enter a temporary password and click Submit
4. To reset a token user’s PIN, set the Token Status field under the Multifactor Authentication panel to Pending Enablement . Delete any data in the PIN field.
5. Click the Save icon at the top of the window, and supply the user with the temporary password.
CHANGE OTHER USER SETTINGS
1. From the Administration tab, select the Change Employee radio button and click Submit
2. Click the name of the user to review.
3. Click the Save icon at the top of the window.
REVIEW USER SETTINGS
1. From the Administration tab, select the Inquire Employee radio button and click Submit
2. Click the name of the user to review.
REVIEW USER ACCOUNT ACCESS
1. Click Employee Accounts under the Employee subheading from the Administration tab.
2. Click Submit on the Select Corporate Employee Accounts Criteria window.
3. Click the name of the user. Hyperlinked accounts in the list indicate the user has access to the account.
4. To remove access, click the Delete (X) icon to the right of the account row. Click Submit and Done to delete the access.
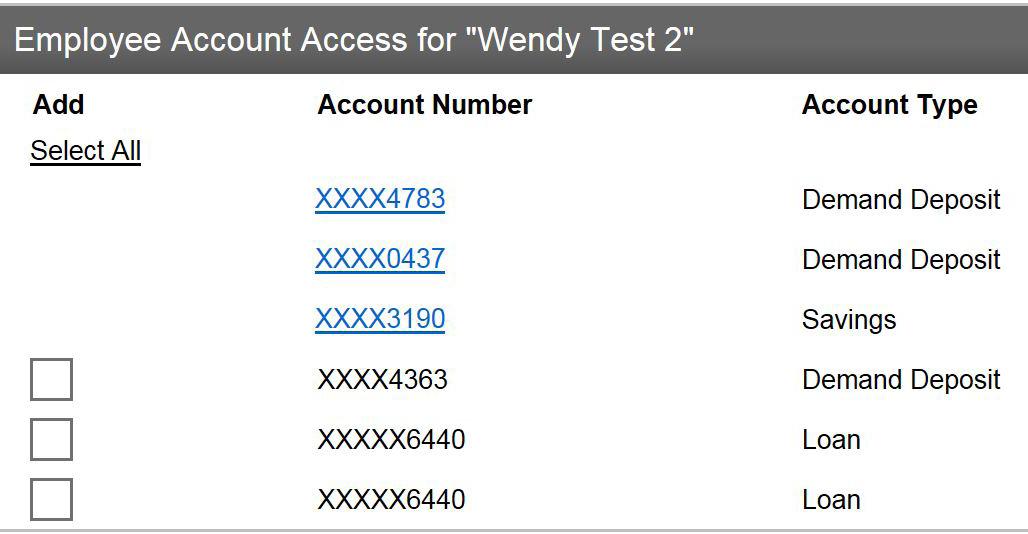
5. To add access, click the check box to the left of the account. Click Submit and Done to add the access.
6. To change access to specific functions, click the Change icon to the right of the account row. Make any changes to the account as needed. When finished, click the Save icon at the top of the screen, and close the popup window.
Fund Transfers
ADD OR CHANGE FUND TRANSFER ACCESS
You can manage fund transfer permissions by specifying which templates a user can access.
1. Click the Change Employee radio button from the Administration tab.
2. Select the All or Account Group radio button and click Submit .

3. Click the name of the user to change. Select Yes or No to set user permissions for each template. Click Submit to save the changes.
Stop Payments
Business Online Banking allows you to place stop payments easily and quickly. Depending on your permissions, you can search for existing stop payments and place new stop payments. The stop payment fee will be charged directly to the account on which the check being stopped is drawn.
Confirm Check Has Not Paid
Before placing a stop payment, review the account’s transaction history to confirm the check has not already paid.
1. Click the account you want to view from the Accounts tab.
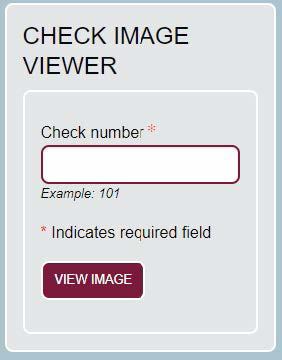
2. Enter the check number being stopped in the Check Image Viewer field.
3. Click View Image
a. If the check has already paid, an image of the check is displayed.
b. If the check has not paid, a message will display: Unable To Retrieve Document.
Place New Stop Payment
After confirming a check has not already been paid, you can place a stop payment on the check.
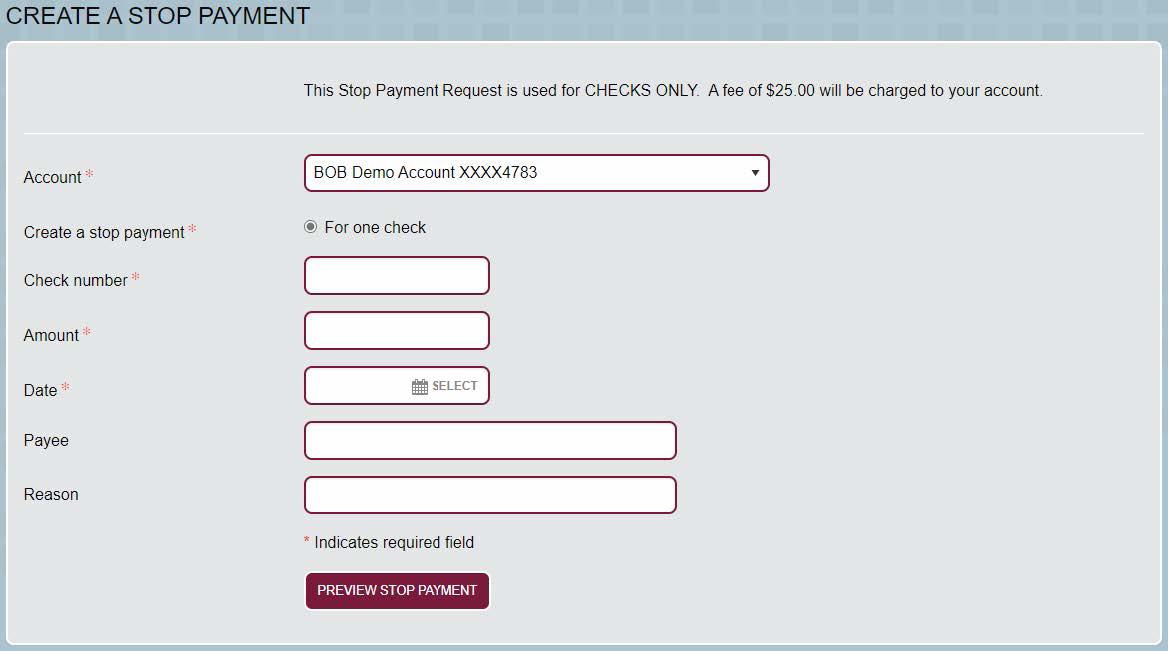
1. Click Checks & Deposits from the Home Page banner.
2. Complete the Create a Stop Payment fields.
3. Click Preview Stop Payment to review. Click Submit when finished.
View Stop Payments
Depending on your permissions, you can view existing stop payments.
1. Issued Stop Payments will display at the bottom of the Checks & Deposits screen.
2. Stop Payments can be viewed by account. Click the Show Details button to display more information on a stop payment.

Transfer Money
With Business Online Banking you can transfer funds from one account to another as long as you have sufficient permissions. Business Online Banking provides added security by allowing the System Administrator to determine if additional approval is needed before the transfer can be completed.
Initiate Fund Transfers
1. Click Payments & Transfers from the Home Page banner.
2. Complete the Create a Transfer screen. If you have multiple transfers to enter, click the Add to Batch button.
3. Click Submit (or Submit All if using batch transfer mode).


NOTE | If approval is required, a warning will appear on the confirmation screen indicating the “Transfer Is Pending Approval.” A user with Fund Transfer Approval permission will need to review and approve the transfer.
Approve Fund Transfers
If a transfer requires approval, the bank cannot complete the transfer until it is approved.
NOTE | To approve a fund transfer, you must have an Administrator or Supervisor security level and the Approve Transfers field under the Approval Options section of your profile must be set to Yes.
1. On the Home Page, scroll down until you see the Payments & Transfers heading.
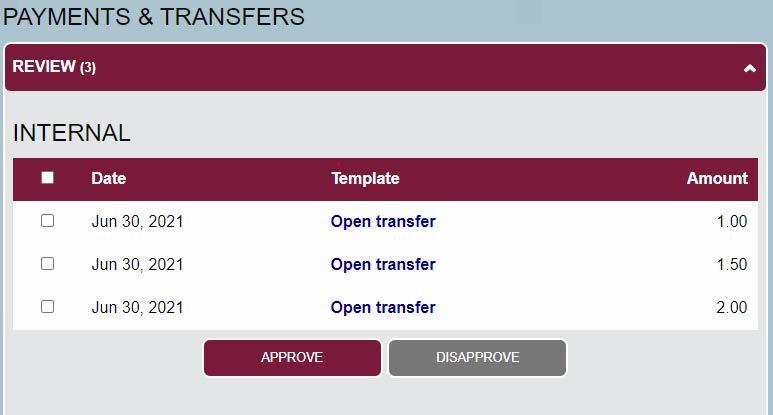
2. Click the checkbox next to a transfer to select it. Click the Approve button.
ONEpay
Business Online Banking with ONEpay offers the ability to send and receive ACH and wire payments securely online.
For more information on ONEpay, visit any branch or speak with your Treasury Management representative.
After the bank has activated the service, the System Administrator should contact Technical Support by phone at (907) 777-3640 or 1 (800) 856-4362 for assistance with first time setup. Technical support can also schedule training on ONEpay, if desired.
Launch ONEpay
1. L og in to Business Online Banking.
2. Click the Click here to access ONEpay link from the dashboard.
For help getting the most out of ONEpay’s features, click the ONEpay Quick Reference guide from the ONEpay dashboard or the Help link within ONEpay. Or call Technical Support at (907) 777-3640 or 1 (800) 856-4362
Bill Pay

Business Bill Pay lets you set up and pay bills quickly and securely through First National Bank Alaska. With Bill Pay you can pay anyone in the United States you would normally pay electronically or by check.
With Business Bill Pay you can:
• P ay several bills at once.
• V iew your pending and recent payments.
• Schedule automatic payments to pay your routine bills on schedule.
• Download your bill payment information for tracking in other financial software.
For more information on Business Bill Pay, visit any branch or speak with your Treasury Management representative.
Launch Bill Pay
1. Click Payments & Transfers from the Management Tools tab.
2. Click the Bill Pay tab.
3. Complete the Bill Pay Enrollment screen.
From the Payment Center, click the Help link to obtain specific information on how to create or delete payees, create payment schedules, view and manage pending payments, and more. You can also view the bank’s online video demonstration for a tutorial on the many great features of Business Bill Pay.

Positive Pay
Positive Pay helps you reduce your risk of fraud by ensuring only the checks you issue are paid.
Each time you issue checks, upload a file listing each check issued. First National will compare the checks posted to your account each night with the checks listed in your file uploads, paying only those that match. Items that do not match or that exceed your business’ threshold amount trigger an exception. When an exception occurs, you can choose whether the item should be paid or returned.
For information on Positive Pay, visit any branch or speak with your Treasury Management representative.
Launch Positive Pay
The Positive Pay Overview window provides access to the Positive Pay features you most frequently use from one screen.
1. From the Home Page, scroll down to the Positive Pay section and click the link to launch Positive Pay.
Review Exception Items
When an exception occurs, an email will be sent at 8:00 a.m. providing notification that action is needed. A second email will be sent around 10:00 a.m. if there are any unworked exceptions.
NOTE | The deadline to handle exceptions is 12:00 p.m. Any exception not reviewed will be paid or returned unpaid in accordance with the agreement for the service. A fee for each unworked item will be assessed.
1. Click Review from the Management Tools tab.
2. Select the account to view in the Account dropdown and click Submit .
3. Review the exception items listed and approve or return the items.
a. Click the Item number link (transaction number) to display an image of the item.

b. Click the Action dropdown list to approve or return an individual item. If return is selected, complete the Return Reason field by selecting the appropriate reason from the dropdown list.
c. Click Process Items when the review is complete.
4. If a Next button is displayed, click it and repeat the previous step as needed. Action must be taken on each page displayed.
Review Issued Item Status
1. Click Overview from the Management Tools tab.
2. Enter the Check Number range or other filters in the Item Search panel.
3. Select All Items from the Status dropdown. Click Search .
Import Issued Item Files
Issued Item files can be uploaded directly from the Business Online Banking dashboard.
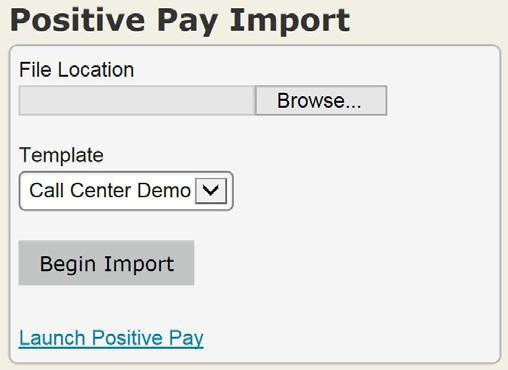
1. Click Browse in the Positive Pay Import panel and locate the file to upload.
2. Select the appropriate template from the dropdown and click Begin Import.
Add an Issued Item
Individual items can be added to Business Online Banking without uploading a file.
1. Click Overview from the Management Tools tab.
2. Complete the Add an Item panel. The Reference Number field is optional.
3. Click the Add Item button.
Edit an Imported Item

After uploading a file, changes to items within the file are completed using the Items option. Uploading the same file multiple times will cause exceptions .
1. Click Overview from the Management Tools tab.
2. Enter the Check Number range or other filters in the Item Search panel and select the appropriate Status. Click Search
3. Click the Edit icon from the Items List. Change the information as needed. Click Save Item .

NOTE | Changing the Issue Type to Item Stop does not place a stop payment on the item. Only use this selection when a Stop Payment has been placed on the item with the bank. Refer to the Stop Payments section for instructions on placing a stop payment. Similarly, change the Issue Type to Void when the actual check was voided and was not delivered to the payee.
Delete an Imported Item
1. Click Overview from the Management Tools tab.
2. Enter the Check Number range or other filters in the Item Search panel and select the appropriate Status. Click Search
3. Click the Delete ( X ) icon from the Items List. Click OK when asked to confirm the deletion.
Need more support?
We’re here to help. Visit FNBAlaska.com/BOBSupport or speak with a local Customer Service expert. 907-777-4362 (Anchorage) 800-856-4362 (Toll Free) M-F: 8am-6pm Sa: 9am-4pm
Security Best Practices
The following is a list of best practices which can help improve internal security. These suggestions point out areas where user control and program settings can be leveraged to attain maximum protection.
Security
All user access levels should be reviewed at least annually to ensure terminated employees have been removed from the system, and current user access levels remain appropriate.
General Password Standards
1. All users should create a secure password. A secure password:
a. Consists of at least eight characters. Longer passwords are harder to guess.
b. Consists of characters from at least three of the four character types:
• Upper case: [A B C D E F]
• Lower case: [a b c d e f]
• Numbers: [1 2 3 4 5 6]
• Special characters, punctuation: [! @ # % & *]
c. Should not contain any of the following:
• Dictionary words
• Names, places, proper nouns, phone numbers, important dates
• Simple pattern of letters on a keyboard
• Any of the above reversed or linked together in a chain, or with numbers added to the beginning or end
d. Is not easily guessed
e. Is not related to the user’s job or personal life
2. A password should never be written down. There are also several computer programs designed to securely store passwords.
3. Passwords should never be shared with other employees.
4. A different password should be used for each separate application or process to which the employee has access.
5. Passwords should be changed every 60 days.
User Setup Best Practices:
1. User access settings should be limited to only those functions needed to perform assigned duties.
2. Dollar limits for wire transfers and ACH transactions should be set so that individual users are granted a level consistent with their job duties and the overall limited of the entire organization.
3. Monetary transactions such as wire transfers and ACH transactions should require the approval of a second user within your organization before being transmitted to the bank for further processing.
4. Creation or modification of a user account to do higher risk transactions should require dual custody authentication.
Miscellaneous Operations:
1. Ensure System Administrators fill in the contact data fields, including security questions and answers, to enable First National phone support.
2. Assign at least two System Administrators in order to have a backup person in case the other is not available. Ensure staff is adequate to continue operations if the primary employees are not available.
3. Users should not leave workstations unattended while logged into an application. If you must leave, ensure your workstation is locked or that a password activated screensaver is enabled.
4. Ensure appropriate contingency plans are in place including backup and recovery procedures.
5. Conduct periodic reviews of audit logs to identify unauthorized transactions, user account creations, etc., ensuring proper segregation of duties.
6. Maintain current operating systems, anti-virus software and anti-malware applications with updates and patches applied timely.
