VOL. 18 NO. 1
IN THIS ISSUE
Marleen Peumans, David Geštakovski, Jacopo Mattiussi and Kostas Karagiannopoulos
Injection moulding technique with injectable composites: quick fix or long-lasting solution?
Robert E. Grover, Kenneth S. Serota
Treatment of compromised teeth: The usual suspects
Surina Sehgal
Medically compromised and vulnerable mouths
Clarence Tam
Anterior case with Clearfil Majesty™ ES-2 Premium

Wallid Boujemaa
Simple chords of shades for harmonious restorations
Meenakshi Lall
Management of stained fluorotic teeth
Vladimir S Todorovic, Inus Snyman, Andre W van Zyl
Masterclass in Implant Dentistry
Lateral window Sinus Floor Elevation technique
Linda Greenwall
Composite smile makeover: A case study
Rachel Derby and Julia Glancey
The process of the dentist and technician. A denture story


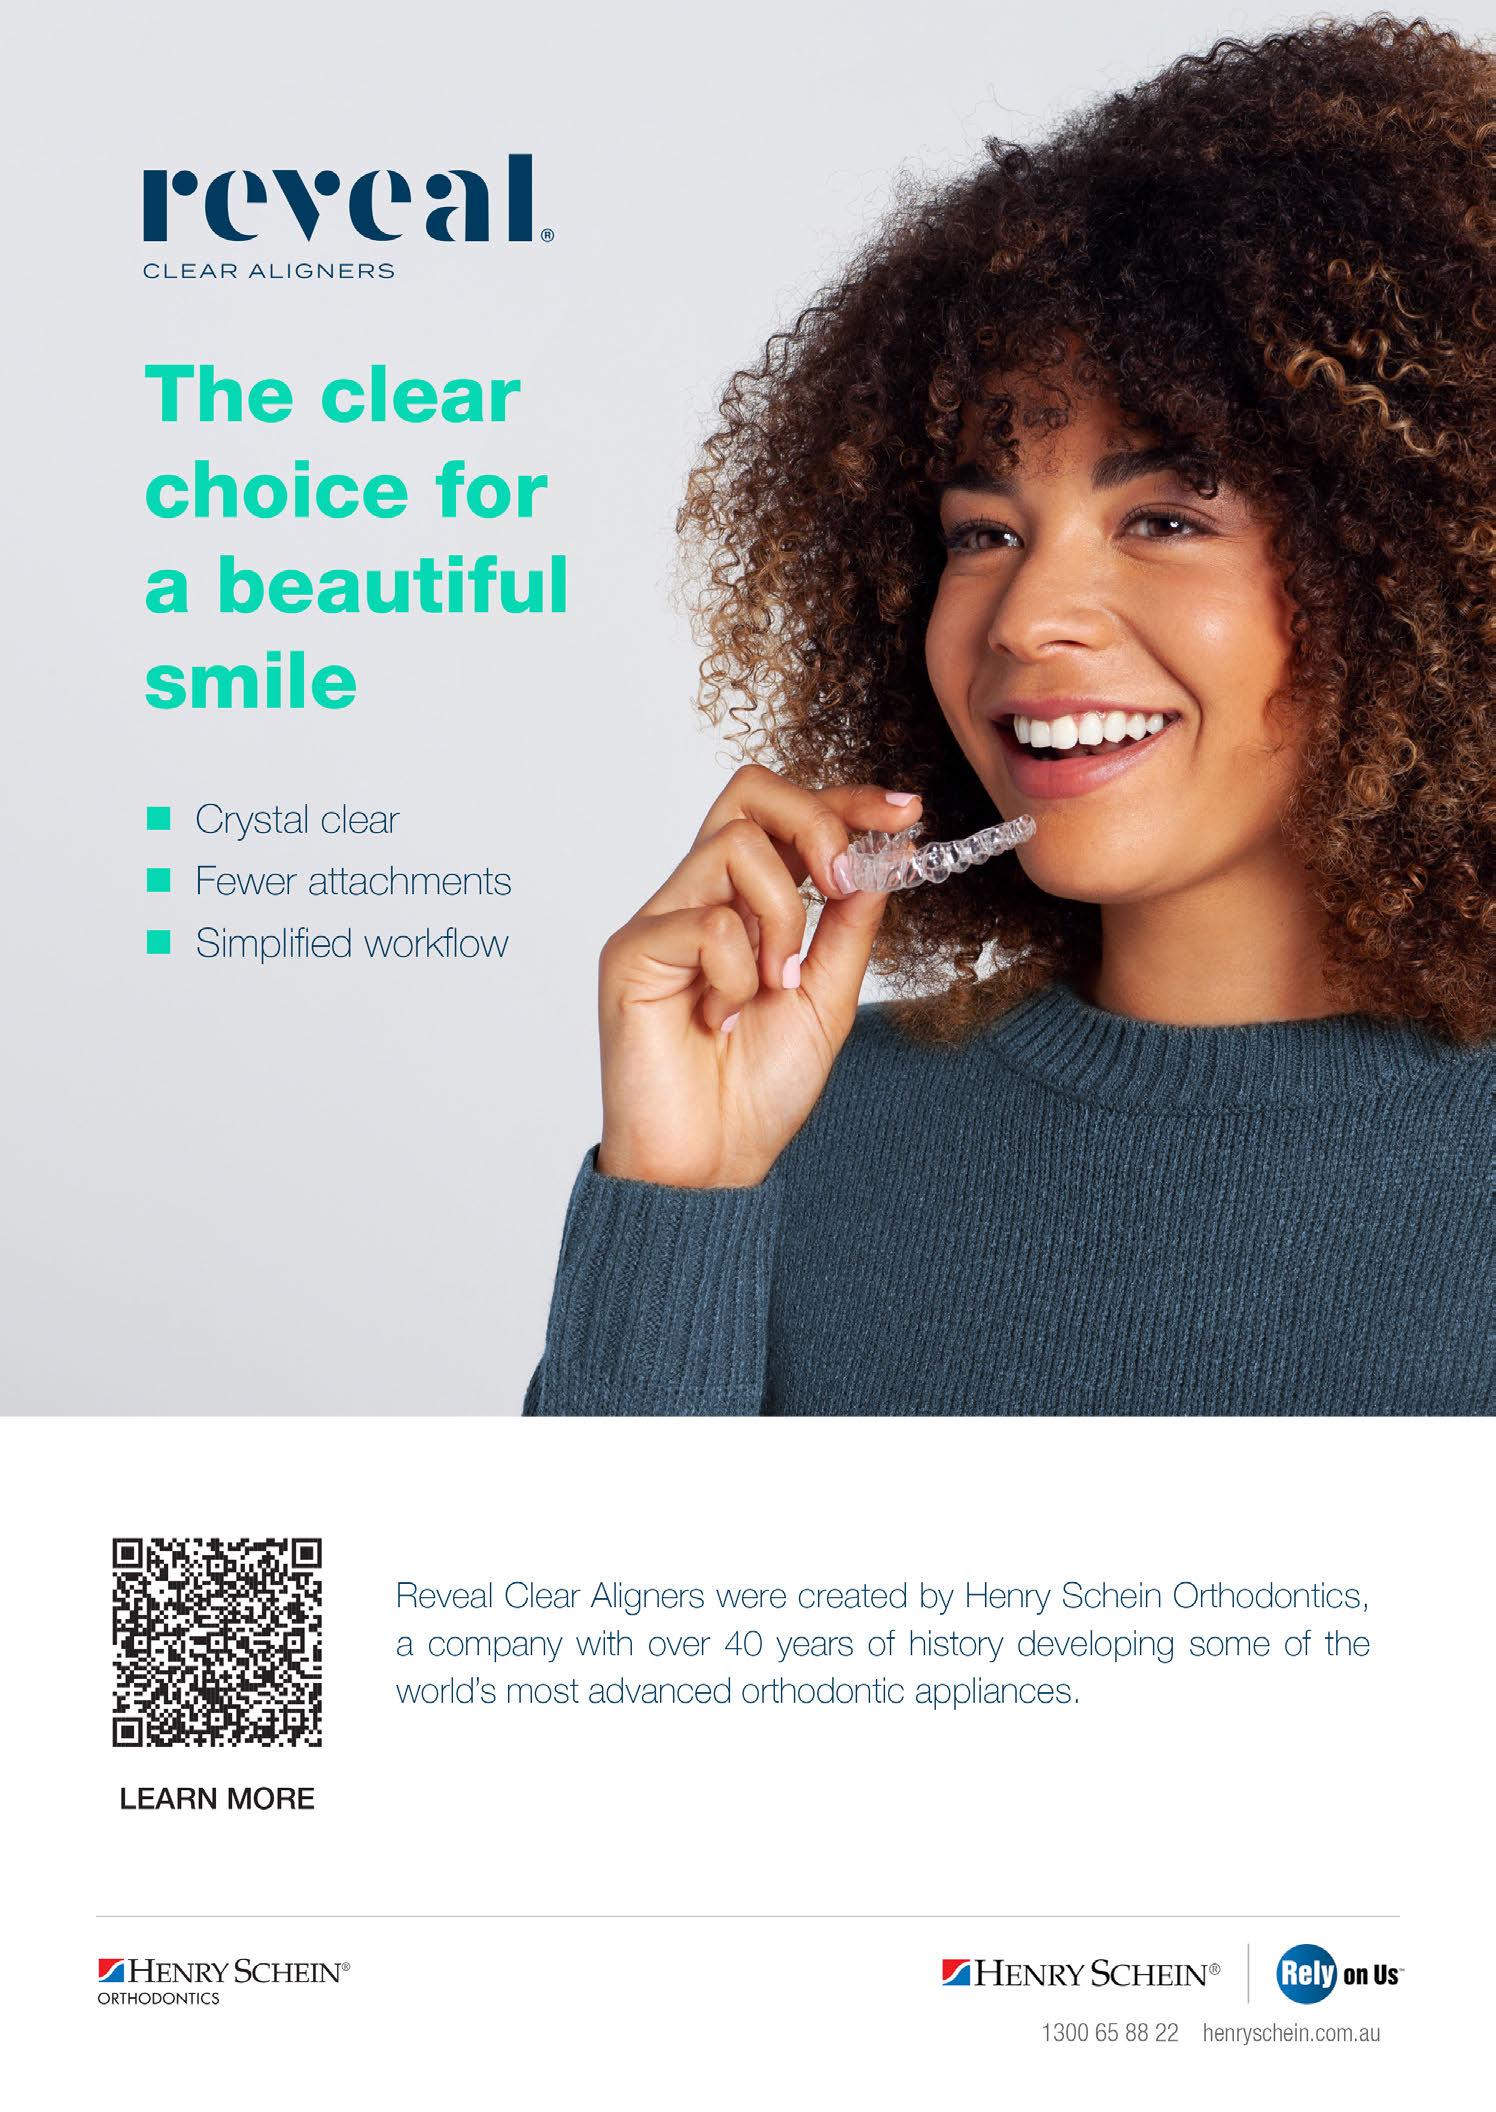
The clear choice for a beautiful smile
henryschein.com.au
04 Clinical Injection moulding technique with injectable composites: quick fix or long-lasting solution?


Marleen Peumans, David Geštakovski, Jacopo Mattiussi and Kostas Karagiannopoulos
12 Clinical
Treatment of compromised teeth: The usual suspects

Robert E. Grover, Kenneth S. Serota

20 Clinical Medically compromised and vulnerable mouths

Surina Sehgal
24 User Report
Anterior case with Clearfil Majesty™ ES-2 Premium
Clarence Tam
28 Clinical Simple chords of shades for harmonious restorations

Wallid Boujemaa
36 Clinical Management of stained fluorotic teeth
Meenakshi Lall
44 Masterclass in Implant Dentistry


Lateral window Sinus Floor Elevation technique
Vladimir S Todorovic, Inus Snyman, Andre W van Zyl
50 Clinical Composite smile makeover: A case study

Linda Greenwall
56 Clinical
The process of the dentist and technician. A denture story
Rachel Derby and Julia Glancey
62 Products
28 50 INTERNATIONAL DENTISTRY AUSTRALASIAN EDITION VOL. 18, NO. 1 1 Contents Volume 18 No. 1 WEBINAR WEEK MONDAY 19 JUNE - THURSDAY 22 JUNE 1 CPD POINT PER WEBINAR READ MORE 4 44
Vinnies CEO Sleepout


The Vinnies CEO Sleepout takes place on a chilly winter night, known as one of the longest and coldest nights of the year. It is an annual event where numerous CEOs, business owners, community leaders, and government officials come together to spend the night outdoors. The purpose of this event is to show support for the homeless individuals and those at risk of homelessness in Australia.
While a single night may seem brief, its impact can be significant. Hence, Henry Schein’s executive team is enthusiastically joining this year’s sleepout. They will be sleeping outside alongside other participants, immersing themselves in an enlightening experience aimed at raising awareness and shedding light on the harsh realities faced by the homeless population.
In 2022, Mike Covey Henry Schein’s VP & Managing Director Dental ANZ participated in this event and was able to raise over $9,000 towards the cause. This money went towards providing emergency accommodation for families in crisis, keeping power on throughout the winter, and relocating a person sleeping rough to accommodation services.
The hope for this year is that we are again able to provide funds required to support those in need, whilst also raising awareness.
Vol. 18 No. 1
ISSN 2071-7962
PUBLISHING EDITOR
Ursula Jenkins
EDITOR
Dr Andre W van Zyl
ASSOCIATE EDITORS
Prof Cecilia Goracci
Prof Simone Grandini
EDITOR-IN-CHIEF EMERITUS
Prof Dr Marco Ferrari
EDITORIAL REVIEW BOARD
Prof Paul V Abbott
Dr Marius Bredell
Prof Kurt-W Bütow
Prof Ji-hua Chen
Prof Ricardo Marins de Carvalho
Prof Carel L Davidson
Prof Massimo De Sanctis
Dr Carlo Ercoli
Prof Roberto Giorgetti
Dr Johan Hartshorne
Dr Patrick J Henry
Prof Dr Reinhard Hickel
Dr Sascha A Jovanovic
Dr Gerard Kugel
Prof Ian Meyers
Prof Maria Fidela de Lima Navarro
Prof Hien Ngo
Dr Hani Ounsi
Prof Antonella Polimeni
Prof Eric Reynolds
Prof Andre P Saadoun
Prof Errol Stein
Prof Lawrence Stephen
Prof Zrinka Tarle
Prof Franklin R Tay
Prof Manuel Toledano
Dr Bernard Touati
Prof Peet van der Vyver
Prof Laurence Walsh
Prof Fernando Zarone
International Dentistry - Australasian Edition is published by Modern Dentistry Media CC, 15 Martinique, Calderwood Rd, Johannesburg 2062, South Africa
Tel: +27 11 702-3195 • Fax: +27 (0)86-568-1116
E-mail: dentsa@iafrica.com


www.moderndentistrymedia.com
© COPYRIGHT. All rights reserved.
No editorial matter published in International Dentistry - Australasian Edition may be reproduced in any form or language without the written permission of the publishers. While every effort is made to ensure accurate reproduction, the authors, publishers and their employees or agents shall not be held responsible or in any way liable for errors, omissions or inaccuracies in the publication whether arising from negligence or otherwise or for any consequence arising therefrom.
Published in association with
2 INTERNATIONAL DENTISTRY AUSTRALASIAN EDITION VOL. 18, NO. 1
Mike Covey at the CEO Sleepout.

Injection moulding technique with injectable composites: quick fix or long-lasting solution?
Introduction
1 Professor Marleen Peumans (Belgium) graduated at the KUL (University of Leuven, Belgium) and is specialised in adhesive dentistry. Currently, she is head of the department of restorative dentistry of the same university.
2 Dr David Geštakovski (Croatia) graduated at University of Zagreb. After graduation he moved on short period of time to work in Dublin (Ireland). Nowadays he works in private dental office in Zagreb. He is member of Croatian Academy of Aesthetic Dental Medicine and European Society of Cosmetic Dentistry.
3 Dr Jacopo Mattiussi (Italy) graduated in Dentistry and Dental Prosthetics with honours at the University of Genoa. Currently, he is working in several dental practices in the conservative, prosthetic and endodontic field with a particular passion and attention for aesthetic and adhesive dentistry.
4 Dr Kostas Karagiannopoulos (United Kingdom) graduated at the Queen Mary University, whereafter he specialized in prosthodontics in King’s College (London, UK). Passionate about education and comprehensive dentistry, he is currently offering patient care in two specialist clinics near London and teaching training specialists at King’s College.
The injection moulding technique with injectable composites, which became known to dentists worldwide due to the work of Dr Douglas Terry, has become increasingly popular in the latest years.


It is a relatively simple procedure that makes it possible to obtain a predicable end result, even in complex situations, because the morphology can be determined in advance.
It is in part because of the development of suitable, high quality materials, such as G-ænial Universal Injectable and Exaclear that injection moulding is a reliable procedure. G-ænial Universal Injectable has the ideal consistency and mechanical properties and thus it is widely used for this technique.
Combined with the highly transparent Exaclear silicone, the technique has become approachable and easy to conduct. In the following overview, it is shown how the restorations that were made with this technique can stand the test of time.
Because of its high wear resistance, G-ænial Universal Injectable can also be used to restore occlusal surfaces. This is particularly useful in case of abrasion/erosions in the molar area and has the advantage that it can be used in a minimally invasive way. In these cases, careful planning is imperative to restore the function in a correct manner. Injection moulding is a valuable method for a correct restoration of a physiologic
CLINICAL 4 INTERNATIONAL DENTISTRY AUSTRALASIAN EDITION VOL.18, NO. 1
Marleen Peumans,1 David Geštakovski,2 Jacopo Mattiussi3 and Kostas Karagiannopoulos4
Case 1: Restored occlusion after severe general wear by Professor Marleen Peumans, Belgium
Figure 1A: Worn occlusal surfaces and maxillary diastema before treatment. The colour of the teeth, discloses the loss of surface enamel, with the colour of the dentine clearly showing through.
occlusion with the aid of digital modelling techniques.
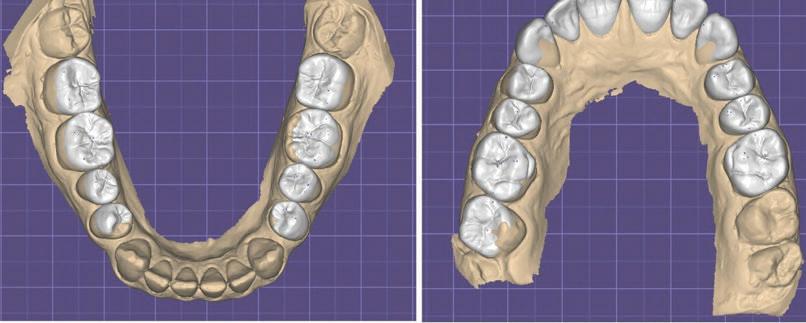
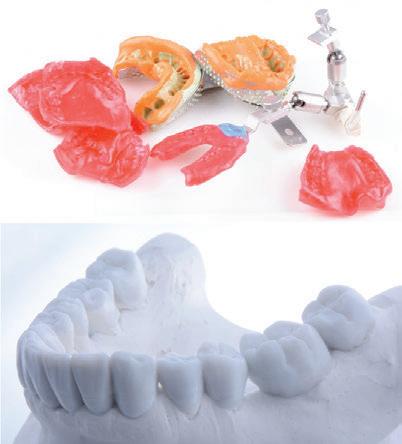
Two models were printed: one with every second tooth restored and another one with all teeth restored. Based on those, two transparent silicon indices were made (Exaclear, GC).


Working with two silicone indices has the advantage that
the intraoral seating is more stable, there is greater control of excess material on adjacent teeth and a better emergence profile can be created.
Four models were made in total (two per jaw). One year after treatment, the surfaces still look smooth and shiny, without obvious occlusal wear facets.

CLINICAL INTERNATIONAL DENTISTRY AUSTRALASIAN EDITION VOL. 18, NO. 1 5
Figure 1B: Computer-aided design of the restored occlusion. The diastemata between the maxillary incisors were restored as well.
Figure 1C: The two 3D-printed models of the maxilla; in model 1, every other tooth was restored, while in model 2, all teeth were restored.
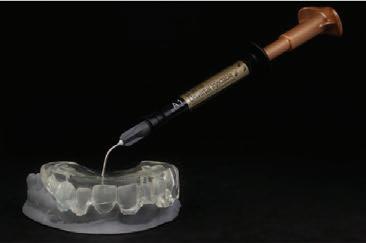
Fig. 1D: Injection moulding with G-ænial Universal Injectable in a transparent mould.
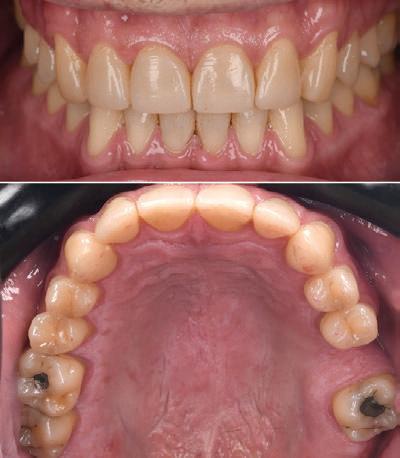
Figure 1E: Restored dentition after treatment.
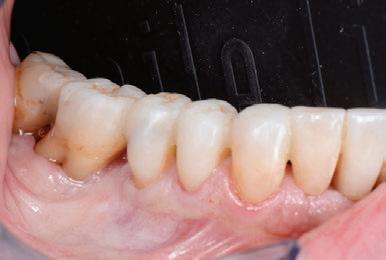
Figure 1F: Close-up of the fourth quadrant. Top: before treatment; Middle: at baseline (after restoration); Bottom: one year after treatment.
In the presented case, six composite veneers were made on the upper incisors and canines with the injectable moulding technique.


After facial analysis, teeth were scanned and a digital ‘wax up’ was made.
Based on the wax up, an intraoral mock-up was done to check guidance, functional parameters, aesthetics, and phonics. To get long lasting results, function needs to be planned in a correct way.
Therefore, canines were included to obtain canine guidance in order to avoid potentially harmful contacts and forces on incisors, which may cause chipping of the
restorations. Because of the low lip line the patient’s gingiva was not visible in the forced smile so the asymmetry in the soft tissue around the central incisors was left as before.
In this case, the silicone indices (Exaclear) were again based on two different 3D-printed models, for the same reasons as mentioned in case 1 (vide supra).
Teeth were cleaned and etched, retraction cords were packed in the sulci to prevent crevicular fluid from flowing in field of work and to avoid subgingival flow of the injectable composite.
Adjacent teeth were isolated with Teflon tape and after the adhesive protocol (G-Premio BOND, GC), G-aenial
Universal Injectable (GC) was injected and polymerised directly onto the teeth.
A1 shade was used for the incisors, while the canines were done with A2. For finishing and polishing, a scalpel no. 12, Epitex strips (GC), a fine diamond polishing bur and silicone spirals were used.
Two years later, the restorations maintained high aesthetic quality, without chipping or marginal discolorations.
The beauty of this technique is its predictability and possibility to achieve great symmetry and marvellous primary, secondary, and tertiary morphology.
PEUMANS ET AL 6 INTERNATIONAL DENTISTRY AUSTRALASIAN EDITION VOL.18, NO. 1
Figure 2A: Initial situation.
Case 2: Cost-effective aesthetic rehabilitation by Dr David Geštakovski, Croatia
Figure 2B: Checking the size of the injection holes in the silicon index (EXACLEAR, GC) on the first 3D-printed model.
Figure 2C: Result directly after treatment, showing nice shape and morphology. The gingival line was not modified since it was not visible during smiling.
2A
Figure 2D: Result after two years. The shape of the restorations was maintained, without chipping or marginal staining.
2B

Case 3: Interceptive restorative treatment of a full mandibular arch by Dr. Jacopo Mattiussi, Italy
In this case, G-ænial Universal Injectable was used to offer the patient a long-term temporary solution that did not hinder a more complex full-mouth rehabilitation in the future because the economic situation of the patient did not allow
such treatment at the moment.
In contrast to the previous cases, no CAD/CAM technique was used to make the design, but a traditional wax-up and bite registration were done.


Initial situation. The upper jaw was restored three years ago by means of a voluminous zirconia full-arch restoration of which the patient was not very satified. The lower jaw was highly chromatic in comparison, with a considerable amount of tartar, extensive destruction of the hard tissues and periodontal attachment loss.
The wax-up was made with the aim of increasing the DVO just enough to regularise the occlusal planes and curves, with obvious limitations dictated by the morphology of the upper maxillary rehabilitation.

The vertical dimension was slightly increased and occlusal planes and curves were regularised as much as the preexisting situation allowed it.
Here, only one clear silicone key was used to restore the entire lower arch was restored in a single session. The
lower are was restored per sextant. Old restorations were removed, cavity edges rounded and their surfaces sandblasted. The enamel was selectively etched before application of G-Premio Bond(GC).
Figure
result impresses in terms of aesthetics and the patient was very satisfied. It was ensured that the patient could clean all interdental spaces and at follow-up, healthy gingival tissues could be seen.

PEUMANS ET AL 8 INTERNATIONAL DENTISTRY AUSTRALASIAN EDITION VOL.18, NO. 1
Figure 3B: Impression taking and facebow registration.
2B
Figure 3A:
3C: The
Figure 3D: Images taken two and a half months after treatment. Harmonised aesthetics, a normalised vertical dimension and excellent health of the soft tissues are evident from the observation.
Case 4: Treatment of localised wear of anterior teeth by Dr Kostas Karagiannopoulos, United Kingdom


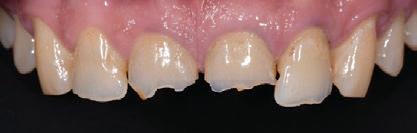
A 45-year-old man presented complaining of the appearance of his front teeth. Severe localised tooth surface loss of multifactorial origin led to short clinical crowns.
Worn teeth in occlusion due to dentoalveolar compensation have the restorative disadvantage of lack of interocclusal space.
It was decided to proceed with additive composite
restorations to restore the affected teeth using the Dahl concept: this is a method of treating the localised wear of anterior teeth, without having to treat the posterior teeth. The latter are discluded and allowed to re-establish itself over time.


All primary disease was controlled prior to the restorative phase, including the intrinsic acid erosion.

PEUMANS ET AL INTERNATIONAL DENTISTRY AUSTRALASIAN EDITION VOL. 18, NO. 1 9
Figure 4D: At the 20-month follow-up, the occlusion was fully re-established. The high gloss retention of the six direct composite restorations was noteworthy, eliminating the need for repolishing.
Figure 4C: Immediate treatment result. The ability to replicate anatomic details and microtexture on the facial surface with the injection moulding technique combined with a fairly rigid stent exceeds that of all other direct composite techniques. Note the slight disclusion in the posterior area.
Figure 4B: Diagnostic wax-up on printed models.
Figure 4A: Pre-operative photographs.
Alternate technique
The alternate tooth technique was used to carry out the injection moulding technique. Once proximal and gingival excess was removed on all six restorations there was minimal finishing as the anatomy was wax-up driven and not freehand.
The final result exhibited good surface texture and lustre whilst anterior guidance was maintained.
At a follow-up appointment after 20 months, no chips, fractures or debondings were observed. The patient is a heavy smoker and sees the hygienist regularly.
Occlusal contacts were fully re-established on the posterior teeth after completion of the Dahl movements and the patient is now wearing an occlusal appliance at nights. Of note is the high gloss retention of the six direct composite restorations.
No further polishing was done on the facial surfaces during that 20 month period.
Conclusion
Injection moulding has a wide range of indications, from anterior to posterior, from interceptive to final restorations, for aesthetic as well as functional rehabilitations, without excessive requirements in terms of clinical skills.
The excellent strength and gloss retention of G-ænial Universal Injectable contribute to a maximum longevity for this type of treatment.
References:
1. Terry, DA. Restoring with Flowables. Quintessenz Publishing. 1st Edition 2017.
2. Terry DA, Powers JM. A predictable resin composite injection technique, Part I. Dent Today. 2014 Apr;33(4):96, 98-101.
3. Terry DA, Powers JM, Mehta D, Babu V. A predictable resin composite injection technique, part 2. Dent Today. 2014 Aug;33(8):12.
Reprinted with permission from GC Europe
PEUMANS ET AL 10 INTERNATIONAL DENTISTRY AUSTRALASIAN EDITION VOL.18, NO. 1
6b

Treatment of compromised teeth: The usual suspects
Introduction
The unceasing innovations and iterations in dental technologies and materials has taken the sophistication of treatment modalities to an historic level. However, when we are focused on the newness, the thrill of the outcome, we fail to pay attention to the purpose of the activity. Case in point; dental implants were initially considered the gold standard for compromised tooth replacement despite reports that endodontic therapies ensured functionality over time to be in the range of 91 percent to 97 percent.1 The newness became tarnished by reports that peri-implantitis and peri-mucositis showed a mean weighted prevalence rate of 43 percent across Europe and 22 percent across South and North America.2 A myriad of factors influences the initiation and progression of the disease, unfortunately, the treatment of peri-implant diseases is at best favorable in the short term with a high rate of persistent inflammation and recurrence.3 A study by Guarnieri et al4 showed that in chronic periodontal patients, active periodontal therapy followed by long-term regular periodontal maintenance was successful in keeping the majority of periodontally compromised teeth. In the same patients, a higher tendency for implant loss than tooth loss was found. This series of case reports will provide decision guide categories for best practices which facilitate retention of compromised teeth using endodontic therapies.
Case Report One – Cone Beam Computed Tomography (CBCT) in endodontics
Perhaps the most important advantage of CBCT in endodontics is that it demonstrates anatomic features in 3D that intraoral, panoramic, and cephalometric images cannot. In addition, because reconstruction of CBCT data is performed natively using a personal computer, data can be reoriented in their true spatial relationships.5
2 Kenneth Serota, DDS, MMSc is an ambassador of the SlowDentistry Foundation, the Digital Dentistry Society (Canada) and the CleanImplant Foundation. He has practiced endodontics in Ontario for over 35 years.
In October of 2015, a 55-year-old male patient, previously seen for treatment in the office, self-referred for a second opinion regarding the recommended removal of a suspected fractured tooth in the maxillary right quadrant. He reported that a soft swelling had become apparent over the past week. Clinical examination noted fluctuant swelling between teeth #s 1.5 and 1.4, and a 12mm probe defect was detected along the mesial-buccal line angle of tooth #1.5.
The patient provided a periapical radiograph showing a mesial-proximal peri-
CLINICAL 12 INTERNATIONAL DENTISTRY AUSTRALASIAN EDITION VOL.18, NO. 1
Robert E. Grover1, Kenneth S. Serota2
1 Robert Grover, DDS, is an Assistant Professor in Endodontics at the University of Virginia Department of Dentistry and the Virginia Commonwealth University School of Dentistry. He maintains a private practice in Endodontics in Staunton, Virginia.
sagittal slice of the CBCT volume shows the lateral lesion extending to the alveolar crest. Fig 1c. The axial slice of the CBCT volume shows the extent of the rarefaction adjacent to the mesial aspect of the root and the presence of an untreated palatal canal. Fig 1d. Selective treatment of the palatal canal was performed. Calcium hydroxide was inserted in the canal space. Fig 1e. The extrusion of the interim Ca(OH)2 medicament through the sulcular area of tooth #1.5 is evident. Fig 1f. A lateral branch of the root canal space containing the obturating medium is shown exiting into the interface of the middle and apical third of the root. Fig 1g. A periapical radiograph taken four years after treatment shows osseous regeneration and the reformation of the periodontal ligament. Fig Ih. The coronal slice of the CBCT volume shows the pre-operative PRRL. Fig 1i. The coronal slice of the CBCT volume taken four years after treatment shows the resolution of the PRRL
radicular radiolucency [PRRL] associated with tooth #1.5. (Fig. 1a) The sagittal slice of the CBCT volume [Carestream CS 9000, Carestream Dental, GA] shows the extent of the lesion. (Fig. 1b) The previous root canal therapy had detected and treated the buccal canal only. The axial slice shows an untreated palatal canal. (Fig. 1d) A fiber post placed in the buccal canal was used to retain the core. The patient was advised of the misdirected anchoring pin extending into the periodontal ligament [PDL]. With the patient’s consent, it was decided to selectively treat the palatal canal.
After an interim six-week period of calcium hydroxide therapy [Ca(OH)2, UltraCal™ XS, UPI, S. Jordan UT] (Figs. 1d, 1e),6 the root canal space was obturated using a warm vertical condensation technique. 7 The obturation media was expressed into a lateral branching portal of exit. (Fig. 1f) A four-year follow-up shows resolution of the lateral lesion. (Figs. 1g, 1h, i) The initial presumption of a fractured root was proven false suggesting that illusory conditions based on insufficient data acquisition are unreliable. The use of CBCT is an imperative in endodontic procedures of any kind provided ALORA principles are followed.

Case Report Two – Root amputation (Perio-Endo Lesion)
Root resective therapy is a treatment option for molars with advanced furcation involvement. In a study by Derks et al, mandibular molars after root resection showed a survival probability of almost 80% even 20 years after root resection.8
In October of 1998, a 39-year-old-male patient presented to the office complaining of “gum tenderness” in the mandibular right quadrant. Extensive bone loss was noted inter-proximally between teeth #’s 4.7 and 4.6, however, the periodontal status of the dentition in general was within normal limits. Pulp sensibility testing of the teeth in the mandibular right quadrant identified the pulp of tooth #4.6 to be necrotic. (Fig. 2a) It was explained to the patient that successful treatment of perio-endo lesions was in general questionable/unfavourable, dependent on the severity of bone loss, root trunk length, degree of root separation, the curvature of the root to be resected, the ability to eradicate the osseous defect, pulpal status, and the restorative and
With the patient’s consent,
root of tooth #4.6
oral hygiene procedures required.
CLINICAL INTERNATIONAL DENTISTRY AUSTRALASIAN EDITION VOL. 18, NO. 1 13
the distal
was
Figure1a. An area of peri-radicular rarefaction is evident along the mesial proximal aspect of tooth #1.5. Previous root canal therapy, a pin-retained post and core supporting a zirconia crown are noted. Fig 1b. The
resected and the overlying crown portion retained. (Fig. 2b) At some point after the amputation procedure, the referring dentist [RD] splinted teeth #’s 4.7 and 4.6 with a composite/ Ribbond bridge. Twenty-two years after the initial procedure, osseous regeneration and cortication in the furcal region are evident between teeth #’s 4.7 and 4.6. (Fig. 2c)

Advancements in strategies to maintain compromised teeth in concert with a greater understanding of risk factors associated with dental implants invite a reassessment of the benefits of strategic extraction of a tooth with a questionable prognosis or of limited strategic value.9 With the use of hard and soft tissue augmentation procedures, PRF (plasma rich fibrin), minimally invasive flap design and suturing techniques
in conjunction with surgical operating microscopes, it is unreasonable to sacrifice a tooth for an implant when this venerable treatment option shows favorable prognosis and success rates.10
Case Report Three – Resorptive Defect
Progressive internal resorption or those instances with perforations of the root can be distinguished from external resorption by varied radiographic techniques. In teeth with internal resorption, the radiolucent lesion “moves” with the canal when the radiographs are taken at different angles, while in external resorption the radiolucent lesion “moves” outside of the canal.11,12


In March of 1999, a 47-year-old female patient presented to the office with facial swelling; tooth #1.1 was tender to percussion. A periapical radiograph (Fig. 3a) of the maxillary anterior sextent showed large Class III and IV restorations. Tooth #1.1 exhibited peri-apical rarefaction. Tooth #2.1 showed internal resorption at the mid-root level. The patient reported that tooth #2.1 had been traumatized some 35 years prior. In the absence of CBCT imaging, it was assumed that the resorption perforated the facial aspect of the root and disrupted the overlying cortical bone.
Pulpal sensibility testing of the teeth in the anterior determined that tooth #1.1 was pulpless. The tooth was

GROVER / SEROTA
14 INTERNATIONAL DENTISTRY AUSTRALASIAN EDITION VOL.18, NO. 1
Fig 2a: Loss of bone between teeth #’s 4.7 and 4.6 and the loss of the PDL around the apical region of the mesial and distal root are evident. Fig 2b: The distal root has been resected; the degree of bone loss appears to have increased. Fig 2c: A 22-year follow-up shows regeneration of the lost interproximal bone and cortication of the alveolar crest.

has been
MTA to
level of the resorptive defect as it demonstrates minimal root discolouration. Were the tooth be treated today, the choice of obturation material would be Endosequence BC putty [Brassler USA, Savannah, GA]. Fig. 3c. The PRRL associated with tooth #1.1 has resolved. The resorptive defect has been reduced in size, radiolucent deposits are evident within the resorptive crypt. Fig. 3d. The sagittal slice of the CBCT volume shows an intact cortical plate. The presence of calcified deposits is evident in the residual resorptive defect which has been significantly reduced.
endodontically treated and obturated using a warm vertical condensation technique. Tooth #2.1 was instrumented to the incisal level of the resorptive defect, and the canal sealed with white MTA.13 Figs 3a & 3b show the pre-operative and post-operative radiographs taken in 1999. (Figs. 3c & 3d) show the healing after 21 years. Currently, there is a trend towards the use of an injectable platelet-rich fibrin (i-PRF) regenerative approach to resolve internal resorptive defects that shows great potential for long-term healing.14

Case Report Four – Cracked Tooth
In a study of 2086 cracked teeth by Krell and Caplan,15 the most common teeth demonstrating fracture were mandibular second molars (36%) followed by mandibular first molars (27%) and maxillary first molars (18%). There were no statistically significant differences in success based on pulpal diagnosis (irreversible pulpitis, 85%; necrosis, 80%; previously treated, 74%), patients’ age, sex, year of treatment, tooth type, restorative material, or number of restored surfaces at the time of examination.
In July of 2014, a 45-year-old female patient presented to the office with a chief complaint of swelling in the distal papilla of tooth #1.4 for a period of 10 days. Clinical examination
revealed an occlusal amalgam restoration with a probeable seam in the distal marginal ridge [DMR]. The probe depths along the distal-buccal and lingual line angles of the tooth demonstrated an infrabony pocket of 8mm. The peri-apical radiograph taken showed a small amalgam restoration with a vertically angulated radiolucency interproximally between teeth #’s 1.4 and 1.5. (Figs. 4a & 4b) shows a fracture line extending into the mesial marginal ridge. The tooth was assessed for vitality with thermal and EPT tests which elicited no response.
The treatment options were explained to the patient; 1) removal, 3-unit fixed bridge, 2) removal, soft and hard tissue augmentation, and implant retained restoration or 3) root canal therapy and restoration with cuspal protection. The patient was advised that option 3 had a questionable prognosis; however, for financial reasons, she chose to proceed with that option.
It should be noted that management of cracked tooth syndrome varies based on the severity of the symptoms and depth of tooth structure involved. Endodontic therapy was performed using a warm vertical condensation technique. (Fig. 4c) The access preparation was sealed with a flowable and hybrid composite restoration. The radiograph taken at

GROVER / SEROTA 16 INTERNATIONAL DENTISTRY AUSTRALASIAN EDITION VOL.18, NO. 1
Figure 3a. The intraoral periapical radiograph reveals a PRRL at the root terminus of tooth #1.1. A large area of internal resorption is evident mid-root of tooth #2.1. The resorption has perforated the lateral aspect of the root causing disruption of the interproximal bone. Fig. 3b. A post-operative radiograph shows the endodontic treatment of #1.1. Tooth #2.1
sealed with white
the incisal
defect is evident along the distal proximal aspect of the root of tooth #1.5. Fig. 4b. Debris present in the [DMR] of the tooth #1.4 demonstrates a fracture line, however, there is no indication of cuspal separation. Removal of the amalgam revealed extension of the fracture into the cuspal stress plane of the buccal and axial line angle. Fig. 4c. The root canal space was obturated using a warm vertical condensation technique. Lateral branches of the root canal system are noted. The tooth was restored with a bonded composite restoration using the Bioclear Matrix System developed by Dr. David Clark, DDS [Tacoma, WA]. Fig. 4d. A post-operative peri-apical radiograph taken in 2020 shows osseous regeneration and reformation of the PDL in the infra-bony defect along the distal aspect of the root.

a six-year follow-up [2020] showed osseous regeneration in the interproximal area eliminating the periodontal defect. The treatment planning process demands the inclusion of a myriad of data pertaining to the status of the tooth and root structure. The Decision Guide of the American Association of Endodontics encourages the clinician to consider local and systemic case-specific issues, economics, the patient’s desires and needs, esthetics, potential adverse outcomes, and ethical factors. The treatment performed must reflect best practices for the patient’s needs [www.aae.org/treatment options.
References
1. Friedman, S.; Mor, C. The success of endodontic therapy –healing and functionality. J. Calif. Dent. Assoc. 2004, 32, 493503.
2. Dadresanfar, B.; Rotstein, I. Outcome of Endodontic Treatment: The Most Cited Publications. J. Endod. 2021, 22, S0099-2399.
3. Bhide, V. Regenerative Surgical Therapy for the Treatment of Peri-Implantitis: A Case Report. Oral Health, 2021.
4. Guarnieri, R.; Di Nardo, D.; Di Giorgio, G.; Miccoli, G.; Testarelli, L. Longevity of Teeth and Dental Implants in
GROVER / SEROTA
INTERNATIONAL DENTISTRY AUSTRALASIAN EDITION VOL. 18, NO. 1 17
Figure 4a. An 8mm infrabony
Patients Treated for Chronic Periodontitis Following Periodontal Maintenance Therapy in a Private Specialist Practice: A Retrospective Study with a 10-Year Follow-up. Int J. Perio. Rest. Dent. 2021, 41, 89-98.
5. Scarfe, W.C.; Levin, M.D.; Gane, D.; Farman, A.G. Use of Cone Beam Computed Tomography in Endodontics. Int. J. Dent. 2009, 2009, 634567.

6. Schilder, H. Filling Root Canals in Three Dimensions. J. Endod. 2006, 32, 281-290.
7. Kim, D.; Kim, E. Antimicrobial effect of calcium hydroxide as an intracanal medicament in root canal treatment: a literature review – Part I. In vitro studies. Restor. Dent. Endod. 2014, 241252.
8. Derks, H.; Westheide, D.; Pfefferle, T.; Eichkholz, P.; Dannewitz, B. Retention of molars after root-resective therapy: a retrospective evaluation of up to 30 years. Clin. Oral. Invest. 2017, 22, 1327-1335.
9. Fu, J-H.; Wang H-L. Breaking the wave of peri-implantitis. Periodontol 2000, 2020, 84, 145-160.
10. Alkahtany, M. Saving a Natural Tooth in the Implant Era: A Case Report on Noninvasive Surgical Root Amputation. J. Contemp. Dental Practice, 2021, 947-950.
11. Trope, T.; Chivian, N. “Root resorption,” in Pathways of the Pulp, S. T. Cohen and R. Burns, Eds., 1994, 486–512, C.V. Mosby, St. Louis, Mo, USA, 6th edition.
12. Kandalgaonkar, S.D.; Gharat, L.A.; Tupsakhare, S.D.; Gabhane, M.H. Invasive cervical resorption: a review. J. Int. Oral Health, 2013, 5, 124-130.
13. Jacobovitz, M.; de Lima, R.K.P. “Treatment of inflammatory internal root resorption with mineral trioxide aggregate: a case report,” Inter. Endod. J., 2008, 41, 905–912.
14. Pruthi, P.; Yadav, N.; Nawal, R.R.; Talwar, S. Novel use of PRF and PDT in the management of trauma induced root resorption and infrabony defect. J. Clin. Diag. Res., 2015, 9, ZD26-ZD28.
15. Krell, K.V.; Caplan, D.J. 12-month success of Cracked Teeth Treated with Orthograde Root Canal Therapy. Endod. 2018, 44, 543-548.0.
This article was originally published in Oral Health May 2022 and has been reprinted with permission. Grover RE, Serota KS. Treatment of Compromised Teeth: The Usual Suspects. Oral Health May 2022
GROVER / SEROTA 18 INTERNATIONAL DENTISTRY AUSTRALASIAN EDITION VOL.18, NO. 1
Figure 4e


Ackuretta 1300 65 88 22 henryschein.com.au
Medically compromised and vulnerable mouths
Surina Sehgal1
When it comes to mouths, it’s not just the teeth that are sensitive. The soft tissues too can become sore or uncomfortable for a variety of reasons.
Patients with medically compromised mouths – and also those with aphthous ulcers, lichen planus or dry mouth – are more prone to soft tissue irritation. This is very uncomfortable for the patient.
Being vulnerable or medically compromised means that as healthcare professionals we should provide special care and consideration when providing treatment or health advice.
In this article, I’ll outline how mouths can become sensitive or vulnerable, how this links to oral health and what we, as dental professionals, can do to help.
Who is medically compromised/vulnerable?
Several medical conditions and drugs can affect teeth, gums and the soft tissues of the mouth, including, but not limited to:
• High blood pressure
• Heart disease
• Diabetes
• Kidney/lung disease
• Osteoporosis
• Rheumatoid arthritis
• Cancer patients
• Pregnancy
• Eating disorders
• Patients on several medications. These patients are more susceptible to developing cavities, periodontal disease and require specific attention to help prevent these oral diseases.
20 INTERNATIONAL DENTISTRY AUSTRALASIAN EDITION VOL.18, NO. 1
CLINICAL
1 Surina Sehgal, BDS Private Practice, London, UK
Oral health implications
One of the main ways that these diseases can affect oral health is through decreased salivary flow.
Salivary flow has a direct link to balanced oral health. A commonality in medically compromised patients is that they experience xerostomia (dry mouth) as a result of their illness or as a side effect of treatment/medication.
A dry mouth creates an ideal environment for pathogenic microorganisms to develop, live and multiply. This can further complicate patients’ health by increasing the risk of other inflammatory diseases.
There is strong research to show direct links between periodontal disease and systemic health (Steele, 2016).
With a decrease in salivary flow, there is an increase in pathogenic biofilm. This means more oral inflammation, which in turn links to gum disease, bone loss, tooth loss and caries.
In the medically compromised patient’s oral environment, natural remineralisation and protection are diminished due to reduced free salivary calcium and phosphate ions, as a result of decreased salivary production and flow (Gonzalez, 2014).
In addition to the risks to their oral health, these patients can experience significant discomfort and soreness. This is a result of reduced lubrication and moisture in the mouth.
Soft tissues conditions
Conditions specific to the mouth can also be a source of pain and discomfort for some patients.
The following conditions are commonly found in an intraoral examination.
Aphthous ulcers
This ulcer is the most common ulcerative condition of the oral mucosa. It presents as a painful punched out sore on oral mucous membranes. Twenty per cent of the population have one or more, at least occasionally.
They can be a manifestation of systemic disease. However, the exact reason why an aphthous ulcer develops is unclear.
Children are also susceptible to mouth ulcers. Research shows those who have a weakened immune system, several allergies, high stress environment, poor nutrition, and certain medication can play a part in the development of mouth ulcers.
Lichen planus
Lichen planus is a chronic inflammatory condition that affects 1-2% of the population. Oral lichen planus presents in
different forms: reticular, atrophic/erosive, plaque-like and sometimes is of mixed types.
Soft tissue irritation can have a detrimental impact on a patient’s oral hygiene. This is due to the discomfort of using a toothbrush or certain products in the mouth.
The goal of managing these oral soft tissue conditions is to ease symptoms for patients, and to recommend certain products that can help improve their oral hygiene experience.
How can dentists help?
Biofilm removal and control is an essential part of oral health. In addition to regular dental hygiene visits and regular toothbrushing, interdental plaque removal is essential.
Carrying out topical fluoride treatment and recommending patients high fluoride treatments can aid in the prevention of caries.
Using specific oral care products is also important to protect the mouths of those who are medically compromised. One ingredient – sodium lauryl sulfate (SLS) – should be avoided for those with sensitive/vulnerable mouths.
SLS is a foaming agent and there are studies to show this is a skin irritant for some (Branco et al, 2005; Oosterhaven, 2019). It can cause ‘tissue sloughing’ when the skin of the inner cheeks can peel, resulting in an irritated sensation (Green et al, 2019).
We can encourage patients to choose certain oral care products that are beneficial for oral health and take into consideration the oral soft tissues. Choosing SLS-free products is appropriate for sensitive mouths as it helps to avoid skin irritation.
As dental professionals, it is our duty to ensure we are tailoring our advice to a patient’s specific needs. We must take into account their medical history, their lifestyle and conditions, which will alter our oral health advice to them.
Further reading
Aphthous ulcers: www.stanfordchildrens.org/en/topic/ default?id=aphthous-stomatitis-90-P01843
Lichen planus: dermnetnz.org/topics/oral-lichen-planus
This article first appeared in Clinical Dentistry and has been reprinted with permission. Sehgal S (2023) Medically compromised and vulnerable mouths. Clinical Dentistry 3(1): 74-75’
CLINICAL INTERNATIONAL DENTISTRY AUSTRALASIAN EDITION VOL. 18, NO. 1 21
Colgate Optic White Range
Colgate Optic White Light Up Dentist Exclusive Kit, Professional Take-Home Teeth Whitening Kit: Reveal your whiter, brighter smile with Colgate® Optic White® Light-Up Dentist Exclusive Kit. A Professional, Take-Home Teeth Whitening Kit with an LED Teeth Whitening Device, Whitening Serum Pen and 6% hydrogen peroxide, for dramatically whiter teeth in 5 days*.
*10 minutes a day for 5 days. Use as directed.
Colgate Optic White Light Up 10% Hydrogen Peroxide Dentist

Exclusive, Professional in-chair Whitening Kit: Our best in-office teeth whitening technology. Reveal your patient’s whiter, brighter smile with Colgate Optic White Light-Up In-Office Teeth Whitening Kit. A Professional Teeth Whitening Kit exclusive to dentists with an LED Teeth Whitening Device, Whitening Serum Pen containing 10% hydrogen peroxide, for dramatically whiter teeth in 1 visit*
*30 minutes treatment. Use as directed.
Colgate Optic White Light Up Dentist Exclusive Kit, Professional Take-Home Teeth Whitening Kit
Colgate Optic White Light Up 10% Hydrogen Peroxide Dentist Exclusive, Professional in-chair Whitening Kit
Colgate Optic White Light Up 6% Hydrogen Peroxide Dentist

Exclusive, Professional Take-Home Whitening Refill Pen: A Professional Teeth Whitening Pen exclusive to dentists. Whitening Serum Pen containing 6% hydrogen peroxide, for dramatically whiter teeth in 10 minutes a day for 10 days*.
*Use as directed. Use with Optic White Professional LED Teeth Whitening Device
Colgate Optic White Light Up 6% Hydrogen Peroxide Dentist Exclusive, Professional Take-Home Whitening Refill Pen

22 INTERNATIONAL DENTISTRY AUSTRALASIAN EDITION VOL.18, NO. 1
ADVERTORIAL

Anterior case with Clearfil Majesty™
ES-2 Premium
Case Background
A healthy systemically ASA I classified 30-year-old male presented to my service for esthetic options relative to tooth 2.1. This tooth had been impacted in a bike accident at 16 years of age in South Africa, where the individual high-sided and traumatized the tooth. Since then, it has progressed through specialist endodontist intervention 7 years prior.
Soft tissue clinical examination revealed a band of localized moderate marginal erythema affecting his upper anterior sextant, with no periodontal pockets of significance, with the likely etiology mouth breathing, for which nasal breathing was reinforced. Clinical dental examination revealed tooth 2.1 with significantly lower value than the contralateral teeth with visible margins of the old acid-etched bonded composite restoration on the MIDBP surfaces. There was an oblique crack affecting the distal marginal ridge extending centro-obliquely. A small enamel fracture was noted on the 11MI angle also. Radiographic examination revealed no apical rarefying osteitis and no caries affecting the teeth in view, however the distal marginal ridge incomplete fracture was visible and extended to a cervical level possibly violating the biologic width.
Restorative Procedure
Internal bleaching was discussed with the patient as a structure-conservative first option for lifting the chroma and value especially in the cervical aspect where the enamel volume is the thinnest and can range from less than 0.3-0.5mm6
The risks inherent to this procedure involve a 15.1% lifetime risk of External Cervical Resorption (ECR) and with internal bleaching an increased risk to 10.6% of teeth involved.1
The patient was anesthetized with 1.5 carpules of 2% Lignocaine with 1:100,000 epinephrine via buccal and lingual infiltration as possible biologic width violation was possible as dissecting out the fracture line to recreate a well-bonded periphery for hermetic enclosure of the walking bleach. Rubber dam isolation was achieved initially but abandoned as the fracture line descended to a significant subgingival level distogingivally and thus required surgical access to be dissected out in its entirety.
USER
24 INTERNATIONAL DENTISTRY AUSTRALASIAN EDITION VOL.18, NO. 1
Clarence Tam1
REPORT
1 Clarence Tam HBSc, DDS, FIADFE, AAACD Auckland, New Zealand
seconds before again blot dried to a moist dentin state before application of a single step 10-MDP-based selfetching adhesive, CLEARFIL™ UNIVERSAL BOND Quick.
Without waiting time after the application, the bond layer was air thinned and carrier evaporated before curing using a 2000mW/cm2 polywave curing light unit (Pencure 2000, J.Morita Corporation).
A pre-crimped Mylar matrix strip was placed to guide the freehand placement of the lingual shelf, a 0.3mm thick layer composed purely of A1E Enamel (CLEARFIL MAJESTY™ ES-2 Premium). Following this, the join line was occluded using two successive layers of shade of A1D Dentin (CLEARFIL MAJESTY™ ES-2 Premium) and the dentin mamelon incisal details characterized using a dental instrument.
Next, Blue Translucent effects were placed (CLEARFIL MAJESTY™ ES-2 Premium) on the proximoincisal corners to accentuate the opalescence of the enamel and a Trans shade was applied to the mid-incisal area. White tint was used to characterize the tips of the dentin mamelons before a final layer of A1E Enamel was sculpted to final form in preparation for finishing and polishing procedures.
Primary anatomy was completed focusing on incisal embrasures, cervical embrasures and line angles. Secondary anatomy characterized facial anatomy and lobe detail.
Final reassessment of the case shows excellent optical and functional integration of an esthetically complex case that would have been an equa challenge for an indirect approach however with greater reduction of tooth structure.
Rationale for Material Choice
An indirect approach using laminate porcelain restorations would have necessitated the removal of a minimal of 0.3mm of enamel cervically, which often is the maximal volume of the rigid enamel shell in the cervical third of upper anterior teeth1
This acts to compound negatively with the reduced flexural strength of a tooth that not only has previously been endodontically-treated but features existing palato-oblique fractures. Preservation of a maximal volume of tooth structure is key to preserving a maximal long-term prognosis.
Part of the preservation effort is not only macroscopic, but importantly on a microscopic level. By limiting the phosphoric acid etch’s effect on dentin and especially deep dentin, there is a maximal volume of hydroxyapatite crystal volume
remaining, which not only bolsters residual flexural strength but allows both super dentin and super enamel development through use of a 10-MDP-based acidic monomer, which has the ability to nanolayer calcium in pattern creating phenotypically a very acid-base-resistant layer, measuring 1000-1200nm in thickness.3, 4 The adhesive selected contains a novel amide monomer, which also increases both hydrophilicity and penetration potential relative to HEMA but is more resistant to hydrolytic degradation.2
CLEARFIL MAJESTY™ ES-2 Premium is the only VITA approved shade (VITA Zahnfabrik, Bad Sackingen, Germany) composite system in the world. It features a buttery, no-slump, non-sticky consistency which is a remarkable benefit for universal applications but especially sculpted direct anterior cases. It features an excellent optical refraction index very similar to tooth structure.
Often, the filler to resin matrix in anterior composites leaves the composite sticky, with the subsequent need to use wetting resin (bis-GMA, TEGDMA) to handle the material, which can often dilute the intended chemistry and affect ultimate performance if not used sparingly.
CLEARFIL MAJESTY™ ES-2 Premium features a very unique Light Diffusion Technology (LDT) which allows applications in thinner layers to achieve the same degree of optical refraction as in other composite systems.
This translates to need for less tooth preparation, which is ideal from a responsible esthetics standpoint. With 15 shades in total, it is a slick and tech-smart armamentarium that will be able to tackle any challenge head on in your minimally-invasive daily practice.
References
1. Heithersay GS. Invasive cervical resorption following trauma. Aust Endod J. 1999 Aug;25(2):79-85. doi: 10.1111/ j.1747-4477.1999.tb00094.x. PMID: 11411085.
2. Kuno Y, Hosaka K, Nakajima M, Ikeda M, Klein Junior CA, Foxton RM, Tagami J. Incorporation of a hydrophilic amide monomer into a one-step self-etch adhesive to increase dentin bond strength: Effect of application time. Dent Mater J. 2019 Dec 1;38(6):892-899. doi: 10.4012/ dmj.2018-286. Epub 2019 Aug 1. PMID: 31366768.
3. Nikaido T, Takagaki T, Sato T, Burrow MF, Tagami J. The concept of super enamel formation -Relationship between
TAM
26 INTERNATIONAL DENTISTRY AUSTRALASIAN EDITION VOL.18, NO. 1
chemical interaction and enamel acid-base resistant zone at the self-etch adhesive/enamel interface. Dent Mater J. 2020 Aug 2;39(4):534-538. doi: 10.4012/dmj.2020-165. Epub 2020 Jul 4. PMID: 32624553.
4. Nikaido, T., Takagaki, T., Sato, T., Burrow, M. F., & Tagami, J.(2021). Fluoride-Releasing Self-Etch Adhesives Create Thick ABRZ at the Interface. BioMed research international, 2021, 9731280. https://doi.org/10.1155/2021/9731280


5. Topcu, F. T., Erdemir, U., Ozel, E., Tiryaki, M., Oktay, E. A., & Yildiz, E. (2017). Influence of Bleaching Regimen
and Time Elapsed on Microtensile Bond Strength of Resin Composite to Enamel. Contemporary clinical dentistry, 8(3), 451–458. https://doi.org/10.4103/ccd.ccd_234_17
6. Yu H, Zhao Y, Li J, Luo T, Gao J, Liu H, Liu W, Liu F, Zhao K, Liu F, Ma C, Setz JM, Liang S, Fan L, Gao S, Zhu Z, Shen J, Wang J, Zhu Z, Zhou X. Minimal invasive microscopic tooth preparation in esthetic restoration: a specialist consensus. Int J Oral Sci. 2019 Oct 2;11(3):31. doi: 10.1038/s41368-019-0057-y. PMID: 31575850; PMCID: PMC6802612.

TAM
Simple chords of shades for harmonious restorations
Wallid Boujemaa1
Composite restorations set the rhythm of the daily life of our dental practices. Whether they are the final goal of a rehabilitation or an intermediate stage of the treatment plan, their implementation must be easy and reproducible. In anterior areas, the shape, colour and occlusal condition must be rigorously studied to achieve the desired aesthetic and functional requirements. In terms of posterior teeth, direct restorations will have to fulfill two major goals, biological and functional. While aesthetics are not to be left behind, respect for cusp morphology will certainly be of greater importance.
For more than a decade, composite resins have been used to fulfill these specifications. Their simplicity of application, their mechanical resistance, their polishing abilities and their optical properties allow them to integrate perfectly with natural tissues over time. Among these materials, GC’s G-ænial range has proven itself for 10 years. Its youngest member G-ænial A’CHORD, has just been born and seems as promising as the former version. With a smaller number of shades, it can cover the same situations as its predecessor, with a markedly improved consistency and surface condition after polishing. The two cases presented here are examples of the possible applications of this material in a successful way.
Case 1: Anterior restorations using monochromatic & multi-shade techniques
A 40-year-old patient, in good general health, attended an emergency consultation. She had fallen on her coffee table, which caused a fracture from the mesial angle up to the middle third of tooth 21. The tooth responded positively to the pulp sensitivity test. Given the colour and textural characterisations to be reproduced, a stratification session was scheduled. The patient also wanted to improve the aesthetics of her smile by having the apparent black triangles between teeth 21 and 22 reduced. An impression for wax-up and a temporary restoration using a composite in single-mass technique are carried out during the emergency consultation. Periodontal remediation and endodontic treatment of the 11, which was necrotized following the trauma, were performed prior to the composite stratification session.
CLINICAL 28 INTERNATIONAL DENTISTRY AUSTRALASIAN EDITION VOL. 18, NO. 1
1 Wallid Boujemaa Lecturer, University of Bordeaux. Private practice, Ondres, France


CLINICAL INTERNATIONAL DENTISTRY AUSTRALASIAN EDITION VOL. 18, NO. 1 29
3
Fig. 3: Initial retro-alveolar X-ray.
4 5
Fig. 4 and 5: Shade selection using the composite button technique, with and without polarizing filters.
6 7 8
Fig. 6: The wax-up allowing the creation of a palatal silicone key.
Fig. 7: Teeth isolation with a rubber dam Fig. 8: Enamel etching using 37% orthophosphoric acid for 10 seconds.
9 10 11
Fig. 9: Application of G-Premio BOND universal adhesive(GC).
Fig. 10 and 11: Creation of the palatal enamel shell using the Junior Enamel shade JE (G-ænial A’CHORD, GC).
1 2
Fig. 1 and 2: Initial situation.


BOUJEMAA 30 INTERNATIONAL DENTISTRY AUSTRALASIAN EDITION VOL. 18, NO. 1
15 16 17
Fig. 15: Modeling of dentin mamelons using the A2 shade (G-ænial A’CHORD).
Fig. 16: Application of superficial enamel, shade JE.
Fig. 17: The distal cavity is blocked with a CORE shade of medium opacity A2.
18 19 20
Fig. 18: Use of a impregnated with an unfilled resin (Modeling Liquid, GC) brush making it easier to sculpt and adjust the composite.
Fig. 19: Macro-anatomy management with a red flame bur.
Fig. 20: Pre-polishing with the pink silicone disc Diacomp TwistPlus® (EVE).
21 22
Fig. 21: Polishing with a beige silicone disc Diacomp TwistPlus® (EVE).
Fig. 22: Surface condition after finishing and polishing.
12 13 14
Fig. 12 and 13: Elaboration of the mesial surface with an enamel shade using a proximal matrix (LumiContrast® Polydentia).
Fig. 14: Modeling of the dentin core in opaque dentine shade AO2 (G-ænial A’CHORD GC).


BOUJEMAA 32 INTERNATIONAL DENTISTRY AUSTRALASIAN EDITION VOL. 18, NO. 1
23 24 25
Fig. 23 and 24: Reduction of the black triangle with a shade of medium opacity A2.
26 27 28
Fig. 25: Immediate post-operative situation.
29 30
Fig. 26: Post-operative X-ray.
31 32
Fig. 27 to 32: Post-operative situation at one week.
A 15-year-old patient, in general good health, presented herself for a check-up. She reported localised sensitivity to
sweet on tooth 36. The tooth responded positively to the pulp sensitivity test, and displayed an occlusal composite without morphology. Clinical and radiographic examinations revealed the presence of secondary caries under the composite,


BOUJEMAA INTERNATIONAL DENTISTRY AUSTRALASIAN EDITION VOL. 18, NO. 1 33
Case 2: Posterior restoration using a cusp by cusp approach
1
Fig. 1: Initial situation.
3 4
Fig. 2: Pre-operative retroalveolar X-ray.
Fig. 3: Isolation of the tooth under rubber dam.
Fig. 4: Composite removal.
5 6 7
Fig. 5: The caries removal is carried out in a centripetal way.
Fig. 6: Etching using 37% ortho phosphoric acid for 10 seconds. This is eliminated with an abundant rinse.
Fig. 7: Application of G-Premio BOND® (GC) universal bonding. This is applied and rubbed vigorously on dental surfaces, then dried strongly before light-curing.
8 9 10 11
Fig. 8 and 9: Application of a 2-mm composite layer on the surface of the cavity, using an injectable composite (G-ænial Universal Injectable® A2, GC).
2
Fig. 10-11: G-ænial A’CHORD composite® A2 (GC) is easily shaped to create the cusps.
which showed micro-leakage at the margins. A session was scheduled to remove the composite and determine if a simple renewal of the composite with a direct technique was possible. At this stage, the cavity was disinfected with 2% chlorhexidine solution to reduce the bacterial load during caries removal, which could have lead to pulp exposure. After cleaning, the


cavity was shaped. The pulpal wall appeared to be located away from the pulp chamber (0.5 mm). The thickness of the remaining walls enabled us to opt for a direct composite restoration.


Reprinted with permission from GC get connected

BOUJEMAA 34 INTERNATIONAL DENTISTRY AUSTRALASIAN EDITION VOL. 18, NO. 1
12 13 14 15
Fig. 12-13: The other cusps are built cusp-by-cusp in the same manner, creating the occlusal anatomy.
Fig. 14: The use of a composite stain (Brown Modifier®, Essentia Modifier Kit, GC) makes it possible to assess the morphology and ensure that there are no gaps.
Fig. 15: 40-second photopolymerization on each side under glycerin gel (AirBarrier® GC).
16 17 18
Fig. 16 and 17: Polishing with silicon wheels (Soft Lex®3M).
Fig. 18: Immediate post-operative situation under rubber dam.
20 21
Fig. 19: Post-operative retroalveolar X-ray.
Fig. 21: Post-operative situation at one month. Sensitivities are gone.
19
Fig. 20: Immediate postoperative situation.

Management of stained fluorotic teeth
Meenakshi Lall1
Introduction
Dental fluorosis is a condition that affects the enamel, caused by overexposure to fluoride during tooth formation. Recommended intake of fluoride for primary prevention of caries is reported to be 0.05-0.07mgF/Kg/day (Warren, Levy and Kanellis, 2001). When the concentration is more than 1.5-4mg/L, as the World Health Organization (WHO) recommends, dental fluorosis occurs. Hypermineralised and hypomineralised areas appear in the enamel that is being formed, resulting in whitish opaque discolourations ranging from yellow to brown with or without porosities in the enamel surface (Pendrys and Stamm, 1990; Celik, Yildiz and Yazkan, 2013).
Fluorosis staining of anterior teeth constitutes an aesthetic problem among affected people. In addition, it has been found to have a psychological impact and adverse impact on academic performance. Thus, conservative aesthetic management of dental fluorosis not only improves smiles but also greatly enhances the self-esteem of the affected individuals.
Contemporary aesthetic procedures allow these teeth to be restored to give them the appearance of healthy teeth in the most minimalistic invasive manner.
This case report aims to highlight a three-treatment combination for aesthetic correction of severe fluorotic teeth. It also discusses the advantages, drawbacks of various treatment choices and apprise the clinician of the appropriate aesthetic conservative management protocol for dental fluorosis with diverse clinical appearance.
Case study
A 43-year-old female patient attended the practice concerned with the aesthetics of her teeth. She had a complaint of chipping, which had been repaired by different dentists.
The patient reported that the teeth had been discoloured for many years. She was unable to recollect when they first started to discolour, but reported that the discolouration had increased over time.
The patient reported no pain or discomfort and she was not aware that she had severe fluorosis. We used Thylstrup-Fejerskov (TF) index for scoring fluorosis. Intraoral examination revealed brownish discolouration of enamel with all maxillary and mandibular incisors, canines and premolars.
The pattern of discolouration was bilateral and symmetrical. The surfaces of some of these teeth were pitted.
Discolouration was more prominent on maxillary teeth compared to mandibular
CLINICAL 36 INTERNATIONAL DENTISTRY AUSTRALASIAN EDITION VOL.18, NO. 1
1 Meenakshi Lall BDS MSC MFDS AD EUNDEM RCS (ENG)
Associate dentist in Stourcote Dental Practice, Private Practice iStourbridge, UK.
teeth (Figure 1).

Pulp sensibility testing of the discoloured teeth was carried out using cold test and electric pulp testing, which indicated normal pulp with all these teeth.

The medical history was non-contributory.
Treatment planning process
In the past, enamel microabrasion and vital bleaching were the preferred treatment for mildly or moderately fluorosed teeth without enamel defects, (Price et al, 2003; Limeback, Vieira and Lawrence, 2006). While fluorosed teeth with enamel defects or severe fluorosis were traditionally restored with laminate veneers or crowns (Habbu et al, 2011; AlJazairy, 2001).
However, the more recent trend is toward minimal intervention dentistry. Since restorative intervention is often the starting point of a long series of re-restorations, commonly leading to crowns and implants, irrespective of how well the first restoration was prepared, minimally invasive techniques (enamel microabrasion and vital bleaching) may be the first option, even though the more traditional restorative techniques result in a satisfactory aesthetic appearance for many patients.
Several treatment strategies are proposed for dental fluorosis, depending on the severity and extent of the disease.

The most frequently reported are microabrasion and/or macroabrasion, dental bleaching, composite restorations, veneers, and prosthetic crowns.
Resin infiltration has also shown promising results. This approach meets the concept of minimally invasive restorative dentistry and allows us to reach satisfying results avoiding unnecessary tissue removal.
Procedure
In this case, complexities and challenges presented throughout treatment.
The patient was not aware of her fluorosis. However, thorough discussion of her social history helped me to diagnose her condition (Tahir and Rasheed, 2013).
The patient was a heavy smoker and consumed a lot of fizzy drinks. These factors would negatively impact the outcome of the treatment. It was important that the patient understood this, so we shared photographic/comparative results, which helped gain her compliance and achieve positive change.
For this case, since the restorative intervention is a starting point of long series of re-restoration, we opted for minimal invasive procedures and the patient was warned about the possible compromised results.
We began treatment with a five-week course of home-
CLINICAL INTERNATIONAL DENTISTRY AUSTRALASIAN EDITION VOL. 18, NO. 1 37
Figure 1: Initial situation. According to the TF index score, the maxillary and mandibular teeth were classed as ‘severe’
Figure 2: Mapping (pink = Icon; green = Venus Pearl)
Figures 3A, 3B and 3C: Shade taking Venus Pearl and Diamond composite
based tooth whitening with 10% carbamide peroxide and a cycle of microabrasion (Figures 4b and 4d). In the future, I will opt for a longer bleaching regime for better results.
A fine grit diamond bur helped in removing darker stains and smoothing of enamel loss. After two weeks microabrasion with 6.6% hydrochloric acid (Opalustre), we saw a lightening of the brown stains (Figure 4c).
We performed the microabrasion according to the manufacturer’s instructions.
Rubber dam was applied, and gingival margins sealed with Oraseal Caulking material. The slurry was applied in 1-3mm thickness on the upper front teeth for 60 seconds using rubber prophy cups (Opalcups). The teeth were rinsed with water.


A study by Ahmed and Murbay (2016) found that 120 seconds of microabrasive treatment reduces approximately 10% (200µm) of the enamel thickness.
It helps to remove discoloured enamel and change

enamel optical characteristics, turning it into a lustrous, shiny and glass-like surface, which may reflect and refract light.
Composite shade matching also presented a challenge, as the patient had different values and chroma of teeth. Moreover, the patient’s enamel has less translucency.


I used Venus Pearl composite A1 shade in interproximal, buccal and incisal areas and A2 shade in cervical areas, since it was the nearest match and has good aesthetic quality (Figure 3).
All old, stained composite fillings were removed. Resin infiltration (Icon) and change of old composite was performed according to manufacturer instructions.
Bonding to composite after resin infiltration does not require an additional adhesive step. If, after the infiltrant final light-curing, there is no contamination of the operatory field, composite increments may be directly applied onto the infiltrated surfaces. The depth of resin infiltration is about 60µm (Davila
LALL
38 INTERNATIONAL DENTISTRY AUSTRALASIAN EDITION VOL.18, NO. 1
et al, 1975) (Figures 5a to 5c).
Figure 4A: White opaque areas, brown discolouration with surface porosities on enamel
Figure 4B: Two-week home-based bleaching with 10% carbamide peroxide for six to eight hours at night
Figure 4C: Microabrasion with Opalustre 6.6% HCL
Figure 4D: Three-week home-based bleaching with 10% carbamide peroxide for six to eight hours at night
Figure 4E: Icon smooth surface and composite restorations
Figure 4F: Occlusion adjusted (especially UL3) and finishing
Figures 5A, 5B and 5C: Old composite filling removed Icon infiltration

Occlusion was managed through silicone putty, as the anterior guidance was likely to change in the treatment process. In cases non-responsive to resin infiltration, this treatment shows a very good example of resin infiltration and composite resin option for the cases of enamel defects and severe fluorosis. This opens the possibilities that aim for a highly aesthetic outcome with a minimally invasive approach.
Treatment stages
Pre-treatment
Figure 4a shows the pre-treatment presentation with white opaque areas, and brown discolouration with surface porosities on the enamel.
Home-based bleaching
Two-week home-based bleaching with 10% carbamide peroxide (Boutique) was carried out for six to eight hours at night. Notice the minimal changes in brown discolouration (Figure 4b).
Microabrasion
We then performed one cycle of microabrasion with Opalustre (6.6% hydrochloric acid). This resulted in a nonhomogenous colour, and thinner enamel (Figure 4c).
Home-based bleaching
Vital home-based bleaching with 10% carbamide peroxide (Pola Night) was undertaken for six to eight hours a night for three weeks to remove brown discolouration, and lighten adjacent enamel to change perception of white opaque areas. This created a homogenous colour of teeth surface (Figure 4d).
Icon smooth surface and composite restorations
One week after Icon and composite restorations (Figure 4e), the occlusion was adjusted (especially UL3) and finished (Figure 4f).
Icon resin infiltration
The old composite filling was removed with a coarse diamond bur. An LED UV torch was used to distinguish between old composite and tooth surface. Next, the following steps using Icon infiltration were undertaken:
•Etch for two minutes, rub with a microbrush and rinse for 30 seconds. Dentine is protected with application of glycerine (Figure 5a)
•Icon-Dry. Let it sit for 30 seconds and thereby carry out visual inspection, dry with oil- and water-free air. If white patch disappears, do not repeat etch cycle. However, if white patch is visible then repeat etch cycle. The etch cycle can be repeated three times. The preview showed an even chromaticity (Figure 5b)
•Apply Icon-Infiltrant. Let it sit for three minutes, maintain wet lesion surface with occasional twist of syringe. Disperse with air, and floss. Light-cure for 40 seconds. Replace applicator tip. Apply Icon-Infiltrant, let it sit for one minute. Remove excess and floss. Light-cure for 40 seconds and polish. According to studies, Icon can penetrate to depth of 60 micrometre (Skucha-Nowak, 2015)
•Polish with Compoglaze (Figure 6).
Reflection
Figures 7a to 7f demonstrate the various treatment stages of this case.
Overall, the patient was pleasantly surprised with the outcome (Figure 7f), reporting that the treatment has helped her to gain social confidence. As the treating clinician, I am also satisfied with the result.
Although the patient accepted the least invasive approach to manage her upper arch for UR4 to UL4, she declined treatment for the lower arch.
Also, at the follow-up appointment, after Icon and composite fillings, the patient felt high points on UR3 and UL3. While achieving her comfort, the anatomy of her canines was compromised.
In relation to the patient’s oral health benefits, the least invasive approach to manage UR4 to UL4 enabled retention of her natural teeth structure.
The pits and fracture lines have been covered and strengthened through removal of the fluorosed surface via microabrasion and application of Icon and composite.
Also, during the microabrasion and whitening stages of treatment, the patient stopped smoking and vaping completely.

LALL 40 INTERNATIONAL DENTISTRY AUSTRALASIAN EDITION VOL.18, NO. 1
Figure 6: Polishing
As a result of this treatment, the patient is now more likely to remain motivated for maintaining her oral hygiene, reducing early onset of staining and caries.
Aesthetically, the impact of fluorosis has been overcome through the process of bleaching, microabrasion and Icon.
Furthermore, fracture lines, pits and caries have been covered using Icon and matching composites. This process has provided a homogeneous colour to her teeth. There is an evenness of the enamel edges of UR4 to UL4, thereby improving the patient’s smile line.

To maintain the outcome achieved, the patient needs to keep good oral hygiene. She will have to attend regular appointments with the dentist and dental hygienist and will also need an annual appointment to manage risk/impact of composite staining and chipping.
In addition, the patient was encouraged to significantly reduce or cease consuming fizzy drinks as well as remaining committed to the smoking and vape cessation.
For this case, there is a good prognosis of five to seven years (Bårdsen, 1999), provided oral health instruction is followed, along with routine dental appointments as stated above.

The restorations completed for this patient can lead to a variety of complications, including:


• General fracturing or fracture through grinding
• Cervical abrasion
• Staining of composite.
Nonetheless, poor diet, excessive fizzy drink consumption, poor oral hygiene (including poor toothbrushing) and grinding are likely to act as modes of failure for her
LALL INTERNATIONAL DENTISTRY AUSTRALASIAN EDITION VOL. 18, NO. 1 41
Figure 7A: Pre-treatment
Figure 7B: Two-week whitening
Figure 7C: One cycle of microabrasion
Figure 7D: Three-week whitening
Figure 7E: Resin infiltration and composite resinFigure 7F: After one-week
restorations. Therefore, this treatment requires continuous maintenance from both the dentist as well as the patient.
References
Ahmed KE, Murbay S (2016) Survival rates of anterior composites in managing tooth wear: systematic review. J Oral Rehabil 43(2): 145-53
Al-Jazairy Y (2001) Management of fluorosed teeth using porcelain laminate veneers: A six-year recall case report. Saudi Dent J 13: 106-11
Bårdsen A (1999) ‘Risk periods’ associated with the development of dental fluorosis in maxillary permanent central incisors: a meta-analysis. Acta Odontologica Scandinavica 57(5): 247-56
Celik EU, Yildiz G, Yazkan B (2013) Clinical evaluation of enamel microabrasion for the aesthetic management of mildto-severe dental fluorosis [clinical trial]. J Esthet Rest Dent 25(6): 422-430
Davila JM, Buonocore MG, Greeley CB, Provenza DV (1975) Adhesive penetration in human artificial and natural white spots. J Dent Res 54(5): 999-1008
Habbu N, Joshi N, Ramamoorthi M, Mabrukar V (2011) Esthetic management of dental fluorosis. Int J Dent Clin 3(2): 80-1
Limeback H, Vieira AP, Lawrence H (2006) Improving
esthetically objectionable human enamel fluorosis with a simple microabrasion technique. Eur J Oral Sci 114(Suppl 1): 123-126
Pendrys DG, Stamm JW (1990) Relationship of total fluoride intake to beneficial effects and enamel fluorosis. J Dent Res 69: 529-538
Price RB, Loney RW, Doyle MG, Moulding MB (2003) An evaluation of a technique to remove stains from teeth using microabrasion. J Am Dent Assoc 134(8): 1066-71
Rodrigues MC, Mondelli RF, Oliveira GU, Franco EB, Baseggio W, Wang L (2013) Minimal alterations on the enamel surface by micro-abrasion: in vitro roughness and wear assessments. J Appl Oral Sci 21(2): 112-117
Skucha-Nowak M (2015) Attempt to assess the infiltration of enamel made with experimental preparation using a scanning electron microscope. Open Med (Wars) 10(1): 238-248
Tahir MA, Rasheed H (2013) Fluoride in the drinking water of Pakistan and the possible risk of crippling fluorosis. Drink Water Eng Sci 6(1): 17-23
Warren JJ, Levy SM, Kanellis MJ (2001) Prevalence of dental fluorosis in primary dentition. J Public Health Dent 61(2): 87-91
This article first appeared in Clinical Dentistry and has been reprinted with permission. Lall M (2023) Management of stained fluorotic teeth. Clinical Dentistry 3(3): 33-36
LALL
42 INTERNATIONAL DENTISTRY AUSTRALASIAN EDITION VOL.18, NO. 1
ENTER A NEW ERA OF MILLING

The innovative milling machine for digital dental technology in the practice lab and laboratory. Optimise your digital workflow, enjoy maximum freedom and achieve perfect results with optimum efficiency.

• 5 Axis
• 1 Disc
• 6 Blocks
• 17 Tools
• Dry Mill
• No compressed air needed
• For Composites, Zirconia, PMMA, CoCr
WATCH VIDEO
E5
1300 65 88 22 henry schein.com.au
Masterclass in Clinical Practice
Implant Dentistry with
Dr
Vladimir S Todorovic1
Dr Inus Snyman2


Dr Andre W van Zyl3
Lateral window Sinus Floor Elevation technique
Introduction
Insufficient bone below the maxillary sinuses in the posterior maxilla is a common finding in dental implant treatment. Reasons for loss of available bone in the posterior maxilla can be from traumatic extractions, pneumatisized sinuses and loss of alveolar bone due to periodontitis.
Over the past five decades sinus floor elevation procedures to increase this available bone have evolved from being an extreme procedure performed by a select few specialists, to a reliable procedure being performed daily by specialists and experienced dentists alike.
The original procedure to establish bone within the sinus floor for implant placement was described and published by Boyne and James as well as Tatum.1,2 Since then it has been refined and made easier by the introduction of specialized instruments and grafting materials.
It must be stressed though that sinus floor elevation (SFE) procedures should only be done by clinicians with surgical training as well as experience in performing these procedures. Knowledge of the sinus anatomy, nerve and arterial supply as well as using CBCT technology is essential in performing successful SFE procedures. The reader is referred to our Masterclass in International Dentistry - African Edition, Vol 12 No 6, Maxillary Sinus Anatomy: Essential knowledge for sinus floor elevation (SFE).3
One stage versus two stage placement protocol
Scan to see video

1 Vladimir S Todorovic, PhD
Research Associate, School of Dental Medicine, University of Belgrade, Serbia
Private practice, Belgrade, Serbia
2 Inus Snyman
BChD, PDD (Implantology), PGDipDent (Oral Surgery), PGDipDent (Implantology), MChD, FCD(SA) OMP
Private Practice, Stellenbosch, South Africa
3 Andre W. van Zyl
MChD (Oral Medicine & Periodontics)
Private Practice, Hermanus, South Africa
Today’s patients demand surgical procedures with less trauma, shorter treatment time and possibly without compromising the success rate. Having this in mind, a one stage (simultaneous) approach would be a preferred one (see video). The procedure implies that both sinus floor elevation and implant placement is done during the same session. It can be considered only if the primary implant stability is achievable. It is well known that primary implant stability is influenced by several factors – residual alveolar ridge dimensions, bone quality (density), implant macro-design and the site preparation technique. However, sufficient sub-antral residual alveolar ridge height is the most important criterion and the threshold of ≥5 mm was traditionally declared for considering a simultaneous implant placement (ITI Treatment Guide, Volume 5). However, implant success has been reported in residual alveolar bone height as low as 3 mm.4,5 Also, we are aware that quality of bone in the posterior maxilla is poor and might be enhanced by certain techniques, such as bone condensing, either by application of osteotomes or under-preparation of implant sites. Additionally, primary implant stability could be improved by using tapered macro-designed implants.
Whenever it is anticipated that adequate primary implant stability cannot be attained, a decision for staged approach should be made. Depending on the maxillary sinus anatomy, extent of augmentation and choice of grafting material, the healing period can vary from 3 – 12 months. For single-tooth gaps with favourable narrow sinus anatomy and predominantly autologous bone graft using a 3–4 months healing time should be sufficient. In cases with so-called “eggshell” sinus floor, augmented with bone substitute only, a total healing period of 9-12 months is needed before implant installation.
44 INTERNATIONAL DENTISTRY AUSTRALASIAN EDITION VOL.18, NO. 1
Figure 5: The groove is checked easily with a light scraping of a periodontal probe which will identify where the bone is not yet fully removed. Light pressure on the central bone disc will also show movement inward if bone is fully prepared (see video)
Figure 3: Instead of drilling bone away, harvesting over the site of window is done with a bone scraper. This creates a large surface to volume bone graft that can be mixed with the bone filler
angiogenesis
After removing the bone over window, the initial release of Schneiderian membrane around window margin is often best done with a universal scaler
Figure
Over the years, several systematic and meta-analysis studies have revealed an average success rate of 92–98% on the efficacy of the lateral window SFE procedures and simultaneous and/or delayed implant placement.6-9


Incision design

The planned position and size of the lateral window mainly determines the flap design. Other factors include a dentate
Once bone has been harvested, a small window is prepared for access with specialized sinus floor elevation instruments. This is prepared in the “white” bone. As soon as the dark shadow of sinus is visible, the depth of the groove is slowly increased to prevent perforating through the Schneiderian membrane
Figure
versus edentulous area, restorations on neighbouring teeth, the amount of attached keratinized tissue, additional need for horizontal and/or vertical augmentation and simultaneous versus delayed implant placement.

Incisions should be placed in such a way which allow good access and visibility to perform the procedure. Incorrect flap design could lead to increased post-operative discomfort for the patient and operator fatigue due to excessive and prolonged retraction of the vestibular tissues.10
A full-thickness mucoperiosteal flap is elevated, by making a mid-crestal incision and two vertical releasing incisions. In the case of a one-staged approach with an inadequate amount of attached gingiva, the crestal incision can be placed slightly more towards palatal. This will ensure a wider band of attached keratinized mucosa buccal of the placed dental implant. The vertical incisions should extend deep enough into the vestibulum to allow elevation of the flap past the superior border of the planned lateral window. The anterior and posterior releasing incisions should not be over the anterior and posterior border of the lateral window, as this could lead to poor wound healing and dehiscence formation. A safe distance is at least 3-4 mm away from the proposed window, allowing for closure of the flap over
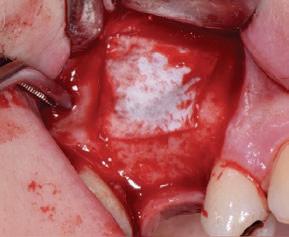


INTERNATIONAL DENTISTRY AUSTRALASIAN EDITION VOL. 18, NO. 1 45 MASTERCLASS IN IMPLANT DENTISTRY
Figure 1: Pre-operative view of the bone volume in 26 position
Figure 2: Red bone and white bone visible with arrow indicating floor of sinus. Window would be prepared above the red bone in white bone
4:
6:
Figure 7: Specialized SFE instruments are then used to lift the Schneiderian membrane to the desired level
Figure 8: A sinus graft packed with clearly visible larger particles (1-2mm) which allows for more
than small particles
Figure 9: Once the graft material has been placed, a membrane is placed over the window.
healthy bone (Figures 1-9).
Some patients may experience post-operative numbness on the side where the lateral window sinus augmentation was performed. This is due to cutting the terminal branches of the infra-orbital nerve when making the anterior vertical releasing incision. This complication could be avoided by making a superficial anterior vertical incision in the alveolar mucosa and then spreading the edges with a Metzenbaum scissor.11

Alternative incision designs for lateral window sinus augmentation include a single horizontal vestibular incision and a triangular flap design.

Grafting materials and technique
Over the past few decades different grafting materials for SFE have been investigated. The first question one must answer is whether a grafting material should be used at all, or if it would be sufficient to just elevate the sinus membrane and leave the space for coagulum formation using an implant as a supporting pilar. Two to three millimetres of bone height can be gained with this technique, but where more than 3 mm of vertical bone dimension is required to accommodate an implant, a grafting procedure is recommended.
For many years autologous bone was considered the gold standard for grafting due to its high osteoinductive potential and desirable biological response. However, some shortcomings related to autologous bone grafts, such as high resorption rate, morbidity of donor site and volume limitations has changed the research focus toward non-autologous bone substitutes. These biomaterials, mainly xenografts,


and some alloplastic materials have been shown to be suitable for grafting procedures, especially in sinus augmentation.11 These materials have shown high osteoconductive and low resorption rates. A recent consensus report revealed that characteristics of biomaterial scaffolds are comparable to autologous bone

MASTERCLASS IN IMPLANT DENTISTRY 46 INTERNATIONAL DENTISTRY AUSTRALASIAN EDITION VOL.18, NO. 1
allografts
Figure 10: The superior border of a sinus graft showing a solid margin indicating intact Schneiderian membrane after SF
Figure 11: Tooth removed and bone below sinus inadequate depth towards distal for implant placement.
Figure 12: Bone healing after 4 months
Figure 13: To avoid a sinus floor elevation, the implant can be angled to utilize the bone mesial of anterior sinus wall and still emerge in the occlusal surface for screw retention. Osteotomes are used to prevent perforation
Figure 14: Careful drilling is done to prevent perforation in the anterior wall
Figure 15: Implant placed without involving sinus
Figure 16: Although the access is slightly towards distal aspect of crown, it has avoided the involvement of sinus or SFE
in augmentation procedures, especially when combined with osteo-inductive cells when it has shown an additional effect in sinus augmentation.12 It is well known that such bone substitutes lack osteogenic and osteoinductive properties. To overcome these shortcomings, some materials with osteoinductive properties, such as platelet-rich-fibrin (PRF), were introduced as an addition in bone augmentation protocols. The positive effects of PRF-xenograft combination in reducing inflammatory reaction, promoting angiogenesis of newly bone formations, and improving scaffold mechanics have been reported13,14 More research is needed to propose clear guidelines on this topic.
To obtain good bone quality and avoid gaps in the augmented sinus, it is important to pack grafting material in a way that provides maximum contact with adjacent native bone. For this purpose, a sterile insulin injector with bevelled tip can be used to deliver grafting material directly against both the medial and the anterior maxillary sinus wall.11
However, a high graft packing density through excessive compaction of grafting particles should be avoided to optimise the macrostructural environment for bone regeneration.15 This is demonstrated in the video. When packing the graft into the sinus, small increments should be packed using specialized instruments. In the author’s experience, packing should be started in the furthest corners of the augmentation to avoid leaving spaces in those difficult to reach areas. Making sure the Schneiderian membrane is mobilised sufficiently will help in this regard and retracting the membrane with a small periosteal elevator to gain access to the deep corners during graft packing may also help. The palato-nasal recess may be too far away from the lateral window to allow for effective membrane lifting and this area is often one where either the membrane is not lifted sufficiently or under packing of the graft material may leave voids.
During packing a “bounce-back” of the Schneiderian membrane will be noticed and this indicates an intact membrane and that the grafting material is not too densely packed (see video).
Membrane to cover window
There is still controversy on whether a resorbable or nonresorbable membrane should be placed over the lateral window SFE following sinus augmentation (Fig.9). Studies have found that the presence of a barrier membrane over the window does not influence the amount of vital bone formation after sinus augmentation.16
Placement of a barrier membrane does however provide graft stability and prevents lateral graft displacement through the sinus antrostomy, which can occur due to baro-trauma such as flying, nose blowing, sneezing, diving, etc.17 The membrane can be placed over the sinus wall osteotomy
or between the graft and inner surface of the sinus wall. To ensure additional stability of the graft, the membrane should be secured with bone tacks/bone pins, if the sinus wall thickness allow for this (See video).11 Patients should be advised prior to the SFE procedure that they will have to avoid activities as mentioned above. A nasal decongestant may have to be used to prevent the nasal passages from becoming blocked to prevent the need for blowing the nose. This may be necessary for up to 2 weeks post-surgery. Patients must be instructed to sneeze through the mouth.
Underwood’s septa
The prevalence of sinus septa was found to be as high as 69%.18 Sinus septa are mostly present in the premolar/first molar region and are more commonly found in edentulous atrophic maxillae than in dentate maxillae.11
Schneiderian membrane perforation is significantly associated with the presence of sinus septa. Therefore, the use of CBCT imaging is an invaluable tool in studying the anatomy of the maxillary sinus to determine the presence, location, number, morphology, and height of sinus septa.
Sinuses with a single prominent medio-lateral septum, requires the creation of two separate window osteotomies to successfully perform sinus augmentation, leaving the septum in between intact.11
In rare cases where an anterior-posterior septa is present; it might be required to perform a “window within a window”. A larger window osteotomy is created in the lateral wall of the lateral compartment. Thereafter the Schneiderian membrane is lifted to expose the lateral wall of the medial compartment. A smaller window osteotomy is created in the lateral wall of the medial compartment to allow lifting of the Schneiderian membrane in the medial compartment. Both medial and lateral compartments are then grafted.11 These cases should only be managed by highly skilled and trained surgeons.
Many clinicians perform sinus augmentation without the benefit of CBCT technology and this should be avoided as septa, amongst other anatomical challenges such as roots within the sinus, may be missed. The anatomy including pathology of the maxillary sinus is covered in a previous Masterclass in Implantology.3
Conclusion
Performing SFE to enable dental implant reconstruction in the posterior maxilla is an essential part of rehabilitation in edentulous or partly edentulous situations. It requires post-graduate training in not only surgical procedures, but specifically maxillary sinus augmentation. It should not be attempted after a superficial training course as dealing with complications may be difficult and may lead to unnecessary litigation. Indemnity insurance should also be comprehensive
INTERNATIONAL DENTISTRY AUSTRALASIAN EDITION VOL. 18, NO. 1 47
MASTERCLASS IN IMPLANT DENTISTRY
and include sinus augmentation procedures. Successful augmentation in cases where sinus pathology is present may require treatment beforehand by an Ear Nose and Throat specialist.
Radiography should be used immediately after SFE surgery to verify that the graft is contained and that the Schneiderian membrane was not torn during the packing process. Should the filler graft material be shown to have spilled into the sinus through such a tear, the graft may have to be removed immediately to avoid the morbidity of a second operation later. A successful graft will show a smooth superior border with “egg” shape (Fig. 10).
It should also be stressed that alternative techniques are available to prevent performing a lateral window SFE, such as a vertical sinus floor elevation using Summers’ technique, or sometimes using what bone is available by angling the implant (Figures 11-16) to prevent perforating the sinus floor. This can be used especially if a patient does not wish to go through a lateral window SFE procedure or does not have the finances for it.
References
1. Boyne PJ, James RA. Grafting of the maxillary sinus floor with autogenous marrow and bone. J Oral Surg. 1980;38(8):613-6.
2. Tatum H, Jr. Maxillary and sinus implant reconstructions. Dent Clin North Am. 1986;30(2):207-29.
3. van Zyl A W, Todorovic V S. Maxillary Sinus Anatomy: Essential knowledge for sinus floor elevation (SFE). Int Dent Afr Ed. 2022;12(6):6-11
4. Mohan N, Wolf J, Dym H. Maxillary sinus augmentation. Dent Clin North Am. 2015;59(2):375-88.
5. Felice P, Pistilli R, Piattelli M, Soardi E, Barausse C, Esposito M. 1-stage versus 2-stage lateral sinus lift procedures: 1-year post-loading results of a multicentre randomised controlled trial. Eur J Oral Implantol. 2014;7(1):6575.
6. Pjetursson BE, Tan WC, Zwahlen M, Lang NP. A systematic review of the success of sinus floor elevation and survival of implants inserted in combination with sinus floor elevation. J Clin Periodontol. 2008;35(8 Suppl):216-40.
7. Esposito M, Grusovin MG, Rees J, Karasoulos D, Felice P, Alissa R, et
al. Effectiveness of sinus lift procedures for dental implant rehabilitation: a Cochrane systematic review. Eur J Oral Implantol. 2010;3(1):7-26.
8. Esposito M, Felice P, Worthington HV. Interventions for replacing missing teeth: augmentation procedures of the maxillary sinus. Cochrane Database Syst Rev. 2014(5):CD008397.
9. Aghaloo TL, Misch C, Lin GH, Iacono VJ, Wang HL. Bone Augmentation of the Edentulous Maxilla for Implant Placement: A Systematic Review. Int J Oral Maxillofac Implants. 2016;31 Suppl:s19-30.
10. Zaniol T, Zaniol A. A Rational Approach to Sinus Augmentation: The Low Window Sinus Lift. Case Rep Dent. 2017;2017:7610607.
11. Valentini P, Artzi Z. Sinus augmentation procedure via the lateral window technique-Reducing invasiveness and preventing complications: A narrative review. Periodontol 2000. 2022.
12. Sanz M, Dahlin C, Apatzidou D, Artzi Z, Bozic D, Calciolari E, et al. Biomaterials and regenerative technologies used in bone regeneration in the craniomaxillofacial region: Consensus report of group 2 of the 15th European Workshop on Periodontology on Bone Regeneration. J Clin Periodontol. 2019;46 Suppl 21:82-91.
13. Ali S, Bakry SA, Abd-Elhakam H. Platelet-Rich Fibrin in Maxillary Sinus Augmentation: A Systematic Review. J Oral Implantol. 2015;41(6):746-53.
14. Oliveira MR, de CSA, Ferreira S, Avelino CC, Garcia IR, Jr., Mariano RC. Influence of the association between platelet-rich fibrin and bovine bone on bone regeneration. A histomorphometric study in the calvaria of rats. Int J Oral Maxillofac Surg. 2015;44(5):649-55.
15. Reich KM, Beck F, Heimel P, Lettner S, Redl H, Ulm C, et al. Bone Graft Packing and Its Association with Bone Regeneration in Maxillary Sinus Floor Augmentations: Histomorphometric Analysis of Human Biopsies. Biology (Basel). 2022;11(10).
16. Suarez-Lopez Del Amo F, Ortega-Oller I, Catena A, Monje A, Khoshkam V, Torrecillas-Martinez L, et al. Effect of barrier membranes on the outcomes of maxillary sinus floor augmentation: a metaanalysis of histomorphometric outcomes. Int J Oral Maxillofac Implants. 2015;30(3):607-18.
17. Ohayon L, Taschieri S, Friedmann A, Del Fabbro M. Bone Graft Displacement After Maxillary Sinus Floor Augmentation With or Without Covering Barrier Membrane: A Retrospective Computed Tomographic Image Evaluation. Int J Oral Maxillofac Implants. 2019;34(3):681-91.
18. van Zyl AW, van Heerden WF. A retrospective analysis of maxillary sinus septa on reformatted computerised tomography scans. Clin Oral Implants Res. 2009;20(12):1398-401.
MASTERCLASS IN IMPLANT DENTISTRY 48 INTERNATIONAL DENTISTRY AUSTRALASIAN EDITION VOL.18, NO. 1
LCD1 3D PRINTER
This small sized Printer-platform using LCD technology delivers a complete workflow combined with our new NextDent® Wash & Cure for post processing. This reliable workflow offers an easy-touse solution for 3D printing with high quality results.


•LCD1 3D Printer
•NextDent Wash and Cure Unit

ADVANTAGES
•Remote Diagnostics and Repair
•2-year Warranty including LCD panel
•Faster than SLA printers/Matches DLP Printing
Speeds
•Smooth Surface Finish
•Auto calibrated – No user calibration required
Faster Auto
1300 65 88 22 henry schein.com.au
Composite smile makeover: A case study
Linda Greenwall1
Case Study
This case demonstrates the use of Ecosite Elements composite for a minimally invasive aesthetic smile makeover.
The 54-year-old female patient was keen to make improvements to her smile in a minimal invasive way. Several options were discussed to make smile improvements. These included tooth whitening, orthodontic treatment using braces or aligners and composite filling.
After discussing the risks, benefits, advantages and disadvantages of all techniques with the patient, it was decided to commence tooth whitening first, followed by composite filling.
The patient had previously whitened her teeth 10 years ago and had old composite filling on both lateral teeth that needed to be replaced. The existing composite restorations were stained around the margins and now needed to be upgraded.
There was a single tooth on the lower anterior teeth that had a slightly different colour to its neighbours. The patient explained that she had experienced minor trauma to this tooth 20 years previously and that it was asymptomatic.
An endodontic opinion was sought, which noted that this tooth was still vital and reacted to the electric pulp tester on the last reading.
It was decided that this tooth should be monitored but it could undergo tooth whitening treatment in the lower bleaching tray. The periapical radiograph showed that this tooth had pulp obliteration but no periapical lesion.
Whitening and planning
We undertook tooth whitening using 10% carbamide peroxide in a custom-made bleaching tray.
First, the upper teeth were whitened for two weeks. The patient was recalled for a shade review, where it was noted that the upper teeth had reached a B1 shade after two weeks. Whitening was uneventful with no reports of sensitivity.
Lower whitening then commenced. Normally, a segmental bleaching tray can be used but it was decided that this was not necessary on this occasion as there was only a slight colour difference that could be whitened effectively.
Following whitening treatment (Figure 1), we waited for a period of two weeks to re-establish the bond strength of the enamel.
The patient wanted to ensure that her teeth looked natural and that her smile appeared as though she had not had anything ‘done’ – rather, she wanted an enhancement of her old composite filling.
BDS
RCS MSC FFGDP FICD BEM
1 Dr Linda Greenwall BEM
MGDS MRD
CLINICAL 50 INTERNATIONAL DENTISTRY AUSTRALASIAN EDITION VOL.18, NO. 1
She had considered porcelain veneers, but she did not want to have her healthy enamel cut down to prepare porcelain veneers. We undertook a simple diagnostic waxup on the lateral and canine teeth to show the patient the new appearance of the teeth, which the patient approved (Figure 2).
A clear silicone index was made to the wax-up to help with the placement of composite material to replicate the shapes of the lateral incisors.


A silicone index (blue) was also made by the technician so that the patient could visualise the new appearance of the teeth (Figure 3). This was undertaken using Luxatemp temporary acrylic (DMG) bleached shade.
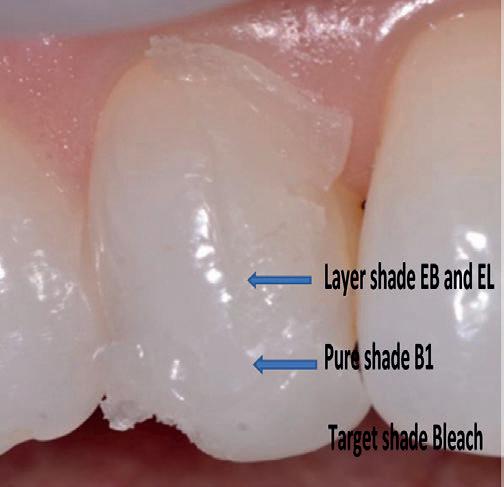
The Luxatemp was placed into the blue silicone index, which was then put on the patient’s teeth. After a setting time of two minutes, excess flash was removed.
The patient was pleased with the appearance of the
mock-up teeth and gave her consent to proceed with the composite filling.
Composite shade choosing and layering
The surgical procedure was carried out under conscious sedation with local anaesthetic, and routine sterile layering Once the Optragate (Ivoclar Vivodent) isolation is placed over the lips and the teeth are well isolated, composite shades can be selected (Figure 4).
This step needs to be undertaken rapidly as the teeth dehydrate quickly and so the incorrect shades can be selected: often, composite shades that are too light can be selected when the teeth dry out.
The material selected for this composite smile makeover was the Ecosite Elements from DMG.
This new composite offers flexibility to layer the teeth with different shades of enamel, which blend well with the shade
CLINICAL INTERNATIONAL DENTISTRY AUSTRALASIAN EDITION VOL. 18, NO. 1 51
Figure 1: Following bleaching, the existing filling on the upper left lateral and a defect on the upper right lateral incisor can be seen
Figure 2: The diagnostic wax-up was placed onto the lateral and central incisors to reshape these teeth
Figure 3: Index used for a mock-up to show the patient the results prior to undertaking definitive treatment
Figure 4: Testing enamel shades for the composite mockup
of post bleached teeth and offer a high gloss finish.
Structure of the Ecosite composite
Ecosite Elements has pure set and layer set. The Ecosite Elements consist of (barium) dental glass in Bis-GMA based dental resins with filler content about 81wt%=65vol%. The filler size of the particles is 0.02-0.7um.
The Ecosite Elements has special properties in that silane is bonded into the glass surface and the other end, a double bond, is incorporated into the resin matrix helping for easy

placement and light curing. This creates a chemical link between the filler and the resin.
Enamel that has been bleached changes in appearance; it can become more opaque and hence it is useful to use a variety of composite that has different properties of translucency and opacity for different parts of the tooth. Doing this can give a more natural appearance of the enamel after bleaching.

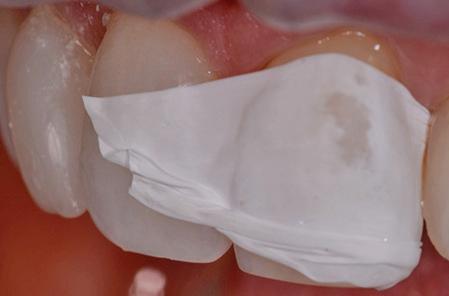


We then tested the shades of Ecosite directly onto the patient’s teeth.

GREENWALL
52 INTERNATIONAL DENTISTRY AUSTRALASIAN EDITION VOL.18, NO. 1
Fig 5: The composite shade was chosen before the definitive composite layering
Figure 6: Etching was undertaken after cleaning the tooth, prior to bonding
Figure 7: PTFE tape was placed onto the adjacent teeth on the upper left side when etching
Figure 8: The composite was placed directly into the position in the index where the different shades are required
Figure 9: The index was compressed against the tooth so that the composite inside can be well bonded onto the tooth
Figure 10: The upper left lateral tooth and the upper left central incisor-distal section

The composite shade (Figure 5) was chosen immediately after the teeth were isolated, as once isolation commences the teeth dehydrate easily.

Composite shade selection
We selected two enamel shades – EB and EL – from the Ecosite Elements composite. There were several reasons for this:
1. The EB shade was selected as we wanted to enhance the bleached enamel and make it a feature of the mesiobuccal shape of this tooth to enhance this aspect
2. The EL lighter shade composite was layered over this for a natural, high-translucency effect
3. B1 was also selected as the true shade to bring everything together on the mesial section where the most composite needed to be added. There was a deficient mesial part and we needed to carry the true shade colour forward.
Layering technique
After cleaning the tooth prior to bond, etching was undertaken (Figures 6 and 7). PTFE tape was placed onto the adjacent teeth to protect them from any etch spillages.
Etch needs to be placed over the whole lateral tooth as the entire surface needs to be bonded in order to be brought, labially and mesially, into harmony for beautiful natural anatomy. The tooth was etched with 37% phosphoric acid (DMG Etch).
First, the B1 was used directly onto the mesial part of the tooth. Then EB followed as a secondary enamel lobe. This was followed by EL shade, blended over to bring forward the glossy translucency of bleached enamel and to give a natural invisible transition from the natural tooth to the composite section.
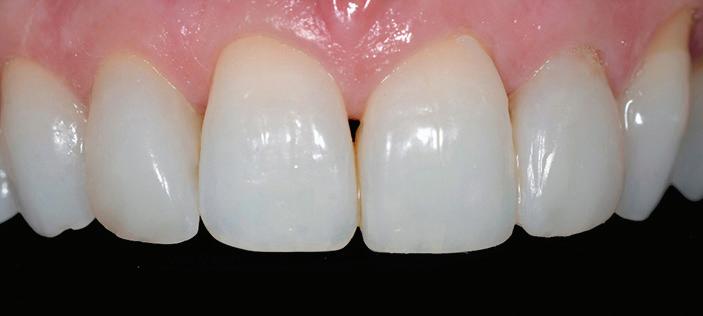
Applying the silicone index
A transparent silicone index (Figure 8) was used in the case as it saves time, prevents air bubble formation and reduces composite defects.
The index assists with the correct shaping as this right lateral tooth needed to have a large mesial lobe section added onto the mesiobuccal part to match the contralateral
tooth. This also saves time with polishing and contouring, as it avoids excess flash material being placed onto the tooth.
Firm pressure needs to be applied to the index once the composite is placed directly into it (Figure 9), which is why a test run is always helpful to check the layering shades and that the correct shade has been selected.
This approach is used often in the three-step technique when building up the occlusal vertical dimension of the bite in cases that have tooth wear from erosion, abrasion and attrition. It is used in aesthetic composite build-ups as it can help speed up the building up the tooth in three dimensions.
Problems associated with poor placement in the index include excess material onto the adjacent tooth, overhang on the mesial side and a separation if not placed with Teflon tape or a clear matrix strip.
Final shaping contouring and finishing
Finishing touches were made to the composite restorations using a flame-shaped bur to ensure any excess composite was removed.
Once the secondary anatomy had been placed (Figure 11), the composite was polished using the ASAP (All Surface Access Polishers) polishing spirals. The interproximal flash was removed and smoothed using a finishing strip (Epitex) and floss was used to check there was no catching interproximally and on the mesiobuccal gingival area.
Finally, polishing of the composites was undertaken using the diamond-impregnated ASAP polishing spirals. These polishing systems come in two different colours and two sizes. A purple colour (44 microns) was followed by an orange colour (3-5 microns) for high shine final contour.
The spirals are useful as they allow for interproximal shaping without affecting the anatomy and finishing, resulting in a smooth, glossy, glass-like surface that has a high shine (Figure 12).
This article first appeared in Clinical Dentistry and has been reprinted with permission.
Greenwall L (2021) Composite smile makeover. Clinical Dentistry 1(6): 27-30
GREENWALL 54 INTERNATIONAL DENTISTRY AUSTRALASIAN EDITION VOL.18, NO. 1
Figure 11: Appearance of the teeth after filling and layering prior to final polishing
Figure 12: The final appearance of the teeth
CHAIRSIDE PRODUCTION IS SO EASY
The new E4 makes it so easy for you to get started with chairside production of dental restorations, and gives you maximum freedom. Combine the E4 with your preferred intraoral scanner, any CAD software and materials that are appropriate for your individual patients. The E4 is the heart of your workflow and produces the perfect restoration for you. The integrated CAM software enables you to get started right away!

THE ALL-ROUNDER FOR BLOCKS

The E4 has many talents. Wet grind glass ceramics or composites with ceramic content and dry mill materials such as zirconia and PMMA
A small change with a big effect
Benefit from easy switching: Insert the tank for wet processing or the optional container for machining dust and start processing high-quality restorations. A special filter mat in the liquid tank ensures that the tank is free of chippings.
Wet grinding
The PUREWATER Technology ensures thatthe closed liquid circuit in the machine requires no grinding additives. For you, this means easy disposal and even lower running costs.

Dry milling
The optional dry container enables you to mill materials such as zirconia, PMMA and various composites with your E4 with no cooling water or compressed air.

E4
WATCH VIDEO 1300 65 88 22 henry schein.com.au
The process of the dentist and technician. A denture story
Mr P. D, male age 62 years attended the practice for a new patient examination June 2021. His primary complaint is that he is losing his teeth and would like to get them sorted.


The Dentist’s Process
First we completed the initial assessment; this allowed me to gather all the information needed.
This began with an open conversation detailing the patient’s wants, and then looking into their past dental history, and ascertaining if there was any pain or discomfort. If there was, we would then prioritize these immediate needs. During this initial assessment we can also obtain an understanding of the patient’s budget so that we can create a suitable and realistic treatment plan for him.
Mr PD stated he would just like to be able to smile again.
Having not seen a dentist for over 10 years due to a previous bad experience he admitted he is somewhat Dental phobic. He is aware however that his teeth are not in an optimal condition and is embarrassed to smile. He is also finding it difficult to eat due to the lack of teeth.
Fortunately Mr PD is not in any pain.
Following on from a thorough discussion and wanting to really understand why it was “Now” he had decided to visit a dentist and what his overall aims were for his oral health, it was then that Mr PD explained that his sister was getting married and that he was to walk her down the aisle.
He would love to be able to simply smile at his sister’s wedding. The wedding would be taking place in six weeks!
CLINICAL 56 INTERNATIONAL DENTISTRY AUSTRALASIAN EDITION VOL.18, NO. 1
Rachel Derby1 and Julia Glancey2
1 Rachel Derby, DDS, BDS MSC Private practice, Chapel Dental, Buckinghamshire. UK.
2 Julia Glancey is senior prosthetic technician and department lead at Ceramic Designs laboratory.
Figure1: Preoperative – full profile
Figure 2: Preoperative – side profile
With understanding what the patient’s wishes and expectations were, along with a full examination including radiographs and supported with a full photographic series. The patient was then invited back for a further appointment to discuss his treatment options.
Clinical Assessment
Facial profile: the patient has a skeletal class one base and has average facial proportions. Thankfully there is no loss of lower facial height, from this we can replicate the vertical dimension.
The nasal labial angle is obtuse at approximately 110degrees. There is a loss of fullness in the maxilla due to a loss of teeth.
Resting lip line shows predominantly lower teeth. There is a low smile-line, however, it is fair to say that this is probably not a Duchene smile.
One positive aspect is the lower lip curve. If we can plan the treatment correctly and place the anterior teeth in an optimal position, we should be able to deliver acceptable aesthetics.
The Temporo-mandibular joint and muscles of mastication are in good health. The patient’s field of motion is within normal range and no click or crepitus detected in the joint. There is no obvious asymmetry and soft tissues are healthy.
The periodontal assessment provided a diagnosis of generalized periodontitis, stage IV, grade C, unstable. There was considerable mobility present in the lower teeth and upper premolars.


Examination of all the dentition showed an unstable and irreproducible ICP. Caries was present on the lower left first premolar and lower right third molar. The upper right canine was in a mild crossbite with the lower right premolar.


Full mouth radiographs were undertaken. Pathology was present on the lower right second premolar and the lower right canine had a loss of lamina dura, it also had a negative response to endo frost when I had completed the sensibility testing.
Bone loss ranged from 30-70% with vertical bone loss on the upper premolars.
CLINICAL INTERNATIONAL DENTISTRY AUSTRALASIAN EDITION VOL. 18, NO. 1 57
Figure 3: Preoperative – at rest
Figure 4: Preoperative – smile
Figure 5: Preoperative – retracted
Figure 6: Retracted right-hand sideFigure 7: Retracted left-hand sideFigure 8: Upper arch
Figure 9: Lower arch
Treatment Planning Phase:
As indicated from the clinical assessment the majority of P.D’s teeth were of poor prognosis. What we know from the original discussion with our patient is that he wants to be able to eat, and he wants to be able to smile again, with his main concern being his sister’s wedding. He had mentioned that he couldn’t afford implants so this was not an option that we could further discuss. It was decided that an upper and lower immediate denture would be the best form of treatment.

Treatment Planning Thought Process:
It would be ideal to try and keep as many teeth as possible to help retain the denture, however, the lower teeth were non-viable due to caries and being periodontally involved. The teeth were also not in the optimal position with heavy tilting and drifting. It was decided that all the lower teeth would have be extracted and a complete lower denture would be fitted.
The upper arch needed more consideration. The premolars had poor prognosis and so it was decided to extract them. However, could we use the canines?
The advantage of keeping the canines would of course be for retention but for how long? There is bone loss present and the patient has been diagnosed with periodontal disease. Placing a denture by these teeth could potentially exacerbate the periodontal disease and thus bone loss.
The canines were also over erupted, would we be able to achieve an aesthetic result despite this?
What does our patient want? P.D had explained his phobia of dentists and does not want to keep returning and would really like a more definitive solution. Based on the above facts, it was decided to extract all the upper teeth.
Treatment Plan: full mouth extraction and the provision of immediate complete upper and lower dentures with the view to fabricate and place definitive dentures in 6-12months.
I planned to visit the lab to discuss the treatment plan in full with Julia. Who throughout this article will intersect with the technical considerations.
Visit One:
Primary impressions were taken of the upper and lower arch. Stock trays were customised to enable the best impression possible. The primary impression is extremely important with the success of the denture resting entirely on the accuracy of this impression.


I paid a visit to Julia at Ceramic Designs.
Rachel and I discussed in full all aspects of Mr P D’s case. From clinical considerations to desired aesthetic outcomes. It was at this stage that I suggested we fabricate spaced custom trays and bite rims. The design of the trays had to take into account that the existing dentition was mostly over erupted and mobile so we ensured that the tray design would allow for all relevant information to be recorded with


DERBY/ GLANCEY
58 INTERNATIONAL DENTISTRY AUSTRALASIAN EDITION VOL.18, NO. 1
Figures 12a, 12b and 12c: Bite registration
12a 12b 12c
Figures 10a and 10b: Primary impressions
10a 10b
Figures 11a and 11b: Secondary impressions
11a 11b

minimal risk to the standing teeth.
As you can see from the photographs there were varying degrees of height between the teeth and soft tissues. Due to this factor an initial impression was taken with putty in the edentulous areas and wax added to the peripheries to acquire full sulcus depth. Excess putty was then cut away and alginate was placed and impression retaken to ensure that all landmarks and information were recorded accurately.
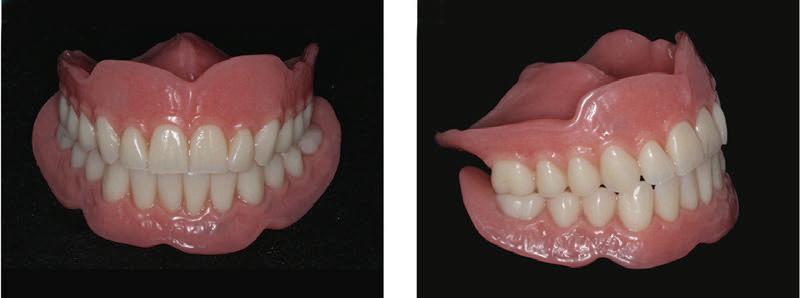

Secondary Impression and Bite Stage
As there were time restraints it was decided to carryout both the secondary impression and bite registration stage together.
The trays were tried in and adjusted in the areas that were overextend. Putty was placed in areas of under extension and a final alginate impression completed.
The Freeway Space was measured and recorded at 4mm (RVD 70mm - OVD 66mm). Therefore we could work to the current vertical height. The upper rim was adjusted to allow a 90degree nasal labial angle.
The wax rims were heated and bite recorded in centric relation. Whilst setting a micro brush into the rims parallel to the interpupillary line to give the laboratory the required information as to the correct aesthetic horizontal plane.
The patient was then asked to bring in any photographs of

him smiling so that we could see what his original teeth were like so that the lab could try to mimic this.
A shade of A2 was chosen with the patient as a brighter but age appropriate colour. It was important to our patient that his teeth were imperfect. He did not want it to be obvious that he was wearing a denture.
Laboratory Stages:
Once I had received the secondary impressions and bite rims it was time to begin creating Mr PD’s new smile. First things first.
The new models needed mounting on an articulator to see if we had to adjust the current OVD taking into account the freeway space that Rachel had previously recorded after examining the situation it was clear we were already at the optimum OVD.
It was then time to transfer all the markings that Rachel had recorded on the bite rims to the models for my reference points.
As technicians we all have our own individual ways of working, for me I prefer to work from exact measurements. This enables me to extract all the teeth from the model giving me a blank canvas to work with.
This always helps me visualize how I am going to create the new smile.
DERBY/ GLANCEY 60 INTERNATIONAL DENTISTRY AUSTRALASIAN EDITION VOL.18, NO. 1
14b 14c 14c
14d
Figures 14a, 14b, 14c and 14d: Denture
Figure13: Patient’s own photo – smiling
“Immediate” cases like these are always difficult because there just isn’t the opportunity for any try-in’s in order to verify that you are on the right track, so this highlights that it is imperative that communication between patient, clinician and technician is clear and concise.
Once the teeth were set in position and the dentures had been fabricated in wax, it was time to process them in acrylic. On finishing the dentures I had decided to fully contour the pink gum work and to also add any natural ware facets to the teeth. This was to help give the patient the natural look that he was hoping for.
Extraction and Fit Appointment:
The patient being Dental phobic requested for his teeth to be extracted under sedation. So an external service was used to carry out the sedation. Midazolam was used.
All teeth were extracted under local anesthetic and the extraction process was uneventful.
The dentures were then fitted and the patient, although drowsy was very happy.
Review Appointment:
The patient was extremely happy with the appearance of his dentures. He was able to walk his sister down the aisle and smile in the photographs say it all.


The patient did of course have to take time to get used to his dentures. An approach that proved successful was to concentrate on wearing the upper denture first, having got used to that he was then able to introduce the lower denture.
Summary
As a dentist, I could not have completed this case as successfully without the support from my lab technician. Due to the time limit on this case there was a lot of pressure to be able to deliver each stage accurately. Julia’s artistic flair really shone through with this denture and exceeded our patient’s expectations.
This article first appeared in Clinical Dentistry and has been reprinted with permission. Derby R, Glancey J (2022) Dentures: a team approach. Clinical Dentistry 2(5): 89-92.
DERBY/ GLANCEY
INTERNATIONAL DENTISTRY AUSTRALASIAN EDITION VOL. 18, NO. 1 61
Figure 15: After – full profile
Figure 16: After – side profile
Figures 17a and 17b: Before and after comparisons
17a 17b
KURARAY NORITAKE NEW KATANA™ ZIRCONIA YML YTTRIA MULTI LAYERED
KATANA™ Zirconia YML is the latest KATANA™ multi-layered disc with a well-balanced blend of colour/ translucency and flexural strength gradation. KATANA™ Zirconia YML has a unique raw material combination of highly translucent and high strength zirconia which are integrated together by advanced manufacturing technology.
Kuraray Noritake Dental’s proprietary multi-layered technology has been further developed by matching three raw materials with different yttria contents, all perfectly harmonised by KND’s fundamental inhouse production steps including purification, refining of the zirconia raw material and the essential addition of components such as yttria. This combination, together with KND’s proprietary zirconia pressing technique and refined pre-sintering process results in a unique “ALLIN-ONE Solution” offering exceptional design flexibility from longspan full-arch monolithic bridge restorations up to highly aesthetic anterior monolithic crowns.
Features
• Fast Processing
• Simple Aesthetics
• All-In-One Solution
• Controlled Firing Deformation
Available in Diameter 98.5mm and Thickness 14mm,18mm and 22mm Shades A1, A2, A3, A3.5, A4, B1, B2, B3,C1, C2, C3, D2, D3, NW
DMG ICON
Caries infiltration with Icon fills the gap between prophylaxis and filling. In addition, this treatment optically blends in the lesion with the healthy enamel. This innovative method can therefore be used for esthetic treatments of front teeth, where appearance plays an important role.
Onset of caries before treatment
Cariogenic acids attack the enamel and draw out minerals. The tooth becomes porous.
PDS NOW TEETH BRIGHTENING TONER

The PDS NOW Teeth Brightening Toner maximises surface aesthetics by changing light reflection on the teeth. This violet coloured, berry flavoured toner significantly reduces any yellowness on the teeth and slightly darkens the gums, making the teeth appear whiter due to increased contrast. The tooth brightening effects are immediate and will show after brushing with the toner just once.
COLTENE HYSOLATE LATEX DENTAL DAM
Previously Hygenic, HySolate is the new Dental Dam Range from Coltene


Complete isolation with Dental Dam is part of the endodontic and restorative workflow. Teeth are isolated from the rest of the oral cavity and the working field is set dry. Using Dental Dam protects patients form aspiration or ingestion of foreign objects and protects soft tissue from contact with instruments.
HySolate Latex Dental Dam is made of pure, natural rubber latex and is powder free. Low protein Dental Dam is a simple and clever measure to reduce the risk of developing latex hypersensitivity and provides strong retraction. The lighter colours have the advantage of naturally illuminating the operating field whereas the darker colours help with visual contrast.
HySolate Black Dental Dam has the template for marking the tooth position printed on, saving the working step of marking the dam before punching.
After treatment
The pore system is closed up, preventing acids from penetrating the tooth. It is therefore possible to stop the progression of emerging caries.
The effect is temporary and will wear off when eating and drinking.
Recommended for wedding days, big events, photo shoots or after a scale and clean to impress your patients as they leave the clinic.
Whiten & Brighten your smile NOW!
PRODUCTS 62 INTERNATIONAL DENTISTRY AUSTRALASIAN EDITION VOL.18, NO. 1
•
•
All products available from: HENRY SCHEIN
Tel: 1300 65 88 22
www.henryschein.com.au

MORITA TRI AUTO ZX2+
Beyond Ingenuity - Intelligent Endodontic Motor Next Level Reciprocation

Tri Auto ZX2+ is equipped with a new generation reciprocating drive, OGP2, that greatly reduces the chance of a file breaking in the canal. This innovative motor can be used for patency, glide path, and shaping, allowing you to finish treatment safely and in less time. Additionally, with no limits on file size or cutting direction, your current file system is compatible.
A new generation motor with world-leading apex location in-built. The future of endodontic treatment is here... Tri Auto ZX2+

GC RUSCELLO TOOTHBRUSH RANGE

KURARAY NORITAKE NEW PANAVIA™ VENEER LC
PANAVIA™ Veneer LC is a light-cure, resin cement with excellent colour stability, high wear resistance with ample working time and a one second tackcure for fast and easy clean up.
It is possible to reduce the time and effort involved in veneer placement with a cement that supports homogeneous cement application, smooth veneer positioning, efficient excess removal and quick polishing. PANAVIA™ Veneer LC offers all of these features, while giving the clinician all the control thanks to the nano cluster technology.
Indicated for permanent cementation of
•Veneers
•Inlays and onlays with less than 2mm in thickness.
Available in
•Four colour stable shades with matching water-soluble try-in pastes (Universal (A2), Clear, Brown (A4) and White)

For optimal results, use in conjunction with
•PANAVIA™ V5 Tooth Primer
•CLEARFIL™ Ceramic Primer Plus
GC EXA ADVANCED
Ruscello toothbrush range from GC, prescribed by the dental professional according to the patients oral condition and age. Ruscello prescription toothbrushes feature an ergonomically shaped handle that provides a stable, comfortable grip and allows the brush to reach posterior.
and anterior teeth easily. Also featuring a range of head sizes and bristle orientation for a truly individualised approach. Speciality brushes include: Ruscello Operation for post oral surgery, Ruscello Implant design to adapt to the contoured shape of implants, Ruscello Grappo with wider brush head and thick handle design, for more effective plaque removal and Fourlesson Mini featuring Colorcoded bristles with a clear handle to give better vision for parents.
EXA Advanced is the latest impression material from GC, featuring all main advantages for accurate impression taking. A successful indirect restoration starts with a good impression with its high accuracy and increased tear strength, it ensures a predictable fit of your indirect restorations.
EXA Advanced accurately replicates the smallest details of your preparations and features: rigidity and elasticity in balance for optimal results, resistant to tearing for an accurate reproduction of the finest preparation margins, Hydrophilic to capture all details, together with a favourable smell and taste of the material for the best possible comfort for both patients and practitioners.
All products available from: HENRY SCHEIN • Tel: 1300 65 88 22 • www.henryschein.com.au 64 INTERNATIONAL DENTISTRY AUSTRALASIAN EDITION VOL.18, NO. 1
PRODUCTS

