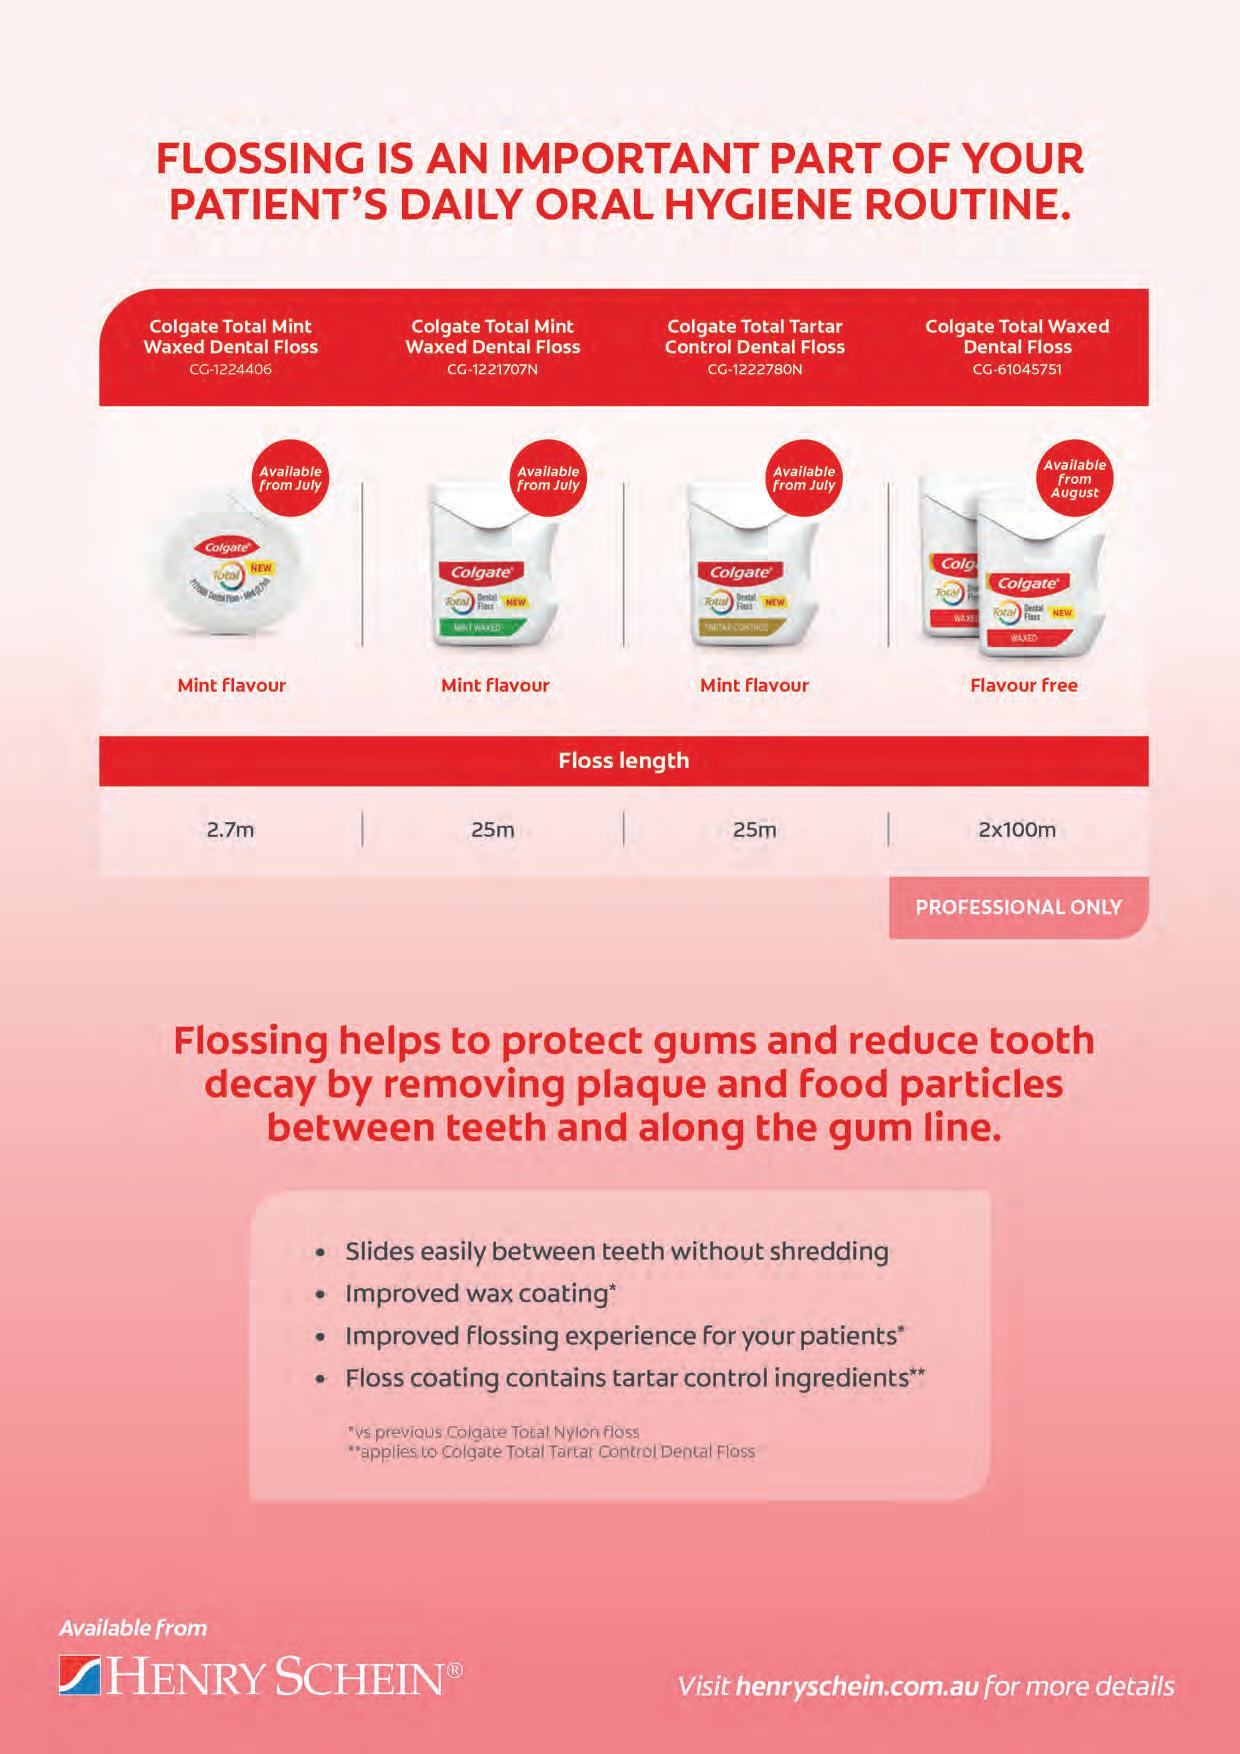
Hiromi Saisho, Juan Carlos Pontons-Melo and Marcos Vargas
Direct anterior resin composite restorations: An update on esthetic techniques
Pedro Alexandre
Deep restoration with bioceramic cement: from the pulp floor to top of the cavity
Vladislav Dvoyris
Artificial intelligence as a day-to-day diagnostic aid in the dental practice
Douglas A. Terry, Wesam Salha, Memo Castro and Markus B. Blatz
The injection resin technique using digital design: An interdisciplinary approach
Avan Mohammed
Traumatic injuries in primary teeth
Shiraz Khan
Minimally invasive restorative dentistry
Willie F. P. van Heerden, Andre W. van Zyl and Wynand P. Dreyer
Masterclass in Oral Diseases
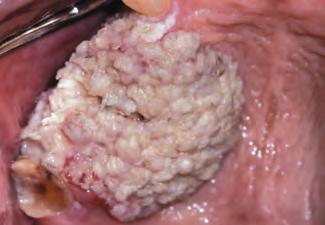
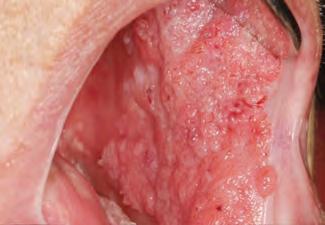
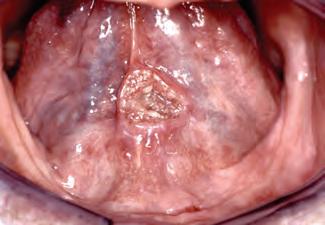
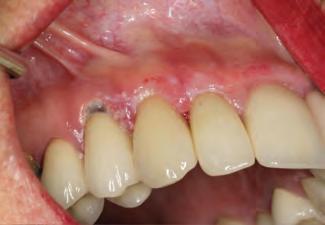
Oral Cancer - A Clinical Update
Pieter-Jan Swerts
Treatment of generalised tooth wear with the injection moulding technique
Direct anterior resin composite restorations: An update on esthetic techniques
Hiromi Saisho, Juan Carlos Pontons-Melo and Marcos Vargas
Deep restoration with bioceramic cement: from the pulp floor to top of the cavity
Pedro Alexandre
Artificial intelligence as a day-to-day diagnostic aid in the dental practice
Vladislav Dvoyris
The injection resin technique using digital design: An interdisciplinary approach
Douglas A. Terry, Wesam Salha, Memo Castro and Markus B. Blatz
Traumatic injuries in primary teeth
Avan
Minimally invasive restorative dentistry
Shiraz Khan
Oral
Willie F. P. van Heerden, Andre W. van Zyl and Wynand P. Dreyer
Treatment of generalised tooth wear with the injection moulding technique
Pieter -Jan Swerts
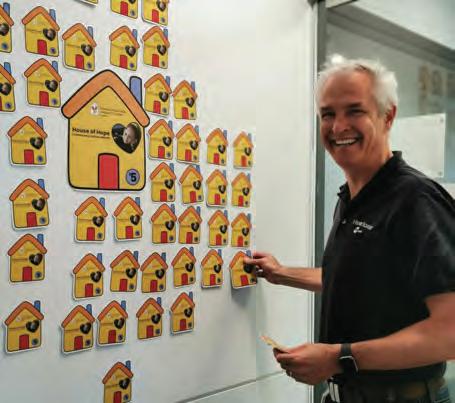
Henry Schein & Ronald McDonald House
VP Asia-Pacific Region & Managing Director Mike Covey participating in the charity day
The Ronald McDonald House is a beacon of hope and support for families navigating the challenges of childhood illness. Founded on the belief that families should not have to face these burdens alone, the Ronald McDonald House provides a comforting “home away from home” environment near hospitals. Here, families find more than just a place to stay – they discover a community of support, understanding, and compassion.
Each Ronald McDonald House offers comfortable accommodations, including private bedrooms, communal living areas, kitchens, and playrooms for children. Beyond physical comforts, these houses foster a sense of belonging and camaraderie among families sharing similar journeys. Volunteers and staff provide invaluable assistance, from warm meals to emotional support, ensuring families can focus on what matters most: the well-being of their child.
These houses are not just shelters but vibrant hubs of hope, where families find solace, friendship, and resilience in the face of adversity. With over 360 houses worldwide, the Ronald McDonald House continues to uphold its mission of keeping families together during times of medical crisis, offering a sanctuary of love and strength.
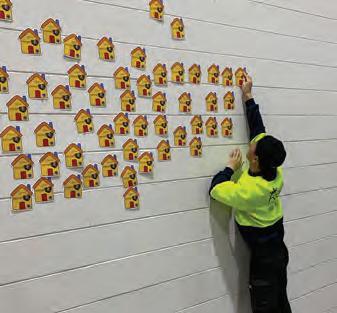
Recently the Henry Schein team at our Mascot Head Office and Eastern Creek Distribution Center (Both NSW) hosted a BBQ fundraiser for the Ronald McDonald House Charity. Each donation added a house to our display wall, symbolising our collective support for this worthy cause.
If you have any questions about Henry Schein Cares and other projects we are involved in, please email scheincares@henryschein.com.au
Vol. 19 No. 1 ISSN 2071-7962
PUBLISHING EDITOR
Ursula Jenkins
EDITOR
Dr Andre W van Zyl
ASSOCIATE EDITORS
Prof Cecilia Goracci
Prof Simone Grandini
EDITOR-IN-CHIEF EMERITUS
Prof Dr Marco Ferrari
EDITORIAL REVIEW BOARD
Prof Paul V Abbott
Dr Marius Bredell
Prof Kurt-W Bütow
Prof Ji-hua Chen
Prof Ricardo Marins de Carvalho
Prof Carel L Davidson
Prof Massimo De Sanctis
Dr Carlo Ercoli
Prof Roberto Giorgetti
Dr Johan Hartshorne
Dr Patrick J Henry
Prof Dr Reinhard Hickel
Dr Sascha A Jovanovic
Dr Gerard Kugel
Prof Ian Meyers
Prof Maria Fidela de Lima Navarro
Prof Hien Ngo
Dr Hani Ounsi
Prof Antonella Polimeni
Prof Eric Reynolds
Prof Andre P Saadoun
Prof Errol Stein
Prof Lawrence Stephen
Prof Zrinka Tarle
Prof Franklin R Tay
Prof Manuel Toledano
Dr Bernard Touati
Prof Martin Vorster
Prof Peet van der Vyver
Dr Martin Vorster
Prof Laurence Walsh
Prof Fernando Zarone
International Dentistry - Australasian Edition is published by Modern Dentistry Media CC, 50 Pineslope Gardens, The Straight, Pineslopes 2194, South Africa
No editorial matter published in International Dentistry - Australasian Edition may be reproduced in any form or language without the written permission of the publishers. While every effort is made to ensure accurate reproduction, the authors, publishers and their employees or agents shall not be held responsible or in any way liable for errors, omissions or inaccuracies in the publication whether arising from negligence or otherwise or for any consequence arising therefrom.
The team at the distribution centre supporting a worthy cause
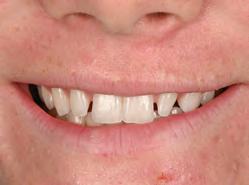
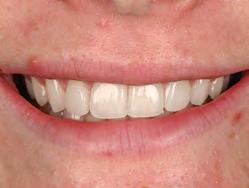
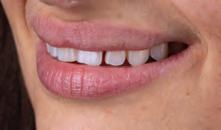
Direct anterior resin composite restorations: An update on esthetic techniques
Hiromi Saisho,1 Juan Carlos Pontons-Melo2 and Marcos Vargas3
Clinical significance
The dentist can use several techniques to esthetically and conservatively restore anterior teeth using resin composite. It is up to the dentist to use a technique, or combination of techniques, to fully exploit the potential of resin composite to produce restorations that seamlessly blend into natural tooth structure.
Abstract
1 Dr. Hiromi Saisho is a Clinical Assistant Professor in the Department of Family Dentistry at the University of Iowa. She received her DDS degree in Lima Peru, then completed a Master’s in Operative Dentistry at the Pontifical Catholic University of Paraná, Brazil and her Prosthodontics residency at Cayetano Heredia University, Lima Peru.
2 Dr. Juan Carlos Pontons Melo received his DDS in 2000. He specialized in restorative and cosmetic dentistry and received a Ph.D. in dental materials from the University of Rio Grande do Sul, FO-UFRGS, Brazil.
3 Dr. Marcos Vargas received his DDS in 1985. From 1990 to 1992, he spent two years in the AEGD program at the Eastman Dental Center in Rochester, New York. He received his certificate and master’s degree in Operative Dentistry in 1994 at the University of Iowa where he is currently a Professor in the Department of Family Dentistry.
Direct resin composites have the potential to create natural-looking restorations that can satisfy the needs and expectations of both patients and clinicians. These restorations are the result of the combination of the use of adequate techniques and materials. Unfortunately, some procedures for composite placement are overlooked by the dentist because they can be labour-intensive and skill-sensitive. Several techniques have been described in the literature, including free-handing, stock matrices, injectable matrices, and digitally produced matrices, to facilitate placement and reduce chair time. Selecting the most appropriate technique for any clinical situation can expedite and facilitate the outcome. All techniques have advantages, disadvantages, weaknesses, and strengths; no technique is hassle-free or works in all conditions. Case selection for each technique and the practitioner’s ability are the main predictors of success. This article describes and compares different techniques for making predictable direct esthetic anterior resin composite restorations in daily practice.
Esthetic patterns demanded by society have stimulated patients to search for dentofacial harmony and improve their appearance. Dentistry allows patients to obtain their desired goals and provides them with great smiles.1,2 One of the most popular materials in dentistry is composite resin. These are used due to their relatively low cost, availability, and bonding efficiency.3,4 They also offer good predictability, acceptable longevity, and less invasive restoration techniques, and they cost less than indirect restorations.5 Thus, when restoring anterior teeth, it is up to the clinician to take advantage of the full potential of direct restorations to provide anatomy, function and esthetic results.5,6
To achieve the full potential of direct restorations, knowledge of the optical properties of dental tissues and restorative materials in terms of individual characteristics such as chromaticity, opacity/translucency, and restorative techniques is necessary. Appropriate contouring and polishing methods are also primordial to achieve restorations that blend into the tooth structure and defy detection.6,7 Restoring a tooth to its ideal shape, function, and esthetics with composite resins requires excellent attention to detail and technical proficiency.8 Due to the rapid advancements in adhesive technology, incorporating composites into tooth structure with minimal or no cavity preparation has become feasible, allowing for a minimally invasive or non-invasive approach.9
Before starting treatment, it is essential to adequately address the patient’s or parents’ desired esthetic concerns during treatment.10,11 Direct esthetic restorative treatments include diastema closures,24 recontouring,3 worn teeth,26 reduction or elimination of black triangles,28 fractured teeth,12 veneers,13 Class III and IV restorations.8 Some techniques like free-hand layering of resin composites involve intricate and time-
intensive additive methods on the part of the clinician, as well as highly specialized skills and attention to detail.14 This is the reason most clinicians may avoid esthetic direct anterior restorations.13
Within the variety of resin composites, monochromatic resin composites, one-shade one-opacity, are probably the most frequently used material for direct procedures. However, in some cases, they fail to replicate teeth that present a gradient of colour from incisal to cervical or present a halo and translucency in the incisal edge.6,10 To replicate the intricacies of natural teeth, layering various shades and opacities of composite materials are used.6,7 However, this can be labour-intensive and complicated, and the outcome may suffer improper blending and/or cannot properly reproduce intricacies observed in natural teeth.10,15,16 Other disadvantages of polychromatic layering include a laborious process, additional cost in materials and maintaining inventory, and more skill, training and practice. 7,16 Moreover, the process of traditional direct restorations is less predictable and more operator-reliant because the clinician needs to contour intra-orally and polish restorations to mimic dental anatomy compared to indirect restorations in which the anatomical shape and finishing are produced in the laboratory.8 Clinicians tend to favour indirect restorations when multiple anterior restorations are needed, or when a smile makeover is necessary.17 Thus, the creation of indirect restorations is frequently outsourced to a dental technician, which drives up expenses and delivery times.8,17
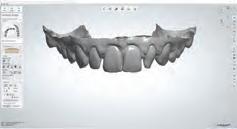
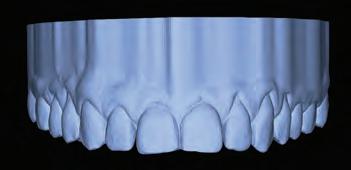
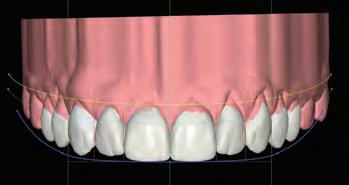
A diagnostic wax-up is frequently employed to facilitate the planning phase in restorative dentistry. Diagnostic waxups can be created both analog and digitally. Wax can be added to change the morphology of the teeth to simulate
the proposed esthetic and function.18,19 However, with the advancement of dentistry, digital wax-ups have become increasingly popular.20 This process involves scanning a patient’s mouth or a stone model, altering the virtual shape of their teeth using computer software, and then 3D printing the replica.21 Once the wax-up is completed, it is presented to the patient and utilized to create mock-ups before the final procedure.22 This helps to understand better and manage patient’s expectations and gives them a sneak peek at how the restorations would look in person.8,22 Wax-ups can fabricate silicone indexes to guide the desired anatomy and obtain proper tooth width proportions,21 as shown in Figure 1. A restorative plan is then formulated using direct or indirect techniques.
This article describes and compares different techniques for producing predictable direct esthetic anterior resin composite restorations in daily practice.
Techniques
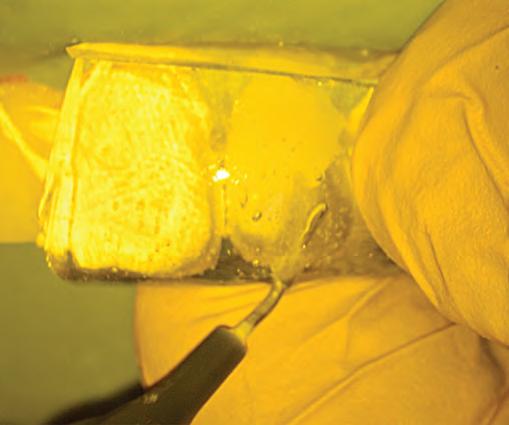
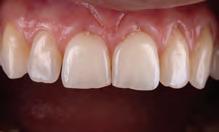
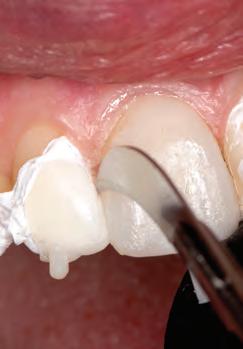
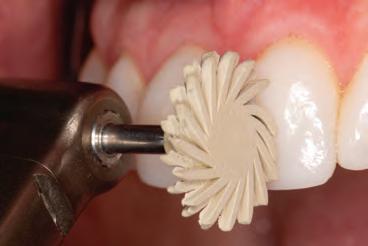
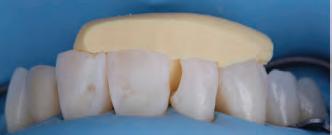
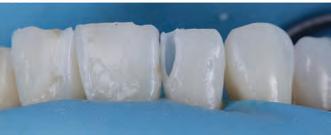
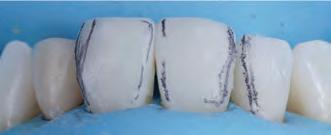
Free-hand: This technique involves the addition of composite layers without the use of any matrix or containing system.23 It relies on the dentist’s ability to manipulate the material in a cavity preparation or to address various issues, such as replacing missing dental tissue in an incisal edge, repairing enamel defects, closing diastemas, or filling small cavity preparations.13,16 Practitioners may choose between different viscosities of resin composite, some opting for flowable or less viscous materials and some preferring higher viscosity, such as conventional composites.5,13 Instrumentation varies from using just the tip of the flowable material to injecting and smoothing thin-bladed instruments and brushes for conventional materials.3 (Fig. 2)
For most free-hand techniques, a conventional mylar strip is necessary.3,24 These strips aid in composite placement and the common “pull-through” technique,3,25 which involves pulling material through the interproximal with the mylar strip to fill proximal areas. While effective in skilled hands, this technique can be challenging and impractical for novices.24 Furthermore, it only works when utilizing very “waxy,” nonsticky, firm materials and is contraindicated for flowable and sticky materials.26
Fig. 1a: STL of maxilla arch. Fig. 1b: Digital wax-up will facilitate the planning phase.
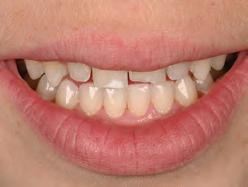
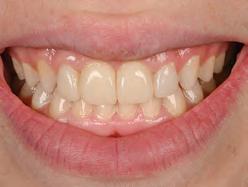
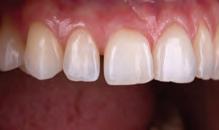
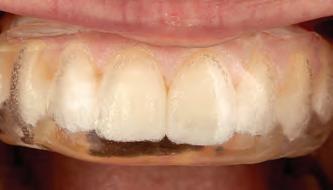
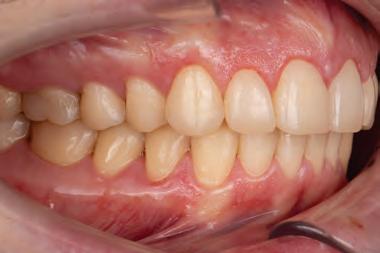
Fig. 2a: Patient was concerned about the discoloration on the two upper central incisors.
Fig. 2b: Old restorations were removed, and the surface was air-abraded with 50-micron aluminum oxide.
Fig. 2c: Freehand technique used to close the diastema.
Fig. 2d: The final result is at the one-year recall.
The advantages of the free-hand technique include its simplicity and minimal instrumentation and the fact that it does not require high operator skills in small preparations and defects.3,27 However, when this technique is used to repair significant defects, missing tooth structure, layering with several opacities and chromaticities, or to close diastemas, an operator with high skills is crucial, thus making it inaccessible to most practitioners.16 Additionally, superb finishing methods are required to produce anatomical features, surface characterization, and gloss to create an imperceptible restoration.27 In these more significant cases, other matrix techniques may offer several advantages over the freehand technique.
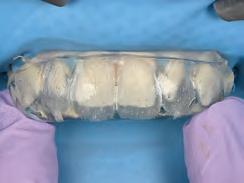
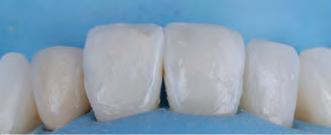
Dental matrix systems: Several commercially available stock matrices are available to the dentist (e.g. Bioclear, Unica and others) to facilitate the placement of composite resins. These matrices (Fig. 3) are appropriate for almost any size and type of restoration.28 They are inserted under dental dam isolation and positioned between the rubber dam and the tooth.29 The rubber dam acts as a rubber band around the tooth, sealing it against the tooth, thus preventing excess material from penetrating the sulcus and creating ledges.28 Additionally, since the composite is polymerized against a very smooth surface, minimal or non-finishing is typically required in the proximal areas. Leaving this highly smooth surface prevents minimal plaque and calculus accumulation.29
Monochromatic materials are used with these matrices and involve the injection of a flowable (no light-curing) followed by a conventional viscosity that extrudes the flowable. This process aids in the insertion of material and elimination of voids.25 The authors prefer heated composites, which can further help their insertion. If a polychromatic restoration is desired, a cut-back approach (also called the window technique) can be employed, involving the removal of some facial composite and its replacement with other opacities and stains to produce halos and incisal translucency.28 These matrices provide suitable proximal contour, but attention should be paid to plastic matrices that require thickness for stiffness, potentially resulting in open contacts. The facial
and lingual surfaces still need contouring and polishing to replicate anatomical contours and blending, which can be considered a disadvantage of this method.
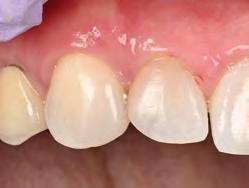
The Bioclear matrices deserve special attention since they are presented as an excellent alternative for closing black triangles and closing diastemas. These matrices prevent any gingival excess in the interproximal area, which is difficult to access for removal and finishing, but instead extrude any excess onto the facial or lingual, where contouring and polishing are more accessible.28 The instruments required for this technique are the same as the free-hand technique with the addition of the matrices.25 When used for black triangles and diastema closures, the clinician can establish the optimal curvature for closing gingival embrasures.29 The Bioclear black triangle kit comes with a colour-coded gauge inserted into the black triangle or diastema space and then corresponding with colours at the top of the matrix.28 This allows the clinician to choose the appropriate size and contour matrix.28,29 In the author’s experience, selecting one size larger matrix than the corresponding colour from the colour-coded gauge is better. The matrices are offered in two sizes (big and small) and four curvatures (red, yellow, green, blue), allowing the operator to treat the entire anterior sextant, from canine to canine, in both upper and lower arches.28 This results in robust and esthetically acceptable outcomes.29 Patients with substantial midline diastemas often lack interdental papilla, influenced by the distance between the interdental contact point and the alveolar bone crest.29,30
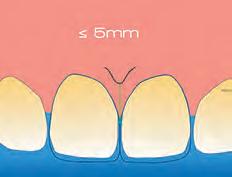
A previous study indicated that when this measurement is 5 mm or less, the interdental papilla is present in nearly 100% of cases.30 However, as this distance increases, the likelihood of papilla presence decreases.30,31(Fig. 4). To address this, rubber dam isolation is crucial for preventing moisture contamination and facilitating effective gingival retraction.29 This retraction enhances access to the cervical area, allowing the addition of composite material in spaces previously occupied by gingival tissue.25,29 This process helps prevent the formation of non-esthetic black triangles and achieves a more aesthetically pleasing result.28
Fig. 3a: A Bioclear gauge measures the black triangle between the tooth, the upper right canine, and the lateral incisor.
Fig. 3b: Bioclear matrix tryin. Note using a larger matrix than recommended by gauge.
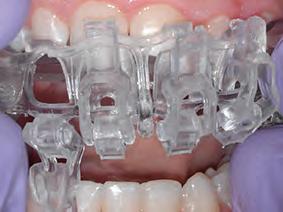
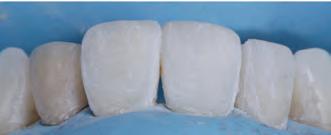
Direct technique with customized prefabricated palatal guides: This technique requires pre-operative impressions of both arches using polyvinyl siloxane (PVS) to prepare a dental cast and transfer the proposed changes from the wax-up.4 (Fig. 5) The palatal index, which is an impression of the palatal portion of the tooth or teeth to be restored, is created using a PVS impression material21 or laboratory silicone.4 During the restorative phase, the index is seated on the palatal side after placing the adhesive. The composite is placed onto the silicone guide to form the restoration’s palatal aspect (palatal/proximal contour and incisal edge).9,10 Once this palatal increment is light-cured, the silicone matrix is removed, and the remaining part of the restoration can be incrementally built up with resin composite.21 A monochromatic material can be used to build the remaining of the restoration, or it can be incrementally built with various opacities and chromaticities to imitate dentin and enamel using “dentin- and enamel-like” materials or by adding layers of translucent composite between the lobes.10 Ultimately, each patient is unique when it comes to selecting the right enamel shade for the final layer.6,10
Advantages of this technique include minimal finishing and polishing of the palatal portion and occlusal adjustments because all details were worked out during the wax-up phase before the matrix fabrication.4,32 The first palatal increment provides a canvas where the dentist can add
the remaining increments to build the restoration.4,10 This technique is beneficial when multiple restorations are to be placed and when the length of the teeth is going to be increased. Thus, the anterior guidance is dialled in the waxup.4,32 Disadvantages include an additional or a longer appointment for impression and laboratory work waxing for future restoration or restorations.32 A longer appointment is required if a polychromatic restoration is to be placed.10 This technique still relies on the ability and skill of the dentist to layer composite and to properly replicate anatomical contours as contouring and polishing.9,10
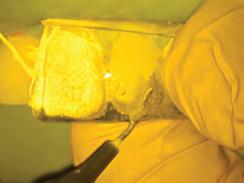
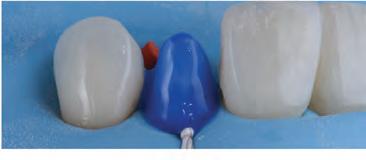
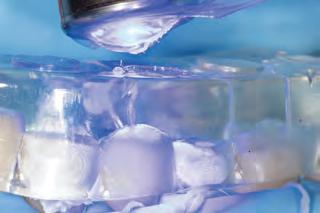
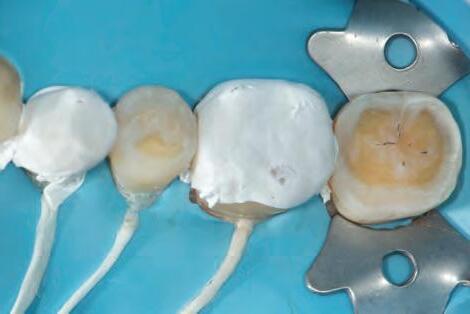
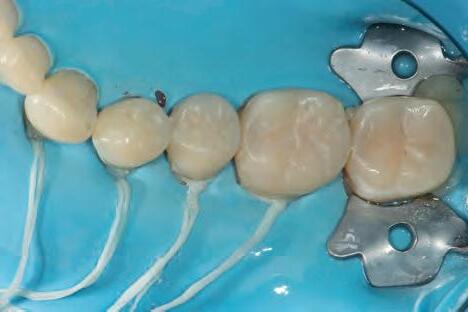
Injectable technique matrices: One method that offers a fast and easy solution to predictably converting a diagnostic wax-up into composite restorations is made possible by the injectable technique, using transparent silicone matrices and flowable resin composites.12 (Fig. 6)
This technique significantly reduces the sensitivity of the procedure and the time spent in the chair, delivering accurate and reliable outcomes, particularly when integrated with a digital workflow.14,22
With this approach, a wax-up is created, and an impression using a clear PVS material is obtained.12, 22 Access holes are made through the clear PVS index at the incisal edges to insert the tip of a flowable material to copy and transfer the anatomy created by the wax-up.22 The PVS index is tried in intra-orally to verify fit.12 The teeth adjacent to the tooth to be restored are covered with polytetrafluoroethylene tape. The tooth to be restored is etched and bonded.33 The index is inserted. The flowable composite is injected through the access holes, thus replicating the contours created from the wax-up. The remaining teeth are to be restored, so repeat this procedure. Once the index has been removed, the final restorations are polished and completed.8
While flow composite restorations may remain more prone to wear or fracture, they can be readily repaired, prolonging the restoration’s lifespan.34 These restorations are nevertheless regarded as contraindicated for stress-bearing areas.8,22, 35
The main advantage of this technique is that the tooth’s anatomy is replicated from the wax-up and does not have to be created by the clinician.12 A drawback of injecting
Fig. 4a: Distance between the interdental contact point and the alveolar bone crest 5mm or less will result in the papilla filling the space in nearly 100% of cases.
Fig. 4b: Distance between the interdental contact point and the alveolar bone crest exceeding 5mm will result in un-esthetic black triangles.
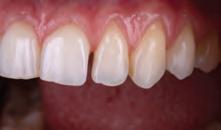
Fig. 5a: The patient was unhappy about the appearance of her smile due to a Bolton discrepancy. Patient desires to have a beautiful smile.
Fig. 5b: Use palatal matrix with the proposed changes transferred from the wax-up.
Fig. 5c: Palatal contours built over the palatal matrix.
Fig. 5d: Post-operative results after restoration.
flowable composite into space is that because the PVS index replicates the complete wax-up, there will always be a space between the mould and the original adjacent tooth. This space can cause the flowable material to extrude over the adjacent unrestored tooth.36 Subsequently, this excess can be difficult and time-consuming for teeth to remove. Thus, the technique’s benefit of reducing time with a satisfactory result is diminished.8 A disadvantage of this technique is the creation of cervical ledges, so attention must be paid to polishing and finishing these areas, which requires time, effort, and skill, especially in interproximal areas.36
An alternative method for the injection technique involves creating two wax-ups. Each wax-up has every other tooth to be restored, and then two clear matrices are created, one over each wax-up. This technique is usually created with a digital workflow, printing each wax-up.36 Through an intraoral scan, a digital wax-up can be created, which is retrievable and adaptable since each phase of the process may be changed and reversed as a single shape.21 Each tooth may remain a single shape once the digital wax-up is complete. This implies that every digitally waxed tooth can be altered or viewed later.36 This feature offers an unmatched advantage Compared to standard waxing methods, which leave the models fragile and irreversibly waxed.8
The ability to print the models in three dimensions (3D), which is more accessible, less expensive, and more durable, is another benefit of the digital workflow.21 To ensure appropriate shape and facilitate clinical operations, this sequential digital workflow is essential.8,21
The first matrix is inserted into the patient’s mouth following the isolation, etching, and bonding steps.36 To prevent the flowable composite from entering the embrasures and coating the neighbouring teeth and to precisely polymerize it within the limited area of the first wax-up, there must be a tight seal between the waxed and unwaxed teeth.8,36 After, the procedure is repeated with the second PVS mould.36 Compared to the traditional injection technique, this approach should prevent excess material from getting over the adjacent teeth.8,36
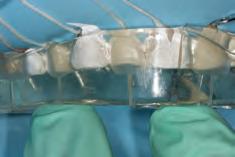
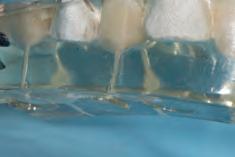
3D printed matrices: This is a relative newcomer in the US market, the 3M Filtek matrix (Fig. 7). It is a 3D-printed matrix based on a digital wax-up and is indicated to treat Class IVs, peg lateral incisors, diastema closures, and direct veneers. The clinician sends a digital or analog impression to the manufacturer indicating the purpose for construction, and the manufacturer creates a digital wax-up with proprietary design software. After the dentist approves the wax-up through a portal, the matrix is designed, printed and shipped to the clinician.
The clear matrix is tried on for fitting, removed for adhesive application, and then seated back and locked with a selflocking mechanism. The matrices have windows over every tooth to be restored and interproximal fins to prevent adjacent restorations from bonding together. The windows are then opened, and material is injected into the matrix through these windows. A flowable and a conventional viscosity composite can be used, allowing the traditional material to displace the flowable, aiding adaptation and ease of insertion. Another workflow is to place and cure a flowable composite at the
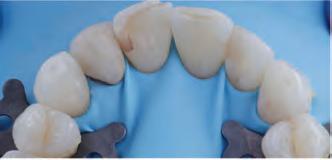
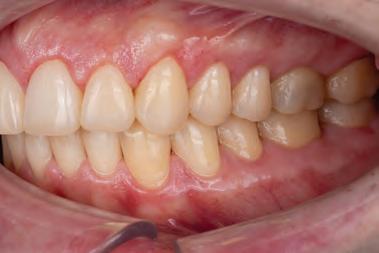
Fig. 6a: Patient requested to build peg laterals to fill the spaces between her teeth.
Fig. 6b: Clear PVS index try-in.
Fig. 6c: Injection of flowable composite.
Fig. 6d: Post-operative result.
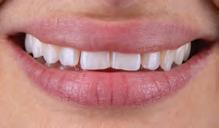
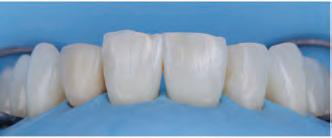
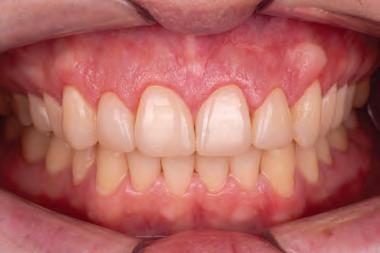
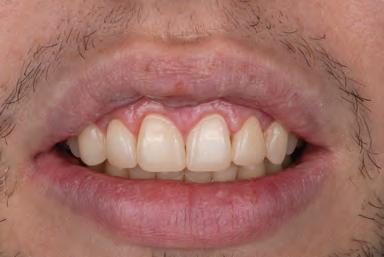
Fig. 7a: Patient is unhappy about the appearance of his smile and desires to have a fuller smile.
Fig. 7b: Filtek matrix try-in. Fig. 7c: Injecting resin composite using the Filtek matrix.
Fig. 7d: Post-operative view of restorations.
Table 1
Techniques
Freehand
Dental matrix systems Direct technique with customized lingual prefabricated matrices
Injectable technique
3D printed matrices
Advantages
•No need for matrix or containing system. 23
•Minimal instrumentation.3
•Appropriate for almost any size and type of restoration.28
•Prevents creation of ledges or residual material.28
•Minimal or non-finishing is required in proximal areas.29
•Good proximal contour. Best alternative to close black triangles and diastemas.25
•Minimal finishing and polishing of the lingual portion and occlusal adjustments.32
•Beneficial when making multiple restorations and when the length of the teeth will increase.32
•Allows layering for polychromatic restorations.10
•Decreases technique sensitivity of the procedure and the time in the chair.14
•Anatomy of the tooth is replicated from the wax-up.22
•Interproximal fins prevent adjacent restorations from bonding together.
•Matrices are easy to insert.
•The composite does not bond to the matrix.
•Predictable results are obtained.
margins to help minimize the potential for voids, light curing, and inserting the conventional material. The windows are closed, and excess material is extruded through vents on the doors. The composite is polymerized through the clear matrix upon removal of the excess material. The composite does not bond to the matrix because the manufacturer coats the matrix with an isolating film.
From the authors’ point of view, this technique’s advantages include reproducing anatomical proximal contours well through the fins in the matrix. It allows treating multiple teeth at a time, and predictable results are obtained. Disadvantages include two appointments, the cost of the matrix, and, in some cases, the practitioner needing to produce the natural contours through contouring and polishing, which increases appointment duration.
Summary
Continuous advancements in techniques, materials, and technology have created esthetically pleasing restorations using composite resins. An essential characteristic of composite resins is their ability to emulate dental characteristics. However, the primary reasons for failures in anterior teeth are typically recurrent decay, chipping and colour discrepancies, issues often remedied through repair and polishing. When properly planned and carried out,
Disadvantages
•Needs dentist’s ability and experience.16
•Impractical for novices.24
•Time consuming.
•Matrices that require thickness for stiffness potentially result in open contacts.
•Facial and lingual surfaces need contouring and polishing to replicate anatomical contours and blending.
•For polychromatic restoration, a cut-back approach must be applied.28
•Cervical ledges may be created with this technique, requiring extra time for finishing.3
•Need of two appointments.
•Cost of the matrix.
•Need to make final contouring and polishing.
the proposed techniques can improve marginal precision, yield a highly esthetic and functional immediate solution, and facilitate an easy workflow through free-handling or reproducing a diagnostic wax-up through matrices. Additionally, the combinations of techniques can be easily incorporated to facilitate composite restorations.
All the previously described techniques are conducive to obtaining excellent esthetic functional restorations. However, each clinician needs to choose the composite material according to their liking regarding handling ability, chromaticities, opacity, and translucency, along with the techniques presented in this article.
References
1. Pontons-Melo JC, Furuse AY, Mondelli J. A direct composite resin stratification technique for restoration of the smile. Quintessence Int . 2011;42(3):205–11.
2. Fahl N Jr. Trans-surgical restoration of extensive Class IV defects in the anterior dentition. Pract Periodontics Aesthet Dent. 1997 Sep;9(7):709-20; quiz 722.
3. Pontons-Melo JC, Atzeri G, Collares FM, Hirata R. Cosmetic recontouring for achieving anterior esthetics. Int J Esthet Dent. 2019;14(2):134-146.
4. Pontons-Melo JC, Garcia IM, Vargas M, Collares FM. Bioadditive and enameloplasty technique for restoring anterior esthetics: 54-month clinical follow-up. Quintessence Int [Internet].
2020;51(8):622–9.
5. Demarco FF, Cenci MS, Montagner AF, de Lima VP, Correa MB, Moraes RR, Opdam NJM. Longevity of composite restorations is definitely not only about materials. Dent Mater. 2023 Jan;39(1):1-12.
6. Dietschi D, Fahl N. Shading concepts and layering techniques to master direct anterior composite restorations: An update. Br Dent J. 2016 Dec 16;221(12):765–71.
7. Fahl N Jr, Denehy GE, Jackson RD. Protocol for predictable restoration of anterior teeth with composite resins. Pract Periodontics Aesthet Dent. 1995 Oct;7(8):13-21.
8. Coachman C, De Arbeloa L, Mahn G, Sulaiman TA, Mahn E. An improved direct injection technique with flowable composites. A digital workflow case report. Oper Dent. 2020 May 1;45(3):235–42.
9. Kabbach W, Sampaio CS, Hirata R. Diastema closures: A novel technique to ensure dental proportion. J Esthet Restor Dent. 2018 Jul;30(4):275-280.
10. Romero MF. Esthetic anterior composite resin restorations using a single shade: Step-by-step technique. J Prosthet Dent. 2015 Jul;114(1):9-12.
11. Paravina RD, Westland S, Kimura M, Powers JM, Imai FH. Color interaction of dental materials: blending effect of layered composites. Dent Mater. 2006 Oct;22(10):903-8.
12. Terry DA, Powers JM. A predictable resin composite injection technique, Part I. Dent Today. 2014;33(4):98–101.
13. Ritter A. Direct Resin-Based Composites: Current Recommendations for Optimal Clinical Results. Compend Contin Educ Dent . 2005;26(7):481–90.
14. Hosaka K, Tichy A, Hasegawa Y, Motoyama Y, Kanazawa M, Tagami J, Nakajima M. Replacing mandibular central incisors with a direct resin-bonded fixed dental prosthesis by using a bilayering composite resin injection technique with a digital workflow: A dental technique. J Prosthet Dent. 2021 Aug;126(2):150-154.
15. de Abreu JLB, Sampaio CS, Benalcázar Jalkh EB, Hirata R. Analysis of the color matching of universal resin composites in anterior restorations. J Esthet Restor Dent. 2021 Mar;33(2):269-276.
16. Elzayat GA, Elsayed MM, Zoghby AFE. Clinical performance of direct anterior composite restorations using esthetic dual-shade versus polychromatic natural layering technique: A split mouth randomized controlled clinical trial. Braz Dent Sci. 2020;23(4):1–12.
17. Mangani F, Cerutti A, Putignano A, Madini L. Clinical Approach to Anterior Adhesive Restorations Using Resin Composite Veneers. Eur J Esthet Dent . 2007;2(2):188–209.
18. Kobayashi S, Nakajima M, Furusawa K, Tichy A, Hosaka K, Tagami J. Color adjustment potential of single-shade resin composite to various-shade human teeth: Effect of structural color phenomenon. Dent Mater J. 2021;40(4):1033–40.
19. Lucena C, Ruiz-López J, Pulgar R, Della Bona A, Pérez MM. Optical behavior of one-shaded resin-based composites. Dent Mater. 2021 May;37(5):840-848.
20. Hosaka K, Tichy A, Motoyama Y, Mizutani K, Lai WJ, Kanno Z, Tagami J, Nakajima M. Post-orthodontic recontouring of anterior teeth using composite injection technique with a digital workflow. J Esthet Restor Dent. 2020 Oct;32(7):638-644.
21. Sampaio CS, Puppin-Rontani J, Tonolli G, Atria PJ. Workflow of digitally guided direct composite resin restorations using open source software and 3D printing: a clinical technique. Quintessence Int. 2021 Feb 1;52(2):104–10.
22. Ypei Gia NR, Sampaio CS, Higashi C, Sakamoto A Jr, Hirata R. The injectable resin composite restorative technique: A case report. J Esthet Restor Dent. 2021 Apr;33(3):404-414.
23. Dietschi D. Free-Hand Bonding in the Esthetic Treatment of Anterior Teeth: Creating the Illusion. J Esthet Dent . 1997;9(4):156–64
24. Saratti CM, Krejci I, Rocca GT. Multiple diastema closure in periodontally compromised teeth: How to achieve an enamel-like emergence profile. J Prosthet Dent. 2016;116(5):642–6.
25. Kwon SR, Oyoyo U, Li Y. Influence of application techniques on contact formation and voids in anterior resin composite restorations. Oper Dent. 2014;39(2):213–20.
26. Fahl N. Step-by-step approaches for anterior direct restorative challenges. J Cosmet Dent. 2011;26(4):42.
27. Fahl Júnior N. The aesthetic composite anterior single crown restoration. Pract Periodontics Aesthet Dent. 1997 JanFeb;9(1):59-70.
28. Hussien AOT, Ibrahim SH, Essa MES, Hafez RM. Restoring black triangle with bioclear matrix versus conventional celluloid matrix method: a randomized clinical trial. BMC Oral Health. 2023 Dec 1;23(1):1–18.
29. Kim J, Clark DJ. Full-Mouth Black Triangle Treatment Protocol. Dent Tod . 2017.
30. Tarnow DP, Magner AW, Fletcher P. The Effect of the Distance From the Contact Point to the Crest of Bone on the Presence or Absence of the Interproximal Dental Papilla. J Periodontol. 1992 Dec;63(12):995–6.
31. Kurth JR, Kokich VG. Open gingival embrasures after orthodontic treatment in adults: prevalence and etiology. Am J Orthod Dentofacial Orthop. 2001 Aug;120(2):116-23.
32. Pontons-Melo JC, Pizzatto E, Furuse AY, Mondelli J. A conservative approach for restoring anterior guidance: a case report. J Esthet Restor Dent. 2012 Jun;24(3):171-82.
33. Terry DA, Powers JM, Mehta B V. A predictable resin composite injection technique, part 2. Dent Today. 2014;33(8):12.
34. Souza MO, Leitune VCB, Rodrigues SB, Samuel SMW, Collares FM. One-year aging effects on microtensile bond strengths of composite and repairs with different surface treatments. Braz Oral Res. 2017;31(5).
35. Watanabe H, Khera SC, Vargas MA, Qian F. Fracture toughness comparison of six resin composites. Dent Mater. 2008 Mar;24(3):418-25.
36. Segundo A, Resende T, da Conceicao V, Sekito T, Sesma N. Direct pressed technique for guided composite restorations to rehabilitate eroded dentition. J Cosmet Dent. 2023;39(1):19–37.
This article was originally published in Oral Health Canada and has been reprinted with permission.
Saisho H, Pontons-Melo JC, Vargas M. Direct Anterior Resin Composite Restorations: An Update on Esthetic Techniques, Oral Health Canada, April 2023.
CLINICAL
Deep restoration with bioceramic cement: from the pulp floor to top of the cavity
Carious lesions in the root region are a major challenge in daily clinical practice. In addition being difficult to detect (diagnosis is often a radiographic finding), they are also very challenging due to their proximity to the pulp tissue and the difficulty of access for restorative procedures.
Biodentine™ is a calcium silicate-based material that has, among its main properties, bioactivity, compressive strength, and short setting time. These qualities make it possible to use Biodentine™ as a one-step filler in the case of conservative treatments of the pulp, with or without exposure.1,2,3
Unlike MTA, the indications of which are more focused on endodontics, Biodentine™ has demonstrated proven results in pulp regeneration.4 When compared to glass ionomers, Biodentine™ is more resistant and bioactive.3 The latter characteristic is not found in GICs, which are not indicated for placement directly on the pulp without another material as a liner or base, such as calcium hydroxide or MTA.5,6,7,8,9 Moreover, Biodentine™ does not cause discoloration of tooth structure like MTA does.10 Thus, it is an excellent option for cases of deep cavities, even those with direct pulp involvement. This article aims to show some of the characteristics and indications of Biodentine™ through a clinical case report.
Case Report
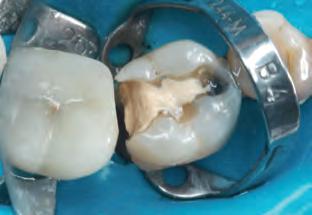
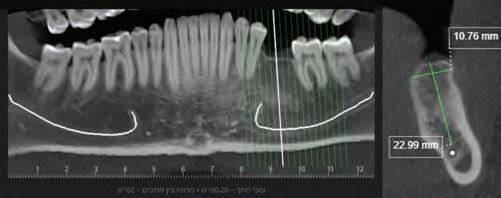
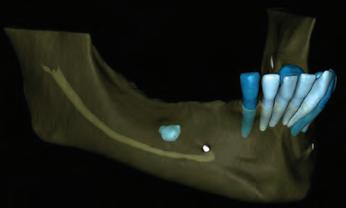
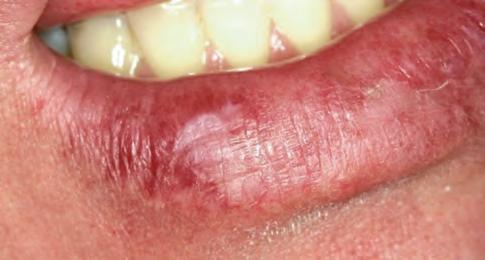
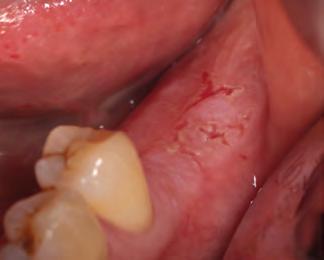
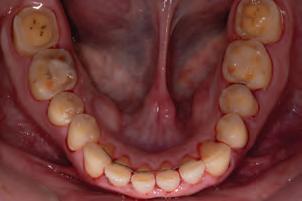
A 77-year-old Caucasian patient presented to the dental clinic after five years without dental care. The clinical findings showed significant bone loss, chronic periodontitis, and loss of some teeth that stabilized the occlusion. The patient reported cold sensitivity in tooth #46, especially when ingesting liquids.
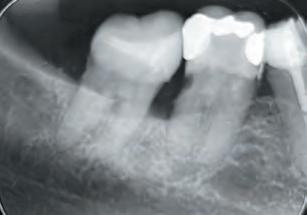
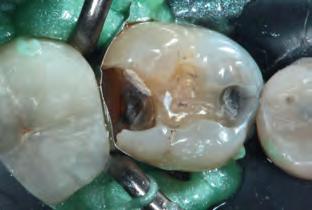
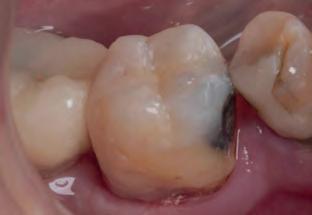
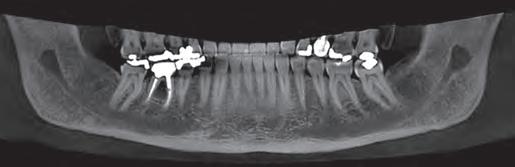
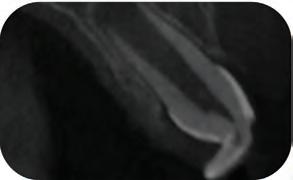
Periapical X-ray confirmed the findings of the clinical examination and root caries was also detected in the distal root of tooth #46, which answered positively to the sensitivity test (Fig.1-2).
1 Dr. Pedro Alexandre Master Degree in Dental Materials (Santa Catarina Federal University, UFSC, Brazil). Specialist in Dentistry (IEAPOM, Porto Alegre, Brazil). Post-Graduation in Implant Dentistry. Specializing in Periodontics (ABO/RS, Brazil). Professor of Improvement and Specialization Courses in Dentistry
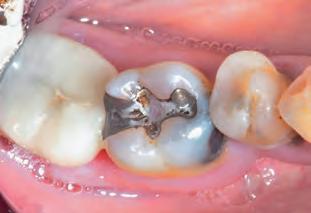
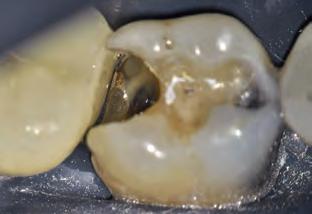
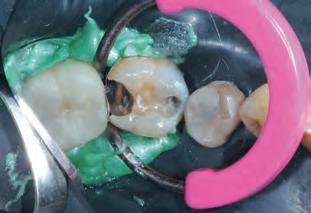
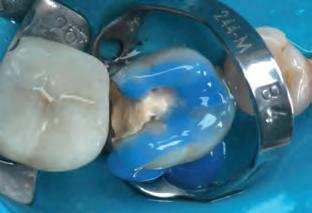
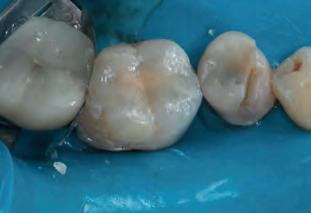
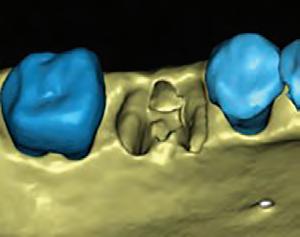
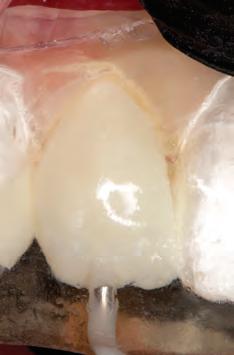
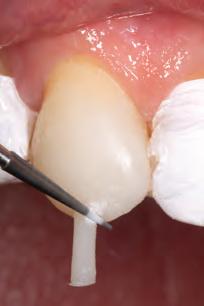
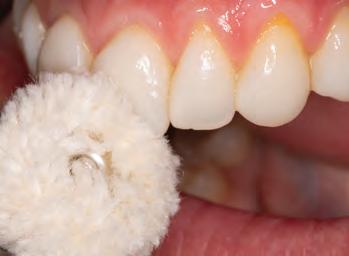
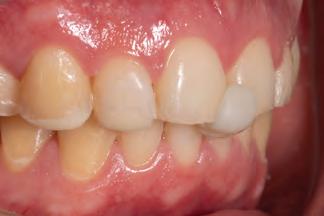
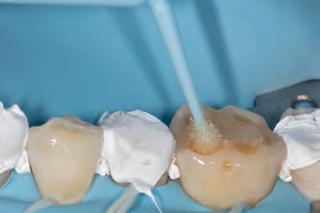
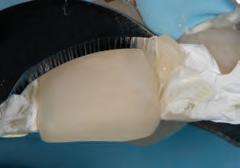
The treatment plan began with a focus on returning the patient to adequate periodontal health. In a subsequent session, with improved condition of the periodontium, the restoration of tooth #46 was performed. Under block anesthesia of right inferior alveolar nerve and rubber dam isolation, the amalgam restoration was completely removed and access to the caries cavity obtained (Fig. 3-5). Despite the proximity to the pulp tissue, no exposure occurred, and the class II cavity was fully restored with Biodentine™ (Fig. 6-8).
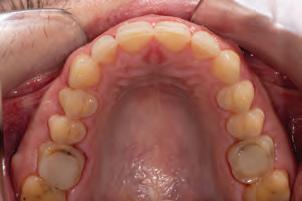
At two months’ follow-up, no symptoms were reported, no periapical lesion was observed radiographically, and the clinical examination showed normal vitality (Fig. 9-10). Thus, it was decided to perform the definitive restoration, leaving Biodentine™ as the definitive base.
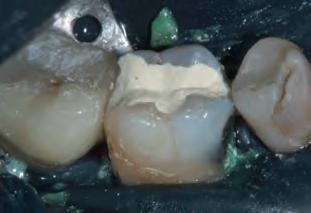
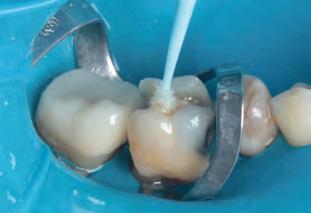
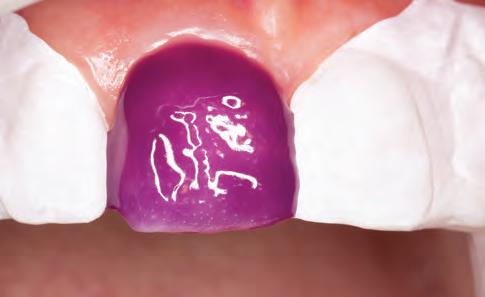
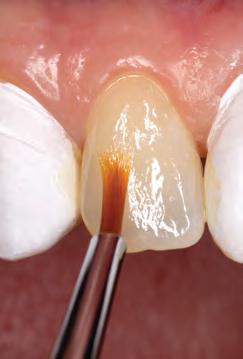
The Biodentine™ material was partially removed and a resin composite filling placed over it (Fig. 11). Selective etching of enamel was done, followed by the application
Pedro Alexandre1
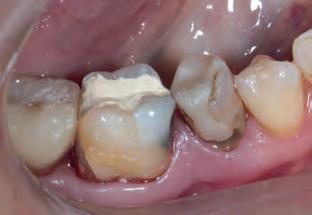
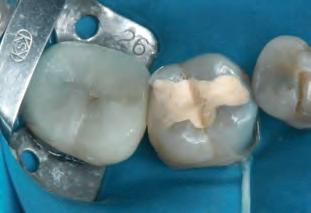
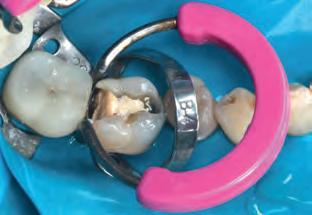
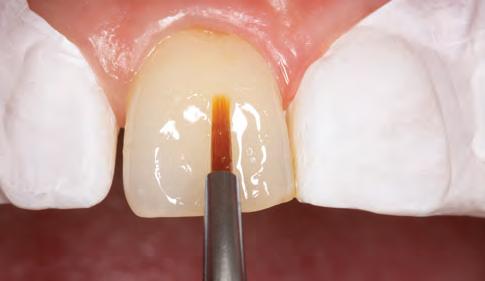
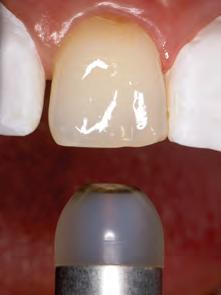
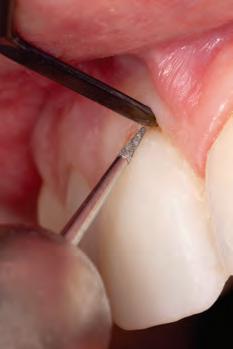
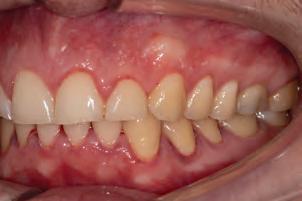
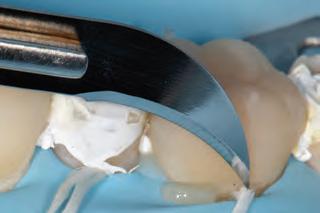
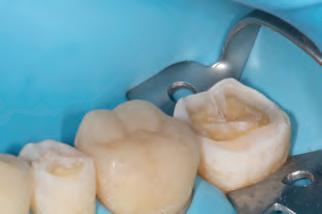
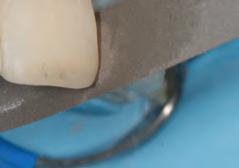
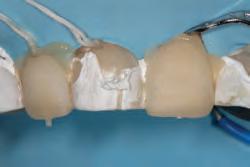
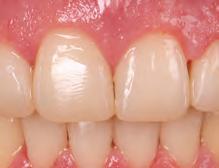
of an adhesive system (Palfique Bond®, Tokuyama) (Fig. 1213). After light-curing, the matrix system (SeptoMatrix, Septodont) was set and a large matrix with a soft ring was used for a better contour and proximal contact point (Fig. 14). The restoration was started in the distal portion, changing the class II cavity into a class I cavity (Fig. 15). Finally, the occlusal face was completed using Palfique LX5® (Tokuyama) composite (Fig. 16). After light-curing, glycerin gel was applied to allow better photo-activation of the surface layer. The restoration was then finished and polished, before removing the rubber dam and checking occlusion (Fig. 17).
Important observations
Firstly, it was decided not to remove the amalgam restoration on the mesial face because, although the amalgam corrosion had stained the tooth structure, the restoration did not harm the health of the tooth. It was felt that removal could cause more aggravation to the pulp tissue and consequent loss of pulp vitality.
With regard to the periodontium, the subgingival treatment had the desired effect within two months. The occlusal adjustment allowed for a decrease in the mobility of two teeth that had previously displayed increased mobility due to vertical bone loss.
Discussion
Caries lesions close to the pulp are a challenge to both diagnose and access in our daily practice, as demonstrated in our reported case. Indirect pulp capping is a procedure that aims to preserve pulp vitality by avoiding endodontic treatment.(5,6) Different materials have been used for indirect pulp capping over the years. Pastes based on calcium hydroxide, glass ionomer, and MTA are presented in several studies as options for this treatment.(5,6,7,8) However, the more effective materials in terms of bioactivity (MTA) do not have enough resistance to fill the entire cavity like Biodentine™, which can be used as a single material to bulk-fill a cavity from pulp to crown for up to six months. In the present case, Biodentine™ remained for a period of two months, which was enough time for the signs and symptoms to resolve and a definitive restoration to be placed.
Conclusion
Biodentine™ is an excellent option for restoring teeth with deep cavities, with or without pulp exposure. Important properties such as bioactivity, resistance, and short setting time, in addition to excellent plasticity, allow Biodentine™ to be easily placed in more challenging cases of difficult access and close pulp proximity, as reported in this clinical case.
Fig. 1: Initial clinical situation.
Fig. 4: Septomatrix in position.
Fig. 2: Initial X-ray.
Fig. 5: Cavity deep.
Fig. 3: Class II cavity prepared.
Fig. 6: Biodentine™ applied in a Bio Bulk-Fill approach.
References
1. Laurent P, Camps J, De Méo M, Déjou J, About I. Induction of specific cell responses to a Ca(3)SiO(5)based posterior restorative material. Dent Mater. 2008 Nov;24(11):1486-94. doi: 10.1016/j.dental.2008.02.020.
Epub 2008 Apr 29. PMID: 18448160.
2. Kunert M, Lukomska-Szymanska M. Bio-Inductive Materials in Direct and Indirect Pulp Capping-A Review Article. Materials (Basel). 2020 Mar 7;13(5):1204. doi: 10.3390/ ma13051204. PMID: 32155997; PMCID: PMC7085085
Fig. 7: Clinical situation after 12 minutes and the removal of the matrix.
Fig. 10: Biodentine™ restoration after 2 months.
Fig. 13: Adhesive application.
Fig. 16: Immediate finished restoration.
Fig. 8: Clinical situation after the removal of the rubber dam.
Fig. 11: Removal of the external part of Biodentine™.
Fig. 14: Placement of a matrix system (Septomatrix, Septodont).
Fig. 17: Clinical situation after finishing and polishing.
Fig. 9: Follow-up X-ray 2 months postoperatively.
Fig. 12: Selective etching of enamel.
Fig. 15: Reconstruction of the distal wall with composite.
3. Koubi G, Colon P, Franquin JC, Hartmann A, Richard G, Faure MO, Lambert G. Clinical evaluation of the performance and safety of a new dentine substitute, Biodentine™, in the restoration of posterior teeth - a prospective study. Clin Oral Investig. 2013 Jan;17(1):243-9. doi: 10.1007/s00784-0120701-9. Epub 2012 Mar 14. PMID: 22411260; PMCID: PMC3536989.
4. Chauhan A, Dua P, Saini S, Mangla R, Butail A, Ahluwalia S. In vivo outcomes of indirect pulp treatment in primary posterior teeth: 6 months’ follow-up. Contemp Clin Dent 2018;9:S69-73
5. Gurcan AT, Seymen F. Clinical and radiographic evaluation of indirect pulp capping with three different materials: a 2-year follow-up study. Eur J Paediatr Dent. 2019 Jun;20(2):105-110. doi: 10.23804/ejpd.2019.20.02.04.
PMID: 31246084
6. Mathur VP, Dhillon JK, Logani A, Kalra G. Evaluation of indirect pulp capping using three different materials: A randomized control trial using cone-beam computed tomography. Indian J Dent Res. 2016 NovDec;27(6):623-629. doi: 10.4103/0970-9290.199588. PMID: 28169260.
7. Sahin N, Saygili S, Akcay M. Clinical, radiographic, and histological evaluation of three different pulpcapping materials in indirect pulp treatment of primary teeth: a randomized clinical trial. Clin Oral Investig. 2021 Jun;25(6):3945-3955. doi: 10.1007/s00784-020-037244. Epub 2021 Jan 6. PMID: 33404764.
8. Rahman B, Goswami M. Comparative Evaluation of Indirect Pulp Therapy in Young Permanent Teeth using Biodentine™ and Theracal: A Randomized Clinical Trial. J Clin Pediatr Dent. 2021 Jul 1;45(3):158-164. doi: 10.17796/1053-4625-45.3.3. PMID: 34192759.
9. Kurun Aksoy M, Tulga Oz F, Orhan K. Evaluation of calcium (Ca2+) and hydroxide (OH-) ion diffusion rates of indirect pulp capping materials. Int J Artif Organs. 2017 Oct 27;40(11):641-646. doi: 10.5301/ijao.5000619. Epub 2017 Jul 8. PMID: 28708217.
10. Camilleri J. Staining Potential of Neo MTA Plus, MTA Plus, and Biodentine™ Used for Pulpotomy Procedures. J Endod. 2015 Jul;41(7):1139-45. doi: 10.1016/j. joen.2015.02.032. Epub 2015 Apr 15. PMID: 25887807.
Reprinted with permission from Septodont - Case Studies Collection - October 2023
Artificial intelligence as a day-to-day diagnostic aid in the dental practice
Vladislav Dvoyris1
1 Vladislav Dvoyris, DMD MBA FICD Private Practice, Tel Aviv, Israel
In the recent years, and more so since the introduction of OpenAI’s Dall-E and ChatGPT, the terms “artificial intelligence” (AI) and “machine learning” (ML) have become commonplace. What was considered as science fiction for many years is slowly becoming a reality, and in fact, we are surrounded by artificial intelligence almost every moment of our daily life. Our Facebook browsing and Google searches, the algorithm that suggests us new shows on Netflix and unfamiliar songs on Spotify, and even the autonomous driving capabilities of modern vehicles – all are examples of artificial intelligence trained to perform various technical tasks, to make our day-to-day activities easier, to make our experience across the various services smoother, and to simplify technical and repetitive work for human operators.
Over the past twenty years, numerous start-up companies around the world have been focusing on AI-based medical and dental solutions. What began as rather modest attempts to build natural language processing engines that enable computerized reading of medical records and systematic extraction of information from them, has in recent years become a real revolution, especially in the field of medical image recognition. Dozens, if not hundreds, of companies around the world are competing for the attention of imaging departments in various hospitals and offering solutions that might help in easing the workload of the radiologist, prioritize patient cases, and alleviate the associated professional burnout through AI-based identification of various pathological conditions.
Here, however, the field of general radiology encountered a problem. Since “narrow” AI is usually trained to recognize one specific thing, each AI model is capable of addressing only one type of lesion or disease. In order to provide a comprehensive AI-based solution to a hospital imaging department, one must acquire and integrate many software solutions, each from a different manufacturer. This task remains impossible to this day.
Luckily for us, the creation of a comprehensive diagnostic tool is much easier when it comes to dental medicine. Most patients who come in for a routine dental checkup would present a fairly limited variety of clinical conditions – mainly periodontal attachment loss and carious lesions, together with various endodontic and periapical conditions. From a purely statistical point of view, it can be said that these diagnoses are at the core of dentistry, and therefore it should be rather easy to create an AI-based diagnostic system that would cover more than 90% of the patients seen by a general dental practitioner in a community setting.
While the reasonable dentist must spend some valuable time reviewing the X-rays or CBCT and looking for abnormal findings, a computerized system can analyze it in a matter of minutes, and with a high average accuracy – highlighting hard-toidentify radiologic findings that the doctor may have missed. Unlike a human doctor, computerized systems do not get tired and their ability to concentrate on a specific case is not impaired throughout the working day.
Indeed, several AI-based dental imaging solutions reviewing dental x-rays and
producing reports have appeared recently. Most of these software solutions are based on image recognition models, and therefore specialize in 2D imaging – namely, bitewings, periapical and panoramic (OPG) X-rays. Fewer advanced solutions exist that are based on convolutional neural networks used for 3D volumes, which are therefore also suitable for interpreting dental Cone Beam CT.
The use of CBCT in dentistry has become commonplace in recent years. While technical capabilities of CBCT devices are constantly improving together with a gradual decrease in radiation exposure, interpretation methods and viewers have also improved. Nevertheless, for many dentists, interpretation of a 3D CBCT volume is still a challenge, or even a disruption of the daily routine. The need for additional training and a considerable amount of time for interpretation of a CBCT, cause a large share of the information to be lost, minimizing its diagnostic benefits.
AI-based innovative decision support systems have entered this space. These systems analyze the simulations and photographs, look for abnormal findings – depending on what the system has been trained to identify – and highlight them to the dental practitioner, saving time and preventing underdiagnosis.
Generally speaking, one may divide the AI tools currently available in the dental market to three different types:
1. Review of findings – identification and numbering of teeth in the 2D X-ray or 3D CBCT imaging; identification of basic dental anatomy (roots and
canals); identification of previous treatments performed on the teeth and related defects; identification of dental and gingival lesions; and identification of lesions and abnormal findings in the jaws and maxillary sinuses.
2. Automated measuring tools – tools that provide alveolar bone measurement for dental implant placement; measurement of root canals for endodontic treatment; measurement of the volume of periapical lesions for clinical decision-making and follow-up; cephalometric measurements; and measurement of the volume of the upper airway (for orthodontic treatment, as well as detection of sleep apnea).
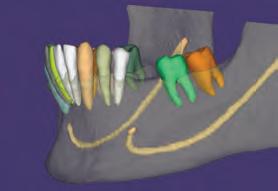
3. Segmentation tools – convert the 3D CBCT volume into digital models, which can then be transferred to specialized software for orthodontic, prosthodontic, or surgical planning. The use of CBCT as an addition to intraoral scans and facial scans is another step towards creating a more complete “virtual patient”, on which we can plan the treatment more accurately, later transferring the products of our planning to computerized production, and finally, to placement in the patient’s mouth.
I have been using artificial intelligence tools throughout the examination of all my patients since 2019. I will now present a number of clinical cases from my daily practice, in which artificial intelligence was used as an aid for making informed decisions in diagnosis and treatment planning. It must be said that I deliberately chose routine cases and not “heroic battle tales”. In my presentation below, I will focus on the process
Fig. 1a: A panoramic reformatting of the CBCT scan, made by artificial intelligence, with automatic marking of the inferior alveolar nerve canal.)
Fig. 1b: A panoramic reformatting of the CBCT scan, performed by a human radiographer, with manual marking of the inferior alveolar nerve canal.)
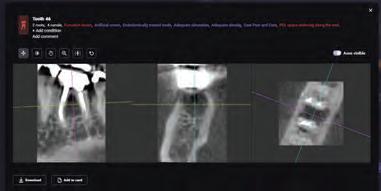
Fig 2: Automatic measurement of the height and width of the alveolar ridge at the designated implantation site (Diagnocat, Diagnocat Inc., USA).
Figure 3a-c: 3D Imaging of the patient’s jaw and teeth. The volume of the CBCT imaging was segmented to STL models, and then the mandible model was made semitransparent to show the IAN canal pathway. (The 3D models were segmented with Diagnocat (Diagnocat Inc., USA) and displayed in the Exocad Webview software (available for free use at webview.dental).
Figure 4a-b: A panoramic reformatting performed by AI based on the patient’s CBCT scan. The lesion on the right side of the jaw was marked by the artificial intelligence and alerted the dentist.
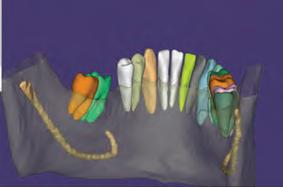
Figure 5a-c: 3D segmentation of the patient’s lower jaw, enabling clear visualization of the residual ridge shape and the mixed lesion location and size.
of examination and decision-making and not necessarily on the treatment itself.
Clinical case no. 1
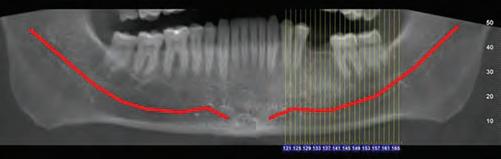
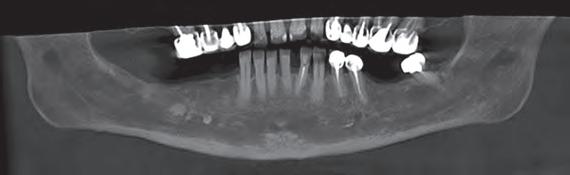
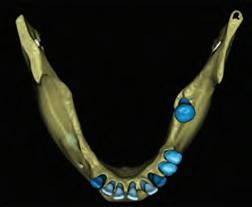
R., a 40-year-old male, came to the dental clinic due to a previously extracted tooth #19 (ISO 36), and asked for an implant-supported crown to be placed. He was referred for a CBCT at an imaging center, and the resulting 3D volume was uploaded to an artificial intelligence system (Diagnocat, Diagnocat Inc., USA) to perform automatic slicing, detection of the inferior alveolar nerve, and alveolar ridge measurements. Parallel to that, a human radiographer in the imaging center created a manual cross-sections report, that was attached to the 3D DI-COM file.
In the panoramic reformatted image produced as part of the AI-based cross-sections report, it seemed that the pathway of the inferior alveolar nerve forms a loop towards the mandibular foramen, close to the future transplant site. (Fig. 1A) It is unfortunate to mention that a human interpreter
did not mark this loop, (Fig 1B) perhaps due to alternate positioning of the panoramic cross-section.
In light of this discrepancy, I ordered a rendering of the 3D volume to a digital STL model, in order to further appraise the distance between the mandibular foramen and the planned implant placement site. The cross-sectional measurements (Fig. 2) and the segmentation to a 3D model (Fig. 3) were carried out by the same artificial intelligence system (Diagnocat, Diagnocat Inc., USA). These made it possible to understand the exact location of the nerve, and to make sure that it was indeed out of range of danger in this case.
Clinical case no. 2
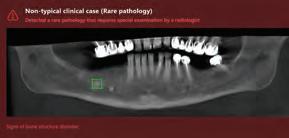
A 68-year old female patient interested in performing dental implants in the lower jaw came for an examination at the dental clinic and was subsequently referred to a CBCT scan. As part of the routine examination process in the clinic, the patient’s imaging files were uploaded to an artificial intelligence system (Diagnocat, Diagnocat Inc., USA) which
Figure 6: An OPG taken after placement of four implants in the patient’s lower jaw. Figure 7: Panoramic reformatting performed by artificial intelligence (Diagnocat, Diagnocat Inc., USA). A hypodense lesion is clearly seen in the furcation region of tooth 46. Figure 8: List of automatically generated diagnoses and sample slices provided by artificial intelligence. Figure 9: A built-in viewer enables easy creation of new slices and clear visualization of the furcational lesion. 10a. 3D segmentation was performed to appraise the bone defect treated by the lesion.
Figure 10b-d: Virtual extraction of tooth 46 (before the actual procedure) allows for a good appraisal of the damage caused by the furcational lesion and planning of the socket preservation / implant placement procedures that would follow the extraction.
indicated the presence of a lesion in the right posterior region of the lower jaw. (Fig. 4a-b) The mixed lesion, presenting a hyperdense core surrounded by hypodense shell, is most likely a fibro-osseous lesion, and in a joint consultation with an oral and maxillofacial surgeon, it was decided to leave it for follow-up at this stage. However, it was also decided that implant placement is possible mesial to the lesion.
Nevertheless, the patient still wants implants to be placed, and for this purpose, a three-dimensional segmentation was carried out to further examine the ridge anatomy and the possibility of designing a surgical guide that will allow the installation of implants mesial to the mixed lesion, which is also well visible in the 3D model. (Fig. 5a)
The 3D model also makes it possible to clearly and
sharply see the narrow shape of the patient’s residual ridge. (Fig. 5b-c) This information helped us plan the future treatment, as well as provide an exhaustive explanation to the patient and obtain informed consent for all stages of the procedure. (Fig. 6)
Clinical case no. 3
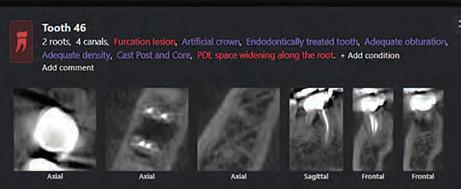
A 67-year-old female patient referred to our clinic in early 2019, complaining of pain in the right posterior region of the mandible. After a clinical examination that included X-rays in the clinic, she was referred to a CBCT scan of the lower jaw, for in-depth investigation of the a lesion between the roots of tooth 46. In Fig. 6, one may see the panoramic reformatting performed on her CBCT using artificial intelligence
Figure 11: A follow-up OPG performed 3 years after restoration of the new implant with a telescopic zirconia crown. Optimal bone healing around the implant and the crown are evident, thanks to proper placement of the implant and the biomechanical properties of telescopic implant-supported restorations.
Discussion, summary, and conclusions
In a paper from 2020, Kaan et al. examined the accuracy of periapical lesion volume measurements performed by artificial intelligence software compared to a human radiologist. One of the conclusions of the study, published in the International Endodontic Journal, was that the measurement carried out by AI was equivalently accurate to measurement performed by a human, and therefore can be used as a reliable substitute.
About a year later, Ezhov et al. published the results of a comprehensive study carried out by an international research group, which included senior dental and maxillofacial radiologists from several centers in Europe and the United States. The most important conclusion of this study was that a statistically significant difference is seen when comparing the accuracy of diagnoses given by dentists who used artificial intelligence versus those who did not, when examining the same clinical cases.
(Diagnocat, Diagnocat Inc., USA).
The AI also provided initial diagnoses, (Fig. 7) including, among other things, a radiolucent lesion in the area of the furcation. The AI-made cross-sections clearly demonstrated the lesion.
In order to further clarify the matter, a multi-planar view was enabled, in which the lesion was also seen in all its glory. (Fig. 8)
In the end, I decided to extract the tooth. To plan the treatment and prepare for further treatment steps, AI-based segmentation was ordered, and a three-dimensional model was created. (Fig. 10a)
Now, we can correctly estimate the size of the bone defect created by furcation lesion, by “virtual extraction” of the tooth model, allowing us to look at the alveolar bone (Fig. 10b-c-d) from different angles – something that is not easily possible in 2D X-rays or classical viewers. Now we can see the shape of the residual alveolar bone before the extraction takes place!
In the end, and in light of the above imaging, I decided that in this case, the extraction will be followed by socket preservation. Four months later, an implant was placed, and after additional three months of healing time, allowing for osseointegration, it was loaded by a telescopic abutment (Abracadabra Implants Ltd., Israel), and a zirconia crown with temporary cement.
Due to the COVID-19 pandemic, the patient didn’t show up for follow-up in a while. However, when she finally came for followup in December 2022, a complete and excellent bone healing is evident around the implant and under the crown. (Fig. 11)
Therefore, while it is difficult to estimate when the AI would become mature enough to be able to complete the patient’s examination with high accuracy and without the need for the dentist to verify the diagnoses (and when would we be able to trust it to do so), it is clear that even today, the findings provided by the AI render it a clinicallysignificant and useful tool for every dentist – new graduates and seasoned specialists alike. The AI is a decision support system, providing various convenient tools, such as detailed review of findings, enhanced visualization, automated crosssectional reports, and digital models created at the touch of a button – and each one of those, in turn, improves the accuracy of diagnosis and treatment. Artificial intelligence is no longer science fiction – it is a reality.
References
1. Orhan K, Bayrakdar IS, Ezhov M, Kravtsov A, Özyürek T. Evaluation of artificial intelligence for detecting periapical pathosis on conebeam computed tomography scans. Int Endod J. 2020 May;53(5):680-689. doi: 10.1111/iej.13265. Epub 2020 Feb 3. PMID: 31922612.
2. Ezhov M, Gusarev M, Golitsyna M, Yates JM, Kushnerev E, Tamimi D, Aksoy S, Shumilov E, Sanders A, Orhan K. Clinically applicable artificial intelligence system for dental diagnosis with CBCT. Sci Rep. 2021 Jul 22;11(1):15006. doi: 10.1038/ s41598-021-94093-9. Erratum in: Sci Rep. 2021 Nov 9;11(1):22217. PMID: 34294759; PMCID: PMC8298426.
This article was originally published in Oral Health Canada and has been reprinted with permission.
Dvoyris V. Artificial Intelligence as a Day-to-day Diagnostic Aid in the Dental Practice, Oral Health March 2023.
The injection resin technique using digital design: An interdisciplinary approach
Douglas A. Terry,1 Wesam Salha,2 Memo Castro3 and Markus B. Blatz4
1 Douglas A. Terry, DDS Private practice, Houston, Texas
2 Wesam Salha, DDS, MSD Private practice limited to periodontics and implant dentistry, Houston, Texas
3 Memo Castro Laboratory technician and digital designer, Houston, Texas
4 Markus B. Blatz, DMD, PHD, Dr med dent habil Chair and Professor of Restorative Dentistry, Assistant Dean for Digital Innovation and Professional Development, Penn Dental Medicine, Phila-delphia, Pennsylvania
Correspondence to: Dr Douglas Terry, dterry@dentalinstitute.com
The availability of a variety of new materials and application techniques in adhesive dentistry expands the esthetic possibilities for the clinician and ceramist but also mandates that patient, clinician, and ceramist remain in close communication to maintain an elevated level of performance, knowledge, and artistic ability. Esthetic dentistry, though scientific in nature, remains an art form, and like other art forms, the final product must be appealing to the patient. The proper communication between patient, clinician, and ceramist ensures esthetic dental work that truly reflects artistic ability and creativity while resulting in patient satisfaction. To remain competitive and successful in this technologically advancing profession, esthetic dentists can no longer afford to work on “stone models without faces.”1
Today, digital technology has transformed almost every aspect of modern life. The information provided by digital technology can be utilized for global positioning systems, visual recognition, imaging to interpret and diagnose disease for various disciplines, digital design and fabrication, and precise placement of various dental prostheses (eg, implant guides, intracoronal and extracoronal restorations). Thus, digital design may provide an additional element for interdisciplinary treatment that further integrates the patient in this triangle of communication.
This article highlights the importance of proper communication between members of the restorative team and demonstrates a digital method to transmit information from the clinical arena to the laboratory environment of the benchtop to develop a natural smile—the innovative inverse injection layering technique.
Preoperative considerations
The diagnostic work-up is the foundation of any successful restorative therapy.2,3 Preoperative considerations during the diagnostic work-up are essential for the development of optimal functional and esthetic restorations. Thus, during the initial diagnosis and treatment planning stages, consideration should be given to tooth type, location in the arch, size and type of any carious lesions present, treatment of decayed or nondecayed unrestored teeth or restoration replacement, and relationship between occlusal function and preparation/preparationless boundaries. Other factors that should be considered are type of biomaterial (ie, ceramic, composite) and restorative technique (ie, direct, semidirect, or indirect), quantity and quality of remaining tooth structure and soft tissue, gingival architecture, mechanical forces on remaining structures, presence of defects, the parameters for extension of the tooth contours to the esthetic zone,4,5 and the method for communication and esthetic planning (ie, conventional, digital).
Digital workflow
Digital technology in dentistry has evolved into a multifunctional tool for evaluation, communication and education, diagnosis, risk assessment, decision making, treatment planning,6 and prosthetic design and development of restorations while enhancing the predictability and outcome of treatment. In the past, clinicians and technicians have relied on written information and utilized procedures and records that have the potential to be translated and repeated inaccurately throughout the diagnostic and treatment process (ie, facebow, articulation of models, impression process).
Digital smile design tools and software have metamorphosed into a scientific system where specific software programs integrate diagnostic data, treatment planning, design, and digital manufacturing into one network. This digital network allows all members of the interdisciplinary team to interact during the entire process from diagnosis to completion of treatment and maintenance. This process for more complex clinical cases can require interrelated interventions that can be coordinated sequentially throughout the various clinical stages of treatment. Furthermore, this visualization (virtually and/or clinically) of the final anticipated result by the entire team before treatment is initiated can eliminate errors and unnecessary treatment procedures and improve decision making. 7 Virtual visualization can be expanded because the digital workflow allows 3D printing of resin models.8 This CAD/CAM software integration provides the capability to fabricate guides (ie, surgical and prosthetic), provisionals, and final restorations (ie, ceramic, composite). Furthermore, this concept allows the patient to be involved in the treatment planning and to visualize the anticipated result prior to initiation of treatment procedures.9
Patient digitization allows the creation of a virtual patient who can have smile design harmonized with the facial appearance.10–13 Facially driven and interdisciplinary integrated software systems allow for the translation of 2D photographs into 3D digital models to develop esthetic parameters in three dimensions that can be completely integrated into the face. 7,14,15 Algorithm libraries of natural tooth and smile designs allow for superimposition for dynamic facial and lip analysis using esthetic reference lines. The addition of functional parameters can be incorporated with digital articulators and jaw-tracking devices that allow for designing of teeth and smiles with 3D simulation and real-time dynamic augmented simulations.14
In addition, correlation between the hard and soft tissue can be assessed by integrating CBCT imaging with intraoral
scans.10,16,17 The integration of these systems allows for a complete workflow that provides the interdisciplinary team with a method to translate various treatment options into 3D simulation. Furthermore, this digital design technology advances the clinician-patient relationship by facilitating patient awareness and involvement.18 It is important to remember, however, that while this technology can provide algorithm data that allows the team to develop a smile, this information is generic and requires experienced technicians and clinicians to assimilate and refine the development.
Material selection and technique
Flowable composite materials have been evaluated in numerous studies since their inception.19–30 Early flowable formulations demonstrated poor clinical performance, with inferior mechanical properties such as flexural strength and wear resistance compared with the conventional hybrid composites.19,20 However, some of the more recent studies28–30 indicate that the clinical performance of specifically tested flowable resin composites is similar to or better than that of specifically tested universal resin composites. Recent studies report that specific flowable composites have comparable shrinkage stress to conventional composites.22,27,31 The wear and mechanical properties of these specific flowable materials suggest an improved clinical performance compared with that of the universal composites. With improved mechanical properties reported,29 these highly filled formulations are indicated for use in anterior and posterior restorative applications.32,33
The injection technique using flowable composite provides a simplified, precise, and predictable method for developing natural esthetic composite restorations while reducing chair time.33 Although not a panacea to all restorative challenges, this technique provides the patient and clinician with an alternative approach to various clinical situations. This technique is a unique and novel indirect-direct process of predictably translating a traditional diagnostic wax-up, digital wax-up, or the anatomical form of the natural dentition of a preexisting diagnostic model or digital model into composite restorations.
In certain clinical situations, this technique can be performed intraorally without anesthesia. A clear polyvinyl siloxane (PVS) impression material is used to replicate the traditional diagnostic wax-up or duplicated model of the diagnostic wax-up, printed resin model of the digital wax-up, or the anatomical form of the natural dentition of a preexisting traditional diagnostic model or printed resin model. The clear matrix can be placed intraorally over the prepared or unprepared teeth and used
as a transfer vehicle for the flowable resin composite to be injected and cured.33 The complete technique is demonstrated later in this article.
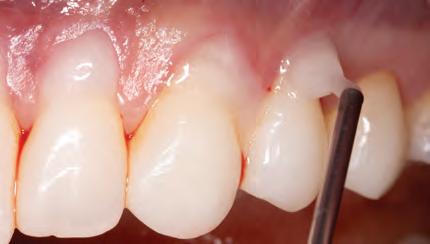
Surgical considerations
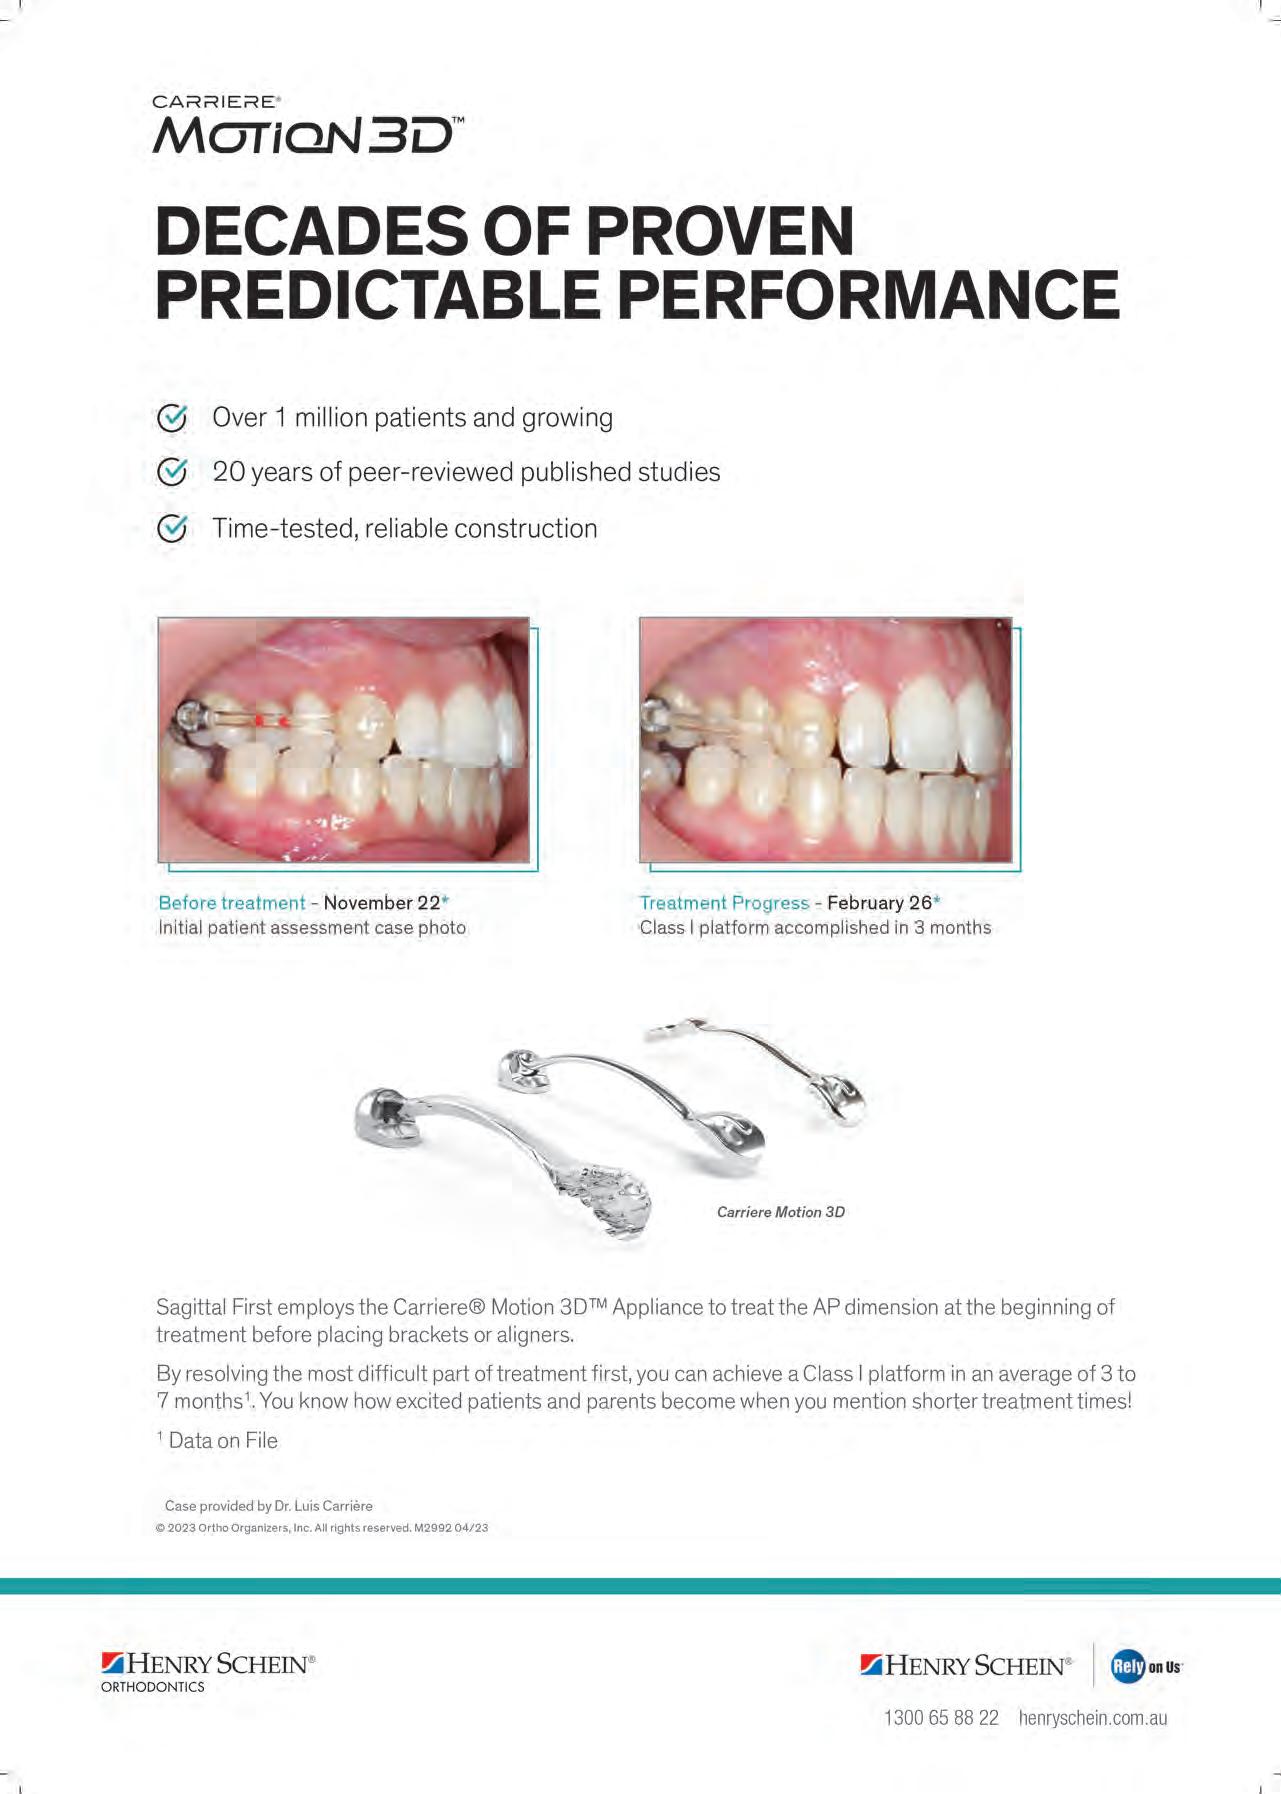
New parameters of restorative therapy require consideration of esthetic results that might require both periodontal and operative procedures to restore a harmonious integration and an esthetic balance of gingiva and tooth.34 Thus, periodontal plastic surgery procedures should be part of the clinician’s recipe for restoring the dentogingival complex. Traditionally, restorative therapy of teeth with gingival recession and carious or noncarious lesions has been achieved through operative procedures, with little attention given to the overall esthetic picture. In contrast, the perioesthetic approach considers the harmonious integration and interrelationship of the gingiva and tooth complex.35
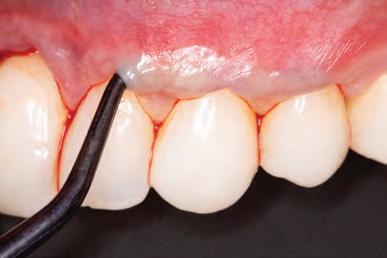
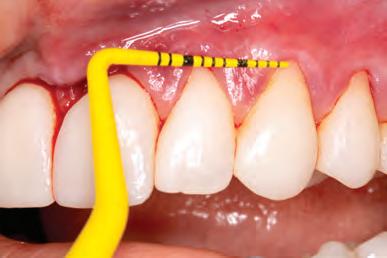
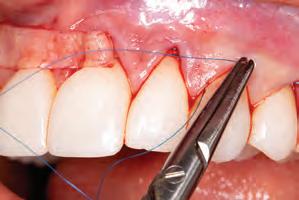
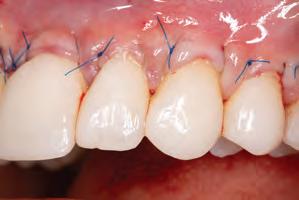
In general, most clinical situations that present with gingival recession also involve a deficiency of keratinized attached gingiva, which requires mucogingival surgery.35 The periodontal plastic surgery procedures available for the treatment and correction of gingival recession include free gingival autografts, subepithelial connective tissue grafts, coronally positioned flaps, guided tissue regeneration, and acellular matrix grafts.36–41 These soft tissue grafts are indicated for the restoration of noncarious and carious cervical radicular lesions and for previously placed restorations associated with gingival recession. Recent advances in periodontal plastic surgery procedures have stimulated reassessment of the envelope technique and its modified version, the tunnel technique, for root coverage of single and multiple adjacent gingival recessions.36,42,43
The envelope technique originated in 1985 for single gingival recession defects.36,44 This procedure involved vertical incisions on either side of a tunnel preparation that
enabled placement of a subepithelial connective tissue graft within the tunnel to cover the gingival recession. The modified microsurgical technique eliminates the vertical incisions and allows the construction of a tunnel under the gingival tissue by means of a sulcular incision beyond the mucogingival line without raising a flap. This alteration of technique by using newly developed microsurgical instruments allows an undermining split-flap preparation of the facial tissues, ensuring improved blood supply, early wound healing, predictable root coverage, and esthetic postoperative results.45–53 This modified microsurgical approach simplifies the technique and allows for the treatment of multiple adjacent gingival recession defects in one surgical visit.
Clinical concepts demonstrated
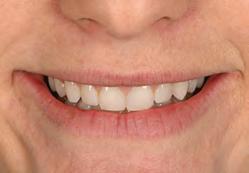
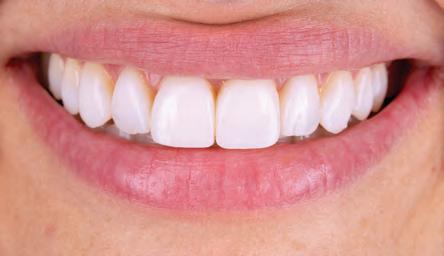
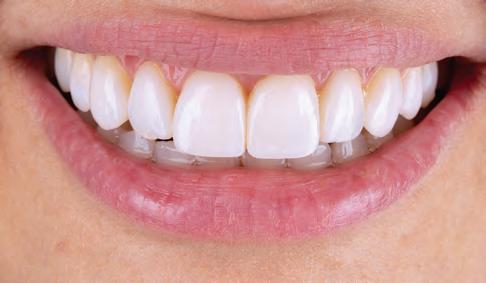
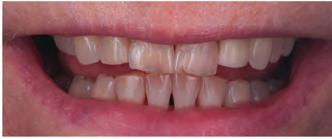
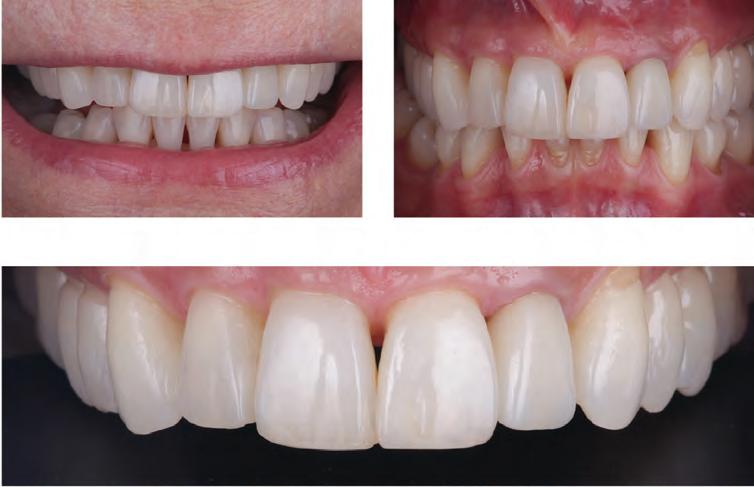
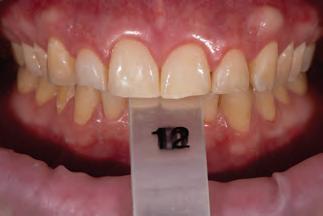
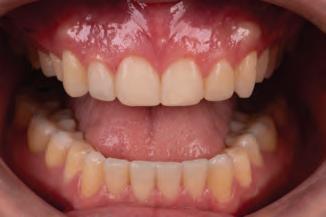
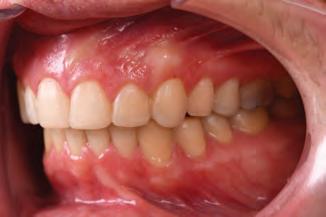
The following clinical procedure illustrates the aforementioned clinical concepts using a methodologic approach for planning and restoring the maxillary anterior dentition.
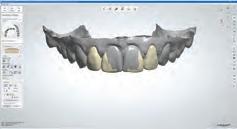
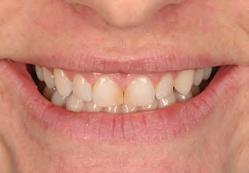
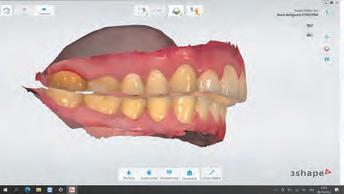
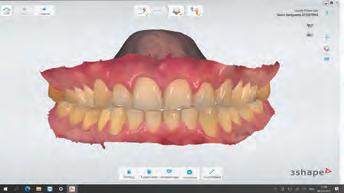
A 31-year-old woman presented with cosmetic concerns regarding her smile and requested a conservative enhancement. After clinical and radiographic analysis, digital 35mm photographs were taken and reviewed by the restorative clinician, technician, and surgeon (Fig 1). A digital impression was taken of the maxillary and mandibular arches using an intraoral scanner (Trios 3, 3Shape; Fig 2), and a smile design was developed with NemoSmile Design 3D software (Nemotec; Fig 3a). This allows for a facially driven smile frame to be created using reference lines of facial and smile proportions and natural teeth shapes and textures from the digital library (Fig 3b).
After developing the simulated mock-up, a 3D-printed resin model was created using CAD software (Fig 4a), and a clear PVS matrix (Exaclear, GC America) was fabricated to replicate the printed diagnostic wax-up using a nonperforated tray (Fig
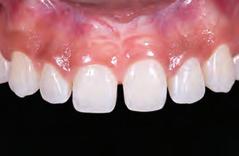
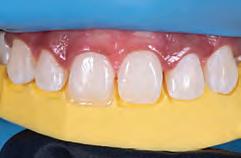
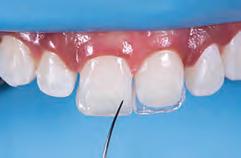
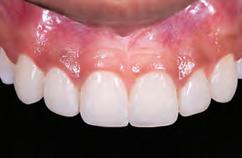
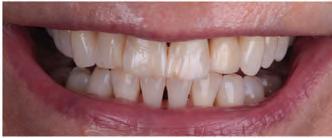
Fig 1 Preoperative clinical views of a 31-year-old woman presenting with diastemas and limited tooth visibility. (top) Portrait. (center row) Intraoral views. (bottom row) Smile.
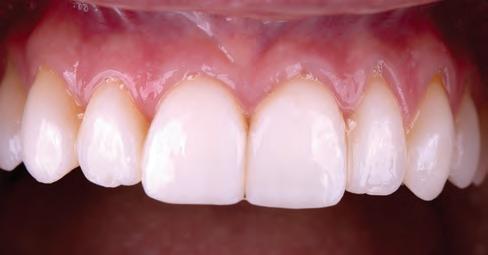
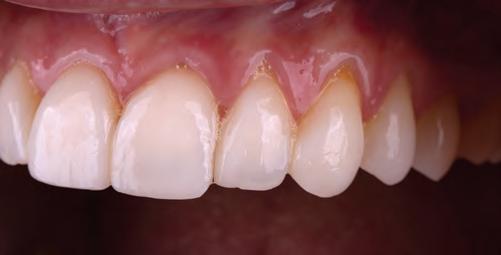
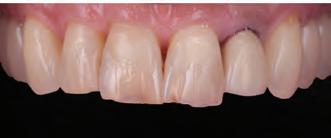
4b). This matrix was used to create an intraoral motivational mock-up with bis-acryl composite (Luxatemp Ultra, DMG). This additive mock-up provides the interdisciplinary team with an intraoral translation for evaluation (Fig 5). Upon evaluation of the digital smile frame and the clinical translation, it was determined that multiple esthetic and restorative requirements were necessary for an optimal biologic framework, and the interdisciplinary team determined the best sequence for these procedures. The patient was presented with the interdisciplinary treatment possibilities that included restoring the maxillary anterior teeth and premolars with a minimally
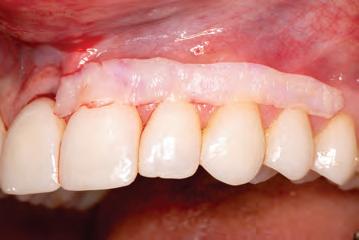
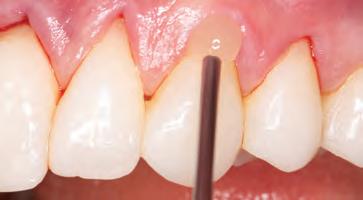
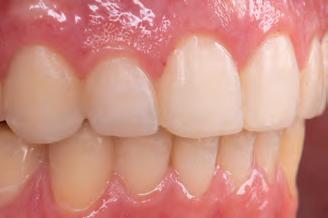
invasive preparationless procedure or with less conservative veneer preparations. The restorative materials discussed included injectable resin composites and ceramic (ie, feldspathic, pressable, machinable). For an optimal biologic framework and health, it was determined that connective tissue grafting would be necessary for treatment of the recessiontype defects on the maxillary left central and lateral incisors, canine, and premolars. The patient opted for the conservative preparationless composite veneers using the injectable resin technique followed by a connective tissue surgical procedure using the tunneling technique.
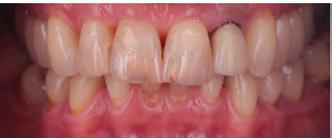
Fig 2 Digital scan of the preoperative maxillary arch.
Fig 3 (above) Simulated smile developed with NemoSmile Design 3D software. (left) A facially driven smile frame was created using reference lines of facial and smile proportions and natural teeth shapes and textures from the digital library.
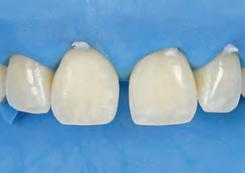
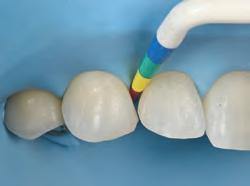
Fig 4 (left) A 3D-printed resin model was created using CAD software. (right) A clear PVS matrix (Exaclear, GC America) was fabricated to replicate the printed diagnostic wax-up using a nonperforated tray.
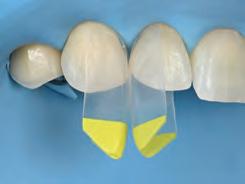
Fig 5 (left) The clear PVS matrix was used as a transfer vehicle for the bis-acryl composite (Luxatemp Ultra). (center and right) This additive mock-up provides the interdisciplinary team with an intraoral translation for evaluation; this is an excellent method for increasing the patient’s understanding of the planned clinical procedure and the anticipated final result.
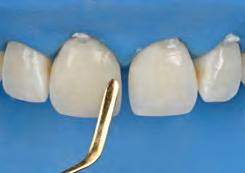
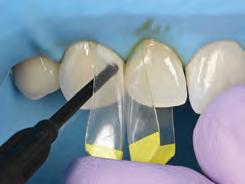
Fig 6 Using the same matrix, a small opening was made above each tooth to be restored using a tapered diamond bur (6847). It is important to clean the internal surfaces with a microbrush to prevent silicone debris from incorporating into the flowable material.
Fig 7 An improved restorative recipe was developed using the clear shade tab (Venus 2-Layer Shade System, Heraeus Kulzer). An opacious B1-shaded flowable (BO1 G-aenial Universal Flo, GC America) was selected for the artificial dentin layer, and a translucent white-shaded flowable (White, Clearfil Majesty ES Flow, Kuraray Noritake) was utilized for the artificial enamel layer.
The clear PVS matrix was used in the development of the final restorations. A small opening was made above each tooth to be restored with a Brasseler 6847 diamond bur (Fig 6). The optimal development of multiple restorations requires completion and finishing of each restoration prior to initiation of the next restoration. The injection process for unprepared teeth involves isolation with Teflon tape and a total etch technique prior to placement of the matrix. The injection of a combination of flowable materials can allow mixing of colors for a polychromatic integration. Figures 7 to 22 provide a detailed description of this adhesive procedure.
Fig 8 Before the adhesive surface preparation, each tooth was separated by applying sterilized Teflon tape on the adjacent teeth. A 37.5% phosphoric acid semigel (Gel Etchant, Kerr) was then applied to the tooth surface for 15 seconds, rinsed for 5 seconds, and gently air dried.
Fig 9 A two-component light-cured universal adhesive (G2-Bond Universal, GC America) was applied to the enamel surface. The primer was applied, allowed to dwell for 10 seconds, and dried before the adhesive was applied, air thinned, and light cured for 10 seconds.
Fig 10 (left) The clear silicone matrix was placed over the arch, and a BO1- shaded flowable resin composite (G-aenial Universal Flo) followed by a translucent white-shaded flowable resin composite (White, Clearfil Majesty ES Flow) were injected through a small opening above each tooth. (right) The resin composite was cured through the clear resin matrix on the incisal, facial, and lingual aspects for 40 seconds each.
Fig 13 Finishing strips (Hawe Finishing and Polishing Strips) were used sequentially according to grit and range (from fine to extrafine) to smooth interproximal regions.
Fig 14 After tooth isolation of the maxillary right lateral incisor, a 37.5% phosphoric acid semigel (Gel Etchant) was applied to the enamel surface for 30 seconds, rinsed with water for 5 seconds, and gently air dried. Note the characteristic frosty white, chalky appearance of the enamel after acid etching.
Fig 11 Upon removal of the matrix, the excess polymerized composite resin was removed from each restored tooth with a scalpel blade (#12 BD Bard-Parker).
Fig 15 A two-component lightcured universal adhesive (G2Bond Universal) was applied to the enamel surface. The primer was allowed to dwell for 10 seconds and dried before the adhesive was applied, air thinned, and light cured for 10 seconds.
Fig 12 The gingival tissue was retracted with a gingival protector (8A, Hu-Friedy), and the tooth–resin composite interface was finished using a tapered finishing diamond (DET Series, Brasseler).
Fig 16 The clear silicone matrix was placed over the maxillary arch, and the same restorative recipe was injected through a small opening above the maxillary right lateral incisor.
Fig 17 The resin composite mix was cured through the clear resin matrix on the incisal, facial, and lingual aspects for 40 econds each.
Fig 18 Upon removal of the matrix, the incisal composite sprue was removed using a tapered diamond finishing bur (DET Series).
Fig 19 A series of prepolishing and high-shine silicone wheels (Diacomp Feather Lite) and points (ET Illustra) were used to increase the smoothness of the resin composite veneers.
Fig 20 The gingival region was smoothed and polished with a silicone hollow cup (ET Illustra Polishing Cup). The cup provides an additional flexibility at the cervical curvature of the tooth.
Fig 21 A goat-hair wheel and diamond polishing paste were used to further refine the surface luster of the resin composite. High surface reflectivity was accomplished with a dry cotton buff applied with an intermittent staccato motion.
Fig 22 The posttreatment smile reflects a proper tooth proportion and incisal edge position relative to the patient’s upper lip.
Fig 23 (left) Upon retraction, notice the incongruent dental and gingival esthetics with inadequate harmony and balance. For an optimal biologic framework and health, it was determined that connective tissue grafting would be necessary for treatment of the recession-type defects on the maxillary left central and lateral incisors, canine, and premolars (right).
Fig 24 A dovetail-shaped bendable microblade (Keydent Micro Blade Tunnel, American Dental Systems) was used for the initial sulcular incision.
Fig 25 Subsequently, a tunneling knife (Hu-Friedy) was used to undermine a split-thickness tunnel. In circular movements, the knife was guided down beyond the mucogingival line until adequate flap mobility was achieved.
Fig 26 The papillae were fully detached with the periosteum using a periosteal elevator, while the integrity of the region was maintained with the lingual counterpart to avoid the loss of papillary tissue.
Fig 27 Measurement of the recipient site for optimal size and volume of the subepithelial connective tissue graft.
Fig 28 A subepithelial connective tissue graft was harvested from the palate using a parallel incision harvesting technique.
Fig 29 After the connective tissue graft was inspected and trimmed to size, the subepithelial connective tissue graft was measured for dimensional appropriateness in the areas of the defects. It is important that there are no glandular tissues or irregularities in this graft.
Fig 32 After thorough rinsing with water to remove the gel residue and drying, Emdogain (Straumann) was applied to the root surfaces. The surface must be free of blood and/or saliva in order to ensure protein deposition.
Fig 30 The exposed root surfaces of the maxillary left incisors, canine, and premolars were inspected for irregular or rough surfaces, mechanically scaled, and root planed with curettes.
Fig 31 The root surfaces were chemically treated with 24% ethylenediaminetetraacetic acid gel for 2 minutes to remove the smear layer from the dentinal tubules and to improve the coagulum adhesion to the root surface.
33 The connective tissue graft was introduced into the tunnel and oriented by placing sutures at each end of the graft.
Fig 34 After the grafts were in place, microsurgical instruments were used to suture and stabilize the grafts with the overlying gingival flap. In the papillary regions, vertical mattress sling monofilament sutures were used (60 polypropylene, Hu-Friedy).
Fig
Figs 35 and 36 The 1-year postoperative result reveals optimal root coverage with a harmonious gingival architecture and enhanced esthetics of the smile.
Conclusion
Fig 37 Final result possible with an interdisciplinary translation and integration of a facially driven smile design using the inverse injection layering technique and a modified microsurgical approach.
The evolution in digital technology has revolutionized the way we practice dentistry in our laboratories and operatories today. Future clinical applications of this injectable resin technique may provide clinicians and technicians with conservative alternative approaches to various clinical situations while allowing them to deliver improved and predictable dental treatment to their patients. By working together in proper sequence using a digital workflow, the clinician/ceramist team can develop restorations that are biologically and mechanically sound. Only through continued education, commitment to excellence, and communication (both quan-titative and qualitative) between clinical and laboratory colleagues can restorations be produced that
reflect the continuous progress in esthetic and restorative dentistry. The proper transmission of information between clinician, ceramist, and patient allows the modern dental practice to progress beyond the antiquated practice of working on “stone models without faces”1 and to remain competitive and successful in this technologically advancing profession.
References
The full list of references 1-53 is available from: ursula@moderndentistrymedia.com
Reprinted with permission from QDT- October 2023
Traumatic injuries in primary teeth
Avan Mohammed1
1 Avan Mohammed is an awardwinning specialist orthodontist working in private practices in Marylebone, Islington and South Kensington.
Contact: avan.mohammed@dentex.group
Trauma to the primary dentition in the early years is common, as children learn to walk and run. Studies have shown that dental injuries account for 17% of all physical injuries in preschool children (Petersson et al, 1997).
Crown calcification of the secondary maxillary and mandibular incisors starts from birth and is completed at four to five years. On average, when the teeth erupt, approximately half to two thirds of the root is formed and continues after eruption for up to three years.
The potential damage to the permanent teeth depends on the dental age at the time of the injury. This is due to the proximity of the primary incisor roots and the developing permanent tooth germ in early years. It is thought that traumatic dental injuries in children up to the age of three years can affect the developing permanent tooth.
A long-term study that looked at 255 traumatised primary teeth found 23% of the corresponding permanent teeth to have developmental disturbances. Severe injuries, such as intrusion and avulsion, can cause developmental malformations in permanent teeth (Andreasen and Ravn, 1971).
Malocclusion factors
Multiple factors affect the severity of damage to the permanent tooth germ, including the force and direction of impact, type of dental injury and the stage of crown development at the time.
The most common malformation sequelae of traumatic injuries to the primary teeth include enamel hypoplasia and developmental disturbances.
Furthermore, several malocclusion predisposing factors have been associated with higher incidence of dental trauma:
•Increased overjet in the primary dentition. The risk of dental trauma is three times greater with an increased overjet greater than 6mm, whereas children with an overjet less than 3.5mm are half as likely to suffer from dental trauma
•A positive association between anterior open bite and traumatic injuries has also been found •Incompetent lips/inadequate lip support.
Disturbances to the secondary dentition
The extent of these malformations depends on the developmental stage of the permanent tooth and the severity of the trauma.
Figure 1A: Severe enamel hypoplasia of the partially erupted UL1 after traumatic injury to the primary central incisors.
Figure 1B: Localised hypoplasia affecting the UR1, causing white discolouration of the enamel as a result of intrusion trauma the URa.
Children with acute dental trauma and severe tooth displacement are often managed by dentists or paediatric dental specialists. However, not all children are diagnosed at the time of injury with parents often not remembering, and therefore unaware of the potential long-term impact to the developing dentition.
Often, parents notice a problem during the early mixed dentition when the incisors fail to erupt and start to seek help. Taking a detailed history often reveals past trauma to the primary teeth.
The severity of the developmental defects to the permanent teeth varies from mild to severe developmental disturbances.
Types of developmental disturbances
1. Mild to severe enamel hypoplasia
This is defined as a developmental disturbance resulting from incomplete or defective enamel matrix formation.
Enamel hypoplasia commonly affects maxillary central incisors and can vary from mild white brownish discolouration of the enamel to severe pitting (Figures 1a and 1b).
These defects can be categorised according to severity (Golpaygani et al, 2009):
•Type I hypoplasia: enamel discolouration due to hypoplasia
•Type II hypoplasia: abnormal coalescence due to hypoplasia
•Type III hypoplasia: some parts of enamel missing due to hypoplasia
•Type IV hypoplasia: a combination of the previous three types of hypoplasia (circular enamel hypoplasia).
2. Ectopic eruption
Traumatic dental injuries such as avulsion or intrusion may result in the physical displacement of the permanent tooth germ disturbing its normal path of eruption (Figure 2).
Figure 4: Partially resorbed crown of the ULb. The UL2 root has a 45-degree dilaceration in the cervical region. The root is narrow as would be seen on a peg lateral (sagittal CBCT view).
Premature loss of primary incisors can also cause lack of eruption guidance for the permanent tooth. Failure to treat ectopic teeth can result in malocclusion and loss of arch length. Early orthodontic treatment is often indicated in these cases.
3. Crown malformation and dilaceration
The abnormal bend of the crown can often be seen as the teeth start to erupt. These are most commonly seen in permanent maxillary incisors, which often erupt in a labial or palatal position. Depending on the severity of the crown malformation, it may be possible to restore the tooth with a crown to improve aesthetics. If the tooth fails to erupt, expose and bonding with orthodontic traction will be necessary. Grossly deformed teeth will need to be extracted and the space replaced with a prosthesis. In the mixed dentition, patients can be provided with a prosthetic tooth retained on an upper removable appliance (Figure 3).
4. Root dilaceration
This is defined as the abrupt deviation of the long axis of the root portion of the tooth. This is more common in the apical half of the root.
Depending on the severity of the dilaceration, the tooth may erupt naturally, or may require surgical exposure with orthodontics or, in severe cases, surgical extraction (Figure 4).
5. Odontome-like malformations
Odonome malformation are mineralised tissue with structure similar to the tooth germ. They are a rare complication of dental trauma with an incidence less than 0.1%.
Figure 2: Ectopic eruption of UL3 as a result of previous trauma to the ULc.
Figure 3: The UL1 crown is partially erupted through the crestal bone. The crown is malformed with a dilacerated appearance (sagittal CBCT view).
5: CBCT showing an odontome lying immediately superior to the apex of the ULb and fused to the crown of the unerupted UL2 (somewhat resembling a fused supernumerary tooth).
They are often confined to maxillary primary incisor trauma with the time of the injury occurring before the age of three years, during the early stages of odontogenesis. Odontome often require surgical removal to facilitate eruption of the permanent teeth.
6. Partial or total arrest of root development
Root development starts as soon as the crown formation has been completed at the cementoenamel junction. Traumatic injuries that occur during that time can result in malformations of the root developments such as partial or complete arrest of roof formation. This is more common in children over the age of four years during the time when the crown of the permanent tooth is in its final stage of formation.
7. Eruption disturbances
Delayed eruption should be considered when the contralateral tooth has erupted for more than six months. Trauma to the upper primary incisor can result in ectopic permanent central incisors (Figure 6). Surgical exposure and orthodontic traction maybe necessary.
Conclusion
The impact on the development of the permanent tooth germ from traumatic injuries to primary teeth can be significant. The successful management of severe dental injuries depends on
the early diagnosis of development disturbances. As treatment can be complicated and lengthy, a multidisciplinary team approach involving general dentists, paediatric specialists, orthodontists and oral surgeons is required for diagnosis and management. Close monitoring and timely action should be carried out during the expected time of eruption to prevent further complications.
References
Andreasen JO, Ravn JJ (1971) The effect of traumatic injuries to primary teeth on their permanent successors. II. A clinical and radiographic follow-up study of 213 teeth. Scand J Dent Res 79(4): 284-94
Golpaygani VM, Mehrdad K, Mehrdad A, Ansari G (2009) An evaluation of the rate of dental caries among hypoplastic and normal teeth: a case control study. Res J Biol Sci 4: 537-41
Oliveira LB, Marcenes W, Ardenghi TM, Sheiham A, Bönecker M (2007) Traumatic dental injuries and associated factors among Brazilian preschool children. Dent Traumatol 23(2): 76-81
Petersson EE, Andersson L, Sörensen S (1997) Traumatic oral vs non-oral injuries. Swed Dent J 21(1-2): 55-68
This article first appeared in Clinical Dentistry and has been reprinted with permission. Mohammed A, Traumatic injuries in primary teeth. Clinical Dentistry 4(2): 15-16
Figure
Figure 6: Delayed eruption of UR1 and UL1 in a nine-year-old due to previous trauma.
Winner of the Composite Smile Makeover category, Dentistry Clinical Case Awards 2023
This case demonstrates a minimally invasive approach at improving the appearance of this patient’s upper incisor teeth, including a single crown replacement.
Not only were we able to preserve the surrounding teeth, but the upper central incisors were also restored as composite veneers and the upper right lateral incisor as a class IV restoration.
This approach minimises full labial coverage, unless necessary, but significantly improves the patient’s confidence and smile.
Case study
A 55-year-old female presented with severely worn teeth (Figures 1 and 2). In her own words, she wanted to have a ‘refresh’ to her smile.
Medically, the patient was fit and well and had no caries experience. Her oral hygiene was exemplary and was a regular attender to the hygienist.
The patient’s aspirations were financially limited, which therefore made ceramic restorations not an option. Furthermore, her current situation was that she had a crown on her upper left lateral incisor, which had been completed some 15 years ago, and was now suffering with recession.
Her goals were to improve the base shade of the teeth, to improve the shape and edges of the front teeth and replace the ceramic restoration to mask the recession defect on the UL2.
The patient has a large overjet, and a discussion was had as to whether orthodontics would be feasible. However, this was not a priority for the patient, and had requested whether any treatment could be completed without orthodontics.
Preoperative periapical radiographs were taken to assess the apical regions of the incisors and canines, which showed no apical pathology, approximately average bone levels and no obvious caries.
Treatment options
In this case, the treatment options discussed to improve the appearance were as follows:
1. Do nothing, which is not acceptable considering the aesthetic and functional compromise
2. Whitening only
3. Whitening with replacement restorations UR2, UR1, UL1 (composite) and UL2 (ceramic)
4. Orthodontics with replacement restorations
5. Composite veneers on upper three to three with UL2 as replacement crown
6. Ceramic veneers on upper three to three with UL2 as replacement crown.
As outlined by the GDC standards (GDC, 2013), an empirical aspect of consent is adequate communication of all of the options and discussion of the relative merits and downfalls of all of the options described.
Option number one is not really an option, as the patient had attended the surgery to improve the appearance of the teeth.
Also, prolonged dentine exposure may lead to pulpal changes, therefore it is unacceptable to leave the patient unrestored.
Option two would be insufficient treatment as whitening the teeth would lead to the restorations not increasing in value, while the surrounding tooth would increase in value, leading to a mismatch between restorative and tooth structure.
Option number three seems to be the choice the patient is wishing for. Based on financial considerations, as well as her aspirations for her teeth, brightening the teeth along with replacement composite and ceramic restorations would significantly improve the patient’s smile, while minimising invasion.
As the patient requested, orthodontics was not an option, and she had financial aspirations in which the restorative treatment would need to fit, therefore multiple ceramic, or indeed composite, restorations would be inappropriate.
It was therefore agreed that we would proceed with treatment option three.
Treatment sequence
After the full patient assessment and treatment plan summary, the patient was booked in for a full course of supra- and subgingival scaling and prophylaxis prior to commencement of treatment.
Figures 1 and 2: Initial situation.
Figure 3: After home whitening.
Figures 4 to 6: Isolation.
Figure 7: Index taken of UR2 restoration.
Figures 8 to 11: Restoration.
The patient then undertook two weeks of home whitening using 16% carbamide peroxide (Figure 3). The system used in this case was LUMIWHITE
There is an importance in ensuring there is a minimum period of seven to 10 days from cessation of whitening to start of bonding. Not only does the improved value of tooth substrate begin to stabilise, but there’s also a statistically significant reduction in bond strength (Garcia-Godoy et al, 1993).
Following two weeks for stabilisation, the patient was booked in for the restorative appointment. A preoperative shade assessment was undertaken with EL enamel and B1 body shade (Ecosite Elements, DMG) composite being a mutually agreed shade match by the patient, dentist and dental nurse. The upper first molar to first molar were isolated using Unodent Heavy rubber dam (Figures 4 to 6).
It is imperative to air abrade the surface of the tooth to remove any aprismatic enamel, which has been identified to improve bonding protocols in adhesive dentistry (Hedge et al, 2010). An index was taken of the UR2 restoration, as the palatal contour was ideal and there was no place for significant shape modification, therefore a wax-up was not required (Figure 7).
The existing composite was removed from the UR1, UR2 and UL1 (Figure 5). The UR2 was restored using EL for the palatal shell, followed by B1 as the dentine, followed by EL for the final labial surface (Figure 8).
The UR1 and UL1 were restored using B1 to replace the labial erosion lesions and to level the incisal edges. This was followed by EL to be placed as full labial coverage veneers over the central incisors (Figure 9 to 11).
The final increments are cured under an oxygen barrier medium to remove the oxygen inhibition layers and optimised stability and hardness (Strnad et al, 2015). In this case, Liquid Strip (Ivoclar) was used.
The primary anatomy was created using Sof- Lex discs at low revolutions. The patient returned the following week for the final polish. Finally, a combination of Sof-Lex discs (3M) and Astropol were used (Ivoclar) as these have also proven to have the smoothest topography under SEM (Marghalani et al, 2010) (Figures 12 and 13).
This was followed by removal of the crown on the UL2, replacement of the margin to be 0.5mm subgingival (using retraction cord) (Figures 14 to 16). This was scanned using a Trios intraoral scanner (3shape), with the UR2 restoration to be used as a template for the shape of the definitive restoration.
This was provisionalised with a bisacrylic provisional crown and the definitive lithium disilicate (IPS e.max, Ivoclar) crown was adhesively cemented under isolation three weeks later (Figure 17).
Conclusion and reflections
This case demonstrates the power of the restorative materials that we have in our armamentarium as restorative dentists today. Not only are we able to restore the shape and form of the natural teeth to a high standard, these restorations can also be polished to a similar standard to ceramic restorations.
Figures 12 and 13: Polishing.
Figures 17A and 17B: IPS e.max crown adhesively cemented under isolation.
Figures 14 to 16: Removal of the UL2 crown.
It goes without saying that the polish retention may differ, however, the patient was extremely satisfied with the result achieved (Figures 18 to 20).
The communication with the patient in the initial discussions did make it clear that there may well likely be a differential in polish retention, including the need to potentially repolish the composites. Furthermore, the treatment plan may include replacement restorations whether they are like-forlike composites or even potentially using ceramic veneer restorations.
References
Garcia-Godoy F, Dodge WW, Donohue M, O’Quinn JA (1993)
Composite resin bond strength after enamel bleaching. Oper Dent 18: 144-144
General Dental Council (2013) Standards for Dental Professionals
Hegde VS, Khatavkar RA (2010) A new dimension to conservative dentistry: air abrasion. J Conserv Dent 13(1): 4-8
Marghalani HY (2010) Effect of finishing/polishing systems on the surface roughness of novel posterior composites. J Esthet Restor Dent 22(2): 127-38
Strnad G, Kovacs M, Andras E, Beresescu L (2015) Effect of curing, finishing and polishing techniques on microhardness of composite restorative materials. Procedia Technology 19: 233-238
This article first appeared in Clinical Dentistry and has been reprinted with permission. Khan S, Minimally invasive restorative dentistry. Clinical Dentistry 4(1): 18-20
Figures 18 and 19: Final result.
Figure 20: One-year follow-up
Masterclass in Oral Diseases
Oral Cancer with Prof Willie F. P. van Heerden1
Dr Andre W van Zyl2
Prof Wynand P. Dreyer3
Introduction
Oral cancer remains one of the most life changing cancers. Early diagnosis of such lesions can assist in ensuring a successful outcome whereas the late diagnosis could lead to debilitating surgery and often a low 5-year survival rate.1 The oral health care worker routinely examines the oral cavity and should therefore be in a position to recognize oral cancers at an early stage. However, such lesions are often missed during routine dental treatment or mis-diagnosed as denture induced trauma or the result of a sharp tooth edge. In such cases, after removal of the identified cause, the lesion should heal within 2-3 weeks, at most. Therefore, such patients must be followedup and, if the lesion does not heal timeously, it should be considered as potentially harmful and examined by means of a biopsy to ensure a diagnosis. Delays in ensuring a definitive diagnosis may impact negatively on the survival/prognosis of the patient. Thus, any ulcer, unidentified lump or white/red lesion should be biopsied if it does not disappear within 2-3 weeks. Moreover, all patients who fall in a high-risk group (over 40 years of age; tobacco and alcohol users) should be thoroughly examined at every opportunity for potentially malignant lesions or the presence of incipient oral cancer.1 E-cigarette use (vaping) has become popular due to the fact that it is considered to be a safer option than cigarettes. There is, however, no hard evidence that this is indeed the case.2 Until the matter has been critically assessed and the long-term effect of vaping on the oral tissues is known, it should be treated as a high risk habit.
Oral Cancer - A Clinical Update
1 Willie F. P. van Heerden
Professor emeritus, Dept of Oral and Maxillofacial Pathology, UP: Pathcare Vermaak Laboratories, Pretoria BChD, MChD, FC Path(SA), PhD, DSc, MASSAf
2 Andre W. van Zyl MChD (Oral Medicine & Periodontics) Private Practice, Hermanus, South Africa
3Wynand P. Dreyer
Professor emeritus, Oral Medicine and Periodontics, Stellenbosch University. Specialist in Oral Medicine and Periodontics. BDS (Wits), HDD (Wits), PhD (Stellenbosch), FCD(SA)OMP
Oral cancer has a higher incidence in developing countries and varies from the sixth to the eight position in the incidence of all cancers.3 Oral health care workers are in the position to save lives and should never underestimate the importance of this duty, nor neglect their professional responsibility in this regard.
Oral cancer or oral squamous carcinoma?
The oral cavity is lined by stratified squamous epithelium; hence cancerous transformation of this epithelium is correctly termed a squamous cell carcinoma. The term oral cancer (OC) is frequently used, especially in the lay press, as a synonym for oral squamous cell carcinoma (OSCC). This is obviously incorrect as oral cancer refers to any malignancy of the oral cavity. Oral cancer may be one of several other oral malignancies such as adenocarcinomas of salivary gland origin, haematological malignancy or any one of the lymphomas, or a mesenchymal malignancy such as rhabdomyosarcoma (skeletal muscle malignancy). However, squamous cell carcinoma is by far the most common malignancy of the oral cavity (more than 90%), contributing to the generalised use of the term “oral cancer”.1, 3
Clinical variants
OSCC may present in a diversity of different forms, some linked to a specific histological subtype. The diagnosis of OSCC should always be confirmed histologically as there are clinical similarities with benign, infective and traumatic lesions. This is especially true for early OSCC lesions which may present clinically as a potential malignant lesion, the most common being leukoplakia (white lesions) (Fig 1)
Figure 1: White lesions of the ventral aspect of the tongue and floor of mouth must be examined histologically. It is a high-risk area for OSCC.
4:
Figure 2: Red lesions on the palate may be easy to identify, but red lesions on floor of the mouth or posterior region of the soft palate are more difficult to discover. The lesion depicted in this photograph was diagnosed histologically as OSCC.
Figure 5: Extensive Papillary OSCC of the cheek with a cobblestone appearance. This lesion had been present for a while and could have been diagnosed earlier. Notice the abnormal growth and the danger sign of bleeding.
or erythroplakia (red lesions) (Fig 2). Clinical erythroplakia lesions have a high probability of being OSCC histologically and a recent systematic review shows that 42.8% of oral erythroplakias are already a carcinoma at the time of the first biopsy.4
Most OSCCs are unfortunately diagnosed late and has a negative effect on the prognosis of the patient. These cancers most often present as non-healing ulcers and are referred to as “malignant ulcers” and usually present with indurated, rolled borders with a necrotic base. They are characteristically painless (Fig 3). All oral ulcers that do not heal after 2-3 weeks should be biopsied.
Verrucous carcinoma is typically seen in older men, often associated with pipe smoking and present as an exophytic lesion with a warty, white surface (Fig 4). These cancers have an excellent prognosis, but they should be thoroughly examined histologically to detect the transformation to a classical OSCC which will negatively influence the prognosis.5, 6
Papillary squamous cell carcinoma is another exophytic
Figure 3: A small malignant ulcer in anterior floor of mouth. These ulcers may show induration and are generally not fixated in its early stage. Palpate the lesion and move it from side to side to determine if it is fixated.
Figure 6: Although this gingival carcinoma may have a small footprint, its treatment will involve extensive resection and loss of teeth. This is often misdiagnosed as either periodontal infection or a candidal infection.
variant of OSCC which usually presents as a diffuse lesion with a papillary and/or cobblestone surface (Fig 5). This type also has a better prognosis than the typical OSCC. 7
Squamous cell carcinoma (SCC) of the gingiva presents as a white leukoplakic area with a granular appearance (Fig 6). Such lesions are frequently misdiagnosed as a Candida infection or a non-malignant periodontal inflammatory condition.8
The oral health care worker is in an ideal position to diagnose SCC of the lip at an early stage. It initially presents as a white or red lesion often with crust formation (Fig 7).
Examination of patient and lesion
To examine the oral cavity one must follow a systematic approach to ensure no area of the oral cavity is missed. It can be done in less than 2 minutes and should be repeated at every dental visit. It is recommended to cover the following areas, in your order of preference:
• Ask the patient to stick out the tongue, grab the tip of tongue using a gauze swab and ask the patient to relax
Figure
Wart-like (verrucous) carcinoma of the palatal area with a pronounced white surface.
Figure 7: Early lip carcinoma appearing as a white/red crusted area. An astute dental practitioner should always examine the lip as part of a comprehensive oral examination.
Figure 8: White lesion with small ulcerative areas. The patient reported a burn with hot food a few days prior to examination. This lesion must be followed up for at least 2-3 weeks to see if it heals.
the tongue completely and gently pull the tongue out and sideways. Make sure the lateral sides of tongue are visually inspected from the posterior foliate papillae to the tip of the tongue. A dental mirror is used to push the tongue away from the teeth to allow visual inspection of the entire floor of the mouth, from its posterior to its anterior aspect. Once the tongue is released, push the tip of the tongue posteriorly to enable visual inspection of the anterior floor of the mouth. This is the highest risk areas for OSCC and should be examined thoroughly at every opportunity.3
• The dorsum of tongue should be examined visually and palpated with the fingers to determine the presence of any lump or ulcer.
• Cheeks, vestibules, and inner lip surfaces should be examined by pulling the tissues away with the help of a dental mirror and then palpate, using a stroking movement of the finger, over the entire vestibule from one side to the other - for both the maxillary and mandibular vestibules.
• Depress the posterior part of the tongue, using the dental mirror, and at same time ask the patient to say “AHH” which will create a gagging reflex and allow visual inspection of the oro-pharynx-tonsillar area.
• Inspect the gingiva (both facial and lingual aspects) and palatal tissues, which must include probing the gingiva with a periodontal probe.
• Lastly, examine the lips for any crusting, white/red lesions, or ulcers.
Examination of the patient must include palpation of neck, in the sub-mental and sub -mandibular areas, for any lymphadenopathy.
Clinical Tip: If a solitary white lesion or ulcer is found, ask the patient about any history of placing aspirin in the mouth,
or of an accidental burn with hot food.
Figure 8 shows a white lesion with ulcerations posteriorly and, after enquiring about the possibility of the local application of painkiller or of a burn episode, she reported that she had burnt herself with hot food, a few days earlier. The lesion must be monitored over a period of two to three weeks for clear signs of healing and, if not, a biopsy would be done.
Clinical Tip: All white lesions should be wiped firmly with a gauze swab to see if it can be wiped off as candidiasis and even an aspirin burn can be wiped off. If it cannot be wiped off, it should be biopsied.
Examination of the lesion must include:
• Photographs to show the lesion and, by holding a periodontal probe next to lesion, the scale can be shown.
• Palpation of the lesion is necessary to feel the consistency and to identify induration (an increased tissue density that feels hard).
• Fixation of a lesion in soft tissue, other than hard palate (i.e. the lesion cannot be moved by lateral pressure) is a negative sign and may indicate deep infiltration of the cancer.
• Any surface bleeding should be noted as this is an ominous sign and is often seen in ulcerative OSCC.
Biopsy of a suspected malignant lesion
Whenever a lesion is suspected to be malignant:
• An incision biopsy should be done. Do this on the anterior border of tumour. This has the advantage of easier access for the biopsy and will not disturb the posterior margins that may negatively influence the surgical removal of
the tumour when referred to the surgeon tasked with the removal of the cancer.
• Do not attempt to completely remove the lesion as this may remove the margins the surgeon will need to see when planning the surgical excision of the cancer.
• Please refer to MC in Oral Cancer, August-September (Vol 13 No.4) and October-November (Vol 13 No. 5) 2023 for further guidelines and examples of biopsy techniques.
Request for histology - how to?
Once an appropriate biopsy has been taken, the tissue must be submitted to a histopathology laboratory. Preferably refer the biopsy of the oral cavity to a laboratory where the diagnosis can be made by a qualified oral and maxillofacial pathologist. The tissue should be place in a container with 10% buffered formalin. Make certain that the tissue is fully covered by the formalin and that the tissue is not stuck to the screw cap of the container.
All specimens should be accompanied by an appropriate request form. This should state all the patient details like age, gender, and site of biopsy. It should also be specified if it is an incisional or excisional biopsy as this will influence the pathology report. All cases of suspicious malignant lesions should be done as an incisional biopsy, unless performed by a qualified surgeon who may attempt to remove the lesion, with clear margins, if small enough.
It is important to add relevant clinical information like smoking history, possible alcohol use or other habits that may be of importance as possible carcinogens, like the use of betel quid or chewing tobacco. It is always helpful to include a clinical image which is, with the availability of mobile phone technology, much easier to do than in the past.
Referring the patient for definitive treatment
As stated in the MC on Oral Biopsies, you should identify the surgeon closest to you who can perform oral cancer surgery. The patient should also be informed that referral will be necessary if the lesion needs follow-up treatment. Referral can be to a maxillo-facial and oral surgeon who performs oral cancer surgery, or an ENT or a general surgeon who specializes in head and neck surgery of this nature. Contact the relevant surgeon to find out more and to make sure that you have all the necessary logistics in place before doing a biopsy that may require follow-up surgery. If you are in a city, you may elect to refer the patient, for the biopsy, to a Specialist in Oral Medicine and Periodontics or to a Maxillo-Facial and Oral Surgeon.
MASTERCLASS IN ORAL DISEASES
Conclusion
Most dentists regularly perform extraction and surgical removal of teeth, and even implant surgery in many cases. There can thus be no excuse for not performing biopsies for oral lesions/diseases.
The important aspect of this is to refer the biopsy tissue to an oral and maxillofacial pathologist. As stated before, all pathology labs should have an in-house oral and maxillofacial pathologist on call. Just contact the laboratory, they collect, and you can mark it for the attention of the oral and maxillofacial pathologist. You can phone them beforehand to find out who this is and address it to that person.
It is the duty of oral health care providers to become involved in the management of oral lesions. Contact your local medical practitioner, if you practice in rural areas, and inform them that you can perform intra-oral biopsies under local anaesthesia, if required.
Oral cancer can be treated more successfully through early diagnosis.3
References
1. Le Campion A, Ribeiro CMB, Luiz RR, da Silva Junior FF, Barros HCS, Dos Santos KCB, et al. Low Survival Rates of Oral and Oropharyngeal Squamous Cell Carcinoma. Int J Dent. 2017;2017:5815493.
2. Chhina MS. Are e-cigarettes a safer alternative to reduce incidences of oral cancer? Evidence-Based Dentistry. 2023.
3. Chen SW, Zhang Q, Guo ZM, Chen WK, Liu WW, Chen YF, et al. Trends in clinical features and survival of oral cavity cancer: fifty years of experience with 3,362 consecutive cases from a single institution. Cancer Manag Res. 2018;10:4523-35.
4. Lorenzo-Pouso AI, Lafuente-Ibáñez de Mendoza I, PérezSayáns M, Pérez-Jardón A, Chamorro-Petronacci CM, BlancoCarrión A, et al. Critical update, systematic review, and metaanalysis of oral erythroplakia as an oral potentially malignant disorder. J Oral Pathol Med. 2022;51(7):585-93.
5. Xiao HD, Bifulco CB. 2 - Cellular and Molecular Pathology. In: Bell RB, Fernandes RP, Andersen PE, editors. Oral, Head and Neck Oncology and Reconstructive Surgery: Elsevier; 2018. p. 57-78.
6. Wang N, Huang M, Lv H. Head and neck verrucous carcinoma: A population-based analysis of incidence, treatment, and prognosis. Medicine. 2020;99(2).
7. Karthik KP, Balamurugan R, Sahana Pushpa T. Oral papillary squamous cell carcinoma (OPSCC): a rare presentation in the palate. J Oral Med Oral Surg. 2020;26(2):16.
8. Hanifa FA, Zazo A, Fares MK, AlHashemi M, Bazkke B, Haddad B, et al. Managing misdiagnosed gingival squamous cell carcinoma (GSCC) with occult symptoms: A report of two cases. Annals of Medicine and Surgery. 2021;69:102820.
Treatment of generalised tooth wear with the injection moulding technique
Pieter-Jan Swerts1
1 Pieter-Jan Swerts graduated in General Dentistry at the Catholic University of Leuven (Belgium) in 2017, followed by a 3-year Master program in Restorative Dentistry at the same university. He is currently in Private Practice in Antwerp, Belgium
Patients with severe generalised tooth wear may need complex restorative care, most often consisting of full rehabilitation at an increased vertical dimension of occlusion (VDO). It goes without saying that this type of treatment is usually challenging and time consuming. In general, minimum-intervention approaches should be considered first.
A 23-year-old patient consulted the dental clinic with concerns related to the condition of his teeth. The following case report describes a predictable workflow for a full-mouth rehabilitation with the injection moulding technique, as well as the rationale behind the method and practical advice for a feasible implementation.
Diagnosis
Examining the smile, short clinical crowns and a gummy smile were noted (Fig. 1a). Intraoral clinical examination revealed excessive tooth wear at an extent that was obviously disproportional for the patient’s age (Figs. 1b, 2). This finding, together with his complaints such as mild hypersensitivity, led to categorise the wear as pathological.1,2 Cupping of the cusps resulted in exposure of dentinal tissue; this pattern is indicating that an erosive factor plays a role, a hypothesis that is further supported by the present restorations standing proud. Clearly defined, glossy wear facets were also present, indicative of excessive attrition.
Aetiology
The aetiology of the wear was found to be multifactorial, with a chemical as well as mechanical component as stated above. This pattern, in which abrasive/attrition processes accelerate tooth surface loss after chemical softening by erosion, is quite often seen.2,3 Nightly bruxism, parafunction (nail biting, nut cracking) and erosion (carbonated soft drinks) were withheld from the anamnesis.
Fig. 1: Initial situation, frontal view.
Prevention
It is important to keep in mind that restorations themselves do not prevent wear processes but merely alter them in terms of pattern and rate. Therefore, it is important to assess the likelihood of further wear and what form this may take, knowing that episodes of wear may well have different aetiologies.3,4
To slow down further progression of the tooth wear, the patient was advised to reduce his intake of carbonated soft drinks, to stop nail biting and to avoid biting hard objects.
Treatment
After informed consent, we opted for a total rehabilitation of the wear with composite restorations using the injection moulding technique.
With the mechanical properties of current direct composite materials, evidence that supports their effectiveness for the management of all types of tooth wear on the medium to long
term, is steadily growing.2,5,6 They offer an additive, minimally invasive alternative to achieve an aesthetically pleasing outcome for the treatment of tooth wear. Direct composite restorations are cost-effective and readily amenable to adjustment, repair, and refurbishment. Form and function are restored, and underlying tooth structures protected.
To resolve the gummy smile and improve the bite (Angle Class II), the option of orthodontic treatment with possible orthognathic surgery was discussed, but not accepted by the patient. To compensate for the gummy smile, a clinical crown lengthening was proposed as an alternative option.
Intraoral scans and bite registration
Both jaws were scanned to register the initial situation. Due to the extreme wear, maximum intercuspation was not reliably reproducible. Because a change in the VDO was planned, the centric relation was used, to ensure a reliable assessment.
Fig. 2: Initial situation, intraoral view.
Fig. 3: Composite jig to determine the centric occlusion at the desired VDO.
Fig. 4: A leaf gauge can also be used to determine the increase in VDO.
SWERTS
An anterior acrylic jig (Fig. 3) was used both as an anterior deprogrammer and as a guide to the extent of the occlusal preparation required. It was made a bit oversized at first and gradually reduced to the desired height to be able to evaluate its influence in a gradual manner. Another method would be to use a leaf gauge (Fig. 4); in general, a 5 mm maximum increase in VDO can be justified to provide adequate space for the restorative material and to improve the aesthetics. Signs and symptoms after an increase below 5 mm tend to be self-limiting. 7,8 By letting the patient move the mandible first forward and then back, the centric relation can be accurately obtained. With the anterior jig, the mandible can be stabilized, which is necessary to digitally record the bite registration.9
Digital wax-up & mock-up
After having finished all scans (Fig. 5), a digital design was made and verified. Based on this ‘digital wax-up’, a mockup was made in the mouth (Fig. 6). This is an important step in all complex treatments, which gives the opportunity to evaluate various aspects of the treatment, such as aesthetics, phonetics, and function, while adaptations are still possible. Moreover, the patient is informed about the treatment result he can expect. After patient approval of the proposed design, the 3D models and the transparent keys for in the injection could be fabricated.
3D models and transparent keys
For each jaw, two models were printed: one of the complete
Fig. 6: Intraoral mock-up of the computer-assisted restorative design.
Fig. 7: 3D-printed models: one alternately restored and one fully restored model.
Fig. 8: Silicone keys from transparent silicone (EXACLEAR, GC): models were made for each quadrant and carefully trimmed, not to interfere with the rubber dam isolation.
Fig. 5: Intraoral scans of the initial situation.
digital design and one where the teeth were alternately built up and the other teeth were left as in the original situation (Fig. 7).
Making use of these alternated models improves the stability of the transparent key because of the distinct and evenly distributed vertical stops. This results in an increased occlusal predictability and control over the proximal surfaces.
In total, 8 keys were made, with two keys for each quadrant (Fig. 8). Keys were made from clear vinyl polysiloxane (EXACLEAR, GC) in a non-perforated tray and were left to
cure in a pressure vessel during 7 minutes at a pressure of 2 bar. Due to the pressure, air bubble inclusion was prevented, facilitating the visual control through the key. It was ensured that the material had sufficient thickness (about 6-7 mm), vertically as well as horizontally, to ensure the rigidity of the key. Two holes per tooth were punched from the inside out with same needle as used for the injection: one for the injection and one as a vent to let composite excess escape.
Injection of flowable composite
Prior to the procedure, the closest matching shades were each tested on a tooth for the proper shade selection. Then, the teeth were isolated with rubber dam (Fig. 9). The keys were tried in and the margins were trimmed to avoid interference with the dam during passive seating. Next, the teeth were separated with metal matrix strips for the surface roughening with Al2O3 powder and selective enamel etching (Fig. 10). Where contact points were too heavy, these were slightly adjusted with ‘New Metal Strips’ (GC). After having thoroughly rinsed and dried, the alternating teeth were separated with PTFE tape. PTFE plugs were placed in the embrasures to avoid they would be filled with resin during the adhesive procedure and injection. Primer and bonding were applied and cured in accordance with the manufacturer’s instructions (Fig. 11). Thereafter, the key was placed on the teeth, once again ensuring that it was stably seated prior to the injection of G-ænial Universal Injectable (Shade A2). After injection, each tooth was cured for at least 40 seconds
of the
Fig. 9: The teeth were isolated with rubber dam prior to the adhesive procedure.
Fig. 10: Teeth were separated with metal matrices prior to sandblasting and selective enamel etching.
Fig. 11: Adhesive procedure with a two-step self-etch bonding system after careful placement of PTFE tape on the neighbouring teeth and in the interdental spaces.
Fig. 12: Each tooth was cured for at least 40 seconds.
Fig. 13: Removal of overhang with a scalpel.
Fig. 14: After injection
first silicone key (G-ænial A’CHORD, Shade A2).
(Fig. 12), hoovering over all surfaces. When all teeth were built up, the key was taken off and each tooth was cured for at least 20 seconds again. Composite overhangs were removed with a scalpel (blade nr. 12; Fig. 13). When finished (Fig. 14), the workflow was repeated with the second key (Fig. 15). All quadrants were built up this way, each time following the same procedure (Fig. 16).
Finishing and polishing
Prior to the polishing, the sprue and surface irregularities due to composite overflow were removed with abrasive disks, fine diamond burs, interdental strips, and stones (Fig. 17). The occlusion was carefully checked, and premature and deflective contact points were removed. Because of the precise copying of the restoration design, only minor adjustments were needed.
An additional benefit of the composite injection technique is the absence of an oxygen-inhibited layer. This improves the polymerization of the surface layer10, which facilitates the polishing process. On the other hand, depending on the resolution and the print process, layer lines are visible on the 3D-printed model.11-13 These layer lines are copied in the composite due to the high accuracy of the silicone key. They are, however, quickly removed with rubber polishing wheels (Fig. 18). Finally, the restorations were polished to high gloss with a brush and Diapolisher Paste.
The final result was a symmetrical dentition with balanced
occlusal contacts (Fig. 19). While this outcome would be extremely difficult to obtain with a free-hand technique and requires a lot of skill and experience, an injection moulding technique can be mastered relatively fast. The patient was very happy with his restored dentition.
A hard occlusal splint with canine guidance (Fig. 20) was provided to protect the restored teeth from nightly bruxism.14
Conclusion
Not all patients with signs of tooth wear require restorative treatment. Even though many of them may be effectively managed with a targeted preventive approach and sufficient monitoring, restorative intervention may be inevitable in the presence of severe pathological tooth wear, as in the described case.
To ensure a useful approach, the treatment should be attainable, stepwise, adjustable, repairable, cost-effective and remaining tooth structure needs to be preserved.15 The composite injection technique fulfils all these requirements. The treatment is minimally invasive, with minimal preparation requirements and an easily repairable material.16,17 Moreover, adjustments can relatively easy be made in a later phase if necessary, after the patient has had time to adjust to the new situation but cannot get fully accustomed. According to recent literature, resin composites are suitable for interim treatment as well as definitive treatment. Eliminating all the etiological factors, however, may be
Fig. 15: All steps were repeated with the second silicone key… Fig. 16: … and all done over to build up the other quadrants.
Fig. 17: Finishing with scalpel (blade nr. 12) and interdental strips (New Metal Strips, GC).
Fig. 18: The layer line pattern copied from the 3D printed model can be removed with simple polishing procedures.
Fig. 19: Treatment result. With careful treatment planning and a reliable procedure, excellent morphology and balanced occlusal contacts were obtained with direct composite.
20: Occlusal night guard.
unrealistic when patients suffer from persistent bruxism or are not willing or able to change potentially harmful habits. In such cases, it is possible that damage will reoccur.2 Then, it can be considered to restore the dentition with indirect materials, such as glass ceramics. These are, however, more invasive in nature and adjustments are very difficult to make in a post-treatment phase. Therefore, it’s preferred to reserve this type of treatment for a later phase.
References
The full list of references 1-17 is available from: ursula@moderndentistrymedia.com
Reprinted with permission from GC get connected
Fig.
Flossing is an important part of your patients’ daily oral hygiene routine. Flossing helps to protect gums and reduce tooth decay by removing plaque between teeth and along the gum line. Your patients can now freshen their mouth with Colgate New Floss for improved mouth health.
• Helps to protect gums and prevent tooth decay by removing plaque between teeth and along the gumline.
• Slides easily between teeth without shredding.
Proper flossing removes plaque and food particles in places where a toothbrush cannot easily reach — under the gumline and between teeth.
Daily flossing is highly recommended in your patients’ oral care routine:
1. Wrap about 50cm around your middle fingers
2. Insert floss at the top of the tooth and work gently downwards
3. Clean both sides of the tooth and along the gumline, using a clean section of floss every few teeth
GC TOOTH MOUSSE™ MILKSHAKE
For the first time in 20 years, GC Tooth Mousse™ comes in a delicious NEW Milkshake Flavour that your patients will love. This creamy, vanilla thickshake flavour contains calcium and phosphate; the major minerals teeth are made from. Because calcium and phosphate are carried in a special milk-derived protein called RECALDENT® (CPPACP), they are available in a soluble form. This means GC Tooth Mousse provides extra protection for teeth, buffers dental plaque acid from bacteria in the mouth and protects teeth from acidic foods and drinks.
GC Tooth Mousse provides daily extra protection for people of all ages including children and people who depend on carers.
Available at Henry Schein
KATANA™ CLEANER
KATANA™ Cleaner is a dental cleaning agent for all restorative procedures. Intra- and extra-oral use.
• Can be used intra- and extra-orally
• Only 10 seconds of rubbing
• Easy fast procedure – rub, rinse and dry
During trial fitting your restoration might become contaminated with proteins (Saliva/Blood) reducing the bond strength. KATANA™ Cleaner has a high
cleaning effect due to the surface active characteristic of MDP Salt. It has a pH value of 4.5 which allows usage not only extraorally but also intraorally. It is the easy way to optimise your bondings including cementation procedures.
• Resin Based Materials (CAD/CAM Crowns, Composite Resin)
• Metals (Precious/Non Precious Metal Alloys)
• Posts (Glass Fiber Posts, Metal Posts)
TRUSANA
PREMIUM DENTURE SYSTEM
The Trusana™ Premium Denture System is comprised of Trusana Premium 3D Tooth Resin, Trusana Premium 3D Denture Base Resin, Trusana Bond Denture System Adhesive. The three products work together to create a premium denture with unmatched physical properties and lifelike esthetics that mirror the beauty and translucency of a natural smile.
With the Trusana Premium Denture System, labs are able to streamline production, saving time and money. The one-step bonding process allows for a simple, straightforward workflow with precision and consistency.
BIOHORIZONS
PRO SURGICAL SYSTEM
Keyless guided and freehand workflows in a single kit, for a new level of flexibility and predictability
The Pro Surgical kit from BioHorizons offers predictability and flexibility in a single system. Guided implant placement can be performed with control and precision following a keyless drilling protocol. The same set of length specific drills can also be used for freehand placement, offering flexibility for treatment planning and for surgery.
Features:
• supports guided and freehand surgical protocols
• keyless guided surgery solution
• color-coded instruments for easy recognition of compatibility
• fully guided implant placement maintains control throughout the full protocol
VISTA ENDOULTRA
Introducing EndoUltra Ultra Effective – Ultra Efficient – Ultra Sonic
EndoUltra, your cordless handheld device that can generate tip frequency (40,000Hz), required to create sufficient acoustical streaming and the cavitation necessary to effectively clean, penetrate and remove vapour lock, when undertaking the irrigation process during endodontic treatment.
Convention hand instrumentation leaves as much as 35% of the canals untouched. Irrigation, although an important part of the canal disinfection and debridement process, cannot be relied on to optimise canal cleanliness. Proper irrigation protocol should include the use of enhanced endodontic solutions to facilitate removal of microorganisms, tissue and dentine chips from the root canal.
EndoUltra, facilitates solutions activation via ultrasonic frequency, generating acoustic streaming and cavitation, resulting in significantly improved debridement of canal spaces, and improved penetration of irrigants into dentinal tubules.
OPTIZYME ULTRA D: AN ADVANCED TOOL FOR DENTISTRY
Steve Kritzler
Novapharm Research (Australia)
Novapharm has been a research leader in the use of enzyme detergent medical instrument reprocessing for 3 decades. The last 15 years has seen an almost total replacement of the old-style alkaline detergents by near neutral enzyme detergent formulations which have proven to be safer, more efficacious, more cost effective and more instrument compatible.
Recently it became clear that the challenges in reprocessing dental instruments are somewhat different from medical requirements and therefore a research project focussed on developing an enzymatic cleaner specifically to meet this dental challenge was undertaken five years ago.
The result is Optizyme Ultra D - an aqueous, multienzyme detergent concentrate developed specifically for dental instrument reprocessing. This formulation has proven to offer superior cleaning efficacy and is applicable to all dental instruments and cleaning modalities i.e. sinks, ultrasound baths and automated washers.
The unique features of the product focussed on satisfying the currently unmet dental requirements are:
•Clear, low foaming solution that is fully compatible with manual washing, ultrasound baths and automated washers
•The ability to clean both organic and inorganic soils (bone, pulp, amalgam, ionomer as well as all human secretions).
•Digests and removes biofilm
•Contains rust and corrosion inhibitor
•The inclusion of a disinfecting system which ensures that the cleaning sink or ultrasound bath does not become a source of cross-infection after being in continuous use with a multiplicity of soiled instruments for many hours. (N.B. the product is not an instrument disinfectant)
Optizyme Ultra D is easily used in exactly the same way as other currently available instrument cleaners. It is simply added to the bath water or automated washer at the rate stated on the label.