2 minute read
3ds Max Cut or slice
from Aug-Sep07.
by Hiba Dweib
Cut or Slice
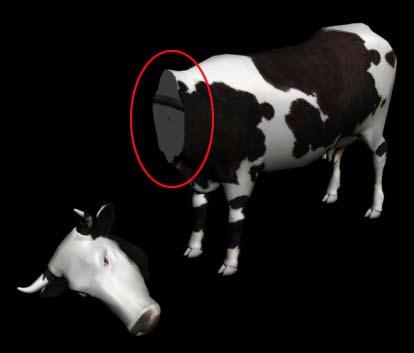
You have seen various times in movies like Ghost Ship, Revolution where cuts object by a thin line and after few seconds object is dropped on the ground with the dripping blood. In this tutorial we try to simulate a same type of effect using premade model without dripping blood. There is nothing max version specific; you just required a Boolean which is available in any version of max. So, without wasting a time let’s get started.
Advertisement
Step 1: Create an object, open or import your model in the scene.
Step 2: Now create a thin box which intersects the object properly from all the sides where you like to show a slice or cut. Thinness of the box depends on which type of cut you like to shown, like sword attack will be thin and cutting a wood through machine then cut will be broader.

Step 3: Select your main object and go to Create > Compound > Boolean and in Operation select Subtraction (A-b) must be selected. Then click on “Pick Operand B” and then select the box. You will notice a fine cut on the object.
Step 4: But in this tutorial we also animate this cut too, so go into Modify> Boolean > Operands and in the Display/Update box “Operands” radio button must be selected so you can see the operand once again which was hidden in previous step when you click the Pick Operand B. Now animate your box from top to bottom or side to side as per your choice. In simple words, turn on “Animate” and set a key for box on frame 0 then move to frame 30 and drag it down so it slices down. Before doing the Boolean don’t try to animate, if you don’t believe me then try it out and check the results.
Step 5: Now apply an “Edit Poly” modifier on the object and select Element. Now select the object part which you like to drop on the ground or animate.
Step 6: Apply Xform modifier on that selected part, Go into the Gizmo mode and now you can animate the object.
Step 7: But have you noticed the texturing on the cutout area, which is totally disturbed. (Or if that is hollow area then create a surface by selecting the edges) So, again apply Edit Poly and select the polygons of that area. Apply UVW Mapping modifier and select planer from the mapping list.

Step 8: Now apply the “Edit Mesh” modifier and apply the different texture you prepared for that cutout area because texture will be totally different in that area. Render the scene and everything is fixed. There are various or say unlimited possibilities of this technique. So, send me your suggestions and critiques, if any query or can be improved more. Sayonara.
- Ranjan Jain jain.ranjan0@gmail.com

In July 07, your mission was to create a 3D image on “Toon” theme and sponsored by ambientLight.
Following are the winners...
First Prize
Baiculescu Ovidiu Nicky, Italy nicky@nik.ge

Second Prize
Gaurav Mohan, India ghonma@gmail.com


