8 minute read
After Effects Bullet Holes
from may2008_mag
by Hiba Dweib
Bullet Holes
by Pradeep Mamgain, India Email: pradeepmamgain@gmail.com Web: http://www.cgsutra.com
Advertisement
In this tutorial we will make bullet holes in the rusted metal sheet. We will first create bullet holes in Photoshop. BG elements will also be created in Photoshop. In After Effects we will add particles and camera shake. Lots of stuff to cover so lets gets started.
Start Photoshop; create a new document of size 512x512 pixels. You might ask why we need such a big file size for making bullet holes. Yes!! We don’t need this much size and eventually we going to reduce it to half. We are using large size because we will use clouds and chrome filters and these effects will not get us the metal looks we need if file size is small. Press D to reset FG and BG color swatches. Select Filter > Render > Clouds and then Filter > Render > Difference Clouds. Next choose Filter > Blur > Gaussian Blur with a radius of 4 units.
Next we will create melted metal looking effect. Chrome filter will give us best results. Choose Filter > Sketch > Chrome. Set Chrome details to maximum 8 and smoothness to 0. Now apply Levels effect to give it more brightness. See image below for reference.


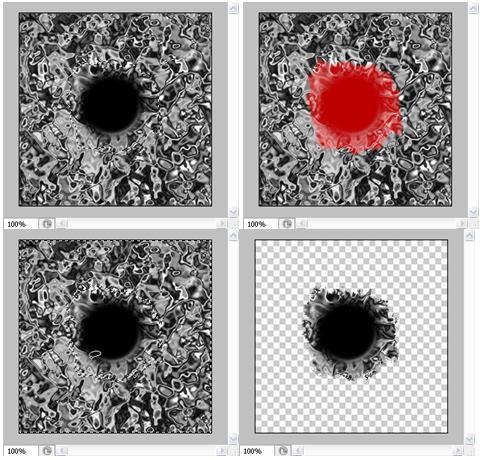
You will get something like image below. Now it is time to create bullet hole, for this select the brush tool, create a new layer and using a soft brush about 80 px diameter and 48% hardness and paint a stroke.
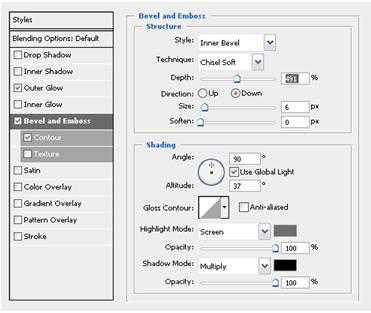
Now reduce the image size by 50%. Select Image > Image Size and reduce by 50%. Now in brush stroke layer apply following layer styles. Bevel and Emboss to give bullet hole depth. Note that we have used highlight color code #6D6D6D. Set mode to screen.

Now give layer outer glow, color code #DFDFDF.


Select the lasso tool and make a rough selection around the hole. Press Ctrl+Shift+I to reverse the selection. Press Q to enter in quick mask mode. Select Filter > Brush Strokes > Splatter. Press Q to quit quick mask mode. Hit delete to remove the out side metal.
Now bullet holes are ready, save this Photoshop document.
To create BG plate we need a metal texture, I have downloaded my texture from http://www.cgtextures.com a great site for textures. You can also download the project of this tutorial and can find metal. jpg inside compressed file. Ok!! Now open metal.jpg. For text we have four text layers WANTED, T, DEADLY and CG ARTIST.
Ok!! Now Create WANTED text layer, place it as shown. Duplicate the layer and delete everything but T from the layer, place the T text layer exactly over the T letter of WANTED layer.
We want the WANTED text to embed in the metal so we will apply some layer styles. Start with Bevel and Emboss, Pillow Emboss and Chisel Hard technique will give us the embed feel. Use the settings for Bevel and Emboss and Contour which are on the next page.


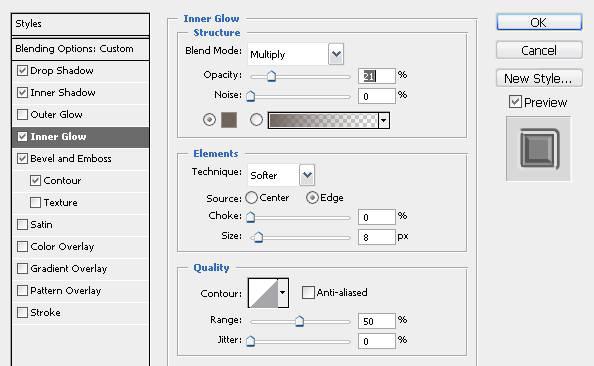
To give it 3D look use following shadow and glow settings
Drop Shadow

Inner Shadow

Inner Glow

Right click on WANTED layer and click copy layer style, select others layers and right click paste layer style. It is now time to add bullet holes. Import the bullet_hole Photoshop document we earlier created. Apply the layer styles as shown in images below.
Bevel and Emboss


Contour

Inner Glow
Likewise add other two bullet holes.
We have completed the Photoshop part, now its time to play with After Effects. Start a new project, set comp length around 200 frames and import file, AE will ask do you want to bake layer styles into layers; say yes.


Import rusted_metal.jpg and place it above metal layer and set mode to Hard Light. It will give it rusty look.
Import bullet_hole PSD and make three copies of it and rename them as bullet1, bullet2 and bullet3. Bullet1 will be fired just below A of WANTED, bullet2 below AD of DEADLY and bullet3 above NT of WANTED. Now we will create and animate a mask so that we can make illusion of bullet widening the hole in the metal. Create a mask as shown in the figure below. At Frame 75 keyframe the Mask Path, jump back to frame 72 and scale down mask to a dot. Select the 75th frame and press Ctrl+Shift+F9 to easy ease out. Repeat this process for Bullet2 and bullet3 at frames 116 – 113, 150 -148.
We have created three bullet holes with proper animation. Select the T layer and press R to bring up rotation properties. Keyframe rotation at frame 148 and at frame 154 set rotation to -150 degrees. Now you comp should look like as shown in image in right.


Default bullets holes are not that dark so we will darken the whole by adjusting levels. Drop in a levels effect on bullet-1 layer and set the following options.
Next task is to add dust particles that will pop up when bullets hit the metal. Create a new solid, make it comp size, rename as shot1dust and add Effect > Trapcode > Particular. Align the layer with bullet-1 layer.

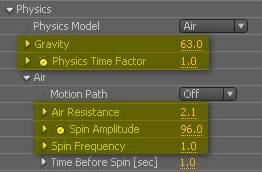
For Trapcode Particular use following settings …


At frame 70 key frame Particle/Per second and set value to 0, move to frame 71 and set it to 100, at frame 88 again set a keyframe for value 100 and at 95 set it again to 0. It will cause particles to fade. Now duplicate the particle layer and make two more copies of it for bullet-2 and bullet-3. You have to align keyframes according to the shots fired.
Add some noise to dust layer, add noise effect to all three layers and set Amount of noise 8%. We also want DEADLY and ARTIST text to shake little bit. We will go ahead and put in a wiggle expression. Select the DEADLY layer and press P for position. Alt click on position stop watch and enter wiggle (2, 10) in expression box. Do same for ARTIST layer.
Ok, now it is time to add camera shake to the comp, it will happen when bullet shot is fired. Since camera shake will work on all the layers we have to pre-compose the layers. To do this, pre-compose all the layers. Select all layers and hit Ctrl+Shift+C. Select the newly created comp and press P for position. Alt click on the stop watch and enter wiggle (6, 30) in the expression box. It will cause whole comp to shake. As you might have noticed we have some problems with the edges.
We have now black edges. To overcome this we will add Motion Tile Effect. Use following settings for Motion Tile Effect. Output width 150 and Output height 150 and check Mirror Edges.
Once you do that you would notice that edges are now mirrored perfectly.


Now our comp is shaking for whole time line and we don’t want that, we want it to shake when shot being fired. Unfortunately we can’t animate the expression but we have one more weapon in our arsenal and that is Slider Control. Add a slider control to pre-comp. It can added from Effect > Expression Control > Slider Control. Rename this control as shakeSliderControl.
To connect expression value to the slider, highlight the 30 of wiggle (6,30) and drag pick whip over the slider control as shown. Now your expression should read wiggle(6, effect(“shakeSliderControl”)(“Slider”))
If it read exactly what I have mentioned above, you have successfully connected the slider to second value of the wiggle expression. Our shake is now position based only, we want little bit of rotation wiggle also. Same expression with little modification can be used for rotation. It is simple. Press R to bring up the rotation properties, alt click the stop watch and enter wiggle(6,ef fect(“shakeSliderControl”)(“Slider”))/20 in the expression box. What it ensures that our rotation wiggle will be of 20% of position wiggle.
Now we have linked the wiggle to the slider control now we can use its stop watch to animate the wiggle.
Our first shot is fired around frame 73, at frame 72 set keyframe for value 0 move one frame down and set it to whatever value you want to put in. Move around frame 82 and set keyframe for the value you mentioned at 73, move one frame down and set it again to zero. Repeat the process for other two bullet shots. Its easy, you just have to copy and paste the keyframes.


Voila!!!!
We have completed the project, now its time to render it. I hope you would have enjoyed this tutorial.
Pradeep Mapgain
pradeepmapgain@gmail.com www.cgsutra.com


