4 minute read
After Effects Dipersion of Text

from sep2008
by Hiba Dweib

Dispersion of Text
Welcome everyone in the world where we make the beautiful things more beautiful. In this tutorial we will create an effect that you have created several times but mostly in 3d i.e. dispersion of name in sand. But in this tutorial we try to do this effect in after effects using Trapcode Form. Trapcode Form is an intelligent particle system which is very strong and gives wonderful results in short span of time. Without wasting more time on theory let’s move on to practical.
Advertisement
Step 1: Create a new composition (Ctrl + N)
Step 2: Select a text tool and create the text you like to disperse.
Step 3: Create a new composition (Ctrl + N) again and then create a Solid Layer. Now we have to create an animated mask. For doing this select the mask tool and create a rectangle mask as per the size of the text, so mask covers the whole text. Apply Blur & Sharpen > Gaussian Blur to blur the edges of the mask from all sides, you can also use feather option of the mask.


Step 4: Animate the mask, moving from right to left or from which side you like to start the dispersion. There is no fixed rule for this. Infact there is no fixed rule for anything, always some way around to do the same thing.
Step 5: Create new comp-sized solid (Ctrl + Y). Note that this solid should never be moved from center to move the form around. Instead, use the controls inside the effect. Solid layer doesn’t matter.
Step 6: Apply Trapcode>Form to the solid (named White Solid 1)
Step 7: Now you have 3 compositions. Drag both the previous compositions (text and map) in this new composition and hide the visibility of those 2 compositions.
Step 8: Now change the settings in the Form plugin as shown in the below images

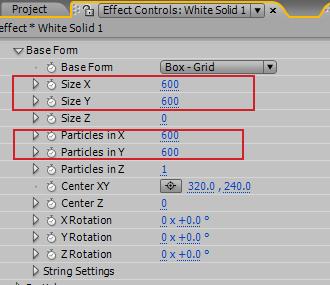
Explanation of Settings:
Size X, Y and Z- Sets the size in X, Y and Z axes correspondingly. The X and Y dimensions correspond to the size of the form horizontally and vertically, while the Z value determines its depth. So, set this according to your effects size. But remember bigger size required more particles to fill and that means more rendering time.
Particles in X, Y and Z - Sets the number of particles used to generate the form along the X, Y and Z axes. Be careful of high Z values, because the Z value essentially replicates the grid, strings, or sphere, and can cause very slow rendering.
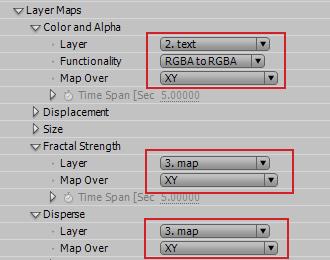
Layer Maps - Layer Maps enables the pixels of another layer to control various aspects of the particles in the grid. Note that any layer used as a map must be pre-composed or pre-rendered to be used as a source for Form. In general, best results are obtained if the size of the layer map equals the size of the particle grid
RGBA to RGBA - which maps color to the particle color and the alpha channel to the particle opacity across the grid
XY - maps the current frame from the source Layer onto the XY plane on the particle grid
Step 9: In Disperse and Fractal Strength choose the animated layer map for control the effect on XY axis. Now move down to the Disperse and Fractal Field settings and changed according to the dispersion you are looking. I

I animate the Fractal field values on 0sec (0) and 5sec (75) for giving some movement of the particles like in air. I also increased the Twist value to give some twist to the text.
Twist = 0
Twist = 5


Now play the effect and you are done. You can also reverse the effect by reversing the Fractal field values and animated mask.
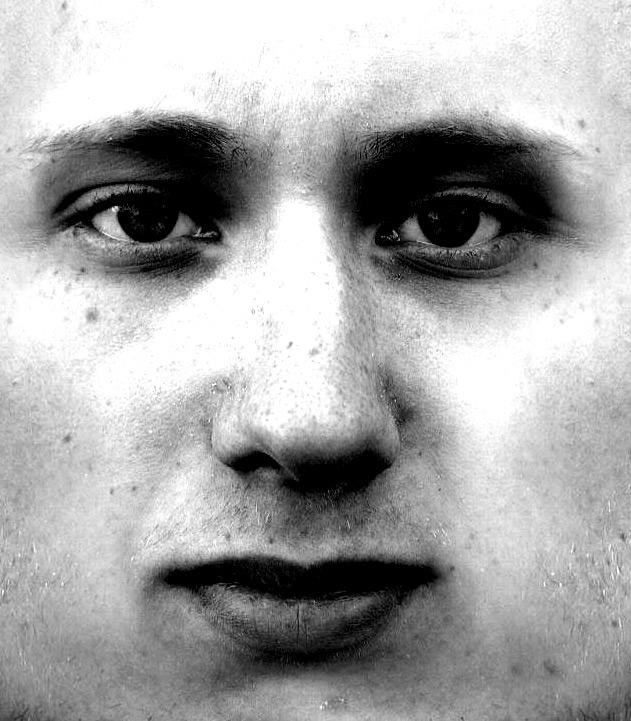
Before conclude I like to say in this Form plugin there is one Displacement feature which works like same as in 3d, so I applied a face map (black and white with grey values) and I get a decent output which I can used to create a effect of zooming camera into face like you have seen in Matrix. Hope you enjoy this small tutorial.
Click to Play Click to Play


by Suzane Smith, Canada suz.smith@hotmail.com