
9 minute read
Using Xposed Framework to Tweak Your Android


The Xposed Framework is for modules that can change the behaviour of the system and the apps. With Xposed, you do not have to flash a ROM on your phone (a risky business) as you can modify its behaviour by using Xposed modules, which can change the behaviour of your apps. With Xposed, the ultimate level of customisation is possible on your phone.
Android is all about customisation. You can push the limits of your phone and, of course, your creativity, once you root your device. After rooting, there comes a new phase in you and your phone’s life, as you install uber-cool apps like Greenify, Titanium Backup, change the boot animations, and much more. You can even change your whole user experience by flashing custom mods and ROMs, but you lose the stability and reliability of your pre-installed vanilla Android. Wouldn’t it be awesome if you could have the exotic features of custom mods with the stability of stock ROMs? The answer is simple - Xposed Framework, authored by two recognised XDA developers rovo89 and Tungstwenty. It allows users to change the behaviour of the system and apps without changing the APK via root access. The Xposed Framework has modules, each targeting a particular need. So, let’s dive in. Note that this only works with root access on Android 4.0.3 or later
Advertisement
Warning
Before you dive in, wear a life jacket! Since it requires root access, be careful about what you are doing because, “With great power, comes great responsibility.” Also, Xposed Framework is likely to work best on stock ROMs with little customisations, as some modules may conflict with the custom ROMs. Though it works perfectly on most devices, neither the author nor OSFY will be held responsible if you damage/brick your device. Proceed at your own risk and do take a back-up. Words like Notification bar and or Tapping and Clicking are used interchangeably.
I tested this on my Micromax Canvas 2 with the Jelly Bean 4.1.1 stock ROM, and it worked almost fine :)
Installation
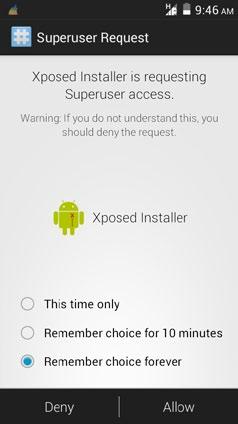
Before installing, do a full back-up as it’s better to have a backup than to be sorry. Installing Xposed Framework is simple. Just download the Xposed installer from the Xposed site, http://repo.xposed.info/module/de.robv. android.xposed.installer. After downloading the APK to your device, just side load it. After installing the framework, open the app and you will see something similar to Figure 1. We haven’t yet installed the framework. To do so, go to Framework and then tap the ‘Install/Update’ button. You may experience some glitches. Don’t worry. Wait for a few minutes and after that, the app will request for root access via your SuperSU/SuperUser app, like in Figure 2. To complete the process, perform a reboot so that you can install modules. You won’t see anything great until you install the modules.
Installing a module
Modules, as discussed earlier, provide extra functionality
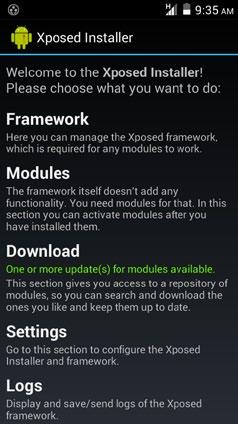
Figure 1: Xposed installer ‘Welcome’ screen Figure 2: Super-user screen
to your device. Xposed offers a wide range of modules that can be downloaded under the Download section of the app, where you will find loads of them with a snippet of information about each module. To install a module, just tap on it, then click on the Download button and you will be prompted to install it. So, let’s install a module. I selected Gravity Box, because it’s my favourite. There are two versions of Gravity Box—one for JellyBean [JB] and another for Kitkat [KK]; so select accordingly. Then click on the Download button. After the download finishes, you will be prompted to install it. If not prompted, you can invoke the installer explicitly by tapping the Install button, which will appear next to the Download button after successful downloading. After installation, you have to activate the module, by going to the Modules section and checking it. Please note, the changes will only take place after rebooting. The list of modules is very vast, but here are my favourites in no particular order, which we will later use to customise our Android experience: GravityBox Tinted Status Bar [BETA] XHaloFloating Window App Settings MinMinGuard
To maintain the modules, just go to the Modules section, and if you want, uncheck/check a particular module.
If an update to the Framework or a module is available, you will be able to see it under the Download section. Now let’s move on to customisation.
GravityBox
Installing GravityBox is just the start; the real fun lies in configuring it for better use. After installation, the GravityBox icon will appear in the app drawer. If you open the app, you will find tons of customisation options, ranging from Status Bar tweaks to miscellaneous others. If the app asks for root access, you already know what to do. Under the Status Bar tweaks you can change the icon colour and the colour of the Status Bar too. You can also change the battery indicator to the one KitKat has, if you want to dress up your device with minute details. If you want an advanced power menu, you can go about getting one under Power Tweaks. My favourite tweak of GravityBox is the Expanded Desktop mode, which gives you extra screen space to run apps by hiding the notification bar. It can be enabled under the Display tweaks. Once you enable it, you can find the option to expand the desktop under your power menu, like in Figure 3. Also, the Transparency Management option gives you the power to make the Status Bar and Navigation Bar mimic the transparent Status Bar of KitKat. There are too many options to discuss, so go ahead and explore and experiment.
Tinted Status Bar
This module gives you a consistent and seamless look throughout the apps on your system. It changes the Status Bar colour with the present app open, much like the Chameleon feature of Unity. So, open up the app, and if it asks for root access, give it the privilege. If you see a list of apps installed on it, you can enable/disable individual apps by tapping on the app and toggling the On/Off button. Now, if you want an app that has a distinct colour like VLC (which has a dominant orange colour), you will see Status Bar turn orange.
XHaloFloatingWindow
This module brings the famous Halo Popup floating window feature from Paranoid Android. It can be used as with the Floating Notifications app to get a closer Halo experience; however, we will keep it simple. First download and install the module, then open up the app and it will ask for root access. Now, activate the module with a reboot. To test the app, open the XHaloFloating Window app from the drawer, go to the Testing Area, and try and launch any of the tests. I chose to launch Xposed Installer in Halo. Now, let’s configure opening the notifications in Halo mode. Open the app and go to SystemUI Mods, and check the Long Press Notifications Option and Long Press Recent Apps. Now, if you want to open a notification from an app in Halo mode, you will have to long press on notification. If you don’t like to long press every time you want to open the notification, you can check the Single Click option as well. It will work for most apps but not with some apps like Play Store and Terminal Emulator; even if you try to open them in Halo mode, they will open in default mode. The Long Press Recent Apps option does the same. This module is extremely useful when you are browsing and you receive a notification from your
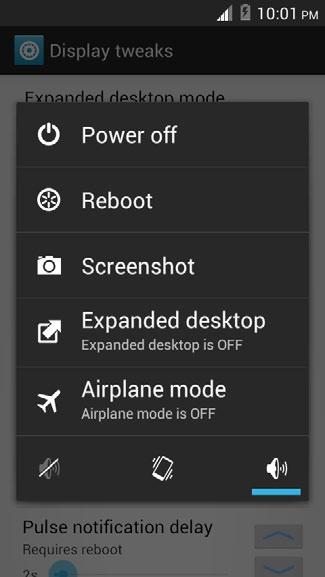


Figure 3: Expanded Desktop option in Power Menu Figure 4: Tinted Status Bar options for Chrome Figure 5: Chrome with a tinted Status Bar
friend from services like WhatsApp. You can just open WhatsApp in Halo Mode, and reply to your friend without leaving your previous work.
Note: XHaloFloatingWindow may conflict with OmniROM’s multi-Window, but it was working fine with Xposed XmultiWindow module (which is a port of the split view feature of OmniROM, available through Xposed), which we will discuss later in this article. Also while testing this app, the Long Press Recent Apps option was not working properly.
XmultiWindow
This module ports OmniROM’s split view to other ROMs. As per information available, it works on MIUI and stock ROMs, and it worked fine with my stock ROM too. Again, download and activate the module and reboot the device. While you have instructions to follow, I found them confusing, so this is how I went about things. Open the app and tap on Open SideBar. After tapping on the option, go to the home screen and wait for the split view to appear; if it doesn’t appear implicitly, invoke it by swiping the left edge of the screen towards the centre and you will notice a left side launcher like Ubuntu's Unity launcher. If it doesn’t appear, keep trying with different gestures on the left edge of the screen. Now to open any app in split view, click on that app from the left-half of the split menu and select the workspace in which you want to place the apps. After selecting two apps each in different workspaces, your screen will look something like this.(mention fig no…is it Fig 8?) To hide the left bar, just click on the notification of XmultiWindow from the Status Bar.
App settings
This module allows you to tweak settings for an individual app. Here’s the list of settings that you can change for an app. DPI and reported screen size Font scale Locale Full screen mode, plus immersive mode on KitKat Hiding the title bar
For complete check the app on Xposed Repo. Now, let’s try this on an app, which in my case is Adblock Plus. Install, activate the module and reboot the device. Open the app and you will see a list of apps installed on your system. Then, click on the app for which you want to change settings, which in my case is Adblock Plus. Toggle the settings ON, select your filters and after that, save this. If you want the original settings, just toggle settings to OFF. The result is shown in Figure 9.
MinMinGuard
Today, ads have become a necessary evil. So while you should not block ads from honest and hard working developers, sometimes they mess up the user experience. Before using the app, read its disclaimer, which can be


