
49 minute read
Backing Up Data with


For U & Me Overview
Backing Up Data with FOSS Tools
Advertisement
Given that backing up data is an essential part of our digital activities, which tools would be best for the task? Naturally, our choice would be the open source variants! The author gives readers a choice of three such tools.
In a world of rapidly evolving technologies, data is everything. Organisations, and even individuals like you and me, are heavily dependent on data for our day-to-day work. System failures, corrupt hard drives, virus infections, etc, are a few of the causes of data loss. Protecting data from these hazards is not that difficult. An effective way to do so is to maintain a regular backup of data, which will ensure that at any given time you have at least one fail-safe copy of your data that you can rely upon.
The tools discussed below have been chosen for their simplicity and as alternatives to advanced backup solutions.
Data backup terminology
There are certain terms related to data backup software that you should be familiar with, to help you in understanding the tools discussed below.
Synchronisation: Maintaining two or more copies of files and folders (data), at different locations, such that any changes made (to data) in one location are reflected in others.
Mono-directional synchronisation: Synchronisation happens in one direction only, i.e., changes made in Location A will be reflected in Location B but not vice versa.
Bi-directional synchronisation: Synchronisation happens in both directions—changes made in either location will reflect in the other.
Full backup: All files and folders will be copied to the backup location irrespective of whether they are changed or not. In a full backup, files are compressed and can be password protected.
Mirror backup: This is identical to the full backup except that it does a straight copy of the original location without compression or password protection.
Incremental/update backup: Only the files that were created or modified after the last backup will be copied or backed up.
Mirror (incremental) backup: As the name implies, this is a combination of a mirror and an incremental backup. It copies only the newly created or modified files to the backup location without any compression or password protection.
Contribute: Only new files will be copied to the backup location.
Schedule: A time table for which backup job to run. This can be daily, weekly, monthly, annually, etc. Once a schedule is set, the tool will automatically start the backup job at the defined interval.
With that out of the way, let us get down to exploring FOSS data backup tools.
Duplicati
Developed by Kenneth Skovhede, Duplicati is a powerful, easy to use backup client. It is free, open source, featurepacked and can work on multiple platforms. The best thing about this tool is that it provides an option to back up data onto cloud storage.
Notable features
Supports remote and cloud-based storage Password protects and encrypts backups, using AES-256 and GNU Privacy Guard Platform-agnostic Built-in scheduler Filters based on regular expressions
Getting the tool
Duplicati can be downloaded from https://code.google. com/p/duplicati/wiki/Downloads?tm=2. The download page lists 32-bit and 64-bit variants for Windows, and for other platforms. The current version, at the time of writing this article, is 1.3.4.
For the purposes of this article, we will use the Windows version but feel free to download and install the one appropriate for your system.
Using the tool
Duplicati features an intuitive user interface and configuring it is a breeze. The following section will walk you through how to set up a simple backup (file and cloud) and how to restore files from that backup.
Setting up a backup
Follow the steps shown below to set up a backup.
Step 1: If you didn’t check the Launch Duplicati now option, you can also launch Duplicati via Start > All Programs > Duplicati
Step 2: Since this is the first time you’re using this tool, in the welcome window select Setup a new backup option and click Next.
Step 3: Give a name to the backup. Additionally, you can also create a group and place the backup in that group. For example, in the sample shown in Figure 1, the backup is named ‘Sample’ and it is placed in Critical group. This is helpful when you want to categorise your backup (e.g., Critical, Important, Normal, etc). Click Next once this is done.
Step 4: The next window allows you to select the folders to be backed up. By default, the tool selects My Documents as the folder to back up and gives you an option to select the individual components. However, if you want to specify your own folder list, select the Custom folder list option, specify the folders (as shown in Figure 2) and click Next.
Step 5: In the next window, set a password for this backup and select the encryption method. Let’s choose AES-256 encryption, built-in for the purposes of this article. Make sure that Use these settings on new backups option is checked. This will ensure that any future backups use the same settings. Click Next once this is done.
The GNU Privacy Guard, external option also does the encryption but requires the user to separately install GNU Privacy Guard, which is free open source encryption
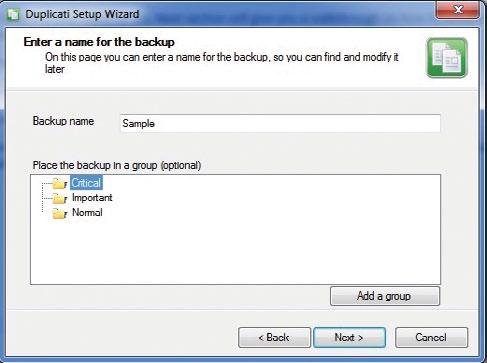
Figure 1: Backup storage options (for file-based backups)
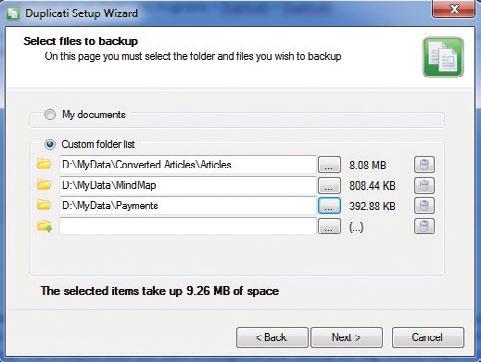
Figure 2: Select files to back up
software that can be downloaded from http://gpg4win. org/download.html (for Windows). For other platforms, please use http://www.gnupg.org/download/ to find the appropriate package.
As stated earlier, one of the good things about Duplicati is that it provides an option for file-based and cloud-based storage of backups. Therefore, Steps 6 and 7 will differ based on your choice. The following text will explain Steps 6 and 7 for both file-based backup and cloud-based backup (using Google Docs).
Step 6 (for file-based backup): In the Select a place to store the backups window select the File based option and click Next.
Step 7 (for file-based backup): In the next window, set the path to the location in which you want to store the backup. This can be a local path or a network location.
In case you’re entering a network path and it requires a separate set of credentials, make sure that the Use alternate credentials option is checked and credentials are set in the respective fields. Alternatively, you can also select the Removable disk option to store the backup on removable media such as a USB drive or a memory card. Select the desired disk from the drop-down box.
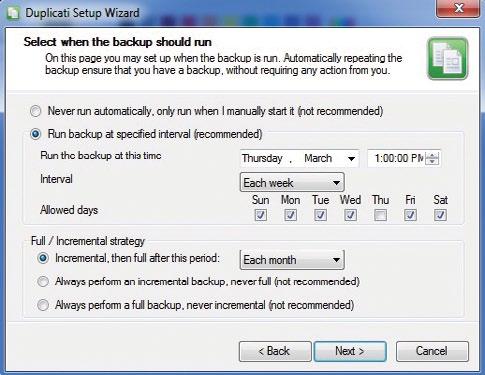
Figure 3: Backup should run time selection
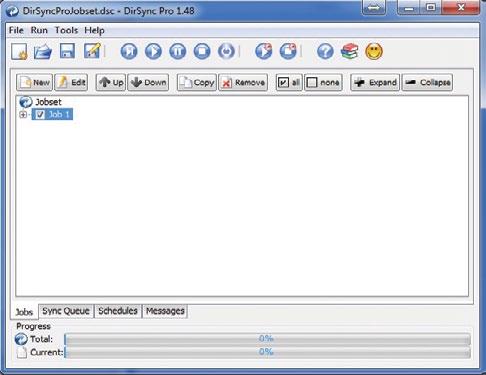
Figure 4: DirSync Pro console
Step 6 (for cloud-based backup): In the Select a place to store the backups window, select the Google Docs option and click Next.
Step 7 (for cloud-based backup): In the next window, enter the credentials for your Google Drive account, specify a Google Docs Collection name (a folder with this name will be created in Google Drive). Click Next once done and press Yes in the Test Connection window that pops up.
Step 8: In the Advanced Settings window check the Select when and how often the backup should run and leave other options as is. This is to schedule the backup at the desired frequency. Refer Figure 3.
Step 9: In the next window, select the desired interval from the drop down list, check/uncheck the Allowed days as per your requirements, and set the time of day when this backup should happen. For any frequency other than ‘Daily’ make sure the current day is checked in the Allowed days option.
In the Full/Incremental Strategy section select the Incremental, then full after this period option and select the month from the drop down list. This setting tells the tool to perform incremental backups at the interval specified above and a full backup once every month.
Step 10: In the next window, check the Run backup now option and click Next. To check the status/progress of the backup, locate the Duplicati icon in the system tray and click on it.
Restore
This section will take you through the steps for restoring a backup.
Step 1: Launch Duplicati via Start > All Programs > Duplicati
Step 2: Select the Restore files from a backup option and click Next.
Step 3: In the next window, select the backup you want to restore.
Step 4: The next window will list all the available versions of the selected backup. Select the one you wish to restore and click Next.
Step 5: Set the path to restore the backup. If you want to restore only selected files or folders, check the Restore only the items selected below option and select the desired files.
Step 6: Click Finish in the next window to start the restore process. The status window will automatically appear above the system tray.
Duplicati is a great tool for secure backups. A good collection of how-tos on other storage options like FTP, SSH, etc, is available at http://www.duplicati.com/howtos.
DirSync Pro
Directory Synchronize Pro, developed by O Givi, is a Java-based file and folder synchronisation tool. It is light on system resources and does the job of data backups perfectly. It comes with a graphical interface that is userfriendly and is easy to learn.
Notable features
Portable Platform independent as it is Java-based Bi-directional and mono-directional synchronisation Provides standard synchronisation modes (Incremental,
Mirror, Contribute and Custom) Users can set filters based on file names, file sizes, etc Bundles a powerful scheduling engine
Getting the tool and installing it
DirSync Pro can be downloaded from http://www. dirsyncpro.org/download.html. The download page lists variants for different operating systems. The current version, at the time of writing this article, is 1.48. Download the tool and install it.
Using the tool
Since this is a file and folder synchronisation tool, setting up a backup or restore job simply means creating a
mono-directional synchronisation job from one location to another.
First time backup
To create a backup for the first time, follow the steps given below:
Step 1: Open the tool by running DirSyncPro.exe
Step 2: Once the console opens, you’ll notice that the tool has already created a sample job for you. You can either edit this job by clicking on the Edit button or remove this job by clicking on the Remove button, and then create a new one by clicking on the New button.
Step 3: Click on the Edit button. In the Edit Job window set the label for the job, set Dir A (the folder to back up) and Dir B (the folder where the backup should be stored; it can be a different partition, a USB drive or a network location) and set the Sync Mode. Since this is the first time, choose Backup A -> B (full). This will ensure that all the files, folders and sub-folders in the selected directory are copied to the location specified in the Dir B field. Do not forget to check the Include sub folders check box. Please note that even though it’s implied that this is ‘Full Backup’, it’s actually a ‘Mirror Backup’.
Note: Before proceeding with the next step, make sure that the directory in which the backup will be stored is empty, or the contents of the directory will be deleted automatically.
Step 4: Press OK and click the Play button.
Step 5: Once the backup is complete, click on the Save Job Set button, and save the current configuration.
To add more jobs to the job set, simply click New and Configure as explained in Step 3. Once all the jobs have been configured, click the Play button to execute.
Ongoing backups
Using the configuration file saved earlier, the task of daily backups becomes simple. All you need to do is open the configuration file and for each of the jobs, in the job set, modify the Sync mode to Mirror A->B (incremental) and then execute by clicking the Play button. As explained earlier, the Mirror (incremental) function copies only the new and modified files to the backup location.
Scheduling backups
DirSync Pro comes with a scheduling engine, which enables users to schedule jobs at various intervals (once, every minute, every hour, or daily, weekly, monthly, yearly, or even a custom option). Unfortunately, it does not allow you to schedule the entire job set at once, so each job has to be scheduled individually.
Follow these steps to schedule a job:
Step 1: Select a job and click on the Edit button.
Step 2: In the Edit window click on the Schedule tab.
Step 3: Click on New button.
Step 4: In the Schedule Options window, select the desired interval. Once an interval is selected, its corresponding tab gets enabled.
Step 5: Select the tab corresponding to the selected interval and configure the desired pattern.
Step 6: Press OK in the Schedule Options window. Press OK in the Edit Job window.
Restore
Creating a restore job is similar to creating the ongoing backup job. Open the configuration file and, for each of the jobs, modify the Sync Mode to Restore B -> A (full) for a full restore. Press OK and execute using the Play button. This will restore the entire data from the backup location to the original location.
DirSync Pro is a powerful tool and is a good alternative to high-end backup solutions. While users can get started with the tool using the above tutorial, more resources can be found at http://www.dirsyncpro.org/
FreeFileSync
FreeFileSync, developed by Zenju, is another free and open source file and folder synchronisation and comparison tool. It can work on multiple platforms and can be easily used as data backup software. The graphical user interface is easy to navigate and simple to learn.
Notable features
Portable Platform-agnostic Bi-directional synchronisation File comparison based on time, size and content Easy to navigate user interface
Getting the tool
FreeFileSync is available for download at http://www.fosshub. com/FreeFileSync.html. The download page lists all the available variants. The current version, at the time of writing this article, is 6.3.
For the purposes of this article, we will use the Windows version, but feel free to download and install the one appropriate for your system.
Installing the tool
Once the file is downloaded, execute it and proceed with the installation.
Using the tool
FreeFileSync is similar to DirSync Pro. Since both are file and folder synchronisation tools, setting up a backup or restore job simply means creating a mono-directional synchronisation job from one hard drive to another.
First time backup
To backup files for the first time, please follow the steps below:
Table 1
Current version 1.48
DirSync Pro
6.3
FreeFileSync
1.3.4
Duplicati
Type
File and folder synchronisation File and folder synchronisation Backup client OS supported Windows, Mac and Linux Windows, Mac and Linux Windows, Mac and Linux
Types of backups supported
Synchronisation, Mirror, Incremental and Contribute Two way synchronisation, Mirror and Update Full backup and incremental
Backup storage options
File-based File-based File- and cloud-based Schedule engine Yes No Yes Backup security Nil Nil Password protection and encryption
File comparison No Yes (based on file size, type or content) No
Filters
Pre-defined (file type, size, date, path and attributes) Pre-defined (file path and type) Regular expression-based
Step 1: Open the tool by navigating to Start > All Programs > FreeFileSync
Step 2: In the console, click on the icon of the green gear, select Mirror and click OK. Leave the other options intact.
Step 3: On the left Drag & Drop window, click the Browse button and navigate to the directory to be backed up. In the right Drag & Drop window, click the Browse button and navigate to the directory where the backup is to be stored. It can be a different partition, a USB drive or a network location.
Step 4: Click on Synchronize Mirror ->> (located on the top right corner of the console) and then on Start in the next window.
Step 5: Once the backup is finished, navigate to Program > Save to save the current settings.
Ongoing backups
An ongoing backup can be taken by slightly modifying the settings saved earlier.
Step 1: Navigate to Program > Open and select the settings file (SyncSettings.ffs_gui) saved in the previous section.
Step 2: Click the green gear icon, select Update -> and press OK.
Follow Steps 4 and 5 as mentioned earlier.
No scheduler
Unfortunately, FreeFileSync doesn’t come with a schedule engine but it does support creating a batch file of the tasks, which can then be executed using any of the task planner tools.
Add the tasks using the + icon located in the left Drag & Drop window and save them as a batch file using Program > Save as the batch job option. This batch file can then be used with any third party task planner tool to schedule the backup.
Restore
To do a full restore, swap the links in the Drag & Drop window using the Swap sides button for each of the tasks. Change the

Figure 5: FreeFileSync console
Synchronisation settings to Mirror ->> using the green gear button and follow Steps 4 and 5 as mentioned above. Though FreeFileSync comes with a limited feature set, it does the job of data backups just fine. Additional resources on FreeFileSync can be found at http://freefilesync.sourceforge.net/.
Comparing the tools
Table 1 briefly compares the three tools.
We cannot afford to lose our data. It should be well protected. This article is sufficient to get you started but if you just leave it at that, no purpose is served. Backing up data is a continuous process and not a one-time task. Doing it on a regular basis will maintain data in its most up-to-date form, and save you from the nightmare of data loss.
By: Uday Mittal
By: Anil Kumar Pugalia The author is an open source enthusiast and likes to experiment with new technologies. He works in the field of information security and can be reached at mailme@udaymittal.com
Maxima is a powerful free and open source Computer Algebraic System (CAS) that is capable of combining symbolic, numerical and graphical entities. This is the 19th article in our mathematical journey through open source, in which we explore advanced set theory concepts through Maxima.

With the introduction to set theory fundamentals in the previous article in this series, we are all set to explore the advanced realms of set theory through Maxima.
More set operations
We have already worked out the basic set creation techniques and some basic set operations provided by Maxima. Here are some next-level set operations it provides: makeset(expr, vars, varslist) – Sophisticated set-creation using expressions adjoin(x, S) – Returns a set with all elements of S and the element x disjoin(x, S) – Returns a set with all elements S but without element x powerset(S) – Returns the set of all subsets of S subset(S, p) – Returns the subset of S, elements of which satisfy the predicate p symmdifference(S1, S2) – Returns the symmetric difference between the sets S1 and S2, i.e., the elements in S1 or S2 but not in both And here is a demonstration of each one of these operations:
$ maxima -q (%i1) makeset(a+b, [a, b], [[1, 2], [2, 3], [3, 4], [4, 5], [5, 6]]); (%o1) {3, 5, 7, 9, 11} (%i2) makeset(a-b, [a, b], [[1, 2], [2, 3], [3, 4], [4, 5], [5, 6]]); (%o2) {- 1} (%i3) makeset(a*b, [a, b], [[1, 2], [2, 3], [3, 4], [4, 5], [5, 6]]); (%o3) {2, 6, 12, 20, 30} (%i4) makeset(a + 2*a*b + b, [a, b], [[1, 2], [2, 3], [3, 4], [4, 5], [5, 6]]); (%o4) {7, 17, 31, 49, 71} (%i5) quit();
$ maxima -q (%i1) S: {-4, 6, 7, 32, 0}; (%o1) {- 4, 0, 6, 7, 32} (%i2) adjoin(3, S); (%o2) {- 4, 0, 3, 6, 7, 32} (%i3) adjoin(7, S);
(%o3) {- 4, 0, 6, 7, 32} (%i4) S: adjoin(3, S); /* Updating S */ (%o4) {- 4, 0, 3, 6, 7, 32} (%i5) adjoin(7, S); (%o5) {- 4, 0, 3, 6, 7, 32} (%i6) disjoin(7, S); (%o6) {- 4, 0, 3, 6, 32} (%i7) disjoin(5, S); (%o7) {- 4, 0, 3, 6, 7, 32} (%i8) quit();
$ maxima -q (%i1) S: {-4, 0, 3, 6, 7, 32}; (%o1) {- 4, 0, 3, 6, 7, 32} (%i2) S1: subset(S, evenp); (%o2) {- 4, 0, 6, 32} (%i3) powerset(S1); (%o3) {{}, {- 4}, {- 4, 0}, {- 4, 0, 6}, {- 4, 0, 6, 32}, {- 4, 0, 32}, {- 4, 6}, {- 4, 6, 32}, {- 4, 32}, {0}, {0, 6}, {0, 6, 32}, {0, 32}, {6}, {6, 32}, {32}} (%i4) S2: {-35, -26, 0, 7, 32, 100}; (%o4) {- 35, - 26, 0, 7, 32, 100} (%i5) symmdifference(S1, S2); (%o5) {- 35, - 26, - 4, 6, 7, 100} (%i6) symmdifference(S, S2); (%o6) {- 35, - 26, - 4, 3, 6, 100} (%i7) quit();
Advanced set operations
With Maxima, much more than this can be done with sets, using just the advanced functionalities provided by it. So now, let’s take a journey through them.
Cartesian product: Given ‘n’ sets, the function cartesian_product() returns a set of lists formed by the Cartesian product of the ‘n’ sets. The following demonstration explains what this means:
$ maxima -q (%i1) cartesian_product({0, 1, 2}, {a, b, c}); (%o1) {[0, a], [0, b], [0, c], [1, a], [1, b], [1, c], [2, a], [2, b], [2, c]} (%i2) cartesian_product({0, 1}, {a, b}, {X, Y}); (%o2) {[0, a, X], [0, a, Y], [0, b, X], [0, b, Y], [1, a, X], [1, a, Y], [1, b, X], [1, b, Y]} (%i3) cartesian_product({0, 1}, {a, b, c}); (%o3) {[0, a], [0, b], [0, c], [1, a], [1, b], [1, c]} (%i4) quit();
Set partitions: Given a set S, it can be partitioned into various subsets, based on various mathematical principles. Maxima provides a host of functions for such partitioning —the basic one being set_partitions(). It returns a set of all possible partitions of the given set. With a number as the second argument, it gives only the partitions with that exact number of sets in each partition. Shown below are some examples to make sense of this concept:
$ maxima -q (%i1) S: {a, b, c}; (%o1) {a, b, c} (%i2) set_partitions(S); (%o2) {{{a}, {b}, {c}}, {{a}, {b, c}}, {{a, b}, {c}}, {{a, b, c}},
{{a, c}, {b}}} (%i3) set_partitions(S, 1); (%o3) {{{a, b, c}}} (%i4) set_partitions(S, 2); (%o4) {{{a}, {b, c}}, {{a, b}, {c}}, {{a, c}, {b}}} (%i5) set_partitions(S, 3); (%o5) {{{a}, {b}, {c}}} (%i6) set_partitions(S, 4); (%o6) {} (%i7) belln(3); (%o7) 5 (%i8) cardinality(set_partitions(S)); /* Number of elements */ (%o8) 5 (%i9) belln(4); (%o9) 15 (%i10) belln(5); (%o10) 52 (%i11) belln(6); (%o11) 203 (%i12) quit();
In the above examples, belln() or the nth Bell number is the number of partitions of a set with ‘n’ members. integer_partitions(n) is a specific function, which partitions a given positive integer ‘n’ into a set of positive integers, the sum of which adds up to the original integer. num_ partitions(n) returns the number of such partitions returned by integer_partitions(n). Examples follow:
$ maxima -q (%i1) integer_partitions(1); (%o1) {[1]} (%i2) num_partitions(1); (%o2) 1 (%i3) integer_partitions(2); (%o3) {[1, 1], [2]} (%i4) num_partitions(2); (%o4) 2 (%i5) integer_partitions(3); (%o5) {[1, 1, 1], [2, 1], [3]} (%i6) num_partitions(3); (%o6) 3 (%i7) integer_partitions(4); (%o7) {[1, 1, 1, 1], [2, 1, 1], [2, 2], [3, 1], [4]} (%i8) num_partitions(4);
(%o8) 5 (%i9) integer_partitions(0); (%o9) {[]} (%i10) num_partitions(0); (%o10) 1 (%i11) integer_partitions(5, 1); (%o11) {[5]} (%i12) integer_partitions(5, 2); (%o12) {[3, 2], [4, 1], [5, 0]} (%i13) integer_partitions(5, 3); (%o13) {[2, 2, 1], [3, 1, 1], [3, 2, 0], [4, 1, 0], [5, 0, 0]} (%i14) integer_partitions(5, 4); (%o14) {[2, 1, 1, 1], [2, 2, 1, 0], [3, 1, 1, 0], [3, 2, 0, 0], [4, 1, 0, 0], [5, 0, 0, 0]} (%i15) integer_partitions(5, 5); (%o15) {[1, 1, 1, 1, 1], [2, 1, 1, 1, 0], [2, 2, 1, 0, 0], [3, 1, 1, 0, 0], [3, 2, 0, 0, 0], [4, 1, 0, 0, 0], [5, 0, 0, 0, 0]} (%i16) num_partitions(5); (%o16) 7 (%i17) num_distinct_partitions(5); (%o17) 3 (%i18) quit();
Note that like set_partitions(), integer_partitions() also takes an optional second argument, limiting the partitions to partitions of cardinality equal to that number. However, note that all smaller-sized partitions are made equal to the corresponding size by adding the required number of zeroes.
Also, num_distinct_partitions(n) returns the number of distinct integer partitions of ‘n’, i.e., the integer partitions of ‘n’ with only distinct integers.
Another powerful partitioning function is equiv_classes(S, r), which returns a partition of S, elements of which satisfy the binary relation ‘r’. Here are a few examples:
$ maxima -q (%i1) equiv_classes({0, 1, 2, 3, 4, 5, 6, 7, 8, 9, 10}, lambda([x, y], remainder(x - y, 2) = 0)); (%o1) {{0, 2, 4, 6, 8, 10}, {1, 3, 5, 7, 9}} (%i2) equiv_classes({0, 1, 2, 3, 4, 5, 6, 7, 8, 9, 10}, lambda([x, y], remainder(x - y, 3) = 0)); (%o2) {{0, 3, 6, 9}, {1, 4, 7, 10}, {2, 5, 8}} (%i3) equiv_classes({0, 1, 2, 3, 4, 5, 6, 7, 8, 9, 10}, lambda([x, y], remainder(x - y, 5) = 0)); (%o3) {{0, 5, 10}, {1, 6}, {2, 7}, {3, 8}, {4, 9}} (%i4) equiv_classes({0, 1, 2, 3, 4, 5, 6, 7, 8, 9, 10}, lambda([x, y], remainder(x - y, 6) = 0)); (%o4) {{0, 6}, {1, 7}, {2, 8}, {3, 9}, {4, 10}, {5}} (%i5) equiv_classes({1, 2, 3, 4, 5, 6, 7, 8, 9, 10}, lambda([x, y], remainder(x, y) = 0)); (%o5) {{1, 2, 4, 8}, {3, 6}, {5, 10}, {7}, {9}} (%i6) quit();
Notice the relation being defined using lamda for the property of divisibility by 2, 3, 5, 6, and among the set elements themselves, respectively.
A closely related function partition_set(S, p) partitions S into two sets, one with elements satisfying the predicate ‘p’, and the other not satisfying the predicate ‘p’. A small demonstration follows:
$ maxima -q (%i1) partition_set({-1, 0, 1, 2, 3, 4, 5, 6, 7, 8, 9, 10, 11, 19, 26, 37, 100}, primep); (%o1) [{- 1, 0, 1, 4, 6, 8, 9, 10, 26, 100}, {2, 3, 5, 7, 11, 19, 37}] (%i2) quit();
Miscellaneous: And, finally, let’s look at some general but mathematically interesting operations: divisors(n) – returns the set of positive divisors of ‘n’ permutations(S) – returns the set of all permutations of the elements of S random_permutation(S) – returns one of the elements of permutations(S), randomly extremal_subset(S, f, max | min) – returns the subset of S, for which the value of the function ‘f’ is maximum or minimum
A demonstration of all the functions mentioned above, follows:
$ maxima -q (%i1) divisors(9); (%o1) {1, 3, 9} (%i2) divisors(28); (%o2) {1, 2, 4, 7, 14, 28} (%i3) permutations({a, b, c}); (%o3) {[a, b, c], [a, c, b], [b, a, c], [b, c, a], [c, a, b], [c, b, a]} (%i4) random_permutation({a, b, c}); (%o4) [c, b, a] (%i5) random_permutation({a, b, c}); (%o5) [c, a, b] (%i6) random_permutation({a, b, c}); (%o6) [b, c, a] (%i7) extremal_subset({-5, -3, -1, 0, 1, 2, 3, 4, 5}, lambda([x], x*x), max); (%o7) {- 5, 5} (%i8) extremal_subset({-5, -3, -1, 0, 1, 2, 3, 4, 5}, lambda([x], x*x), min); (%o8) {0} (%i9) quit();
By: Anil Kumar Pugalia
By: Anil Kumar Pugalia The author is a gold medallist from NIT Warangal and IISc Bengaluru. Mathematics and knowledge-sharing are two of his many passions. He can be reached at email@sarika-pugs.com.
Embed Your PC on a USB
and Plug it into Any System!

If you wish to enjoy the convenience of your own desktop even while on the move, this is just the article for you. Learn how to embed your PC on a USB stick, so that it can be used anywhere and on any desktop or laptop.
Did you ever wish you could carry your PC, desktop or OS in your pocket and run it anywhere? This is now possible! You can create or install a full Linux desktop (OS) into your USB stick. This pocket Linux desktop also saves the state, which means that all your files will be saved in the USB for you to carry along. In other words, you will be able to view your desktop in exactly the way you left it the last time. The biggest advantage is that you can insert your USB PC into any modern laptop or computer hardware to launch, reboot and enter your ‘personal PC’. This is especially useful when you are visiting friends or travelling abroad and don’t want to carry your laptop (carrying around a computer is obviously not even an option). All you need is your USB PC in your pocket!
The pre-requisites are: 1. One USB stick of a size that you can choose (I use a 16
GB Sony 3.0 USB for a reliable and fast response). 2. Temporary USB (4 GB). I used an 8 GB Sandisk
USB for this experiment. 3. The latest Ubuntu ISO from the following link: http://www.ubuntu.com/download/desktop (I chose 64bit Ubuntu 14.04 LTS because I have 64-bit hardware computers and a laptop, but you can choose the 32-bit option too). 4. Linux installer: I used Startup USB Creator that is available on Ubuntu Desktop, but if you have Windows, you can use http://unetbootin.sourceforge.net/
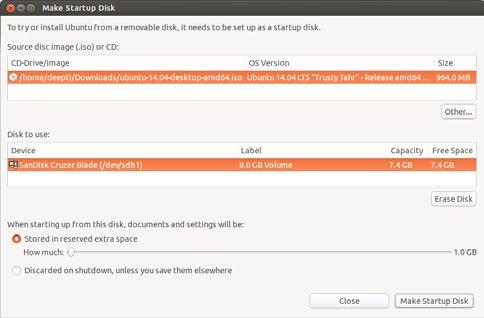
Figure 1: Installing Ubuntu on USB
The procedure
Step 1: First download the latest Ubuntu ISO from the location mentioned in pre-requisite number 3. Use a Linux installer to install the downloaded Ubuntu into the temporary Sandisk USB (see Figure 1).
Though this gives you a live Ubuntu desktop, it’s not good enough as it’s a trial version and asks for the Trial/Install option every time you use it. While installing the temporary

Figure 2: Boot option

Figure 3: Welcome screen
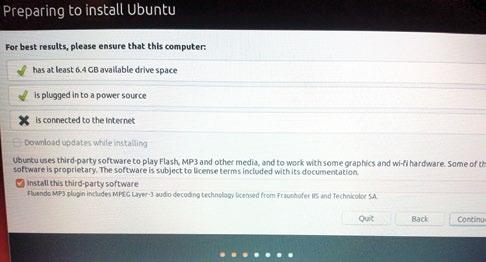
Figure 4: Preparing to install
OS, you may be asked to input your sudo password.
This step is essential to do a permanent install of the Linux/ Ubuntu desktop into the other USB (Sony 16 GB). In just a few minutes, the temporary OS installation will be completed. The temporary OS is now installed in the Sandisk 8 GB USB.
Step 2: Insert the Sandisk USB into the laptop or computer and reboot. While rebooting, press F12 (or a similar key) for booting into the USB. For many laptops, you need to press F12 to boot from the USB; on some hardware, pressing Shift+Del keys works. Use Google to find out the USB boot key if your hardware is not USB bootable, using these keys.
Step 3: You will see a few options after rebooting. Choose the option as seen in Figure 2, and then hit Enter.
From this step onward, the procedure followed is a technique that I have developed for embedding a personal PC into a USB; so you probably will not find this anywhere on the Internet.
Step 4: Keep hitting the Continue button when you see a screens like what’s shown in Figure 3 & 4. Continue till you see the Installation Type screen.
Step 5: This is a critical step. Choose the option that can be seen in Figure 5. Please do not make any mistakes here, or you could lose the contents of the laptop or computer on which you are running this step.
Step 6: Create two partitions on your Sony USB. The first one is ext 4 and the second is swap. See Figure 6. Please ensure that you select the Sony USB for Device for boot loader installation and select the Sony USB ext 4 partition before clicking the Install Now button.
Step 7: Follow the usual steps of installation by clicking

Figure 5: Installation type

Figure 6: Creating partitions

Figure 7: Location options
Continue/Next. See Figures 7 and 8.
Step 8: When asked about User creation, input details similar to what is seen in Figure 9.
Step 9: Follow the other screen by clicking Continue/ Next till you see Figure 10. Congratulations! You now have your OS ready to be carried around in your pocket, ready to be run anywhere!
You can insert your USB PC into any computer or laptop and do a USB boot (remember, you need to press F12 or a similar key to boot from the USB). You will see the screen

Figure 8: Copying installation files

Figure 9: Creating a user
shown in Figure 11 when you log in.
You can install any software from the Ubuntu Software Centre and it will be available in your USB PC, no matter where you run it.

Figure 10: The installation is complete!

Figure 11: The first screen
One important point to note is that you should choose 32-bit Ubuntu (as mentioned in pre-requisite number 3) if you intend to use your USB PC on any hardware. The 64-bit version will work only when you run it on 64-bit hardware (laptops or PCs). And if you decide to choose the 64-bit option, then during embedding (Step 2), you should use a 64bit laptop or PC.
By: Rajesh Gheware
By: Anil Kumar Pugalia The author works as a lead solutions architect for a multinational bank. He maintains his personal blog at http://rajeshg.info and can be reached at rajeshgheware@gmail.com.
Read more stories on Components in www.electronicsb2b.com

• The latest in power converters • The latest in microcontrollers • Growth of Indian electronic components industry • India continues to import significant amount of components every year • The latest in IGBTs, MOSFETs and relays • Top 12 connector brands available in India TOPCOMPONENTS STORIES ELECTRONICS

INDUSTRY IS AT A
Log on to www.electronicsb2b.com and be in touch with the Electronics B2B Fraternity 24x7
For Cash-Strapped Start-Ups, Open Source Technology is a Boon
Open source technology is not just about an economical solution but also about freedom, flexibility and a lot more. Sparsha Learning Technologies is making it big in the education space, courtesy open source technology. Diksha P Gupta from Open Source For You spoke to Debabrata Bagchi, founder, Sparsha, about how open source software proved to be a boon for this venture.

Debabrata Bagchi, founder, Sparsha Learning Technologies
Asuccessful start-up is all about having a great idea and backing that with the right technology. Sparsha Learning Technologies is one of the finest examples of an idea being transformed into reality with open source software.
Sparsha Learning Technologies is a technology startup headquartered at IIT, Kharagpur, and has an extended R&D centre at PESIT CORI (Crucible of Research and Innovation), Bengaluru. Sparsha provides technology solutions to create active learning content and integrate it in existing learning solutions. Talking about his start-up, Debabrata Bagchi, founder, Sparsha Learning Technologies, says, “The instructional methodologies of Sparsha Learning Technologies are based on a central philosophy of ‘learning-by-doing’. Sparsha designs products for the engineering curriculum using simulation-based learning, which combines cuttingedge technology with the social aspect of human interaction to create significantly more interesting and engaging learning experiences. We have two products built using open source technology: Electronics Virtual Labs - DoCircuits (www. docircuits.com) and Programming Virtual Labs - Coderipe (www.coderipe.com).”
For both these products, the base platforms and technologies used are open source. Bagchi adds, “DoCircuits and Coderipe are cloud-based products and are based on the LAMP architecture, components of which are entirely open source.”
The team at Sparsha is very clear about why it chose open source technologies. Bagchi explains, “Today, open source technologies have matured well enough to be used in production environments. They are more cost effective and, most importantly, the licensing models are open and flexible. For a start-up with limited capital and a fast runaway, using open source platforms makes more sense than proprietary solutions.”
Sparsha has made complete use of open source technologies and is trying to promote OSS in sectors like higher education, online learning, e-learning, publishing and the hobbyist market. Within these industries, the company deals with engineering colleges, textbook publishers, test and measurement companies, training companies, MOOC publishers, etc.
For all those who believe that cost is the main factor behind start-ups like Sparsha choosing open source technology, here’s a disclaimer from Bagchi. He says, “With open source technologies, one gets the convenience of easier on-premise deployments. Also, since there are no licensing restrictions involved, life gets a whole lot easier. Of course, affordability is the cherry on the cake and leads to better pricing of the end products for our customers.”
If you are wondering about the challenges involved in the process, Bagchi confidently shares that there were none. He explains, “I have a great comfort level with open source technology. I know, for sure, that I have the controls in my hands. And also, if I am stuck somewhere, community support is something I can bank upon. Popular open source projects have a vibrant community around them. And there is a lot of help available from these communities for users struggling with issues.”
To be continued on page 95...
For U & Me Open Strategy
Motorola Bets on Pure Android for its Smartphones
Motorola recently launched the Moto E smartphone, which has received a tremendous positive response in the market. The smartphone went out of stock in less than 24 hours after it was launched exclusively on the e-commerce portal Flipkart. Prasid Banerjee from Open Source For You, who was at the launch, had a chat with Punit Soni, vice president, Product Management for Motorola, about the company’s open source strategy.

Punit Soni, vice president, Product Management for Motorola
Motorola has taken the smartphone universe by storm with three of its most recently launched smartphones—the Moto X, Moto G and Moto E. The company has been following a combination of running pure Android along with state-of-the-art engineering to bring out devices that are cheap, yet powerful, and high on features compared to their competitors. But Motorola has repeatedly refused to do its own customisation to the Android OS, maintaining that pure Android is the best way to go. So does this mean Motorola has no open source aspirations of its own? Apparently not.
Motorola and openness
According to Soni, “I think, in general, being open is better. Opening our platform so that people can take advantage of it is better and it’s in line with our overall strategy. We haven’t done it yet because we’re still building ourselves up.”
Soni explained that for things like touchless control and active notifications (both defining features of the company’s flagship Moto X smartphone), it is better to get developers involved. But the company’s focus right now is to deliver a good product rather than sell it in large numbers. So while the company is considering the option of going open, it doesn’t think that this is the right time to do so. Soni did not, however, rule out the possibility of Motorola launching its own open source initiatives in the future.
Knowing Motorola, the chances of this happening could be high, considering that the company’s Rhomobile Suite for enterprise mobility is pretty well known. This is an application development platform that allows you to build applications that run on all kinds of devices, irrespective of the type of the device, its screen size or what operating system it runs on. Not only does it help with developing apps for use within the enterprise, but also addresses a wider user base. The company already enjoys partnerships with big names like Cognizant, Cell Software, Tata Consultancy Services, and many others. Motorola also has the Mx suite of enterprise features and the Enterprise Development Kit (EMDK) for Android, which are available to the developer community.
Connecting with developers
Motorola has already announced the dates for its AppForum event for this year. The event is into its fifth edition and hosts three days of developer-oriented activities for those developing apps for the enterprise segment. A free-to-attend technical seminar will be held in the United Kingdom in July, apart from monthly webinars for developers, where experts from Motorola Solutions discuss various relevant topics to help developers in their work.
It is evident that the company has a number of developer initiatives. Unlike other original equipment manufacturers (OEMs), Motorola currently doesn’t have its own platform. But Soni said that while layering on Android and adding UIs was pretty useless, Motorola would, sometime in the future (subject to conditions), consider developing its own platform.
Right now, Motorola is focusing on delivering good products at a more than affordable price. The company made a killing in both foreign and domestic markets with the Moto G,
and now its Moto E, in all probability, has already overtaken the G in terms of the number of units sold.
If you use any of the three latest Motorola smartphones, you will be aware that the company doesn’t simply put in pure Android into its devices. Motorola has been bringing out its own apps based on what its customers want. With the Moto X and Moto G, the company had showcased the Motorola Assist app, which recognises what you are doing and sets up your phone accordingly. This includes a driving mode that reads your text messages or plays music automatically, a feature that allows only important calls after working hours, and so on. Although Assist has been downloaded by over 5 million users, it still has some issues that the company needs to iron out.
Apps that matter
At the launch event for the Moto E, the company showcased another of its apps—the Moto Alert app, which provides emergency services. This app lets you periodically notify your near and dear ones of your whereabouts to enable them to help you if necessary. You can set your locations as ‘home’, ‘work’, ‘school’, etc. In addition, the app also lets you trigger an alarm or automatically call your emergency contacts. You can also press the lock button five times to trigger an alarm on your phone. This app has received quite a few positive reviews from users.
Previously owned by Google, Motorola has been sold to Chinese PC giant Lenovo, recently. The complete
Continued from page 93...
Since open source is no more an alien phenomenon, the level of acceptance is far greater than what it may have been ten years ago. Bagchi says, “I think, today, almost everyone understands and acknowledges the advantages that open source technology brings with it. There is enough awareness, so we don’t have those issues coming our way so frequently. However, if any of our clients are not aware of the benefits offered by open source, we explain them at length, to propagate our product and philosophy. Some of the clients do raise questions on licensing issues, and we help them by providing licensing details in the Service Legal Agreement and End User Licence Agreement when we work with them. Also, since we sell products based on open source frameworks, rather than the open source frameworks themselves, things are not so challenging for us.”
For many operating in the open source space, getting the right kind of talent can be quite a task. But things are radically different for Sparsha. Bagchi claims that getting the right kind of talent was never a struggle for him. “In fact, due to the fact that we use open source technologies, it’s much easier to get the right talent. Today, enterprising, young, talented men and women work and create their portfolio using open source technologies. They write blogs, etc; so, it’s much easier to locate and get them on board.”
The company chooses some innovative ways of reaching out to the desired candidates prior to hiring. Bagchi elaborates, “We organise coding hackathons and contests using our tool Coderipe (www.coderipe.com), and select those who do well for the face-to-face interviews. In some cases, we have taken the help of recruitment agencies as well.” Sparsha goes in for both lateral and fresh hiring. For R&D work, it primarily chooses freshers. For senior management roles, the firm does lateral hiring.
process of acquisition should be over by the end of the year. Motorola, though, has been on a mission to regain its share in the smartphone market. The company has repeatedly talked about how important the Indian market is for it, and with both the Moto G and Moto E doing well, this has been a good start for the firm.
While it is still setting up its business in the country, the current partnership with Flipkart seems to be working well for Motorola. Soni said that Motorola’s focus right now is to set up its base in India, and the makers of the first mobile phone seem to be doing that well. This was also confirmed by Magnus Ahlqvist, corporate vice president for EMEA and APAC, Motorola.
Whether Motorola will have open source initiatives for its smartphones in the future remains to be seen. But like we said earlier, there’s a good chance that it will. Soni did not rule out the possibility but the company is understandably focusing more on rebuilding its base in India rather than on developer initiatives. Pure Android is working for the firm at the moment. The Moto Assist and Moto Alert apps may lead to a lot more.
Tip for open source businesses
Today, there are a number of ‘marketplaces’ for known open source technologies, where a developer can make money. For example, if you are great at Twitter Bootstrap, then there are awesome marketplaces online where you can advertise and market your bootstrap themes, and have the right audience buy them. Developers have made tens of thousands of dollars in these marketplaces.
Millions of bytes of data are being generated every moment, every day, around the world, and this volume will only increase in the future. The storage of all these bytes has become a challenge. Simple storage is no longer enough—the data that is stored has to be safe, secure and retrievable. Of the many data storage solutions available today, this article evaluates the best open source storage solutions.
Digital storage needs are increasing rapidly. According to IDC, there will be 40 zetta bytes of data in the digital universe by 2020. The open source community has developed a number of products to assist users to store, secure and manage all that data. Open source software defined storage provides the benefits of open source tools and the benefits of massive economies of scale by running the products on commodity hardware. The end result is scalable, agile, easily manageable, and loosely coupled environments for unstructured data storage. Software defined storage brings the power of virtualisation to data storage. It allows organisations to abstract and pool storage capacity, as well as compute and networking resources, across on-premise and cloud environments.
Here is an overview of nine open source storage solutions that are considered top-of-the-line today.
Gluster: A NAS/SAN solution
Gluster is an open source and general-purpose distributed file system that aggregates storage exports over the network to provide a single unified namespace. It is written in C, with a GPLv3 licence and access APIs - libglusterfs and FUSE. It pools storage servers over TCP/IP or InfiniBand Remote Direct Memory Access, which allows rapid provisioning of additional storage based on storage requirements. It can be used with lowcost commodity computers. Some of the popular uses of GlusterFS are in: unstructured data storage, virtual machine image storage, archiving, disaster recovery, cloud storage for service providers, semi-structured and structured data, Big Data, content delivery and streaming media. It is very suitable for unstructured data such as audio and video files, images, documents and log files. Gluster’s open source community develops GlusterFS and related products.
GlusterFS is based on the following concepts: Trusted Storage Pool is a collection of storage servers that work as a logical partition for all data and management operations Brick is the mixture of a node and an export directory Volume is a mountable entity and logical collection of bricks


Figure 1: FreeNAS
Features
Automatic failover without a centralised metadata server Layered approach to the file system, where features are added or removed on demand Disk file systems such as ext3, ext4, xfs, etc, are supported to store the data Can scale up to petabytes of storage Distributed geo-replication File snapshots Compression translator
FreeNAS: A NAS/SAN solution
FreeNAS is a FreeBSD-based operating system for network attached storage. It comes with an easy-to-use Web UI. NAS-oriented open source storage distributions of Linux and FreeBSD include FreeNAS, Gluster, Openfiler, etc, which can be connected and configured using a Web browser. It is released under a BSD licence. The FreeNAS Project was initially founded by Olivier Cochard-Labbe in 2005. It was PHP-based, easy to use and was based on an embedded firewall (also based on FreeBSD). FreeNAS can run from a USB disk or virtual machine. It is distributed as an ISO image. FreeNAS is available for both 32-bit and 64bit architectures (a 32-bit system can only address up to 4 GB of RAM). The FreeNAS stable version is 9.2.1.5.
Features
Supports protocols such as NFS, SSH, FTP, TFTP,
BitTorrent, iTunes, CIFS (via Samba), etc Plug-in support for SlimServer and Xbox Media Stream
Protocol iSCSI target feature is used to create virtual disks. ZFS,
UFS, ext2, and ext3 are also supported. Read and write for FAT32 and NTFS Hard drives supported are (P/S)-ATA, SCSI, iSCSI, USB and FireWire; and booting is possible from a HDD, CD-
ROM, floppy disk or USB flash drive.

Figure 2: OpenFiler
It provides snapshot support, deduplication, a removable log device, etc.
Openfiler: A NAS/SAN solution
Openfiler is a free network storage OS created by Xinit Systems, and is based on the rPath Linux distribution. It supports file-based Network Attached Storage (NAS) and block-based Storage Area Networking (SAN) functionality in a single unified framework. Openfiler uses the Linux 2.6 kernel base to deliver a wide-ranging storage management solution that fulfils the needs of enterprise applications. Openfiler supports on-disk file systems such as XFS, ext3, ReiserFS v3 and JFS. XFS and ext3 are journalled file systems that enhance data security and reduce the need for regular file system checks. Openfiler has the following hardware requirements: an x86- or x64-based computer with at least a 64-bit processor with 1.6 GHz or more, 512 MB of RAM, a CD-ROM or DVD-ROM drive if you are performing a local install, 10 GB of hard disk space (8 GB for OS installation and 2 GB for swap space). It is licensed under the GNU General Public License version 2. It supports the i386/AMD64 platforms. Installable images are available for x86_64 architectures. The download options are available at http://www.openfiler.com/community/download
Features
Full industry-standard protocol suite: NFSv3 support for all UNIX-based clients with additional support for ACL protocol extensions; CIFS or SMB support for Microsoft Windows-based clients; FTP support, WebDAV and HTTP 1.1 support; and NFSv4 support (testing)
Good block storage virtualisation: Point-intime snapshots support with scheduling; synchronous/ asynchronous volume replication and migration; optimal division of storage by full iSCSI target support. It also supports virtual iSCSI targets.
Extensive share management: Support for multiple

Figure 3: 7-zip
shares per volume; multi-level share directory tree; multigroup-based access control on a per-share basis; multi-host/ network- based access control on a per-share basis
Accounts management: Authentication by utilising pluggable authentication modules; Web interface-enabled configuration; it supports network directories such as LDAP, Hesiod, NIS, NT4 domain controller, and Active Directory.
Amanda: A backup and synchronisation solution
Advanced Maryland Automatic Network Disk Archiver, or Amanda, is an open source backup solution that can be used to take backups of data stored on multiple computers over a network. It is written in C and Perl. Windows, Mac OS X, Linux and Solaris are supported operating systems. It is distributed under the GPL, LGPL, Apache and Amanda licences. Amanda is available in two different flavours—the community edition and a fully supported enterprise edition.
Features
It supports tape-based and disk-based backup It supports tape spanning if a backup set does not fit in one tape It uses utilities and formats such as dump and/or GNU tar It supports multiple simultaneous writes to storage devices
Clonezilla: A backup and synchronisation solution
Clonezilla is a partition and disk imaging/cloning program distributed under the GNU General Public License version 2. It is utilised for bare metal backup and recovery. It comes in two flavours—Clonezilla SE is used for group machine backups and restores, while Clonezilla Live is used for single machine backups and restores. It is written in Perl and UNIX shell. It supports POSIX GNU/Linux operating systems. The minimum system requirements for Clonezilla Live are 196

Figure 4: TrueCrypt
MB of RAM, a CD/DVD drive, a USB port, PXE or hard drive, and an x86 or x86-64 processor.
Features
File systems supported for Microsoft Windows are:
FAT12, FAT16, FAT32 and NTFS File systems supported for GNU/Linux are: ext2, ext3, ext4, reiserfs, reiser4, xfs, jfs and btrfs File system supported for FreeBSD, NetBSD, and
OpenBSD is: UFS File systems supported for ESXi are: VMFS3 and VMFS5 File system supported for Mac OS is: HFS+ Cloning supported for 32-bit or 64-bit GNU/Linux,
MS Windows, Intel-based Mac OS, FreeBSD, NetBSD,
OpenBSD, Minix and VMware ESX
Pydio: An online data storage solution
Pydio is an open source tool that is used to utilises a server available on premise or in a cloud environment.
Features
It provides more control, privacy, a better total cost of ownership and security Easy to install Easy integration with available employee directory
Libvirt: A storage management solution
Libvirt is an open source management tool for platform virtualisation. It also provides storage management on the physical host in different ways such as storage pools and volumes. A storage pool is a quantity of storage that is used by virtual machines (VMs). Storage pools are divided into storage volumes and assigned to VMs as block devices. Pools and volumes ensure that storage will be available for a VM. Management applications using libvirt enable users to allocate storage resources, run the virtual machines, shut them down, de-allocate the resources, etc.
Table 1: File compression ratio
Archiver Mozilla Firefox
161 files 15,684,168 bytes
Google Earth 115 files 23,530,652 bytes
Compressed size Ratio Compressed size Ratio
7-Zip 4.23 (7z format)
WinRAR 3.50 CABARC 5.1 WinZip 10.0 beta (maximum-PPMd)
7-Zip 4.23 (zip format)
WinZip 10.0 beta (maximum-portable)
Source: 7-zip.org Features
Libvirt supports storage pool types such as directory backend, logical backend, disk backend, local file system backend, network file system backend, iSCSI backend, SCSI backend, multipath backend, RBD (RADOS Block Device) backend, Sheepdog backend and Gluster backend.
7-Zip: A file compression solution
7-Zip is open source software written in C++ that is used to compress files in the 7z archive format. It was developed by Igor Pavlov and first released on July 18, 1999. A stable release has been available since November 18, 2010. It supports various operating systems such as GNU/Linux, Microsoft Windows and Mac OS X. Table 1 gives the file compression ratio of this storage solution.
It has a graphical user interface and command line interface.
Features
Confidentiality increases due to AES-256 encryption in 7z and ZIP formats Supports localisation for 79 languages It has a powerful command line version and file manager Provides integration with Windows Shell
TrueCrypt: An encryption solution
TrueCrypt is an open source application used for data encryption before it is saved and data decryption before it is consumed. It supports operating systems such as Linux, OS X, Microsoft Windows, etc. TrueCrypt currently uses the XTS mode [XEX-based Tweaked CodeBook mode (TCB) with CipherText Stealing (CTS)]. Password, keyfile(s) or correct encryption keys are only ways to access data stored on an encrypted volume. They are used to protect data confidentiality even if the OS is not active.
Supported algorithms: Twofish, Serpent and AES
Supported hybrid combinations of algorithms:
4621135 100% 6109183 100% 5021556 109% 6824892 112% 5131393 111% 7434325 122% 5277118 114% 8200708 134% 6222627 135% 8909446 146% 6448666 140% 9153898 150%
Cascades, Serpent-Twofish-AES, Serpent-AES, AESTwofish-Serpent, Twofish-Serpent and AES-Twofish
Supported cryptographic hash functions: TrueCrypt supports the SHA-512, RIPEMD-160 and Whirlpool hash algorithms. Roadmap for future versions includes features such as support for Windows 8 to encrypt Windows system partitions/drives on UEFI-based computers, ‘raw’ CD/ DVD volumes, command line options for volume creation on the Windows operating system, etc. You can download these from: http://www.truecrypt.org/downloads
Features
Two-factor authentication Individual disk partitions and swap space can be encrypted Encrypted container can be persisted in a file Hidden containers - one per ‘outer’ container is supported; hidden containers are similar to nested containers Pre-boot authentication on Windows is required before booting the computer to encrypt the boot disk More than one active key Passphrase strengthening - key strengthening is used with pure text passwords Hardware acceleration - cryptographic accelerator expansion cards can be used Windows MBR volumes can be encrypted and not UEFI
GPT drives Complete physical disk or logical volume, including the partition tables and master boot record can be encrypted
References
[1] http://www.truecrypt.org [2] http://en.wikipedia.org/wiki/FreeNAS [3] http://doc.freenas.org/index.php/Quick_Start_Guide
By: Mitesh Soni
The author is a technical lead at IGATE Global Solutions Limited. He is into Cloud Practice and loves to write about new technologies. He blogs at: http://clean-clouds.com


