


Most of us don't have the time, or the patience, to always have our kids by our side in the kitchen. Yes, they want to help, but when you've got 30 minutes to get everyone fed and out the door in the morning, the last thing you want is the specific kind of kitchen "help" 5-year-olds usually offer.
But there are real benefits to cooking with kids, or at least helping them get comfortable in the kitchen, from an early age. Getting kids in the kitchen, even just to wipe down the counters after dinner, can encourage them to think about how meals are planned, made and cleaned up. The kitchen is also a great place for kids to build confidence by mastering challenges.
Toddlers: Kneading or mixing dough. This is great sensory work, something all toddlers need and love. But it's also skill-building! Whether you're making bread, cookies or playdough, let your toddler mix with a big wooden spoon or get their hands in the dough. Better yet, give them a shallow container with their own bit of flour or dough to work with alongside you.
Three-year-olds: Measure ingredients for a


recipe. Pull a chair or stool up to your workspace and hand them the measuring cup. They can scoop, dump and mix with the best of them. Supervise carefully and provide lots of direction if you plan to actually eat what you're making.
Four-year-olds: Make their own breakfast. As long as everything they need is within arm's reach, your 4-year-old can pull together a bowl of cereal and some toast. Put the cereal in a low cabinet and put a small pitcher of milk with a lid in the fridge. These skills are key because they have the potential to provide you up to 20 extra minutes of sleep on weekend mornings.
Five-year-olds: Make a peanut butter and jelly sandwich. Again, the key is accessibility. Just make sure they can reach the bread, peanut butter, jelly and a butter knife or spreader. (Also works with presliced cheese, meat and veggies!) Five-year-olds can also learn to chop food with kid-safe knives. Slicing and chopping require practice and close supervision, but they lay the foundation for basic knife skills and give kids the opportunity to really "cook." Great choices to practice chopping and

slicing: bananas, a halved apple with the flat side down and cheese.
Seven-year-olds: First and second graders can put several of these skills into practice and pack their own school lunches. Kids who've practiced a bit can make a sandwich, cut some cheese cubes, even slice an apple. It's helpful to make a checklist with everything they need to pack and have them get it together the night before to avoid morning meltdowns.
Eight-year-olds: Turn up the heat! Third graders

are often ready to make simple dishes on the stove top. Start by reviewing how to safely turn the burners on and off, and adjust the temp. Demonstrate safe positioning for pots and pans (handles turned in, sitting evenly on the burner) and how to use pot holders. Try quesadillas, scrambled eggs or rice. Pasta can work too, but an adult should help with the draining step.
Nine- and ten-year-olds: Teach basic chef's knife skills like chopping, slicing and dicing. Kids this age often have the dexterity and concentration for this careful work. It's challenging, but rewarding. Mincing the garlic for pasta sauce or slicing veggies for a colorful stir-fry is really helpful, and kids will feel great about making a tangible contribution to a family meal.
Twelve-year-olds: If they have built up these skills they can - wait for it - make a simple family dinner with little to no help. Think burritos with rice, beans, salsa and cheese; scrambled eggs and toast with a salad; or stir-fried veggies.
Everyone: Help with cleanup! Even toddlers can clear their dishes after a meal and help wipe down the table. Older kids can wash or dry dishes and kindergarteners are terrific silverware sorters. There may be some kid resistance to this at first, but pitching in isn't just helpful, it also shows appreciation to whomever prepared the meal. Feeding people is a big, important job. Getting kids into the kitchen early will help prepare them to do it well.


allrecipes.com
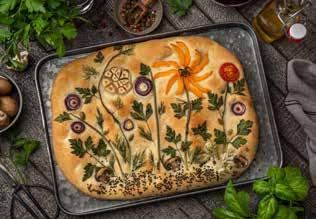
What is focaccia?
Focaccia is an Italian bread that is often shaped and baked into a large, flat rectangle, is very similar in flavor and texture to pizza dough, and there are as many focaccia recipes as there are Italian grandmothers. Recipes can range from incredibly time consuming to quick and easy, and everywhere in between.
Ingredients
Dough:
4 ½ cups unbleached all-purpose flour, divided
1 tablespoon active dry yeast
2 teaspoons dried Italian herbs
1 ¼ teaspoons kosher salt
1 cup warm water (110 degrees F)
1 cup warm milk (110 degrees F)
¼ cup olive oil
1 tablespoon olive oil, or as needed
Toppings to decorate:
Whatever you would like! Some suggestions are cherry tomatoes, asparagus spears, sliced red/ green peppers, mushrooms, garlic, olives, dill, basil, parsley, pine nuts, olive oil, sea salt, etc.
Directions
Combine 2 cups flour, yeast, dried Italian herbs, and salt in the bowl of a stand mixer fitted with the paddle attachment. Add warm water, warm milk, and 1/4 cup oil; beat until well combined, about two minutes. Mix in remaining flour, 1/2 cup at a time, switching to a wooden spoon when needed, until a soft and sticky dough is formed.
Scrape down the sides of the bowl, drizzle the sides with one tablespoon oil, and cover loosely with plastic wrap. Let rise at room temperature until doubled in size, about one hour.
Oil an 11x17-inch baking sheet.
Turn the dough out onto the prepared baking sheet. Gently spread and flatten dough to fit the entire sheet. Press your fingers into the dough to make light dimples over the entire surface. Let rest,

uncovered, at room temperature for 15 minutes. Place an oven rack in the lower third of the oven and preheat to 450 degrees F.
Decorate dough by gently pressing down your chosen ingredients. Brush a thin layer of olive oil over the top and sprinkle with salt.
Bake in the preheated oven for 15 minutes. Reduce temperature to 350 degrees F and continue to bake until golden and bread springs back when gently pressed, about 20 more minutes. Let cool in the pan for five minutes, then carefully slip out onto a cooling rack. Cool and serve at room temperature.


Lemons
Look at the size
You may feel inclined to grab the biggest one in the bunch, so you’ve got more to use. But the truth is, lemons are usually picked when they’re about 2 to 3 inches long because that’s one of the best indicators that they're perfectly ripe.
Check out the color
Lemons grow and ripen on a tree, and are picked when they turn greenish yellow in color. Of course, a vibrant yellow color is the best way to tell if a lemon is ripe, but if there’s a hint of green, that’s fine too.
Examine the texture
Lemons with smoothed skin is another key sign of ripeness and maturity. If you notice bumps and grooves on a lemon, it’s best to put it back because it likely means it isn’t ripe and doesn’t contain much juice.
Hold it for heaviness
Firmness is important when searching for a ripe lemon, but the lemon shouldn’t be too hard. Lemons that are heavy with a thin but firm exterior are usually the juiciest and most flavorful.
Limes
Limes stop ripening once they’re plucked from the tree, so the limes you find at the grocery store should be ready to eat. They’re often picked slightly underripe because soft, tender limes could be easily damaged in shipping. At the store, you’ll want to pick ripe limes, which can last in the refrigerator for up to a month.
Smell the skin
Gently scratch the rind to let out the essences, and see if the lime smells lime-y. If you’re not getting a smell, it may not be ripe.
Squeeze the whole lime
Limes should be soft and easy to juice, not too mushy, and definitely not hard as a rock. Limes that have been left out at room temperature, or even in a cold area for too long, will harden and be dry inside. Pick up a lime and test it by giving the skin a gentle squeeze. The lime should have a gentle give to it, and bounce back into shape after you squeeze. If your fingers leave an indentation, the lime is overripe or even spoiled.
Check the color
While dark green limes may be picture-perfect, they are the least ripe of all limes. Like peppers, which go from green to red, limes ripen from a dark green to yellow. Yellow limes are the sweetest and the ripest, though light green limes are very common
Continued on Page 9


In the heart of Nazareth, a gem does gleam, A haven for coffee lovers, it’s Bella Bean! With beans so fresh and pastries divine, Our cozy café is a must-see sign.
From dawn till dusk, we’re here to serve, A cup of joy with the verve. Espresso, latte, or a simple brew, Each sip promises something new.
So come on in, take a break, For Bella Bean’s delicious cake.
And while you’re here, don’t forget to try, Our famous coffee that’ll make you sigh.
Bella Bean, where dreams are spun, In every cup, under the sun. Join us now, and you will see, The magic in our coffee, as pure as can be!


Continued from Page 6
and perfectly good to eat or juice.
Weigh the limes in your hand
Like many juice-filled fruits, limes should be heavy for their size, which, honestly, can be a little hard to perceive. A heavier lime is full of more juice, so compare limes of similar sizes in your hand to see if any stand out as heavier.
Feel the skin texture
Healthy, ripe limes will have a smooth skin texture, similar to pebbled leather. Bumpy limes, or limes with thick skin, are not ripe.

realsimple.com
Did you know that certain nutrients (and foods) can actually help protect your skin from ultraviolet (UV) rays? Don’t skip the sunscreen, but adding sun-protective foods to your diet can help further defend against sun damage.
Vitamins C, E, B3 (also known as niacin), omega-3 fatty acids, a handful of plant compounds and astaxanthin can all help to naturally protect our skin

from damaging UV light.
Berries- Whether it’s raspberries, blackberries, blueberries, strawberries or otherwise, all berries help you stay protected in the sun (in combination with sunscreen). This is thanks to their vitamin C, flavonoid (and thus polyphenol) and carotenoid content.
Green tea- This popular beverage contains a multitude of plant compounds, including polyphenols like flavonoids and catechins.
Carrots- Carrots are a great source of skin-
Continued on Page 11

&

Ingredients
Red Layer
1 cup (5 oz/142 g) strawberries, fresh or defrosted
⅓ cup (2 ½ fl oz/80 ml) lemonade
⅓ cup (2 ½ oz/71 g) plain yogurt
1-2 teaspoons granulated sugar (optional; substitutions could include maple syrup, honey or agave)
1-2 drops red food coloring (optional)
White Layer
⅔ cup (5 fl oz/160 ml) lemonade
⅓ cup (2 ½ oz/71 g) plain yogurt
1-2 teaspoons granulated sugar (optional; substitutions could include maple syrup, honey or agave)
Blue Layer
½ cup (2½ oz/71 g) blueberries, fresh or defrosted
⅓ cup (2½ floz/80 ml) lemonade
⅓ cup (2½ oz/71 g) plain yogurt
1-2 teaspoons granulated sugar (optional; substitutions could include maple syrup, honey or agave)
1-2 drops blue food coloring (optional)
Instructions
Make The Red Layer
Combine the strawberries, lemonade, yogurt, teaspoon of sweetener and food coloring (if using) in a blender and puree until smooth. Taste and add more sweetener if needed.
Pour evenly into 10 popsicle molds, then insert wooden popsicle sticks and freeze until solid, at least two hours.
Make The White Layer
Combine the lemonade, yogurt and teaspoon of sweetener in a blender and process until smooth. Taste and add more sweetener if needed.
Pour evenly over the frozen red layer and freeze until solid, at least two hours.
Make The Blue Layer
Combine the blueberries, lemonade, yogurt, teaspoon of sweetener and food coloring (if using) in a blender and puree until smooth. Taste and add more sweetener if needed.
If desired, strain to remove the skin, then pour evenly on top of the frozen white layer. Freeze now for a minimum of four hours, but preferably overnight.
To unmold, run the mold under warm water for a few seconds to loosen the popsicles.
Store leftovers in the freezer and in their molds for up to two weeks.


Continued from Page 9
boosting carotenoids and also contain notable amounts of polyphenols, vitamin C and niacin, making them a skin superfood.
Salmon- This popular fish is rich in omega-3s, astaxanthin, niacin and vitamin E—a major bonus when skin health is a top priority.
Chocolate- Cacao and cocoa are excellent sources of antioxidant-rich polyphenols, helping to protect our skin from sun damage.
Tomatoes- Tomato season just so happens to perfectly align with the high UV summer months, and how ironic, given these bright beauties also offer natural sunblock through their polyphenol, carotenoid (like lycopene) and vitamin C content.
Chia seeds- The omega-3 fatty acids, polyphenols like flavonoids, niacin and vitamin E in chia seeds benefit our immune, heart and metabolic health while also protecting our skin.
Bell peppers- All peppers, but especially bell peppers, have a very similar nutritional profile to tomatoes, making them another great sunprotective choice full of vitamin C, lycopene and flavonoids.


AVAILABLE FOR THIRD-PARTY DELIVERY WITH (doordash logo)!

order GET ONE LARGE TREAT FOR THE PRICE OF A SMALL
BUY 2 QUARTS OF ICE, GET 1 FREE!
coupon
