5 minute read
Shooting into the light
Strong light sources make dynamic elements in a photograph. Including the sun or any strong artificial light in a composition adds a focal point and, if done well, doesn’t compete with the subject but rather embellishes it.
The challenge with including a bold light source in a picture is exposure. Don’t use the histogram to ascertain whether or not it’s correct. The reason I say that is photographers are taught to avoid a ‘spike on the right’ when looking at the graphic that comprises the histogram. This indicates some of the areas in the image are blown out, meaning they are solid white with no texture or detail. In most cases, though, bright lights like the sun and intense artificial lights photograph white with no detail. We expect this and accept it. In fact, when you look at the sun, a street lamp at night, a security light, or car headlights, all of these appear to our eyes as brilliant white areas of a composition with very little or no detail at all. The photographs then, in essence, capture what we are seeing.
In these instances, the spike on the right side of the histogram indicates there is an error in the exposure when, in fact, there isn’t.
This is why I say don’t rely on the histogram to judge exposures when shooting into bright lights. The graph will be confusing.
Considering the exposure
When does a bright light not interfere with the exposure? Knowing this should eliminate a lot of your confusion regarding these kinds of tricky exposure situtions.

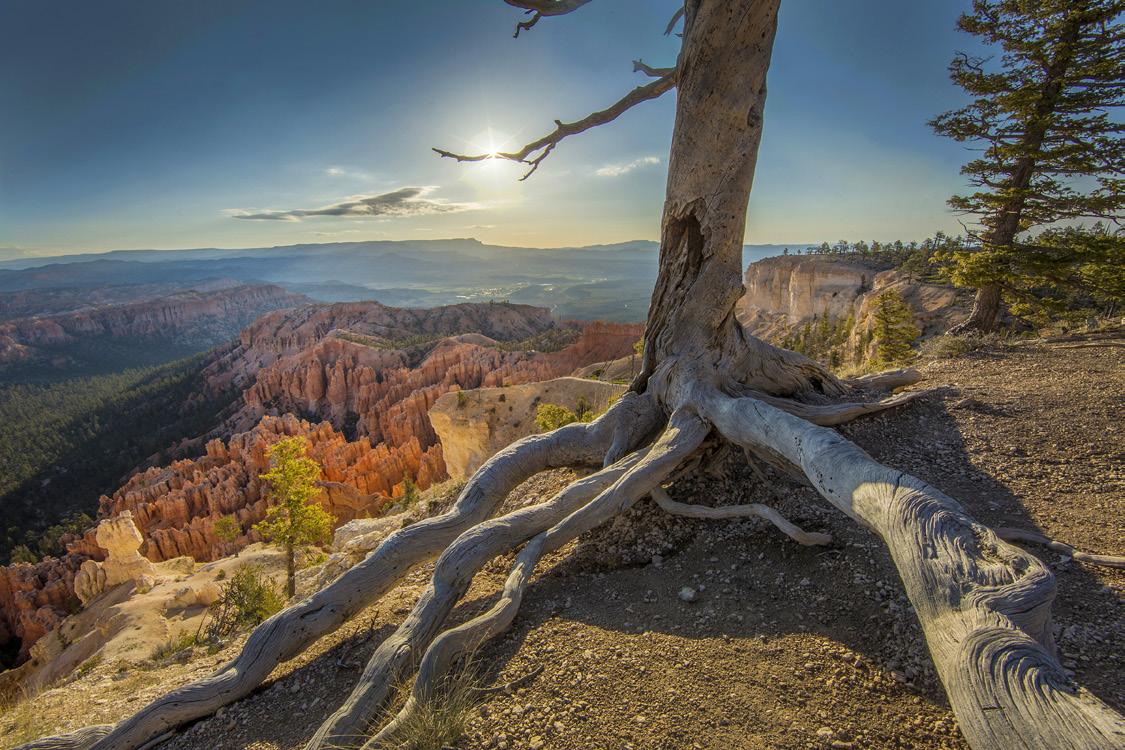
1. The source of light is partially blocked by an element in the frame. The landscape shot of Bryce Canyon on the previous page is an example. I used the tree branch to reduce the illumination from the sun, thus it played a very small role in the exposure

2. A wide angle lens is used; consequently, the sun appears very small in the frame. The photos of Bryce Canyon (page 4) and the town of Alesund, Norway, (page 5) are examples.
3. The sun or bright light source is composed away from the center of the frame. The shot at dawn in Venice, Italy, during carnival on page 5 and the ice formation in Iceland, below, are examples. Meters take most of their information to determine a correct exposure from the center of the frame. The further the bright light source is placed from the center, the less it influences the exposure reading.
Note: To make a star effect of a point source of light, use a wide angle lens in combination 4. If the subject blocks the light source altogether, as the snowy owl does on the next page. The bright light, in these instances, has little relevance to the exposure.
5. The sun is very close to the horizon and becomes diminished by the atmosphere. It has little affect on the exposure, especially when it is composed near the outer edges of the frame.
So, when does the bright light source have a large impact on the exposure?
a. When you use a telephoto lens and the sun or other bright light source is large in the frame, even if it’s off-center. The shot of the wildebeest at sunrise on the next page is an example. I


took this with a 640mm focal length (400mm plus the 1.6 crop factor in the Canon 7D Mark II) which is why the sun is so large.
b. When the sun or any bright light is composed in the center of the frame.
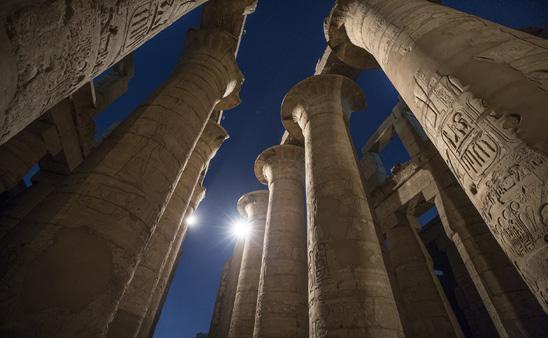
c. When shooting at night and an artificial light source is anywhere near the center portion of the frame. The subtlety of detail in the shadows can be lost if the picture is underexposured by even a small amout (like one f/stop or less). The bright light can cause this underexposure, and even with the manipulation of the shadows slider in ACR or Lightroom you may not be able to recover the detail without introducing a lot of noise. The ruins of Karnak, below, shows an instance where noise is an important issue.


All of the exposure modes in the camera -- spot, evaluative (for Canon) or matrix (for Nikon), average, center weighted, dynamic range optimizer (Sony), etc., will have problems in producing an accurate exposure in each of these situations. Therefore, you have to oversee the exposure and tweak it to your taste once the initial reading has been made.
8 The procedure I use is to use (in Canon) the evaluative metering mode because for most situations, this is the most accurate. The camera takes most of its exposure information from the center, but contributing to the calculation are peripheral zones. I take a test shot, noting where I placed the light source in the frame, and then -- based on what I see on the LCD screen (not the histogram as I’ve already noted), I then use the exposure compensation feature to fine tune the exposure in 1/3 f/stop increments. With a very bright light source that takes up a large portion of the frame such as the fire above, captured during the summer solstice celebration in Vilnius, Lithuania, the amount of exposure compensation needed to make a correctly exposed photo is significant. To avoid underexposure, I had to open the lens 2-1/3 f/stops from the camera’s reading.

To arrive at the correct exposure, you may need to take two or three test shots. With scenes that are very contrasty like the one above, it’s a balancing act between retaining detail in the shadows and holding on to detail in the highlights. In this case, I sacrified detail in the fire so there was a good exposure on the crowd of people. There is even a little detail in the dark sky. §


