Focal Points
Same Place, Different Eyes
Chair Programs
Treasurer Membership
Editor Communications Meetup
Instagram Outings Outings

Chair Programs
Treasurer Membership
Editor Communications Meetup
Instagram Outings Outings
Joe Doherty
Susan Manley
Ed Ogawa
Joan Schipper
Joe Doherty
Velda Ruddock
Ed Ogawa
Joan Schipper
Joan Schipper
Alison Boyle
joedohertyphotography@gmail.com
SSNManley@yahoo.com
Ed5ogawa@angeles.sierraclub.org
JoanSchipper@ix.netcom.com
joedohertyphotography@gmail.com
vruddock.sccc@gmail.com
Ed5ogawa@angeles.sierraclub.org
JoanSchipper@ix.netcom.com
JoanSchipper@ix.netcom.com
AlisoniBoyle@icloud.com
Focal Points Magazine is a publication of the Sierra Club Camera Committee, Angeles Chapter. The Camera Committee is an activity group within the Angeles Chapter, which we support through the medium of photography. Our membership is not just from Southern California but is increasingly international.
Our goal is to show the natural beauty of our world, as well as areas of conservation concerns and social justice. We do this through sharing and promoting our photography and by helping and inspiring our members through presentations, demonstration, discussion, and outings.
We have members across the United States and overseas. For information about membership and/or to contribute to the magazine, please contact the editors or the membership chair listed above. Membership dues are $15 per year, and checks (payable to SCCC) can be mailed to: SCCC-Joan Schipper, 6100 Cashio Street, Los Angeles, CA 90035, or Venmo @CashioStreet, and be sure to include your name and contact info so Joan can reach you.
The magazine is published every other month. A call for submissions will be made one-month in advance via email, although submissions and proposals are welcome at any time. Member photographs should be resized to 3300 pixels, at a high export quality. They should also be jpg, in the sRGB color space.
Cover articles and features should be between 1000-2500 words, with 4-10 accompanying photographs. Reviews of shows, workshops, books, etc., should be between 500-1500 words.
Copyright: All photographs and writings in this magazine are owned by the photographers and writers who created them. They hold the copyrights and control all rights of reproduction and use. If you desire to license one, or to have a print made, contact the editor at joedohertyphotography@gmail.com, who will pass on your request, or see the author’s contact information in the Contributors section at the back of this issue.
https://angeles.sierraclub.org/camera_committee
https://www.instagram.com/sccameracommittee/

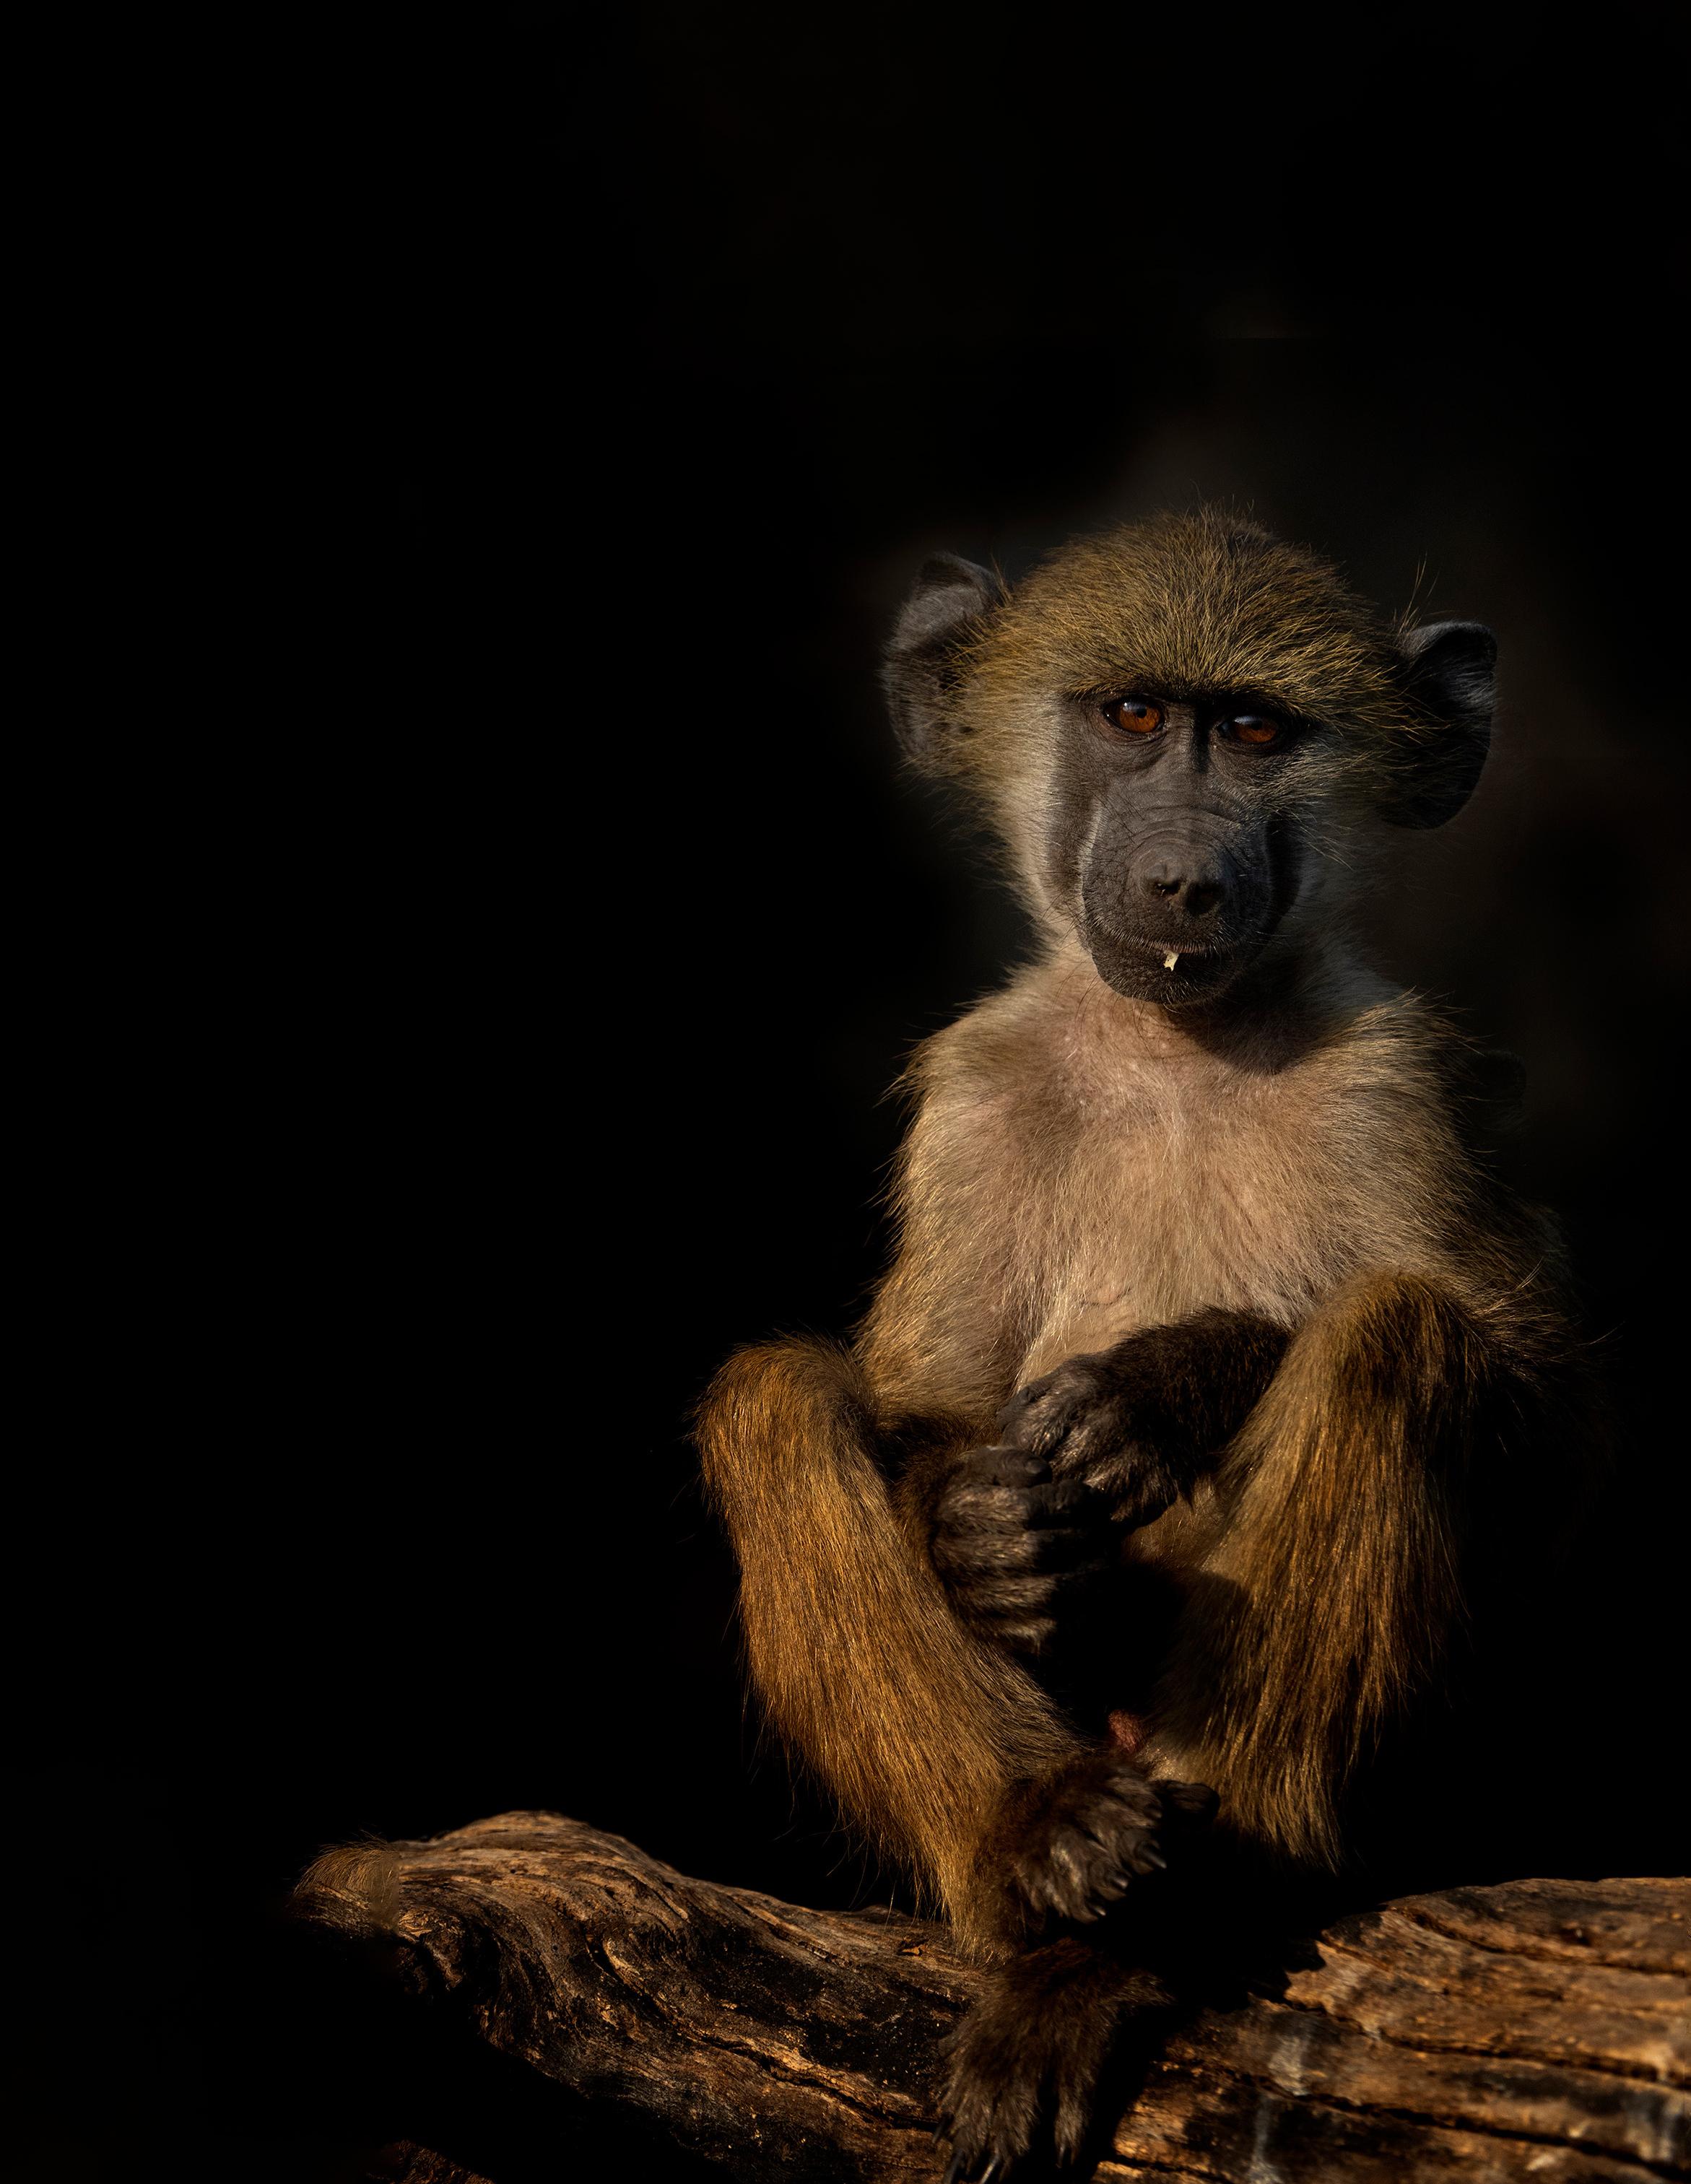
Photo: A young Baboon along the Chobe River in Botswana © Karen Schuenemann
Karen Schuenemann
Joe Doherty
Basil Katsoros
Many of us are heading out to shoot fall color right now. It’s a time when the aspens, cottonwoods, dogwoods, birches, and almost every other deciduous plant is shutting down photosynthesis and preparing itself for winter. It’s a glorious show.
A few days ago Velda and I flew across the country to experience the season in Maine. From the air we could see the mountains of Utah and Colorado covered by vast groves of golden aspens. All reports from the ground suggest that it’s a bumper crop.
During five days of our trip in Maine we’ll be guided by Colleen Miniuk. As part of her workshop she’s booked hotel rooms for the participants, for four nights. Since we’re staying a little longer we’ve booked a few more nights, but rooms are hard to come by, and expensive.
It seems that there are a lot of people heading to Maine, and to Bar Harbor in particular, to experience the seasonal splendor. I don’t have any specific figures, but I imagine that the Fall tourism business is a big part of the local economy, and an important part of the income of photographers like Colleen who make their living teaching workshops.
I bring this up because of what’s happening in Western North Carolina and Eastern Tennessee. Hurricane Helene has destroyed a lot of homes, buildings, and roads. It’s made it unwise or impossible for leaf peeping tourists to descend on places like the Great Smoky Mountains. There will be no fall color season there.
Like the towns that surround Acadia National Park the people who live in these areas depend on people like us to maintain their economy. Tourists buy food, shelter, and fuel, along with the many sundries that people on vacation feel the need to acquire. As tends to happen with disasters, many of the businesses that provide these goods and services will never come back. And it will be years before the roads return to pre-storm levels.
In California we have floods and fires and drought, which have become more unpredictable and more volatile as a result of climate change. We’ve felt the repercussions of these events in areas like insurance and housing costs. We see firsthand how it has affected neighborhoods and people’s lives.
And we’ve been through these catastrophes before, and we have an idea of what recovery looks like. The people of Asheville, NC, have not. This is the first time that city has experienced a flood of this magnitude. The region was unprepared, to some extent because preparation would be a tacit acknowledgment that climate change exists.
So how that region emerges will depend in no small part on how We the People respond. And when it’s at least partially recovered, it will depend on how we the photographers respond. If the Great Smoky Mountains aren’t on your list, maybe pencil it in for Fall 2026.
Joe Doherty
October 9 at 7pm (Wednesday)
Zoom registration link below

Scotland and Ireland offer incredible opportunities for natural encounters, whether you are a photographer or not. Through the lens and stories of award-winning photographer Krisztina Scheeff, embarks on an up-close view of these wonderful wildlife-rich places. Krisztina will take you on a photographic journey of some of the special places in Scotland and Ireland: Atlantic Puffins, Northern Gannets, White-tailed Eagles, Red Kites, all the small cute birds among gorgeous landscapes. Join her for a session of photos, videos, and stories of these two favorite places so close to each other yet so different.
Based in San Diego CA Krisztina Scheeff is an award-winning and professional nature photographer. Recognized for her photographic work in National Audubon Society as well as a finalist in the prestigious Wildlife Photograph of the Year competition, Krisztina’s photos have been published in magazines and articles around the world, including National Geographic, Wild Planet Photo Magazine, California 101, San Diego Audubon Society, American Wild Magazine, Birders Digest, Marine Conservation Magazine – UK, North American Nature Photography Association, and more. They have also been featured in art shows and galleries around the country. Krisztina operates a successful business leading photography workshops and tours to Scotland (Puffins), Ireland, Galapagos Islands, Costa Rica, Ecuador, Hungary, Bosque del Apache, Grand Teton NP, and more. She also leads workshops for bird festivals around the country and presents at various events. Krisztina spent years studying and photographing the Rushing Grebes and guides her clients at Lake Hodges in San Diego to experience this amazing behavior and capture their own photos. She is known as the "Grebe Whisperer," as their clients like to call her.
KS Nature Photography 949-436-5747 • www.KSNaturePhotography.com • info@KSNaturePhotography.com
Register for the Zoom presentation here: https://us02web.zoom.us/meeting/register/tZUldequrzIjE9SYCpJKfQzC6b0Ls-T3_Gyr

“The great rocks of Yosemite, expressing qualities of timeless yet intimate grandeur, are the most compelling formations of their kind. We should not casually pass them by, for they are the very heart of the earth speaking to us.” ― Ansel Adams
Text and photographs by Karen Schuenemann
This image was taken on the Chobe River from our boat. I loved that we were at eye level, and the image was exposed expressly to blow out the water ripples yet retain the critical features of the hippo.

As a Wildlife photographer, many have asked me why I often return to the same places. I have tried to explain the pull. My senses come alive and heightened even as I think about them. I can see in my mind the Chobe River at sunrise with the birds just waking up. I can hear the flapping of the Sandhill Cranes’ wings as they lift off. I feel my heart race as I imagine a sighting of a grizzly with her cubs in the Tetons. I can vividly smell the rich red earth of Kenya as I look out over the Great Rift Valley. And I respond to those that ask that it is NEVER the same!
I love to repeatedly go to the same places to photograph. I have been to the Tetons over 30 times in the past 15 years, to Bosque over 20 times and to Africa 8 times. This is not just to shoot a liftoff of Sandhill Cranes in Bosque Del Apache always utilizing the same technique with my camera and using the same lens. I intentionally plan to do new work. My hope is to create something new and different. As I head back, I create a “creative ideas list” to work from and strive towards. It does not always come to fruition, but it is a worthy challenge. It is the same-
but-different approach that keeps me taking pictures.
“You don’t take a picture, you make a picture.” -Ansel Adams
By returning to places, I have become familiar with the light, the landscapes, the animals and their behaviors. All these are components of getting a wonderful image. What I have learned at each of these locations has been a foundation that I have been able to build upon each time I visit. This knowledge can become a tool to further exploration and creation in my photographic process.
I do not think that Ansel could have created “Monolith, The Face of Half Dome” on his first visit to Yosemite in 1916. When he took that image, he had already spent six summers as a trip photographer for the Sierra
Club. On that first trip, he hopped up on a tree stump to take a photo of Half Dome, then stumbled, headfirst, and accidentally pushed the shutter release. The upside-down image remained one of Adams’s favorites, he wrote in his autobiography. He had become intimately aware of the landscape and with many “failures” he created some iconic images that we all enjoy and celebrate.
“There is nothing like returning to a place that remains unchanged to find the ways in which you yourself have altered.” -Nelson Mandela
I love to return to these special places and often share them with like-minded photographers. When I am standing next to a group of photographers, we all produce different images, based on cameras, lenses and our personal vision. It is never the same, however, they are often not “new” images.


What I am referring to is that often I have seen very similar images on Facebook or Instagram. Did you realize that EACH day now, 3.2 billion images are shared in social media! By pushing the boundaries of my creative vision with new techniques, I am always hopeful to create something uniquely different. That drives my photography when I return to Africa, the Tetons and New Mexico.
I truly get excited when I see a workshop participant try something new. It is indeed the same, but different.
“Our inexperience fed our restless enthusiasm for trying new things, which became part of our core mission.” — Richard Branson
My workshops in Botswana and Kenya have challenged me. I have been fortunate to see
lions, hippos, rhinoceros, so many birds and typically the “Big Five” in the areas that I have visited. We have been up-close and personal with elephants, giraffes and leopards. Always a thrill, but my brain is keeps whispering, “How can you do something different?” We have all seen so many lions on social media, and they begin to look the same. The voice returns…” How can I do something different?” I certainly did not mind capturing this leopard up-close and personal, but “What could I do next?” was my mantra. My photography has continued to evolve and the more I have learned, the better it has become.
“Art does not just happen by accident. It is about pulling out new tricks and trying new things.” — Nicholas Meye


I am trying to respond to that narrative running through my head that asks me what I can do to create an image that is unique. If you have experienced those moments when you desire to create something different, I suggest trying several of these techniques. As a painter takes the brush to a canvas, you can use your camera to be the tool on the digital canvas.
One of my favorite techniques is low key lighting. I love the mood that is created with a low-key image. There is mystery and drama that is created using low-key lighting. Initially I look for an illuminated subject with a dark background. By using a low ISO with a wide aperture, the shallow depth of field will blur the background and make it disappear. I typically shoot in Manual or Aperture, utilizing exposure compensation to
manage the camera. You will not want to use Auto ISO. Spot metering can be useful so that you do not blow out the subject.
Depending on the light’s direction, you can use front light with the subject lit up, side light, and even back light. Side light works great, particularly with animal’s faces, and by using the highlight setting, you can see if you are blowing it out or not. Side lighting is when the sun is at anywhere from 45 to 90 degrees and gives your image a threedimensional appearance. Back lighting, often known as rim lighting, brings a beautiful look to a bird’s feathers or an animal’s fur. It is important that the animal’s shape is identifiable by not overlapping on trees or other animals. If your ISO climbs, noise will be generated, but thankfully can now be eliminated or reduced in post processing.


The light was key to the image on the previous page, as you notice the rim light and background provided texture and identifiable shape to the baboon mother and youngster.
As you can see in these two images, the attention to the light is a fresh look at the same animals. I was focused on the light and the background, and the results were exciting. It almost looks like the above image was taken in a studio. The subject was striking
with the simplicity of the background and the behaviors of the subjects.
The opportunities to take this type of lowlight imagery are everywhere. I especially enjoy early mornings here in Florida to capture birds with this wonderful approach. This tri-colored heron was busy getting breakfast and oblivious of me. He seemed to gravitate to the dark areas of the swamp and he was illuminated by the early morning

light. It was perfect conditions to take a lowkey image.
The gorgeous egret in mating plumage on page 10 was a challenge to photograph. Getting the dark background in which the bird was isolated kept me shooting for several hours. It was rewarding to finally get an image of nature’s beauty.
Shooting silhouettes can create dramatic images. With wonderful sunsets with some of the most vibrant colors along the Chobe River in Botswana, I cannot help doing some silhouette photography. In this case, you would meter for the sky, use meter lock, and then recompose. It is important to not have your animals overlap. You want to isolate the critters so that you don’t end up with an unidentifiable blob. That is particularly challenging to do with birds, but as you pay attention in your viewfinder, you will find success.
Have you tried high key photography? This works great with an overcast sky and creates brighter imagery. Often, you can nicely convert these images to black and white. You can use this technique with water, snow and even the white sands of New Mexico as your background. Use a slow shutter speed in the low light of mornings and evenings to create some wonderful high-key imagery. Use spot metering and aperture priority and shoot wide open, so that you have a shallow depth of field, and then push your exposure compensation to the right…plus 2-3 for starters. If you increase ISO, it will lead to noise, but often with shooting animals, you may choose to do so as they are often unpredictable and may move suddenly. This wild dog (page 12) came straight towards us in our safari vehicle, emerging into the sunlight and bright grasses which provided the opportunity to do a high-key image.


We stopped after crossing an old wooden bridge in Kenya to watch the hippos. The juxtaposition of the hippo and the over exposed water provided a nice detail of this enormous animal.
This handsome gorilla was captured at the Los Angeles Zoo. I composed him against a very bright background so that I could create a high-key gorilla image.
In post processing, try increasing whites and blacks, clarity, and contrast. Converting to black and white, you will generate some new looks to your photography. Post processing with different methods can also assist you in making something new. I love to experiment with DXO software, which is simple, saves time, and is nondestructive. It is fun to try a fresh look on an image. You can download a free trial to see if this works for yourself.
I often suggest that my workshop attendees try panning. This can be an exercise in frustration.. or NOT! Often once they have gotten the standard lift off pictures or the lions moving across a field in Kenya, it is worth trying some panning images. Set up shutter priority with auto ISO, or manual, shooting at 1/30th of a second for starters. The goal is to keep the eyes in focus but the body moving. A walking lion might be shot at 1/10th of a second, or birds at 1/30th .
EXPERIMENT…There is not just one standard setting that is dependent on both the environment and the animals. Keep your camera steady. You can slow the shutter and play with the settings to see what will work. Seriously, take hundreds of pictures with your camera set on continuous. KEEP clicking. A tripod, monopod, or beanbag are great tools


for this. If only one picture turns out, I promise that you will be thrilled that you tried this technique.
What is interesting is that these techniques can be used in landscape photography, portraiture, macro and wildlife…it is not specialized to only be used with wildlife photography. I recently was asked to do a friend’s wedding photography…a different kind of wildlife for sure. This was a special event at a casual location at the ocean. I immediately thought to try a high-key look because it was bright and captured the joy of the day. It worked perfectly for the look that I wanted.
Again, what is your vision, and is your voice asking you how you can create something different? Try it and see what happens. You can try these techniques locally at the Los

Angeles Zoo, or at a wedding, or working a landscape at the ocean, or a destination on the other side of the world. You are the artist.
As they say, love the camera you are with! If you only have a cell phone, USE it! You have so many new options to create images with a phone! I am often shocked at what I am able to capture with my iPhone. When they have a 600m lens for the iPhone, I will trade in all my gear. Did you guess that the image of the Yellow-Crowned Night Heron on page 15 was taken with an iPhone? I used the Snapseed App to manipulate the image applying the high key idea to this photo. It was carefully composed with a white background and then I used the camera slider to overexpose the image. I used DXO to further process the image on my phone.
While our boat was coming back to the dock on the Chobe, I grabbed the opportunity for an iPhone image of this stunning elephant. The rich colors were far better on my iPhone than the ones with my DSLR! I used Topaz to Denoise and sharpen after importing it into Photoshop.
In addition to still images with your phone, try out the video opportunities. After a special trip, I love looking back not only on my images but at the videos that I have captured. They are fun to share, and the memories always flood back.
I hope that this gives you some ideas for your photography. Return to those places that you have discovered repeatedly. Be willing to commit and let go of the notion that you will miss something by returning to the same
familiar places. The truth is that you will have discovered your own voice and creativity when you see that one special image that was created with the building blocks of repetition and creativity. It gives us immense satisfaction to finally create something “different!”
If this inspires you, consider joining me on one of my upcoming workshops. I return to Bosque Del Apache in New Mexico in
January, with an optional trip to White Sands National Park. Kenya is calling us in June. This is an all-inclusive 14-day trip with airfare from Los Angeles with a small group of photographers. Visit WildernessAtHeart.com if this sounds interesting, and feel free to reach me by email at Karen@WildernessAtHeart.com with any questions.
“Never be afraid to try something new. Remember, amateurs built the ark; professionals built the Titanic.” — Unknown

by Joe Doherty
In my last column (May/June 2024) I discussed how to plan a book, from identifying the audience to curating your images. In this issue I get into the mechanics of it.
There are two paths to making a book. One involves uploading your photographs to a site that has pre-existing templates, selecting which image goes where, and letting the printer do the rest. Shutterfly is a good example. And there are printers, like Magcloud, which require you to upload a completed PDF. The path you choose depends on your comfort with layout software and your pocket book.
Before getting into the nitty-gritty of software I’ll say a bit about Shutterfly. It’s easy and the quality is high. I used them to make one-off books until 2019. For each book I uploaded hundreds of images fullframe at 2000 pixels in sRGB color space, and then flipped through ready-made templates for each page. I could adjust the templates, and there were options for typeface and background design. After choosing a template and dropping in the images, I left the sharpening and resizing to them. Doing it this way meant giving up control over multiple aspects of the process, but that didn’t concern me at the time.
The rest of this article assumes you want more control than that, and that you plan to produce a PDF to upload to a printer. I’ve broken the process down into three key areas – setup, design, and layout. Within each of these there are myriad variables, but a grounding in them will make it easier to begin for yourself.
If you are going to produce a hard copy of your book (as opposed to an e-book), the first thing to become familiar with are the concepts of bleeds, trims, and safe zones. Modern printing technology is excellent, but it is not exact. To produce an 8.25” x 10.75” magazine you need an 8.5” x 11” pdf. This is because the outer quarter-inch -- the bleed zone – will be trimmed off of your magazine after printing. Where the trimming takes place isn’t precise, so if you want an image or a block of color to bleed off the edge of page, it needs to cover the bleed zone. This means you will sacrifice some of the outer portion of your image, so crop appropriately. Also, if you definitely want something to appear on the page (like a block of text or a page number) it should not be in the bleed zone. The trim zone is inside the bleed zone. Theoretically the trim line is at the edge of the printed page, but tolerances being what they are, it can float around a bit. For this
reason you should not place anything (a photograph or a block of text) too close to the trim line. It might leave a white line between the edge and the image, or it might inadvertently crop the image/text. To avoid that happening, keep all content within the safe zone. This is the rest of the page, and begins about one-quarter of an inch inside the trim line. (see page 21 for image)
The two book printers I’ve used are Magcloud (magcloud.com) and Blurb (blurb. com). They sell different products, but are the same company. Blurb is upscale (hard cover, glossy paper), and Magcloud is consumer (soft cover, different bindings), but they use the same printers (HP Indigo), so the specifications and the image quality are the same. Both of them publish their
specifications (size of bleed/trim/safe areas) online, and provide templates for using Adobe InDesign and Adobe Photoshop. I print my calendars through Lulu.com, and they have a similar product line.
It’s possible to create your PDF in Adobe Lightroom, which contains the Books module. It has the bleed/trim/safe areas builtin. The specifications in Lightroom are for Blurb products, but they can be uploaded to Magcloud. I don’t like this module because the layouts and text are difficult to modify, but it does have its uses. I know one prominent photographer who uses it to create a draft (for image order, etc.), but he hires a professional designer and printer to complete his projects.


I have used Adobe InDesign, but I find that software difficult to master. If I was a professional designer I’m sure it would be ideal, but I am not. Instead I use Affinity Publisher (the software on which I lay out this magazine). I enter the page size and trim specifications manually. I’ll refer to this software for the rest of the column; the principles are the same across all layout programs.
Making a new document in Affinity Publisher brings up a dialog for the specifications of your book. What is the size (8.5” x 11” or 11” x 8.5”)? What is the DPI (300)? How many pages are there (overestimate, you can easily reduce)? What is the colorspace (sRGB)? What are the margins (0.25”)? And what is the bleed setting (0.125”)? It took me a few iterations to be comfortable with this, but it’s nearly impossible to make a mistake. Once these are entered, hit the “Create” button. Affinity will show you empty pages. The first one, on the top right, is your cover.
A universal part of these types of software is the toolbar. I use three of these buttons for 95% of my work: the pointer button, the text button, and the frame button. With the text and frame buttons you create containers within a page to hold text and pictures. With the pointer button you can select either of these to move them around the page. Within a text box you can enter copy, choose the typeface/font size/paragraph justifications, and other options (leading, anyone?). Within a frame box you can zoom and crop your image to fit the frame.

This software also has a panel on the right side that shows the layers on the active twopage spread. When you are trying to superimpose type over a photograph, or partially stack one photograph over another, you will want to be able to move the layers.
Once the document is set up, think about how the book will look. As discussed in my May/June piece, the design should reflect what you want to communicate. If it’s an art book, a simpler design is better. To my mind this is one photograph per page, with a small block of text. The text could include the
image title and date, some text describing the image, a meaningful quote, or really anything you think is relevant. A book about an event or a trip might have multiple images on some pages, with blocks or pages of text. It could be divided into sections thematically or chronologically.
Perhaps the most important thing about the design is consistency. Typefaces should be consistent throughout the book. Placement of titles and text should be consistent throughout. Borders should be consistent throughout. Of course this is all a matter of taste, and rules are made to be broken. But I


recommend that you look at books and magazines that you find pleasing and notice the regularities, how certain parts of the design are repeated. My influences from eons ago were the weekly magazines Life and Look.
So, what kind of choices can be made? Let’s begin with a simple cover design.
I’ve chosen to make a horizontal book, 11 inches wide and 8.5 inches tall. Note how this appears in the software. The bleed area surrounds the page but is not part of the layout. The trim area is within the bleed, and the safe area is all of the rest. If you are making an e-book or other online publication (like this magazine), there is no need for a bleed area. And since there won’t be any trimming, the safe area isn’t relevant. In this magazine, for example, I set the trim line at 0.625 inch, which serves as a margin. You may not notice it, but you would notice it if I varied it from page-to-page.
My first thought in producing the cover for a book is to center the photograph, so I place a
frame container dead center. The big “X” across it indicates that it is empty and waiting for content. After dragging and dropping my cover photograph into the frame, I then add some text for the title and my credit. I choose to center the title on the page above the photograph, and to place my credit on the lower right hand side. Choosing a typeface that supports the photography is an article by itself.
These choices are conventional, and not very dynamic. I opted to change things, enlarging the frame to cover the bleed area, and adding text as an overlay. (This is where the layers panel, mentioned above, is necessary.) Text color then becomes an issue. There is no black in the photograph, so having black type would be jarring. After selecting the text, I used the eyedropper (in the toolbar) to sample from the colors in the photograph. Which color is a matter of taste, and I settled on the top-most color patch on the pole. After playing with the font size and alignment, I placed the title on the top left in a place that gave balance to the whole cover.

Every cover is an invitation to what’s inside. A reader who picks up a book with a minimalist cover might expect a spare design on the pages. Similarly, if the cover promises a story, the inside of the book should continue the tale. How does one do that? First, the choice of typeface is very important, and in many cases just as mysterious. I do not pretend to be an expert, but I have friends who are, which is even better. Second, think about how the photographs and text occupy space. Is the book comprised of single photographs with the occasional title or caption, or is the text an important part of the story as well? How do the photographs relate to each other? Are they of about equal weight, or do they vary?
I’ve laid out this double-page spread with three photographs and one text box. A couple of things to note here. One is how the images align with each other. The lower bounds are even with each other across both pages, and the two on the right page are the same size. Also, the outside margins on both pages are the same. This is the consistency I was discussing above. The second thing to note is the wintry story told by the sequence of photographs. It begins with snow on red rocks, with a little Charlie Brown-sized tree that says “Christmas.” The next image includes the snow and red rock, with a frozen creek at the bottom. And the last image is a frozen creek. No explanation is necessary.

Now I’ll throw in a caveat. It’s taken me hundreds of hours to learn to do this all in a few minutes. There are so many options, so many controls, so many confusing and counter-intuitive menu items in every page layout program that I don’t think I will ever learn them all. But I’m confident that every problem I confront has a solution buried in the manual. Want to automatically paginate? You need a master page. Is the type too compressed? Look for leading. Does that image need a thin border? Choose a stroke border of the appropriate size. Most importantly, accept that your first efforts are not going to be great. But they will be yours, and they will be done.
So now you’ve done everything in Part 1 (selected, curated, sequenced) and in Part 2 (setup, design, layout). It’s time to export to a PDF or other format. For this you use the menu File/Export. There are many items in this dialog, and I’ll address just a few. When making a printed book you need to be sure that you export as “Press Ready.” This includes the bleed area in the pdf. If you export without the bleed area, the printer might reject the document, or it might trim off bits that you wanted to include. The DPI is 300, and the Area is either All Spreads or All Pages (different printers want different output). If you are outputting an online book, All Pages is correct.
Once the book is exported you will have a PDF file that can be printed by Magcloud or Blurb or any one of a dozen other print-ondemand houses. It can be a very large
(100mb or more) file. If it’s too big for the service you’ve chosen, go back into the Export dialog and reduce quality from 98 to 92 and see if that helps.
As I’ve noted before, first books are not usually very good. As with photography there is a learning curve, and given modern technology you can get off of the toe of the learning curve pretty quickly with just two or three books. What I recommend is that you make one, have one copy printed, and then show it to people whose opinions you value. Be humble, take their advice, go back and revise, and print it again.
As I’ve learned since I published Part 1 of this How-To, preserving a family or artistic archive is on the minds of many people. If the goal is to create a catalog of images, without much design input, then I recommend acquainting yourself with the Lightroom Book module. It is not subtle, but for for the task of putting a single image on a page and turning the whole collection into a printable PDF, it can’t be beat.
But if your goal is to attain mastery over the publication process, to gain the skills necessary to inexpensively produce a book, a magazine, or even a single page flyer, then archiving your personal and professional works is a good way to get the training. The very first publication I worked on was my high school yearbook, as a freshman in 1974. Some of the lessons learned from those primitive days are still with me. As are my high school yearbooks.
August 11-13, 2024
Recently, SCCC member Allan Der led eight photographers to a dark sky site east of Mono Lake. They photographed the Perseid Meteor Showers by night and the feral horses of the Adobe Valley by day.
We met in Lee Vining at noon for orientation, and then caravanned 30 miles to our campsite in the Granite Mountain Wilderness. It was a primitive camp, surrounded by granite outcrops and scrub, and exposed to the wind. Allan’s multi-page description of the trip was all we needed to prepare, and at the site he reiterated the “leave-no-trace” principles so important to a group trip like ours. At the site we set up camp, reviewed the PhotoPills app, planned our shots, and set up our tripods.
The Perseids were at their peak on the two nights we were there, with the most activity between midnight and 4am. The moon had already set, and we worked by dim red headlamps. Some of us used the camera’s internal timers and went to bed, while others were actively shooting during those hours. There was a wide range of lenses and cameras, and we all came away with something we liked. The first night was beset by clouds, but the second was clear with not much wind.
It wasn’t evident until the images were viewed later, but there was a SAR Arc Aurora visible to the north. If you aren’t looking for it, the SAR Arc Aurora appears to be light pollution at the horizon. Allan’s cameras caught the glow.
During the daytime we went into the Adobe Valley, where we spotted at two separate herds of feral horses. The first herd, numbered about 150. We were instructed to avoid walking directly towards the horses, and to avoid prolonged eye contact. Many of us walked to an area about 75 yards south of the herd, in an upstream swampy spot of the meadow, where we spread out.
As we photographed the horses, they started to move towards us.We remained in place as they approached, checked us out, and then walked through and past us over a period of about 30 minutes. After they moved on we relocated to a different spot, and again they came towards us. But this time they lingered for over an hour, comfortable enough to allow their foals to approach and be touched.


Text
photographs by Allan Der
August, this year, the Camera Committee had a multi-faceted adventure in Mono County for wildlife, landscape and astrophotography. We dispersed camped in the Granite Mountain Wilderness east of Lee Vining. Our remote camp allowed us to shoot night sky without the usual campground light pollution and in a part of California that is classified as Bortle Class 1, very dark night sky.
On both nights of shooting, I noticed a red glow in my shots, at first I thought auroras. Checking my aurora app on my phone confirmed no auroras. A friend sent a message of possible auroras, but I dismissed that and said we were too far south. I later found out that what we saw was a little-known phenomenon called Stable Auroral Red (SAR) arc, which appears as a shimmery red curtain of light spreading across the night sky, usually at lower latitudes than the aurora borealis. It’s usually invisible to the human eye but can be detected by modern day digital cameras. SAR arc occurs at the same time as auroras but without the oscillating patterns and at the far edges away from the earth’s poles. We are heading into a solar activity peak in the next year so expect more geomagnetic storms creating more auroras. SAR that evolve into strong thermal velocity enhancement (STEVE), I will save for another day.
My intended photograph was muti-purpose. The images can create a time-lapse video or star trails and I wanted to capture the milky way. My camera was a Nikon Z-8 with 16mm f/1.8 Vitrox prime lens, all mounted on a carbon tripod with ball head and stone bag. I exposed for the foreground at 25 sec at f/1.8, ISO 3200. My exposure for the sky was 25 sec. at f/1.8 ISO 4000. The number of
exposures exceeded 700 images. I used the camera’s built-in intervalometer to delay start the exposures to astronomical twilight and capture the landscape. I used an external power bank to power my camera via a USB cable so the camera could run all night until dawn.

I pointed my camera in the direction near Perseids where the radiant is located and included the north star. The radiant is where the meteor shower appears to originate. I determined my composition by placing the tree to the side and finding a good ratio of sky to landscape before it was totally dark. Once it was dark, I used the camera's live view to focus on the stars. My tripod did not move for the entirety of the shooting and was weighed down with a sandbag in a stone bag and I applied my weight onto the tripod to set it into the ground.
For the star trails, I stacked 600 frames and processed the images with StarStaX to get the star trails. I chose a foreground landscape that was illuminated by the setting moon. The meteor frames were selected for meteors with more prominent streaking, almost all frames had meteors but many were small or very far away. In post processing the three base images, landscape, star trails and meteors were all layered together in Photoshop. Software used was Lightroom, StarStaX, Photoshop, Topaz AI, DXO RAW, OnOne NoNoise. Planing APPs Photo Ephemeris, PhotoPills, and Stellarium.

August 3, 2024
Joe Doherty led ten photographers on a twohour exploration of the Sepulveda Basin Wildlife Reserve on August 3, assisted by Joan Schipper.
The group met at 5:45am in the parking lot at the north end of the Reserve. Sunrise on that day was at 6:07am, and we needed to be at the pond when it did. This was not a winter trip, with thick fog and wintering birds. It was an orientation to the Reserve for people who had never been before, and a chance for those who had to see it in a different season.
The plan was to walk along the west side of the pond, pass under Burbank Blvd. to the LA River, and then return along the east side of the pond. The vegetation alongside the trails was high, and getting to the pond was not always easy. We persisted, learned some lore of the Reserve, and how the 2020 fire changed the landscape significantly.
There were wildflowers, rabbits, and many birds. Participants were warned there would be many spiderwebs, and they came dressed appropriately with hats and longsleeved shirts. A return outing is promised for December or January.


Text
and photographs
by Basil Katsaros
In the last issue of Focal Points Magazine, (“Peaks and Chapels” July/August) John Nilsson wrote about our Dolomites workshop. I thought I would augment that article with Paula von Lindern and my preand post-Dolomite trip. I had bargained with Paula that if I could do the workshop, we would go to Paris. We figured on a max three-week trip, but it culminated in five weeks! In addition to the Dolomites, we visited France, Italy and Switzerland.
Our journey started May 18th from Denver, CO, to Paris, France. Our VRBO was well located on the island of I’sle Saint Louis in the Seine River. We visited the typical sites in advance of the upcoming Olympics and typical tourist attractions: the Louvre, Musee d’Orsay, the Picasso museum, and Jardin Gardens. We had a cheese plate at Les Deux Magots, an artists’ restaurant hangout for about 150 years. Our saddest visit was Notre Dame. That reconstruction will take years.


Early in the morning of May 25 (5 AM) we headed to Toulouse via train. The six-hour ride was fantastic; we had all the conveniences for a productive trip.
We then went for our rental car from Liigu. That was a trip down technology lane. The entire rental was completed on the agency’s app, including directions to where the car was located, and a keyless starting. Advice to others: make sure your phone is fully charged
Our hotel in Viscos, La Grange Aux Marmottes, was a fantastic experience. The owners and food were great, and what a good location for hiking and exploring! Not far from the hotel, we did a six-mile hike into the Pyrenees national park and the Cirque de Gavarnie. At the top of our hike was a hotel
reported to be owned by the same family for 125 years.
After Viscos we went back to Toulouse for a quick tour of the city, and the next morning we caught an early Iberian flight to Bologna, Italy. Our challenge was to find Mount Belvedere and Riva Ridge where the 10th Mountain Division drove the Nazis from a machine gun nest. That victory was instrumental in the ending of WWII. Just by chance, we found a plaza dedicated to the 10th in the village of Querciola. If you don’t know the story of the amazing group of men of 10th, please read one of several books.
After the workshop in the Dolomites, Paula and I went to Switzerland and France. Our goal was to photograph the three icons: the
Matterhorn (Zermatt, Switzerland); the Eiger (Grindelwald, Switzerland); and Mont Blanc (Chamonix, France).
While the Matterhorn, sadly, was shrouded in clouds, however a traditional fondue dinner hit the spot.
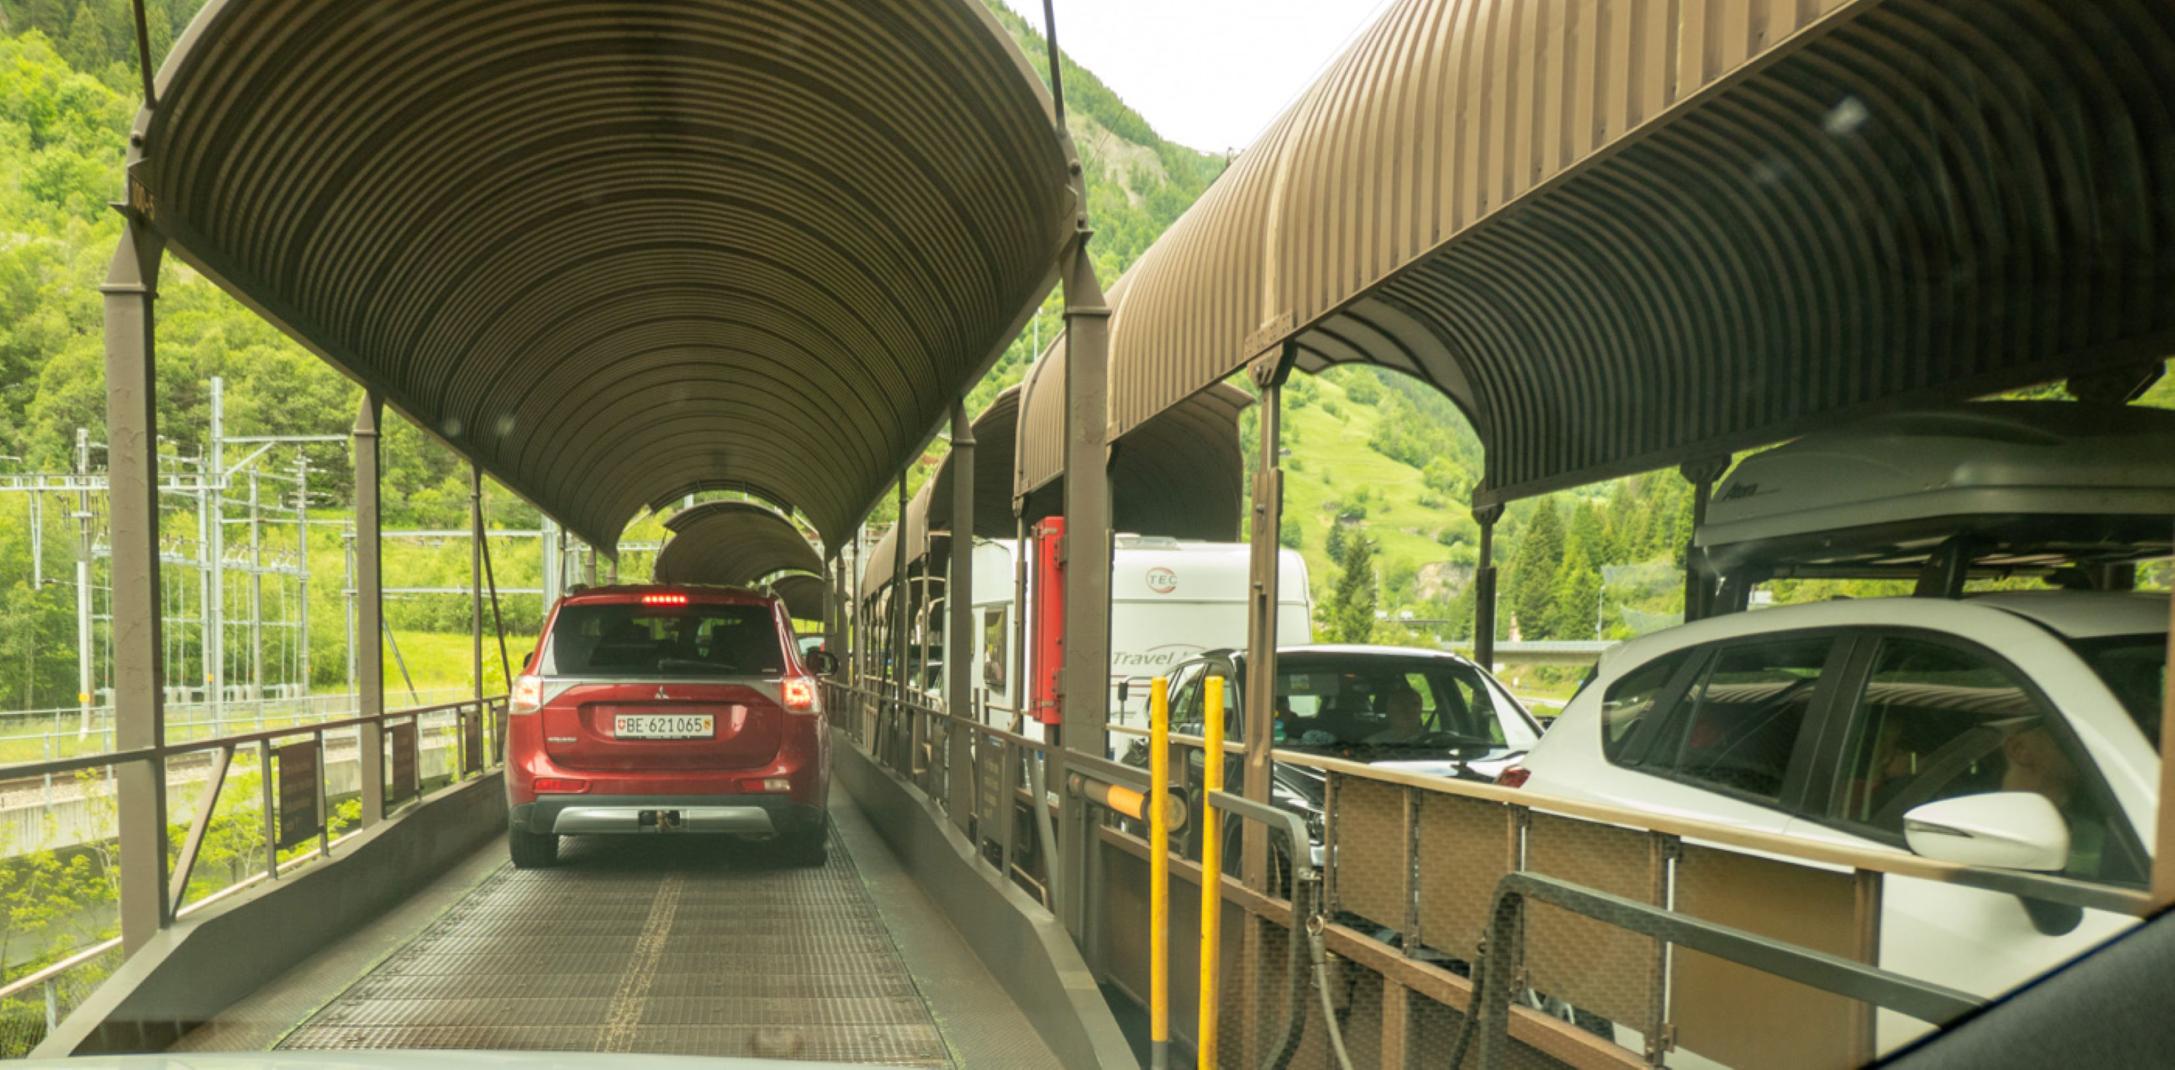
The next day we had a unique experience: the Lötschberg Tunnel. The tunnel, opened in July, 1913, is nine miles long. Automobiles, trucks, campers, etc., are all loaded onto flatbed railcars. It felt strange to drive onto train cars then sit in your car for the ride, but it did save some time in getting to the next destination, Grindelwald.
The Eiger mountain is the location of the 1975 Clint Eastwood movie, The Eiger Sanction. We took a train to Jungfraujoch, Top of Europe to photograph glaciers and extreme mountain ridges.
On to Chamonix, France, and Mont Blanc, we took a tram to the top of a ski area, Domaine du Brevent. The views were spectacular, but I would not want to ski there!
Before we ended our journey, we stayed at the Le Palace de Menthon on shores of Lake Annecy, outside of Geneva. The hotel was a unexpected treat. The adjoining village was quaint and enjoyable – just what one would expect of a European village.

The end of our five-week journey was a few days in Geneva, Switzerland. We had a most enjoyable tour in Geneva. We visited eight chocolate makers. Some had been in business for over two hundred years. And, as
expected, watches everywhere, several costing over $100,000.
For us, the Dolomite workshop was great, but the extended trip, well, that was stupendous.


Here are photos taken last April during a visit to Texas, when the spring wildflowers were peaking.


Here are some photos of street art from my recent wanderings in Long Beach and San Pedro.


“Metamorphosis”


Osprey fishing, backlighted, Willow Springs, Reservoir, Sitgreaves National Forest, Arizona


Every year since the pandemic I produce a calendar of my flower photographs. My first collection was “Flowers in a Time of Quarantine,” images I created during and after lockdown. This year is celebratory. I’m calling it “Bouquets and Other Parties.” This is a selection of those photographs.


Elizabeth Bassirian has always been fascinated with photography since she saw her father setup a darkroom in the kitchen. With no knowledge of photography, except for the rule of thirds and National Geographic magazines, she set out on her documentary adventures of family gatherings. Her first childhood camera was a Vivatar instamatic camera then a 35mm Rolliflex, Nikon FM2, Nikon 200,750, and now Z9. Photography has allowed her to slow down tremendously to observe and enjoy her surroundings. Photography has become a meditative experience. Her interest varies from travel photography, landscape, and nature. Then with the development of digital cameras and the Tamron 100-600 G2 lens, bird photography finally became affordable and a new avenue of nature photography commenced. She is now becoming better at bird identification and learning bird behavior. Also, with the purchase of the Nikon Z9, those elusive split second images of an insect being grabbed midair are achievable. Bird photography has now become her photographic passion creating more nature destinations to visit.
Bonnie Blake is a fine art photographer based in Los Angeles with roots in Louisville, Kentucky and New York City. In contrast to her years collaborating as a motion picture camera operator on television, features and the TED talks, her still photography expresses her own observations about what, as Robert Adams wrote, “astonishes” her in the beauty of the natural world.
She uses a documentary approach as well as intentional camera movement to create traditional images as well as conceptual collages. Her belief that beauty can be an agent of change inspires her to express her concern about the destruction of these lands from climate change. She hopes to use her photography to propel action toward preserving these treasured places. Her work has been exhibited at the Photo Place Gallery in Middlebury, Vermont, the Praxis Gallery in Minneapolis and the Duncan Miller Online Gallery. She was awarded honorable mention in the 2020 Creative Portrait Exhibit at the Los Angeles Center of Photography. Currently she has a photograph in the
Unbound12! Exhibit at the Candela Gallery in Richmond, Virginia.
Michael Caley was drawn to photography as a teenager, during backpacking trips to Yosemite, where he was inspired by the work of Ansel Adams. Today Michael’s dramatic landscape and wildlife photography are a natural extension of his long career as an architect and his many trips to the Eastern Sierras, Joshua Tree NP, the western United States and five trips to Africa. His work has been exhibited in several different venues including a 2010 solo exhibit at The G2 Gallery in Venice, CA. He can be reached at mcaleyaia@aol.com
Thomas Cloutier has been with SCCC since 2001, and he has been contributing to Focal Points Magazine since that time.
Cloutier’s interest in photography coincides with his interest in travel and giving representation to nature landscapes. His formal education in photography comes from CSU Long Beach.
At present Cloutier is a volunteer at CSU, Long Beach where he taught Water Colors and Drawing at the Osher Lifelong Learning Institute (OLLI), designed for Seniors over 45. He also is a docent at Kleefield Contemporary Museum CSU Long Beach. He is Liaison for the Art And Design Departments for a scholarship program for students at CSU Long Beach, Fine Arts Affiliates, FineArtsAffiliates.org. Cloutier at cde45@verizon.net
Allan Der is a native California conservation photographer in Mono County, CA. He studied Photography and Graphic Design at Pasadena CC, Art Center LA and graduated with a BFA from CSULB. He has worked as a Graphic Designer, Photographer and Art Director. His photographic work has mostly been commercial and advertising, annual reports and other publications. His clients have included
IBM, Arco, Knudsen, Kraft Foods, Lawrys Foods. He has participated group shows with Art Directors Club of Los Angeles, Communication Arts, Los Angeles Center for Photographic Studies, Pasadena Museum of Modern Art and MOCA Temporary.
When graphic design moved to computers in the 80's he started consulting and supporting computer graphics. Achieving Apple and Microsoft certification, his career turn to IT consulting and support.
He has had a passion for hiking, backpacking, caving and mountaineering for more than 50 years and has lead trips for the Sierra Club. With semi-retirement his passion continues with photography and currently focused on super wide 360 degree panoramic photography http://www.allan-der.com/
Joe Doherty
Joe grew up in Los Angeles and developed his first roll of film in 1972. He has been a visual communicator ever since. He spent his teens and twenties working in photography, most of it behind a camera as a freelance editorial shooter.
Joe switched careers when his son was born, earning a PhD in Political Science from UCLA. This led to an opportunity to run a research center at UCLA Law.
After retiring from UCLA in 2016, Joe did some consulting, but now he and his wife, Velda Ruddock, spend much of their time in the field, across the West, capturing the landscape.
www.joedohertyphotography.com
John Fisanotti
John was a photography major in his first three years of college. He has used 35mm, 2-1/4 medium format and 4x5 view cameras. He worked briefly in a commercial photo laboratory.
In 1980, John pivoted from photography and began his 32-year career in public service. He worked for Redevelopment Agencies at four different Southern California cities.
After retiring from public service in 2012, John continued his photographic interests. He concentrates on outdoors, landscape, travel and astronomical images. Since 2018, he expanded his repertoire to include architectural and real estate photography.
John lives in La Crescenta and can be contacted at either: jfisanotti@sbcglobal.net or fisanottifotos@gmail.com
http://www.johnfisanottiphotography.com
http://www.architecturalphotosbyfisanotti.com
A native of Denver, Colorado, I first attended Lewis and Clark College in Portland, Oregon. Not understanding humidity or seeing the sun for 30 days, I transferred to the University of Colorado. During my junior year, a roommate needed money and sold me his Pentax 35mm camera. That moment launched my interest in photography. My interests and knowledge were expanded by the Nikon School of Photography. In the earlier days, subject matter centered around my twin sons with travel photos and Christmas cards. As a real estate appraiser, I used photography in much of my work. I must admit, however, the 70’s primarily utilized a Polaroid as film was too time consuming for client demands. I have since graduated to two Nikon digital cameras and too many lenses.
While attempting to downshift in work, I occasionally use my photography skills to testify as an expert witness in real estate. My interests include travel, landscape, and wildlife photography. I’m not smart enough to have a website, maybe someone can show me how. Most images are for personal enjoyment and mainly remain in my computer. My goal at this time is too not only become a better photographer, but to conquer Photoshop!!!
Peter Mason began taking photographs in the mid1960s. These were snapshots of family trips and YMCA camp outs. Peter was introduced to the magic of the darkrom when a neighbor constructed one behind his garage. Watching that first print appear in the tray of developer was all it took. Soon
he too had a darkroom, constructed in a playhouse behind his parents' home. Over the years he experimented with several film formats, including 127, 6x6cm, 35mm, 6x12cm, and 4x5in. Currently he uses a full-frame "35mm" digital camera for capture and a large format pigmented ink printer to make prints.
His interest in fine art photography was kindled by Ansel Adams' large folio Images 1923-1974, published by New York Graphic Society in 1974. Other influences include the work of Richard Knepp, John Sexton, Don Kirby, and Stu Levy. Peter was a Broadcast Engineering Consultant for 30 years. Today, he makes his home in Nevada City, California.
Larry Miller
Larry used his first SLR camera in 1985 to document hikes in the local mountains. In fact, his first Sierra Club Camera Committee outing was a wildflower photo shoot in the Santa Monica Mountains led by Steve Cohen in 1991. Since then the SCCC has introduced him to many other scenic destinations, including the Antelope Valley California Poppy Reserve, the Gorman Hills, and Saddleback Butte State Park.
Larry’s own photography trips gradually expanded in scope over the years to include most of the western National Parks and National Monuments, with the Colorado Plateau becoming a personal favorite.
Photography took a backseat to Miller’s career during the 32+ years that he worked as a radar systems engineer at Hughes Aircraft/Raytheon Company. Since retiring in 2013, he has been able to devote more time to developing his photographic skills. Experiencing and sharing the beauty of nature continues to be Larry’s primary motivation.
lemiller49@gmail.com
John has a fond memory of his father dragging him to the Denver Museum of Natural History on a winter Sunday afternoon. His father had just purchased a Bosely 35mm camera and he had decided he desperately wanted to photograph one of the dioramas of several Seal Lions in a
beautiful blue half-light of the Arctic winter. The photo required a tricky long exposure and the transparency his father showed him several weeks later was spectacular and mysterious to John’s young eyes. Although the demands of Medical School made this photo one of the first and last John’s Dad shot, at five years old the son was hooked.
The arrival of the digital age brought photography back to John as a conscious endeavor - first as a pastime enjoyed with friends who were also afflicted, and then as a practitioner of real estate and architectural photography during his 40 years as a real estate broker.
Since retiring and moving to Los Angeles, John continued his hobby as a nature and landscape photographer through active membership in the Sierra Club Angeles Chapter Camera Committee, as well as his vocation as a real estate photographer through his company Oz Images LA. The camera is now a tool for adventure!
www.OzImagesLA.com
Creativity has always been important to Velda. She received her first Brownie camera for her twelfth birthday and can’t remember a time she’s been without a camera close at hand.
Velda studied social sciences and art, and later earned a Masters degree in Information and Library Science degree from San Jose State University. All of her jobs allowed her to be creative, entrepreneurial, and innovative. For the last 22 years of her research career she was Director of Intelligence for a global advertising and marketing agency. TBWA\Chiat\Day helped clients such as Apple, Nissan, Pepsi, Gatorade, Energizer, and many more, and she was considered a leader in her field.
During their time off, she and her husband, Joe Doherty, would travel, photographing family, events and locations. However, in 2011 they traveled to the Eastern Sierra for the fall colors, and although they didn’t realize it at the time, when the sun came up over Lake Sabrina, it was the start of them changing their careers.
By 2016 Velda and Joe had both left their “day jobs,” and started traveling and shooting nature – big and small – extensively. Their four-wheeldrive popup camper allows them to go to areas a regular car can’t go and they were – and are –always looking for their next adventure. www.veldaruddock.com
VeldaRuddockPhotography@gmail.com
Karen Schuenemann
Karen Schuenemann is a nature and wildlife photographer whose work focuses on the “Urban Wilderness” that exists next to the roads, homes and businesses in Southern California and now in Central Florida. As she captures images of birds, animals and nature that coexist in these increasingly urbanized environments, her hope is that her photography will inspire people to truly care and protect the natural world.
Schuenemann’s work has garnered numerous awards and has been exhibited in collections and publications around the world. In 2018 she received a Highly Commended Award from the London Natural History Museum in the prestigious Wildlife Photographer of the Year contest. Audubon recognized her image in 2017 as one of the top five images in their national contest. She has written several published articles on photography.
Karen founded Wilderness At Heart Photography providing personal instructions, classes, lectures and leading workshops to places ranging from Bosque Del Apache, New Mexico, to the Grand Tetons to Africa.She teaches classes at Tuttle Cameras in Long Beach and Samy's Cameras, Los Angeles.
https://www.wildernessatheart.com/
Rebecca Wilks
Photography has always been some kind of magic for Rebecca, from the alchemy of the darkroom in her teens… to the revelation of her first digital camera (a Sony Mavica, whose maximum file size was about 70KB)… to the new possibilities that come from her “tall tripod” (drone.)
Many years later, the camera still leads Rebecca to unique viewpoints and a meditative way to
interact with nature, people, color, and emotion. The magic remains.
The natural world is Rebecca’s favorite subject, but she loves to experiment and to do cultural and portrait photography when she travels.
Rebecca volunteers with Through Each Other’s Eyes, a nonprofit which creates cultural exchanges through photography, and enjoys working with other favorite nonprofits, including her local Meals on Wheels program and Cooperative for Education, supporting literacy in Guatemala.
Rebecca’s work has been published in Arizona Highways Magazine, calendars, and books, as well as Budget Travel, Cowboys and Indians, Rotarian Magazines, and even Popular Woodworking.
She’s an MD, retired from the practice of Obstetrics and Gynecology and Medical Acupuncture. She lives in the mountains of central Arizona with my husband and Gypsy, the Wonder Dog.

by Karen Schuenemann