ExLaB Tong Su 846112
exlab.org
Design Journal 04/02/2021
Experimental Design Lab (1)
ExLaB
Experimental Design Lab (2)
Contents 1.0 Introduction 2.0 Stool Exercise#1 - Thick Veneer Stool 3.0 Major project
Table of contents
3 4 13
ExLaB 1.0 Introduction
Experimental Design Lab (3) The Experimental Design Lab is an investigation into material and process driven design. It suggests an alternative, “bottom-up” approach to the conceptual process where playful experimentation with materials and hacking of both traditional craft methodologies and contemporary digital fabrication equipment leads ultimately to the design of a functional item of furniture. Risk is encouraged, and hard-earned failure is rewarded in parallel to successes. Physical experimentation lies at the core of the ExLaB pedagogy. Designers are encouraged to get out of sketchbooks and get their hands dirty. The process becomes as important as the final outcome and provides a glimpse of the breakthroughs, the heartbreaks, the red herrings and the intense amount of labor that goes into the ExLaB process.
Introduction
ExLaB 1.0 Stool Exercise#1 - Thick Veneer Stool
Experimental Design Lab (4)
(1) Thick Veneer Stool, Tong Su & Haoyang Yu, 2021
2.0
Stool Exercise 1
Thick Veneer Stool
ExLaB
Experimental Design Lab (5) 2.1 Thick Veneer bending strength experiments
Firstly we tested the bending strength of the veneer with the length of 40cm, and we can see the 2mm veneer is easily to bend, 3mm is harder than the 2mm and the 5mm (1)
(2)
can hardly bend. But when we change the length to 80cm with the same thickness, the veneer is seems easily to bend compared with 40cm. Then another bending method was tested which we soaking the 6mm veneer into the warm water for 2 hours, the result turns out really hard to bend and finally cracked.
(3)
(4)
The third method we tried was the kerf bending which cutting the 3mm gap between 5 mm distance, and it resulted in a slightly bended curve which is not as good as we expected.
(5)
(6)
(1) Bending 2mm thick veneer with length of 400mm. (2) Bending 3mm thick veneer with length of 400mm. (3)Bending 5mm thick veneer with length of 400mm. (4) Bending 6mm veneer which soaking in warm water for 2 hours. (5) Try Kerf bending in 6mm thick veneer. (6) The maximum bending degree of kerf bending in thick veneer.
2.0
Stool Exercise 1
Thick Veneer Stool
ExLaB
Experimental Design Lab (6) 2.2 First experiment - “wrap and weft”
After did some experiments on the timber veneer bending test, we decided to explore the possibilities of untreated timber veneer and push the maximum strength and (1)
bending moments boundaries. The first experiment is using the 2mm thick veneer, because we found out the 2mm is more suitable to work with as it has more flexibility, and we used the 2mm veneer to weave an surface to increase its strength using the method “wrap and weft”. After done that, we tried to weave the longer timber veneer into the surface to serve the
(2)
stool legs, however the strength is not as good as we expect, and the structure seems way too weak to support a person.
(3) (1) “Wrap and Weft” weave method in progress. (2) The seating area and the timber strip are weave together to serve as the stool legs. (3) Another experiment with same width and dense weave distance.
2.0
Stool Exercise 1
Thick Veneer Stool
ExLaB
Experimental Design Lab (7) 2.3 Second experiment - weave as single circle The second experiment was designed to weave the veneer as a dome to support person instead of being a surface. The structure starts with a base circle with 40 even distance holes, which consist of 4 layers of timber veneer to fix the strips in between.
(1)
(2)
Then the 2mm thick timber veneer are connected to the base which results in a dome shape with two veneers connected at one point. The final result is hardly being a consistent surface at the top, as the bending moments are not the same, and the veneer is too wild to be connected.
(3)
(4)
(1) The bottom support of the second experiment. (2) Connecting the 2mm thick timber veneer to curtain two points of the base. (3) Two timber veneer are connected at one point of the base. (4) Final result of the second experiment.
2.0 1.0
Chapter Name
Thick Veneer Stool
ExLaB 2.4 Precedent Study
Experimental Design Lab (8)
This project is called polar array dome stool designed by studio toer. It is using the polar array of iron wire to develop the strongest shape in order to hold the user. The polar array has double curve which increases the landing points to the base and enhance the structural strength.
(1)
(2)
(3)
polar array dome stool by studio toer. All images are from: https://www.designboom. com/design/polar-array-dome-stool-by-studio-toer/
2.0
Stool Exercise 1
Thick Veneer Stool
ExLaB
Experimental Design Lab (9) 2.5 Third experiment - weave as double circle As inspired by the project polar array dome stool which consist the double curve at the base so it can increase the strength of the structure, we also tried with double circle at the base.
(1)
(2)
The stool is fabricated by starting with the inner circle of timber veneers and then connect them to the outer circle. This experiment has a more successful result compared with last one, with more consistent and smoother surface at the top for people to sit on. Therefore, this prototype is decided as our final stool. The next for (3)
(4)
us is to consider about how to fix the base for the stool, and also the thickness of the veneer to maximize the strength.
(5)
(6)
(1) The inner circle was firstly created using the same method as before. (2) Connecting the 2mm thick and 2cm width timber veneer with the base with hemp rope. (3) The finished inner circle base. (4) The timber veneers are ready to connect with the outer circle. (5) Connecting the veneer to the outer circle. (6) Final result of the third experiment.
2.0
Chapter Name
Thick Veneer Stool
ExLaB
Experimental Design Lab (10)
2.6 Final Production
(2)
(3)
(4)
(5)
(6)
(7)
(8)
(9)
(2) Submit the CNC file which separate the stool base to two pieces due to the plywood size restriction. The radius of the inner circle is 150 mm with the 3mm hole in between of the 10mm boundary at each side. The radius of the outer circle is 2500mm with 3mm hole and 10mm at each boundary. (3) CNC 3 Axis milling in progress. (4) The pieces are sanded already by hand and ready to glue. (5) The timber strips with 3 mm thickness to insert at the hole to hold the circle in place when gluing them together. The bottom part of the strips is taped to avoid glued with the stool base. (6) The timber strips are insert at the holes and the circles are gluing together using the timber glue. (7) The timber is placed at the top of the stool base and press them together. (8) The clamps are used to add pressures and make sure the timber is glued tight. (9) When the glue is squeezed out, it means the pressure is enough.
1.0
Stool Exercise 1
Thick Veneer Stool
ExLaB Experimental Design Lab (11)
2.6 Final Production
(10)
(11)
(12)
(13)
(14)
(15)
(16)
(17)
(10) The sandpaper is pasted at two sides of a timber strip to sand out the extra glue and maintain the same thickness of the hole inside. (11) Select Oak timber which have the higher strength compared with pine. (12) Put the timber into the jointer to make it have flat surface. (13) Then put the timber into the planer to get the consistent thickness. (14) Cut the timber into even 3 mm thickness veneer with the width of 2cm, and 40 pieces. (15) Using the extra timber strip to measure the perimeter of the inner circle and outer circle to mark the position of the timber veneer. (16) Insert the timber veneer into the inner circle first, and then bend them to the outer circle. (17) Finally using cotton rope to fasten the connection between the stool base and timber veneer, also to hide the inside of the stool base from outside. The rope will also keeps the distance betwwen each veneer as the same.
1.0
Stool Exercise 1
Thick Veneer Stool
ExLaB 2.7 Reflection
Experimental Design Lab (12)
During this group exercise, we were given to design a stool and using thick veneer which have the thickness about 2mm to 6mm. During the first week, we tested the strength of the veneer at different thickness, and we want to fulfill the natural strength of this material without other bending method interrupted. We also did try to make the veneer as a surface to increase the strength using the wrap and weft method. However, to make our stool stand up, we try to weave the veneer strips bended to achieve its functional requirements, and the final design lands on to the double circle bending to maximize the structural strength using the 3mm oak instead of pine. It not only will provide and relatively stable structural strength, but also allows some flexibility and elasticity to serve as a stool. The result turns out a really elegant and balanced form to serve as a stool, but there are still lots of aspects needs to be considered further, for instance the comfort when people sitting on and the maximum structural strength as a stool. In my opinion, I really found out that the thick veneer has lots of potentials to be further developed such as bending and laminating, and these methods will benefit the material further stable structurally and also aesthetically. The lesson that I had until now would be to test this (18) Thick Veneer Stool, Tong Su & Haoyang Yu, 2021
1.0
Stool Exercise 1
material using other bending method to see how much I can push the boundary of this material properties.
Thick Veneer Stool
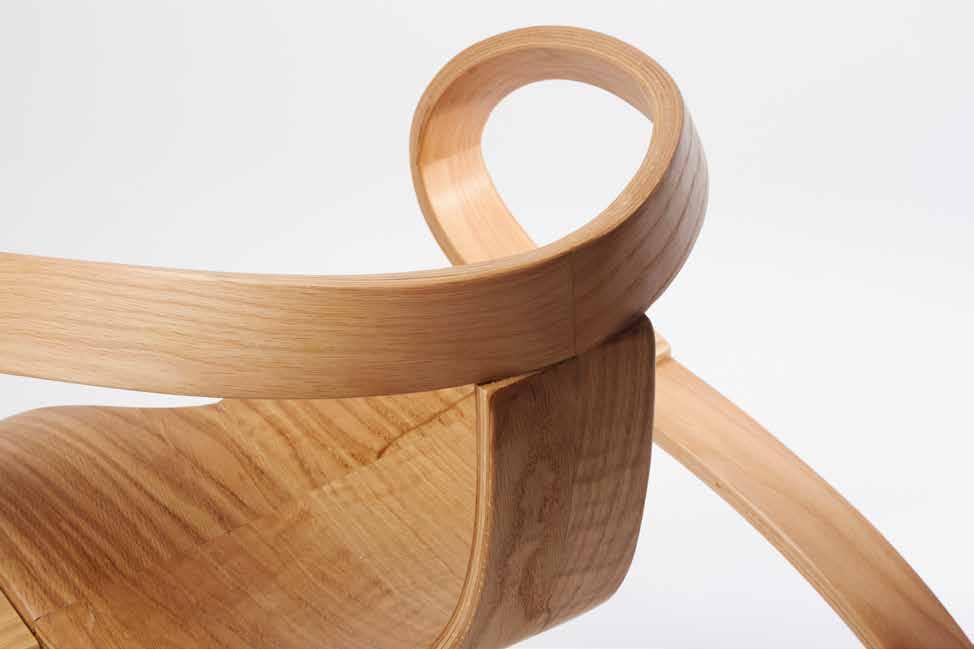
ExLaB 3.0 Wooden Ribbon Chair
Experimental Design Lab (13)
(1)Wooden Ribbon Chair, Tong Su, 2021
1.0
Major Project
Wooden Ribbon Chair
ExLaB
Experimental Design Lab (14) 3.1 Precedent Study
Bending timber veneer is a great method to achieve an elegant and smooth curve line, as the timber veneer is relatively elastic and have a curtain level of strength to serve as a structural element. (1)
(2)
During the first stool exercise, we experiment a lot of properties of thick veneer, and I really like to push its potentials and boundaries for my final project. The Arc Chairs and Table designed and fabricated by Henry Williams Design was using the free hand steam bending to (4)
(3)
give the more comfortable seating arches and lightness to the structure. The Bend by Kayla Lim is using different method called hot pipe steal bending to bend the timber veneer, and the Tadao Tando’s Dream Chair is using 3D bending using machine to achieve the complex chair gesture.
(1) Arc Chairs by Henry Williams Design using free hand steam bending. (2) Arc Table by Henry Williams Design using free hand steam bending. (3) The Bend by Kayla Lim using hot pipe steal bending and hydrowood. (4) Tadao Ando's Dream Chair
3.0
Major Project
Wooden Ribbon Chair
ExLaB
Experimental Design Lab (15) 3.1 Precedent Study
The veneer lamination really gives more potentials to the shapes that designer can achieve. The Loop by Shavendra Goonetillek is made by veneer lamination to allow the shape to have an elegant curve but also increased the strength of a single layer of veneer. The Mobius Chair by Adam Raphael Markowitz is
(1)
also using veneer lamination method to achieve the complex bending process while gives enough strength to the structure.
(2) (1) The Loop by Shavendra Goonetillek is inspired by the "notion of singularity and elegance". (2) Mobius Chair by Adam Raphael Markowitz.
3.0
Major Project
Wooden Ribbon Chair
ExLaB
Experimental Design Lab (16) 3.3 Intial Design Iterations
The initial design was starting with an simple form of combining the twisting timber strip and bent surface. Then the iterations are generated according to the “S” shape from the side view, and to connect the hand rest and legs to be a continuous S curve. The final design decision was decided on the continuous curve connecting the hand rest and the back two legs, while the (1)
(2)
(3)
sitting area connected with the front two legs as a continuous surface.
(4)
3.0
(5)
Major Project
Wooden Ribbon Chair
ExLaB
Experimental Design Lab (17) 3.3.1 Mould experimentation - Steam bending prepration
Before starting the steam bending process, I have researched about the steam bending process and preparation steps. The steam bending process will make the timber exposed to steam and increase the workability to generate curves. However, soaking the timber overnight before steaming it will make the timber much easier to work with. Therefore, all the timber veneers that I did experiments are pre soaking (1)
(2)
(3)
(4)
overnight to be further bending process.
(1) Cut the timber veneer into different thickness to be further experiments. I cut Tasmanian Blackwood, White Oak and American Ash into 2mm and 5mm thick veneer. (2) Put 2 caps of the fabric softener per Gallon to soft the timber. (3) Put all the timber veneer into the tube and the fabric softener and leave it overnight. (4) Steaming the timber veneer according to its thickness. I normally steam them for 2 and half hours.
3.0
Major Project
Wooden Ribbon Chair
ExLaB
Experimental Design Lab (18) 3.3.2 Mould experiment #1 - Steam bending
The first mould that I experimented with is one simple jig which will fix the timber veneer at one end and using the riband to apply even pressure at all places and ensure the timber veneer are bend continuously. After letting it dry for one night, the (1)
(2)
clamps are removed and the timber veneer start to spring back. The clamps leave mark on the timber veneer, and due to the veneer is wider than the riband, the timber veneer have the tendency to curl up at the edges.
(3)
(4) (1) Cut the timber mould and drilling the nail inside to hold the two pieces of timber mould together. (2) Use the riband and clamps to bend the 2mm timber veneer along with the mould after steaming them. (3) Leave it for overnight, and remove the clamps, the timber veneer starts to spring back a little bit. (4) The clamping will leave the mark at the outer strip. (5) The timber veneer is wider than the riband so the timber has the tendency to curl up at the edges.
(5)
3.0
Major Project
Wooden Ribbon Chair
ExLaB
Experimental Design Lab (19) 3.3.2 Mould experiment #1 - Timber Veneer Lamination
After the timber veneer dry, the veneer was taking off to be laminated. The plastic tape was needed to wrap the mould to avoid the timber glued with the mould. The glue needed 24 hours to dry and to be further smooth. The glue result is not as good (1)
(2)
(3)
(4)
as I expected, as the pressure is not even all over the place, which results in the gaps between each layer of timber veneer.
(1) Tape the mould with plastic to avoid the laminated timber glued with the mould. (2) After the overnight drying, apply a thin layer of timber glue and put it back into the mould and hold by clamps. (3) The laminated timber will stay in place after overnight drying. (4) the finished timber strip, the result is not entirely good, the pressure is not even at all surfaces.
3.0
Major Project
Wooden Ribbon Chair
ExLaB
Experimental Design Lab (20) 3.3.3 Mould experiment #2 - Steam bending
The second mould was tested with positive and negative mould which may give enough even pressure at all places. However, when cutting the curved area for timber veneer, the thickness must be very accurate to ensure the even pressure is applied. (1)
(2)
Also, the width of the veneer must be less than the mould, to ensure there is no leakage area of the timber. This attempt was failed due to the mould was twisting due to mould is not fixed vertically, the mould need to be further considered.
(3)
(4) (1) Cut the timber mould with accurate thickness with all area, to make sure the same pressure is applied. (2) After steaming the 5mm thick veneer, put it into the mould and using clamps to tighten the mould. (3) Leave it for overnight and wait for it to completely dry. (4) The 2 hours steam bending process is not enough for the 5mm thick veneer, so the bending edge was starting to crack. (5) The 2mm thick veneer was tested using this mould as well and it start to spring back.
(5)
3.0
Major Project
Wooden Ribbon Chair
ExLaB
Experimental Design Lab (21) 3.3.4 Mould experiment #3 - Steam bending & Lamination This mould was tested to form the shape of the hand resting area. The shape was generated by free hand bending with the fixed at both ends. When bending the timber after steaming it, the curve of each timber will not fit with each other perfectly, which results in lots of gaps in between. The clamps were used to get rid of the gaps, however it will result in the uneven curve shapes of the timber veneer.
(1)
(2)
This happens for the lamination process too, as the gaps needs to be tightened to ensure the lamination is perfect. Therefore, I had two options to solve this problem. The first one would be to bend the timber veneer one by one, and make sure each one has the smooth curve. The second option is to use the bike inner tube to wrap the timber veneer together, just like what Shavendra Goonetillek did by his project ‘The Loop’ with no clamps in the middle part to give a continuous and smooth curve.
(3)
(4)
(1) According to the hand rest area shape that I want to achieve, the timber mould was designed to fix each end of timber. (2) After steam bending the timber, fix the two ends and using serval clamps in between to ensure these is no gaps. (3) After letting it dry overnight, apply a thin layer of timber PVA glue and put them back to the mould. (4) The result of lamination turns out not very good as the curve is not smooth enough due to the usage of clamps.
3.0
Major Project
Wooden Ribbon Chair
ExLaB
Experimental Design Lab (22) 3.4 timber selection After tried three different types of timber, the final decision was landed on the American white oak as it turns out the best steam bending result. Also, the white
(1)
(2)
(3)
oak is hard and heavy considering the sustainability. The color of white oak is really suitable for a modern looked chair with very identical grains.
(4)
(5)
(6)
(1) White Oak timber surface after lamination. (2) Tasmanian Blackwood timber surface after lamination. (3) American Ash timber surface after lamination. (4) White Oak timber surface after smoothing. (5) Tasmanian Blackwood timber surface after smoothing. (6) American Ash timber surface after smoothing.
3.0
Major Project
Wooden Ribbon Chair
ExLaB
Experimental Design Lab (23) 3.5.1 fabrication process design & mould selection
540.00
730.00
400.00
12.00°
60.00
730.00
800.00
Considering the comfort of the users and ergonomics principles, the chair is refined by tilting the sitting area by 12 degree to create a more suitable angle for people to sit on.
60.00 420.00
540.00
800.00
PARTA
The fabrication process divided the chair into 8 parts, with domino joints in between to connect them together, and
PARTC
PARTB
also using another piece of timer at the bottom to connect the seat and hand rest part together.
PARTD
(1) Final design of pabrication parts and process
3.0
Major Project
Wooden Ribbon Chair
ExLaB 3.5.2 Top Leg (part A) mould experimentation
Experimental Design Lab (24)
(3)
(8)
(1)
(4)
(6)
(2)
(5)
(7)
(9)
(1) Test to bend the timber veneer one by one. (2) The final result is good enough, but it will take a lot of time if I want to have 7 layers of the timber veneer. (3) The new mould with the scale 1:2 in rhino. (4) According to the dimension in rhino, to make the actual mould for further testing. (5) Using the bike inner tube to wrap the timber veneer together to ensure there is no gaps in between. (6) The bending in progress using the bike tube. (7) After letting it dry overnight, I get rid of the bike tube to ensure there is enough amount of air to let the timber veneer dry, and the result turns out quite good with really smooth curve. (8) The lamination in progress. As I am using the PVA timber glue, so I cannot have the bike tube wrapping again, as it won’t dry properly. (9) The final result of laminating the timber with hand sanding surface.
3.0
Major Project
Wooden Ribbon Chair
ExLaB
Experimental Design Lab (25) 3.5.2 Top Leg (part A) mould experimentation review
During the bending and lamination process, the timber veneers can not be ensured that touching each other really tight, therefore this will result in some gaps after the lamination process. There are two ways to solve this problem. The first one is using the bike tube to wrap them really tight to get rid of the gaps. Another one is to change the type of glue. The PVA glue is using at this time, however it has less time to set and also not act as a gap filler. The epoxy is decided to use at the end to avoid the gaps and increase the strength of the timber.
3.0
Major Project
Wooden Ribbon Chair
ExLaB 3.5.3 Bottom Leg (part B) mould experimentation
Experimental Design Lab (26)
(3)
(8)
(1)
(4)
(6)
(2)
(5)
(7)
(9)
(1) Considering the time and accuracy of this mould, I submitted the CNC job to make the mould. (2) Nailing the mould together to save time of gluing. (3) Get the soaking timber veneer ready to put it into the mould. (4) The curve looks quite smooth and consistent.(5) Release the clamps and the timber veneer start to spring back.(6) Apply a layer of PVA glue and put it back to the mould.(7) Using the clamps to squeeze the glue out to have enough glue at each layer, but I think I had too much glue this time.(8) Due to the mould did not allow enough air circulation and the glue is too much, the drying process takes 4 days.(9) The glue is still not dry completely, so the creaking is happening at the side.
3.0
Major Project
Wooden Ribbon Chair
ExLaB
Experimental Design Lab (27) 3.5.3 Bottom Leg (part B) mould experimentation review
The same problem happens to this piece as well, as the moulds are touching a lot of surfaces which makes the timber veneer and the PVA glue really hard to dry. Therefore, is necessary to use epoxy glue instead of PVA. Another thing is the timber veneer is tested to not steaming and just soaking them overnight. However, this makes the timber really hard to dry and extend the making time. Therefore, the timber veneer is still decided to steam bended.
3.0
Major Project
Wooden Ribbon Chair
ExLaB 3.5.4 Seating area (part C&D) mould experimentation
Experimental Design Lab (28)
(3)
(8)
(1)
(4)
(6)
(2)
(5)
(7)
(9)
(1) Submit the CNC job to get the mould. (2) Gluing all the mould to one piece. (3) Steaming the timber veneer and the thickness is not even which results in the cup warping of the veneer. (4) I made the same mistake as last time which the veneer is wider than the mould which results in the cracking of the veneer. (5) I cut the veneer again with accurate thickness of 2mm and soaking them. (6) After steaming them, put them into the mould. This time the mould have the timber strips at the top to hold two pieces at flat surface and correct position. (7) After releasing the mould, due to the bending moment of the timer veneer, it results in the leakage in between, but it will solve by using the exopy resin as it will act as a filler. (8) Apply a layer of exopy resin and glue them up using the mould.
3.0
Major Project
Wooden Ribbon Chair
ExLaB
Experimental Design Lab (29) 3.5.4 Seating area (part C&D) mould experimentation review
Due to the timber veneer is soaking overnight and steamed for one hour, the timber will shrink after steaming and then start to have the leakage according to the grain direction. The leakage was glued up by the epoxy glue and it will influence the timber strength, however it will be obvious after sanding it. Therefore the timber veneer is decided to steaming less time for about 30 mins to avoid this happening.
3.0
Major Project
Wooden Ribbon Chair
ExLaB
Experimental Design Lab (30) 3.6 Final design refinement After considering the mould needed for the final production, the shape of the sitting area was adjusted a little bit to make the same curve is apply for both two parts. It will make the mould the same as they are in the same shape, but also the vertical support at the end of the chair legs will be more strong and less deformation when people sit on.
previous shape
3.0
Major Project
new shape
Wooden Ribbon Chair
ExLaB
Experimental Design Lab (31) 3.6.1 Final Production - Glue Selection As the PVA timber glue is requires enough air circulation to dry and I need bike tube to wrap the timber to be tight enough, so PVA is not my best choice. The Epoxy Resin was chosen to be the final glue that will be used, as it requires more assembly time, no air circulation required as it was the chemical reaction. Also, it was the great choice to act as the gap filler, especially for my hand resting part. However it needs extra care on the safety issue as it is toxic, so the gloves are essential when setting up the glue.
3.0
Major Project
Wooden Ribbon Chair
ExLaB
Experimental Design Lab (32) 3.6.2 Final Production - Material Quantity As the veneer curve lamination will results in a lots of waste, the material quantity needs to be considered at least 50% more, each 2.5 mm veneer will needed to be cut at 3mm first and then sanded down, the bandsaw will also take 2mm off. Therefore, I ordered two piece of timber for 245*50*2170 and 250*50*2500 for all my veneers. For these timber I will have 2-3 layer of veneer more for each type, and I order one piece of timber more with my friend for just in case.
3.0
Major Project
Wooden Ribbon Chair
ExLaB
Experimental Design Lab (33) 3.6.3 Final Production - timber color and pattern matching As I ordered two piece of American Oak and they comes with a little bit of color difference, therefore I decided to put the timber veneer with lighter color in the middle to keep the consistency of the outer skin and also gives more special appearance to the chair side views.
3.0
Major Project
Wooden Ribbon Chair
ExLaB
Experimental Design Lab (34) 3.6.4 Final Production - timber knots and defects
Piece 2
3.0
Piece 1
Major Project
When cutting out the timber veneer with the accurate dimention, the timber knots are need to be avoided as it will result creaking. From the image, the knots are avoided to cutout the timber seprately.
Wooden Ribbon Chair
ExLaB 3.7.1 Final Production - Veneer prepration
Experimental Design Lab (35)
(1)
(2)
(3)
(4)
(5)
(6)
(7)
(8)
(9) (10) (11) (12) (1) Calculate the dimensions of the timber veneer. (2) To find the timber grain direction and knots. (3) Measure the exact timber dimensions and mark on the timber for further divisions. Allow 3-5 cm tolerance for each piece of timber. (4) Use the Mitre Saw to cut the timber horizontally for further dressing. (5) Using Planer to get two flat surfaces of each timber. (6) Using Thicknesser to get a consistent thickness of each timber. (7) Label each piece of timber with dressed surfaces. (8) Using band saw to cut the veneer with about 3mm. (9) Using thicknesser to get a flat surface again. (10) Each veneer is sanded to about 2.5mm for further bending and lamination. (11) Allow extra 2-3 piece of timber veneer for backup. (12) Soaking the timber veneer prior the steam bending.
3.0
Major Project
Wooden Ribbon Chair
ExLaB
Experimental Design Lab (36) 3.7.2 Final Production - Veneer production issues When dressing the timber veneer down to about 2.5mm, as the minimum thickness of the thicknesser is about 6mm, the veneer needs to have a higher base to be dressed. However, the thicknesser will eat up the veneer if the timber has the imperfect grain direction. Also, as the timber veneer is wild enough, it will result in the cup warping of the veneer. The bottom of the veneer is not flat, which also results in the defect of the veneer dressing. Therefore, the drum sander is chosen to be dressing the veneer down to the right thickness.
(1) The cup warping of timber veneer. (2) The timber veneer was eaten up by the thicknesser.
3.0
Major Project
Wooden Ribbon Chair
ExLaB
Experimental Design Lab (37) 3.7.3 Final Production - Part A mould options To produce the part A, the mould is designed to fix only at two ends and free bending using hands. It will be unaccepable to control the middle part of the timber as it will influence the smooth shape. The mould have the offset of 2mm aiming to leave some space for the bike rope.
3.0
Major Project
Wooden Ribbon Chair
ExLaB
Experimental Design Lab (38) 3.7.3 Final Production - Part B Mould options The mould for part b is designed to be solid as well to ensure the consistent and even pressure is applied for all the surfaces. The top blocks are used to mark the position of the two pieces of moulds and pressing the two pieces at the flat surface.
3.0
Major Project
Wooden Ribbon Chair
ExLaB
Experimental Design Lab (39) 3.7.3 Final Production - Part C&D Mould options The mould for the seat area is designed as the first image at first, the clamps can be used across the blocks at the outer layer. However, this will not ensure the enough pressure is applied at all the surfaces. Therefore, a more solid mould is also used at this case to get the best result of lamination. previous mould
new mould
3.0
Major Project
Wooden Ribbon Chair
ExLaB 3.7.4 Final Production - Part A
Experimental Design Lab (40)
(1)
(2)
(3)
(4)
(5)
(6)
(7)
(8)
(9)
(10)
(11)
(12)
(1) Submit the CNC file of the mould with the offset of the fixing area and make the mould more accurate. (2) Gluing up all the mould using PVA glue. (3) Nailing the mould together to be stronger. (4) After steaming the timber veneer for 2 hours, steam bending them and using clamps to fix each end. (5) The bike tube is used to tighten the veneers and make sure the minimum gaps are achieved. (6) After leaving it for overnight, release the clamps and make them ready for gluing. (7) Use the Epoxy Resin this time to act as a gap filler as well. (8) Mixed them up with 2 part of the resin and 1 part of the hardener. (9) Using roller to apply an even thin layer of glue onto the veneer. (10) The plastic wrap is used to avoid the direct contact between the glue and the bike tube, and the using the bike tube to wrap at the very outside to add enough pressure and make the glue squeeze out. (11) The epoxy resin was squeezed out at the end. (12) Finished hand resting part.
3.0
Major Project
Wooden Ribbon Chair
ExLaB
Experimental Design Lab (41) 3.7.4 Final Production - Part A refinement The first two image show the lamination process when I was making the first piece. Due to the timber veneer is really hard to band, the clamp is narrower than the veneer, which results in the veneer is receiving uneven pressure and makes the shape
(1)
(2)
has not consistent thickness at the two ends. Also, as I did not clamp the top end at the very edge of the mould, this results in a longer piece than I was planning to make. Therefore, when I was making the second piece, some refinement was made to achieve a better result. The timber blocks are added at the clamping area to ensure the even
(3)
(4)
pressure is applied. And also the clamp at the top end was located at the mirrored position with the first one to ensure the two piece has the same length.
3.0 1.0
Major Project
Wooden Ribbon Chair
ExLaB 3.7.5 Final Production - Part B
Experimental Design Lab (42)
(1)
(2)
(3)
(4)
(5)
(6)
(1) Glueing all the MDF mould toghether with the base supports and top marking blocks. (2) Tape all the contact surfaces with plastic to avoid the exopy glued with the mould. (3) After steaming the timber venneer, put them into the mould using clamps to get the accurate shape. (4) Let it dry overnight, and using the exopy glue for lamination. (5) Mixing the exopy glue with the ratio 1:2. (6) Let it dry for one day to get the final shape.
3.0 1.0
Major Project
Wooden Ribbon Chair
ExLaB
Experimental Design Lab (43) 3.7.5 Final Production - Part B refinement The gluing process is not that successful as the timber did not dry for almost 3 days. However I need the mould for my next piece, so the timber was taking off after 3days. As the glue is not completely dry, the timber starts to spring back and have the gaps between each lamination layers. Luckily, the part I actually need is not getting too many gaps, so I still tried to fix the timber and make it works.
3.0
Major Project
Wooden Ribbon Chair
ExLaB 3.7.6 Final Production - Part C&D
Experimental Design Lab (44)
(1)
(2)
(3)
(4)
(5)
(6)
(7)
(8)
(1) Gluing all the MDF mould together with the base supports and top marking blocks. (2) Tape all the contact surfaces with plastic to avoid the epoxy glued with the mould. (3) put the base support to keep the two pieces at the flat surface. (4) Using the parallel clamps to clamp the mould together. (5) Put the steamed timber veneer into the mould and let it dry overnight. (6) Using the epoxy glue to laminate the veneers again. (7) Make sure the glue have squeezed out which means the adequate glue are applied at all the surfaces. (8) Finished peice.`
3.0
Major Project
Wooden Ribbon Chair
ExLaB
Experimental Design Lab (45) 3.7.6 Final Production - Part C&D refinement The timber veneer was soaking overnight and steamed for about 2-3 hours, this is resulting the timber expand a lot. The timber blocks which are used to mark the position of the two pieces are removed as it will not allow the timber being bended. Therefore, the timber veneer are only soaking for one hour and steamed for one hour to avoid this happening.
3.0
Major Project
Wooden Ribbon Chair
ExLaB
Experimental Design Lab (46) 3.8.1 Final Production - Part A cleaning and sanding The cleaning process for part a is mainly did by the hand sander. The 80-grit sanding paper was used at first to sand out all the Epoxy glue at the outer surface, and then change it to 120 grit to sand all the surface again. The edges are cur out using the table saw and using the clamps to fix it with the cutting plate.
3.0 1.0
Major Project
Wooden Ribbon Chair
ExLaB
Experimental Design Lab (47) 3.8.2 Final Production - Part B cleaning and sanding The cleaning and sanding process for part b is using the metal plate scrapper to get the big piece of glue off the surface, then dressing it using the planer to get a flat surface. After that, the timber is put into the thicknesser to get the consistent and the same thickness of 6mm. The surface will be flat and smooth enough, however it still needs further sanding before the finishing oil.
3.0
Major Project
Wooden Ribbon Chair
ExLaB
Experimental Design Lab (48) 3.8.3 Final Production - Part C&D cleaning and sanding The cleaning process for the part c and d is pretty much the same with the part b, however it will not put into the thicknesser as it is too tall to put into this machine. Therefore, the method is mainly getting a flat surface from the planer, and then using the table saw to cut out the other surface out by using the flat surface as the reference. Then the shape of the seating area are cut out using the bandsaw by hand, and the two ends are cut out using the table saw, and using the printed out drawing to locate the two pieces. It’s been a hard process to cut out all the connection edges with accurate angle, as it will determine the shape of the timber after gluing directly. The edge also cannot be sanded as only the machine can ensure a flat cutting surface for further domino joints are made.
3.0
Major Project
Wooden Ribbon Chair
ExLaB
Experimental Design Lab (49) 3.9 Final Production - Connections (domino joints) Joining all the pieces and aligning them is the hardest part of my final chair. As the timber veneer are soaked and steamed, the timber starts to expend, and when it dries up it will result in a lot of shrinkage and spring back. This makes my pieces cannot be aligned with each other. The way I fixed this was using the domino joints to twist the timber a little bit and make them joined and aligned. However, it is a tricky process when doing the domino joints as all my timber pieces are curved, but the domino machine needs to have flat surface so it can cave out the timber. At this time, serval jigs are made to domino different timber pieces. It is really important to keep the domino joints aligned as it will determine whether the outer surface is consistent or not.
3.0
Major Project
Wooden Ribbon Chair
ExLaB
Experimental Design Lab (50) 3.10 Final Production - Clamping After done with the domino joints, the clamping position needs to be further considered as the joining surface need to have adequate pressure to make sure the joint it strong enough. As all the timber pieces are joining curved, the additional timber blocks are needed to clamp with the timber first, then clamping the timber blocks to apply enough pressure. In this case, the two pieces of seating area was making with the joint of end grain and end grain. After the two parts are glued, joining them horizontally (long grain to long grain) using domino joints to be aligned.
3.0
Major Project
Wooden Ribbon Chair
ExLaB
Experimental Design Lab (51) 3.11 Final Production - finishing (gap filling) Due to the timber have shrinkage and some inadequate pressure were applied during the lamination process, there will Titebond III Ultimate
have some gaps in between the lamination layers. therefore the timber dust is collected and mixed with the Titebond III Ultimate glue to filling the gaps. It will help when the oil is applied to get a smooth timber surface.
3.0
Major Project
Wooden Ribbon Chair
ExLaB 4.6.2 Final Production - sanding and finishing
Experimental Design Lab (52) 3.12 Final Production - Part C&D cleaning and sanding After the gap was filled, all the surfaces need to be sand again using 240-grit sanding paper to ensure these won’t be any obvious scratches after the oil. The finishing oil was selected to use the Evolution Matte which will highlight the grain pattern of the oak and also deepening the timber color.
3.0
Major Project
Wooden Ribbon Chair
ExLaB 3.13 Reflection
Experimental Design Lab (53)
Achieving this chair with such an ambitious shape is not an easy thing to do. The design idea was to push the boundary of timber veneer to see what kind of curve it can achieve. The curve lamination is adding a lot of difficulties to the shape and also the joints. Although the curve lamination achieves quite fancy result, it also involves lots of drawbacks such as a lot of MDF moulds and epoxy glue which is not sustainable enough. After done this final chair, I realized that the design of this chair actually not considering much of the timber techniques. For example, the joints are all curve to curve which will not making the shape and joints accurate enough. All the pieces of this chair are not the same and making the joints not identical and decrease the structure strength. However, I am still very glad that I finally made this, the result turns out a very elegant shape. The more details need to be considered in advance if I have a longer schedule to make the chair next time, such as how to make the joints identical and strong enough. This summertime was really busy but worth it when I finally finished with my chair.
3.0
Major Project
Wooden Ribbon Chair
ExLaB
3.0
Experimental Design Lab (54)
Major Project
Wooden Ribbon Chair
ExLaB
3.0
Experimental Design Lab (55)
Major Project
Wooden Ribbon Chair