
Published May 2021
September 2022
250 Pages, 8.5” x 8.5”
370 Pages, 8.5” x 8.5”
COPYRIGHT 2020 – Auburn University Rural Studio
This publication contains copyrighted images without the direct authorization of the copyright holder. The images were used for educational, nonprofit purposes, constituting a “fair use” of any such materials as provided in Section 107 of the Copyright Law. Whenever Possible, Source Credit is Attributed to the Copyright holder.
For Ophelia
May life bring you countless gifts and all the cabinets you need to put them in.
KITCHEN 32 Introduction 34 Construction Drawings 38 Module Outline 40 Upper Single Cabinet 62 Single Drawer 86 Upper Cabinet Short 1 & 2 114 Lower Double Cabinet BEDROOM 136 Introduction 138 Construction Drawings 140 Module Outline 142 Big Upper Box 162 Upper Cabinet Short 2 INTRODUCTION 01 Rural Studio 02 Ophelia’s Home 04 The Spring Class of 2020 12 The Sring Classs of 2021 PREPARATION 20 Budget 22 Tools / Materials 24 Pre-Assembly CONTENTS
NOOK 194 Introduction 196 Construction Drawings 198 Module Outline 200 Upper Short 226 Drawer UTILITY 250 Introduction 252 Construction Drawings 254 Module Outline 256 Small Upper Box 276 Upper Cabinet Short 3 BATHROOM 304 Introduction 306 Construction Drawings 308 Module Outline 310 Medicine Cabinet CONCLUSION 336 Moving In CONTRUCTION GUIDES (INDEX) 344 Applying Glue / Clamping 346 Using Nail Guns / Using Screws 348 Using Wood Putty / Applying Oil 350 Applying Bucher Block / Applying Wax FINAL REMARKS 352 What We Learned 354 Final Remarks
Dave’s Home Mac’s Home
Home 2OK Product Line Homes
Joanne’s
Rural Studio 2021 16
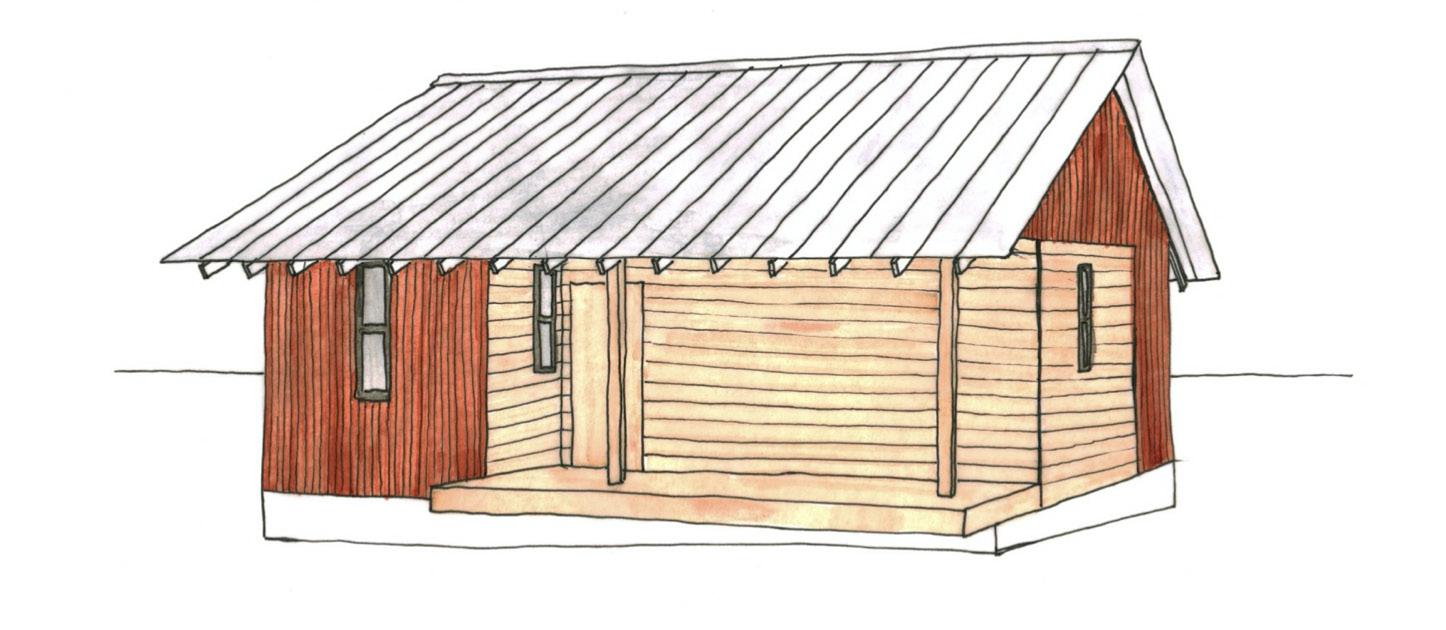
A Sketch of Ophelias Home (Revised Joanne’s Home)
Rural Studio and the 20K House INTRODUCTION
The Rural Studio of Auburn University is one of the most famous design-build architecture programs in the United States. Located in Newbern, Al, the Rural Studio views architecture not merely as a theoretical idea, but as something that can have a real impact on the everyday lives of community members. Because of this mindset, Rural Studio began the 20K housing project in 2004.
one of the moWst famous design-build architecture programs in the United States. Located in Newbern, Alabama, the Rural Studio views architecture not merely as a theoretical idea but as something that can impact the everyday lives of community members. Because of this mindset, Rural Studio began the 20K housing project in 2004.
this year was the cabinetry for our 20k houses. In the past, cabinetry had been purchased from big box stores like IKEA or Lowe’s. The quality of the material was inferior and did not meet our standards of craft and durability. Why settle for that?
spirit, creativity, and passion, the sky doesn’t have to be the limit. Here at the Rural Studio, we are constantly finding new ways to solve old problems.
The 20K housing project is a program in which a team of third-year architecture students build a home for a member of the Newbern community. The goal is to complete the home in two semesters for about $20,000 and built so that it will last over 100 years. This is a lofty goal, but with
The 20K housing project is a program in which a team of third-year architecture students built a home for a member of the Newbern community. The goal is to complete the house in two semesters for about $20,000 and build it to last over 100 years. Here at the Rural Studio, we are constantly finding new ways to solve old problems. One problem we wanted to address
Is it possible to make beautiful, high-quality cabinetry for a lower price than what could be bought in a store? That is what we were determined to find out.
One problem we wanted to address was the cabinetry for our 20k houses. In the past, cabinetry had been purchased from big box stores like IKEA or Lowe’s. The quality of the material was very poor and did not meet our standards of craft and durability. Why settle for that?
Is it possible to make beautiful, high-quality cabinetry for a lower price than what could be bought in a store? That is what we were determined to find out.
A 20K Storage Soloution Ophelia’s Home Introduction 17
1
The Two-Year Journey OPHELIA’S HOME
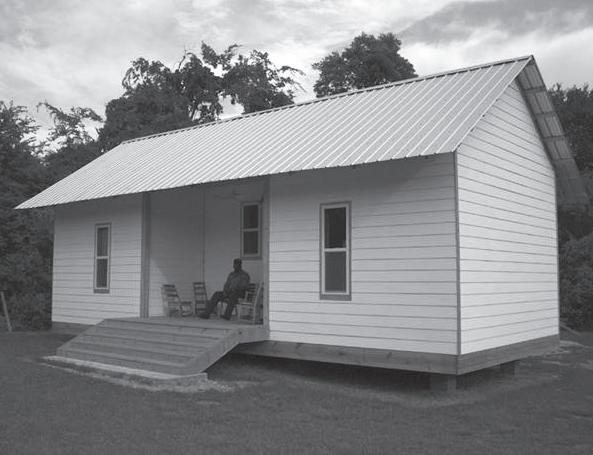
In the Fall of 2019, the first team of students was introduced to our new client, Ms. Ophelia. She lives less than a mile away and across the street from our previous client, Ms. Patrick. Ms. Ophelia has lived in this neighborhood all her life and is a beloved member of the Newbern community. She needed a place for her and her son to live so we decided to adapt a previous 20k home to meet her individual needs.
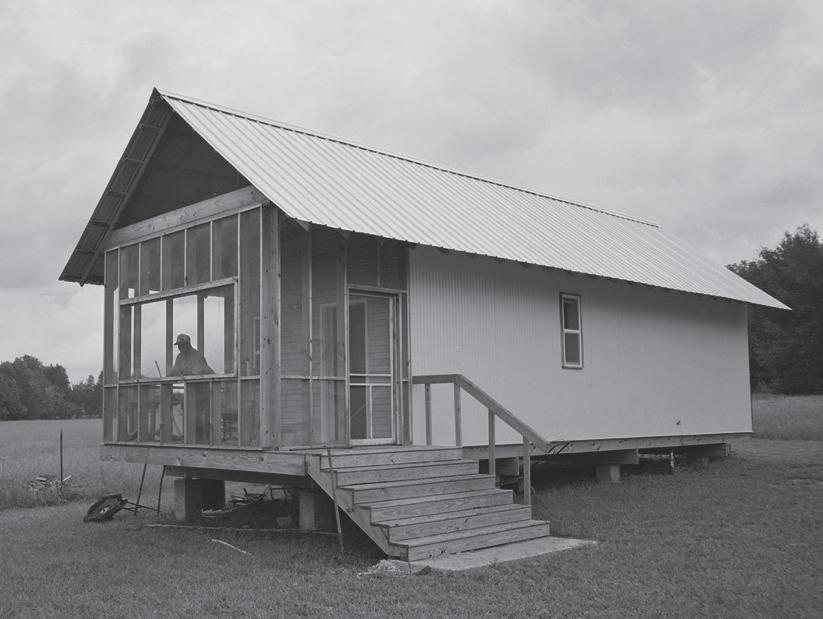
The team of Fall 2020 completed the construction documents and was even able to raise the walls and roof. Over the summer, the house’s foundation had settled and cracked, but this was fixed with helical piers.
with Ms. Ophelia and found that her preference for sleeping in the living room necessitated a new design called the “quarter bedroom.” This quarter bedroom is essentially a nook built into the living room that provides privacy for Ophelia, but also allows her to maintain her current lifestyle.
The Two Year Journey OPHELIAS HOME
The team decided to adapt Joanne’s Home, a project built in 2011. One of Ms. Ophelia’ sons is in a wheelchair, so they altered the plan to include an FHA compliant entrance, kitchen, and bathroom. Also Ms. Ophelia’s preference for sleeping in her living room prompted the idea of a “quarter bedroom.” This quarter bedroom is essentially a nook built into the living room that provides privacy for Ms. Ophelia, while also allowing her to maintain her current lifestyle.
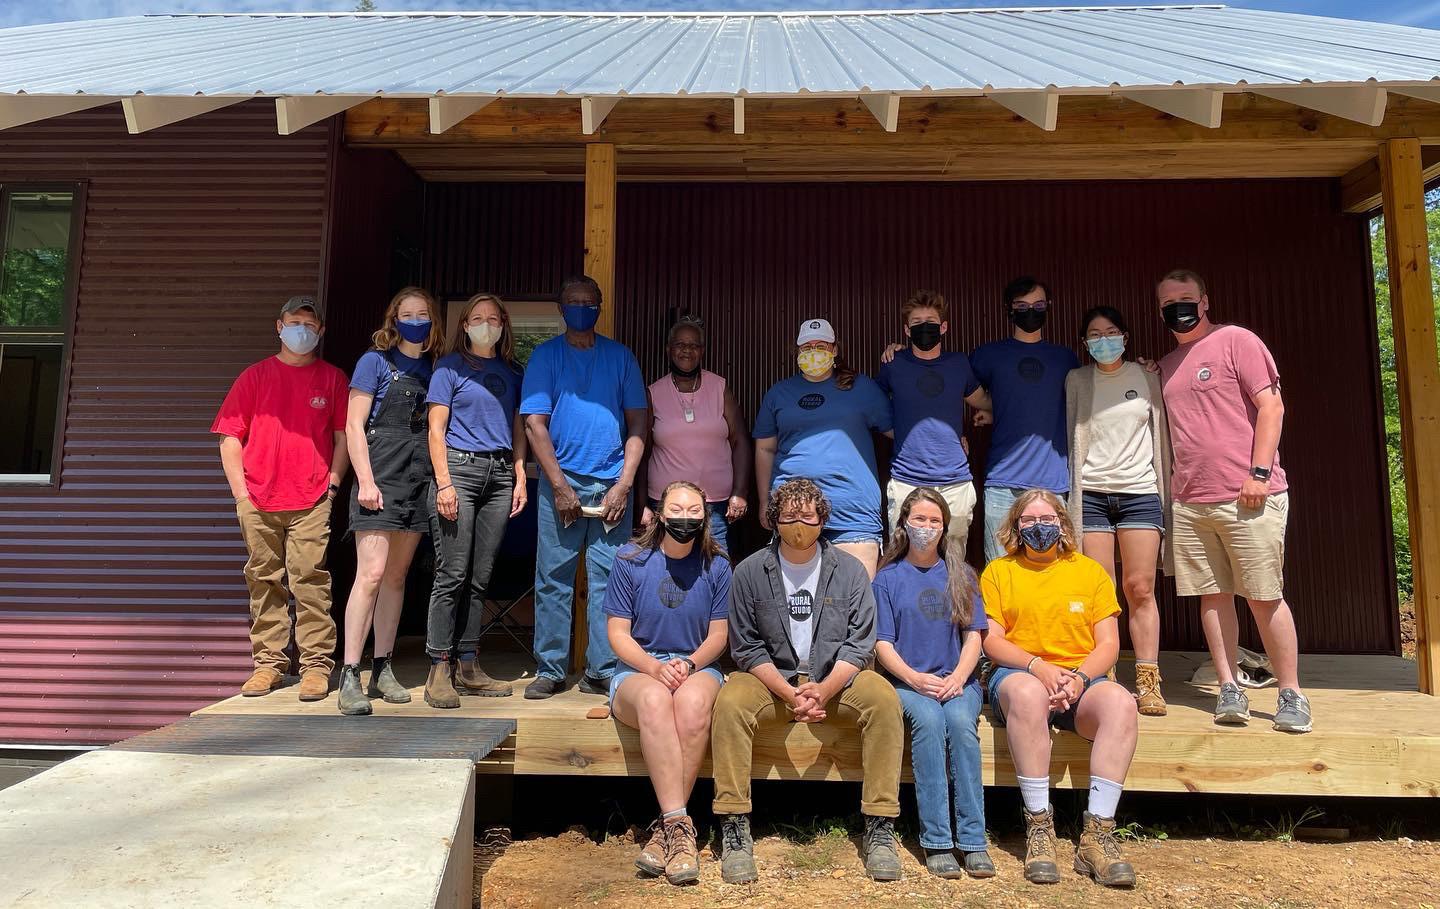
The team of Fall 2020 made great strides in putting our team in a position to complete the house. Our team of Spring 2021 had nine members divided into three groups of three: the Enclosures team, the Interiors team, and the Mechanical/Electrical/Plumbing team. We began with four walls and a roof, but by the end of the semester, we were able to give her the keys to a fully-completed home filled with cabinets designed and crafted with our own hands.
Then came the Spring team of 2020. This team was tasked breaking ground and building the foundation. Due to the covid pandemic, initial plans were interrupted. However, they took the set back as an opportunity to get a head start on the design work for the next team. They even began a proposal for creating customized cabinetry for Ophelia’s home – an idea which sparked the creation of this book.
The team of Fall 2020 completed the construction documents and was even able to raise the walls and roof. Over the summer, the house’s foundation had settled and cracked, but this was fixed with helical piers.
In the Fall of 2019, the first team of students was introduced to our new client, Ms. Ophelia. She lives less than a mile away and across the street from our previous client, Ms. Patrick. Ms. Ophelia has lived in this neighborhood all her life and is a prominent* member of the Newbern community. She needed a place for her and her son to live so we decided to adapt a previous 20k home to meet her individual needs.
Then came the team of Spring 2020. This team was tasked with breaking ground and building the foundation. Due to the covid pandemic, initial plans were interrupted. However, this team took the setback as an opportunity to develop the design drawings for the next team. They even began a proposal for creating customized cabinetry for Ophelia’s home – an idea which sparked the creation of this book.
The house that the team decided to adapt was Joanne’s home from a project built in 2011. One of her sons is in a wheelchair, so the plan was altered to include an FHA compliant entrance, kitchen, and bathroom. They also talked
The team of Fall 2020 made great strides in putting our team in a position to complete the house. Our team of Spring 2021 had nine members and we divided into three groups of three: the Enclosures team, the Interiors team, and the Mechanical/Electrical/Plumbing team. We began with four walls and a roof, and by the end of the semester, with only minor setbacks, we were able to give her the keys to a fully-completed home with cabinetry designed and crafted with our own hands.
2021 18 Rural Studio
2
 Joanne’s Home Ophelia’s Home
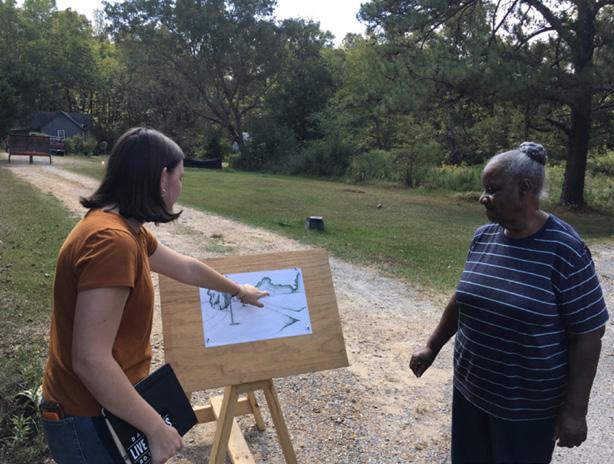
Anna Clair showing ophelia some schematic design sketches.
Joanne’s Home Ophelia’s Home
Anna Clair showing ophelia some schematic design sketches.
A 20K Storage Soloution Ophelia’s Home Introduction 19
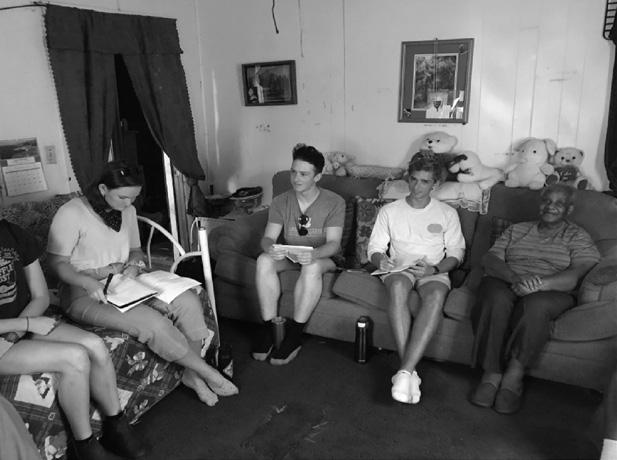
The fall of 2019 class visiting Ophelia’s home.
Anna Claire showing Ms. Ophelia schematic design sketches.
3
The Fall Team of 2019 visiting Ms. Ophelia’s old home.
TEAM OF 2020
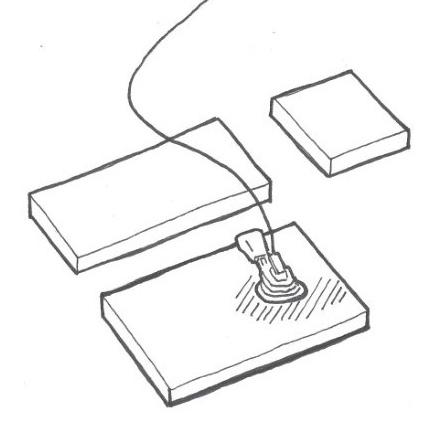
Using the CNC Router THE SPRING CLASS OF 2020
The team of Spring 2020 began by designing the first iteration of cabinetry for Ms. Ophelia’s Home. They divided into teams based on rooms and each team created a very customized and individualized design. Through their budget calculations, they theorized that the challenge was feasible– there was a possibility that we could build high-quality cabinets for less than what could be purchased from Lowe’s or Ikea. After this discovery, the team experimented with the idea of using a CNC router and integrated handles. Even though they were interrupted by the pandemic, this team was able to produce a mock-up of their design and a preliminary manual for the budget and construction.
the iteration of cabinetry for Ms. Ophelia’s Home. Each team created a very customized design for each designated room. After running budget calculations, they theorized that the challenge was feasible. There was a possibility that we could build highquality cabinets for less than what could be purchased from Lowe’s or Ikea. After this discovery, the team experimented with the idea of using a CNC router and integrated handles. Even though they were interrupted by the pandemic, this team was able to produce a mock-up of their design and a preliminary manual for the budget and construction.
2021 20 Rural Studio
4


 Jooyoung Lim South Korea
Jasvandhan (Jay) Coimbatore Upendranath Coimbatore Tamil Nadu, India
Hannah Moates Ozark, AL
Elizabeth Brandebourg Auburn, AL
Shijin Ding Qingdao, China
Jackie Rosborough Deerfield, IL
Adam Boutwell Bay Minette, AL
Luke Killough Huntsville, AL
Alex Harvill Tampa, FL
Lauren Deck Aurora, IL
Daniel Burton Prattville, AL
Jooyoung Lim South Korea
Jasvandhan (Jay) Coimbatore Upendranath Coimbatore Tamil Nadu, India
Hannah Moates Ozark, AL
Elizabeth Brandebourg Auburn, AL
Shijin Ding Qingdao, China
Jackie Rosborough Deerfield, IL
Adam Boutwell Bay Minette, AL
Luke Killough Huntsville, AL
Alex Harvill Tampa, FL
Lauren Deck Aurora, IL
Daniel Burton Prattville, AL
A 20K Storage Soloution Ophelia’s Home Introduction 21 5
Elle Whitehurst Peachtree City, GA
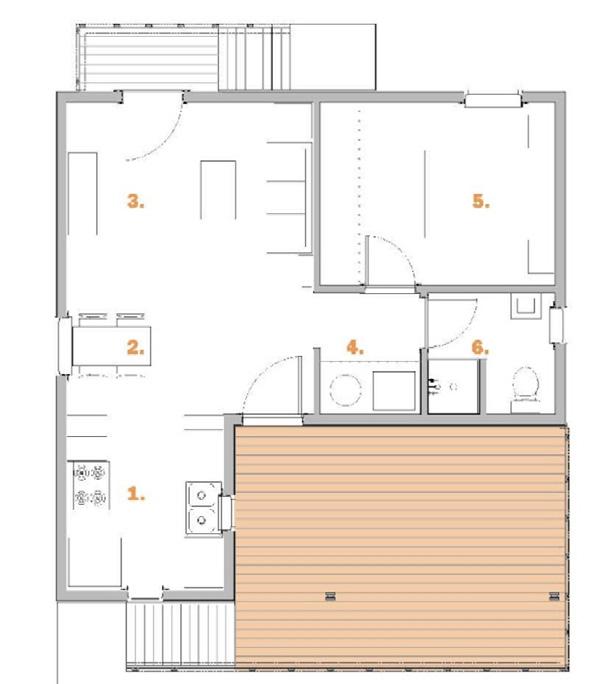
Kitchen 2021 22 Rural Studio 6
Bedroom A 20K Storage Soloution Ophelia’s Home Introduction 23 7
Nook Rural Studio 2021 24 8

Utility A 20K Storage Soloution Ophelia’s Home Introduction 25 9
Rural Studio 2021 10
Bathroom
A 20K Storage Soloution Ophelia’s Home Introduction 27
The Spring Class of 2021
THE SPRING TEAM OF 2021
Using the Table Saw
Our team of Spring 2021 took what they started and ran with it. We decided that we needed a more cohesive design that would not only simplify construction, but also create a unifying language more appropriate for such a small house.
built on the ideas from the previous team. We decided that we needed a more cohesive design that would not only simplify construction, but also create a unified language more appropriate for such a small house.
We began by re-designing the cabinetry for Ms. Ophelia. The cabinets were designed to meet her individual needs but were also standardized so they could be used for future homes or other organizations such as Front Porch Initiative.
We began by re-designing the cabinetry for Ms. Ophelia. The cabinets were designed to meet her individual needs, but were also standardized so they could be used for future homes or other organizations such as Front Porch Initiative.
As for construction, we wanted to experiment with using only the tools we had on site. This meant precisely cutting everything by hand using a plunge saw and table saw. This also meant abandoning the idea of integrated handles. After multiple iterations of handrouted handles, we decided that additional cabinetry hardware was necessary for timeefficiency, aesthetics, and durability.
We grouped ourselves into teams based on our strengths and created an assembly line for the most efficient means of production. With passion, determination, and countless consecutive 14-hour workdays, we were finally able to accomplish our goal. We had created a house full of beautifully crafted cabinets at a lower price and higher quality than what is available on the market. We are making big strides here at Rural Studio and proving that nothing can get in the way of hard work, determination, and good design.
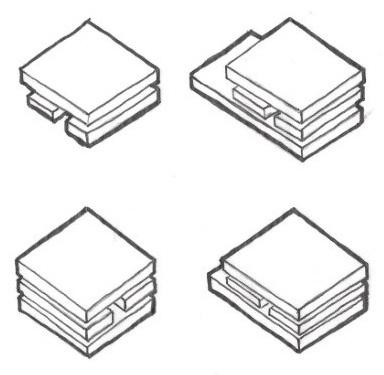
The goal was to create a module that could be utilized and adapted throughout the entire house. For example, the needs of the bathroom cabinetry are different from those of the kitchen, so that module was modified accordingly to fit those needs.
The goal was to create a module that could be utilized and adapted throughout the entire house. For example, the needs of the bathroom cabinetry are different from those of the kitchen, so the bathroom module was modified accordingly.
The module made things simple. It gave us something to reference back to…a standard. All cabinets were designed to hang at the same datum, but their heights vary according to the function of the space.
The module concept made things simple. It gave us something to reference…a standard. All cabinets were designed to hang at the same datum, but their heights vary according to the function of the space.
As for construction, we wanted to experiment with using only the tools we had on site. This meant precisely cutting everything by hand using a plunge saw and table saw. This also meant abandoning the idea of integrated handles. After multiple iterations of hand-routed handles, we decided that additional cabinetry hardware was necessary for time efficiency, aesthetics, and durability.
We grouped ourselves into teams based on our strengths and created an assembly line for the most efficient means of production. With passion, determination, and many consecutive 14-hour workdays, we were finally able to accomplish our goal. We had created a house full of beautifully-crafted cabinets at a lower price and higher quality than what is available on the market. Here at Rural Studio, we are proving that nothing can get in the way of hard work, determination, and quality design.
2021 28 Rural Studio


 Sadie McIntyre Rogersville, AL
Wendy Webb Hazel Green, AL
Logan Lee Decatur, AL
Kirby Spraggins Southlake, TX
Austin Black Birmingham, AL
Drew Haley Smith Auburn, AL
James Foo Marietta, GA
Juyeon Han South Korea
Sadie McIntyre Rogersville, AL
Wendy Webb Hazel Green, AL
Logan Lee Decatur, AL
Kirby Spraggins Southlake, TX
Austin Black Birmingham, AL
Drew Haley Smith Auburn, AL
James Foo Marietta, GA
Juyeon Han South Korea
A 20K Storage Soloution
Home Introduction 29
Ashley Wilson Wetumpka, AL
Ophelia’s
Sadie McIntyre Rogersville, AL
Wendy Webb Hazel Green, AL
Logan Lee Decatur, AL
Kirby Spraggins Southlake, TX
Austin Black Birmingham, AL
Drew Haley Smith Auburn, AL
James Foo Marietta, GA
Juyeon Han South Korea
Ashley Wilson Wetumpka, AL

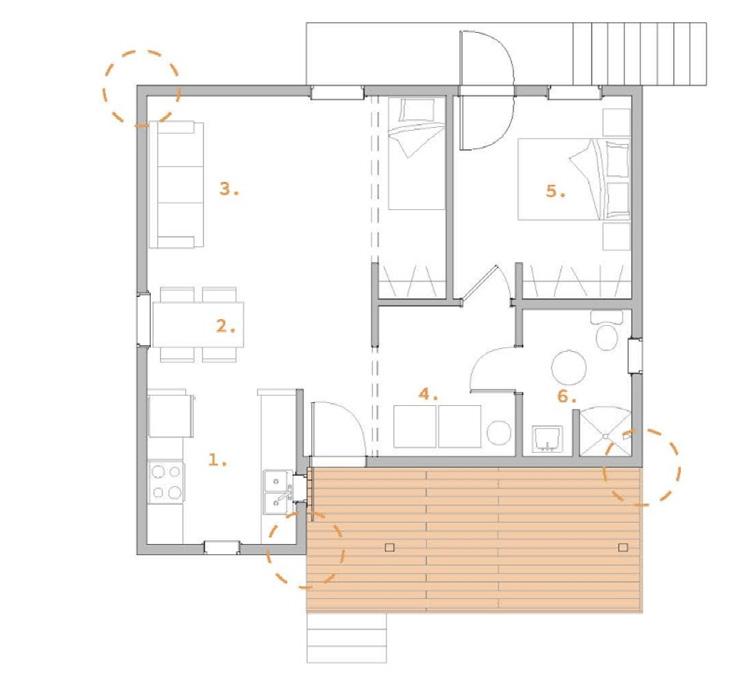
Kitchen Rural Studio 2021 30
Bedroom A 20K Storage Soloution Ophelia’s Home Introduction 31
Nook Rural Studio 2021 32
Utility A 20K Storage Soloution Ophelia’s Home Introduction 33 17
Rural Studio 2021 18

A 20K Storage Soloution Ophelia’s Home Introduction 35
Bathroom
BUDGET
* The material price on our shopping list exceeded the projected amount due to extra materials purchased for mockup cabinets.
COST PER ROOM Lowe's Ikea Ours Kitchen 931.00 $ 923.00 $ 1,166.12 $ Utility 296.00 $ 282.00 $ 239.12 $ Nook 676.00 $ 600.00 $ 368.58 $ Bedroom 150.00 $ 150.00 $ 146.56 $ Bathroom 50.00 $ 60.00 $ 83.28 $ Total 2,103.00 $ 2,015.00 $ $ 2 , 0 0 3 . 6 6 Ikea/Lowes Comparison Cost Per Module Cost Per Room $1,542.00 $1,518.00
TOTAL TOTAL Ikea Ikea Lowe’s Lowe’s Ours
$2,003.66 $2,103.00 $2,015.00
C OST PER MODU L E Ikea Lowe's Upper Single Kitchen 81.00 $ 91.00 $ Upper Double Utility 111.00 $ 123.00 $ Upper Double Nook 100.00 $ 123.00 $ Upper Double Bedroom 100.00 $ 100.00 $ Upper Fridge 100.00 $ 99.00 $ Upper Oven 100.00 $ 99.00 $ Upper Bathroom 50.00 $ 50.00 $ Lower Double 118.00 $ 119.00 $ Lower Drawer Kitchen 122.00 $ 111.00 $ Lower Drawer Nook 500.00 $ 553.00 $ Open Shelves 60.00 $ 50.00 $ T OT AL 1,542.00 $ 1,518.00 $ C OST PER MODU L E Ikea Lowe's Upper Single Kitchen 81.00 $ 91.00 $ Upper Double Utility 111.00 $ 123.00 $ Upper Double Nook 100.00 $ 123.00 $ Upper Double Bedroom 100.00 $ 100.00 $ Upper Fridge 100.00 $ 99.00 $ Upper Oven 100.00 $ 99.00 $ Upper Bathroom 50.00 $ 50.00 $ Lower Double 118.00 $ 119.00 $ Lower Drawer Kitchen 122.00 $ 111.00 $ Lower Drawer Nook 500.00 $ 553.00 $ Open Shelves 60.00 $ 50.00 $ T OT AL 1,542.00 $ 1,518.00 $ 2021 36 Rural Studio
$1,542.00 $1,518.00 TOTAL
*Our Shopping List
*Some materials were left-over. See Cost per Room chart for total cost of cabinets.
*Some materials were left-over. See Cost per Room chart for total cost of cabinets.
TOTAL
Price Total Quantity SHOPPI NG L I ST I T EM Pr i ce Qua nt i t y T o t a l Multi-surface Painter's Tape $31.98 2 packs of 9 $63.96 Oil and Cleaning Rags $12.98 3 $38.94 Orbital Sanding Paper 220 Grit $9.98 1 $9.98 Sandpaper Sheets 220, 320, 400 grit $11.97 2 $23.94 Minwax Wood Putty (match plywood) $3.68 1 $3.68 3/4" Baltic Birch Plywood $52.00 25 $1,300.00 1/4" Baltic Birch Plywood $24.50 5 $122.50 1" Brad Nails 18 Gauge $5.98 1 box of 1000 $5.98 1 1/2" Brad Nails 18 Gauge $7.08 1 box of 1000 $7.08 Pro Compact Face Frame Press-in Hinge $1.16 40 $46.40 22" Pro 100 Super Rail Soft-Close Drawer Slides $9.69 20 $193.80 3/4" Mounting Screws for Doors and Drawer Slides $4.78 2 boxes of 100 $9.56 1" Mounting Screws for Drawer Slides $4.78 2 boxes of 100 $9.56 Matte Black Square Door Pulls $6.96 30 $208.80 Tung Oil Finish 16 oz. $10.98 6 $65.88 Butcher Block 16 oz. $12.98 2 $25.96 Paste Finishing Wax 454 grams $9.98 2 $19.96 1/2"-3/4" Paint Brushes $3.48 2 packs of 3 $6.96 Door Stops T OT AL : $ 2 , 1 6 2 . 9 4
$2,162.94
SHOPPI NG L I ST I T EM Pr i ce Qua nt i t y T o t a l Multi-surface Painter's Tape $31.98 2 packs of 9 $63.96 Oil and Cleaning Rags $12.98 3 $38.94 Orbital Sanding Paper 220 Grit $9.98 1 $9.98 Sandpaper Sheets 220, 320, 400 grit $11.97 2 $23.94 Minwax Wood Putty (match plywood) $3.68 1 $3.68 3/4" Baltic Birch Plywood $52.00 25 $1,300.00 1/4" Baltic Birch Plywood $24.50 5 $122.50 1" Brad Nails 18 Gauge $5.98 1 box of 1000 $5.98 1 1/2" Brad Nails 18 Gauge $7.08 1 box of 1000 $7.08 Pro Compact Face Frame Press-in Hinge $1.16 40 $46.40 22" Pro 100 Super Rail Soft-Close Drawer Slides $9.69 20 $193.80 3/4" Mounting Screws for Doors and Drawer Slides $4.78 2 boxes of 100 $9.56 1" Mounting Screws for Drawer Slides $4.78 2 boxes of 100 $9.56 Black Square Door Pulls $6.96 30 $208.80 Tung Oil Finish 16 oz. $10.98 6 $65.88 Butcher Block 16 oz. $12.98 2 $25.96 Paste Finishing Wax 454 grams $9.98 2 $19.96 1/2"-3/4" Paint Brushes $3.48 2 packs of 3 $6.96 Door Stops T OT AL : $ 2 , 1 6 2 . 9 4
A 20K
Home Budget 37
Our Shoping List
Storage Soloution Ophelia’s
21
Tools
Drill Orbital Sander Pocket Hole
Sandpaper Rags Pencil and
Rural Studio 2021 38
Table Saw Circular Saw Nail Gun Glue Staple Gun Clamps
Jig
Tape Measure Brush
A 20K Storage Soloution Ophelia’s Home Materials 1½” 1” 1” 1¼” ¾” ¼” Table Router Square 18 Gauge Brad Nails 1 .5 Inch 18 Gauge Brad Nails 1 Inch Staples 1 Inch Pocket Screws 1 .25 Inch Russian Birch 0.75 Inch Russian Birch 0.25 Inch Tung Oil Finishing Wax Sliders Hinges Brush Container A 20K Storage Soloution Ophelia’s Home Process Drawings 39 Materials 1½” 1” 1” 1¼” ¾” ¼” Table Router Square 18 Gauge Brad Nails 1 .5 Inch 18 Gauge Brad Nails 1 Inch Staples 1 Inch Pocket Screws 1 .25 Inch Russian Birch 0.75 Inch Russian Birch 0.25 Inch Tung Oil Finishing Wax Sliders Hinges Brush Container A 20K Storage Soloution Ophelia’s Home Process Drawings 39 Materials ¼” Table Router 18 Gauge Brad Nails 1 .25 Inch Tung Oil Finishing Wax A 20K Storage Soloution Materials 1½” 1” 1” 1¼” ¾” ¼” Table Router Square 18 Gauge Brad Nails 1 .5 Inch 18 Gauge Brad Nails 1 Inch Staples 1 Inch Pocket Screws 1 .25 Inch Russian Birch 0.75 Inch Russian Birch 0.25 Inch Tung Oil Finishing Wax Sliders Hinges Brush Container A 20K Storage Soloution Process Drawings 39 Drawings 23

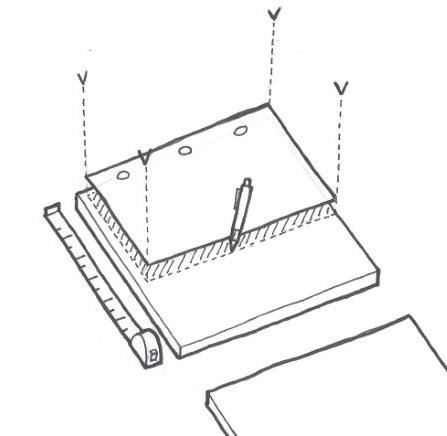
 1. Measure dimensions of the kitchen space
Rural Studio 2021 40
2. Design and draw space in AutoCAD
Before The Fun PRE-ASSEMBLY
Before The Fun PRE-ASSEMBLY
1. Measure dimensions of the kitchen space.
2. Design and draw space in AutoCAD.
 3. Breakdown kitchen and jig components into assembly pieces
A 20K Storage Soloution Ophelia’s Home Process Drawings 41
4. Gather sheets of birch plywood from the shop 3 (3/4”) 1 (1/2)
3. Organize kitchen and jig components into assembly pieces.
Drawings 25
4. Gather three 3/4” plywood sheets and one 1/2” plywood sheet.
 5. Plot out jig and assembly designs on a 1/1 drawing
Rural Studio 2021 42
6. Transfer Cut lines onto plywood
5. Plot out jig and assembly designs at a 1;1 scale drawing.
6. Transfer Cut lines onto plywood.
 7. Use table saw to cut the plywood into cabinet comonents
A 20K Storage Soloution Ophelia’s Home Process Drawings 43
8. Sand the individual plywood pieces with the orbital sander.
7. Use table saw to cut the plywood into cabinet comonents.
Drawings 27
8. Sand the individual plywood pieces with the orbital sander
Rural Studio 2021 44
9. Organize and lable pieces into cabinet components
9. Label and organize cabinet components.
A 20K Storage Soloution Ophelia’s Home Process
45
Drawings
Drawings
KITCHEN
KITCHEN
Sub-Header
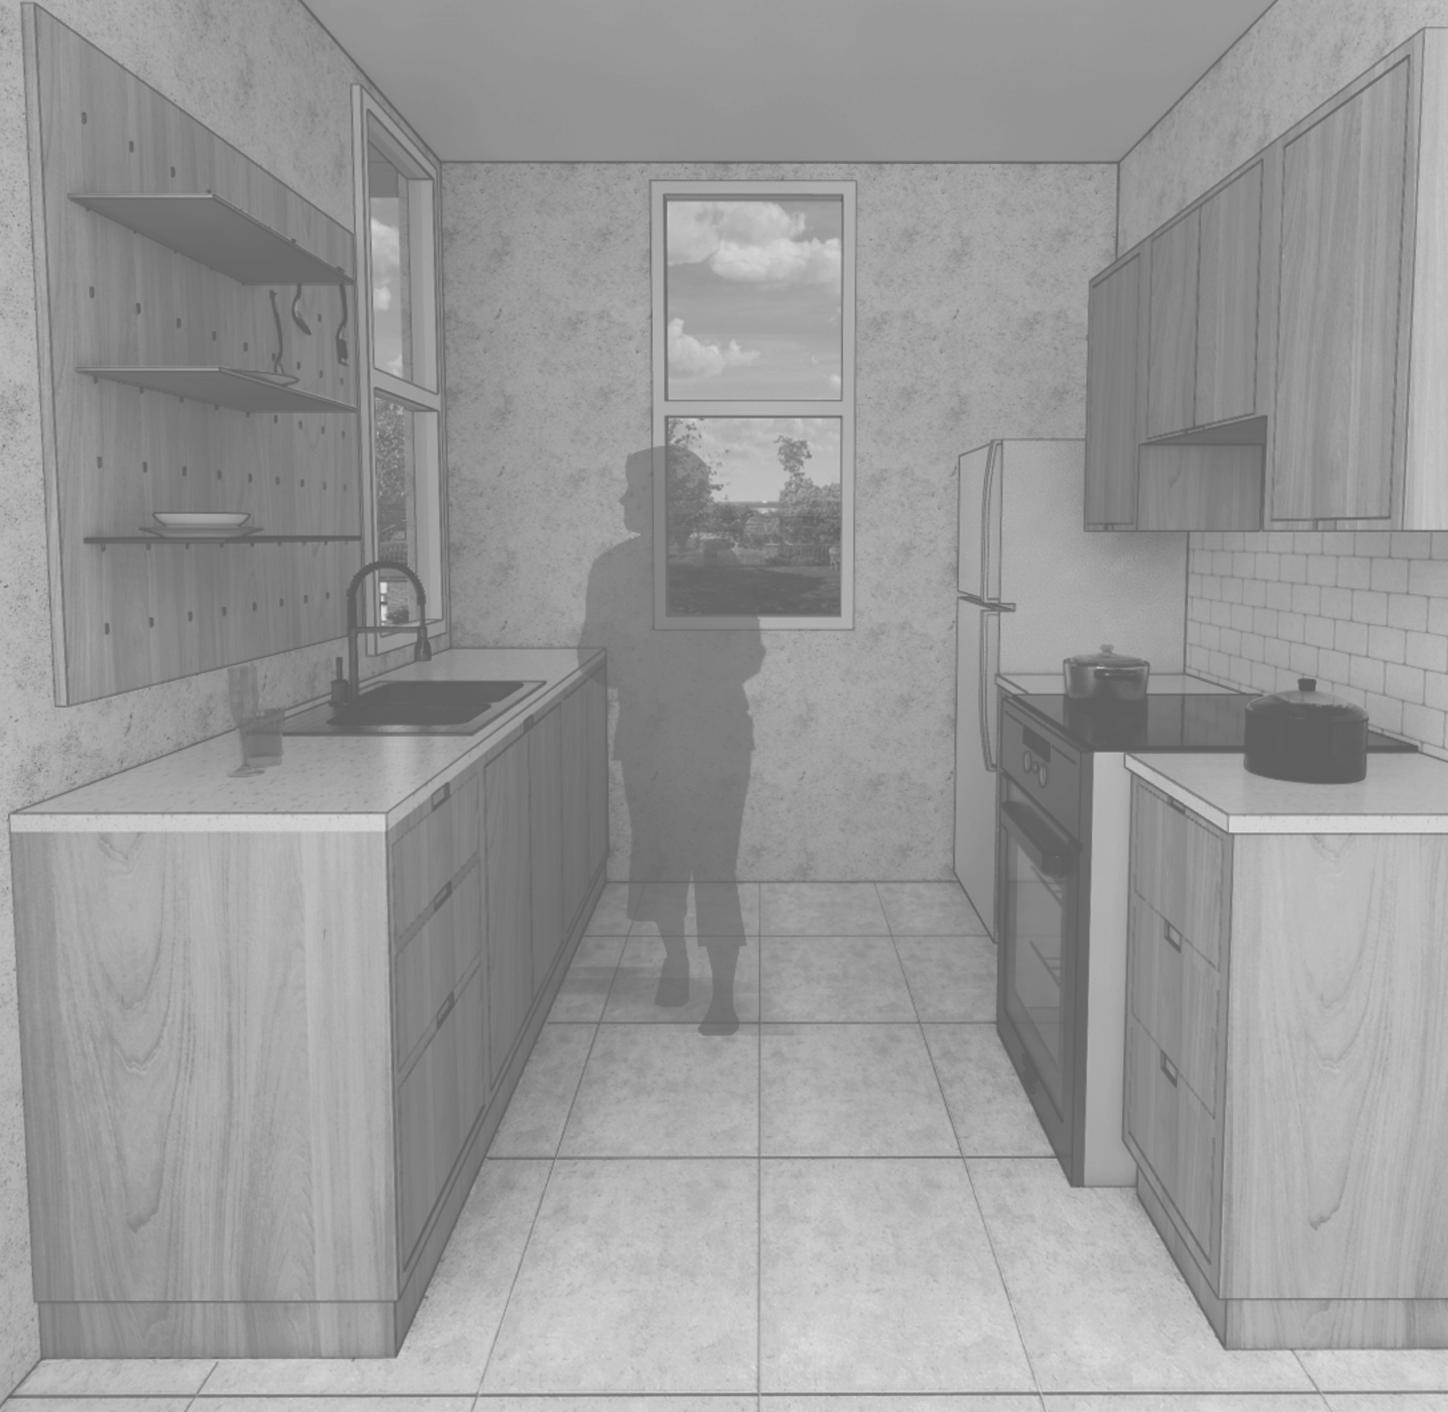
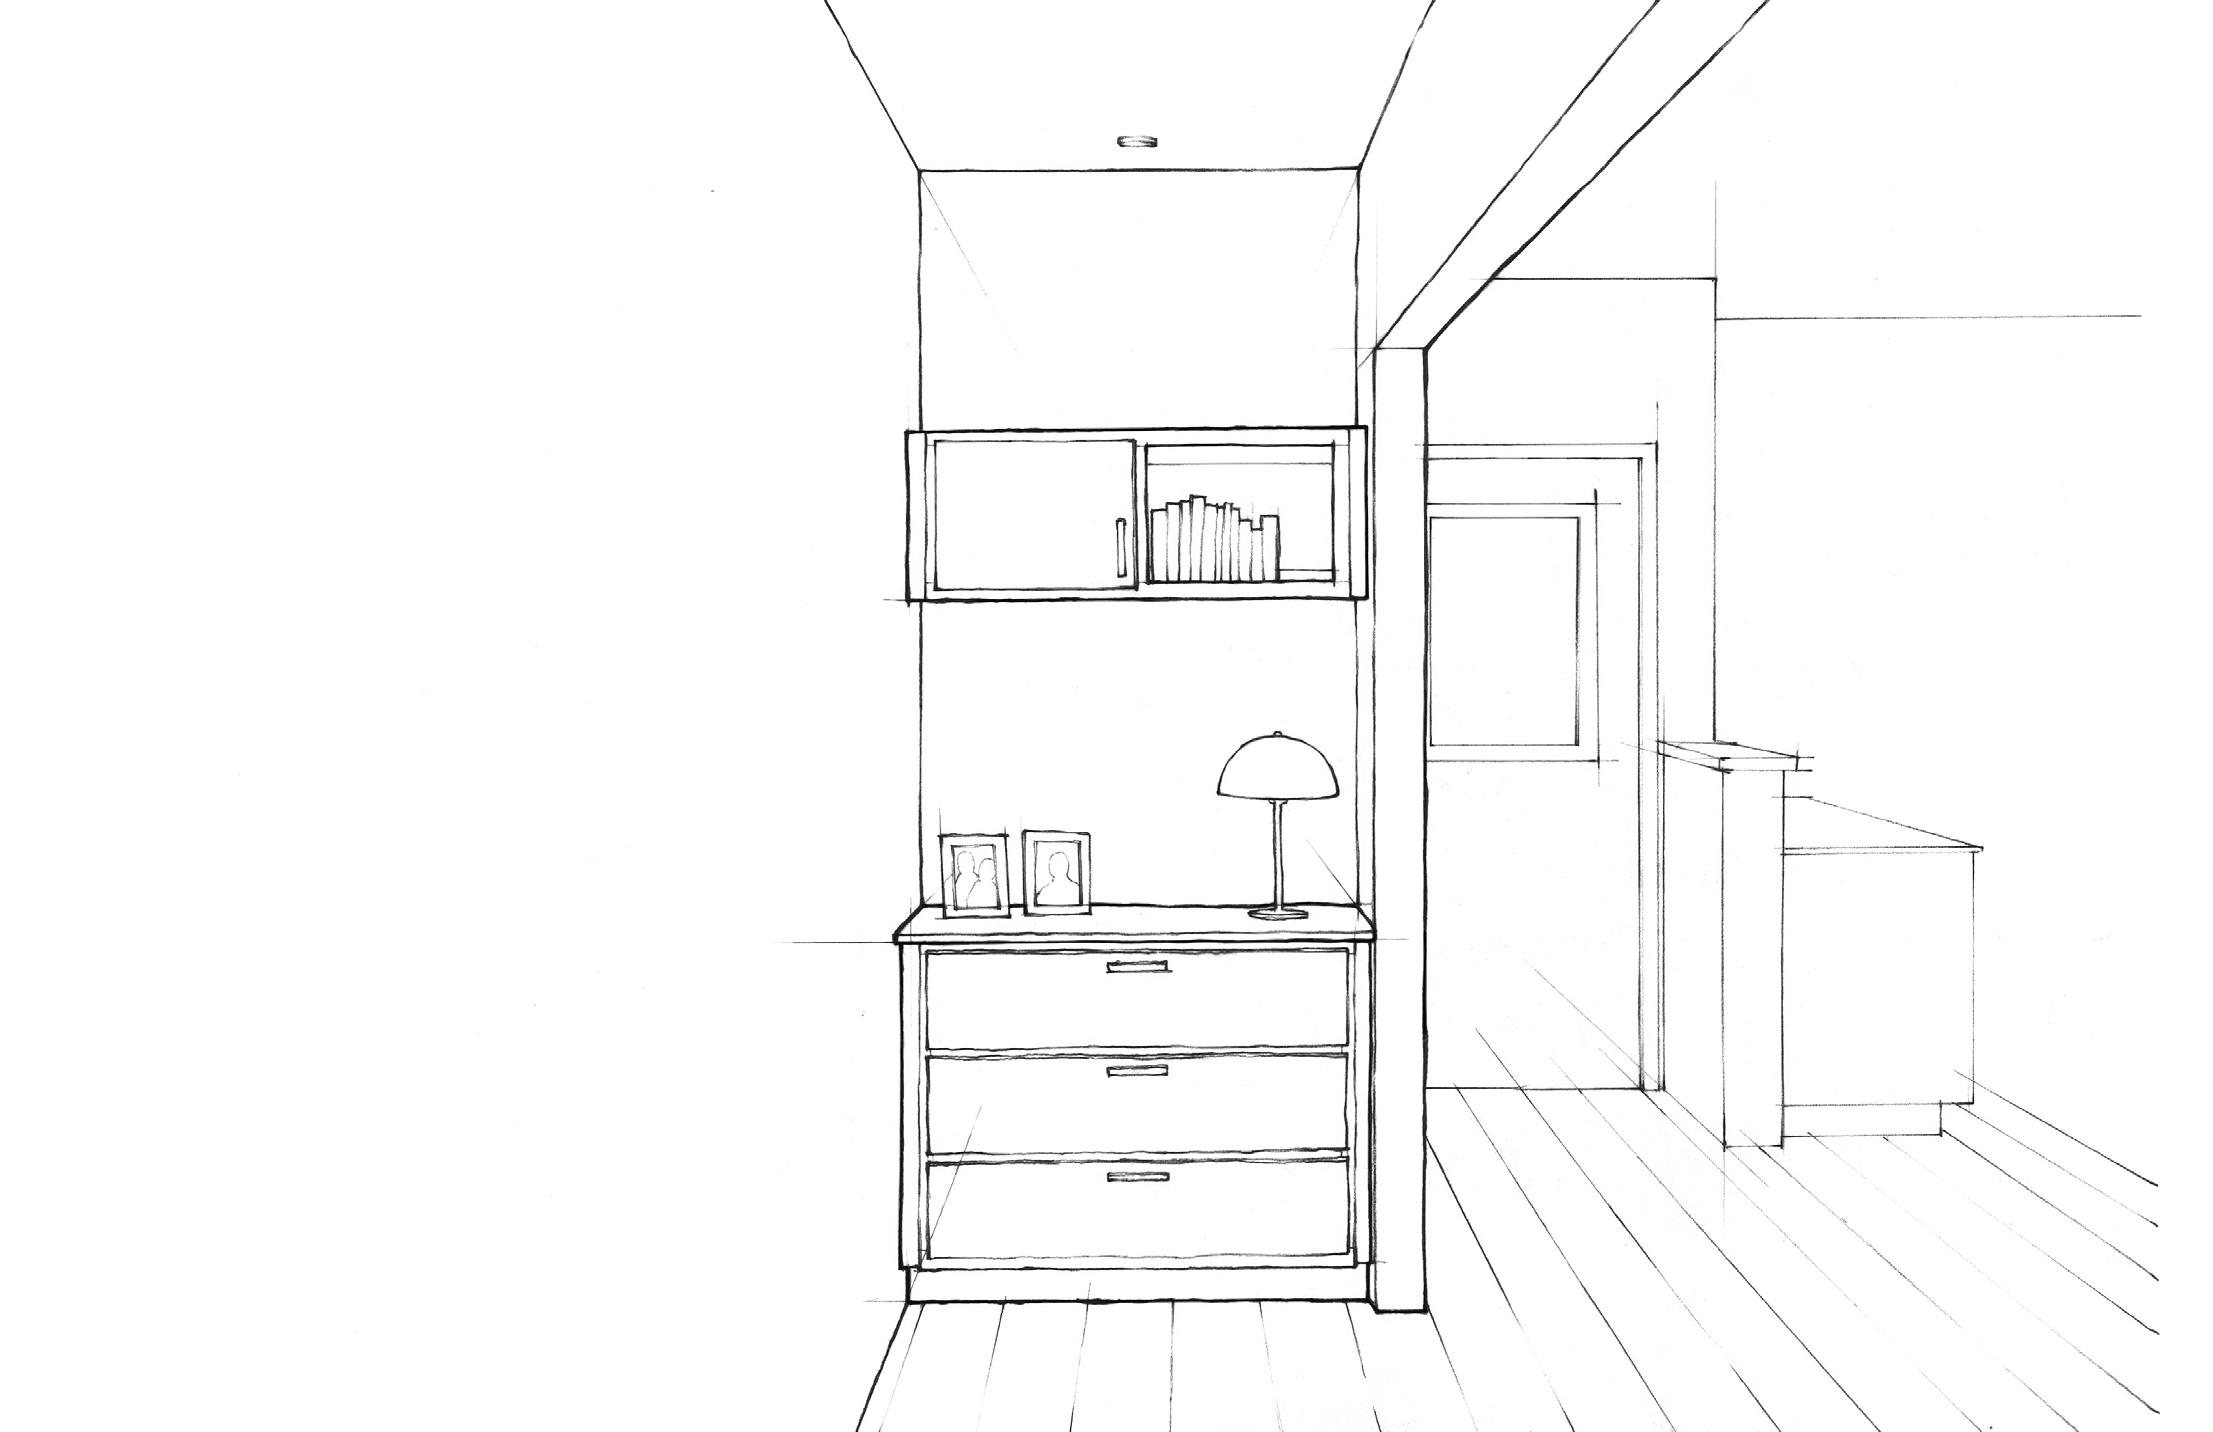
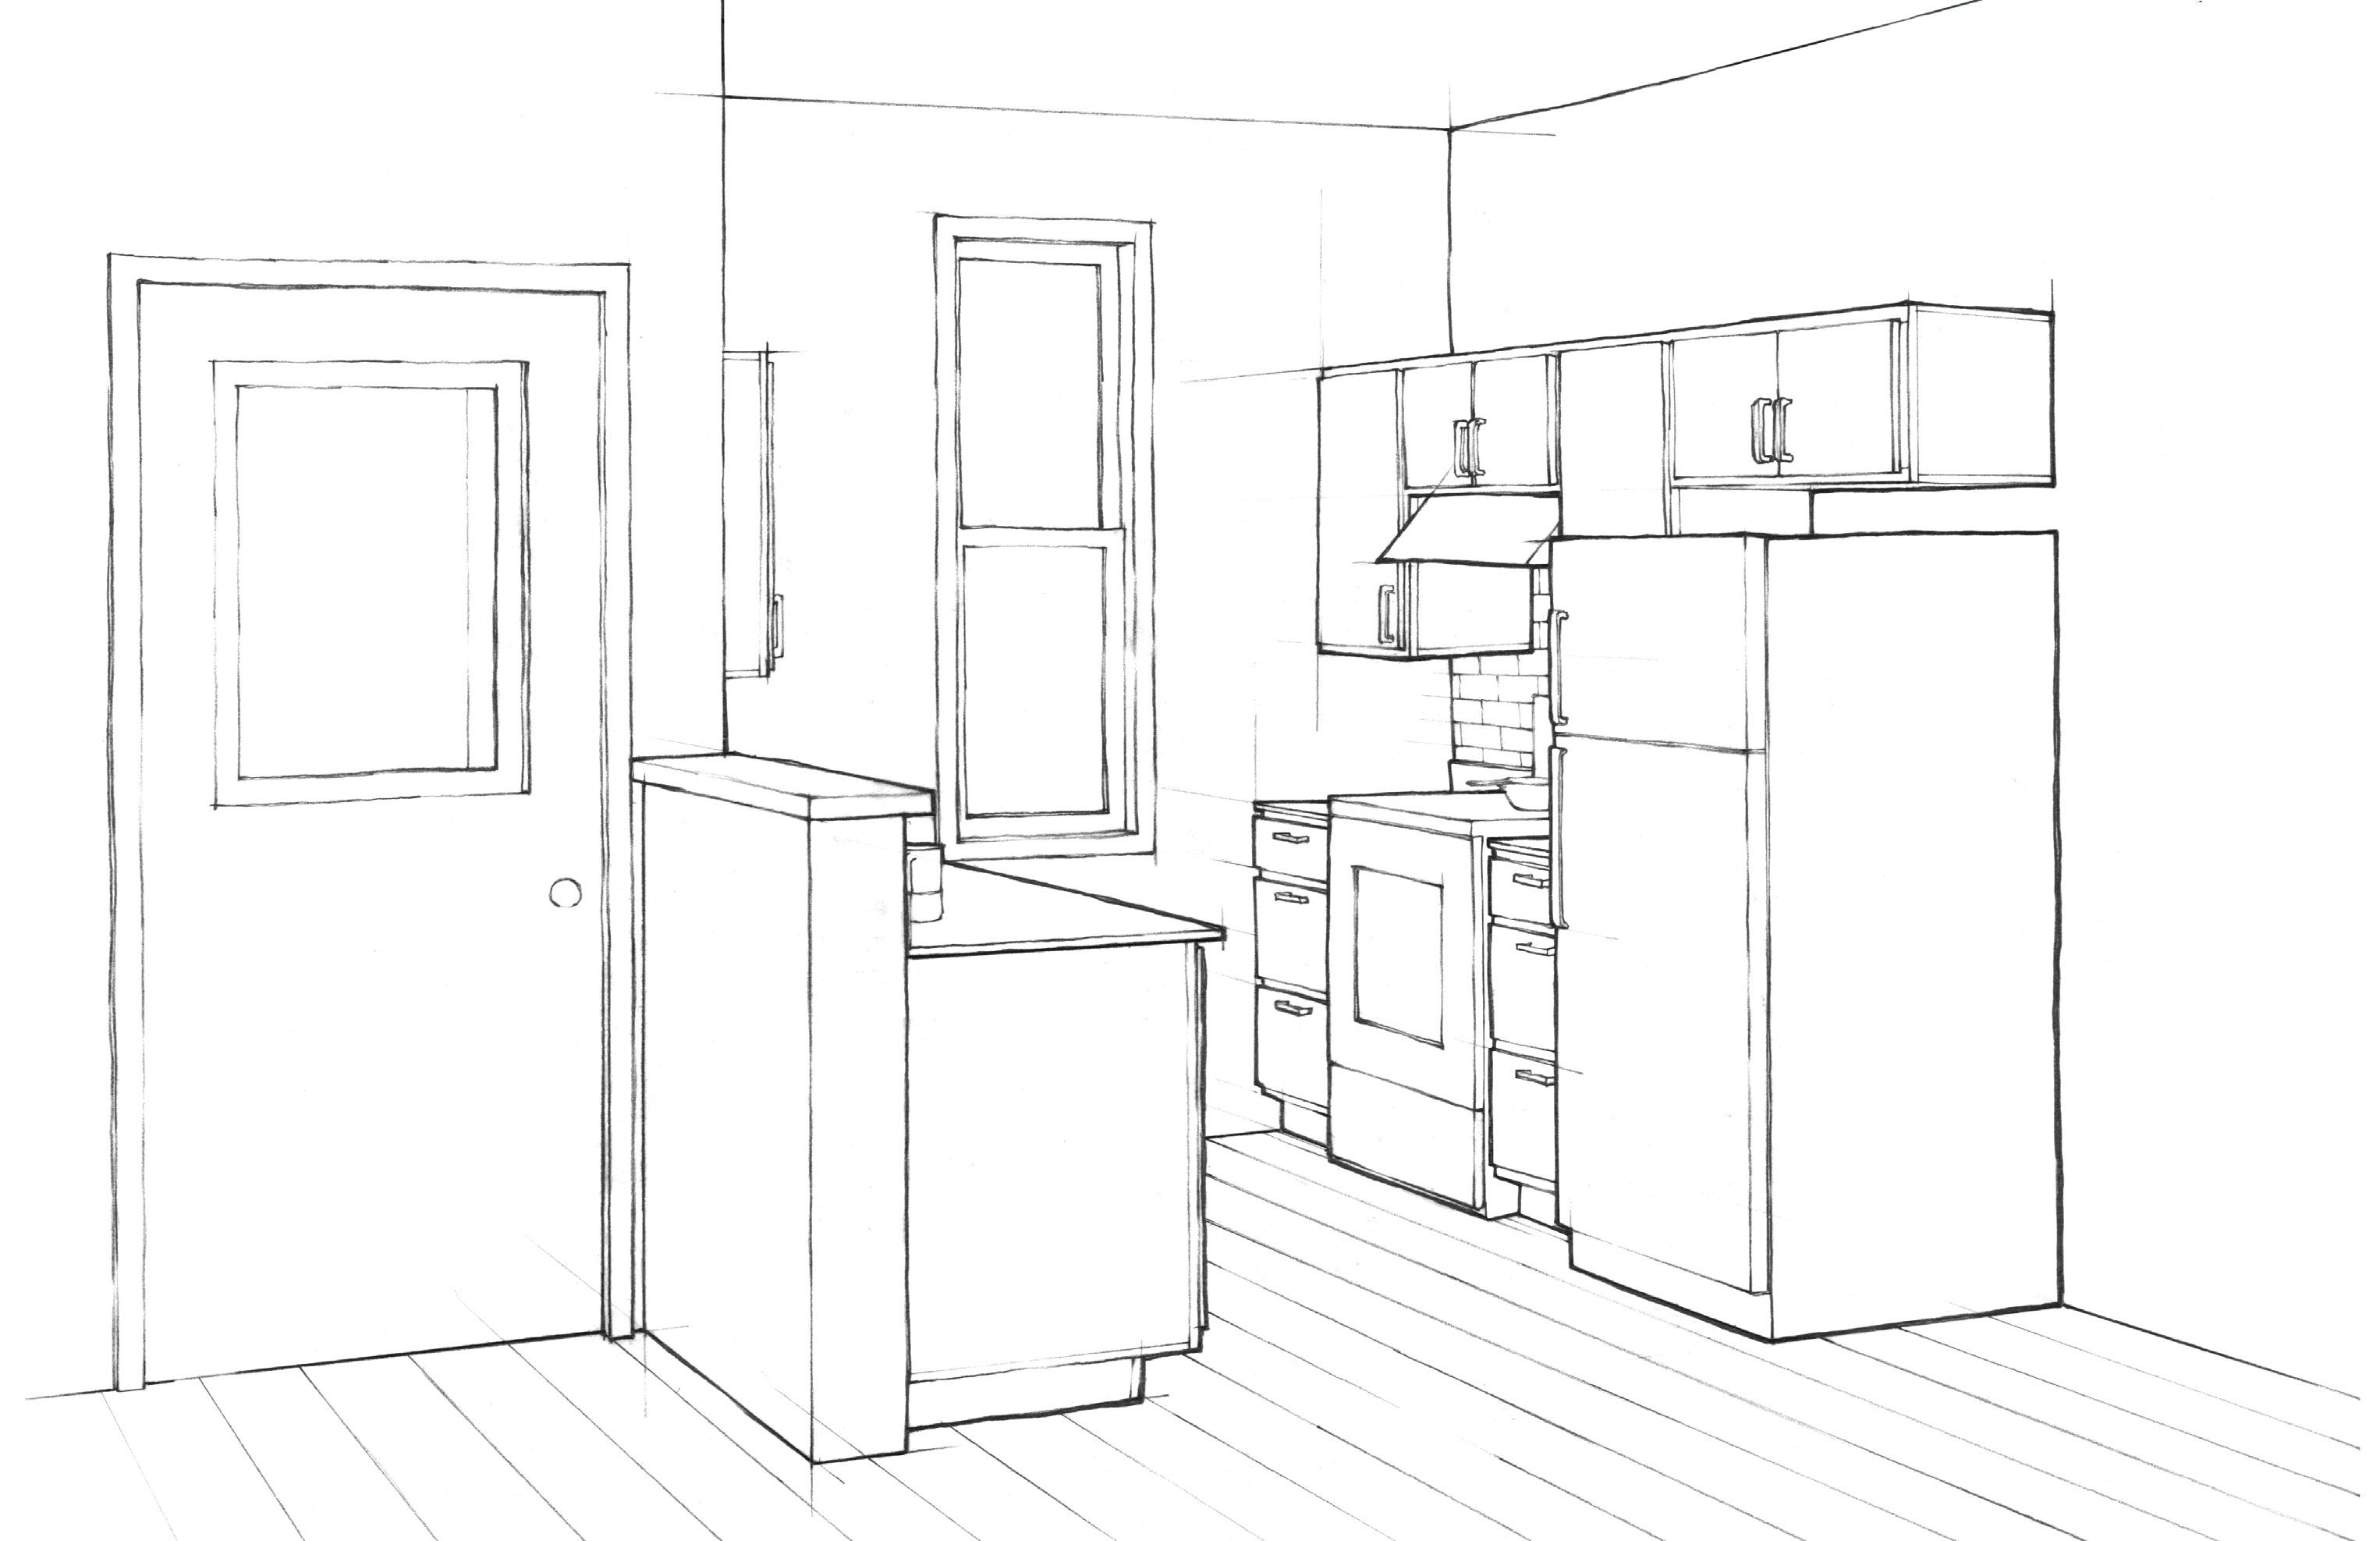
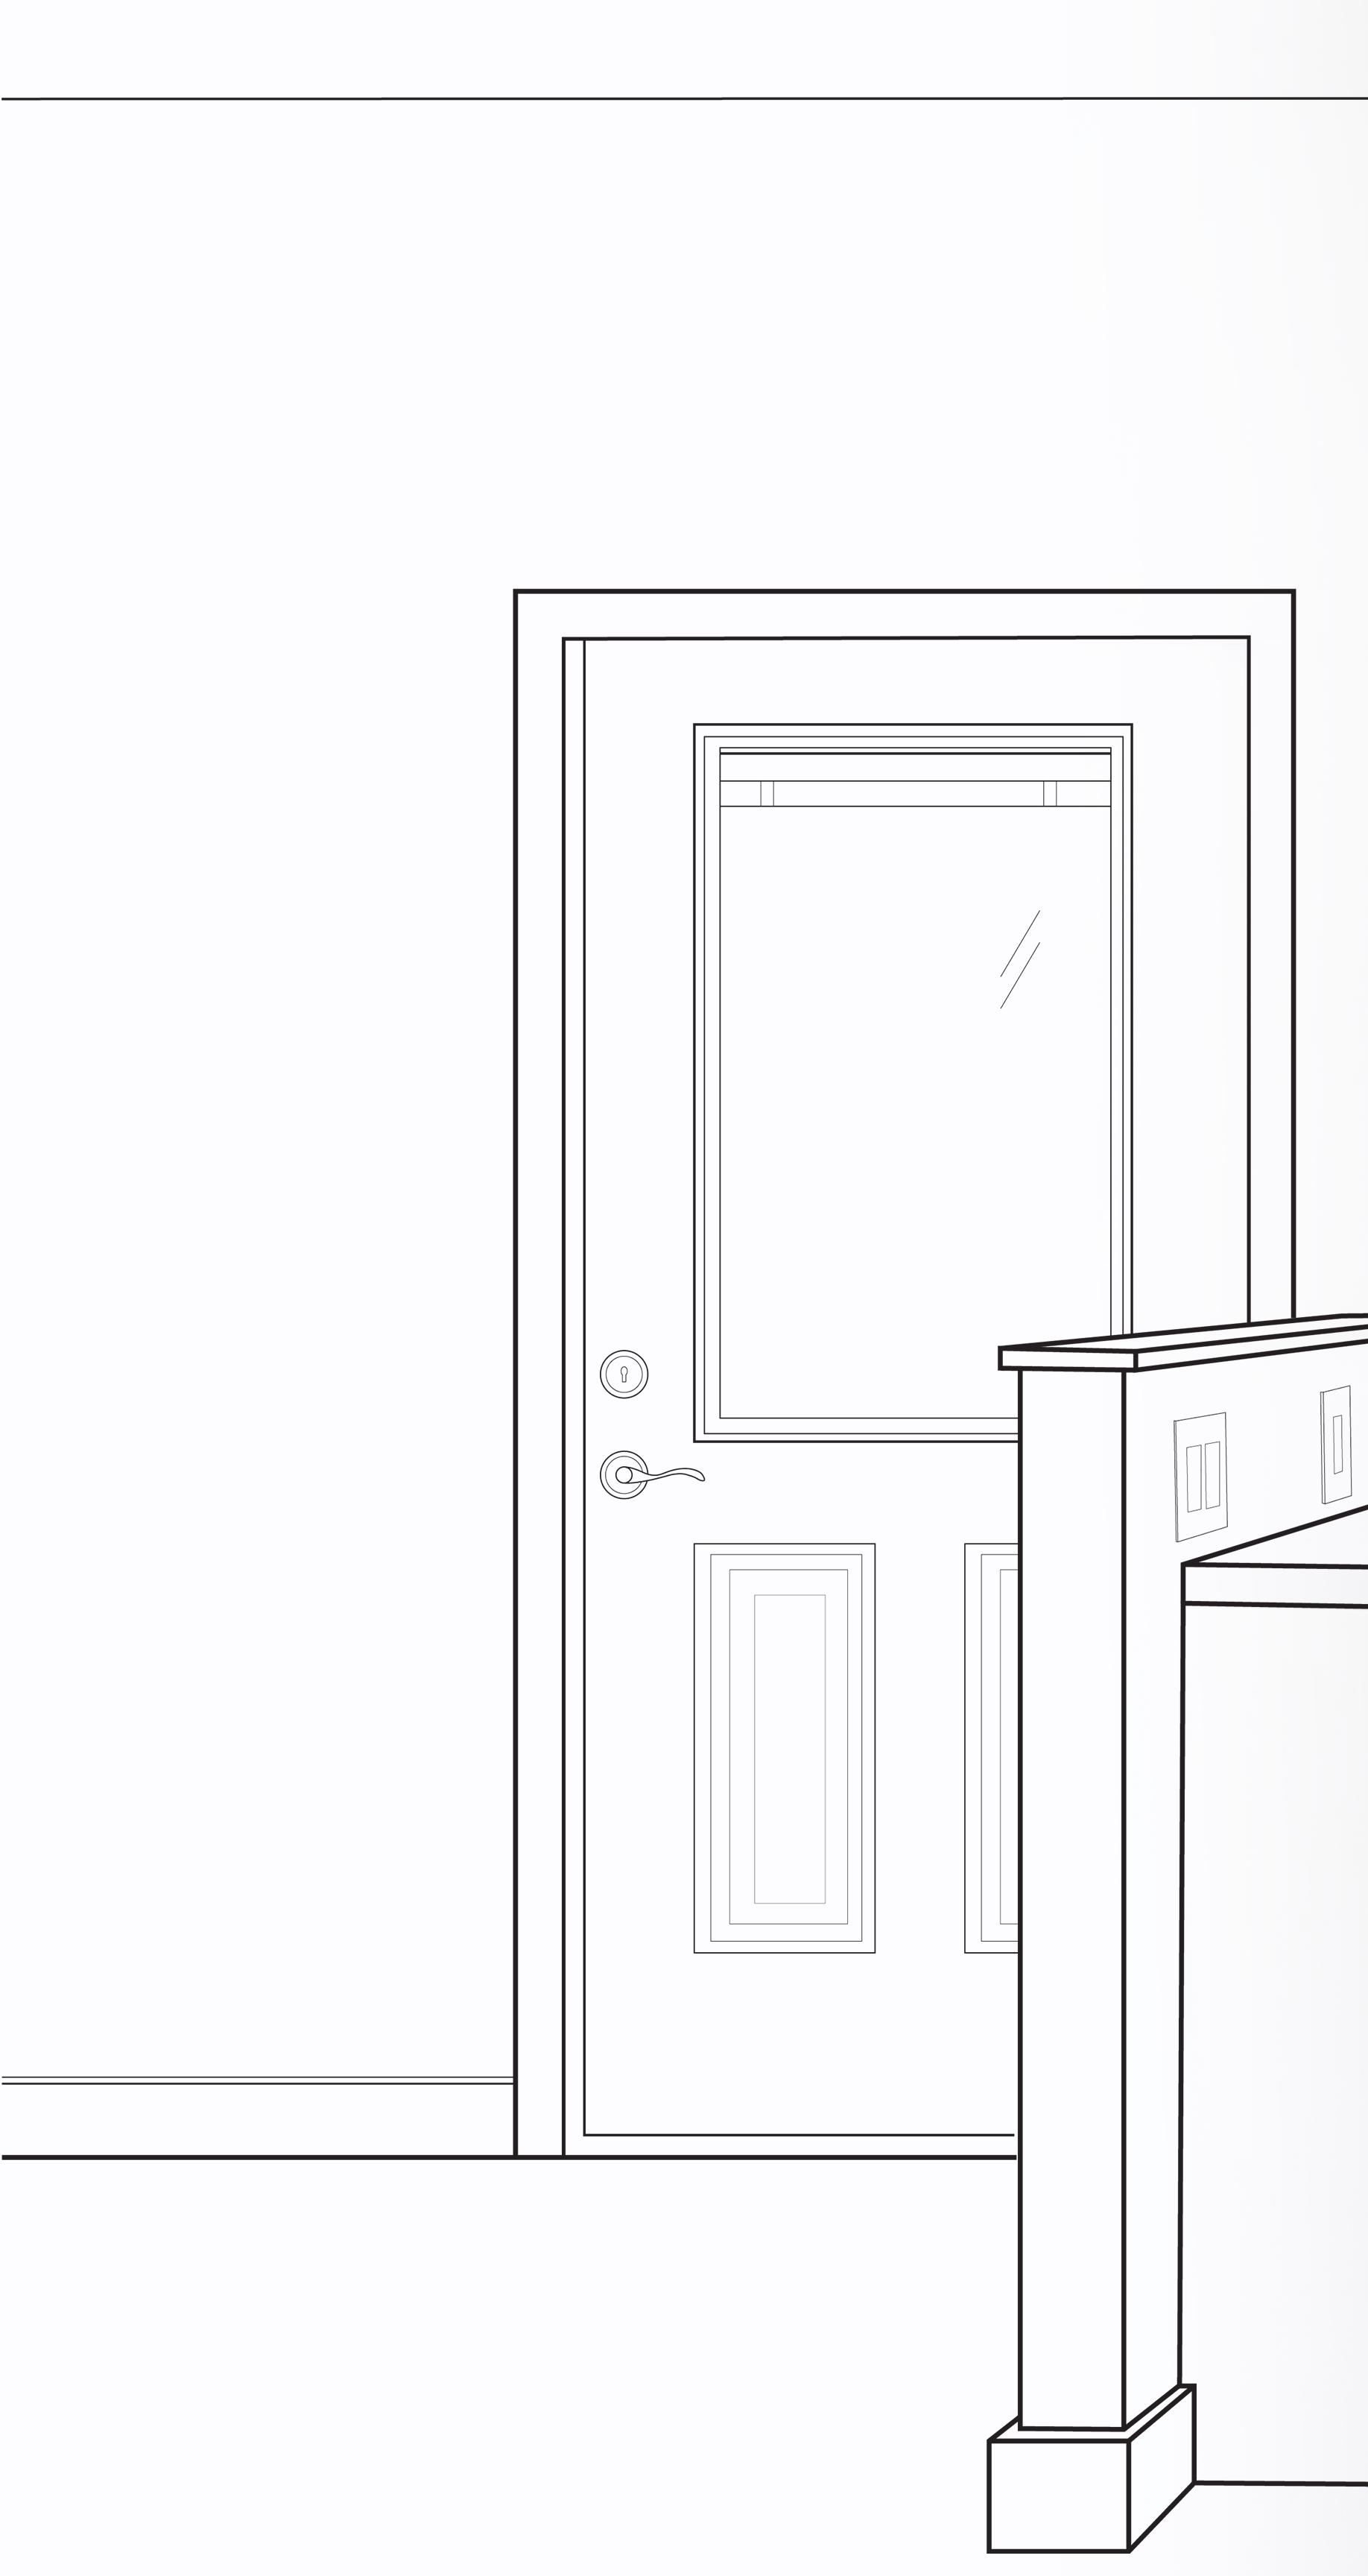
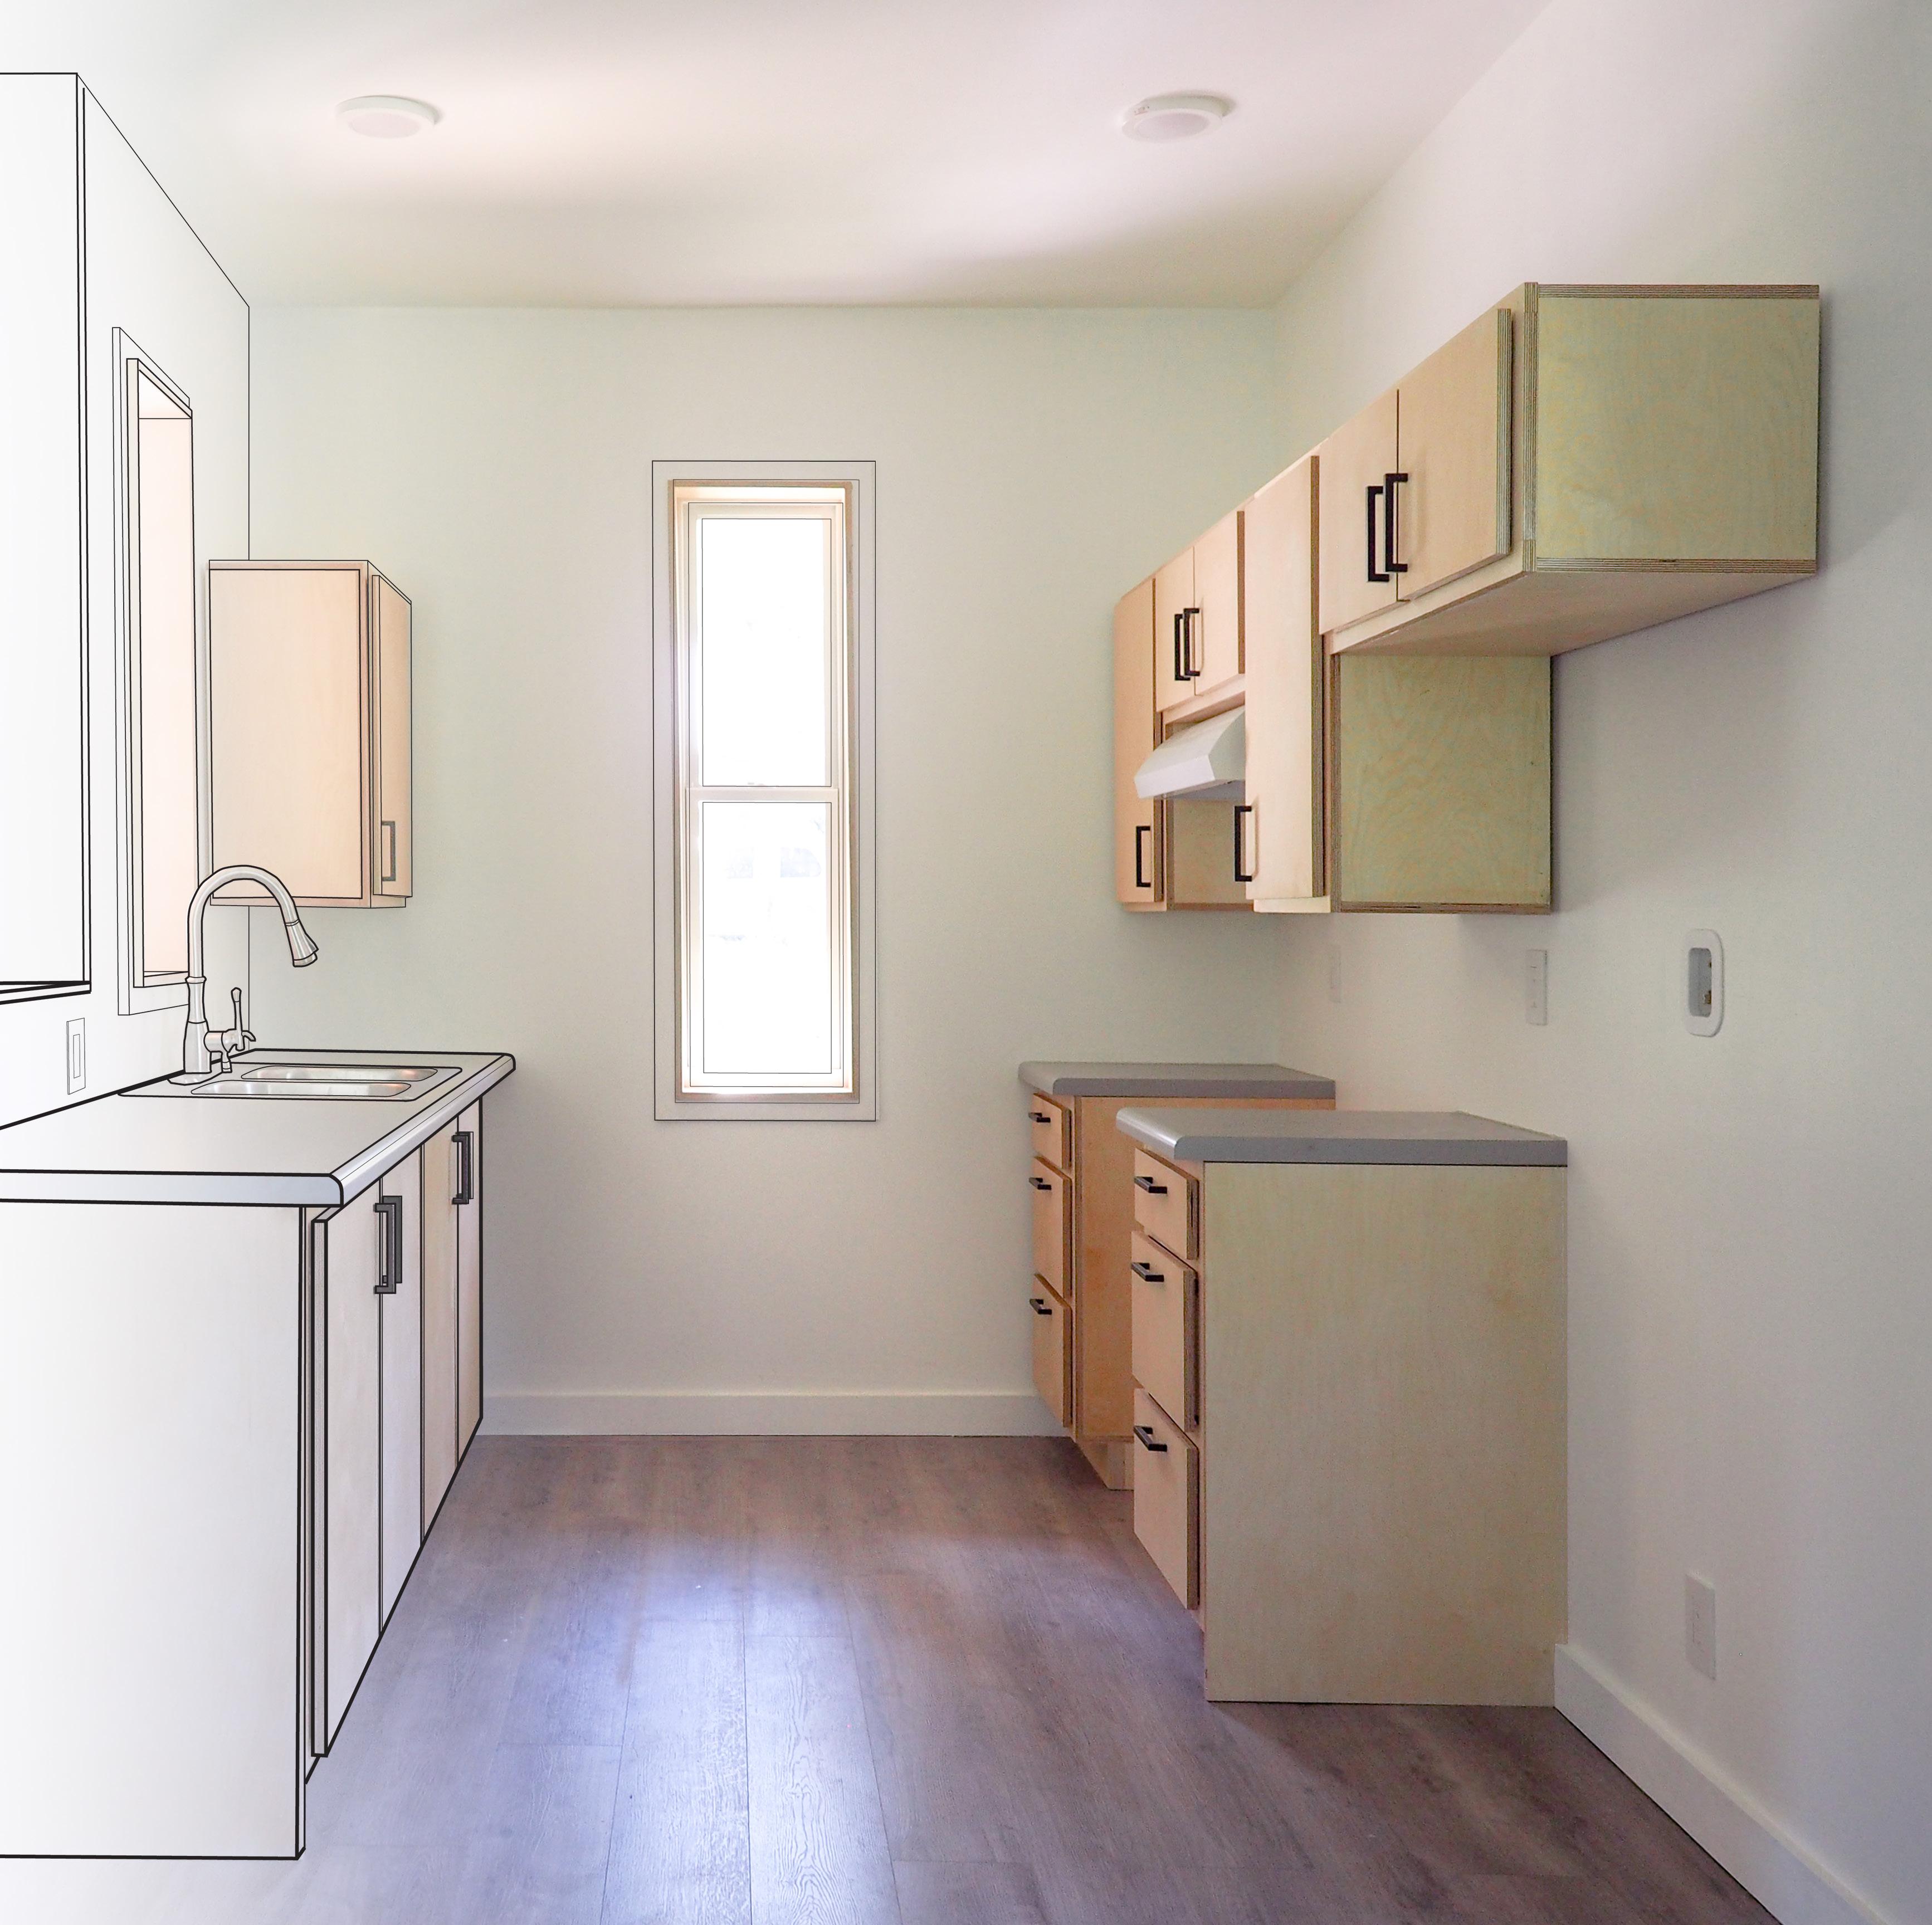
For the design of the kitchen cabinetry, we strove to maximize storage space and accessibility. The double lower cabinet in the kitchen provides the standard for all other cabinet modules. The Fair Housing Act played a major role in developing the interior layout of Ms. Ophelia’s home, so we had to reconfigure the fridge and dishwasher to meet those standards.
For the kitchen cabinetry design, we prioritized both storage quantity and accessibility. The lower double cabinet is the standard for all other cabinet modules. The dimensions of this module were determined by common household measurements. For example, the counter height was 36” tall by 25” deep, and the backsplash was 15” tall. Sometimes our modular dimensions were interrupted by a kitchen appliance such as the fridge or the stove vent. In such cases, we modified that particular cabinet to accommodate these appliances.
The design of the cabinetry itself was also based off of standardized measurements. For example, the counter height was 36” tall by 25” deep and the backsplash was at a standard of 15”. Sometimes our modular dimensions were interrupted by a kitchen appliance such as the fridge or the stove vent. In such cases, we modified the module design to accommodate these appliances.
Half-way into the design of the cabinets, Ms. Ophelia requested a space for a dishwasher. Although this appliance is not typical in a 20K house, we wanted to try to fulfill her request. We were able to salvage a FHA-compliant space for an 18” dishwasher. However, this space could also be used for another cabinet or as space for a trash can if desired. Throughout this design hiccup, we struggled with the conflicts of designing for the specific needs of a client verses designing for versatility. In the end, we managed to find a happy medium. Ms. Ophelia was left with a kitchen that maximized storage space, enhanced accessibility, and fulfilled her individual needs.
Half-way into the design of the cabinets, Ms. Ophelia requested a space for a dishwasher. Although this appliance is not typical in a 20K house, we wanted to try to make this happen. We were able to salvage a FHA-compliant space for an 18” dishwasher. However, this space could also be used for another cabinet or as space for a trash can. Throughout this design hiccup, we struggled through designing for the specific needs of a client verses designing for versatility, but in the end, we managed to find a happy medium. Ophelia was left with a kitchen that maximized storage space, enhanced accessibility, and met her individual needs
2021 48 Rural Studio
32
Kitchen Ophelia’s Home Introduction 49
Rural Studio 2021 34 West Kitchen Elevation West Kitchen Section PRODUCED BY AN AUTODESK STUDENT VERSION PRODUCED BY AN AUTODESK STUDENT VERSION PRODUCED BY AN AUTODESK STUDENT VERSION PRODUCED BY AN AUTODESK STUDENT VERSION PRODUCED BY AN AUTODESK STUDENT VERSION PRODUCED BY AN AUTODESK STUDENT VERSION PRODUCED BY AN AUTODESK STUDENT VERSION PRODUCED BY AN AUTODESK STUDENT VERSION PRODUCED BY AN AUTODESK STUDENT VERSION PRODUCED BY AN AUTODESK STUDENT VERSION PRODUCED BY AN AUTODESK STUDENT VERSION PRODUCED BY AN AUTODESK STUDENT VERSION PRODUCED BY AN AUTODESK STUDENT VERSION PRODUCED BY AN AUTODESK STUDENT VERSION PRODUCED BY AN AUTODESK STUDENT VERSION PRODUCED BY AN AUTODESK STUDENT VERSION PRODUCED BY AN AUTODESK STUDENT VERSION PRODUCED BY AN AUTODESK STUDENT VERSION PRODUCED BY AN AUTODESK STUDENT VERSION PRODUCED BY AN AUTODESK STUDENT VERSION West Kitchen Elevation West Kitchen Section
KITCHEN CONSTRUCTION DOCUMENTS
PRODUCED BY AN AUTODESK STUDENT VERSION PRODUCED BY AN AUTODESK STUDENT VERSION PRODUCED BY AN AUTODESK STUDENT VERSION PRODUCED BY AN AUTODESK STUDENT VERSION PRODUCED BY AN AUTODESK STUDENT VERSION PRODUCED BY AN AUTODESK STUDENT VERSION PRODUCED BY AN AUTODESK STUDENT VERSION PRODUCED BY AN AUTODESK STUDENT VERSION PRODUCED BY AN AUTODESK STUDENT VERSION PRODUCED BY AN AUTODESK STUDENT VERSION PRODUCED BY AN AUTODESK STUDENT VERSION PRODUCED BY AN AUTODESK STUDENT VERSION PRODUCED BY AN AUTODESK STUDENT VERSION PRODUCED BY AN AUTODESK STUDENT VERSION PRODUCED BY AN AUTODESK STUDENT VERSION PRODUCED BY AN AUTODESK STUDENT VERSION North Kitchen Elevation North Kitchen Section Kitchen Ophelia’s Home Construction Drawings 51 North Kitchen Elevation North Kitchen Section
KITCHEN CONSTRUCTION DOCUMENTS Rural Studio 2021 36 PRODUCED BY AN AUTODESK STUDENT VERSION PRODUCED BY AN AUTODESK STUDENT VERSION PRODUCED BY AN AUTODESK STUDENT VERSION South Kitchen Elevation South Kitchen Elevation
PRODUCED BY AN AUTODESK STUDENT VERSION PRODUCED BY AN AUTODESK STUDENT VERSIONPRODUCED BY AN AUTODESK STUDENT VERSION PRODUCED BY AN AUTODESK STUDENT VERSION PRODUCED BY AN AUTODESK STUDENT VERSION PRODUCED BY AN AUTODESK STUDENT VERSION PRODUCED BY AN AUTODESK STUDENT VERSION PRODUCED BY AN AUTODESK STUDENT VERSION PRODUCED BY AN AUTODESK STUDENT VERSION PRODUCED BY AN AUTODESK STUDENT VERSION South Kitchen Section Kitchen Ophelia’s Home Construction Drawings 53 South Kitchen Section
56 Upper Single Cabinet 78 Single Drawer 102 Upper Cabinet Short 1 & 2 130 Lower Double Cabinet Sub-Header MODULE OUTLINE 2021 54 Rural Studio 86 114
Upper Single Cabinet
Upper Cabinet Short 1
Small Upper Box
Upper Cabinet Short 2
Upper Cabinet Short 3
Big Upper Box
Single Drawer
Lower Double Cabinet
Kitchen Ophelia’s Home
Drawings 55
Process
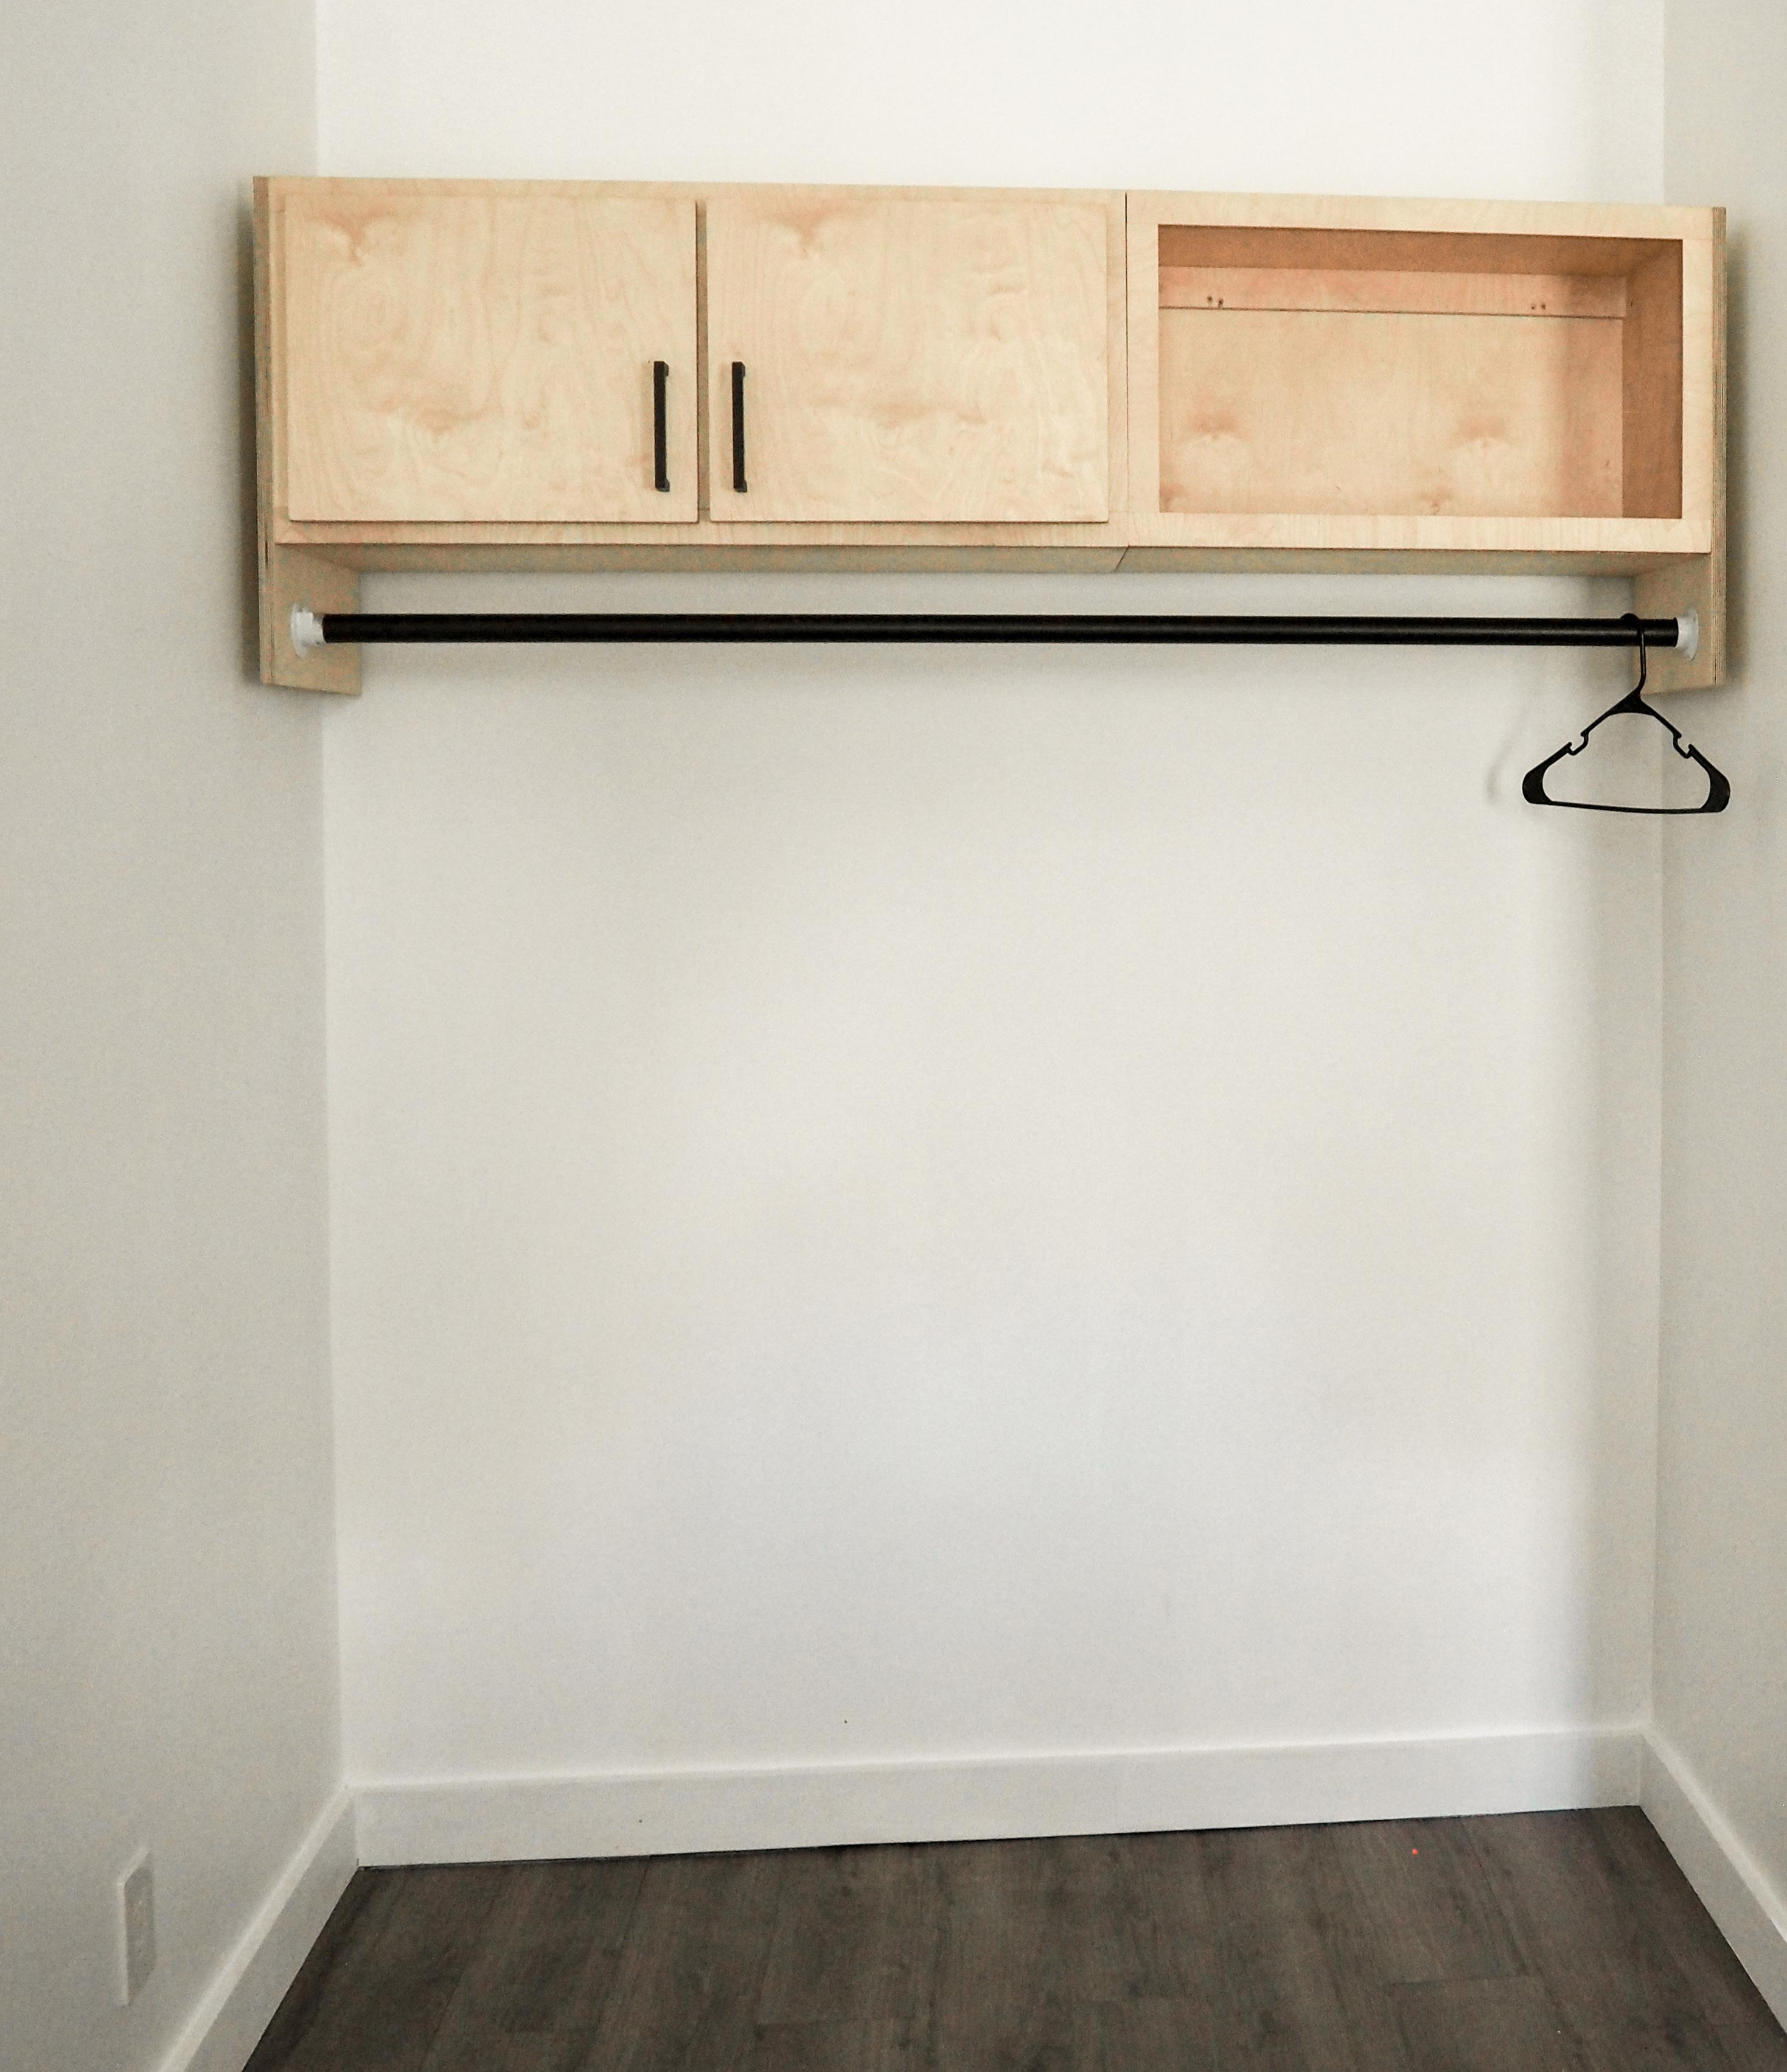
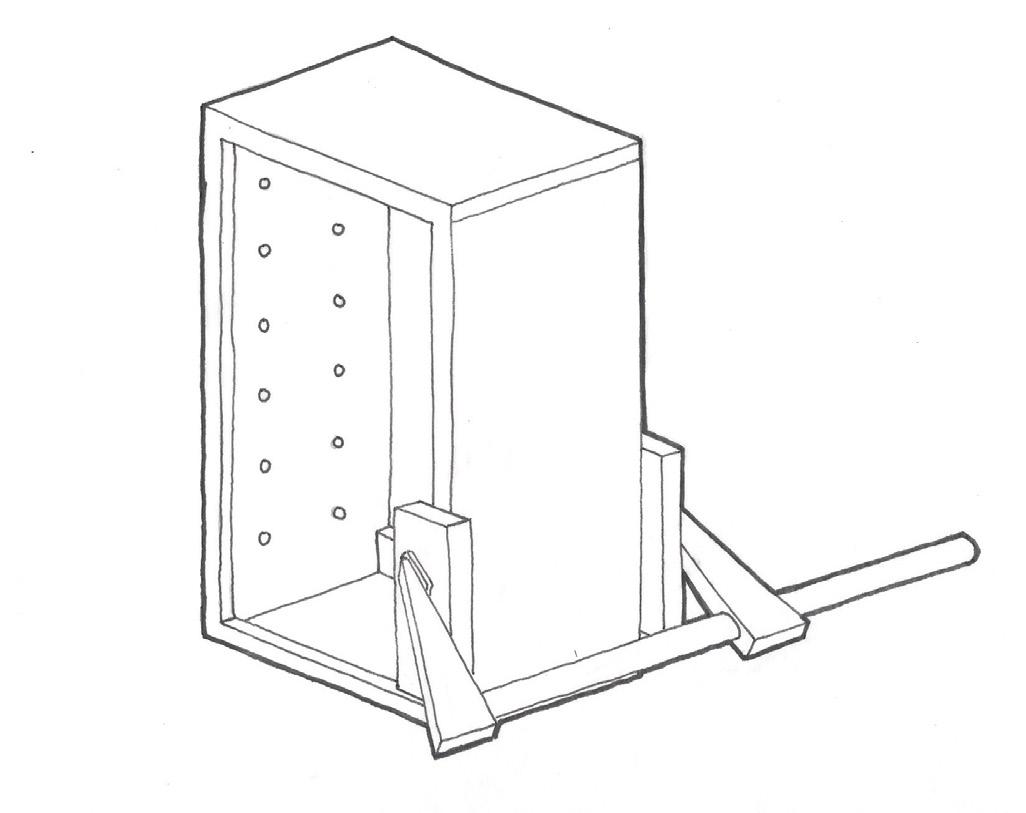
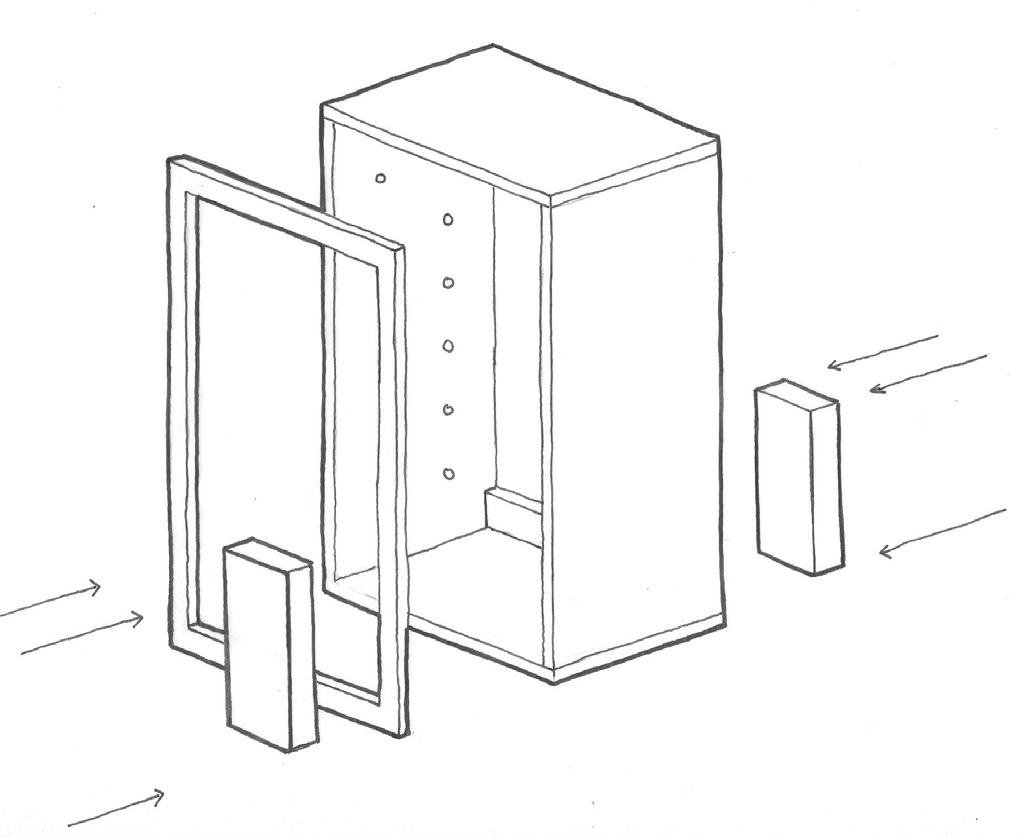
UPPER SINGLE CABINET
2021 56 Rural Studio
Southern Elevation
Sink Wall Elevation Kitchen Ophelia’s Home Process Drawings 57 South Kitchen Elevation 41
U PP ER SIN GLE C A BIN E T
Side Piece Special Instructions
Place Hole Jig on Side
Place Hole Jig on Side
Repeat for Both Sides
Repeat for Both Sides
Attach Side 1 and Bottom
Drill Holes with Plunge Router
Drill Holes with Plunge Router
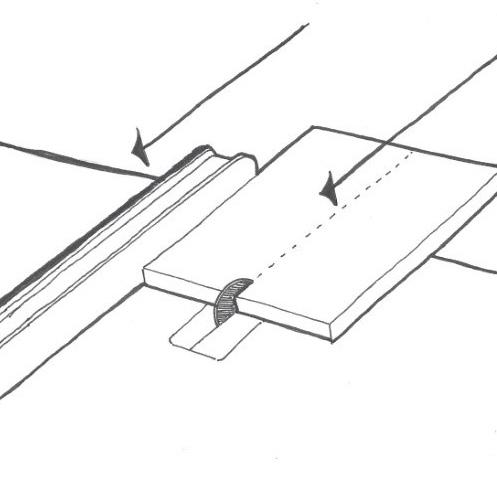
Run Edge Through Table Saw for Rabbiting
Run Edge Through Table Saw for Rabbiting
Attach Side 1 and Bottom
2021 54 Rural Studio 58
Final Result Kitchen Ophelia’s Home Process Drawings 55 Process Drawings 59 Kitchen Final Result
56 2021 60 Rural Studio
57 Kitchen Ophelia’s Home Process Drawings 61 Kitchen
58 2021 62 Rural Studio
59 Kitchen Ophelia’s Home Process Drawings 63 Kitchen 47
ASSEMBLY
Assembly
60
2021 64 Rural Studio
61 Kitchen Ophelia’s Home Process Drawings 65 1” Kitchen 1”
62 2021 66 Rural Studio
63 Kitchen Ophelia’s Home Process Drawings 67 Kitchen
64 2021 68 Rural Studio
65 Kitchen Ophelia’s Home Process Drawings 69 Kitchen
68 2021 70 Rural Studio 54

69 Kitchen Ophelia’s Home Process Drawings 71 Kitchen 55
68 2021 72 Rural Studio
69 Kitchen Ophelia’s Home Process Drawings 73 Kitchen
70 2021 74 Rural Studio 58
71 Kitchen Ophelia’s Home Process Drawings 75 Kitchen
72 2021 76 Rural Studio 60
73 Kitchen Ophelia’s Home Process Drawings 77 1” Kitchen 61
SIN GLE DR A W E R Southern Elevation 2021 76 Rural Studio 62
Sink Wall Elevation Kitchen Ophelia’s Home Process Drawings 77 Kitchen Process Drawings 79 South Kitchen Elevation
SINGLE DRAWER
SINGLE DRAWER
SIDE PIECE SPECIAL INSTRUCTIONS
Side Piece Special Intructions
2021 80 Rural Studio
Kitchen Ophelia’s Home Process Drawings 81 Kitchen
SINGLE DRAWER
SINGLE DRAWER
FACE FRAME
Face Frame
2021 82 Rural Studio
Kitchen Ophelia’s Home Process Drawings 83 Kitchen
SINGLE DRAWER
DRAWER
Drawer SINGLE DRAWER
2021 84 Rural Studio
Kitchen Ophelia’s Home Process Drawings 85 Kitchen
SINGLE DRAWER
BOX
2021 86 Rural Studio Box
SINGLE DRAWER
Kitchen Ophelia’s Home Process Drawings 87 Kitchen 71
SINGLE DRAWER ASSEMBLY
SINGLE DRAWER Assembly
2021 88 Rural Studio
Kitchen Ophelia’s Home Process Drawings 89 1” Kitchen 1”
SINGLE DRAWER
Finish SINGLE DRAWER
2021 90 Rural Studio
74
FINISH
Kitchen Ophelia’s Home Process Drawings 91 Kitchen
SINGLE DRAWER
Finish SINGLE DRAWER
2021 92 Rural Studio
76
FINISH
Kitchen Ophelia’s Home Process Drawings 93 Kitchen 77
FINISH SINGLE
2021 94 Rural Studio FINISH SINGLE 2021 94 Rural Studio Finish SINGLE
2021 94 Rural Studio
DRAWER
DRAWER
Kitchen Ophelia’s Home Process Drawings 95
DRAWER Kitchen
SINGLE
SINGLE DRAWER
SINGLE DRAWER
DRAWER ATTACHMENT
Drawer Attachment
2021 96 Rural Studio
Kitchen Ophelia’s Home Process Drawings 97 Kitchen 81
SINGLE DRAWER
SINGLE DRAWER
DRAWER ATTACHMENT
Drawer Attachment
2021 98 Rural Studio
Kitchen Ophelia’s Home Process Drawings 99 Kitchen
INSTALLATION SINGLE DRAWER 2021 100 Rural Studio Installation SINGLE DRAWER Install Toe Kick 84
Kitchen Ophelia’s Home Process Drawings 101 Kitchen 85
UPPER CABINET SHORT 1 & 2
Southern Elevation 2021 102 Rural Studio 86
Sink Wall Elevation Kitchen Ophelia’s Home Process Drawings 103 South Kitchen Elevation 87
UPPER CABINET SHORT
UPPER CABINET SHORT
SIDE PIECE SPECIAL INSTRUCTIONS
Side piece special instructions
2021 104 Rural Studio
88
Kitchen Ophelia’s Home Process Drawings 105 Kitchen 89
UPPER CABINET SHORT
UPPER CABINET SHORT
SIDE PIECE SPECIAL INTRUCTIONS
Side Piece Special Intructions
2021 106 Rural Studio
90
Kitchen Ophelia’s Home Process Drawings 107 Kitchen 91
UPPER CABINET SHORT
UPPER CABINET SHORT
FACE FRAME
Face Frame
2021 108 Rural Studio
92
Kitchen Ophelia’s Home Process Drawings 109 Kitchen 93
BOX UPPER CABINET
2021 110 Rural Studio Box UPPER CABINET
94
SHORT
SHORT
Kitchen Ophelia’s Home Process Drawings 111 Kitchen 95
UPPER CABINET SHORT ASSEMBLY
UPPER CABINET SHORT Assembly
2021 112 Rural Studio
96
Kitchen Ophelia’s Home Process Drawings 113 1” Kitchen 1” 97
2021 114 Rural Studio
98
FINISH UPPER CABINET SHORT
Finish UPPER CABINET SHORT

Kitchen Ophelia’s Home Process Drawings 115 Kitchen 99
FINISH UPPER CABINET SHORT
SHORT
2021 116 Rural Studio
Finish UPPER CABINET
Kitchen Ophelia’s Home Process Drawings 117 Kitchen 101
FINISH UPPER CABINET SHORT 2021 118 Rural Studio FINISH UPPER 2021 118 Rural Studio Finish UPPER CABINET SHORT 2021 118 Rural Studio 102
UPPER
Kitchen Ophelia’s Home Process Drawings 119 103
CABINET SHORT
UPPER CABINET SHORT
DOOR ATACHMENT
2021 120 Rural Studio Door Atachment
104
UPPER CABINET SHORT
Kitchen Ophelia’s Home Process Drawings 121 Kitchen 105
UPPER CABINET SHORT
DOOR ATACHMENT
2021 122 Rural Studio Door Atachment
106
UPPER CABINET SHORT
Kitchen Ophelia’s Home Process Drawings 123 Kitchen 107
DOOR ATTACHMENT UPPER CABINET SHORT 2021 124 Rural Studio DOOR ATTACHMENT UPPER 2021 124 Rural Studio Door Attachment UPPER CABINET SHORT 2021 124 Rural Studio
UPPER
Kitchen Ophelia’s Home Process Drawings 125 109
ATTACHMENT
CABINET SHORT
INSTALLATION UPPER CABINET SHORT 2021 126 Rural Studio Installation UPPER CABINET SHORT 110
Kitchen Ophelia’s Home Process Drawings 127 Kitchen 111
INSTALLATION UPPER CABINET SHORT 2021 128 Rural Studio INSTALLATION UPPER 2021 128 Rural Studio Installation UPPER CABINET SHORT 2021 128 Rural Studio
INSTALLATION UPPER CABINET SHORT Kitchen Ophelia’s Home Process Drawings 129
2021 130 Rural Studio 2021 130 Rural Studio 114
Kitchen Ophelia’s Home Process Drawings 131 Kitchen Ophelia’s Home Process Drawings South Kitchen Elevation 115
LOWER DOUBLE CABINET
LOWER DOUBLE CABINET
SIDE PIECE SPECIAL INSTRUCTIONS
Side Piece Special Instructions
2021 132 Rural Studio
116
Kitchen Ophelia’s Home Process Drawings 133 Kitchen 117
LOWER DOUBLE CABINET
LOWER DOUBLE CABINET
SIDE PIECE SPECIAL INSTRUCTIONS
Side Piece Special Instructions
2021 134 Rural Studio
Kitchen Ophelia’s Home Process Drawings 135 Kitchen
LOWER DOUBLE CABINET
LOWER DOUBLE CABINET
FACE FRAME
Face Frame
2021 136 Rural Studio
Kitchen Ophelia’s Home Process Drawings 137 Kitchen 121
LOWER DOUBLE CABINET
LOWER DOUBLE CABINET
BOX
2021 138 Rural Studio Box
Kitchen Ophelia’s Home Process Drawings 139 Kitchen
LOWER DOUBLE CABINET ASSEMBLY
LOWER DOUBLE CABINET Assembly
2021 140 Rural Studio
Kitchen Ophelia’s Home Process Drawings 141 1” Kitchen 1” 125
LOWER DOUBLE CABINET
LOWER DOUBLE CABINET
FINISH
2021 142 Rural Studio
Finish
126
Kitchen Ophelia’s Home Process Drawings 143 Kitchen 127
LOWER DOUBLE CABINET
LOWER DOUBLE CABINET
FINISH
2021 144 Rural Studio
Finish
128
Kitchen Ophelia’s Home Process Drawings 145 Kitchen 129
LOWER DOUBLE CABINET
LOWER DOUBLE CABINET
DOOR ATTACHMENT
2021 146 Rural Studio Door Attachment
130
Kitchen Ophelia’s Home Process Drawings 147 Kitchen 131
BEDROOM
BEDROOM
BEDROOM
Sub-Header BEDROOM
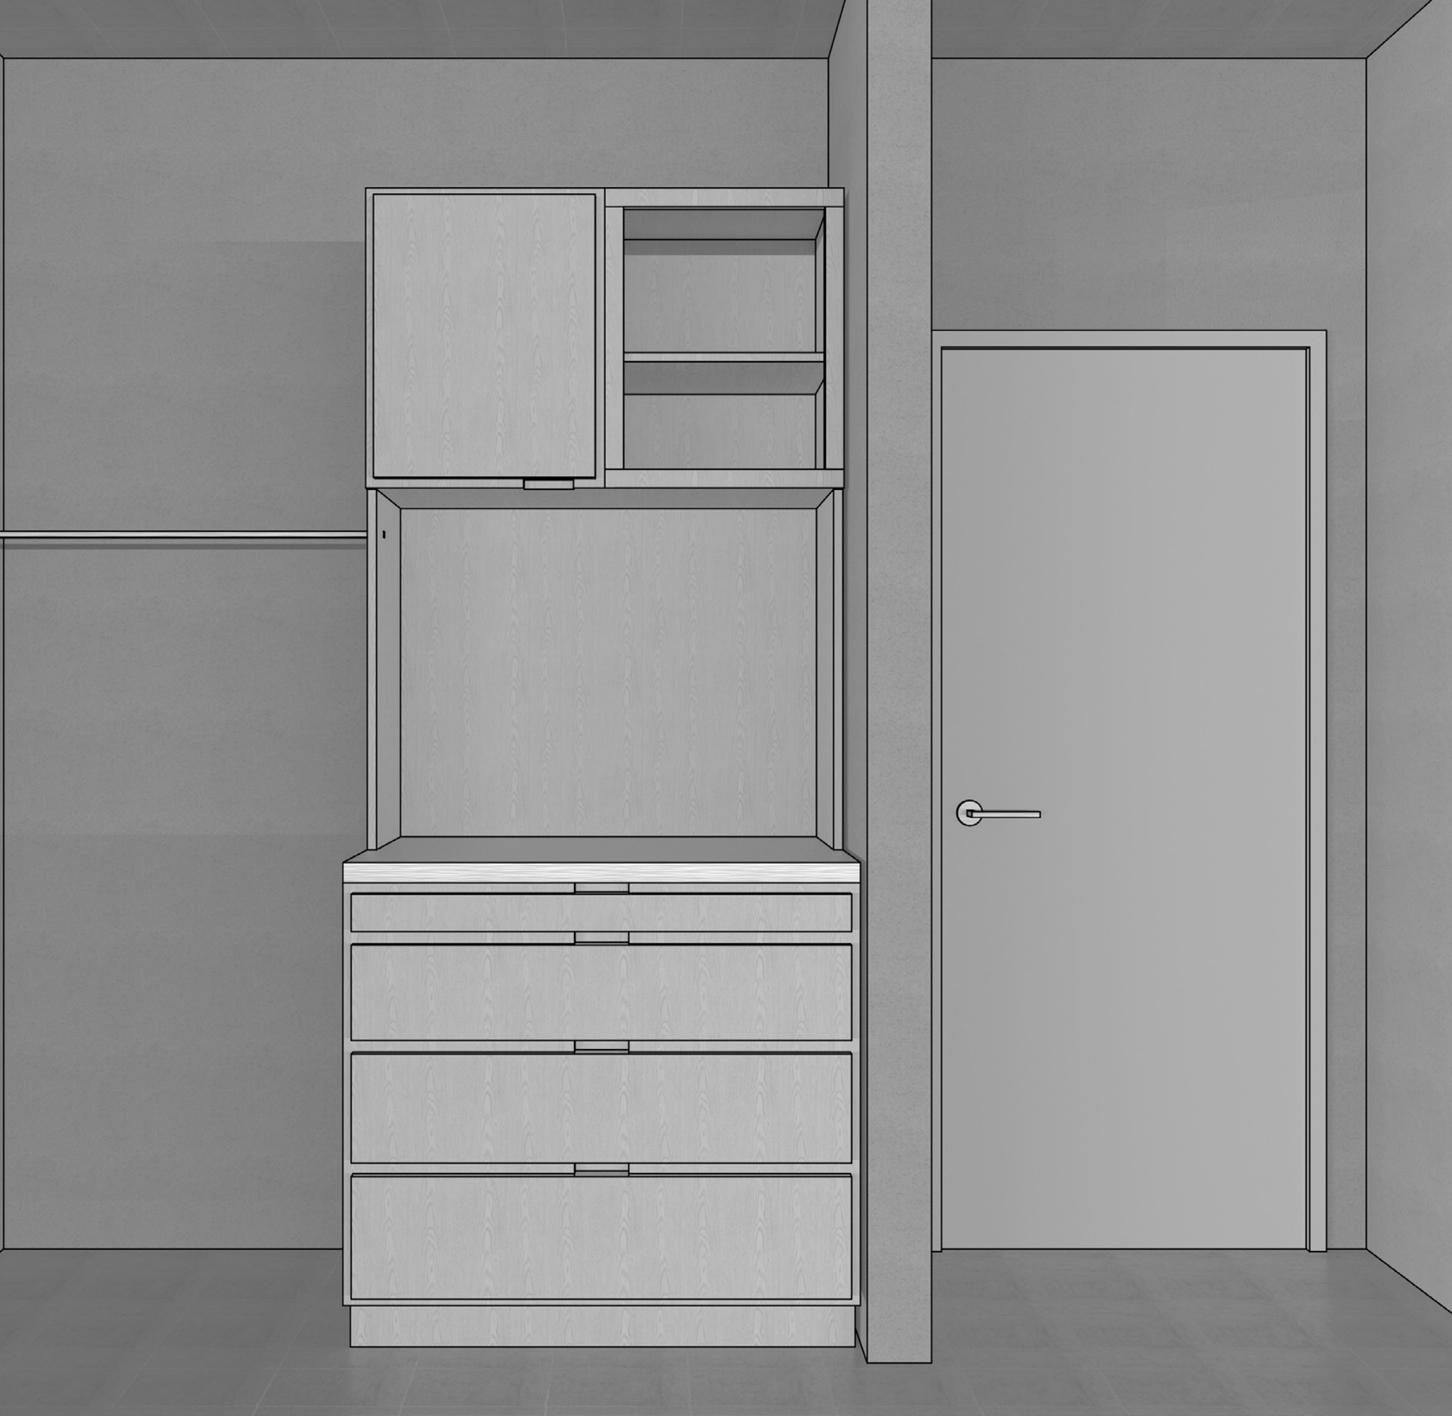
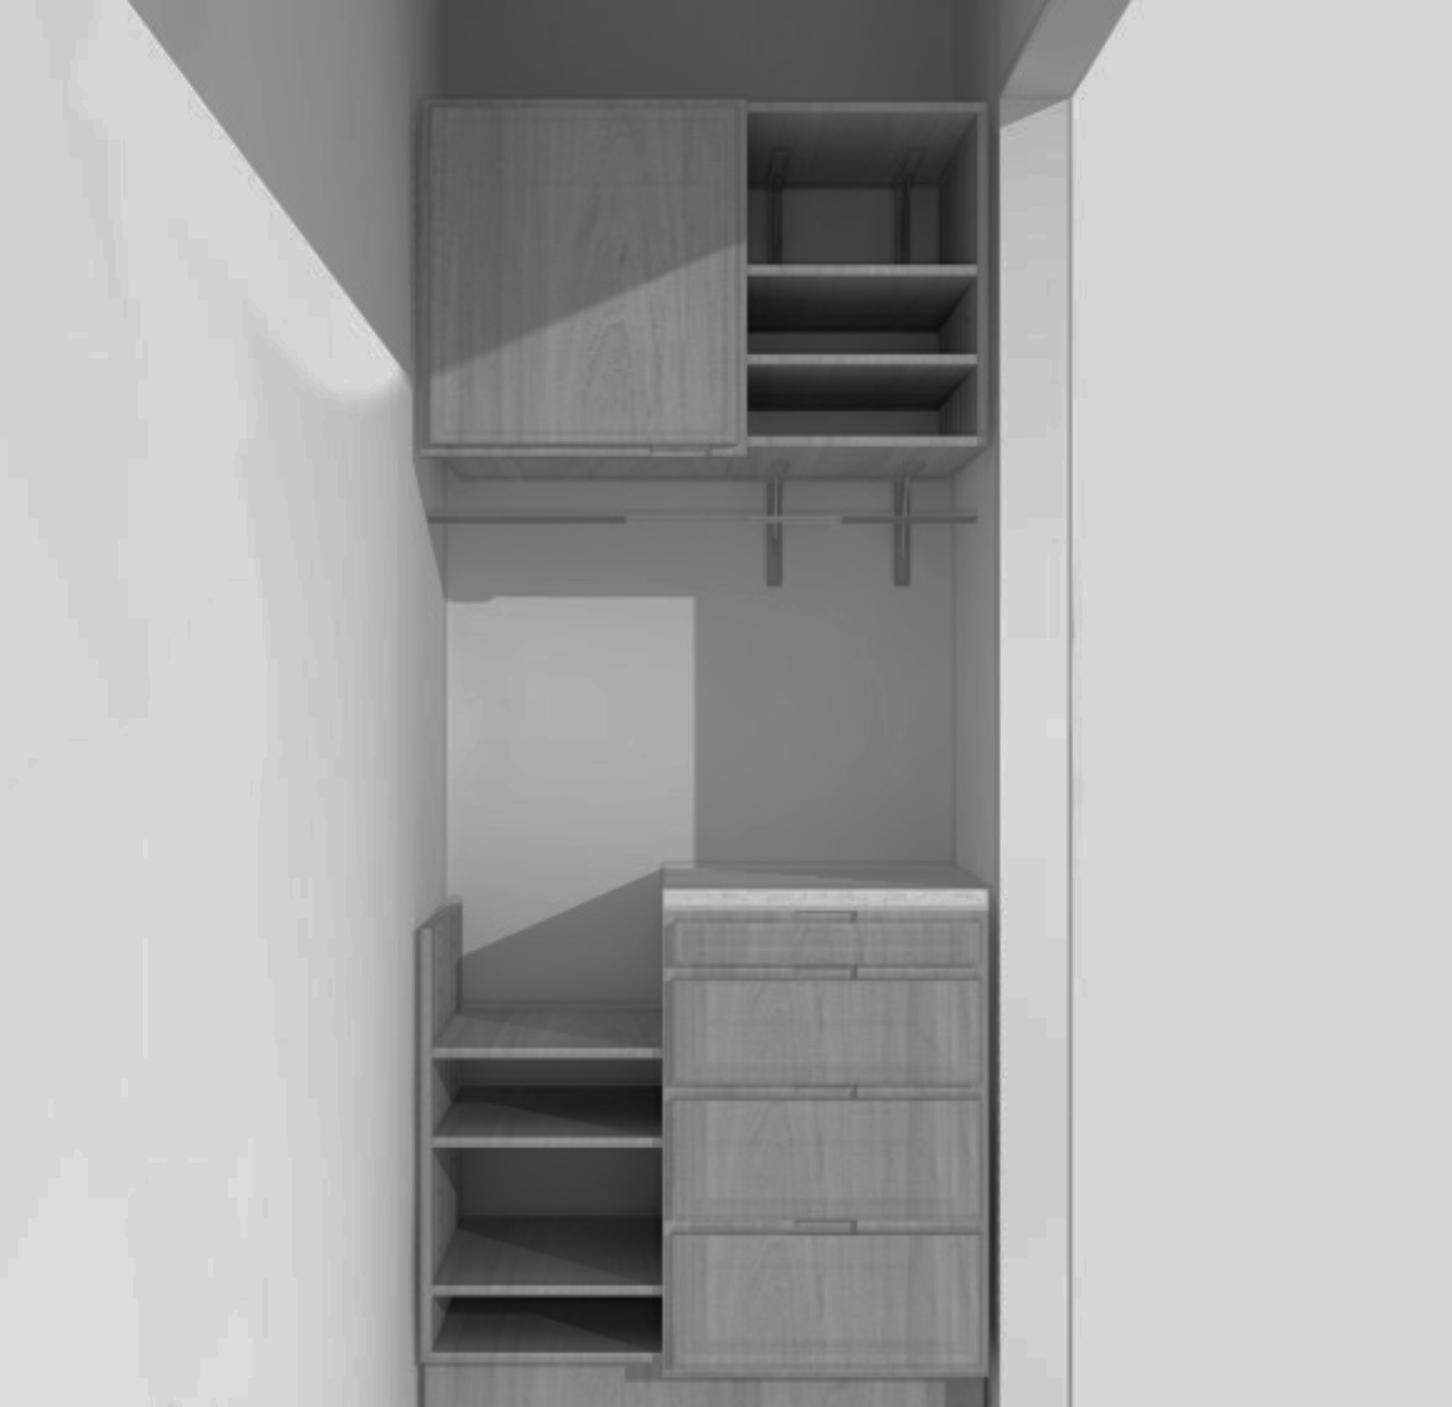
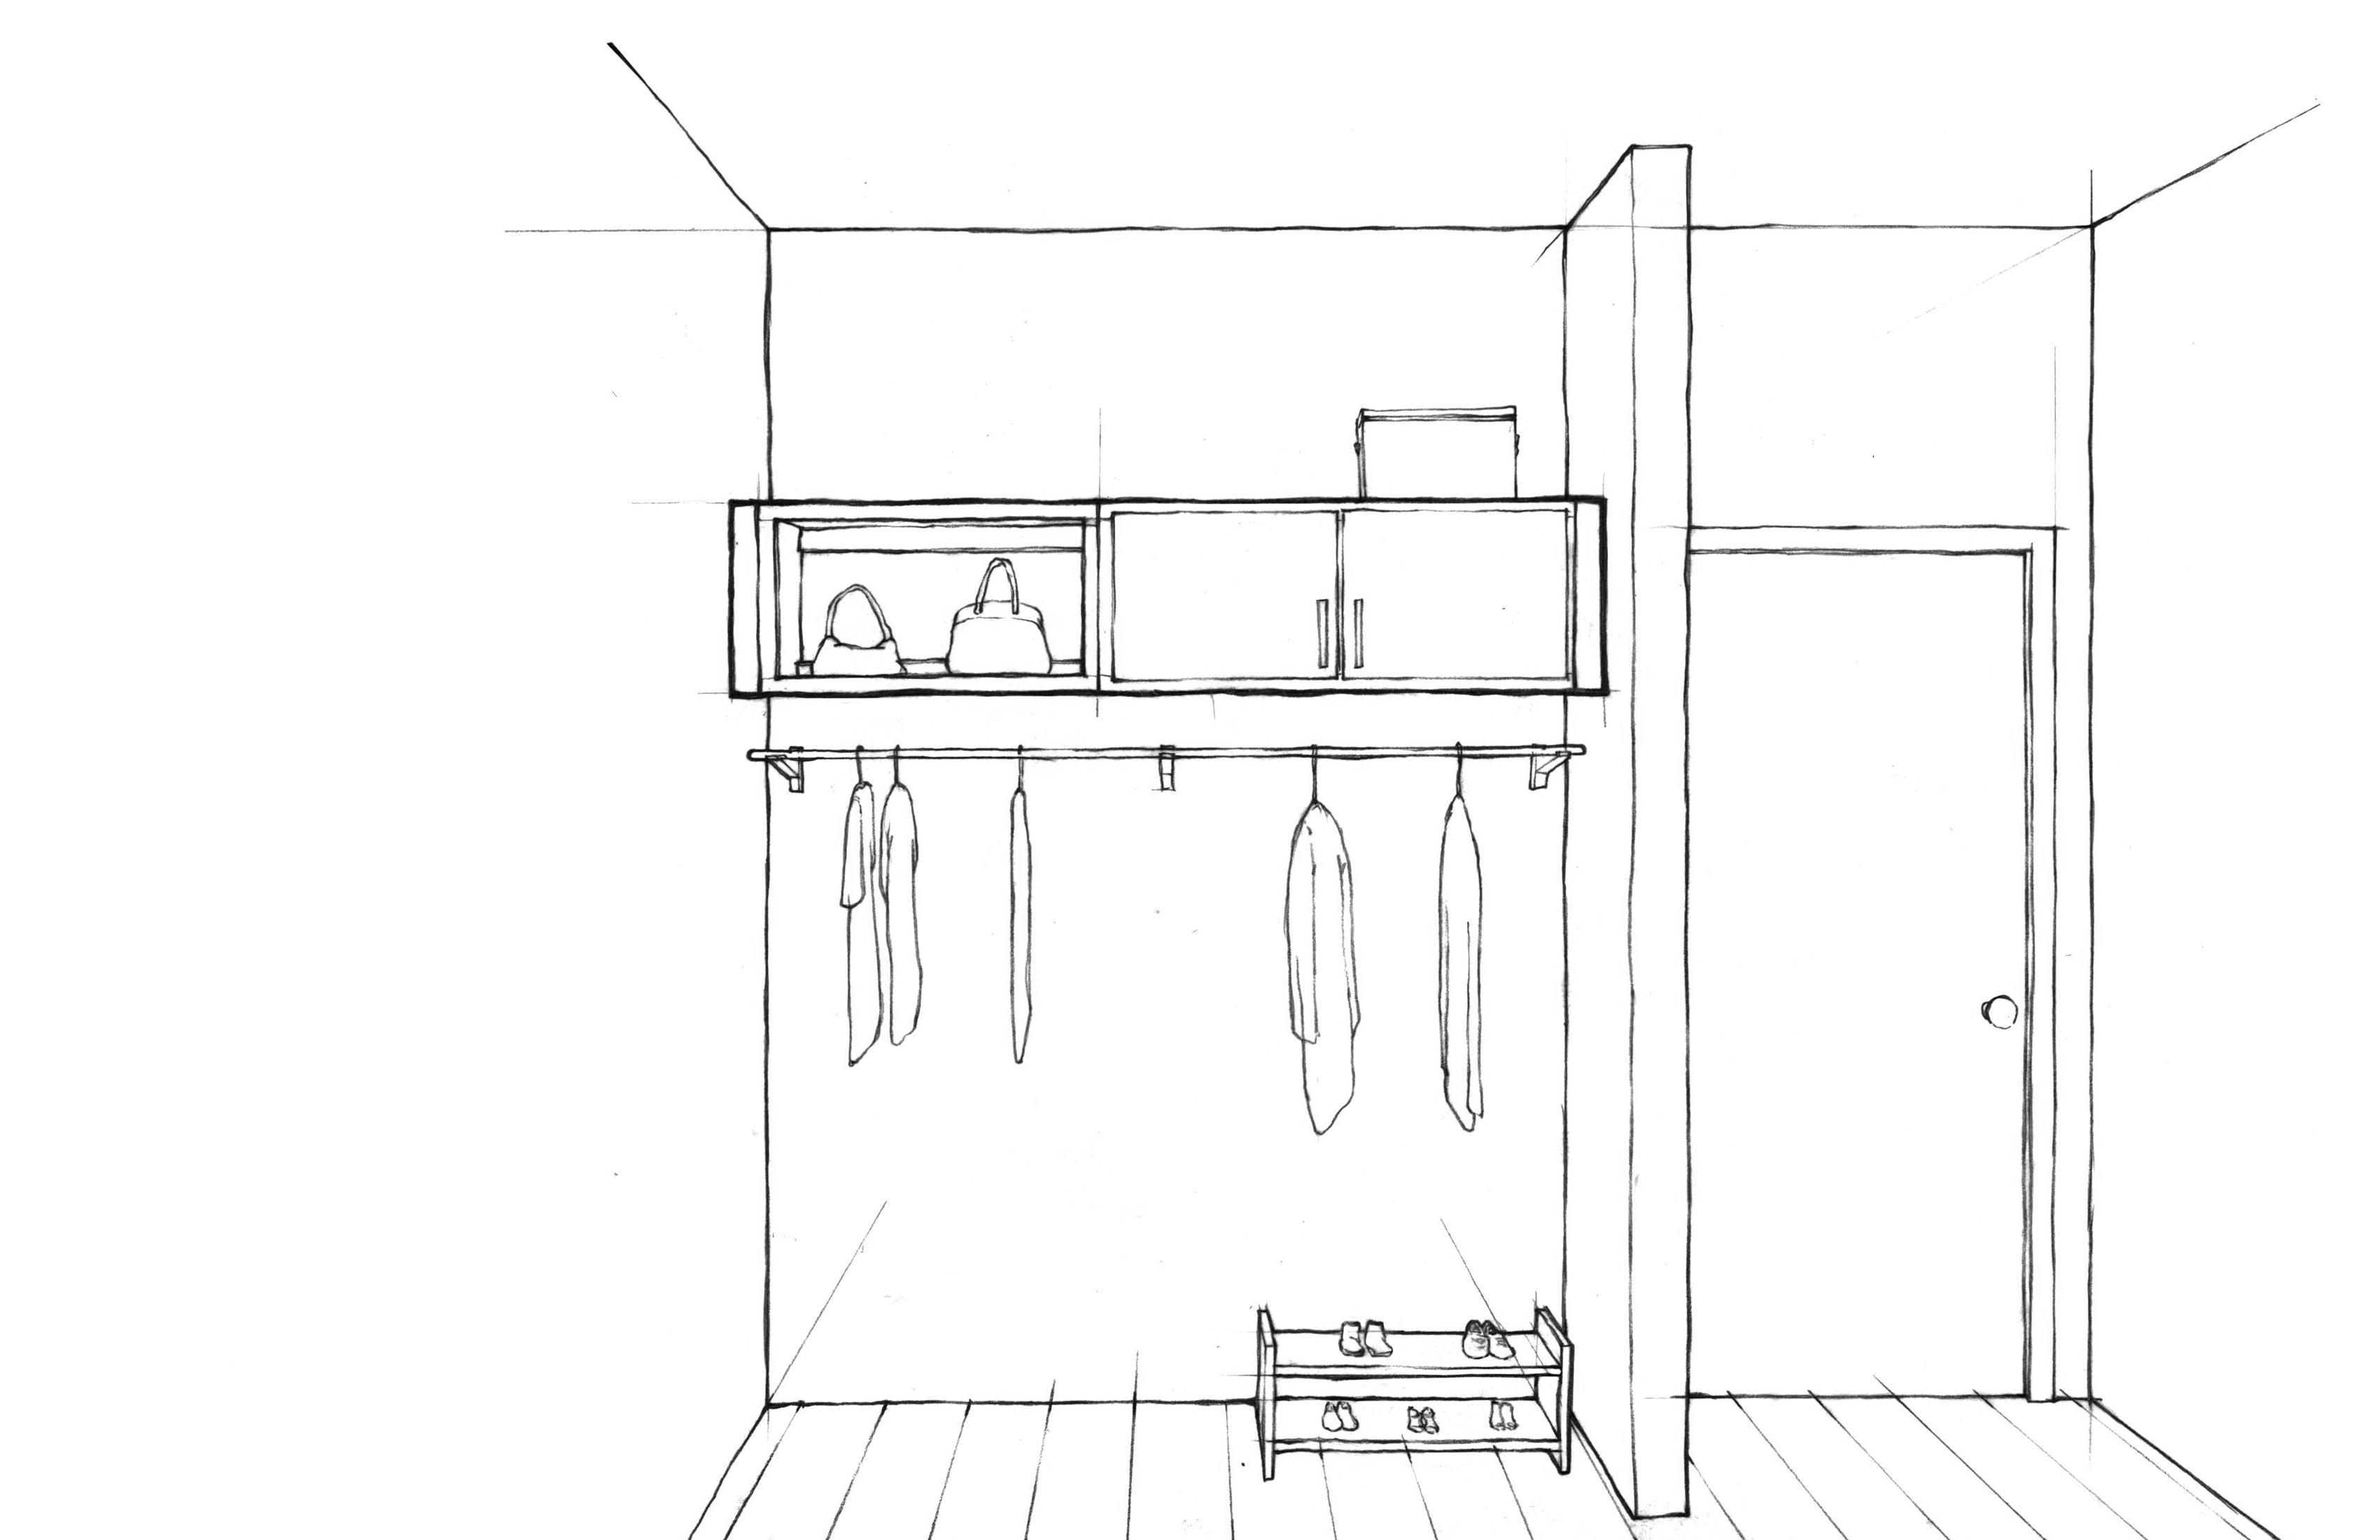
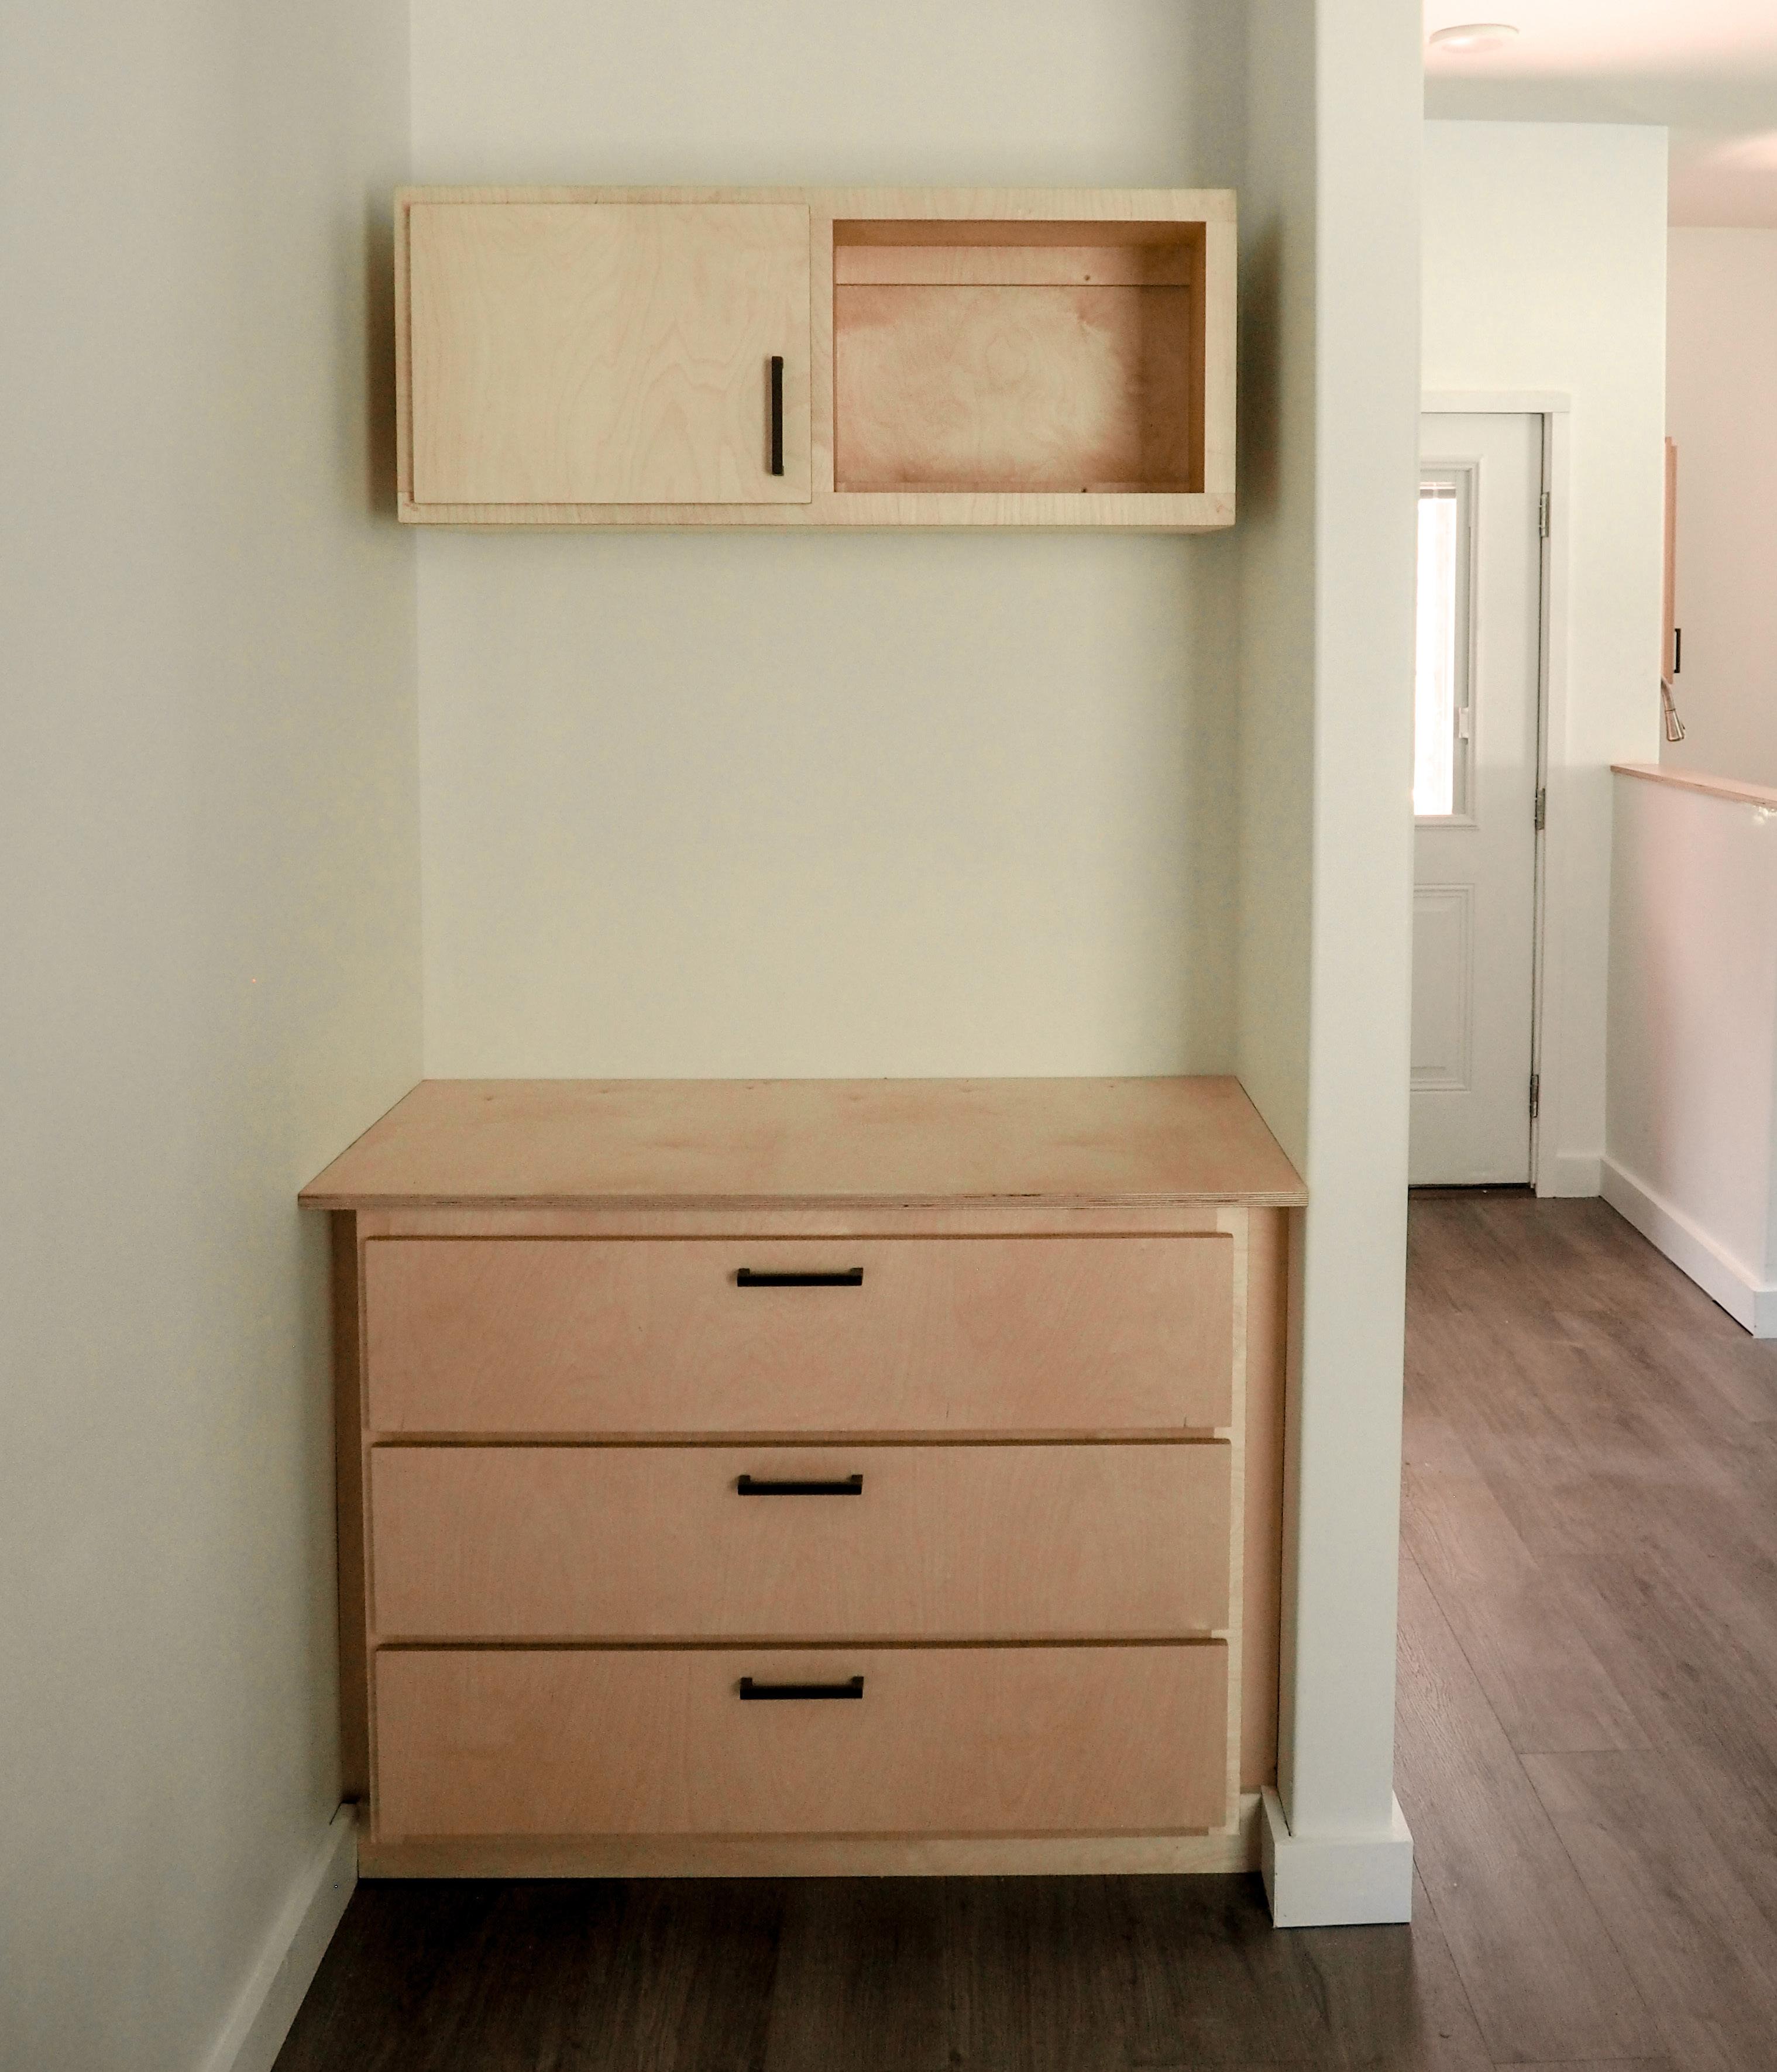
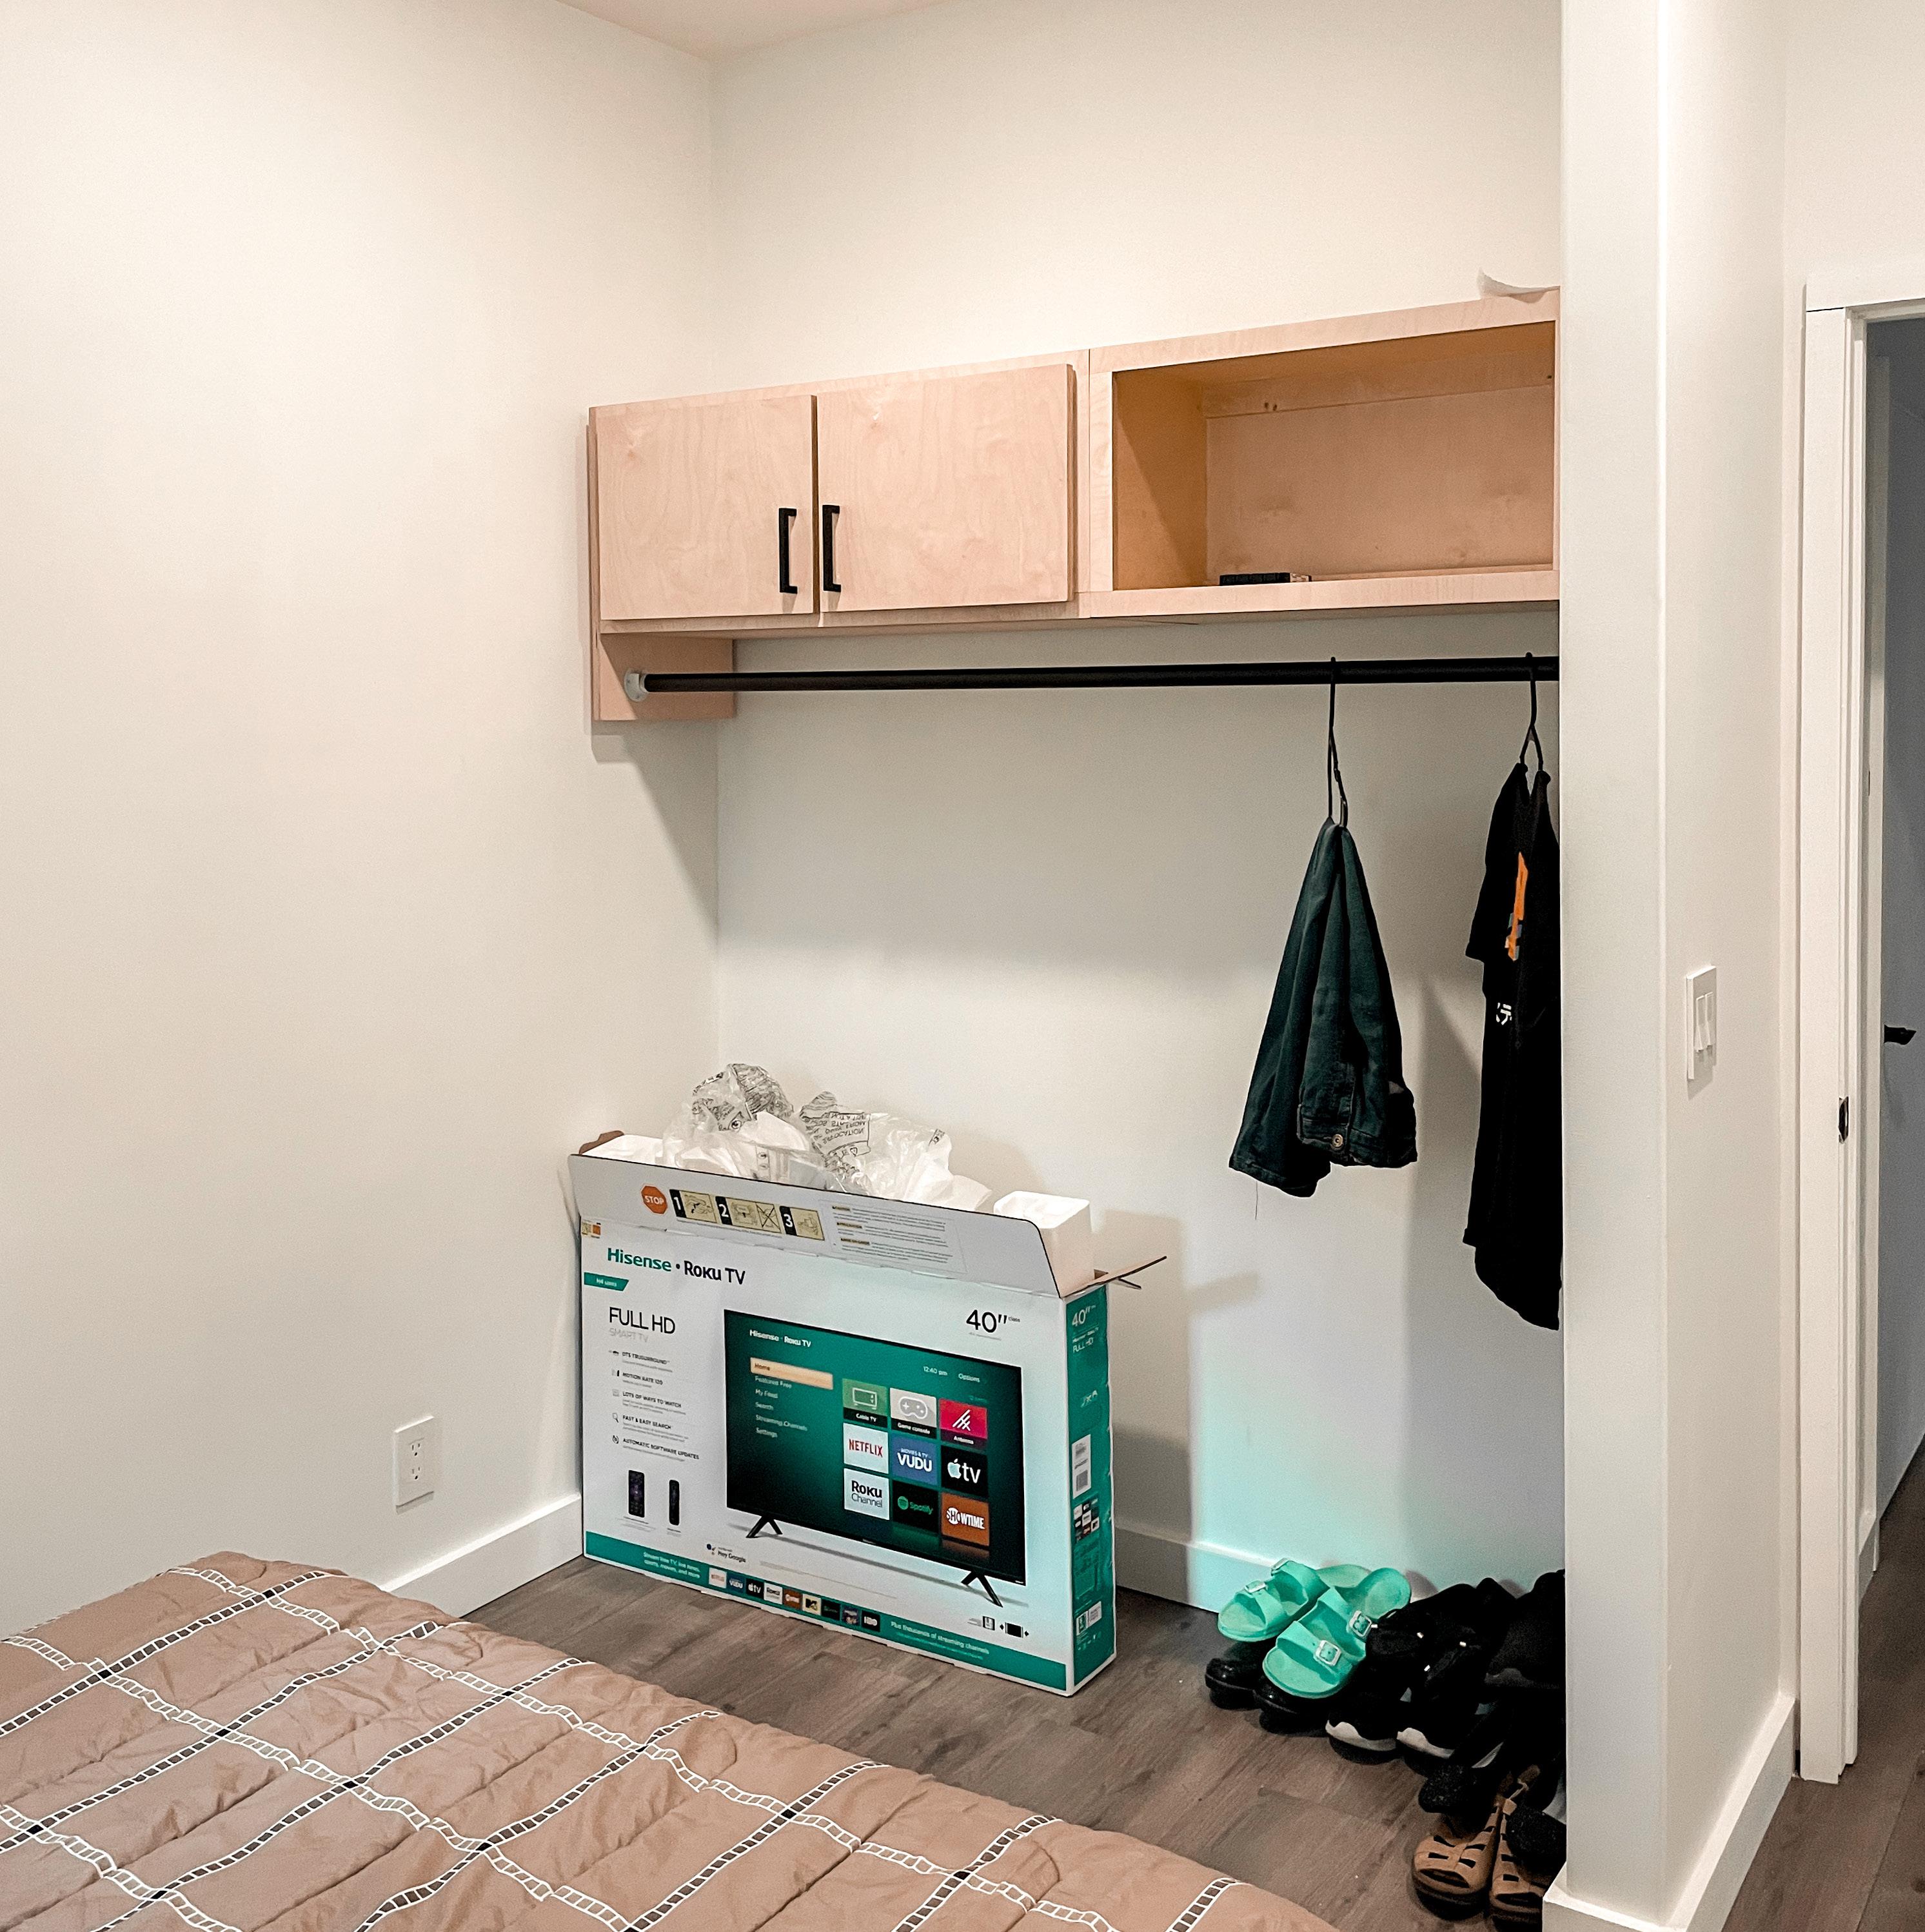
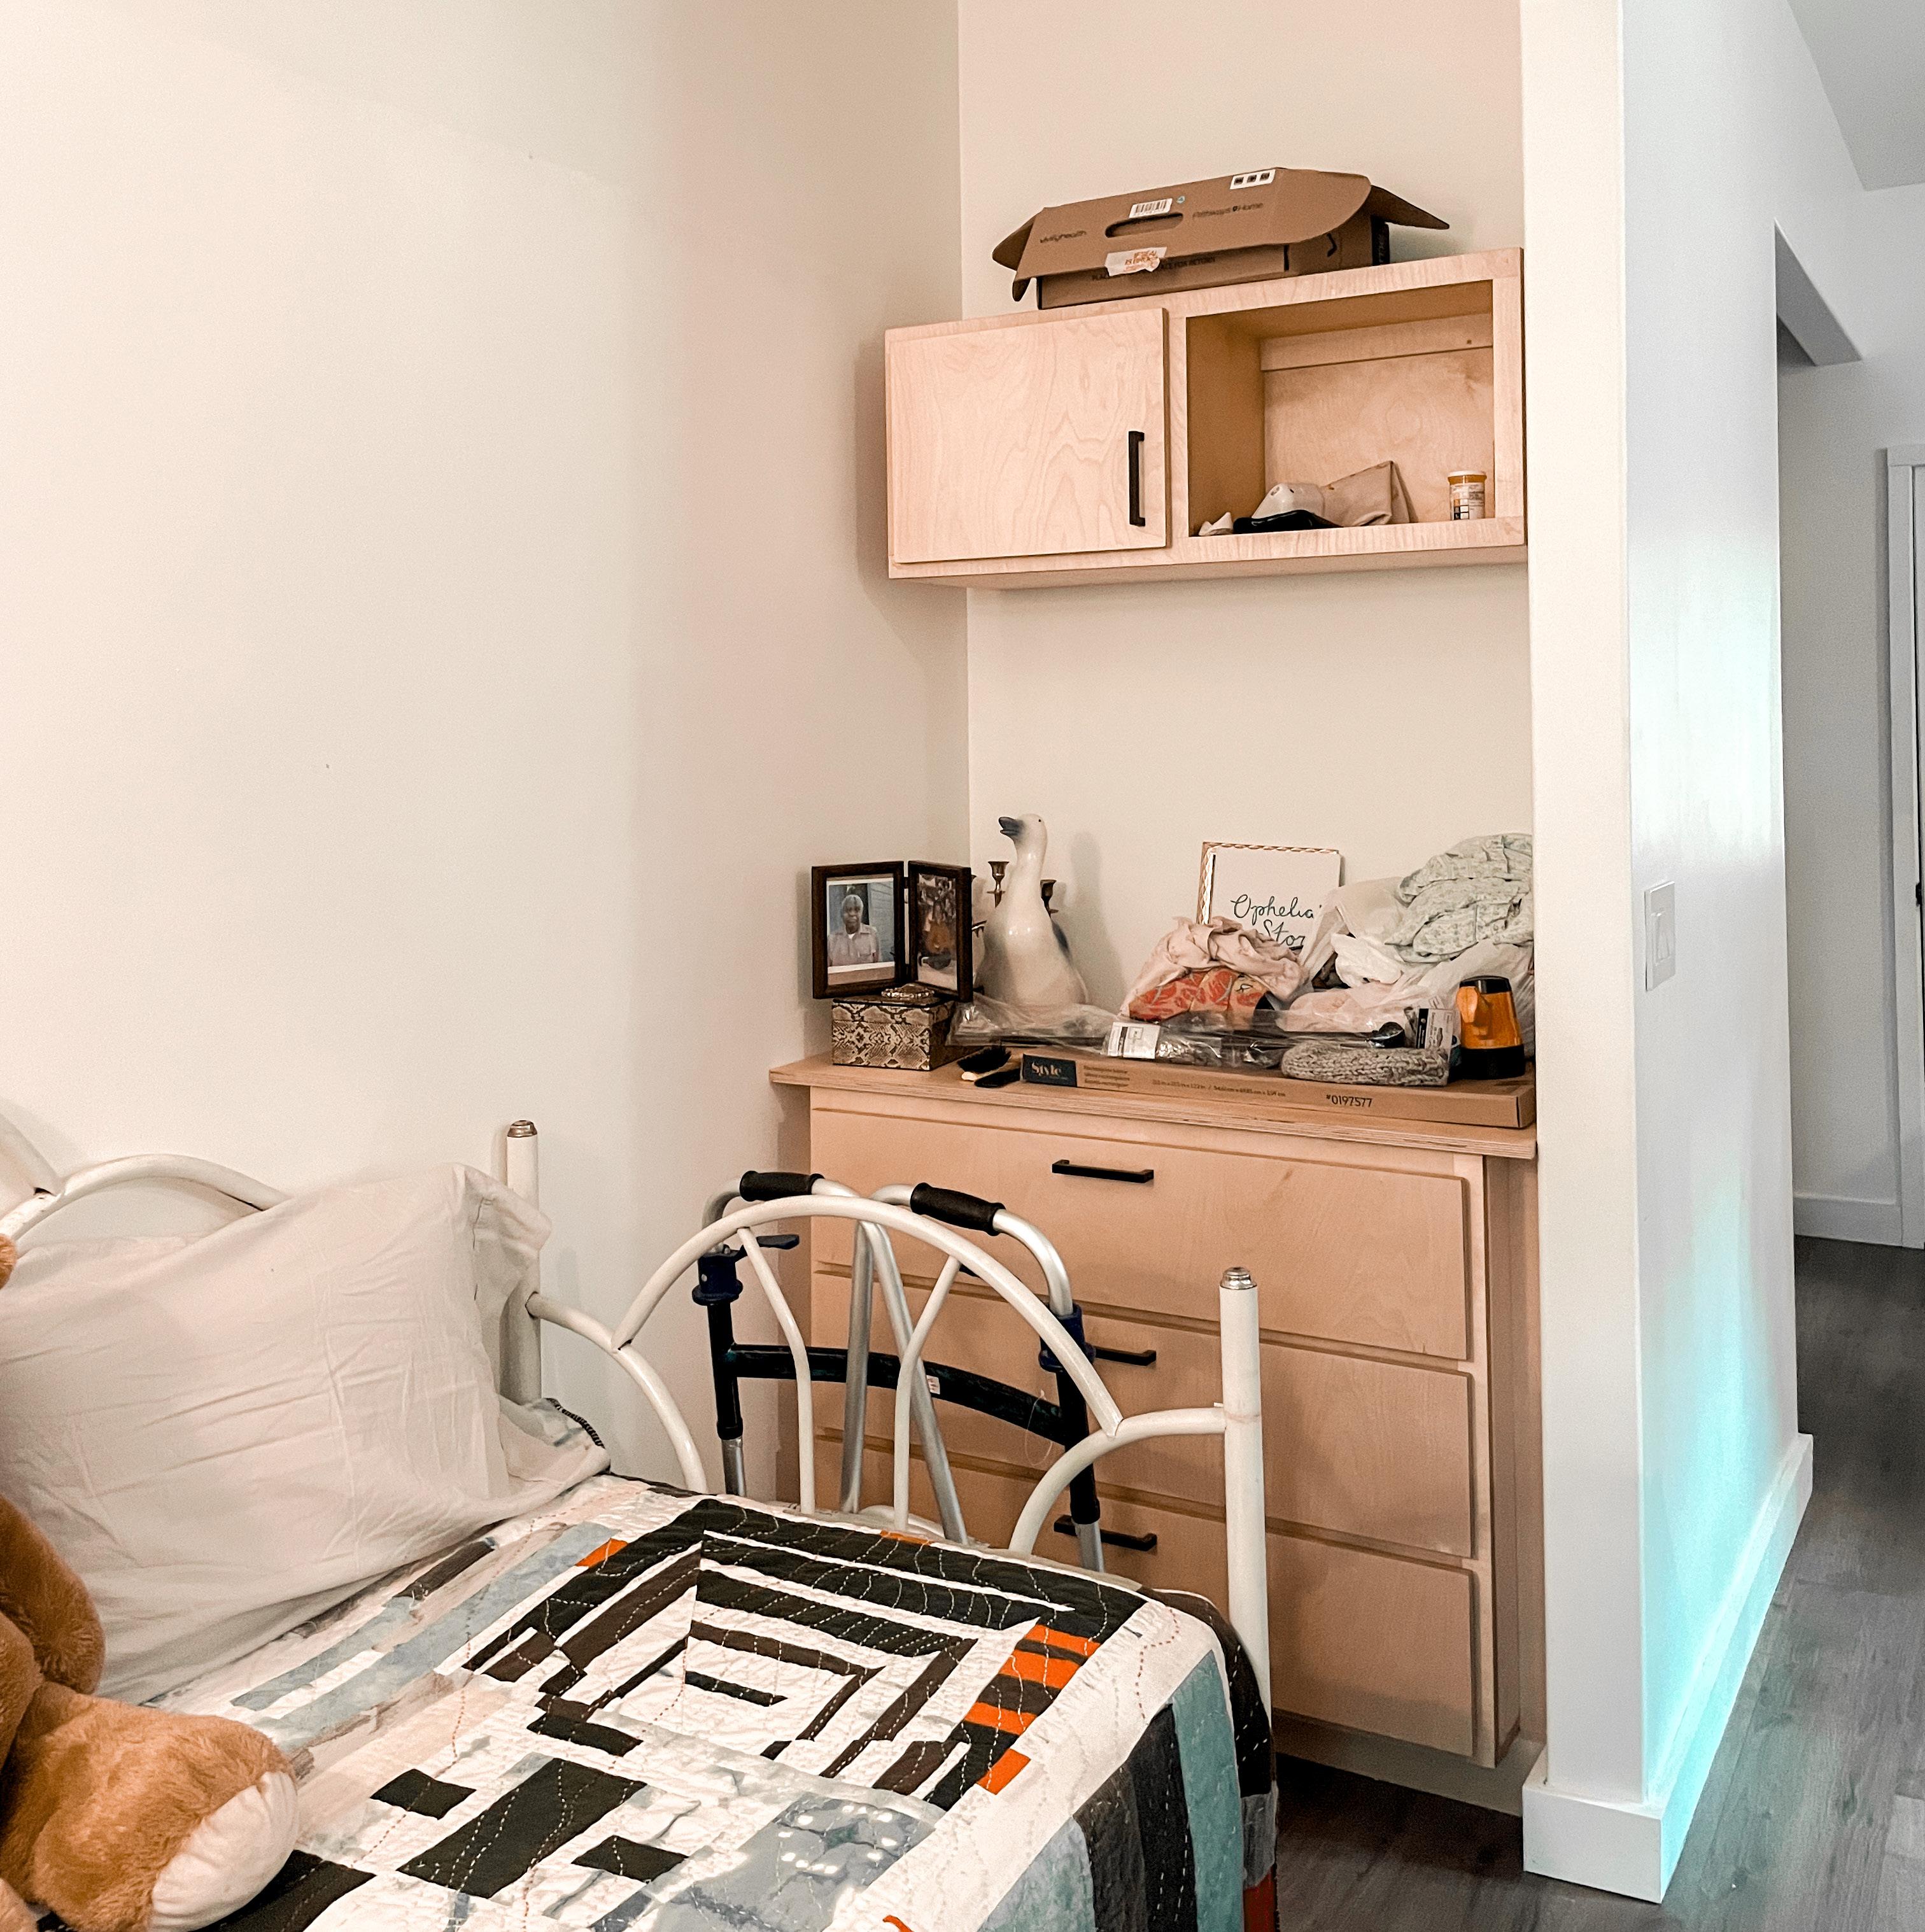
The bedroom closet mainly focuses on versatility by having a free space under the hanger and providing two types of storage options, an open shelf and a double cabinet with two doors. We designed only upper cabinets for the bedroom as Ms. Ophelia needs a place to put her own furniture. The placement of the cabinets was driven by the hanger which is 5’ high from the floor. The right double cabinet is modular throughout the house, but the length of the left open shelf was determined by the width of the closet space.
The bedroom closet prioritizes versatility by providing a free space under the hanging rod and providing both open and closed cabinetry. We decided to include only upper cabinets for the bedroom as Ms. Ophelia needed floor space for her own furniture. The height of these cabinets was driven by the hanging rod which is five feet from the floor. The right double cabinet is modular, but the open shelf was adapted to address the width of the closet.
2021 150 Rural Studio
136
Bathroom Ophelia’s Home Introduction 151 Bedroom Introduction
BEDROOM CONSTRUCTION DOCUMENTS Rural Studio 2021 138 PRODUCED BY AN AUTODESK STUDENT VERSION PRODUCED BY AN AUTODESK STUDENT VERSION PRODUCED BY AN AUTODESK STUDENT VERSION PRODUCED BY AN AUTODESK STUDENT VERSION PRODUCED BY AN AUTODESK STUDENT VERSION PRODUCED BY AN AUTODESK STUDENT VERSION PRODUCED BY AN AUTODESK STUDENT VERSION PRODUCED BY AN AUTODESK STUDENT VERSION West Elevation West Elevation

PRODUCED BY AN AUTODESK STUDENT VERSION PRODUCED BY AN AUTODESK STUDENT VERSION PRODUCED BY AN AUTODESK STUDENT VERSION PRODUCED BY AN AUTODESK STUDENT VERSION PRODUCED BY AN AUTODESK STUDENT VERSION PRODUCED BY AN AUTODESK STUDENT VERSION PRODUCED BY AN AUTODESK STUDENT VERSION PRODUCED BY AN AUTODESK STUDENT VERSION PRODUCED BY AN AUTODESK STUDENT VERSION PRODUCED BY AN AUTODESK STUDENT VERSION South Section Bedroom Ophelia’s Home Construction Drawings 153 South Section
Sub-Header MODULE OUTLINE 156 Big Upper Box 176 Upper Cabinet Short 2 2021 154 Rural Studio 142 162 140
Upper Single Cabinet
Upper Cabinet Short 1
Small Upper Box
Upper Cabinet Short 2
Upper Cabinet Short 3
Big Upper Box
Single Drawer
Lower Cabinet
Bedroom Ophelia’s Home Process Drawings 155 141
2021 156 Rural Studio 142
Bedroom Ophelia’s Home Process Drawings 157 Bedroom Ophelia’s Home Process Drawings
BIG UPPER BOX
BIG UPPER BOX
SIDE PIECE SPECIAL INTRUCTIONS
Side Piece Special Intructions
2021 158 Rural Studio
144
Bedroom Ophelia’s Home Process Drawings 159 Bedroom 145
BIG UPPER BOX
BIG UPPER BOX
SIDE PIECE SPECIAL INSTRUCTIONS
Side Piece Special Instructions
2021 160 Rural Studio
Bedroom Ophelia’s Home Process Drawings 161 Bedroom 147
BIG UPPER BOX
BIG UPPER BOX
FACE FRAME
Face Frame
2021 162 Rural Studio
Bedroom Ophelia’s Home Process Drawings 163 Bedroom
BOX BIG UPPER BOX 2021 164 Rural Studio Box BIG UPPER BOX 150
Bedroom Ophelia’s Home Process Drawings 165 1” Bedroom 1”
BIG UPPER BOX ASSEMBLY 2021 166 Rural Studio BIG ASSEMBLY 2021 166 Rural Studio BIG UPPER BOX Assembly 2021 166 Rural Studio 152
ASSEMBLY Bedroom Ophelia’s Home Process Drawings 167 1” 153
BIG UPPER BOX
FINISH BIG UPPER BOX
Finish BIG UPPER BOX
2021 168 Rural Studio
154
Bedroom Ophelia’s Home Process Drawings 169 Bedroom 155
FINISH BIG UPPER BOX
Finish BIG UPPER BOX
2021 170 Rural Studio
156
Bedroom Ophelia’s Home Process Drawings 171 Bedroom 157
FINISH BIG UPPER BOX 2021 172 Rural Studio FINISH BIG 2021 172 Rural Studio Finish BIG UPPER BOX 2021 172 Rural Studio 158
FINISH
Studio Bedroom Ophelia’s Home Process Drawings 173 159
BIG UPPER BOX
INSTALLATION
2021 174 Rural Studio Installation
160
BIG UPPER BOX
BIG UPPER BOX
Bedroom Ophelia’s Home Process Drawings 175 Bedroom 161
2021 176 Rural Studio 2021 176 Rural Studio 162
Bedroom Ophelia’s Home Process Drawings 177 Bedroom Ophelia’s Home Process Drawings 177 163
UPPER CABINET SHORT
UPPER CABINET SHORT
SIDE PIECE SPECIAL INSTRUCTIONS
Side Piece Special Instructions
2021 178 Rural Studio
164
Bedroom Ophelia’s Home Process Drawings 179 Bedroom 165
UPPER CABINET SHORT
UPPER CABINET SHORT
SIDE PIECE SPECIAL INSTRUCTIONS
Side Piece Special Instructions
2021 180 Rural Studio
166
Bedroom Ophelia’s Home Process Drawings 181 Bedroom
UPPER CABINET SHORT
UPPER CABINET SHORT
FACE FRAME
Face Frame
2021 182 Rural Studio
168
Bedroom Ophelia’s Home Process Drawings 183 Bedroom 169
BOX UPPER CABINET SHORT 2021 184 Rural Studio Box UPPER CABINET SHORT 170
Bedroom Ophelia’s Home Process Drawings 185 Bedroom 171
ASSEMBLY UPPER
2021 186 Rural Studio Assembly UPPER
172
CABINET SHORT
CABINET SHORT
Bedroom Ophelia’s Home Process Drawings 187 1” Bedroom 1” 173
FINISH UPPER
2021 188 Rural Studio Finish UPPER
174
CABINET SHORT
CABINET SHORT
Bedroom Ophelia’s Home Process Drawings 189 Bedroom 175
FINISH UPPER CABINET SHORT 2021 190 Rural Studio Finish UPPER CABINET SHORT 176
Bedroom Ophelia’s Home Process Drawings 191 Bedroom 177
FINISH UPPER CABINET SHORT 2021 192 Rural Studio FINISH UPPER 2021 192 Rural Studio Finish UPPER CABINET SHORT 2021 192 Rural Studio 178
FINISH UPPER CABINET SHORT Bedroom Ophelia’s Home Process Drawings 193 Bedroom 179
2021 194 Rural Studio Door Attachment
DOOR ATTACHMENT UPPER CABINET SHORT
UPPER CABINET SHORT
Bedroom Ophelia’s Home Process Drawings 195 Bedroom 181
2021 196 Rural Studio Door Attachment
DOOR ATTACHMENT UPPER CABINET SHORT
UPPER CABINET SHORT
Bedroom Ophelia’s Home Process Drawings 197 Bedroom 183
2021 198 Rural Studio Door Attachment
DOOR ATTACHMENT UPPER CABINET SHORT
UPPER CABINET SHORT
Bedroom Ophelia’s Home Process Drawings 199
INSTALLATION UPPER
2021 200 Rural Studio Installation UPPER
CABINET SHORT
CABINET SHORT
Bedroom Ophelia’s Home Process Drawings 201 Bedroom
INSTALLATION UPPER CABINET SHORT 2021 202 Rural Studio INSTALLATION UPPER 2021 202 Rural Studio Installation UPPER CABINET SHORT 2021 202 Rural Studio
INSTALLATION UPPER CABINET SHORT
Studio Bedroom Ophelia’s Home Process Drawings 203
NOOK
Sub-Header NOOK

The incorporation of the nook is the highlight of Ms. Ophelia’s home. Serving as Ms. Ophelia’s bedroom while also existing as part of the living room, the nook is the most unique space in the house. To accompany this character, we introduced a new type of module, the dresser, and modified the upper-short cabinet. The dresser has three equal-sized drawers that can provide enough storage space for her clothes and miscellaneous items. Also, the dimensions for the upper cabinet are the same with the ones in the utility room and bedroom, but we added a divider in the middle and removed the right door as an open shelf for more storage options and easy access.
nook is the most iconic part of Ophelia’s home as it is truly a “living room’s bedroom.” The nook contains a lower drawer module and upper cabinet modules. The lower module has three equally-sized drawers for clothes and miscellaneous items. The upper cabinet module is the same as the bedroom and utility modules. However, the open shelving was altered to address the width of the nook.
2021 206 Rural Studio
Nook Ophelia’s Home Introduction 207 Introduction 195

Nook CONSTRUCTION DOCUMENTS Rural Studio 2021 196 PRODUCED BY AN AUTODESK STUDENT VERSION PRODUCED BY AN AUTODESK STUDENT VERSION PRODUCED BY AN AUTODESK STUDENT VERSION PRODUCED BY AN AUTODESK STUDENT VERSION PRODUCED BY AN AUTODESK STUDENT VERSION West Elevation
PRODUCED BY AN AUTODESK STUDENT VERSION PRODUCED BY AN AUTODESK STUDENT VERSION PRODUCED BY AN AUTODESK STUDENT VERSION PRODUCED BY AN AUTODESK STUDENT VERSION PRODUCED BY AN AUTODESK STUDENT VERSION PRODUCED BY AN AUTODESK STUDENT VERSION South Section Nook Ophelia’s Home Construction Drawings 209 197
Rural Studio 2021 198
236
Sub-Header MODUL OUTLINE 210
200
212 Upper Cabinet Short 2 (1 Door)
Dresser
MODULE OUTLINE
Upper Single Cabinet
Upper Cabinet Short 1
Upper Cabinet Short 2
Upper Single Cabinet 1
Small Upper Box
Upper Cabinet Short 3
Upper Single Cabinet 2
Big Upper Box
Single Drawer
Lower Cabinet
Dresser
Nook Ophelia’s Home Process Drawings 211
199
Rural Studio 2021 200 212
Nook Ophelia’s Home Process Drawings 213 Nook Ophelia’s Home Process Drawings
UPPER CABINET SHORT
UPPER CABINET SHORT
SIDE PIECE SPECIAL INSTRUCTIONS
Side Piece Special Instructions
2021 214 Rural Studio
202
Nook Ophelia’s Home Process Drawings 215 Nook 203
UPPER CABINET SHORT
Rural Studio 2021 204
Construct Face Frame Jig Set up Frame Pieces Place Scrap Piece on Connection Drill Holes with Jig
Clamp Screw in Pocket Screws Drill Pilot Holes
Face Frame
Nook Ophelia’s Home
217
Process Drawings
205
BOX UPPER CABINET SHORT 2021 216 Rural Studio Box UPPER CABINET SHORT 206
Nook Ophelia’s Home Process Drawings 217 Nook 219
Rural Studio 2021 208 ASSEBLY UPPER CABINET SHORT 218 Assebly UPPER CABINET SHORT 220
Nook Ophelia’s Home Process Drawings 219 1” Nook 221 1” 209
FINISH UPPER CABINET SHORT 2021 220 Rural Studio Finish UPPER CABINET SHORT 210
Nook Ophelia’s Home Process Drawings 221 Nook 223
FINISH UPPER CABINET SHORT 2021 222 Rural Studio Finish UPPER CABINET SHORT 224
Nook Ophelia’s Home Process Drawings 223 Nook 213
FINISH UPPER CABINET SHORT 2021 224 Rural Studio Finish UPPER CABINET SHORT 226
Nook Ophelia’s Home Process Drawings 215
DOOR ATTACHMENT UPPER CABINET SHORT 2021 226 Rural Studio Door Attachment UPPER CABINET SHORT 216
Nook Ophelia’s Home Process Drawings 227 Nook 229 217
DOOR ATTACHMENT UPPER CABINET SHORT 2021 228 Rural Studio Door Attachment UPPER CABINET SHORT 218
Nook Ophelia’s Home Process Drawings 229 Nook 231
DOOR ATTACHMENT
2021 230 Rural Studio Door Attachment
UPPER CABINET SHORT
UPPER CABINET SHORT
Nook Ophelia’s Home Process Drawings 233 221
2021 232 Rural Studio
INSTALLATION UPPER CABINET SHORT
Installation UPPER CABINET SHORT
Nook Ophelia’s Home Process Drawings 233 Nook
INSTALLATION UPPER CABINET SHORT 2021 234 Rural Studio Installation UPPER CABINET SHORT 224
Nook Ophelia’s Home
237
Process Drawings
225
DRESSER
2021 236 Rural Studio
Nook Ophelia’s Home Process Drawings 237 Nook Ophelia’s Home Process Drawings 239 227
SIDE PIECE SPECIAL INSTRUCTIONS 2021 238 Rural Studio
Side Piece Special Instructions 240
DRESSER
DRESSER
Nook Ophelia’s Home Process Drawings 239 Nook 241
FRAME DRESSER 2021 240 Rural Studio Face Frame DRESSER 230
FACE
Nook Ophelia’s Home Process Drawings 241 Nook 243
DRAWER DRESSER
Drawer DRESSER
Rural Studio 2021 232
242
Kitchen Ophelia’s Home Process Drawings 243 Kitchen Drawings
BOX DRESSER 2021 244 Rural Studio Box DRESSER 234
Nook Ophelia’s Home Process Drawings 245 1” Nook 247 1” 235
2021 246 Rural Studio
236
FINISH DRESSER
Finish DRESSER
Nook Ophelia’s Home Process Drawings 247 Nook 249
2021 248 Rural Studio
250
FINISH DRESSER
Finish DRESSER
Nook Ophelia’s Home
251 239
Process Drawings
DRESSER
DRAWER ATTACHMENT
2021 250 Rural Studio
Attachment
240
Drawer
DRESSER
Nook Ophelia’s Home Process Drawings 251 Nook 253 241
DOOR ATTACHMENT DRESSER 2021 252 Rural Studio Door Attachment DRESSER 242
Nook Ophelia’s Home Process Drawings 253 Nook 243
INSTALLATION DRESSER 2021 254 Rural Studio Installation DRESSER 244
Nook Ophelia’s Home Process Drawings 255 Nook 257
UTILITY
Sub-Header UTILITY
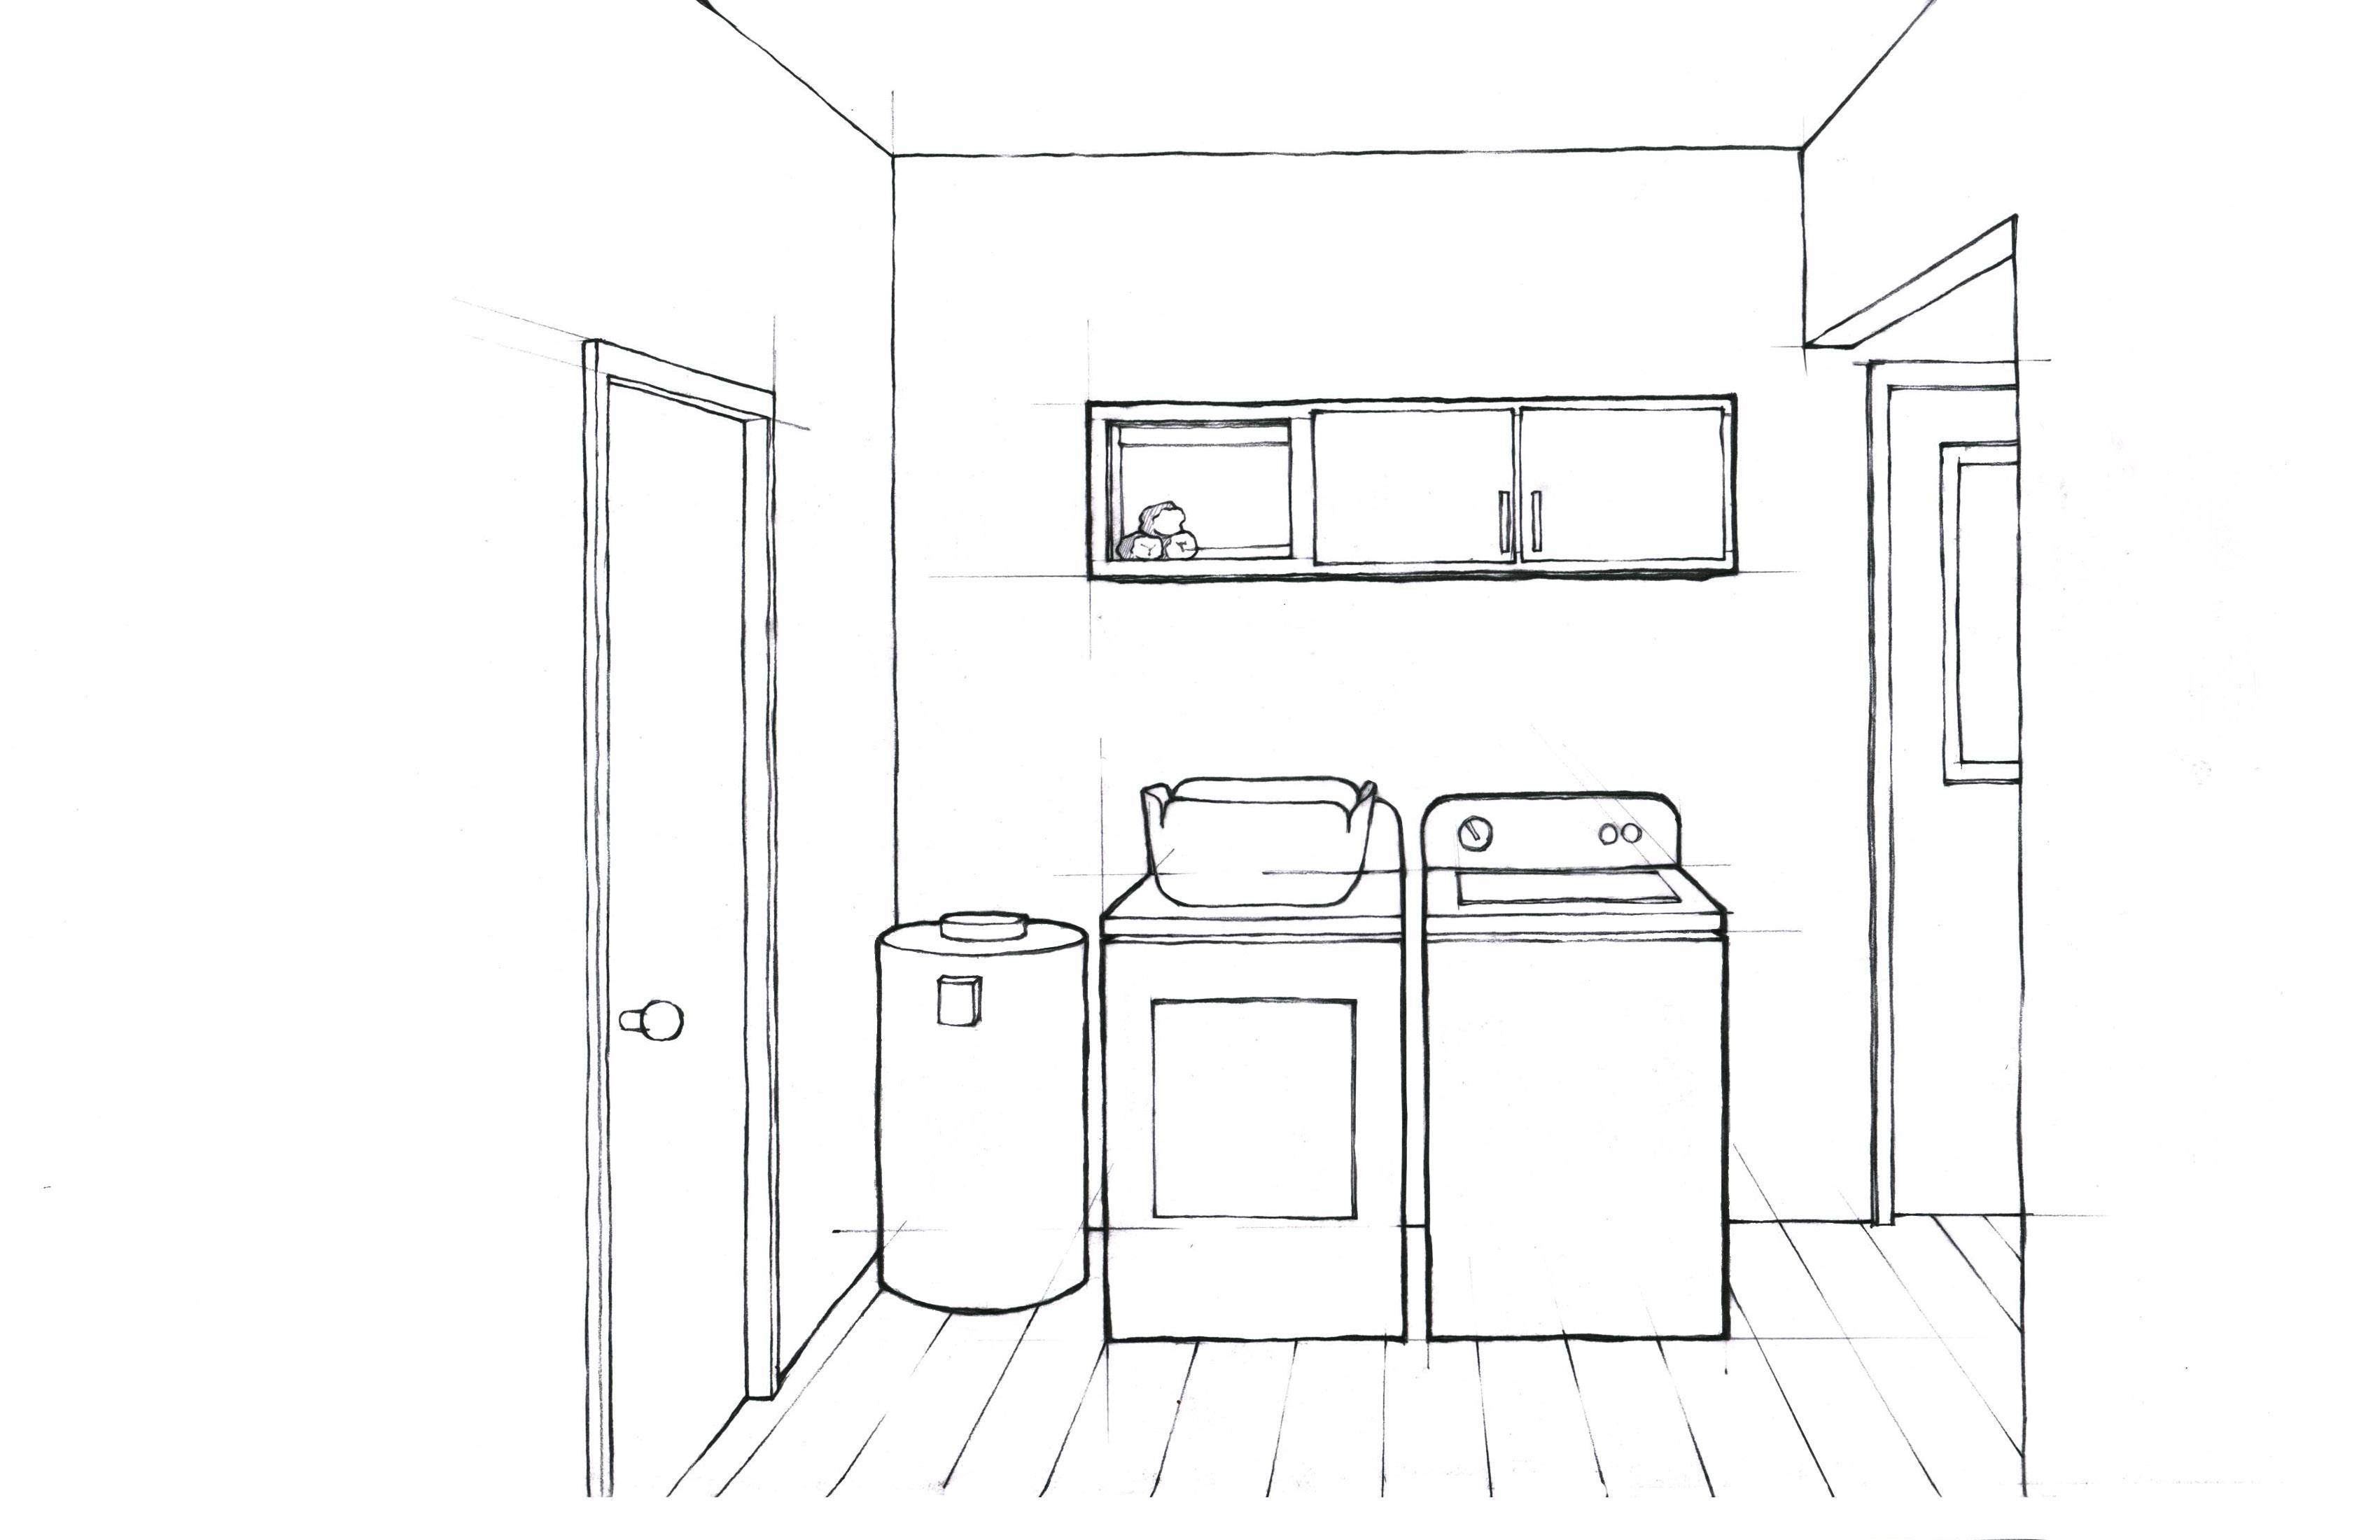
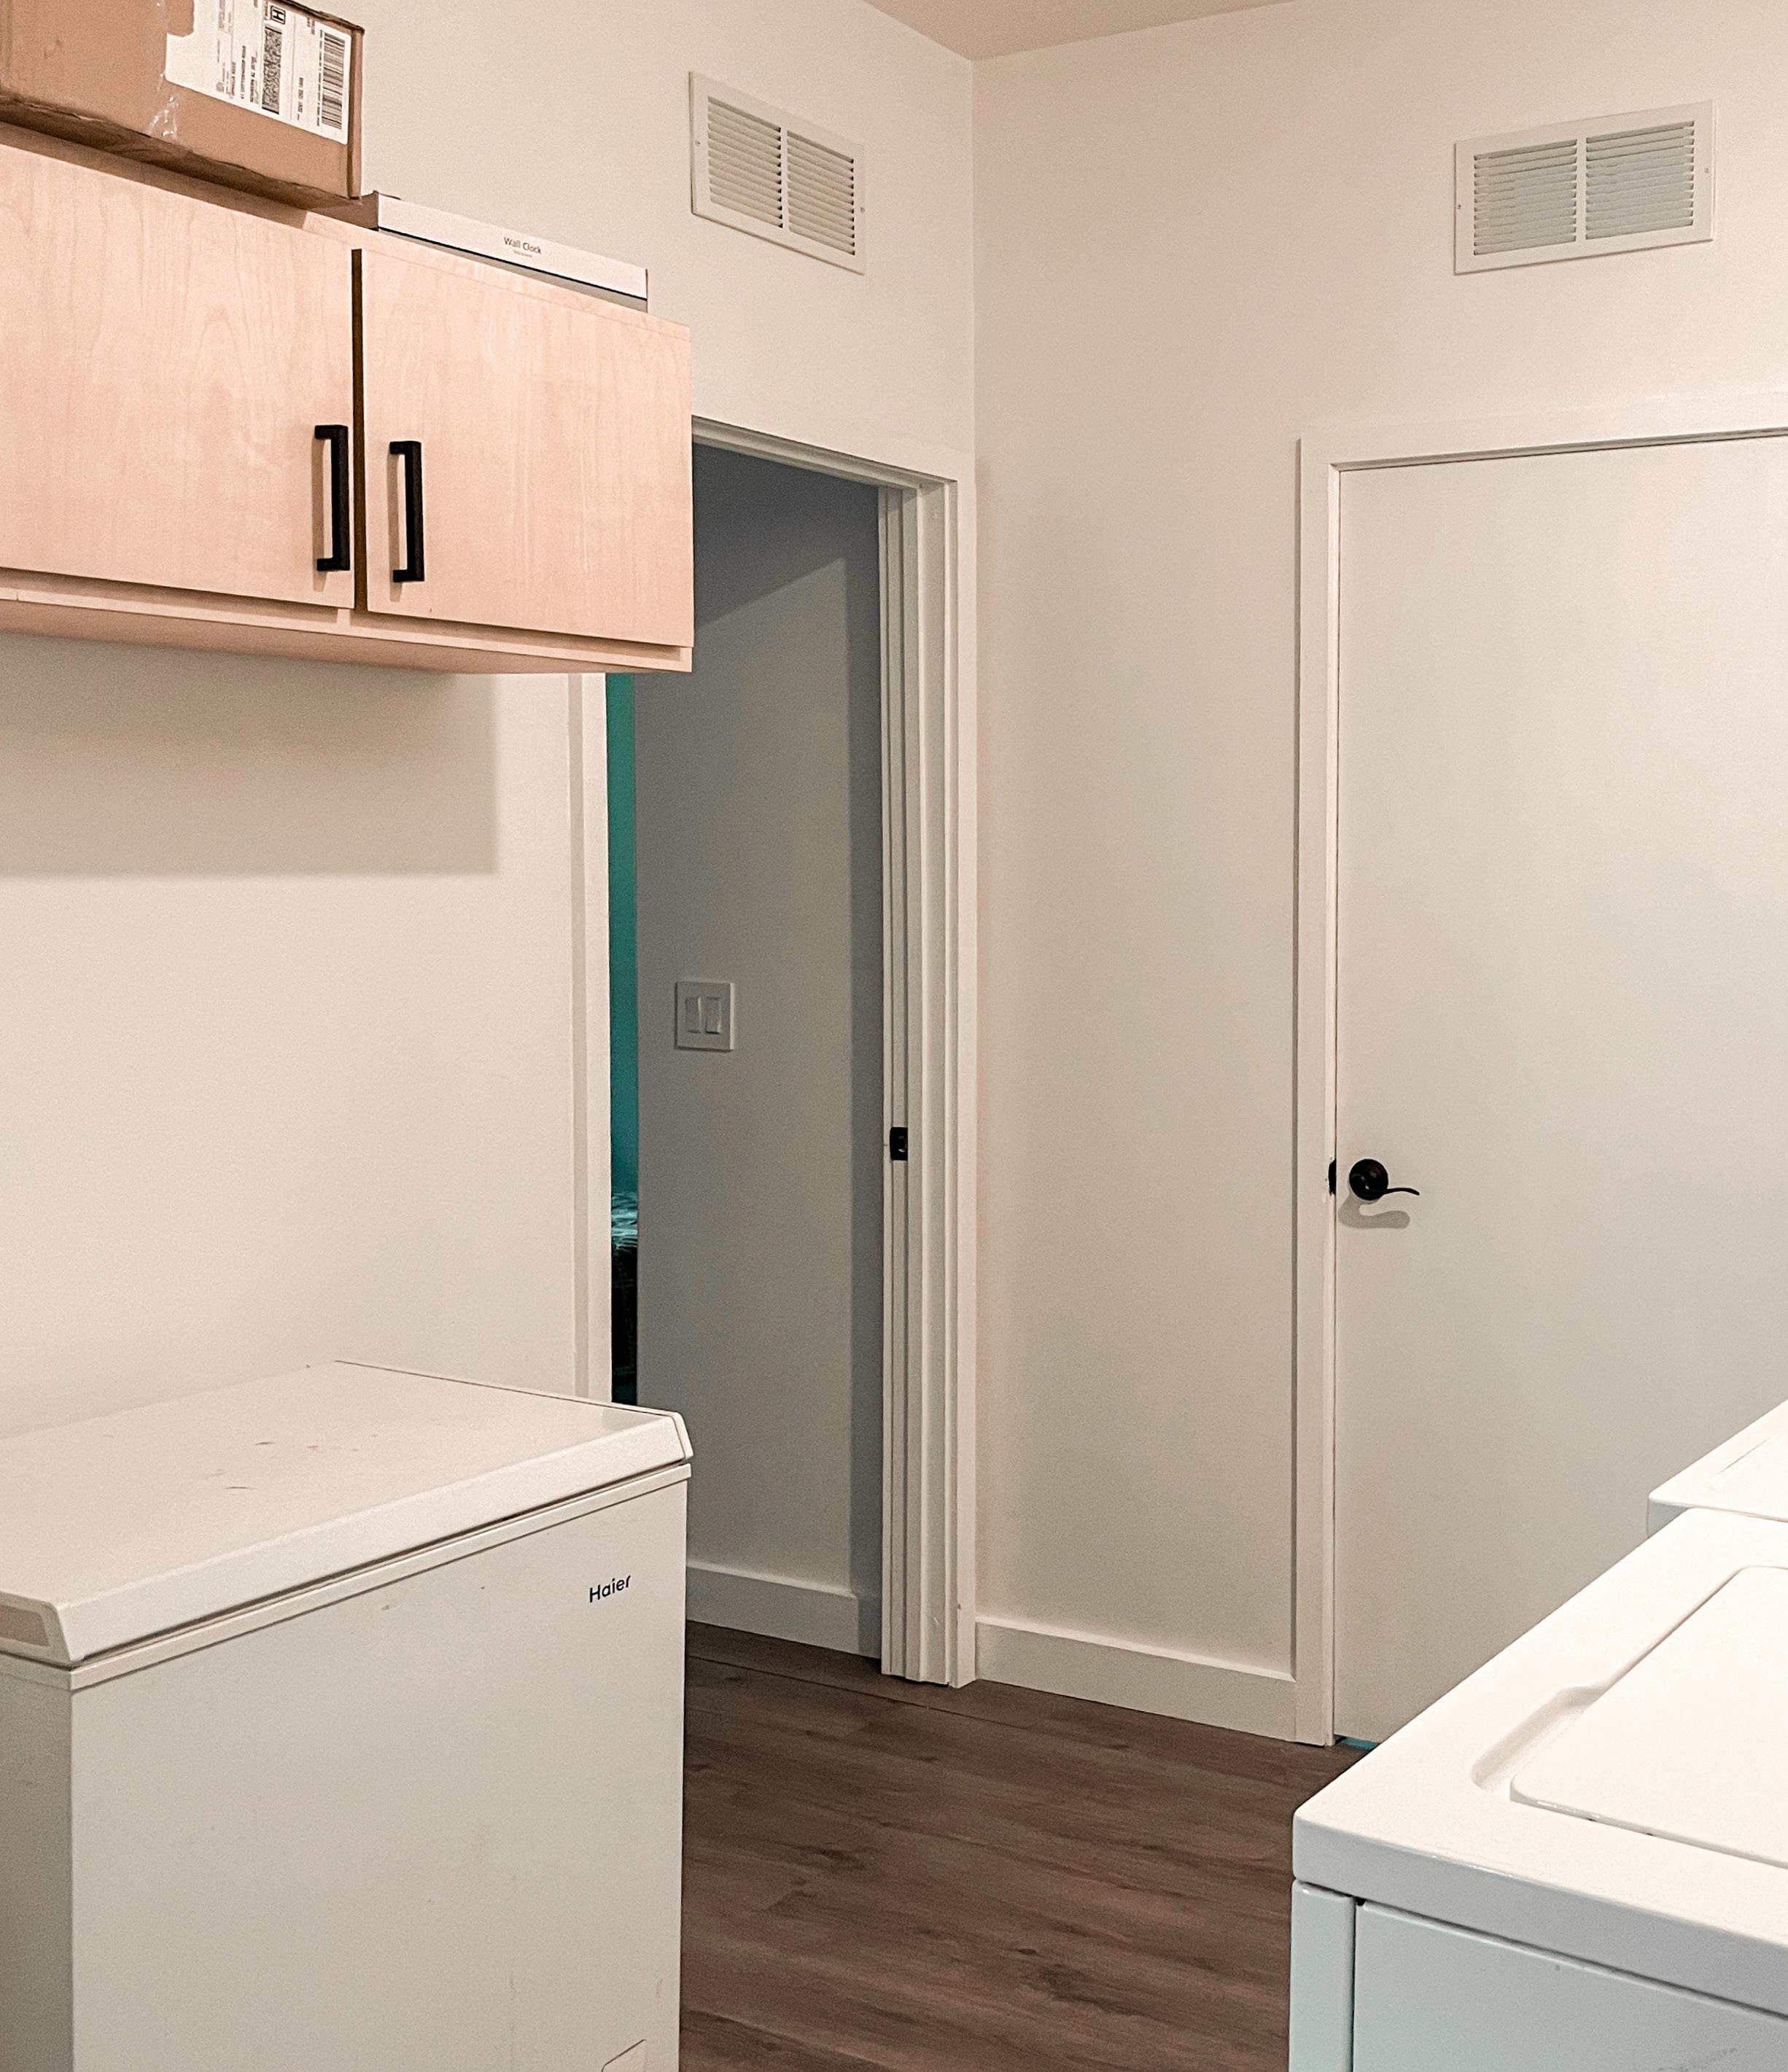
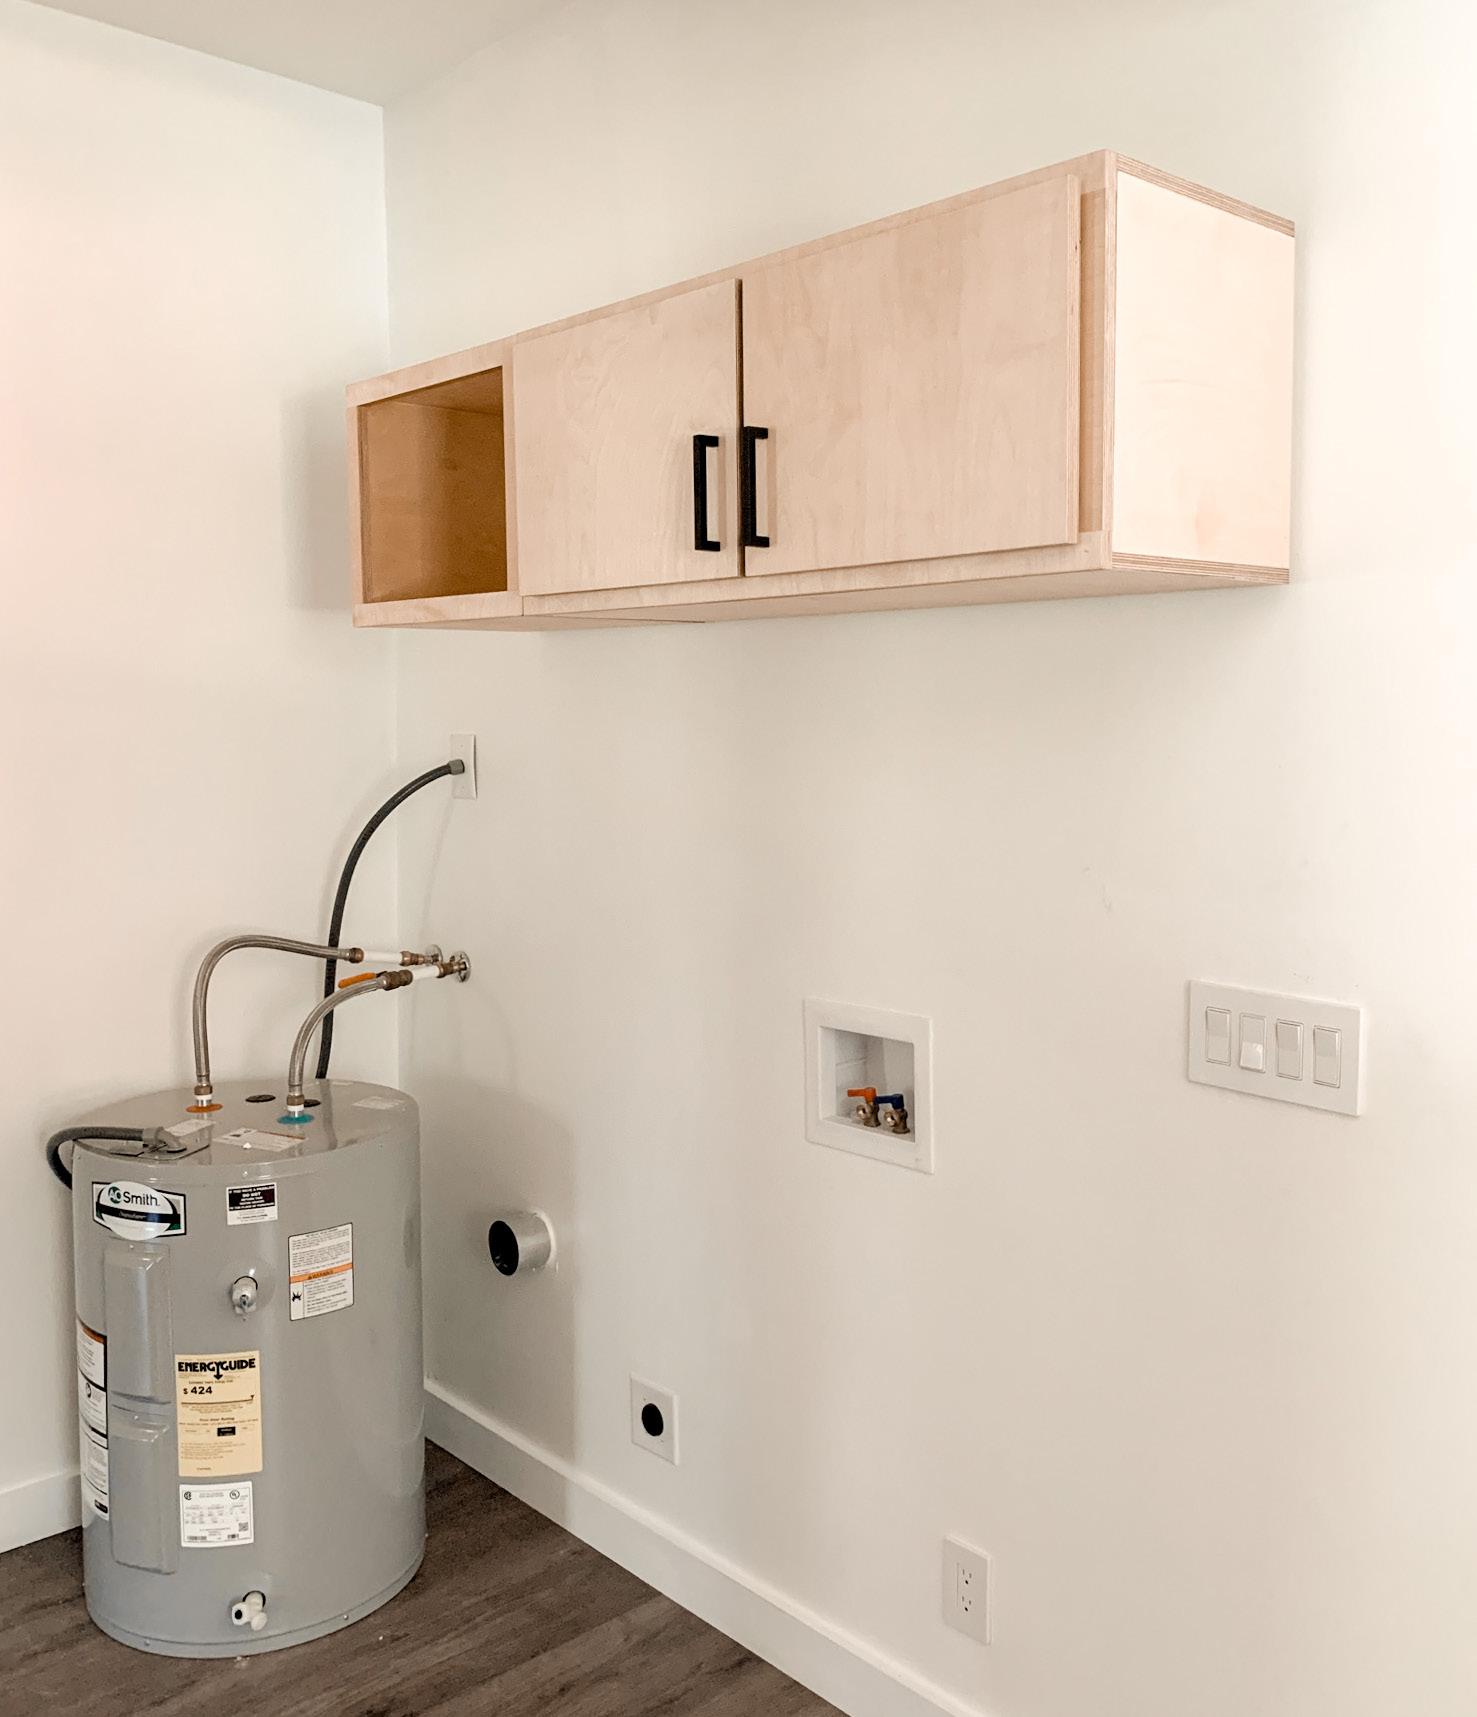
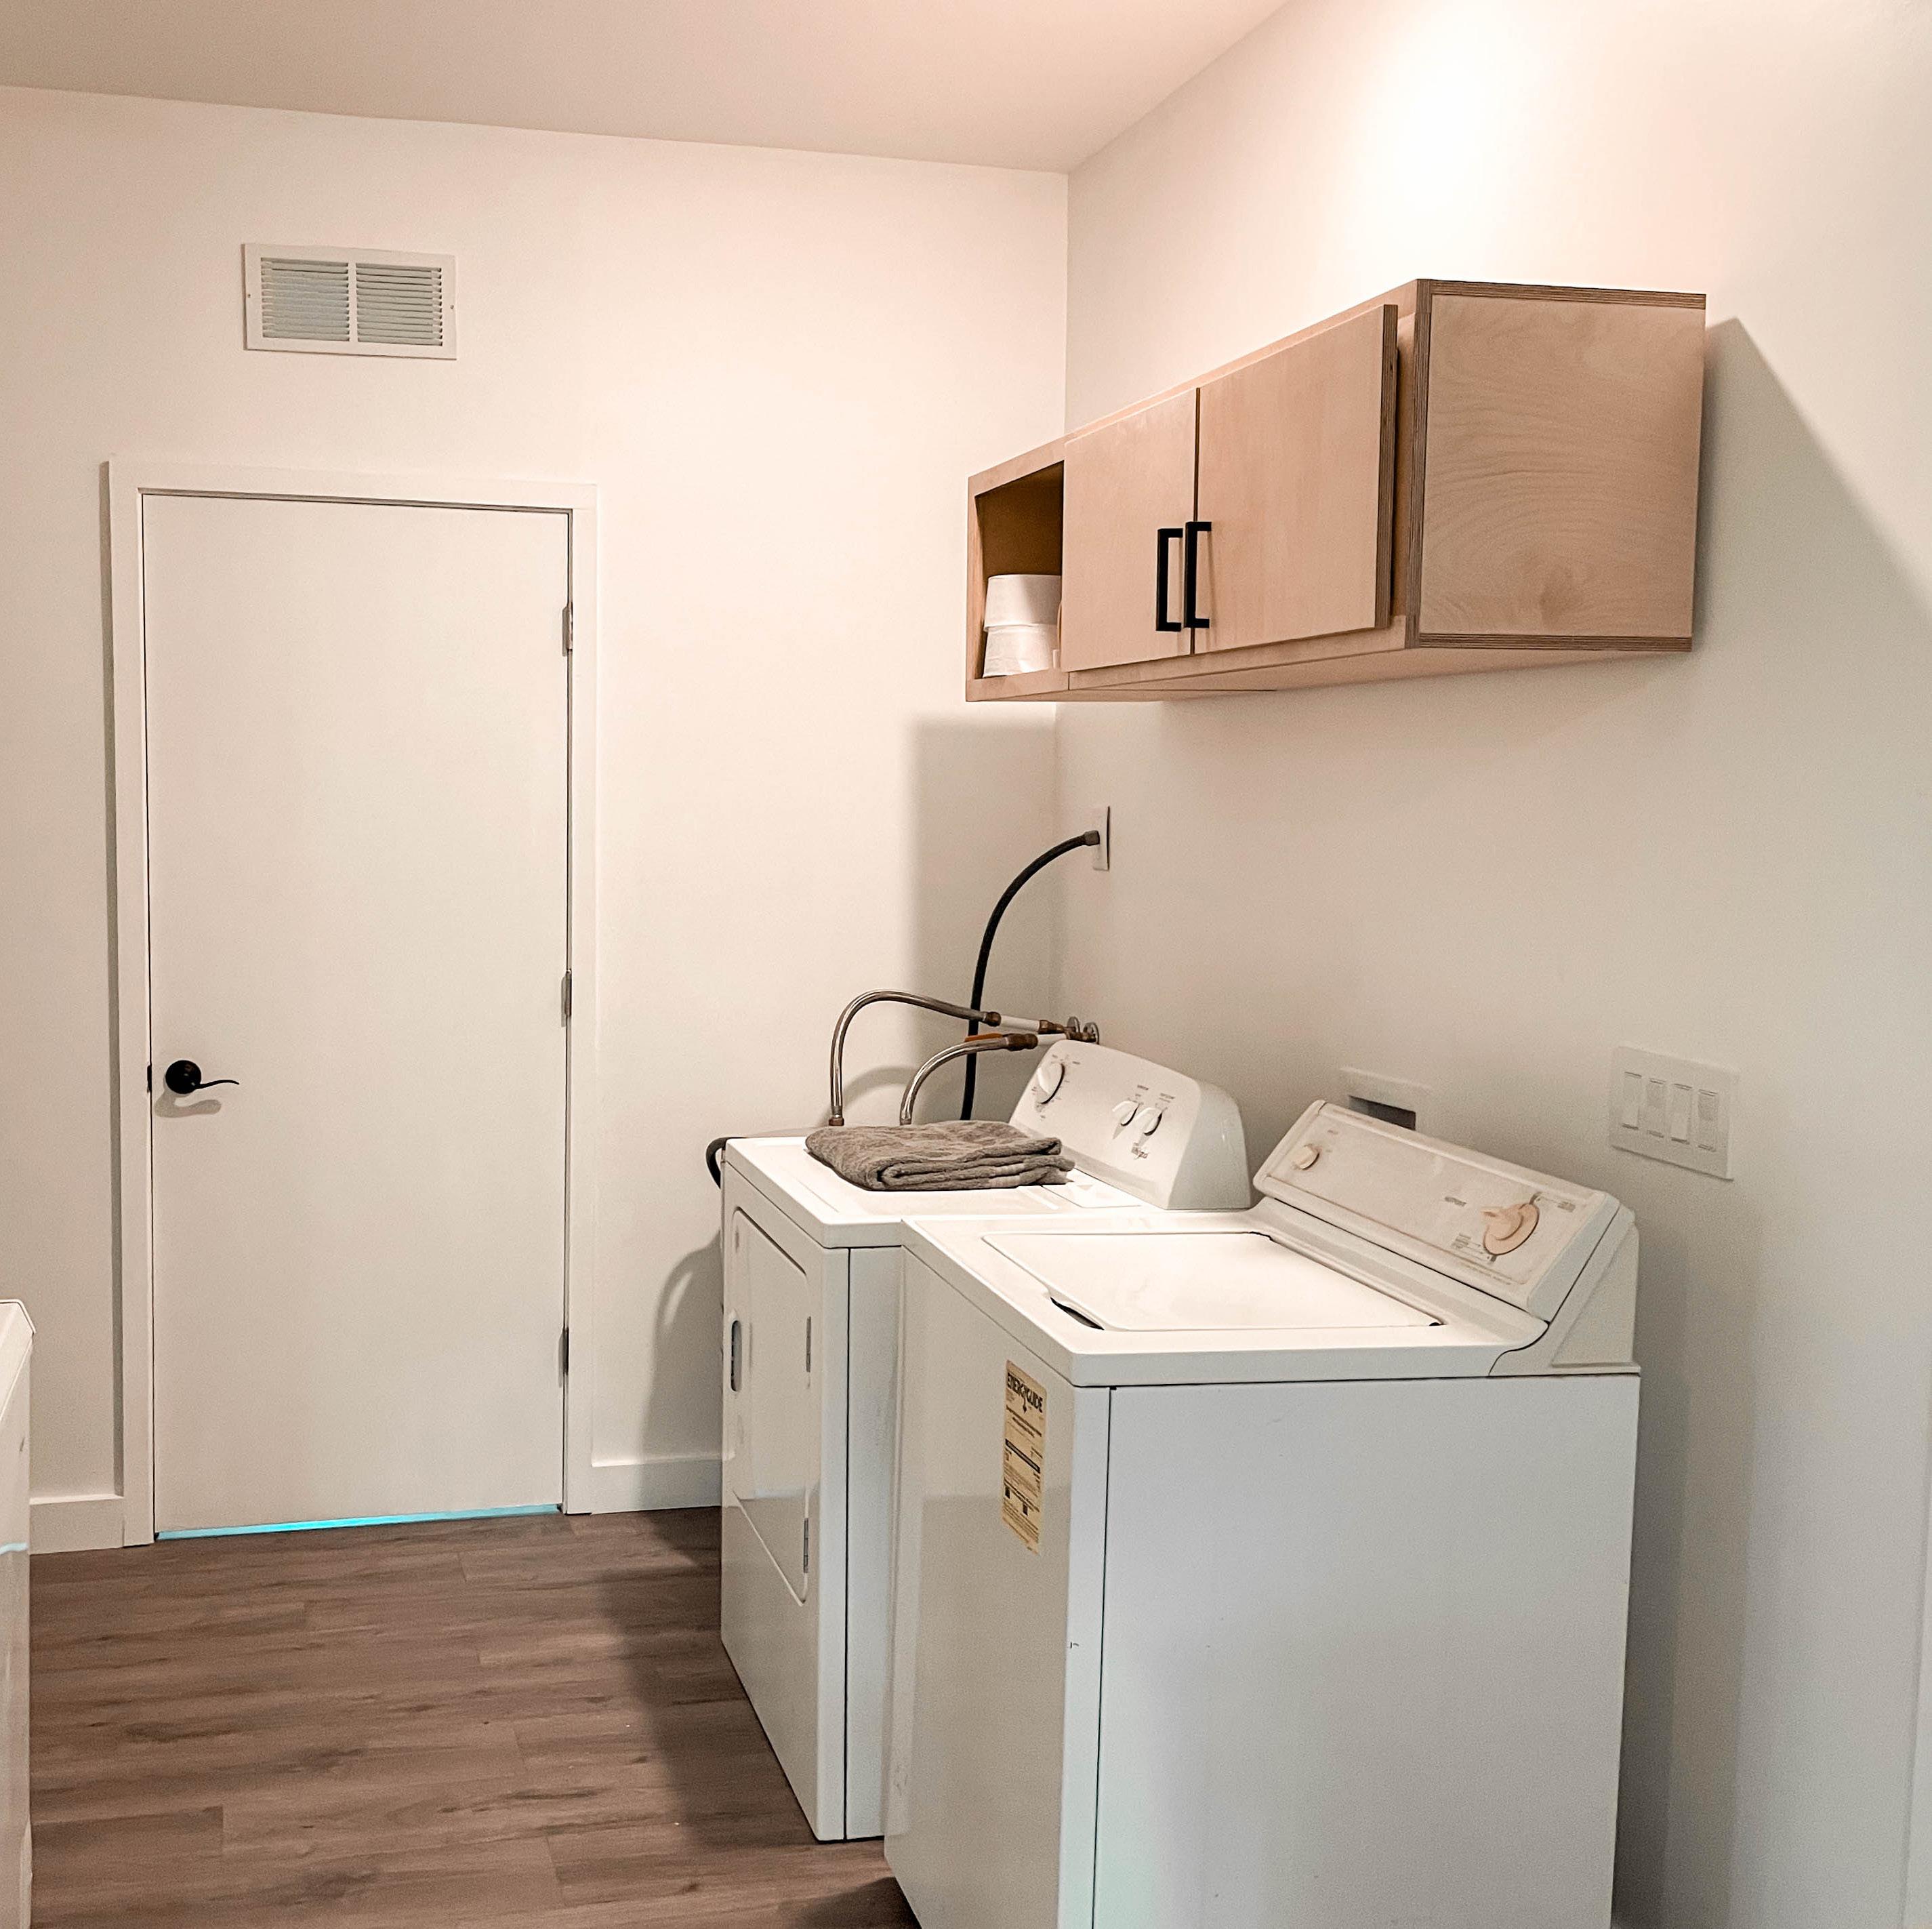
In the utility room, it was obvious that there needed to be ample amounts of storage. We started the design of this space by placing a cabinet above the washer and dryer. The size of this double upper cabinet was determined by the original modular dimensions and the necessary clearances from the washer and dryer. We also felt that an open shelf was a viable option to include in the utility space, as it allows for easy access to frequently used items. We decided to attach the open shelf to the left side of the double cabinet, as it is out of site from the living room and kitchen. Another double cabinet is placed on the opposite wall, above the ice chest, serving as additional storage space for
For the utility room, we began by designing the cabinets above the washer and dryer. We maintained the modular dimensions and accounted for the necessary clearances above the washer and dryer. We also included an open shelf for easy access to frequentlyused items. We decided to attach this open shelf to the left side of the double cabinet to keep it out of sight from the living room and kitchen. On the opposite wall, we placed another upper cabinet for additional storage.
2021 260 Rural Studio
Utility Ophelia’s Home Introduction 261 Introduction
Utility CONSTRUCTION DOCUMENTS Rural Studio 2021 252 East Elevation West Elevation PRODUCED BY AN AUTODESK STUDENT VERSION PRODUCED BY AN AUTODESK STUDENT VERSION PRODUCED BY AN AUTODESK STUDENT VERSION PRODUCED BY AN AUTODESK STUDENT VERSION PRODUCED BY AN AUTODESK STUDENT VERSION PRODUCED BY AN AUTODESK STUDENT VERSION PRODUCED BY AN AUTODESK STUDENT VERSION PRODUCED BY AN AUTODESK STUDENT VERSION PRODUCED BY AN AUTODESK STUDENT VERSION PRODUCED BY AN AUTODESK STUDENT VERSION PRODUCED BY AN AUTODESK STUDENT VERSION
PRODUCED BY AN AUTODESK STUDENT VERSION PRODUCED BY AN AUTODESK STUDENT VERSION PRODUCED BY AN AUTODESK STUDENT VERSION PRODUCED BY AN AUTODESK STUDENT VERSION PRODUCED BY AN AUTODESK STUDENT VERSION PRODUCED BY AN AUTODESK STUDENT VERSION PRODUCED BY AN AUTODESK STUDENT VERSION PRODUCED BY AN AUTODESK STUDENT VERSION PRODUCED BY AN AUTODESK STUDENT VERSION PRODUCED BY AN AUTODESK STUDENT VERSION North Section Utility Ophelia’s Home Construction Drawings 263
MODUL OUTLINE
Sub-Header
Small Upper Box
264 Upper Single Cabinet 1
284 Upper Cabinet Single Short 3
276 Upper Cabinet Short 3
2021 264 Rural Studio
Upper Single Cabinet
Upper Cabinet Short 1
Small Upper Box
Upper Cabinet Short 2
Upper Cabinet Short 3
Big Upper Box
Single Drawer
Lower Cabinet
Utility Ophelia’s Home
Drawings 255
Process
Upper Single Cabinet
Rural Studio 2021 256
West Elevation
Utility Ophelia’s Home Process Drawings 267 East Elevation 257
UPPER SINGLE CABINET
UPPER SINGLE CABINET
SIDE PEICE SPECIAL INSTUCTIONS
Side Peice Special Instuctions
2021 266 Rural Studio
Utility Ophelia’s Home Process Drawings 267 Utility
UPPER SINGLE CABINET
UPPER SINGLE CABINET
SIDE
Side Peice
SPECIAL INSTUCTIONS 2021 268 Rural Studio
PEICE
Special Instuctions 270
Utility Ophelia’s Home Process Drawings 269 Utility 271 261
UPPER SINGLE CABINET
UPPER SINGLE CABINET
FACE FRAME
Face Frame
2021 270 Rural Studio
262
Utility Ophelia’s Home Process Drawings 271 Utility 273 263
BOX UPPER SINGLE CABINET 2021 272 Rural Studio Box UPPER SINGLE CABINET 274 264
Utility Ophelia’s Home Process Drawings 273 1” Utility 1” 265
2021 274 Rural Studio Assembly
276 266
ASSEMBLY UPPER SINGLE CABINET
UPPER SINGLE CABINET
Utility Ophelia’s Home Process Drawings 277 1” 267
FINISH UPPER SINGLE CABINET 2021 276 Rural Studio Finish UPPER SINGLE CABINET 278 268
Utility Ophelia’s Home Process Drawings 277 Utility 279 269
FINISH UPPER SINGLE CABINET 2021 278 Rural Studio Finish UPPER SINGLE CABINET 280
Utility Ophelia’s Home Process Drawings 279 Utility 271
FINISH UPPER SINGLE CABINET 2021 280 Rural Studio FINISH UPPER 2021 280 Rural Studio Finish UPPER SINGLE CABINET 2021 282 Rural Studio 272
FINISH
Studio Utility Ophelia’s Home Process Drawings 283 273
UPPER SINGLE CABINET
INSTALLATION UPPER SINGLE CABINET 2021 282 Rural Studio Installation UPPER SINGLE CABINET 274
Utility Ophelia’s Home Process Drawings 283 Utility 275
Upper Cabinet Single Short
2021 286 Rural Studio West Elevation 276
Utility Ophelia’s Home Process Drawings 287 East Elevation 277
Upper Cabinet Single Short SIDE PEICE SPECIAL INSTUCTIONS
Upper Cabinet Single Short Side Peice Special Instuctions
2021 286 Rural Studio
278
Utility Ophelia’s Home Process Drawings 287 Utility 289
Upper Cabinet Single Short SIDE PEICE SPECIAL INSTUCTIONS
Upper Cabinet Single Short Side Peice Special Instuctions
2021 290 Rural Studio
Utility Ophelia’s Home Process Drawings 289 Utility 291
Upper Cabinet Single Short
Upper Cabinet Single Short
FACE FRAME
Face Frame
2021 290 Rural Studio
Utility Ophelia’s Home Process Drawings 291 Utility 293
BOX Upper Cabinet Single Short 2021 292 Rural Studio Box Upper Cabinet Single Short
Utility Ophelia’s Home Process Drawings 293 Utility
FINISH
2021 296 Rural Studio Finish
Upper Cabinet Single Short
Upper Cabinet Single Short
Utility Ophelia’s Home Process Drawings 297 Utility 299
FINISH Upper Cabinet Single Short 2021 300 Rural Studio Finish Upper Cabinet Single Short
Utility Ophelia’s Home Process Drawings 303
Upper Cabinet Single Short
Upper Cabinet Single Short Door Attachment
DOOR
2021 302 Rural Studio
ATTACHMENT
Utility Ophelia’s Home Process Drawings 303 Utility 291
ATTACHMENT Upper Cabinet Single Short 2021 304 Rural Studio Door Attachment Upper Cabinet Single Short
DOOR
Utility Ophelia’s Home Process Drawings 305 Utility 307
DOOR ATTACHMENT Upper Cabinet Single Short 2021 306 Rural Studio Door Attachment Upper Cabinet Single Short
Utility Ophelia’s Home Process Drawings 309
INSTALLATION Upper Cabinet Single Short 2021 308 Rural Studio Installation Upper Cabinet Single Short 310
Utility Ophelia’s Home Process Drawings 309 Utility 311
INSTALLATION Upper Cabinet Single Short
Installation Upper Cabinet Single Short
2021 310 Rural Studio
298
Utility Ophelia’s Home Process Drawings 313 299
Rural Studio 2021 302
Utility Ophelia’s Home Process Drawings 303 BATHROOM
Sub-Header BATHROOM
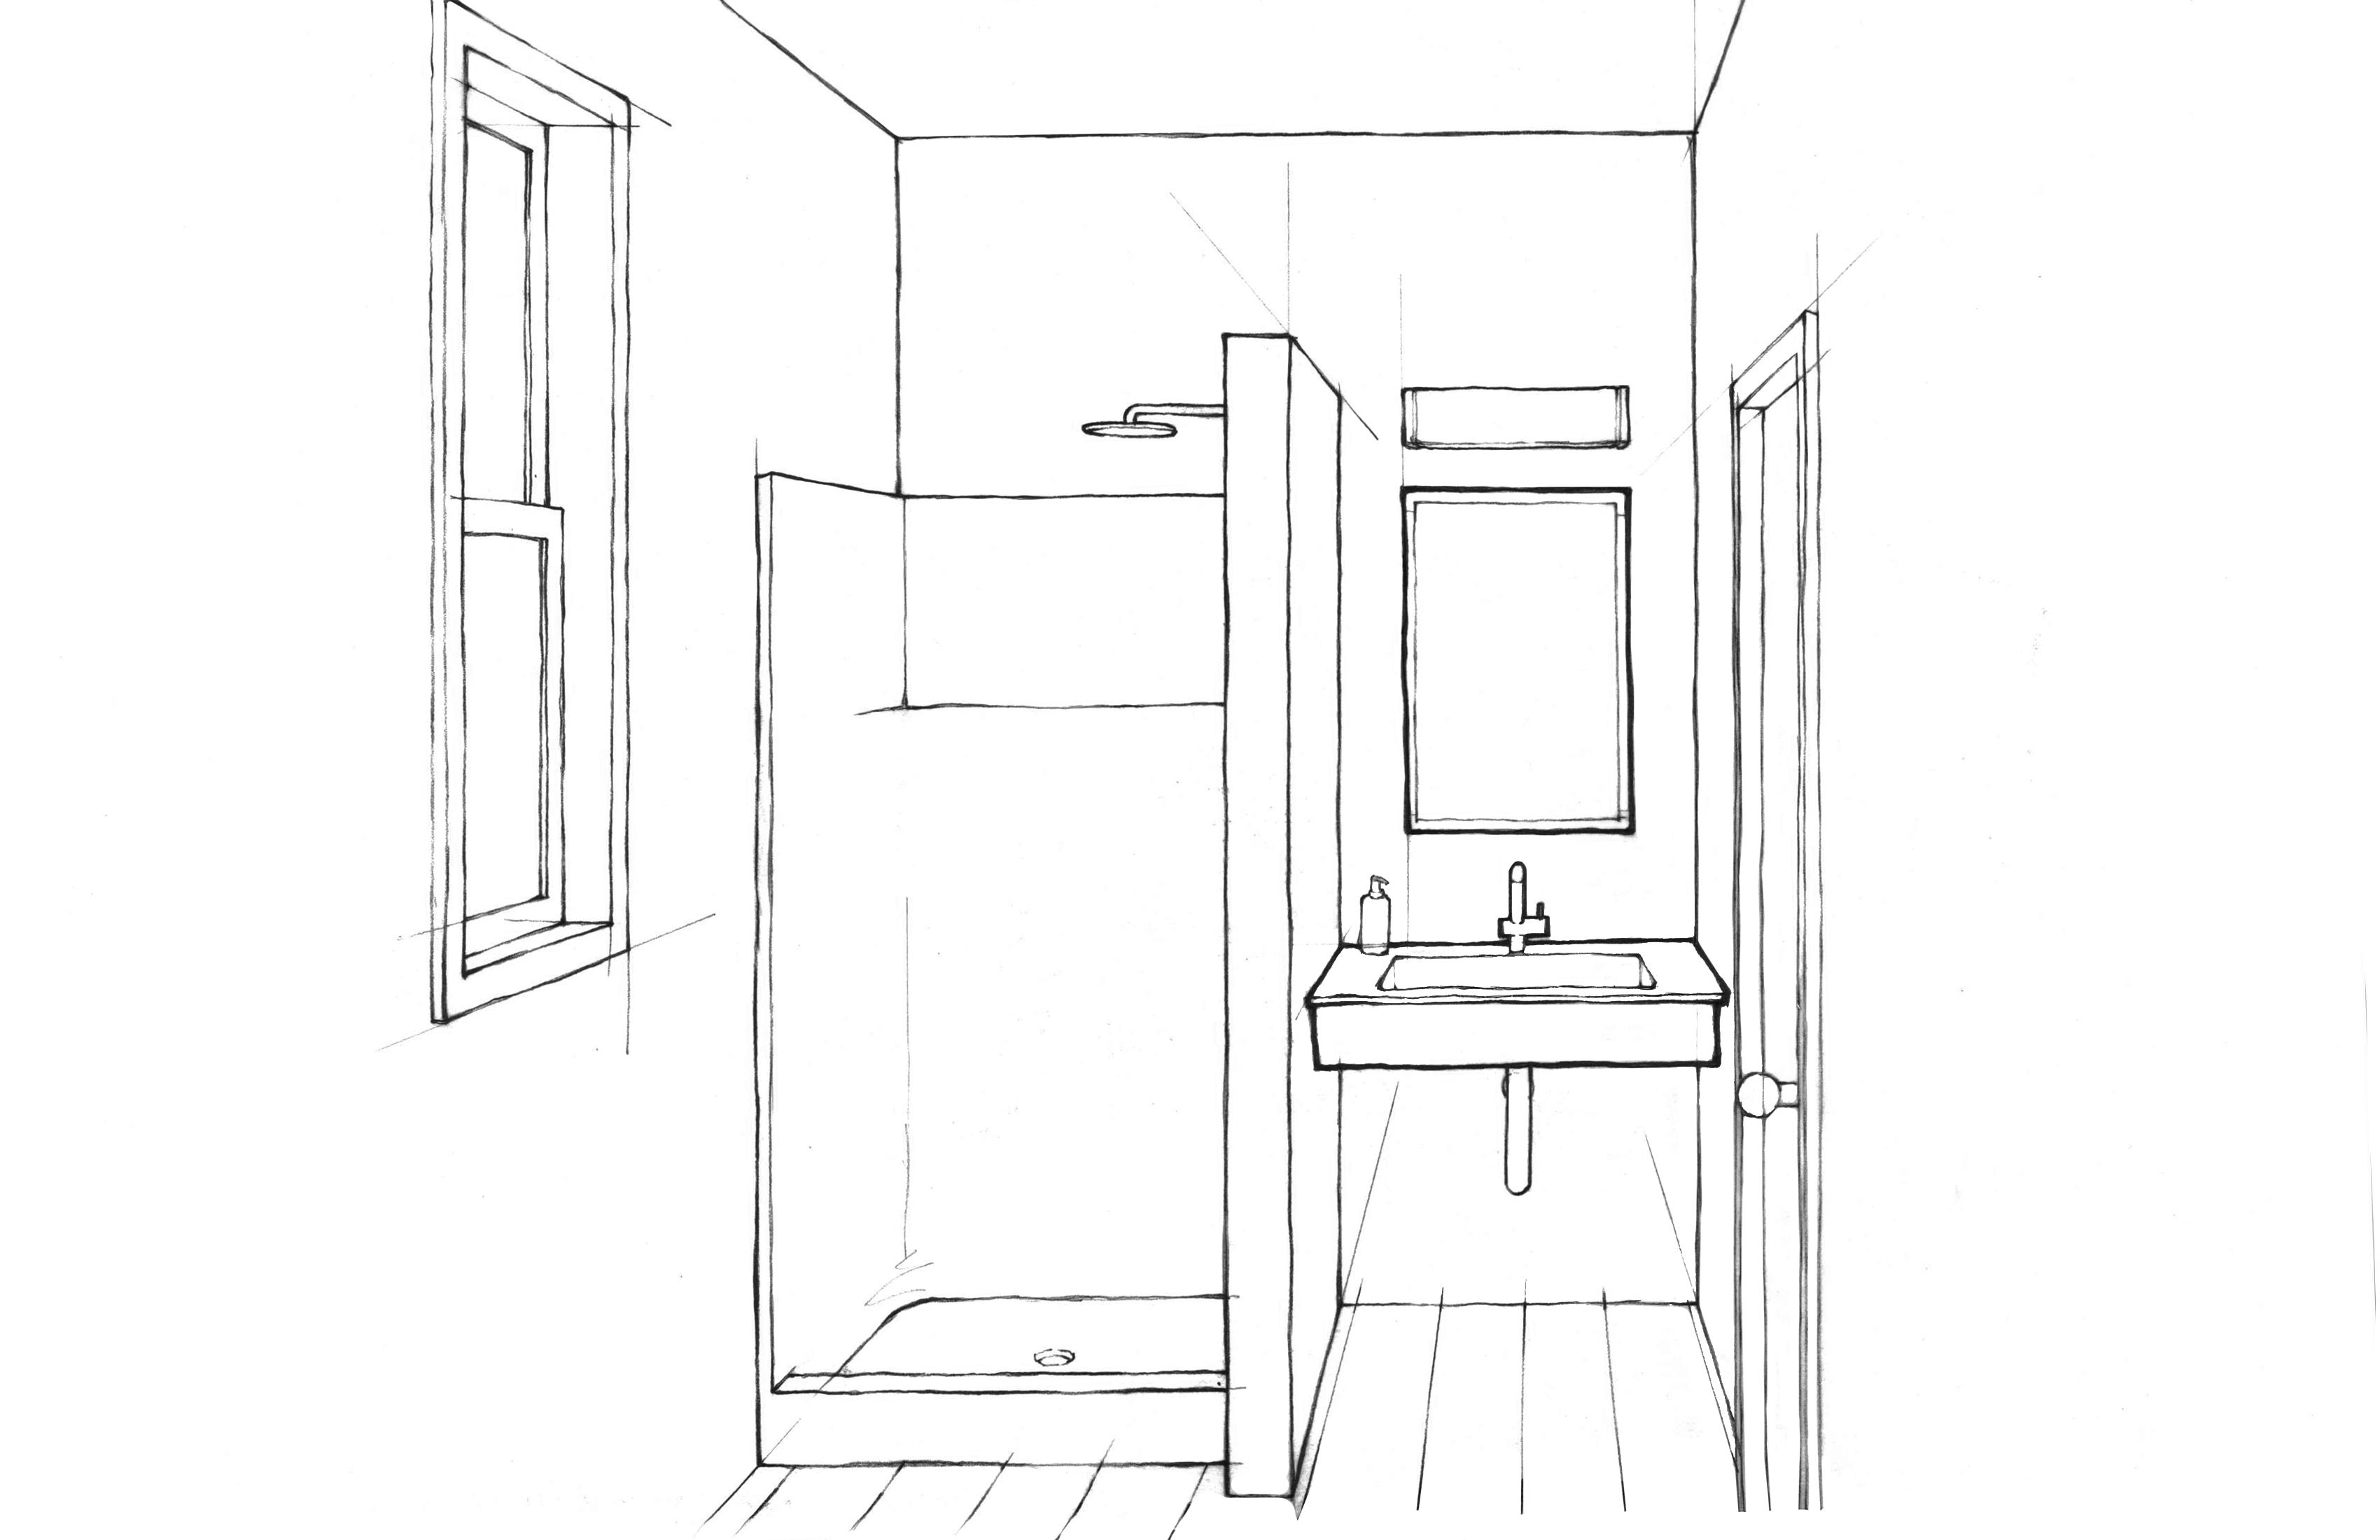
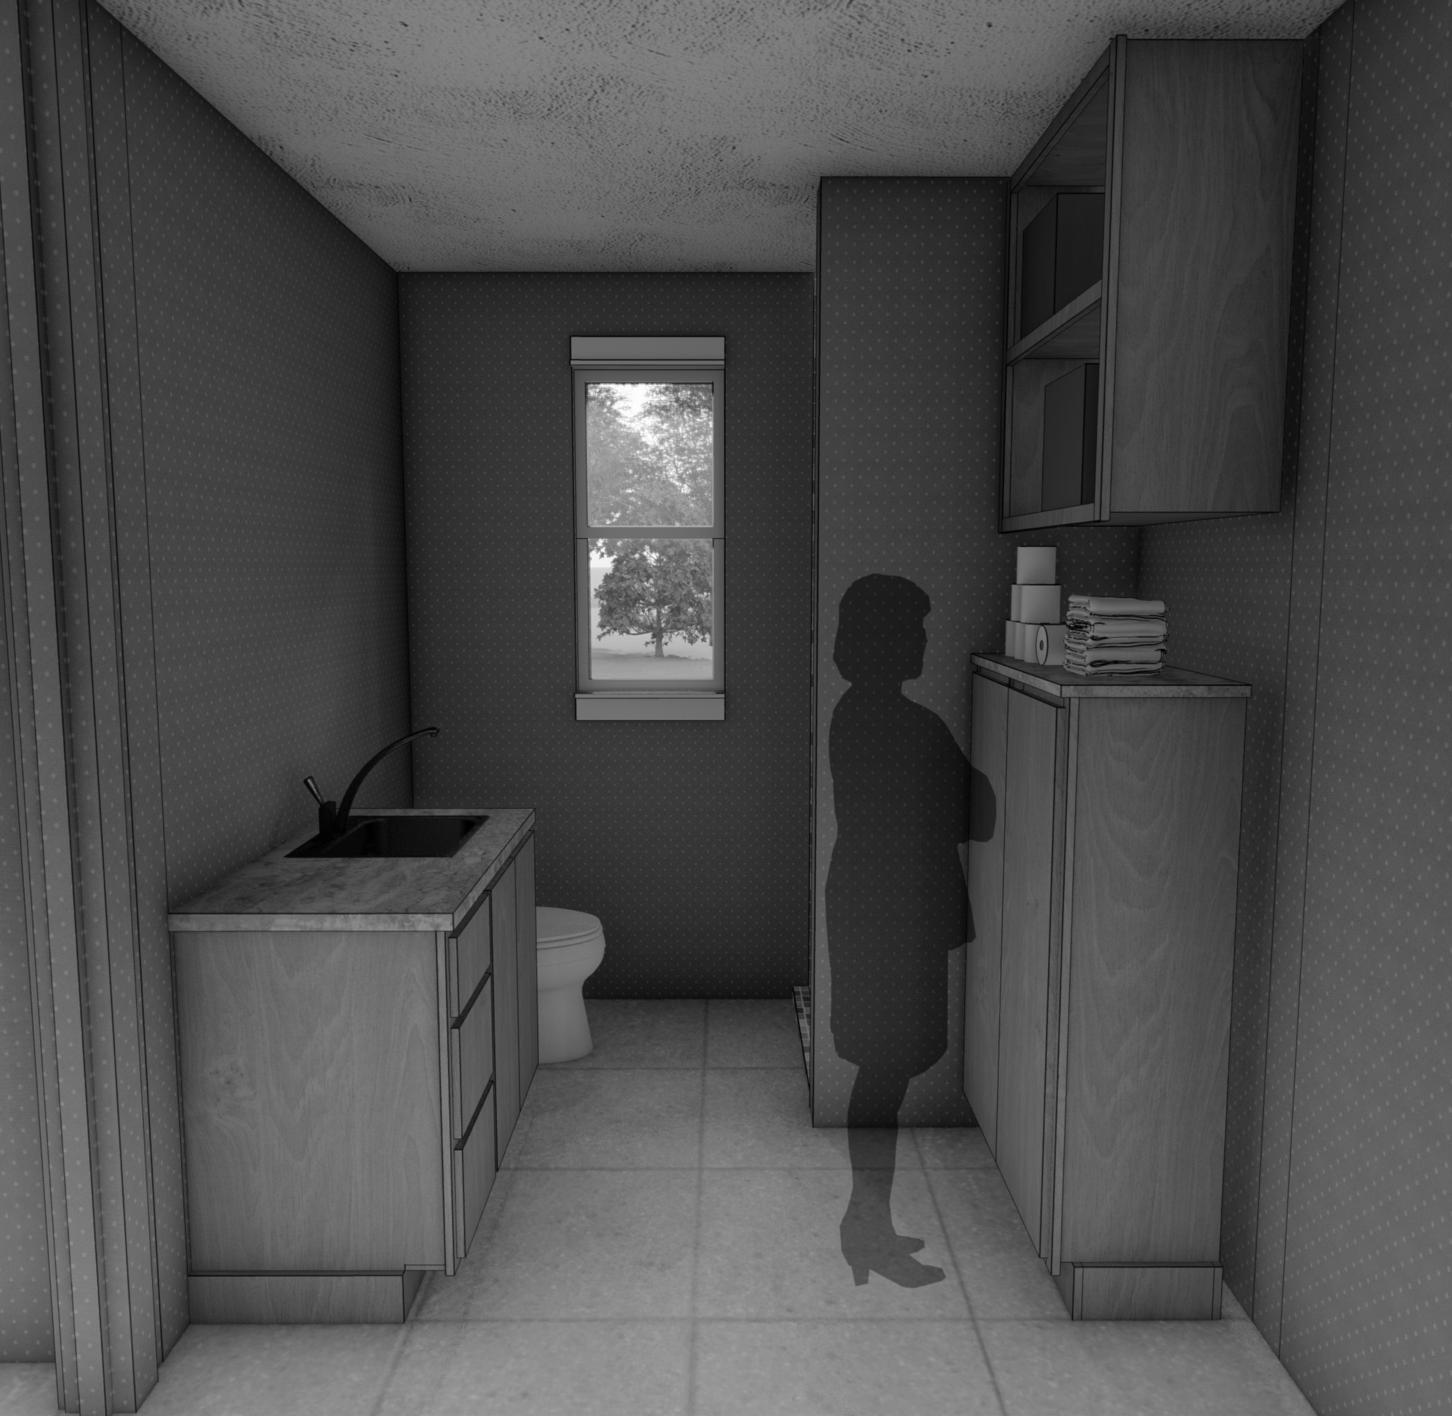
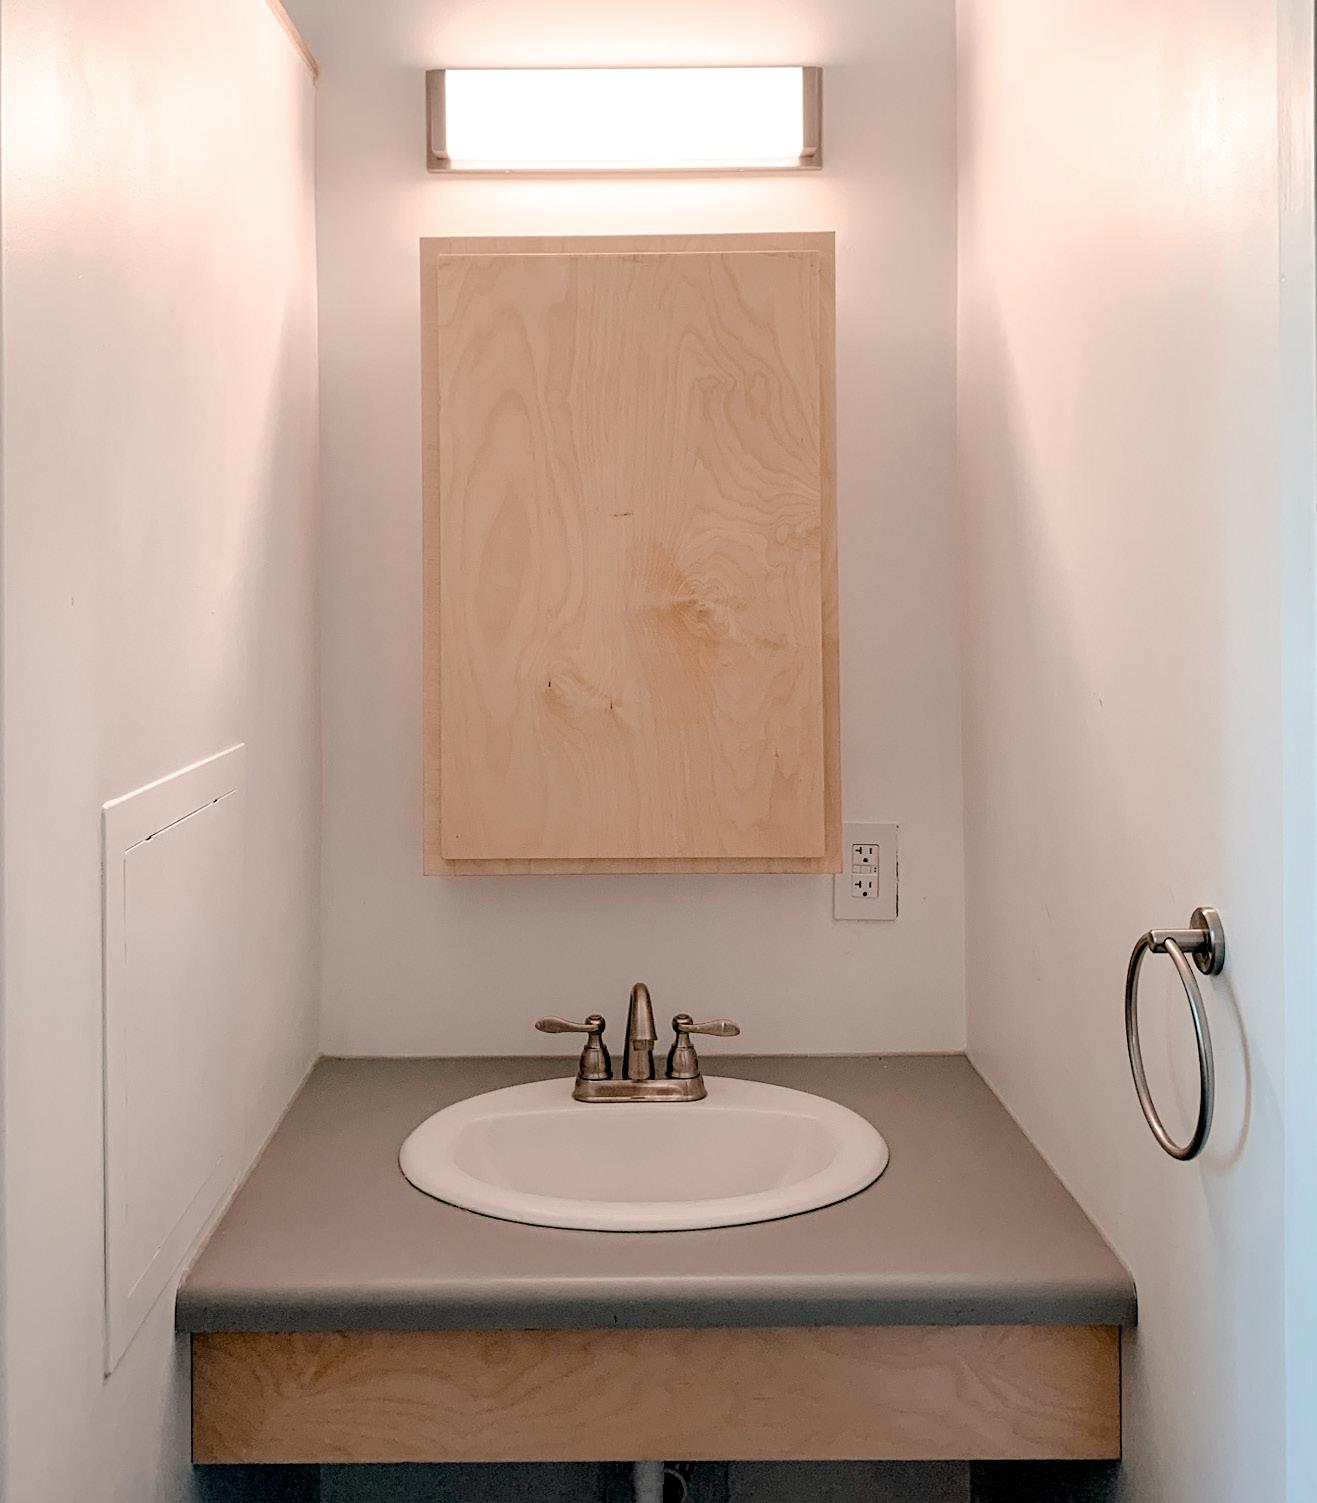
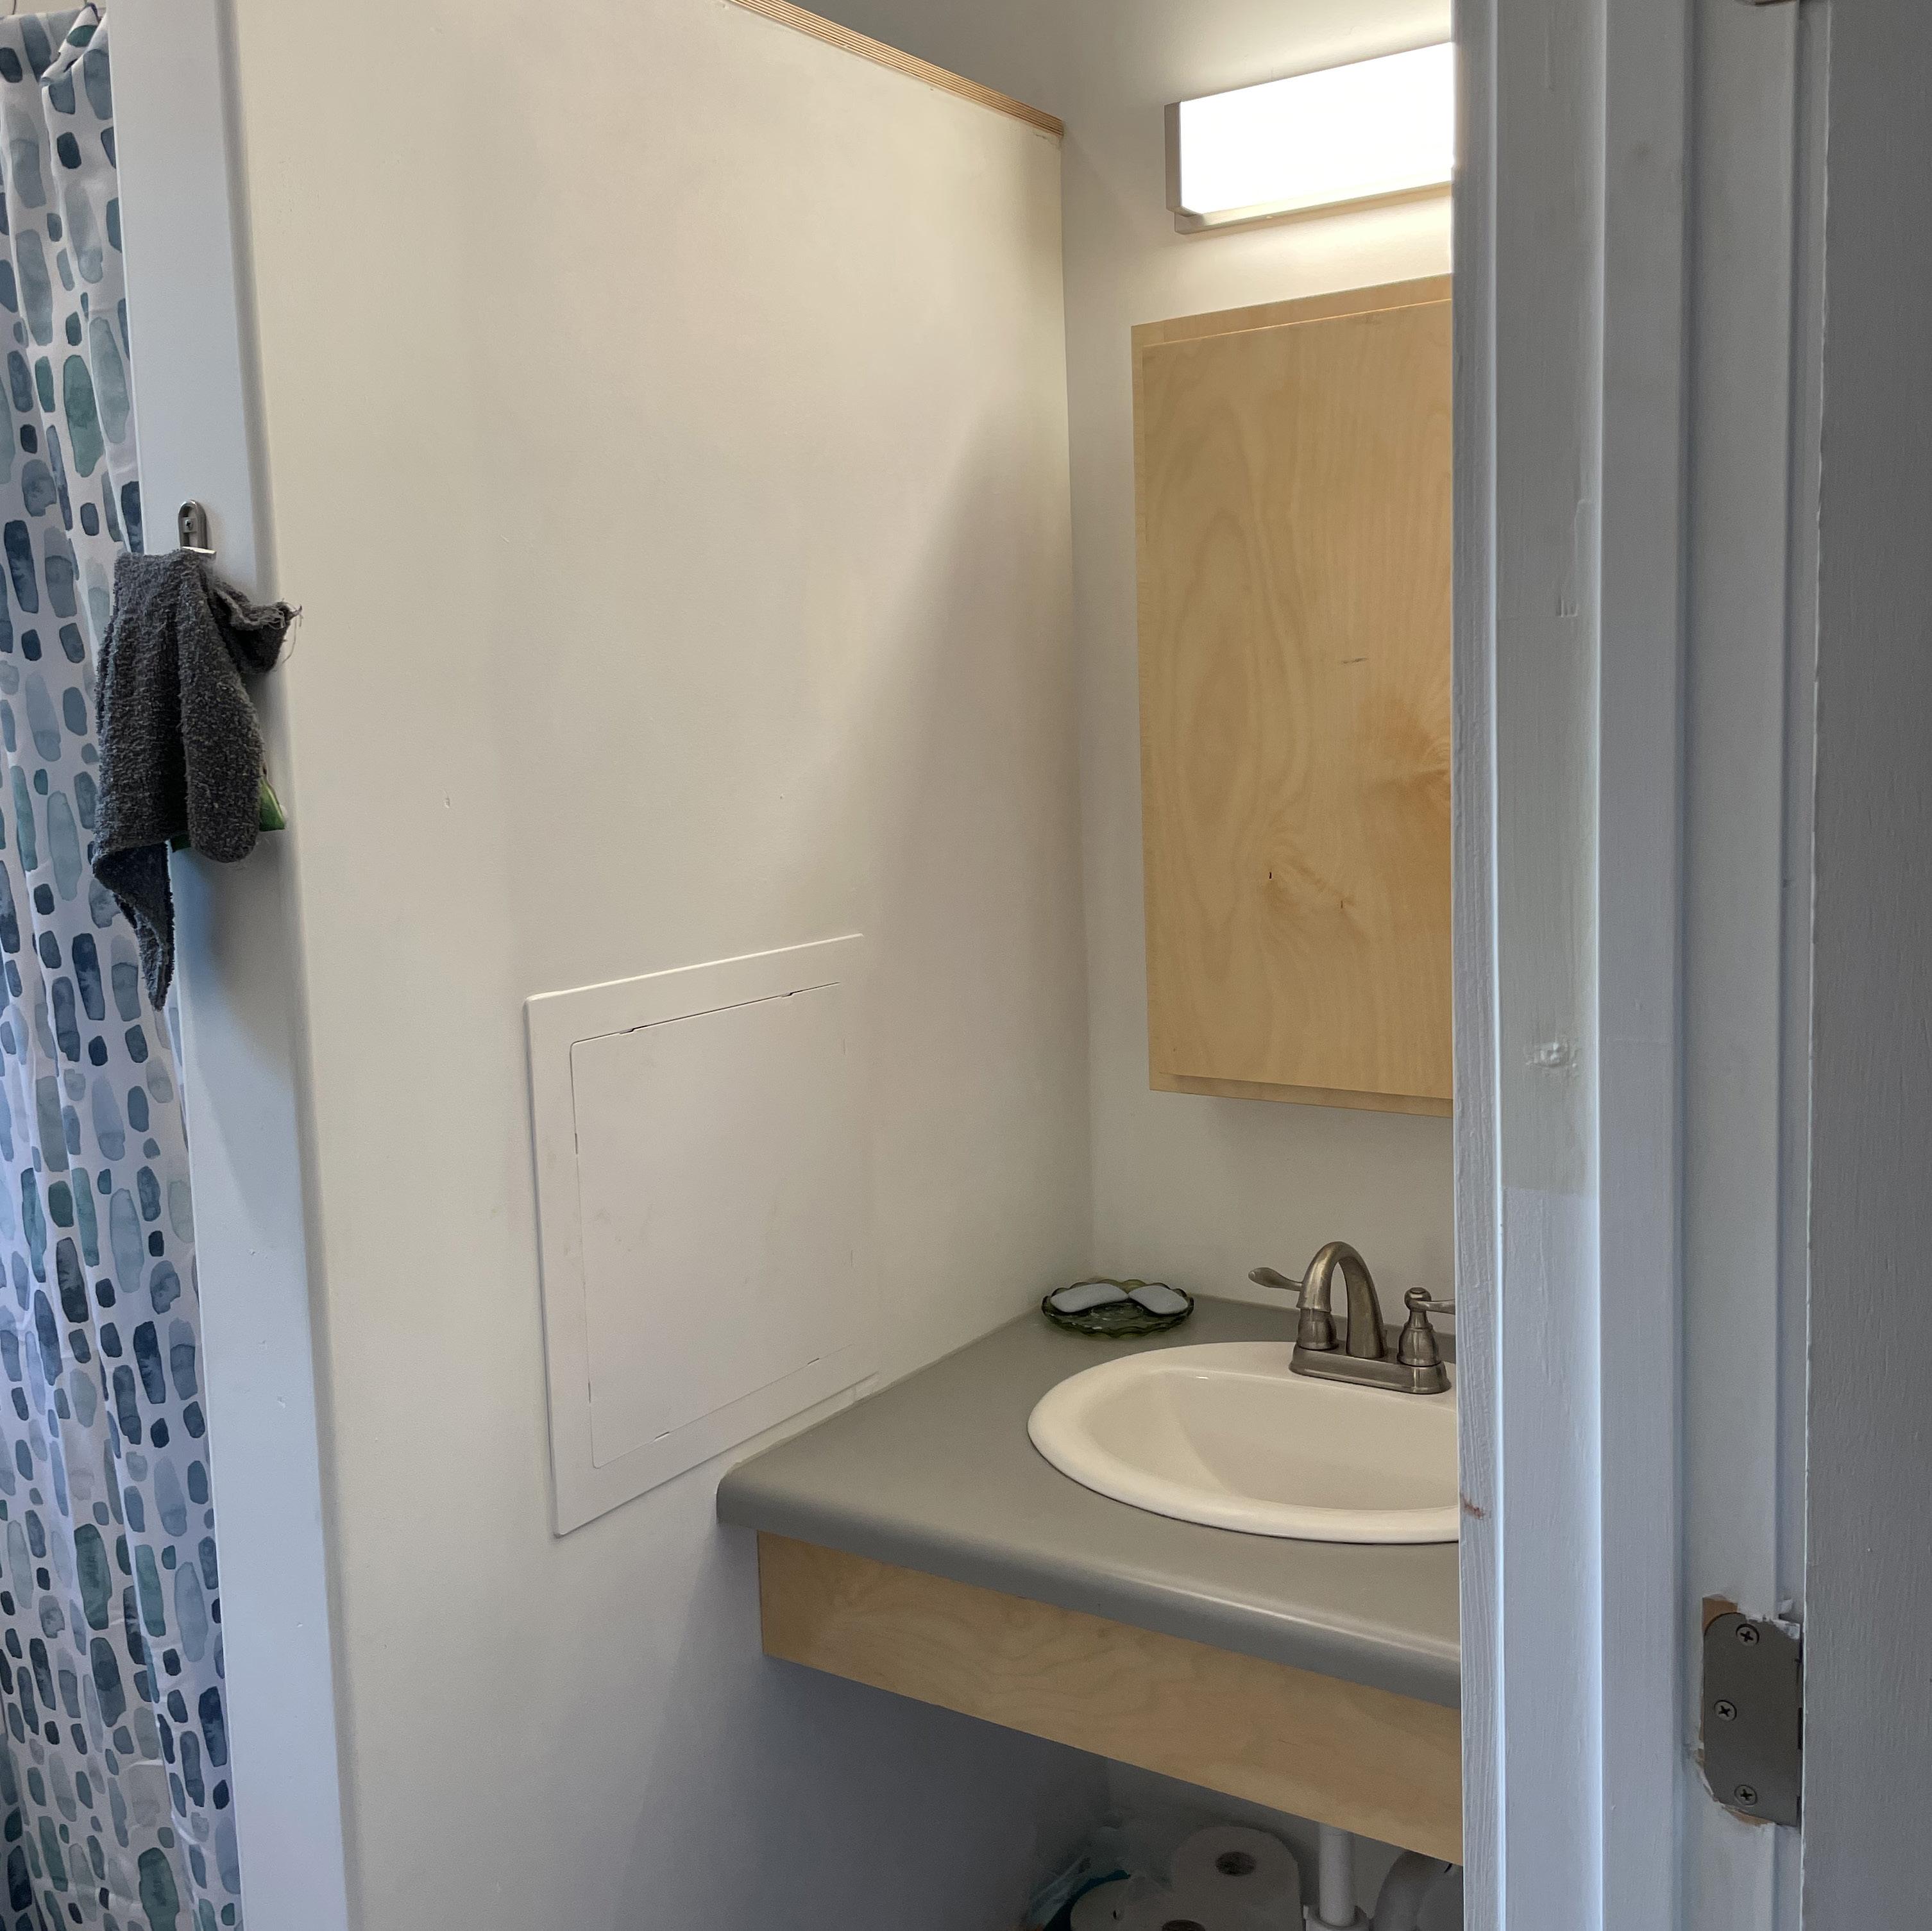
In the bathroom we went with a wall mounted countertop along with a knee guard attached underneath the sink and a medicine cabinet with a mirror mounted above the sink. Both of these items broke the repetitive modularity seen throughout the house. The countertop and knee guard were made different to adapt to Fair Housing Act (FHA) standards, to allow someone in a wheelchair to access the sink without requiring any rearranging of cabinets/faux cabinets. Installing the knee guard was necessary to adhere to FHA standards for protecting someone who is paralyzed from being burned on their leg(s). The medicine cabinet was created to allow for more storage of small-scale items to help relieve the countertop of unwanted clutter.
For the bathroom, we designed a wall-mounted countertop with a knee guard attachment and a mirrored medicine cabinet above the sink. Both of these items broke the modularity seen throughout the rest of the house. The countertop and knee guard needed to comply with the Fair Housing Act (FHA) which would allow someone in a wheelchair to access the sink and/or prevent him from burning his legs. The medicine cabinet was designed to store small-scaled items and relieve the countertop of unwanted clutter.
2021 304 Rural Studio
316
Introduction 305 Bathroom Ophelia’s Home Introduction 317
West Elevation
Westt Elevation
Rural Studio 2021 306 318 PRODUCED BY AN AUTODESK STUDENT VERSION PRODUCED BY AN AUTODESK STUDENT VERSION PRODUCED BY AN AUTODESK STUDENT VERSION PRODUCED BY AN AUTODESK STUDENT VERSION
Bathroom CONSTRUCTION DOCUMENTS
PRODUCED BY AN AUTODESK STUDENT VERSION PRODUCED BY AN AUTODESK STUDENT VERSION
PRODUCED BY AN AUTODESK STUDENT VERSION PRODUCED BY AN AUTODESK STUDENT VERSION PRODUCED BY AN AUTODESK STUDENT VERSION PRODUCED BY AN AUTODESK STUDENT VERSION PRODUCED BY AN AUTODESK STUDENT VERSION South Section Bathroom Ophelia’s Home Construction Drawings 319 South Elevation
Medicine Cabinet
2021 308 Rural Studio
310
MODUL OUTLINE
Upper Single Cabinet
Upper Cabinet Short 1
Upper Cabinet Short 2
Upper Cabinet Short 3
Big Upper Box
Single Drawer
Lower Cabinet
Bathroom Ophelia’s Home
Drawings 309
Process
MEDICINE CABINET
Rural Studio 2021 310
322 West Elevation
Utility Ophelia’s Home Process Drawings 323 311
Rural Studio 2021 312 MEDICINE CABINET SIDE PEICE SPECIAL INSTUCTIONS 322 MEDICINE CABINET Side Peice Special Instuctions 324
Utility Ophelia’s Home Process Drawings 323 Utility Bathroom 313
Rural Studio 2021 314 MEDICINE CABINET SIDE PEICE SPECIAL INSTUCTIONS 324 MEDICINE CABINET Side Peice Special Instuctions 326
Utility Ophelia’s Home Process Drawings 325 Utility 327 Bathroom
Rural Studio 2021 316
326
FACE FRAME MEDICINE CABINET
Face Frame MEDICINE CABINET
Utility Ophelia’s Home Process Drawings 327 Utility 329 Bathroom 317
Rural Studio 2021 318 SHELVING BOX MEDICINE CABINET 328 Shelving Box MEDICINE CABINET
Utility Ophelia’s Home Process Drawings 329 1” Utility 331 1” Bathroom
Rural Studio 2021 320 FINISH MEDICINE CABINET 330 Finish MEDICINE CABINET

Utility Ophelia’s Home Process Drawings 331 Utility 333 Bathroom
Rural Studio 2021 322 FINISH
332
MEDICINE CABINET
Finish MEDICINE CABINET
Utility Ophelia’s Home Process Drawings 333 Utility Bathroom
Rural Studio 2021 324 DOOR ATTACHMENT MEDICINE CABINET 334 Door Attachment MEDICINE CABINET
Utility Ophelia’s Home Process Drawings 335 Utility 337 1” Bathroom
Rural Studio 2021 326 DOOR ATTACHMENT MEDICINE CABINET 336 Door Attachment MEDICINE CABINET
Utility Ophelia’s Home Process Drawings 337 Utility 339 Bathroom
Rural Studio 2021 328 INSTALLATION MEDICINE CABINET 338 Installation MEDICINE CABINET
Utility Ophelia’s Home Process Drawings 339 Utility 341 Bathroom
Rural Studio 2021 330 INSTALLATION
340 Installation
MEDICINE CABINET
MEDICINE CABINET
Utility Ophelia’s Home Process Drawings 343 Bathroom 331
CONCLUSION
MOVING IN
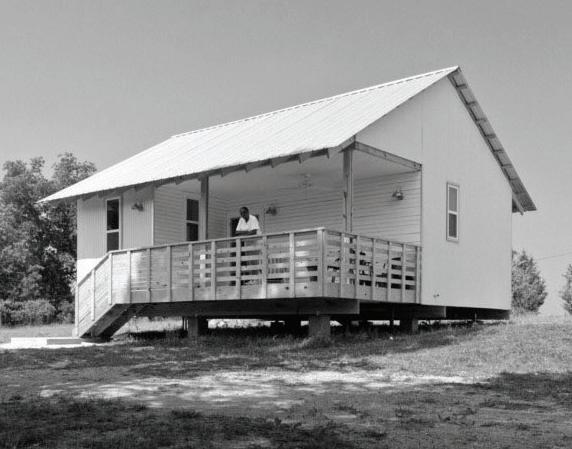
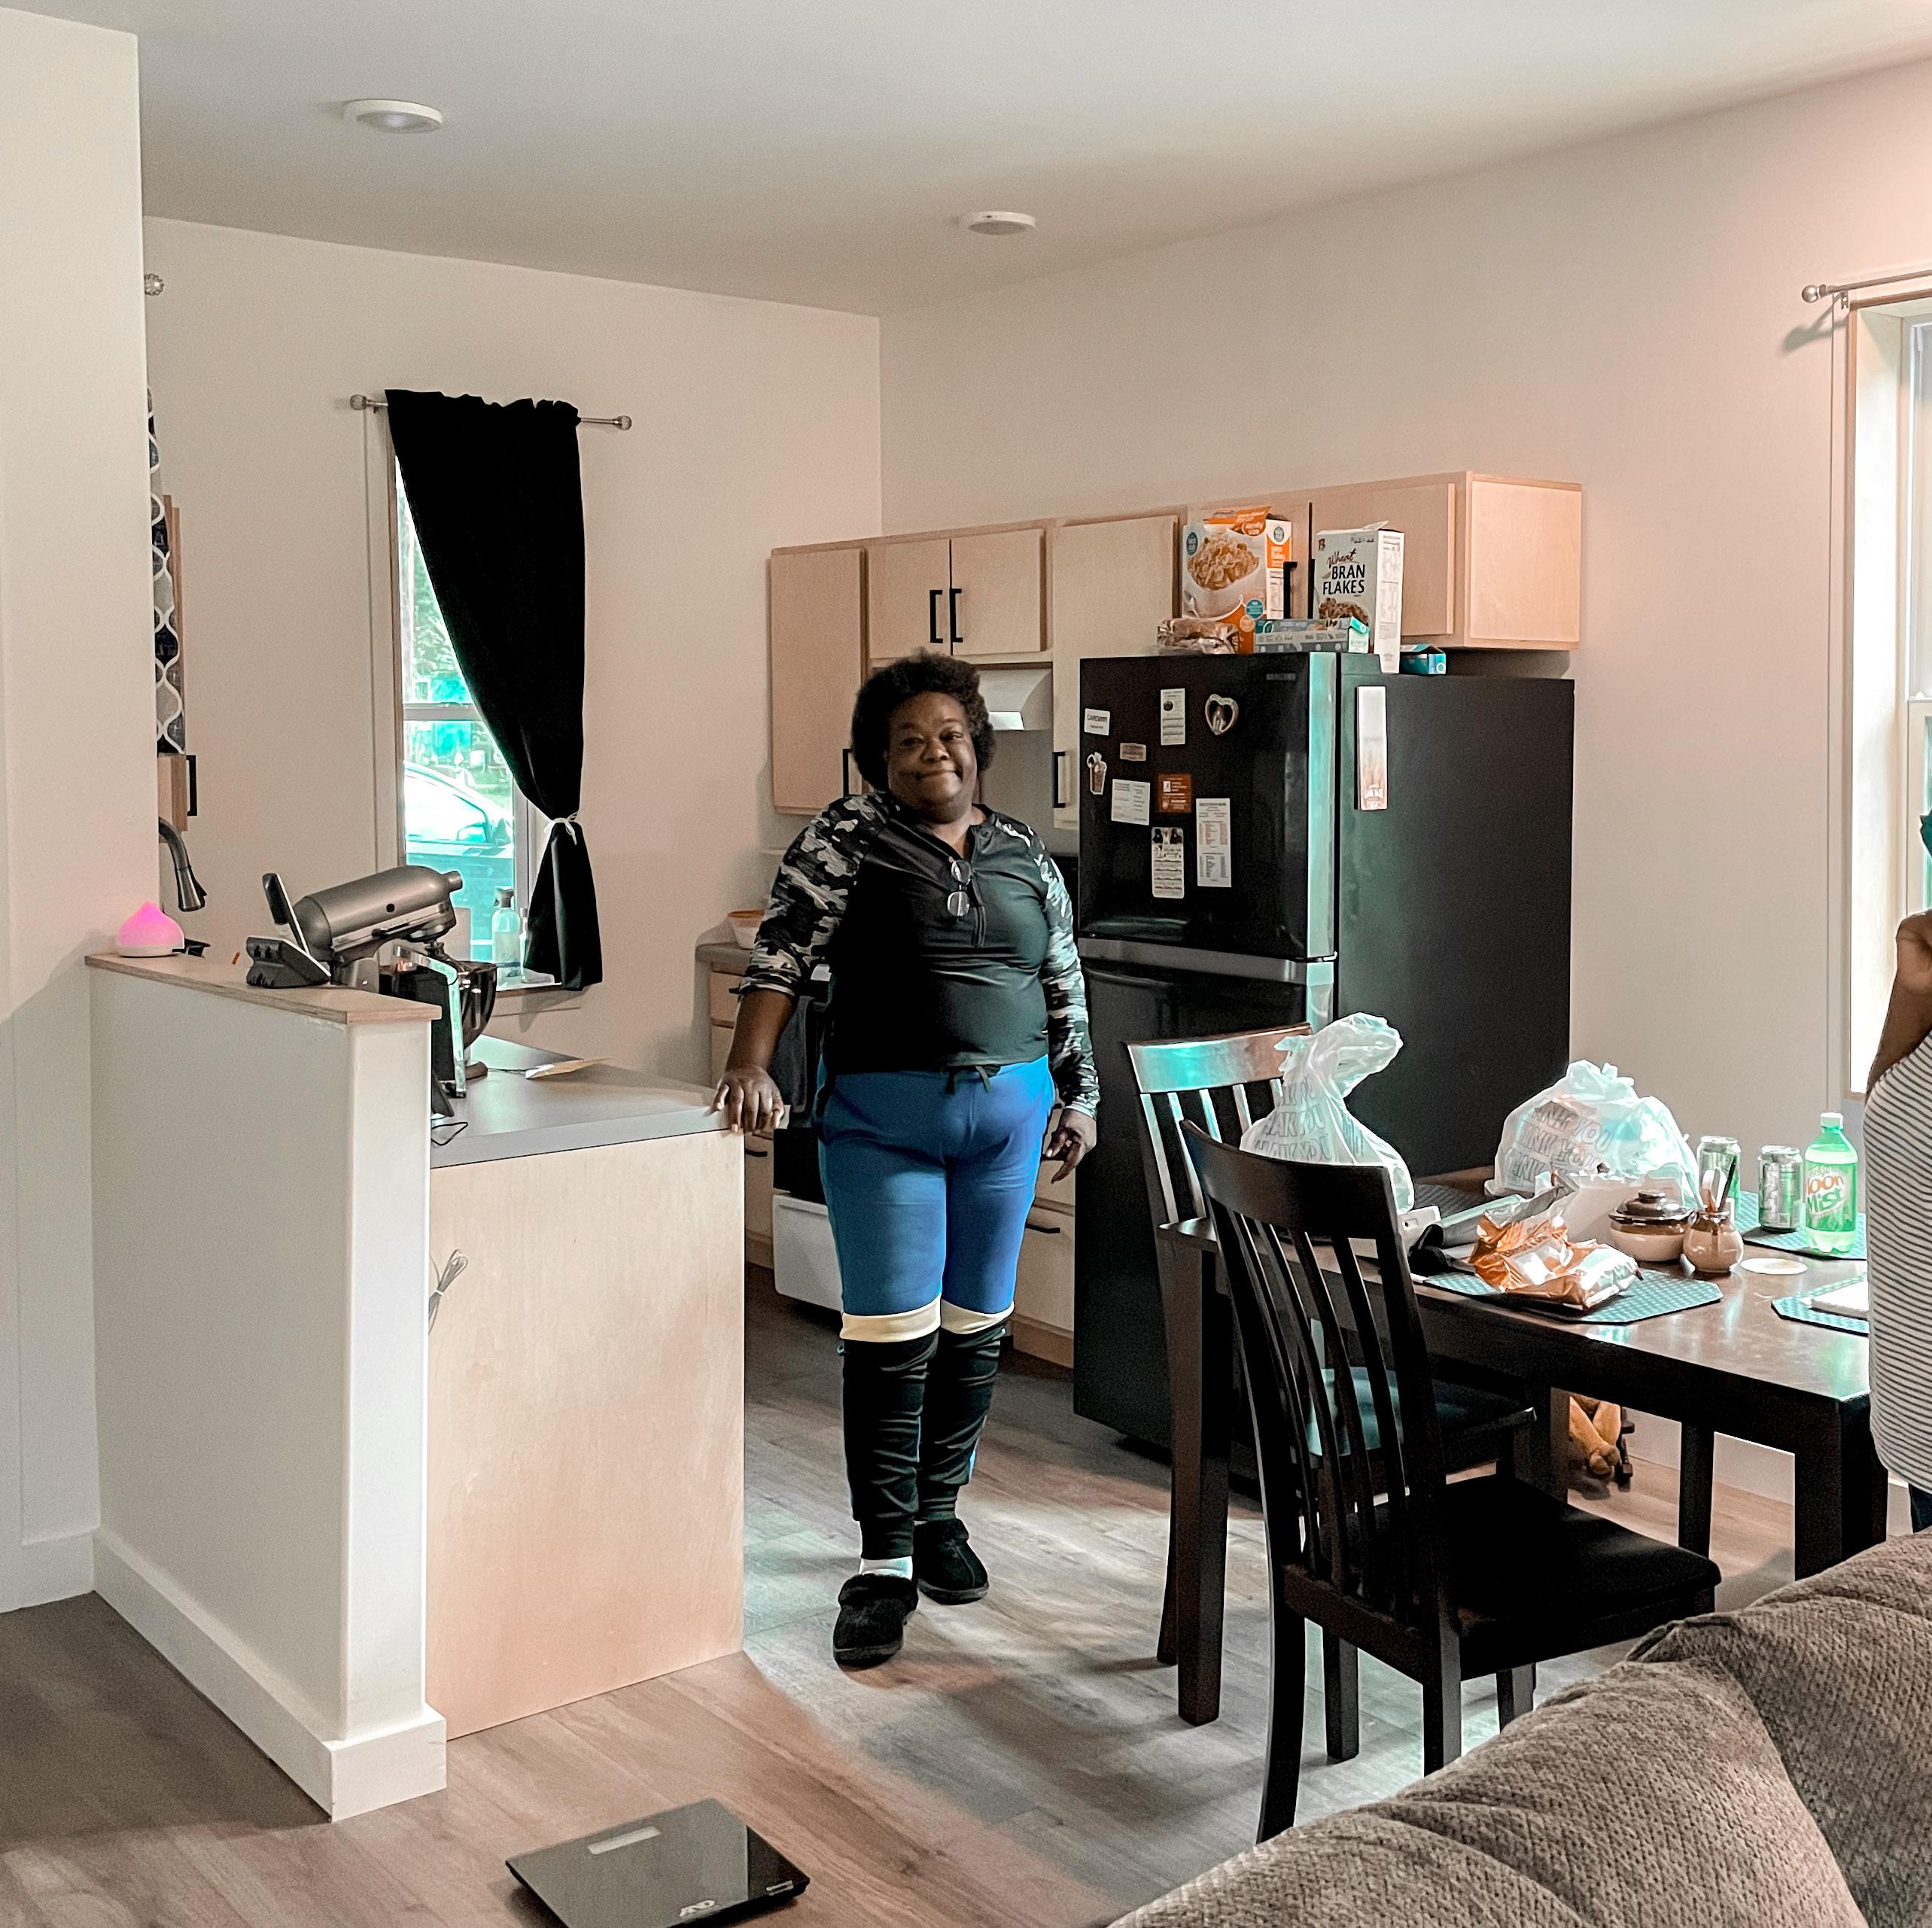
On Wednesday, April 21st, we celebrated the completion of Ophelia’s Home with a ribbon-cutting ceromony. Ms. Ophelia, her famiy, and our Spring Class of 2021 invited everyone inside to admire the new home. We gave a brief presentation on our cabinet journey and explained how we were able to build our own high-quality cabinets at the same price as store-bought cabinets. In the end, Ms. Ophelia received nineteen beautiful cabinets and a charming new home for her family.
Rural Studio 2021 336
Rural Studio 2021 342
Construction Guidelines

Applying Glue
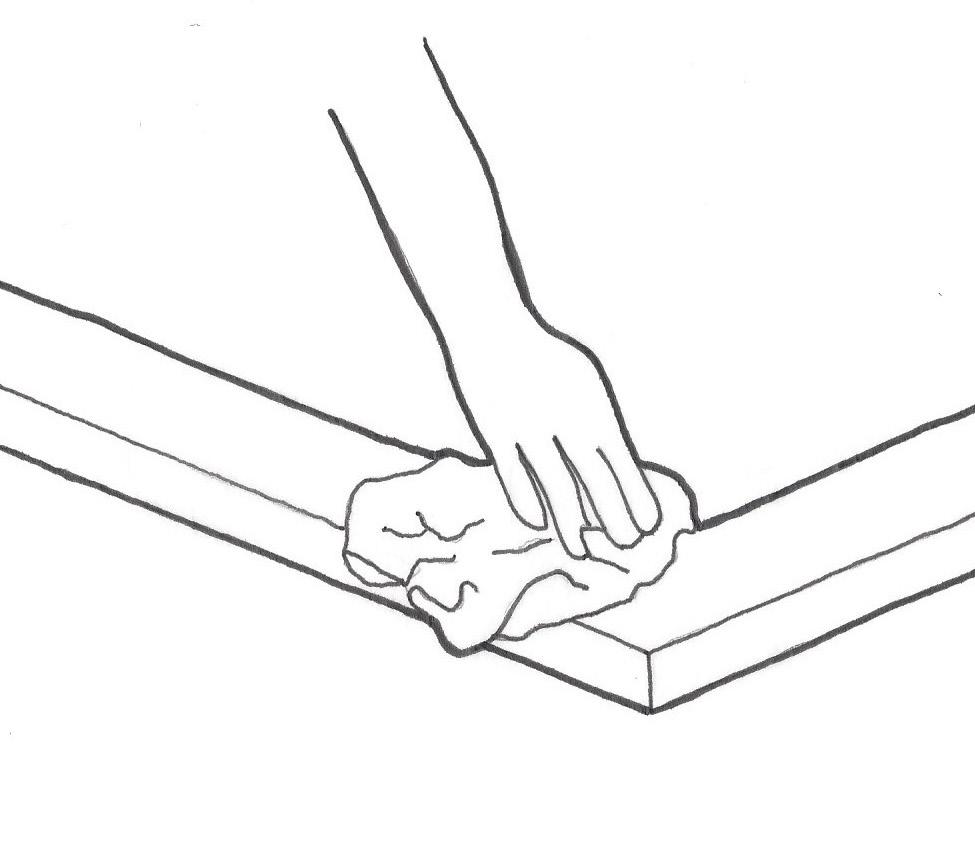
fit all the pieces before applying glue. Apply glue liberally to both surfaces.
Dry fit all the pieces before applying glue. Apply a liberal amount of glue to both gluing surfaces.
Wipe off any excess glue with a damp cloth. Hold the pieces in place until the glue hardens. Allow the glue to set properly overnight.
Remove excess glue with a damp cloth. Hold the pieces in place until the glue hardens. Allow the glue to set properly overnight.
2021 358 Rural Studio
Clamping
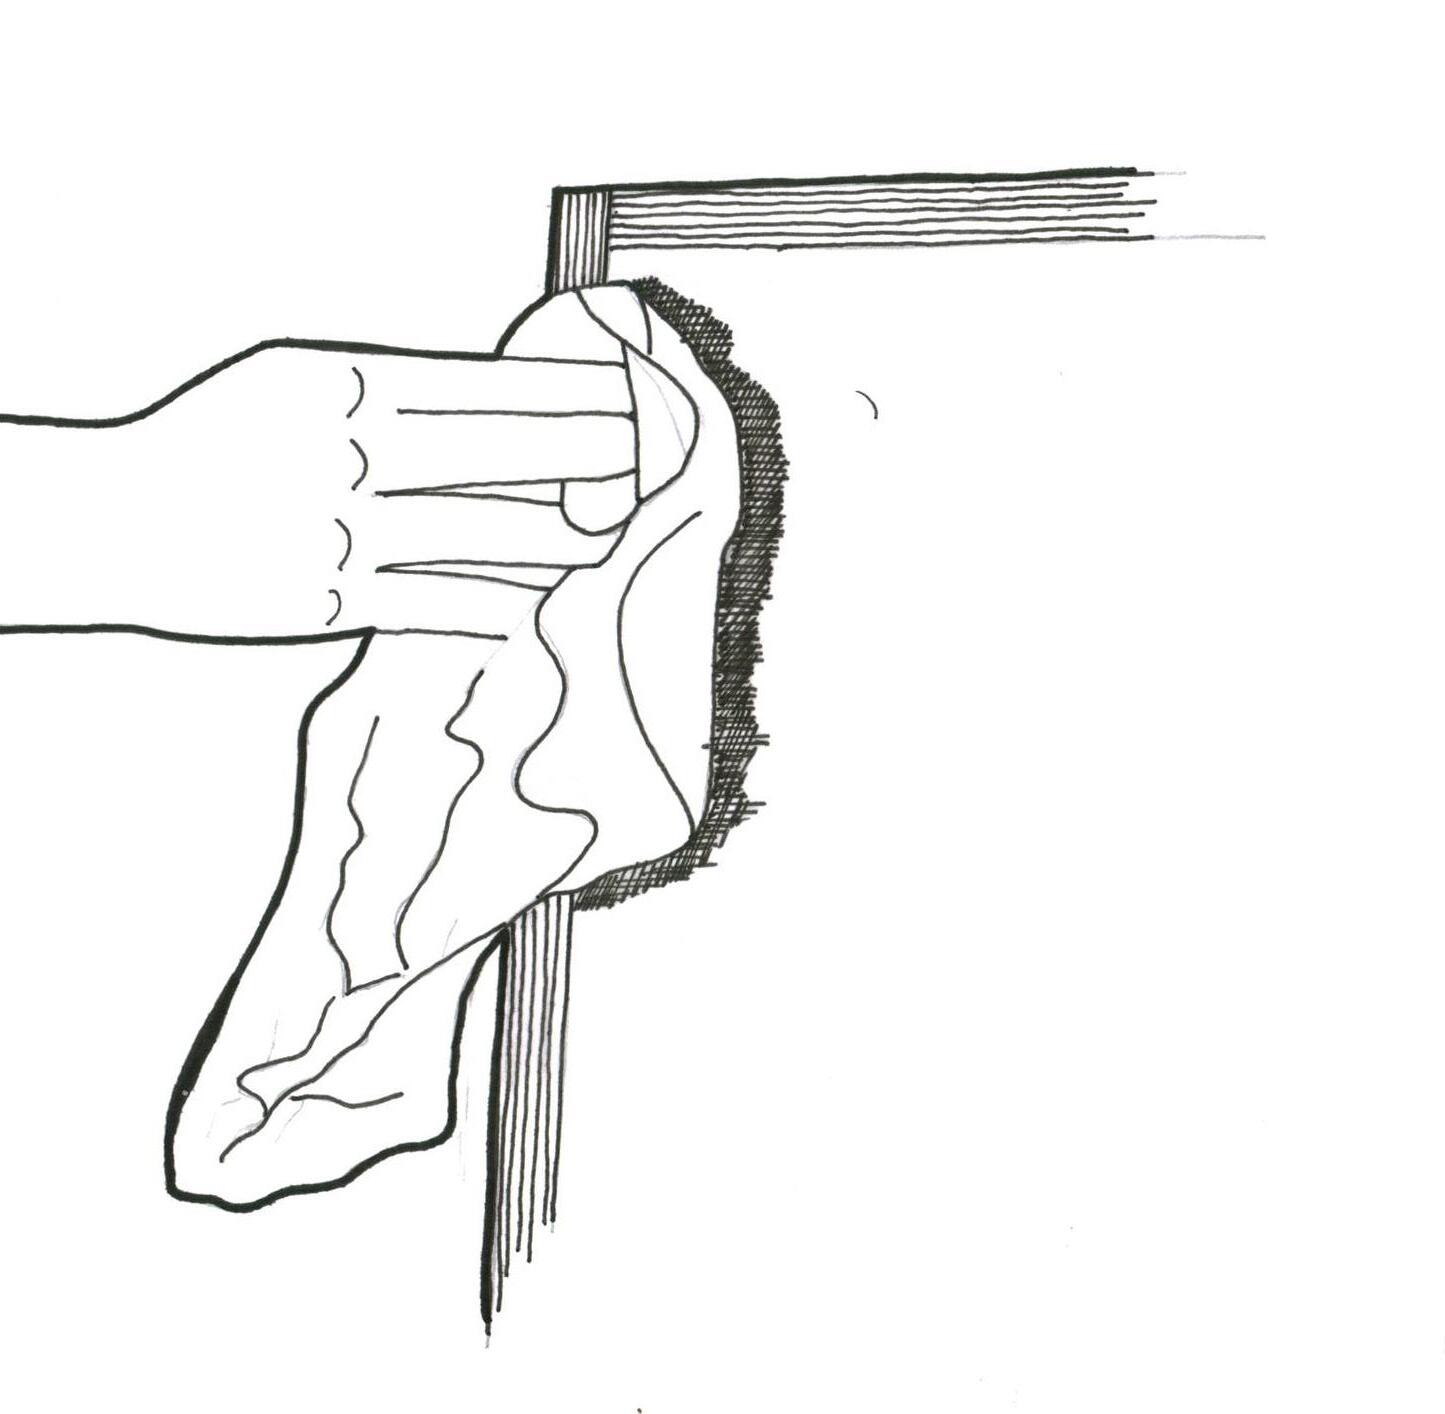
When clamping, never clamp directly onto the finished surface. Find scrap pieces to position where you desire to clamp in order to not leave a clamp mark on the finished surface.
clamping, never clamp directly onto the finished Find pieces to place in between clamp and cabinet piece. This will prevent the clamp from leaving an indention on the finished surface.
Use the clamp and tighten until the gap is closed. Either use your finger to feel or look to see if the two pieces are flush together.
Tighten the clamp until gap is closed. Use your finger to make sure the two pieces are flush.
A 20K Storage Soloution Ophelia’s Home Process Drawings 359
Process Drawings 345
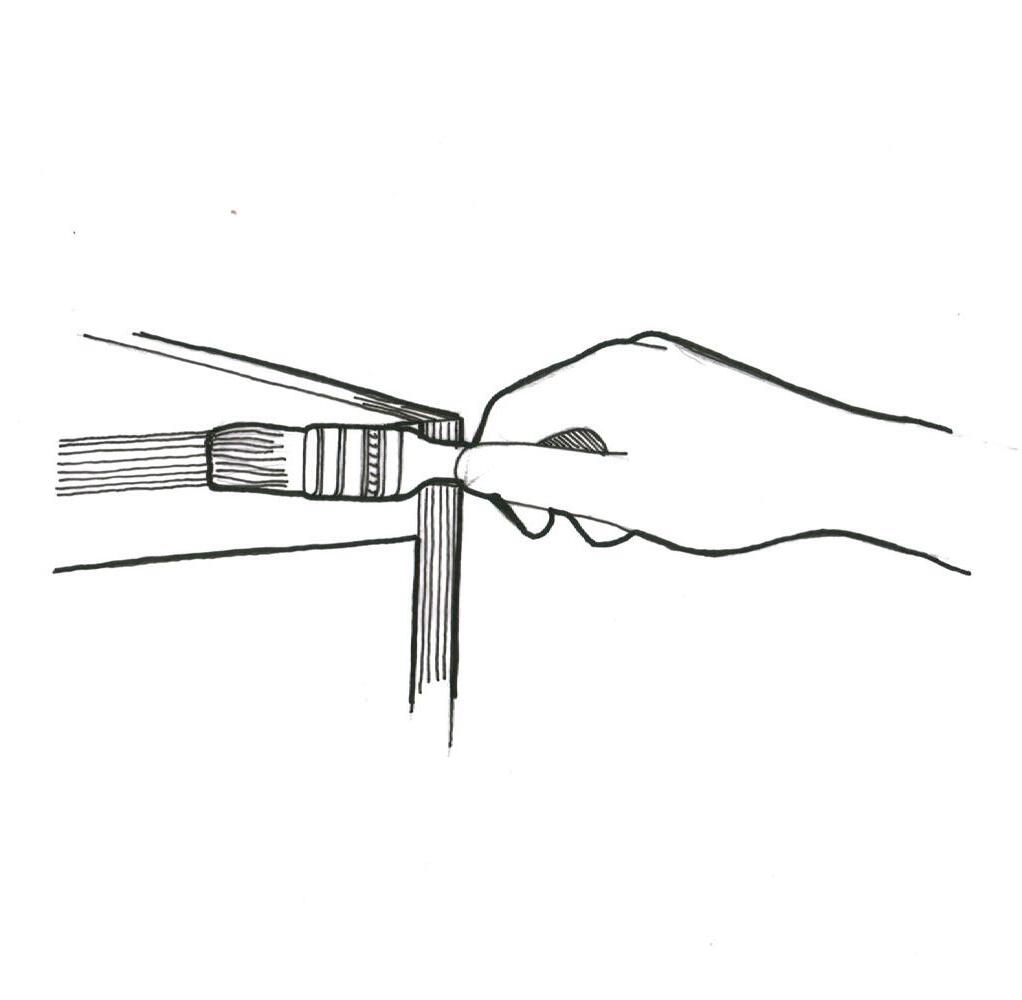
Using Nail Guns
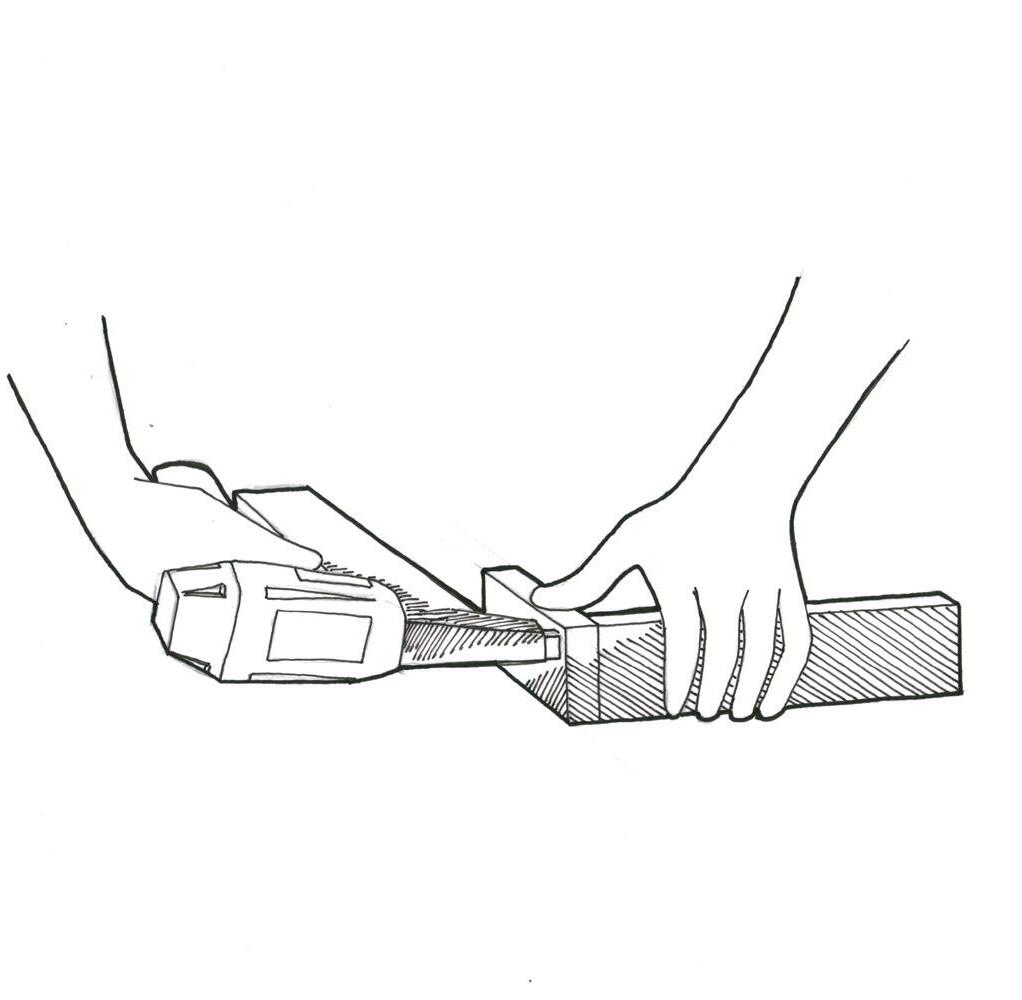
confirming that the pieces are flush, use the gun to lock in place.
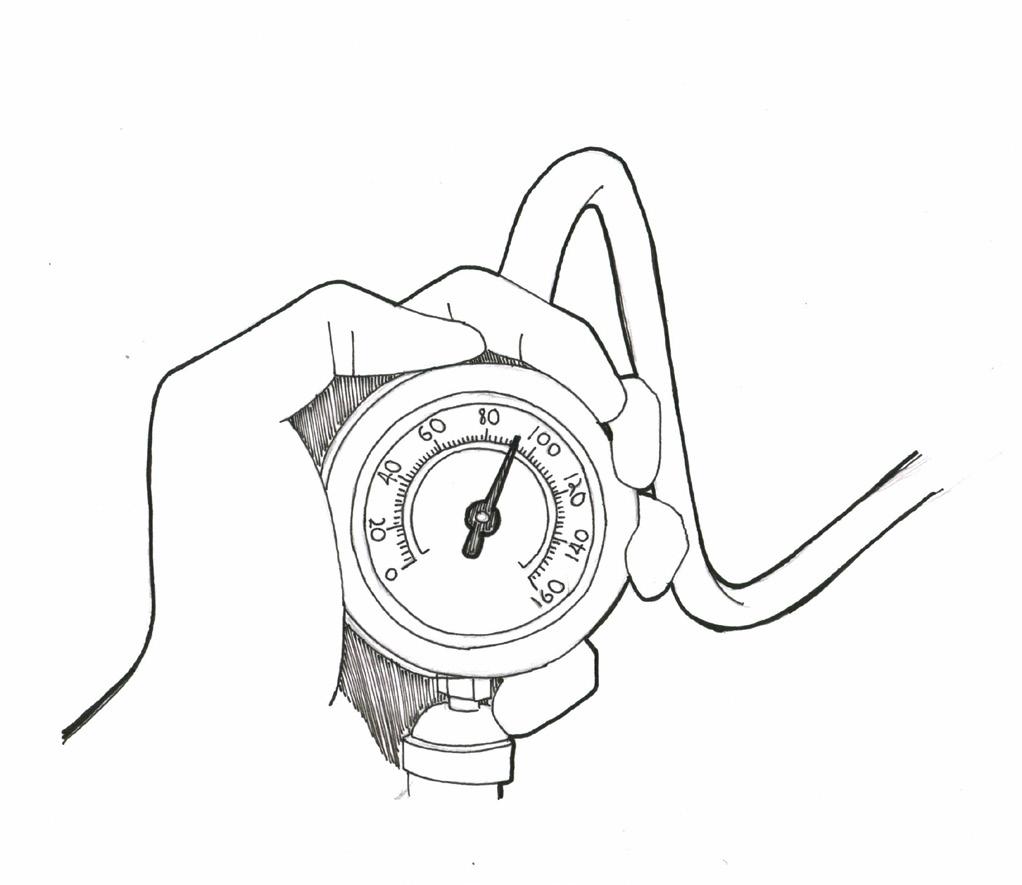
After double checking that the pieces are flush, use the nail gun to lock in place.
Make sure the air pressure is between 80-100 psi. Use 18-gauge brad nails, then fill the holes with wood putty. (if desired)
sure the nail gun air pressure is between 80-100 psi. Use 18-gauge brad nails, then fill the holes with wood putty.
2021 360 Rural Studio
Using Screws
Inspect which side of the face frame is desired to be on display, drill into the opposite side. Use the pocket screw jig to drill the holes.
Determine which side of face frame you would like to and drill into the opposite side. Use the pocket screw jig to drill the holes.
Using the face frame jig, align the two pieces together and use a clamp to keep them flush. Then, use a drill to screw in 1-1/4” pocket screws into the face frame.
face jig, align the pieces, and use a clamp to keep them flush. Then, screw in 1-1/4” pocket screws into the face frame.
Process Drawings 361
Process Drawings 347
A 20K Storage Soloution Ophelia’s Home
How and When to Use Wood Putty
Use wood putty on the face frame and sides of the cabinets where the nails can be seen. Apply the putty to fill in the holes after the oil is applied, in order to get a more consistent color.
wood putty on the face frame and sides of the cabinets where the nails can be seen. To get a more consistent color, apply the putty to fill in the holes after the oil is applied.
Use finger to cover up the nail hole. After drying 30 minutes, continue with the sanding process.
Apply putty with your finger. Allow to dry 30 minutes before continuing with the sanding process.

2021 362 Rural Studio
Applying Oil

Make sure you are in a clean area before starting the finishing process. Tape off the end grain in order to not get oil on it. Take a damp rag and clean the surface. Allow that to dry. Then, apply the first coat of oil with a rag, applying in small circular motions in order to ensure full coverage.
sure you are in a clean area before beginning the finishing process. Tape off the plywood end grain to prevent oil from seeping in. Take a damp rag and clean the surface. Allow that to dry. Then, apply the first coat of oil with a rag using small, circular motions to ensure full coverage.
Buff with a clean rag. Allow to dry for 24 hours. Sand lightly with 320 grit sandpaper to break the surface tension before applying the second coat. Repeat oiling process.
with a clean rag. Allow to dry for 24 hours. Sand lightly with 320 grit sandpaper to break the surface tension before applying the second coat. Repeat oiling process.
A 20K Storage Soloution Ophelia’s Home Process Drawings 363
Process Drawings 349
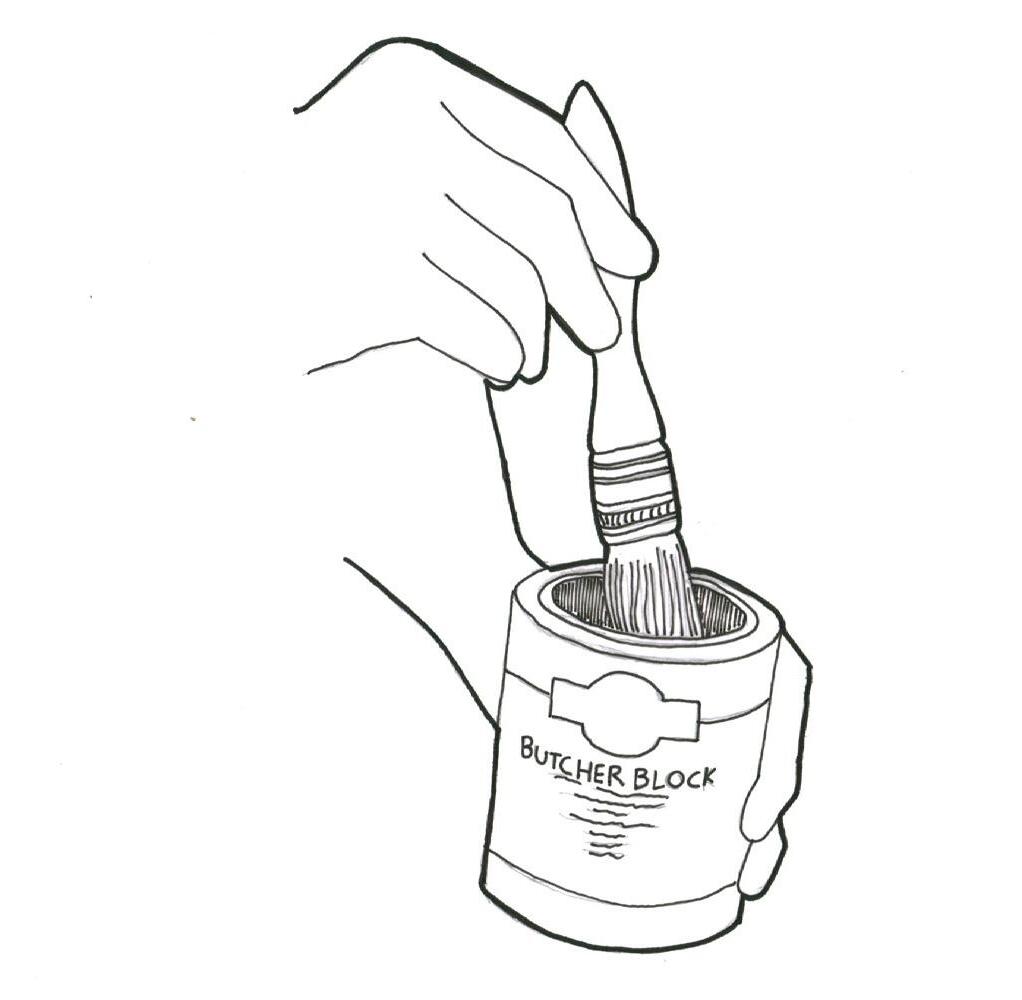
Applying Bucher Block
Tape around the end grain so the butcher block does not bleed onto the oiled surfaces.
around the end grain so the butcher block does not bleed onto the oiled surfaces.
Using a small paintbrush, apply butcher block to the end grain. Allow to dry for 6 hours. Repeat this process 2 times.
a small paintbrush, apply butcher block to the end Allow to dry for 6 hours. Repeat this process twice.
2021 364 Rural Studio
Applying Wax
After two coats of oil, three coats of butcher block and cabinets have been installed, begin the waxing process. Apply wax coat with a clean cloth, applying in small circles to ensure full coverage.
two coats of oil, three coats of butcher block, and installing the cabinets, begin the waxing process. Apply wax coat in circular motions with a clean cloth to ensure full coverage.
Allow 15 minutes to dry. Buff any imperfections and inconsistencies with a clean cloth.
Allow 15 minutes to dry. Buff out any imperfections and inconsistencies with a clean cloth.


A 20K Storage Soloution Ophelia’s Home Process Drawings 365
Process Drawings 351
WHAT WE LEARNED
Learning From Our Mistakes
Modularity
The main reason for revisions to the previous iterations of the cabinets for Mrs. Ophelia’s Home was to improve of the modularity. We wanted to have a small collection of cabinets, drawers, and shelves that could be modified slightly, typically by adjusting the size, to adapt to the intended area of installation. Examples of where it was necessary to break the modularity include the small double cabinets in the kitchen above the stove and fridge and also the set of drawers in the nook which were widened to expand from one wall to the other.
Pre-Construction
Always make a mock-up. Originally, we felt confident in our capabilities in cutting out and putting together cabinets, and then we were given the task of producing one cabinet. Though we had spent countless hours in producing digital renderings, nothing could have prepared us for the real thing. Through making a physical mock-up, we learned many things that hadn’t been thought of beforehand, such as, but not limited to
• How to use the drawer slider installation jig
• Double up the face of the drawers to be rid of a gap surrounding the drawers
• Invest in a corner clamp, it will ensure all boxes are square
• Address the end grain, should it be left exposed or wrap it with an edge banding strip
• Routing drawer handles difficulties
• Pay attention to the wood grain for all cabinet door faces and face frames
• Don’t use wood fill putty, just drive the nails into the wood
• Avoid putting nails in through the face frame
• Don’t wax cabinets until after installation. Because of the results of the mock-up, we were able to adjust the final process of cabinet construction which went smoothly compared to the predecessor step.
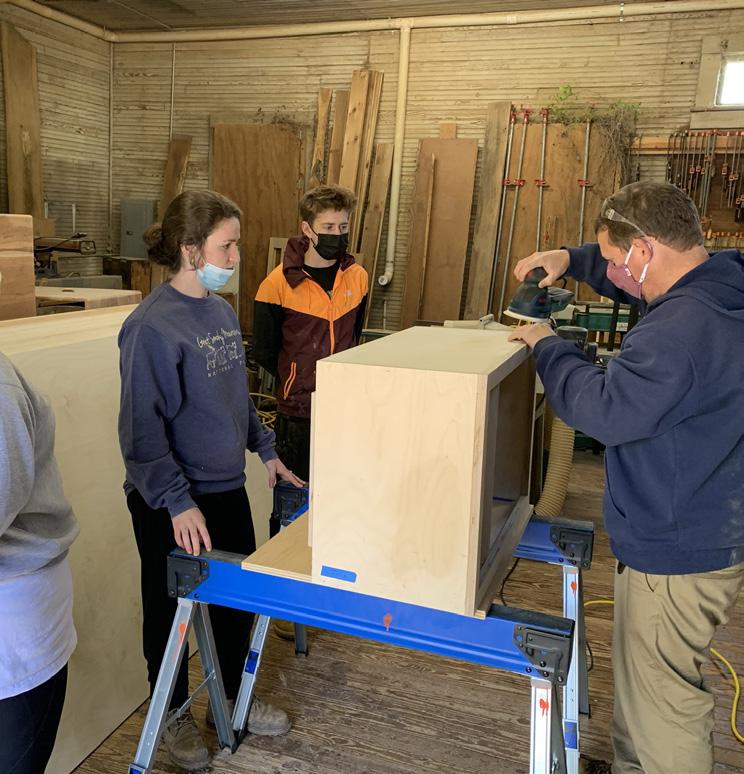
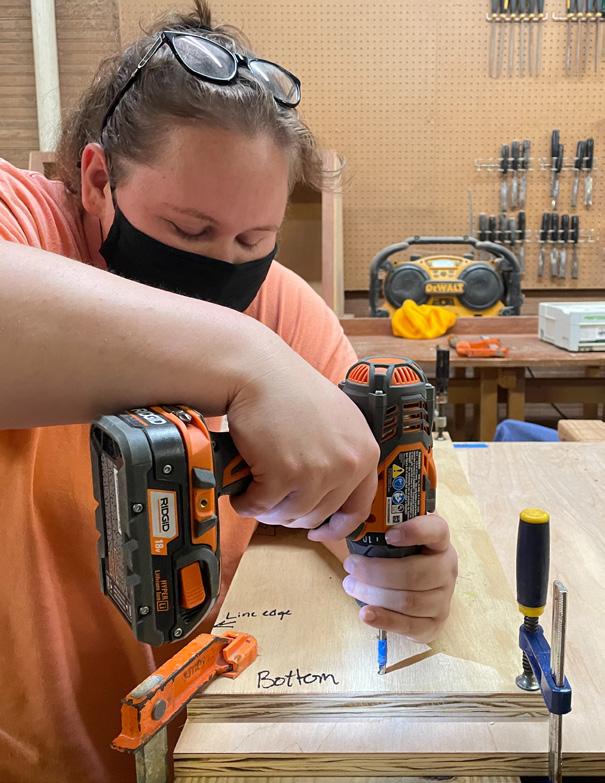
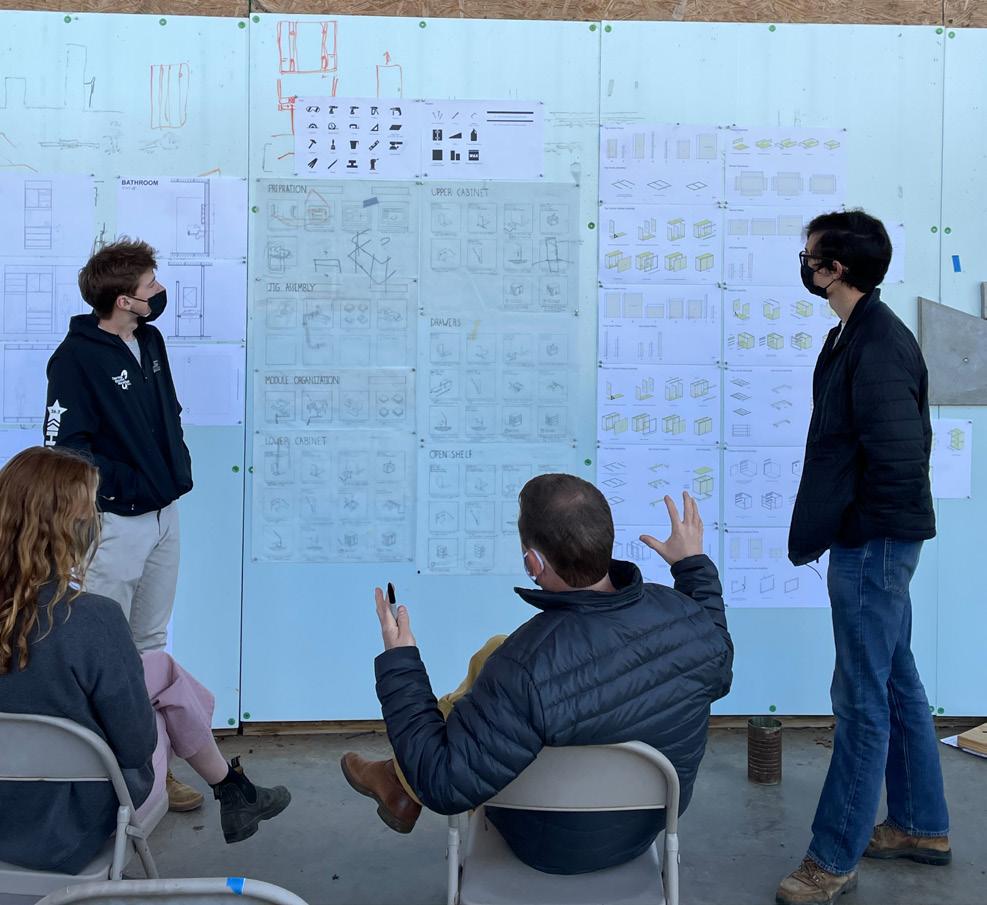
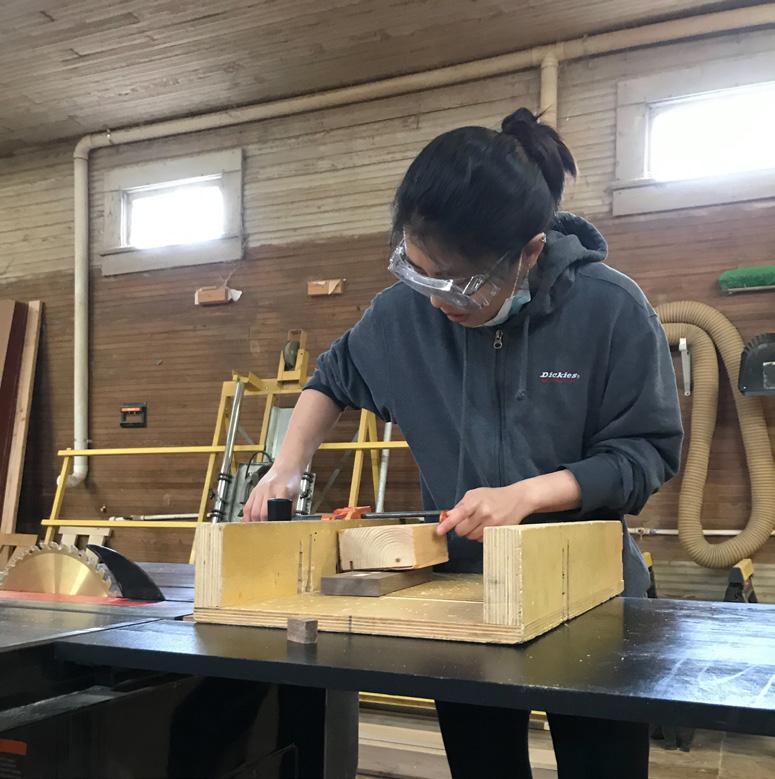
Top Left: Dylan and Keith from Wood Studio Teach us the art of cabinet making from their woodshop in Arley, Alabama.
Top Right: James and Kirby review the construction process with Steve and Chelsea.
Bottom Images; Jueon, Wendy, Kirby, and Drew Haley constructing cabinets in the woodshop.
2021 352 Rural Studio

353 Conclusion A 20K Storage Soloution Ophelia’s Home
and Rural Studio for creating an environment where students’ ideas can become a reality.


We especially want to thank Steve Long, Emily McGlohn, and Chelsea Elcott for their ongoing effort, patience, and dedication to the success of every project. Steve guided us toward professionalism and perfection. Emily taught us how to conduct ourselves by showing us the process, allowing us to make mistakes, and then patiently helping us find a way to fix those mistakes. Chelsea was our friend and go-to person to ask
questions. We are so thankful to have had the honor to learn from them this semester. Without their guidance and fortitude, our goals would have been unattainable.
366
355 A 20K Storage Soloution Ophelia’s Home Process Drawings Conclusion
colophon
Minion Pro released in 1990. In 1992 and available in 65 styles: 4 weights plus italics, in 2 widths and 4 optical sizes, plus a standalone Black. The Condensed range and the Black are not included in the Minion 3 update.
Franklin Gothic designed by Morris F. Benton were issued by ATF between 1904 and 1913.
Rural Studio 2021 358
