Fed 5b Manual

Page 1

Fed 5B

The Camera of Tomorrow www.lomography.com/fed5 Presented by the Lomographic Society International

Fed 5B Specifications Film Type: all standard 35mm Lens: Industrar 61 1:2.8 f=55mm Focal Range: .75m to infinity Shutter Speeds: B, 1, 1/2, 1/4, 1/8, 1/15, 1/30, 1/60, 1/125, 1/250, 1/500 Aperture Settings: f/2.8, f/4, f/5.6, f/8, f/11, f/16 Flash Connection: standard hot-shoe, sync at 1/30
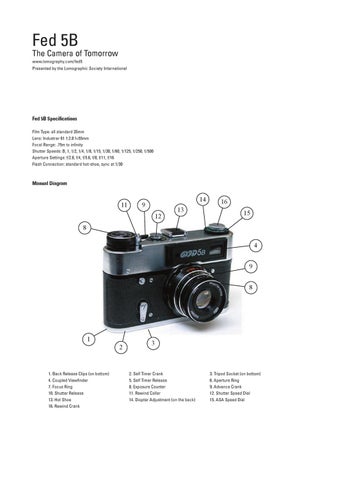
Manual Diagram

11

14

9 12

13

16 15

8 4 9 8

1

1. Back Release Clips (on bottom) 4. Coupled Viewfinder 7. Focus Ring 10. Shutter Release 13. Hot Shoe 16. Rewind Crank

2

3

2. Self Timer Crank 5. Self Timer Release 8. Exposure Counter 11. Rewind Collar 14. Diopter Adjustment (on the back)

3. Tripod Socket (on bottom) 6. Aperture Ring 9. Advance Crank 12. Shutter Speed Dial 15. ASA Speed Dial


A. Important Notes Before you start, please read below to avoid the two most common troubleshooting issues with the Fed 5 The Viewfinder is Blurry: Not necessarily. Around the viewfinder is a knobby metal ring. This is the Diopter Adjustment (14), and intended to allow use of the viewfinder with glasses. Rotate the ring until the viewfinder image looks sharp. The Shutter Speed Dial (12) looks like Fun: It is. However, do not turn it until the shutter is cocked, or you risk irreparable damage to your camera. Better yet, don‘t do anything until you fully read through this manual.

B. Film Loading Turn your camera over to the bottom. Flip out each of the Back Release Clips (1) and rotate them towards the outside of the camera body. Slide the back off. Load your 35mm cartridge onto the left side. Pull out the film leader and bring it to the right. Place the leader over the spikes on the rolling sprocket (to the immediate left of the take-up spool) and into one of the take-up spool grooves. Advance the film with the Advance Crank (9) and shoot a frame with the Shutter Release (10). The film should transport smoothly to the right side. Replace the camera back, rotate the Clips (1) inside, and you are locked n‘ loaded.

C. Rangefinder & Focus Ring Right next to the Coupled Viewfinder (4) is a „brightline“ system rangefinder. When peering at your subject, you‘ll notice a small bright square in the center of your viewfinder. Look closely, and you‘ll see a miniature image within the square. As you rotate the Focus Ring (7), the „brightline“ image will merge into the full image around it. When the two match up, your distance is perfectly set. If it‘s too dark to use this rangefinder, then just note the distance markings on your focus ring (in meters), and guess-stimate the distance to your subject. The symbol that looks like a sideways „8“ denotes infinity. Line up your estimated distance value with the straight green line that touches the middle of the Focus Ring (7).

D. Shutter Speed The Fed 5B has no light meter or exposure control - it‘s totally manual. However, no worries - it‘s a lot of fun as well! After cocking the shutter with the Advance Crank (9), use the Shutter Speed Dial (12) to select from the available speeds. The „B“ setting allows you to keep the shutter open for as long as you keep the Shutter Release (10) depressed. As stated before - do not attempt to set the shutter speed without first cocking the shutter!

E. Aperture Control The Fed 5B‘s aperture is a set of small, iris-like metal blades around the lens. The Aperture Ring (6) determines the size of the opening made by these blades. Smaller numbers denote larger openings - so f/2.8 is the largest aperture and f/16 is the smallest. Larger apertures let in more light - thereby allowing for faster shutter speeds with less outside light. They also yield a small „depth of field.“ This is great for creating a portrait - merely select a large aperture, focus on a close subject, and your image will yield a sharp subject against a completely blurred background. Smaller apertures allow for greater resolution and a larger depth of field. If you want all elements of your photo to be in focus, then select f/16. This will require a longer shutter speed, and possibly a tripod (screw it into the Tripod Socket (3).

F. Exposure As aperture and shutter speed is totally manual, correct exposure begs a bit of guess work. Here are some general guidelines. First off, we would recommend to load your Fed 5B with 100ASA film - the colors and resolution are top-notch. Now, set the aperture to a middle value, like f/5.6. If it‘s sunny out, then use a shutter speed of 1/250. Overcast? - use 1/125. For indoor shots, 1/30 or 1/15 will do the trick without a flash,


but be sure to keep the camera steady. For a nightshot, take the aperture to f/2.8 and use 1 second for a brightly-lit street and about 5 to 10 seconds (use the „B“ setting and count them down yourself) for a skyline or night landscape. When you very from these parameters, just change your values and experiment. So, if you use ASA400, then set the aperture to f/16 and 1/250 on a sunny day. To be more precise, you can pick up an external light meter, or sniff around the internet for one of the many online exposure guides out there. However, don‘t worry - just play around and your shots will be great. You‘ll also learn a lot about manual photography (if you didn‘t know it already).

G. Take a Picture So, you have your aperture selected, shutter cocked, focus perfect, and shutter speed set. Hit the Shutter Release Button (10) to take your shot. This button will also accommodate a standard screw-in cable release if you wish to use one. They are especially nice for shake-free, long-exposure shots. You can also use the Self-Timer Crank (2) for fun self-pictures or smooth long exposures. Cock the Shutter, push the crank counter-clockwise until it stops, and hit the Self Timer Release (5) to start the action.

H. Flash Use The Fed 5B accepts all standard hotshoe flashes. Plug your flash into the Hot Shoe (13) and use the 1/30 shutter speed to sync it up. Use a large aperture (f/2.8 or f/5.6) to maximize your effective flash distance. Note: The Lomography Colorsplash Flash will NOT work with the Fed 5B. Its sexy curves unfortunately bump against the Fed‘s top dials.

I. Film Rewind Keep tabs on the Exposure Counter (8) to see when your film is up. You‘ll also know it‘s done when it no longer advances. To rewind, first press down the Rewind Collar (11) with your fingers. It is the metal ring that encircles the Shutter Release (10). Flip out the Rewind Crank (16), and turn it clockwise (note the little arrow) until the tension drops off. Your film is fully rewound and can be removed. It can be developed anywhere - but stay away from those cheap 1-hour service labs. Their quality is lousy.

J. Care & Protection Store your camera in a dry place when not in use. Protect it from dirt, moisture, bumping, and other nasty treatment. Keep the lens cap on during transport. Never leave your Fed in direct sunlight or intense heat for an extended period of time. When using your Fed in very cold weather - keep it under your coat and only take it out for shooting. Clean the lens with a soft cloth only. Do not use any solvents or chemicals around the lens. If it becomes dirty - use a tiny amount of rubbing alcohol on a cotton swab.

K. Warranty & Support Your Fed includes a 90-day limited warranty from the Lomographic Society International. The warranty is effective following your receipt of the camera. In the event of a manufacturer defect, you will be offered an exchange for another identical product or equivalent value in the Lomographic Online Shop. Damage caused by misuse, abuse, or incorrect handling is not covered. To claim your warranty or get customer support, please contact us directly at lomocustomerservice@lomography.com.


Turn static files into dynamic content formats.

Create a flipbook
Issuu converts static files into: digital portfolios, online yearbooks, online catalogs, digital photo albums and more. Sign up and create your flipbook.