5 minute read
Turn Heads This Summer With a Straw Bale Garden and Watch Friendships Bloom


By Joel Karsten
Gardening can be a wonderful hobby for those who enjoy spending time outdoors, getting their hands dirty, and watching their plants grow. However, only some have the space, time, or resources to grow a garden in the traditional sense. Fortunately, alternative gardening methods are becoming increasingly popular, one of which is straw bale gardening.
Advertisement
Straw bale gardening involves growing plants directly in straw bales rather than soil. This gardening method is ideal for those with limited space, poor soil quality, or who want to avoid the back-breaking work of traditional gardening. Straw bale gardening, including patios, balconies, and rooftops, can be done almost anywhere.
One of the keys to successful straw bale gardening is properly conditioning the bales before planting. This is where BaleBuster, a conditioning agent designed explicitly for straw bale gardening, comes in. BaleBuster is a microbial inoculant that feeds the bacteria and helps it to colonize the bales and then to metabolized the straw, breaking it down so the straw
BECOMES "soil" or a rich, fertile growing medium for plants.
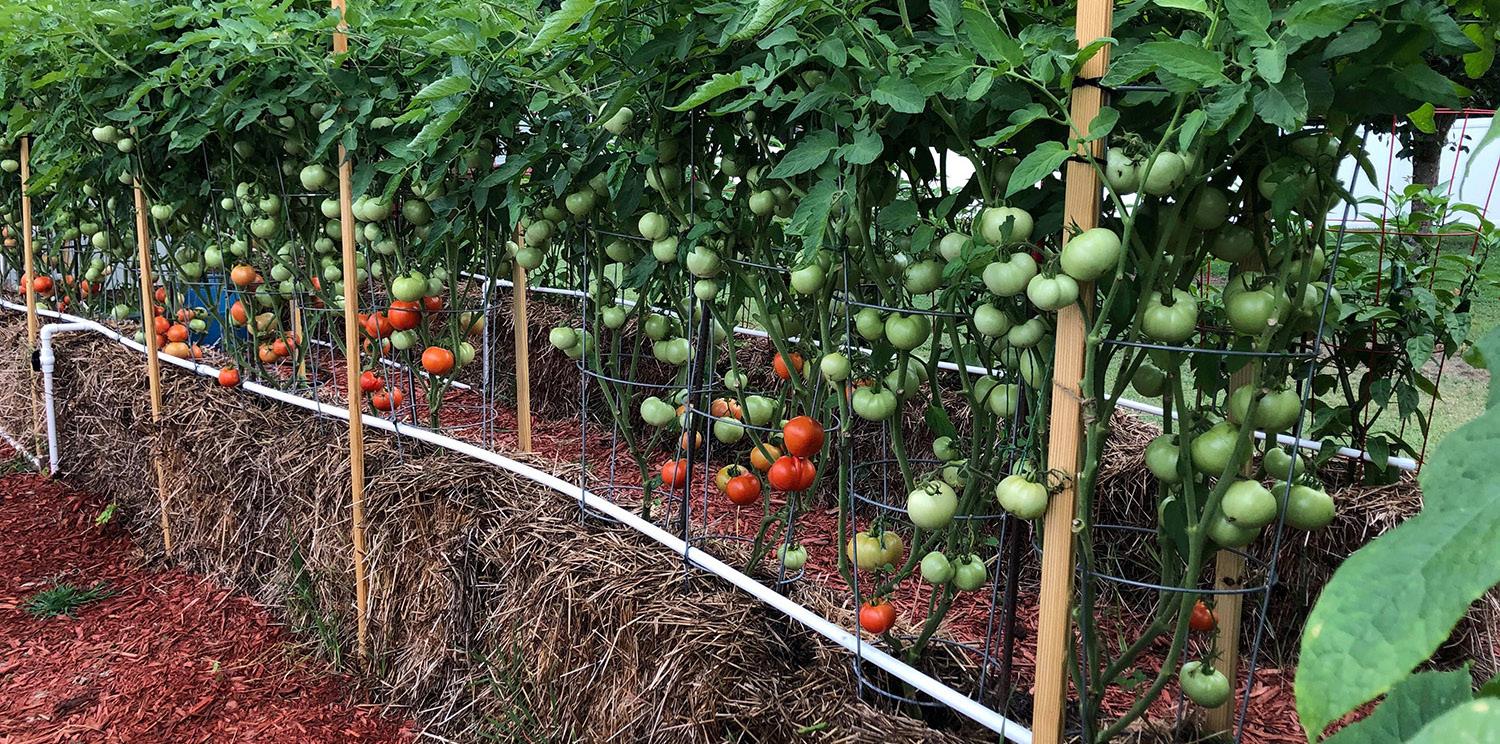
To get started with straw bale gardening, you will need to purchase some bales of straw or hay; either works well and whichever is available and least expensive is fine. It is important to choose well-compact bales, as these more dense bales will allow two years of gardening. Once you have your bales, you must condition them using BaleBuster or a similar conditioning agent; this takes between 12 and 18 days.
Initially, the granular high-nitrogen material will be sprinkled over the top and watered into the bales. Water the bales thoroughly, making sure to wet them all the way through.
Apply BaleBuster or another conditioning agent to the bales according to the manufacturer's instructions. This will help to activate the microbes that will break down the straw and turn it into a fertile growing medium. The bales will get warm, this is a natural part of the process, and this signals that bacteria, which are not visible by the naked eye, are accumulating and colonizing inside the bale.
Keep the bales moist by watering them regularly. This will help keep the microbial activity going and prevent the bales from drying out and stopping the decomposition process.
After 12-18 days, the bales should be fully conditioned and will drop under 105 degrees, meaning they are now ready for planting.
When it comes to planting straw bales, there are a few things to keep in mind. First, you will need to create a seedbed on top of the bales with a clean planting mix, NOT SOIL, where you can plant any tiny seeds. Big seeds and/or seedlings can simply be slipped into the bales into a crack made with your fingers or a trowel. Avoid cutting a string on the bale because the bale needs to maintain the squeezing and compression the string provides in order to continue the quick decomposition process.
Once you have tucked the roots of a transplant into the bale, you can add some potting mix to help seal up the roots so they are not exposed to air. Closely monitor the transplants to ensure they have enough moisture and are rooting well into the bale. Be careful not to overwater because this is the most common mistake new straw bale gardeners make. A bale may give up a gallon of water or maybe two on a hot, dry day with lots of plants growing from the bale, so when watering, the objective is only to replace the lost water and not add a whole lot more. Watering for long periods with a soaker or drip system will cause water to run through the bales, and this leaches out soluble nutrients and carries out tiny new soil particles that are just forming inside. This will often cause plants to wilt, and the gardener then thinks the plants are dry, so they water more, exacerbating the problem. Try to add only one gallon each time the garden is irrigated, and then adjust the frequency of watering, but never change the dose applied each time.
When it comes to choosing plants for straw bale gardening, the possibilities are almost endless. You can grow everything from tomatoes and peppers to herbs and flowers. However, it is important to avoid a few crops, like corn, asparagus, and rhubarb, that are not well-suited to growing in bales. Corn gets too tall and has a huge root system, so one, three, or four plants could grow in a bale. Asparagus and rhubarb are perennial plants that come back year after year from the root, and the bales will be nothing more than a hump of soil in the garden after three years.
It takes about three years to get asparagus and rhubarb plants established.
One of the benefits of straw bale gardening is that it is relatively low maintenance. Because the bales are already in a raised position, you don't need to do as much bending or kneeling as you would with traditional gardening. Additionally, because the straw bales hold moisture well, you don't need to water them as frequently as you would with plants grown in soil.
It is still important to monitor your plants regularly to make sure they are getting the nutrients and water they need. You may also need to prune or trellis your plants as they grow to keep them from encroaching on your neighbor's yard. Keeping tomato vines from dropping down and contacting the soil will keep them disease free. Pruning off lower branches will also allow better air circulation and prevent the fungal disease from spreading due to constantly moist leaves.
Remember to keep the bales for a second year; they often produce even better the second year because they are more broken down. The bales may need to be reconnoitered for best results. It works well to wrap a used bale with chicken wire about 15" tall and then pile another old bale on top and smash it down. This resulting "bale" is now more round than square, and the strings are long gone, making a wonderful planting bed for root crops, or early season planting of cold season vegetables. No conditioning is needed on the second-season bales; sim- ply sprinkle a cup of fertilizer on top, water it in, and plant it the next day. This is where the early crops go in while the first-year bales undergo conditioning. Because those bales are warm on the inside due to the microbial activity, they are perfect for warm-season crops that like warm roots, like tomatoes, peppers, cucumbers, and squash.
Be prepared to answer questions from curious friends, neighbors, and strangers. Straw bale gardening is conspicuous, and this is one reason why it has spread so quickly and become so popular. People see a neighbor's success, and they can't help but inquire about the details and are often encouraged to plant a straw bale garden of their own the next year.
You will be amazed at how much fun gardening can be when you never have to pull weeds, and most people who try it succeed beyond their expectations, and that excitement and success breeds enthusiasm.
Remember to plant an extra bale or two that you can use to share with a neighbor or friend who you know struggles with the weekly cost of grocery shopping. Fresh produce is expensive, and offering some of your extra bounties can not only help out financially, but it can also help steer someone to a healthier diet. There is something about sharing something you have grown yourself with another magical person, not only for them but also for you. So plan to plant an extra bale just to give away, it will change how you see the world, and that is not "small potatoes."
Thirty years ago, Joel Karsten, a horticulturist from the University of MN, pioneered a unique method for growing vegetables in bales of straw. Joel has written five best-selling books, now translated into many languages. He has traveled extensively to spread his method worldwide, including a presentation to the United Nations and a popular TED talk. Straw Bale Gardening offers tangible hope for people in some of the poorest places on earth to grow their own food successfully.