14 minute read
What’s In Your Tattooing Toolbox? Essential Insights Every Artist Needs To Know


By Kat McCann
Let’s talk about NEEDLES: Types, Tapers, and Techniques
As a cosmetic or medical tattoo artist, mastering the tools of your trade is non-negotiable—and your needles are one of your most important assets. While pigments, techniques and client care get much of the attention, needles are one essential element that often flies under the radar. This article aims to help you navigate the oftencomplex world of tattoo needles, breaking down their types, uses, and safety factors, as well as identifying some of the most used techniques in a bid to help elevate your skill sets and help demystify a few grey areas.
While the main needle configurations that are ‘usually’ taught to new cosmetic tattoo artists when they are first learning are 1RL, 3RL & 5RS, these are only the tip of the iceberg and sadly, there are some artists who only ever use these needles for fear of not knowing how other needles work. These seemingly simple tools are the backbone of your work, determining everything from the precision of a hair stroke to the softness of a gradient lip blush or consistency of ink implantation. It’s only once you truly understand how your needles work that you will gain the flexibility to adapt to any client, adjust or change up your technique and begin to watch your healed work become so much more consistent and predictable - because you’re using the right tools.
This article aims to help demystify the often-complex world of tattoo needles—what they are, how to choose the right one and why having a deeper understanding is critical to your success. Whether you’re new to the industry or a seasoned professional, continually learning new skills and refining your work will not only build your confidence but your competitive advantage as an artist as well.

Needles 101: What Every Artist Should Know
Tattoo needles come in a variety of types, configurations, tapers, and sizes. At first glance, the options can feel overwhelming, so many options, needle groupings, sizes, tapers, solders – not to mention straight needles (on the bar style) or cartridges, oh and not to mention the codes on the needle boxes! Rest assured, though, once you understand how to read the code combinations and what they all mean, everything becomes so much clearer and less overwhelming. Let’s break it down: The codes on needle boxes that define needle types are typically referred to as needle configurations or needle codes. These codes are shorthand notations used to describe the type, size, and configuration of the needles in the cartridge or box. Here’s what they usually include:
Common Elements in Needle Codes:
1. Needle Count: The number of needles grouped together (e.g., 1, 3, 5, 7, etc.). This refers to how many individual needle points are in the configuration.
- Example: 3 means three needles are grouped together.
2. Configuration Type: The arrangement of the needles, usually denoted by a letter:
• RL: Round Liner – these needles are tightly grouped and used for crisp, clean lines. Often your go-to for hairstrokes in brows, precise lip contours, or sharp eyeliner.
• RS: Round Shader – needles in a loose circular grouping for shading Similar to liners but spaced further apart, shaders are ideal for softer fills, small shading areas, or subtle lash enhancements.
• F: Flat – needles arranged in a straight line, ideal for packing colour – these can be straight or sloped and are a flexible needle for strokes and shading.
- M1: Magnum – needles are arranged in two rows or are “stacked” one on top of the other; perfect for shading or covering larger areas like lips or large areas on the body.
- M2: Double Magnum – similar to M1 but with more space between the needles for softer shading.
- CM: Curved Magnum – needles are arranged in a slight curve for smoother blending. Often called “soft-edge” magnums, these have rounded edges that reduce trauma and create natural gradients. They’re ideal for scar camouflage, Areola or soft, blended lip blush – you can even turn them on the side to ballerina the needle for hair strokes, but that’s for another time.
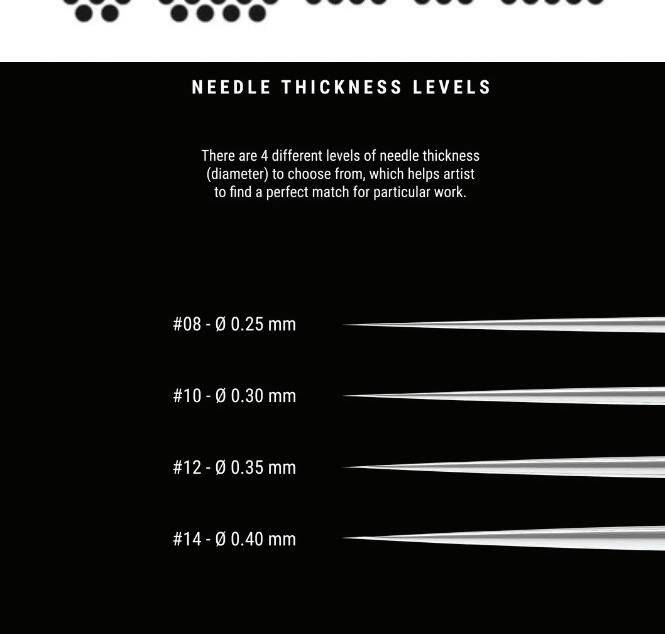
3. Needle Diameter: Often represented in millimetres (e.g., 0.25 mm, 0.30 mm, 0.35 mm, 40mm) or as “bugpin” tighter configurations and “nano” needles (extra-thin needles, e.g., 0.18 mm or 0.20 mm). Smaller diameters create finer, more precise work but can also tend to have more bend or movement in the needle.
4. Taper: This describes how much the needle’s tip narrows. It’s typically classified as:
- Short Taper: Minimal narrowing, good for packing pigment.
- Medium Taper: A balance of precision and pigment deposit.
- Long Taper: Fine, precise work with minimal trauma.
- Extra-Long Taper: The sharpest and most precise taper.

Why Taper and Size Matter
• Taper: The length of the needle’s point affects how pigment is delivered. A long taper deposits pigment gradually for soft, natural effects, while a short taper saturates boldly and quickly.
• Size: Needles range in diameter, from fine (0.25mm) to thicker (0.35-0.40mm). Thin needles are great for detail work, while thicker needles provide better coverage for bold fills or resilient skin types.
The combination of needle type, taper, and size directly impacts how pigment interacts with the skin and influences your healed results.
Additional Features – stick to reputable brands & check safety & expiry dates: When choosing tattoo needles, always stick to reputable brands and check for key safety features, as well as the expiry date. Here are two critical details to keep in mind:
• Safety Membranes: Certain needles include a safety membrane, which is crucial for maintaining hygiene. This feature prevents ink, bodily fluids, and contaminants from entering your machine, protecting both the equipment and your client.
Breaking it down when you are reading a Needle Box:
If a box says “7CM 0.30 LT”, it means:
• 7: Seven needles.
• CM: Curved Magnum configuration.
• 0.30: Needle diameter of 0.30 mm.
• LT: Long Taper (which is for precise yet smooth shading – my go-to taper!).
**Remember: These codes ensure artists can quickly and easily select the right needle for each procedure and knowing how the needles work can achieve their desired technique and result. If you think of having a pencil case with lots of different types of colouring in pens, crayons, pencils and marker pens – you will use each of these tools very differently to achieve your desired outcome. Fine drawings would need a soft sharp pencil or fine tip pen whereas a thick-tip marker would lose desired detail – so always keep in mind your tattoo needles are very similar.
It’s also important to practice with them on different surfaces latex, fruit, a balloon or even the back of your hand with a glove on so you can see, feel and adjust to the pressures required as well as identify how ink flows and deposits. It is also important to understand it’s not uncommon to use 2-3 different needles per procedure (don’t laugh), there are many artists that have never tried any other needles other than what they first learned with and for years have just used the same configurations out of fear or lack of knowledge.
Confidence is key with needles and building this brings comfort to pick up and try new needles, especially if you want to achieve a certain result. For example, I often use a 1RL and a 5RS for eyebrows - the soft round shader for the bulk of the brow and the 1RL for any light shading or fine soft hairstrokes or powdery points where necessary. I may also switch up to a curved magnum and use a diluted colour if working on older, thicker or even oily skin, but having the choice means of needle selection means I can pick what is most appropriate and safely create the desirable results per face I am working on.

Matching Needles to Machines
Understanding how needles pair with different machines is just as important as understanding the needles themselves.
Cartridge Needles
Cartridge needles are the most common choice for modern penstyle rotary machines. These pre-assembled cartridges make switching between needle types seamless, improving efficiency during treatments. Most importantly, look for cartridges with safety membranes—these prevent ink, blood, and fluids from contaminating your machine.
Standard Needles
Standard needles, used in coil machines, are manually assembled and less common in cosmetic tattooing. However, they’re still relevant for certain medical applications, particularly in settings requiring high saturation. You may also hear artists talk about using a ‘needle on the bar’ this refers to this type of needle which is more commonly used by body tattooists.
Why Compatibility Matters
Not all cartridges work with all machines. Always check for compatibility and invest in needles from reputable brands that prioritise safety, consistency, and quality. Sometimes, you will find the cheaper machines offered may come with specific needles that fit that machine only –however the most popular machines all take universal cartridge needles, which provide the most flexibility when it comes to choosing different configurations and cost-effective price points.
Practical Applications: Matching Needles to Techniques
The magic happens when you know how to match the right needle to the right technique. Here’s a breakdown of the most common treatments and the needles best suited for them:
Brows
• Use 1RL or 3RL for crisp hair strokes that mimic natural brow hairs.
• Opt for a 5 or 7RS or curved magnum for soft, powdered effects or ombré brows.
• Why: Fine liners excel at precision work, while shaders create natural density and soft gradients.
Lips
• Curved Magnums deliver a soft, natural blush perfect for subtle lip colour.
• For bold lip fills, standard magnums, Flat needles or bigger RS’s provide quick, even saturation.
• Why: Lips require a balance of efficiency and delicacy to avoid trauma while achieving vibrant, even results.
Eyeliner
• For lash enhancements, 1RL or 3RL ensures fine, precise lines (particularly wings or wedges using the finer needles helps to get lines crisp and precise; 3RL/RS is great for colour packing lash lines) Bigger needles like round shaders will make achieving that smoky or blurred line a breeze.
• Why: Precision is key to eyeliner work, especially when working close to sensitive areas like the lash line – make sure your stretch is firm, as this will also impact needle performance.
Medical Tattooing
• Use RS needles for detailed work on small scars.
• For larger areas (once scars are prepped correctly), curved magnums blend pigments seamlessly.
• Why: Scars demand gentle application to minimise trauma while ensuring even pigment distribution – colour building is also important so ensure you watch the skin and adjust needle selection according to what type of scar or compromised areas you are working on.
Magnum Needles: Your Shading Powerhouse
Magnums are amazing when working on larger areas or creating soft gradients. Their design allows for efficient pigment application, making them a favourite among artists for lips, scar camouflage and even eyebrows.
Standard Magnums
• Ideal for flat colour fills or bold lip tattoos.
• Their larger surface area speeds up treatments but requires a steady hand to avoid overworking the skin – a straight magnum needs to be evenly applied to the skin as it will hit deeper should the angle be incorrect.
Curved Magnums
• Perfect for blending, these reduce trauma and are ideal for sensitive areas like scars or lips.
Pro Tip: Use magnums with caution. Overworking the skin can lead to trauma, scarring, or poor pigment retention. So, ensure you practice using this needle and that your gradients, ink deposits and shadings are consistent before taking to the skin. Magnums do take some mastery to get comfortable using, especially being bigger needle configurations, but once you get the hang of them, they will become your go-to!
Angles, Depth, and Speed: Perfecting Your Technique
Even the best needles won’t perform without the proper technique. Mastering angles, depth, and speed is the key to consistent, safe, and beautiful results.
• Angles:
- A 90-degree angle provides sharp, defined strokes.
- A 45-degree angle softens the pigment for gradients or shading.
- Remember, always adjust your angle depending on the angle you are working (faces and bodies are not flat, so make sure you master this for perfect ink implantation).
• Depth:
- Pigment must reach the dermis (1–2mm deep as a guide) for lasting results. Going too shallow leads to poor retention, while going too deep risks scarring, but you will need to remain mindful that depending on the type of skin you are working on, this guide changes so you will need to learn the ‘feeling’ of being in the sweet spot and monitoring your results as they come back healed and adjusting as you learn and go.
• Speed:
- Faster speeds work well for large fills but demand control and pressure – the bigger the needle, the more pressure is required, the smaller the needle, the less pressure you need. Lower speeds are better for detailed, precision work, but remember pressure, hand speed and machine speed will all vary depending on the needle type you have selected as well as the skin type you are working on and the technique you are looking to create.
Safety First: Protecting Your Clients and Your Reputation
Safety is non-negotiable in tattooing. High-quality needles are essential for maintaining hygiene, protecting your clients, and delivering consistent results
– My advice is never cut corners and stick to reputable sellers (eBay/ali express, temu or any third party means you are not covered insurance-wise should anything go wrong!)
What Makes a Needle Safe?
• Medical-grade materials: Prevent contamination and ensure durability.
• Safety membranes: Block fluids and bacteria from entering your machine.
• Reputable brands: Offer consistent quality and performance & accountability.
The Cost of Cutting Corners
Using low-quality or unsafe needles can lead to:
• Ink Flow Issues: Uneven distribution or pooling.
• Poor Retention: Fading pigment or patchy results.
• Scarring: Trauma caused by incorrect technique or faulty tools (barbs or hooks) - using a needle loop is also a great habit to get into, allowing you to check up close every needle you use before putting it into the skin.
Investing in safe, reliable needles not only protects your clients but also upholds your reputation as a professional.
When Things Go Wrong: The Risks of Misusing Needles
Even with the right tools, improper technique can undermine your work. Common issues include:
• Blowouts: Caused by excessive depth, resulting in blurred pigment edges.
• Uneven Shading: Poor angles or inconsistent speed disrupt smooth gradients.
• Permanent Damage: Overworking the skin can lead to scarring or pigment rejection.
Why Technique Matters
These issues underscore the importance of refining your technique and understanding the nuances of your tools. Proper training, combined with practice and a thorough knowledge of skin anatomy, ensures you can:
• Adjust needle depth appropriately to avoid scarring or blowouts.
• Maintain consistent angles and speeds for smooth shading and clean lines.
• Work with skin types of varying thickness and resilience without causing trauma.
When you master the fundamentals, you not only deliver consistently beautiful results but also protect the integrity of your client’s skin. This dedication to precision and care sets exceptional artists apart, ensuring that your work is not only aesthetically pleasing but also safe and long-lasting.
Final Thoughts: Knowledge is Power
Tattoo needles are more than just tools—they’re the foundation of your craft. By mastering their intricacies, you unlock the ability to adapt to any client, technique, or skin type.
Take the time to explore needle types, practice till your hands ache, explore different machines, their weight, the way they feel, understand different machine compatibilities and test all kinds of needles and see what suits you and your style the best – don’t be scared, instead be curious and excited about new applications and techniques. This knowledge doesn’t just refine your skills; it sets you apart as an artist who can deliver exceptional results with confidence and care.
When you truly understand your tools, it opens you up to taking on more complex work with the confidence of knowing you can genuinely make a difference.
If you have any questions about needles or would like to know more, I’m always here to help.
Happy tattooing!
Till next time,
Kat
@katmccann_inka